
C H A P T E R 5
Understanding Encapsulation
In the Chapters 3 and 4, you investigated a number of core syntactical constructs that are commonplace to any .NET application you might be developing. Here, you will begin your examination of the object-oriented capabilities of C#. The first order of business is to examine the process of building well-defined class types that support any number of constructors. After you understand the basics of defining classes and allocating objects, the remainder of this chapter will examine the role of encapsulation. Along the way, you will learn how to define class properties, and come to understand the role of static members, object initialization syntax, read-only fields, constant data, and partial classes.
Introducing the C# Class Type
As far as the .NET platform is concerned, the most fundamental programming construct is the class type. Formally, a class is a user-defined type that is composed of field data (often called member variables) and members that operate on this data (such as constructors, properties, methods, events, and so forth). Collectively, the set of field data represents the “state” of a class instance (otherwise known as an object). The power of object-oriented languages, such as C#, is that by grouping data and related functionality in a unified class definition, you are able to model your software after entities in the real world.
To get the ball rolling, create a new C# Console Application named SimpleClassExample. Next, insert a new class file (named Car.cs) into your project using the Project ![]() Add Class... menu selection. Choose the Class icon from the resulting dialog box, as shown in Figure 5-1, and click the Add button.
Add Class... menu selection. Choose the Class icon from the resulting dialog box, as shown in Figure 5-1, and click the Add button.
A class is defined in C# using the class keyword. Here is the simplest possible declaration:
class Car

{

}
After you have defined a class type, you will need to consider the set of member variables that will be used to represent its state. For example, you might decide that cars maintain an int data type to represent the current speed and a string data type to represent the car’s friendly pet name. Given these initial design notes, update your Car class as follows:
class Car

{

  // The 'state' of the Car.

  public string petName;

  public int currSpeed;

}
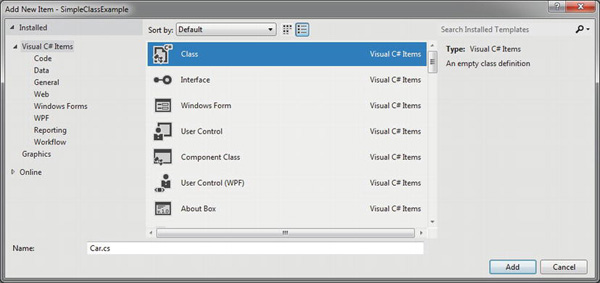
Figure 5-1. Inserting a new C# class type
Notice that these member variables are declared using the public access modifier. Public members of a class are directly accessible once an object of this type has been created. Recall the term “object” is used to describe an instance of a given class type created using the new keyword.
![]() Note Field data of a class should seldom (if ever) be defined as public. To preserve the integrity of your state data, it is a far better design to define data as private (or possibly protected) and allow controlled access to the data via properties (as shown later in this chapter). However, to keep this first example as simple as possible, public data fits the bill.
Note Field data of a class should seldom (if ever) be defined as public. To preserve the integrity of your state data, it is a far better design to define data as private (or possibly protected) and allow controlled access to the data via properties (as shown later in this chapter). However, to keep this first example as simple as possible, public data fits the bill.
After you have defined the set of member variables that represent the state of the class, the next design step is to establish the members that model its behavior. For this example, the Car class will define one method named SpeedUp() and another named PrintState(). Update your class as so:
class Car

{

  // The 'state' of the Car.

  public string petName;

  public int currSpeed;


  // The functionality of the Car.

  public void PrintState()

  {

    Console.WriteLine("{0} is going {1} MPH.", petName, currSpeed);

  }
  public void SpeedUp(int delta)

  {

    currSpeed += delta;

  }

}
PrintState() is more or less a diagnostic function that will simply dump the current state of a given Car object to the command window. SpeedUp() will increase the speed of the Car by the amount specified by the incoming int parameter. Now, update your Main() method in the Program class with the following code:
static void Main(string[] args)

{

  Console.WriteLine("***** Fun with Class Types *****
");


  // Allocate and configure a Car object.

  Car myCar = new Car();

  myCar.petName = "Henry";

  myCar.currSpeed = 10;


  // Speed up the car a few times and print out the

  // new state.

  for (int i = 0; i <= 10; i++)

  {

    myCar.SpeedUp(5);

    myCar.PrintState();

  }

  Console.ReadLine();

}
After you run your program, you will see that the Car variable (myCar) maintains its current state throughout the life of the application, as shown in the following code:
***** Fun with Class Types *****


Henry is going 15 MPH.

Henry is going 20 MPH.

Henry is going 25 MPH.

Henry is going 30 MPH.

Henry is going 35 MPH.

Henry is going 40 MPH.

Henry is going 45 MPH.

Henry is going 50 MPH.

Henry is going 55 MPH.

Henry is going 60 MPH.

Henry is going 65 MPH.
Allocating Objects with the new Keyword
As shown in the previous code example, objects must be allocated into memory using the new keyword. If you do not make use of the new keyword and attempt to make use of your class variable in a subsequent code statement, you will receive a compiler error. For example, the following Main() method will not compile:
static void Main(string[] args)

{

  Console.WriteLine("***** Fun with Class Types *****
");


  // Error! Forgot to use 'new' to create object!

  Car myCar;

  myCar.petName = "Fred";

}
To correctly create an object using the new keyword, you may define and allocate a Car object on a single line of code:
static void Main(string[] args)

{

  Console.WriteLine("***** Fun with Class Types *****
");

  Car myCar = new Car();

  myCar.petName = "Fred";

}
As an alternative, if you wish to define and allocate a class instance on separate lines of code, you may do so as follows:
static void Main(string[] args)

{

  Console.WriteLine("***** Fun with Class Types *****
");

  Car myCar;

  myCar = new Car();

  myCar.petName = "Fred";

}
Here, the first code statement simply declares a reference to a yet-to-be-determined Car object. It is not until you assign a reference to an object that this reference points to a valid object in memory.
In any case, at this point we have a trivial class that defines a few points of data and some basic operations. To enhance the functionality of the current Car class, we need to understand the role of constructors.
Understanding Constructors
Given that objects have state (represented by the values of an object’s member variables), a programmer will typically want to assign relevant values to the object’s field data before use. Currently, the Car class demands that the petName and currSpeed fields be assigned on a field-by-field basis. For the current example, this is not too problematic, given that we have only two public data points. However, it is not uncommon for a class to have dozens of fields to contend with. Clearly, it would be undesirable to author 20 initialization statements to set 20 points of data!
Thankfully, C# supports the use of constructors, which allow the state of an object to be established at the time of creation. A constructor is a special method of a class that is called indirectly when creating an object using the new keyword. However, unlike a “normal” method, constructors never have a return value (not even void) and are always named identically to the class they are constructing.
The Role of the Default Constructor
Every C# class is provided with a freebee default constructor that you may redefine if need be. By definition, a default constructor never takes arguments. After allocating the new object into memory, the default constructor ensures that all field data of the class is set to an appropriate default value (see Chapter 3 for information regarding the default values of C# data types).
If you are not satisfied with these default assignments, you may redefine the default constructor to suit your needs. To illustrate, update your C# Car class as follows:
class Car

{

  // The 'state' of the Car.

  public string petName;

  public int currSpeed;


  // A custom default constructor.

  public Car()

  {

    petName = "Chuck";

    currSpeed = 10;

  }

...

}
In this case, we are forcing all Car objects to begin life named Chuck at a rate of 10 mph. With this, you are able to create a Car object set to these default values as follows:
static void Main(string[] args)

{

  Console.WriteLine("***** Fun with Class Types *****
");


  // Invoking the default constructor.

  Car chuck = new Car();


  // Prints "Chuck is going 10 MPH."

  chuck.PrintState();

...

}
Defining Custom Constructors
Typically, classes define additional constructors beyond the default. In doing so, you provide the object user with a simple and consistent way to initialize the state of an object directly at the time of creation. Ponder the following update to the Car class, which now supports a total of three constructors:
class Car

{

  // The 'state' of the Car.

  public string petName;
  public int currSpeed;


  // A custom default constructor.

  public Car()

  {

    petName = "Chuck";

    currSpeed = 10;

  }


  // Here, currSpeed will receive the

  // default value of an int (zero).

  public Car(string pn)

  {

    petName = pn;

  }


  // Let caller set the full state of the Car.

  public Car(string pn, int cs)

  {

    petName = pn;

    currSpeed = cs;

  }

...

}
Keep in mind that what makes one constructor different from another (in the eyes of the C# compiler) is the number of and type of constructor arguments. Recall from Chapter 4, when you define a method of the same name that differs by the number or type of arguments, you have overloaded the method. Thus, the Car class has overloaded the constructor to provide a number of ways to create an object at the time of declaration. In any case, you are now able to create Car objects using any of the public constructors. For example:
static void Main(string[] args)

{

  Console.WriteLine("***** Fun with Class Types *****
");


  // Make a Car called Chuck going 10 MPH.

  Car chuck = new Car();

  chuck.PrintState();


  // Make a Car called Mary going 0 MPH.

  Car mary = new Car("Mary");

  mary.PrintState();


  // Make a Car called Daisy going 75 MPH.

  Car daisy = new Car("Daisy", 75);

  daisy.PrintState();

...

}
The Default Constructor Revisited
As you have just learned, all classes are provided with a free default constructor. Thus, if you insert a new class into your current project named Motorcycle, defined like so:
class Motorcycle

{

  public void PopAWheely()

  {

    Console.WriteLine("Yeeeeeee Haaaaaeewww!");

  }

}
you are able to create an instance of the Motorcycle type via the default constructor out of the box:
static void Main(string[] args)

{

  Console.WriteLine("***** Fun with Class Types *****
");

  Motorcycle mc = new Motorcycle();

  mc.PopAWheely();

...

}
However, as soon as you define a custom constructor with any number of parameters, the default constructor is silently removed from the class and is no longer available! Think of it this way: if you do not define a custom constructor, the C# compiler grants you a default in order to allow the object user to allocate an instance of your type with field data set to the correct default values. However, when you define a unique constructor, the compiler assumes you have taken matters into your own hands.
Therefore, if you wish to allow the object user to create an instance of your type with the default constructor, as well as your custom constructor, you must explicitly redefine the default. To this end, understand that in a vast majority of cases, the implementation of the default constructor of a class is intentionally empty, as all you require is the ability to create an object with default values. Consider the following update to the Motorcycle class:
class Motorcycle

{

  public int driverIntensity;


  public void PopAWheely()

  {

    for (int i = 0; i <= driverIntensity; i++)

    {

      Console.WriteLine("Yeeeeeee Haaaaaeewww!");

    }

  }


  // Put back the default constructor, which will

  // set all data members to default vaules.

  public Motorcycle() {}

  // Our custom constructor.

  public Motorcycle(int intensity)

  {
    driverIntensity = intensity;

  }

}
![]() Note Now that you better understand the role of class constructors, here is a nice short cut. The Visual Studio IDE provides the
Note Now that you better understand the role of class constructors, here is a nice short cut. The Visual Studio IDE provides the ctor code snippet. When you type “ctor” and press the Tab key twice, the IDE will automatically define a custom default constructor! You can then add custom parameters and implementation logic. Give it a try.
The Role of the this Keyword
C# supplies a this keyword that provides access to the current class instance. One possible use of the this keyword is to resolve scope ambiguity, which can arise when an incoming parameter is named identically to a data field of the class. Of course, ideally you would simply adopt a naming convention that does not result in such ambiguity; however, to illustrate this use of the this keyword, update your Motorcycle class with a new string field (named name) to represent the driver’s name. Next, add a method named SetDriverName() implemented as follows:
class Motorcycle

{

  public int driverIntensity;


  // New members to represent the name of the driver.

  public string name;

  public void SetDriverName(string name)

  {

    name = name;

  }

...

}
Although this code will compile just fine, Visual Studio will display a warning message informing you that you have assigned a variable back to itself! To illustrate, update Main() to call SetDriverName() and then print out the value of the name field. You might be surprised to find that the value of the name field is an empty string!
// Make a Motorcycle with a rider named Tiny?

Motorcycle c = new Motorcycle(5);

c.SetDriverName("Tiny");

c.PopAWheely();

Console.WriteLine("Rider name is {0}", c.name); // Prints an empty name value!
The problem is that the implementation of SetDriverName() is assigning the incoming parameter back to itself given that the compiler assumes name is referring to the variable currently in the method scope rather than the name field at the class scope. To inform the compiler that you wish to set the current object’s name data field to the incoming name parameter, simply use this to resolve the ambiguity:
Do understand that if there is no ambiguity, you are not required to make use of the this keyword when a class wishes to access its own data fields or members, as this is implied. For example, if we rename the string data member from name to driverName (which will also require you to update your Main() method) the use of this is optional as there is no longer a scope ambiguity:
class Motorcycle

{

  public int driverIntensity;

  public string driverName;


  public void SetDriverName(string name)

  {

    // These two statements are functionally the same.

    driverName = name;

    this.driverName = name;

  }

...

}
Even though there is little to be gained when using this in unambiguous situations, you might still find this keyword useful when implementing class members, as IDEs such as SharpDevelop and Visual Studio will enable IntelliSense when this is specified. This can be very helpful when you have forgotten the name of a class member and want to quickly recall the definition. Consider Figure 5-2.
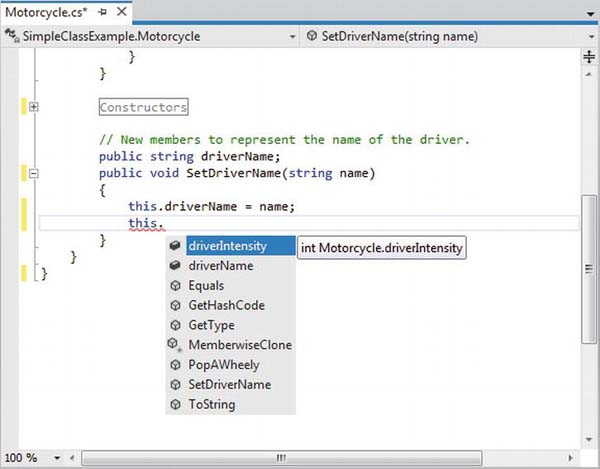
Figure 5-2. The IntelliSense of this
Chaining Constructor Calls Using this
Another use of the this keyword is to design a class using a technique termed constructor chaining. This design pattern is helpful when you have a class that defines multiple constructors. Given the fact that constructors often validate the incoming arguments to enforce various business rules, it can be quite common to find redundant validation logic within a class’s constructor set. Consider the following updated Motorcycle:
class Motorcycle

{

  public int driverIntensity;

  public string driverName;


  public Motorcycle() { }


  // Redundent constructor logic!

  public Motorcycle(int intensity)

  {

    if (intensity > 10)

    {

      intensity = 10;

    }

    driverIntensity = intensity;

  }


  public Motorcycle(int intensity, string name)

  {

    if (intensity > 10)

    {

      intensity = 10;

    }

    driverIntensity = intensity;

    driverName = name;

  }

...

}
Here (perhaps in an attempt to ensure the safety of the rider) each constructor is ensuring that the intensity level is never greater than 10. While this is all well and good, you do have redundant code statements in two constructors. This is less than ideal, as you are now required to update code in multiple locations if your rules change (for example, if the intensity should not be greater than 5).
One way to improve the current situation is to define a method in the Motorcycle class that will validate the incoming argument(s). If you were to do so, each constructor could make a call to this method before making the field assignment(s). While this approach does allow you to isolate the code you need to update when the business rules change, you are now dealing with the following redundancy:
class Motorcycle

{

  public int driverIntensity;

  public string driverName;
  // Constructors.

  public Motorcycle() { }


  public Motorcycle(int intensity)

  {

    SetIntensity(intensity);

  }


  public Motorcycle(int intensity, string name)

  {

    SetIntensity(intensity);

    driverName = name;

  }


  public void SetIntensity(int intensity)

  {

    if (intensity > 10)

    {

      intensity = 10;

    }

    driverIntensity = intensity;

  }

...

}
A cleaner approach is to designate the constructor that takes the greatest number of arguments as the “master constructor” and have its implementation perform the required validation logic. The remaining constructors can make use of the this keyword to forward the incoming arguments to the master constructor and provide any additional parameters as necessary. In this way, you only need to worry about maintaining a single constructor for the entire class, while the remaining constructors are basically empty.
Here is the final iteration of the Motorcycle class (with one additional constructor for the sake of illustration). When chaining constructors, note how the this keyword is “dangling” off the constructor’s declaration (via a colon operator) outside the scope of the constructor itself:
class Motorcycle

{

  public int driverIntensity;

  public string driverName;


  // Constructor chaining.

  public Motorcycle() {}

  public Motorcycle(int intensity)

    : this(intensity, "") {}

  public Motorcycle(string name)

    : this(0, name) {}


  // This is the 'master' constructor that does all the real work.

  public Motorcycle(int intensity, string name)

  {

    if (intensity > 10)

    {
      intensity = 10;

    }

    driverIntensity = intensity;

    driverName = name;

  }

...

}
Understand that using the this keyword to chain constructor calls is never mandatory. However, when you make use of this technique, you do tend to end up with a more maintainable and concise class definition. Again, using this technique you can simplify your programming tasks, as the real work is delegated to a single constructor (typically the constructor that has the most parameters), while the other constructors simply “pass the buck.”
![]() Note Recall from Chapter 4 that C# supports optional parameters. If you make use of optional parameters in your class constructors, you can achieve the same benefits as constructor chaining, with considerably less code. You will see how to do so in just a moment.
Note Recall from Chapter 4 that C# supports optional parameters. If you make use of optional parameters in your class constructors, you can achieve the same benefits as constructor chaining, with considerably less code. You will see how to do so in just a moment.
Observing Constructor Flow
On a final note, do know that once a constructor passes arguments to the designated master constructor (and that constructor has processed the data), the constructor invoked originally by the caller will finish executing any remaining code statements. To clarify, update each of the constructors of the Motorcycle class with a fitting call to Console.WriteLine():
class Motorcycle

{

  public int driverIntensity;

  public string driverName;


  // Constructor chaining.

  public Motorcycle()

  {

    Console.WriteLine("In default ctor");

  }


  public Motorcycle(int intensity)

    : this(intensity, "")

  {

    Console.WriteLine("In ctor taking an int");

  }


  public Motorcycle(string name)

    : this(0, name)

  {

    Console.WriteLine("In ctor taking a string");

  }
  // This is the 'master' constructor that does all the real work.

  public Motorcycle(int intensity, string name)

  {

    Console.WriteLine("In master ctor ");

    if (intensity > 10)

    {

      intensity = 10;

    }

    driverIntensity = intensity;

    driverName = name;

  }

...

}
Now, ensure your Main() method exercises a Motorcycle object as follows:
static void Main(string[] args)

{

  Console.WriteLine("***** Fun with class Types *****
");


  // Make a Motorcycle.

  Motorcycle c = new Motorcycle(5);

  c.SetDriverName("Tiny");

  c.PopAWheely();

  Console.WriteLine("Rider name is {0}", c.driverName);

  Console.ReadLine();

}
With this, ponder the output from the previous Main() method:
***** Fun with class Types *****


In master ctor

In ctor taking an int

Yeeeeeee Haaaaaeewww!

Yeeeeeee Haaaaaeewww!

Yeeeeeee Haaaaaeewww!

Yeeeeeee Haaaaaeewww!

Yeeeeeee Haaaaaeewww!

Yeeeeeee Haaaaaeewww!

Rider name is Tiny
As you can see, the flow of constructor logic is as follows:
- You create your object by invoking the constructor requiring a single
int.- This constructor forwards the supplied data to the master constructor and provides any additional start-up arguments not specified by the caller.
- The master constructor assigns the incoming data to the object’s field data.
- Control is returned to the constructor originally called, and executes any remaining code statements.
The nice thing about using constructor chaining, is that this programming pattern will work with any version of the C# language and .NET platform. However, if you are targeting .NET 4.0 and higher, you can further simplify your programming tasks by making use of optional arguments as an alternative to traditional constructor chaining.
Revisiting Optional Arguments
In Chapter 4, you learned about optional and named arguments. Recall that optional arguments allow you to define supplied default values to incoming arguments. If the caller is happy with these defaults, they are not required to specify a unique value, however they may do so to provide the object with custom data. Consider the following version of Motorcycle, which now provides a number of ways to construct objects using a single constructor definition:
class Motorcycle

{

  // Single constructor using optional args.

  public Motorcycle(int intensity = 0, string name = "")

  {

    if (intensity > 10)

    {

      intensity = 10;

    }

    driverIntensity = intensity;

    driverName = name;

  }

...

}
With this one constructor, you are now able to create a new Motorcycle object using zero, one, or two arguments. Recall that named argument syntax allows you to essentially skip over acceptable default settings (see Chapter 3).
static void MakeSomeBikes()

{

  // driverName = "", driverIntensity = 0

  Motorcycle m1 = new Motorcycle();

  Console.WriteLine("Name= {0}, Intensity= {1}",

    m1.driverName, m1.driverIntensity);


  // driverName = "Tiny", driverIntensity = 0

  Motorcycle m2 = new Motorcycle(name:"Tiny");

  Console.WriteLine("Name= {0}, Intensity= {1}",

    m2.driverName, m2.driverIntensity);


  // driverName = "", driverIntensity = 7

  Motorcycle m3 = new Motorcycle(7);

  Console.WriteLine("Name= {0}, Intensity= {1}",

    m3.driverName, m3.driverIntensity);

}
While the use of optional/named arguments is a very slick way to streamline how you define the set of constructors used by a given class, do always remember that this syntax is only valid under .NET 4.0 or higher. If you need to build classes that can run under any version of the .NET platform, it is best to stick to classical constructor chaining techniques.
In any case, at this point you are able to define a class with field data (a.k.a., member variables) and various operations such as methods and constructors. Next up, let’s formalize the role of the static keyword.
![]() Source Code The SimpleClassExample project is included under the Chapter 5 subdirectory.
Source Code The SimpleClassExample project is included under the Chapter 5 subdirectory.
Understanding the static Keyword
A C# class may define any number of static members, which are declared using the static keyword. When you do so, the member in question must be invoked directly from the class level, rather than from an object reference variable. To illustrate the distinction, consider your good friend System.Console. As you have seen, you do not invoke the WriteLine() method from the object level:
// Error! WriteLine() is not an object level method!

Console c = new Console();

c.WriteLine("I can't be printed...");
but instead simply prefix the class name to the static WriteLine() member:
// Correct! WriteLine() is a static method.

Console.WriteLine("Much better! Thanks...");
Simply put, static members are items that are deemed (by the class designer) to be so commonplace that there is no need to create an instance of the class before invoking the member. While any class can define static members, they are quite commonly found within “utility classes.” By definition, a utility class is a class that does not maintain any object-level state and is not created with the new keyword. Rather, a utility class exposes all functionality as class-level (a.k.a., static) members.
For example, if you were to use the Visual Studio object browser (via the View ![]() Object Browser menu item) to view the
Object Browser menu item) to view the System namespace of mscorlib.dll, you would see that all of the members of the Console, Math, Environment, and GC classes (among others) expose all of their functionality via static members. These are but a few utility classes found within the .NET base class libraries.
Again, be aware that static members are not only found in utility classes; they can be part of any class definition at all. Just remember that static members promote a given item to the class level rather than the object level. As you will see over the next few sections, the static keyword can be applied to the following:
- Data of a class
- Methods of a class
- Properties of a class
- A constructor
- The entire class definition
Let’s see each of our options, beginning with the concept of static data.
![]() Note You will examine the role of static properties later in this chapter, during our examination of properties themselves.
Note You will examine the role of static properties later in this chapter, during our examination of properties themselves.
Defining Static Field Data
Most of the time when designing a class, you define data as instance-level data; said another way, as nonstatic data. When you define instance-level data, you know that every time you create a new object, the object maintains its own independent copy of the data. In contrast, when you define static data of a class, the memory is shared by all objects of that category.
To see the distinction, create a new Console Application project named StaticDataAndMembers. Now, insert a new class into your project named SavingsAccount. Begin by defining a point of instance-level data (to model the current balance) and a custom constructor to set the initial balance:
// A simple savings account class.

class SavingsAccount

{

  // Instance-level data.

  public double currBalance;


  public SavingsAccount(double balance)

  {

    currBalance = balance;

  }

}
When you create SavingsAccount objects, memory for the currBalance field is allocated for each object. Thus, you could create five different SavingsAccount objects, each with their own unique balance. Furthermore, if you change the balance on one account, the other objects are not affected.
Static data, on the other hand, is allocated once and shared among all objects of the same class category. Add a static point of data named currInterestRate to the SavingsAccount class, which is set to a default value of 0.04:
// A simple savings account class.

class SavingsAccount

{

  // Instance-level data.

  public double currBalance;


  // A static point of data.

  public static double currInterestRate = 0.04;


  public SavingsAccount(double balance)

  {

    currBalance = balance;

  }

}
If you were to create three instances of SavingsAccount in Main() as follows:
static void Main(string[] args)

{

  Console.WriteLine("***** Fun with Static Data *****
");

  SavingsAccount s1 = new SavingsAccount(50);

  SavingsAccount s2 = new SavingsAccount(100);

  SavingsAccount s3 = new SavingsAccount(10000.75);

  Console.ReadLine();

}
the in-memory data allocation would look something like Figure 5-3.
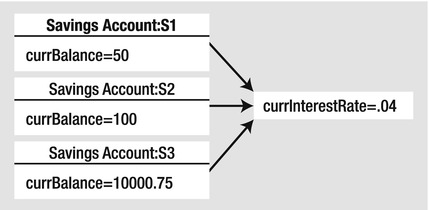
Figure 5-3. Static data is allocated once and shared among all instances of the class
Here, our assumption is that all saving accounts should have the same interest rate. Because static data is shared by all objects of the same category, if you were to change it in any way, all objects will “see” the new value the next time they access the static data, as they are all essentially looking at the same memory location. To understand how to change (or obtain) static data, we need to consider the role of static methods.
Defining Static Methods
Let’s update the SavingsAccount class to define two static methods. The first static method (GetInterestRate()) will return the current interest rate, while the second static method (SetInterestRate()) will allow you to change the interest rate:
// A simple savings account class.

class SavingsAccount

{

  // Instance-level data.

  public double currBalance;


  // A static point of data.

  public static double currInterestRate = 0.04;


  public SavingsAccount(double balance)

  {

    currBalance = balance;

  }
  // Static members to get/set interest rate.

  public static void SetInterestRate(double newRate)

  { currInterestRate = newRate; }


  public static double GetInterestRate()

  { return currInterestRate; }

}
Now, observe the following usage:
static void Main(string[] args)

{

  Console.WriteLine("***** Fun with Static Data *****
");

  SavingsAccount s1 = new SavingsAccount(50);

  SavingsAccount s2 = new SavingsAccount(100);


  // Print the current interest rate.

  Console.WriteLine("Interest Rate is: {0}", SavingsAccount.GetInterestRate());


  // Make new object, this does NOT 'reset' the interest rate.

  SavingsAccount s3 = new SavingsAccount(10000.75);

  Console.WriteLine("Interest Rate is: {0}", SavingsAccount.GetInterestRate());


  Console.ReadLine();

}
The output of the previous Main() is seen here:
***** Fun with Static Data *****


Interest Rate is: 0.04

Interest Rate is: 0.04
As you can see, when you create new instances of the SavingsAccount class, the value of the static data is not reset, as the CLR will allocate the static data into memory exactly one time. After that point, all objects of type SavingsAccount operate on the same value for the static currInterestRate field.
When designing any C# class, one of your design challenges is to determine which pieces of data should be defined as static members, and which should not. While there are no hard and fast rules, remember that a static data field is shared by all objects of that type. Therefore, if you are defining a point of data that all objects should share between them, static is the way to go.
Consider what would happen if the interest rate variable were not defined using the static keyword. This would mean every SavingsAccount object would have its own copy of the currInterestRate field. Now, assume you created 100 SavingsAccount objects, and need to change the interest rate. That would require you to call the SetInterestRate() method 100 times! Clearly, this would not be a very useful way to model “shared data.” Again, static data is perfect when you have a value that should be common to all objects of that category.
![]() Note It is a compiler error for a static member to reference nonstatic members in its implementation. On a related note, it is an error to use the
Note It is a compiler error for a static member to reference nonstatic members in its implementation. On a related note, it is an error to use the this operator in a static member as “this” implies an object!
Defining Static Constructors
A typical constructor is used to set the value of an object’s instance-level data at the time of creation. However, what would happen if you attempted to assign the value of a static point of data in a typical constructor? You might be surprised to find that the value is reset each time you create a new object!
To illustrate, assume you have updated the SavingsAccount class constructor as follows (also note we are no longer assigning the currInterestRate field inline):
class SavingsAccount

{

  public double currBalance;

  public static double currInterestRate;


  // Notice that our constructor is setting

  // the static currInterestRate value.

  public SavingsAccount(double balance)

  {

    currInterestRate = 0.04;  // This is static data!

    currBalance = balance;

  }

...

}
Now, assume you have authored the following code in Main():
static void Main( string[] args )

{

  Console.WriteLine("***** Fun with Static Data *****
");


  // Make an account.

  SavingsAccount s1 = new SavingsAccount(50);


  // Print the current interest rate.

  Console.WriteLine("Interest Rate is: {0}", SavingsAccount.GetInterestRate());


  // Try to change the interest rate via property.

  SavingsAccount.SetInterestRate(0.08);


  // Make a second account.

  SavingsAccount s2 = new SavingsAccount(100);


  // Should print 0.08...right??

  Console.WriteLine("Interest Rate is: {0}", SavingsAccount.GetInterestRate());

  Console.ReadLine();

}
If you execute the previous Main() method, you would see that that the currInterestRate variable is reset each time you create a new SavingsAccount object, and it is always set to 0.04. Clearly, setting the value of static data in a normal instance-level constructor sort of defeats the whole purpose. Every time you make a new object, the class-level data is reset! One approach to setting a static field is to use member initialization syntax, as you did originally:
class SavingsAccount

{

  public double currBalance;


  // A static point of data.

  public static double currInterestRate = 0.04;

...

}
This approach will ensure the static field is assigned only once, regardless of how many objects you create. However, what if the value for your static data needed to be obtained at runtime? For example, in a typical banking application, the value of an interest rate variable would be read from a database or external file. To perform such tasks requires a method scope such as a constructor to execute the code statements.
For this very reason, C# allows you to define a static constructor, which allows you to safely set the values of your static data. Consider the following update to our class:
class SavingsAccount

{

  public double currBalance;

  public static double currInterestRate;


  public SavingsAccount(double balance)

  {

    currBalance = balance;

  }


  // A static constructor!

  static SavingsAccount()

  {

    Console.WriteLine("In static ctor!");

    currInterestRate = 0.04;

  }

...

}
Simply put, a static constructor is a special constructor that is an ideal place to initialize the values of static data when the value is not known at compile time (e.g., you need to read in the value from an external file, a database, generate a random number, or whatnot). If you were to rerun the previous Main() method, you would find the output you expect. Note that the message “In static ctor!” only prints out one time, as the CLR calls all static constructors before first use (and never calls them again for that instance of the application):
Here are a few points of interest regarding static constructors:
- A given class may define only a single static constructor. In other words, the static constructor cannot be overloaded.
- A static constructor does not take an access modifier and cannot take any parameters.
- A static constructor executes exactly one time, regardless of how many objects of the type are created.
- The runtime invokes the static constructor when it creates an instance of the class or before accessing the first static member invoked by the caller.
- The static constructor executes before any instance-level constructors.
Given this modification, when you create new SavingsAccount objects, the value of the static data is preserved, as the static member is set only one time within the static constructor, regardless of the number of objects created.
![]() Source Code The StaticDataAndMembers project is included under the Chapter 5 subdirectory.
Source Code The StaticDataAndMembers project is included under the Chapter 5 subdirectory.
Defining Static Classes
It is also possible to apply the static keyword directly on the class level. When a class has been defined as static, it is not creatable using the new keyword, and it can contain only members or data fields marked with the static keyword. If this is not the case, you receive compiler errors.
![]() Note Recall that a class (or structure) that only exposes static functionality is often termed a utility class. When designing a utility class, it is good practice to apply the
Note Recall that a class (or structure) that only exposes static functionality is often termed a utility class. When designing a utility class, it is good practice to apply the static keyword to the class definition.
At first glance, this might seem like a fairly odd feature, given that a class that cannot be created does not appear all that helpful. However, if you create a class that contains nothing but static members and/or constant data, the class has no need to be allocated in the first place! To illustrate, create a new Console Application named SimpleUtilityClass. Next, define the following class:
// Static classes can only

// contain static members!

static class TimeUtilClass

{

  public static void PrintTime()

  { Console.WriteLine(DateTime.Now.ToShortTimeString()); }


  public static void PrintDate()

  { Console.WriteLine(DateTime.Today.ToShortDateString()); }

}
Given that this class has been defined with the static keyword, you cannot create an instance of TimeUtilClass using the new keyword. Rather, all functionality is exposed from the class level:
static void Main(string[] args)

{

  Console.WriteLine("***** Fun with Static Classes *****
");


  // This is just fine.

  TimeUtilClass.PrintDate();

  TimeUtilClass.PrintTime();

  // Compiler error! Can't create static classes!

  TimeUtilClass u = new TimeUtilClass ();


  Console.ReadLine();

}
At this point in the chapter, you hopefully feel comfortable defining simple class types containing constructors, fields, and various static (and nonstatic) members. Now that you have the basics of class construction under your belt, you can formally investigate the three pillars of object-oriented programming.
![]() Source Code The SimpleUtilityClass project is located under the Chapter 5 subdirectory.
Source Code The SimpleUtilityClass project is located under the Chapter 5 subdirectory.
Defining the Pillars of OOP
All object-oriented languages (C#, Java, C++, Visual Basic, etc.) must contend with three core principals, often called the pillars of object-oriented programming (OOP):
- Encapsulation: How does this language hide an object’s internal implementation details and preserve data integrity?
- Inheritance: How does this language promote code reuse?
- Polymorphism: How does this language let you treat related objects in a similar way?
Before digging into the syntactic details of each pillar, it is important that you understand the basic role of each. Here is an overview of each pillar, which will be examined in full detail over the remainder of this chapter and the next.
The Role of Encapsulation
The first pillar of OOP is called encapsulation. This trait boils down to the language’s ability to hide unnecessary implementation details from the object user. For example, assume you are using a class named DatabaseReader, which has two primary methods named Open() and Close():
// Assume this class encapsulates the details of opening and closing a database.

DatabaseReader dbReader = new DatabaseReader();

dbReader.Open(@"C:AutoLot.mdf");


// Do something with data file and close the file.

dbReader.Close();
The fictitious DatabaseReader class encapsulates the inner details of locating, loading, manipulating, and closing a data file. Programmers love encapsulation, as this pillar of OOP keeps coding tasks simpler. There is no need to worry about the numerous lines of code that are working behind the scenes to carry out the work of the DatabaseReader class. All you do is create an instance and send the appropriate messages (e.g., “Open the file named AutoLot.mdf located on my C drive”).
Closely related to the notion of encapsulating programming logic is the idea of data protection. Ideally, an object’s state data should be specified using the private (or possibly protected) keyword. In this way, the outside world must ask politely in order to change or obtain the underlying value. This is a good thing, as publicly declared data points can easily become corrupted (hopefully by accident rather than intent!). You will formally examine this aspect of encapsulation in just a bit.
The Role of Inheritance
The next pillar of OOP, inheritance, boils down to the language’s ability to allow you to build new class definitions based on existing class definitions. In essence, inheritance allows you to extend the behavior of a base (or parent) class by inheriting core functionality into the derived subclass (also called a child class). Figure 5-4 shows a simple example.
You can read the diagram in Figure 5-4 as “A Hexagon is-a Shape that is-an Object.” When you have classes related by this form of inheritance, you establish “is-a” relationships between types. The “is-a” relationship is termed inheritance.
Here, you can assume that Shape defines some number of members that are common to all descendents (maybe a value to represent the color to draw the shape, and other values to represent the height and width). Given that the Hexagon class extends Shape, it inherits the core functionality defined by Shape and Object, as well as defines additional hexagon-related details of its own (whatever those may be).
![]() Note Under the .NET platform,
Note Under the .NET platform, System.Object is always the topmost parent in any class hierarchy, which defines some general functionality for all types (fully described in Chapter 6).
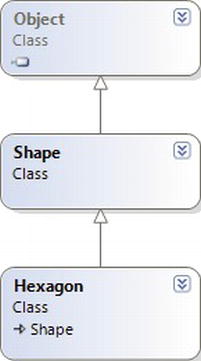
Figure 5-4. The “is-a” relationship
There is another form of code reuse in the world of OOP: the containment/delegation model also known as the “has-a” relationship or aggregation. This form of reuse is not used to establish parent/child relationships. Rather, the “has-a” relationship allows one class to define a member variable of another class and expose its functionality (if required) to the object user indirectly.
For example, assume you are again modeling an automobile. You might want to express the idea that a car “has-a” radio. It would be illogical to attempt to derive the Car class from a Radio, or vice versa (a Car “is-a” Radio? I think not!). Rather, you have two independent classes working together, where the Car class creates and exposes the Radio’s functionality:
class Radio

{

  public void Power(bool turnOn)

  {

    Console.WriteLine("Radio on: {0}", turnOn);

  }

}


class Car

{

  // Car 'has-a' Radio.

  private Radio myRadio = new Radio();


  public void TurnOnRadio(bool onOff)

  {

    // Delegate call to inner object.

    myRadio.Power(onOff);

  }

}
Notice that the object user has no clue that the Car class is making use of an inner Radio object.
static void Main(string[] args)

{

  // Call is forwarded to Radio internally.
  Car viper = new Car();

  viper.TurnOnRadio(false);

}
The Role of Polymorphism
The final pillar of OOP is polymorphism. This trait captures a language’s ability to treat related objects in a similar manner. Specifically, this tenant of an object-oriented language allows a base class to define a set of members (formally termed the polymorphic interface) that are available to all descendents. A class’s polymorphic interface is constructed using any number of virtual or abstract members (see Chapter 6 for full details).
In a nutshell, a virtual member is a member in a base class that defines a default implementation that may be changed (or more formally speaking, overridden) by a derived class. In contrast, an abstract method is a member in a base class that does not provide a default implementation, but does provide a signature. When a class derives from a base class defining an abstract method, it must be overridden by a derived type. In either case, when derived types override the members defined by a base class, they are essentially redefining how they respond to the same request.
To preview polymorphism, let’s provide some details behind the shapes hierarchy shown in Figure 5-5. Assume that the Shape class has defined a virtual method named Draw() that takes no parameters. Given the fact that every shape needs to render itself in a unique manner, subclasses such as Hexagon and Circle are free to override this method to their own liking (see Figure 5-5).
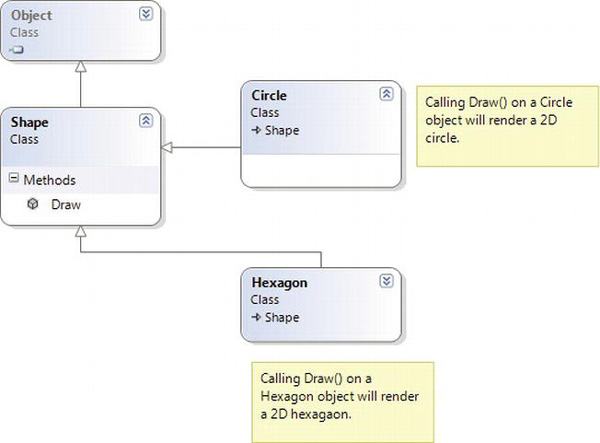
Figure 5-5. Classical polymorphism
After a polymorphic interface has been designed, you can begin to make various assumptions in your code. For example, given that Hexagon and Circle derive from a common parent (Shape), an array of Shape types could contain anything deriving from this base class. Furthermore, given that Shape defines a polymorphic interface to all derived types (the Draw() method in this example), you can assume each member in the array has this functionality.
Consider the following Main() method, which instructs an array of Shape-derived types to render themselves using the Draw() method:
class Program

{

  static void Main(string[] args)

  {

    Shape[] myShapes = new Shape[3];

    myShapes[0] = new Hexagon();

    myShapes[1] = new Circle();

    myShapes[2] = new Hexagon();


    foreach (Shape s in myShapes)

    {

      // Use the polymorphic interface!

      s.Draw();

    }

    Console.ReadLine();

  }

}
This wraps up our brisk overview of the pillars of OOP. Now that you have the theory in your mind, the remainder of this chapter explores further details of how encapsulation is handled under C#. Chapter 6 will tackle the details of inheritance and polymorphism.
C# Access Modifiers
When working with encapsulation, you must always take into account which aspects of a type are visible to various parts of your application. Specifically, types (classes, interfaces, structures, enumerations, and delegates) as well as their members (properties, methods, constructors, and fields) are defined using a specific keyword to control how “visible” the item is to other parts of your application. Although C# defines numerous keywords to control access, they differ on where they can be successfully applied (type or member). Table 5-1 documents the role of each access modifier and where it may be applied.

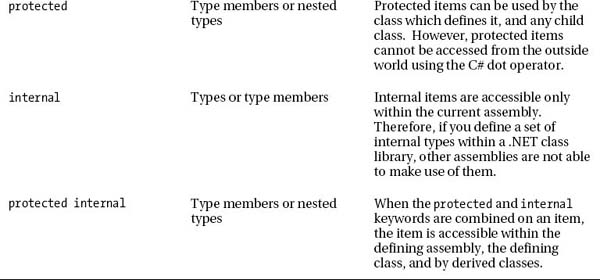
In this chapter, you are only concerned with the public and private keywords. Later chapters will examine the role of the internal and protected internal modifiers (useful when you build .NET code libraries) and the protected modifier (useful when you are creating class hierarchies).
The Default Access Modifiers
By default, type members are implicitly private while types are implicitly internal. Thus, the following class definition is automatically set to internal, while the type’s default constructor is automatically set to private:
// An internal class with a private default constructor.

class Radio

{

  Radio(){}

}
To allow other parts of a program to invoke members of an object, you must mark them as publicly accessible. As well, if you wish to expose the Radio to external assemblies (again, useful when building .NET code libraries; see Chapter 14), you will need to add the public modifier.
// A public class with a public default constructor.

public class Radio

{

  public Radio(){}

}
Access Modifiers and Nested Types
As mentioned in Table 5-1, the private, protected, and protected internal access modifiers can be applied to a nested type. Chapter 6 will examine nesting in detail. What you need to know at this point, however, is that a nested type is a type declared directly within the scope of class or structure. By way of example, here is a private enumeration (named CarColor) nested within a public class (named SportsCar):
public class SportsCar

{

  // OK! Nested types can be marked private.

  private enum CarColor

  {

    Red, Green, Blue

  }

}
Here, it is permissible to apply the private access modifier on the nested type. However, nonnested types (such as the SportsCar) can only be defined with the public or internal modifiers. Therefore, the following class definition is illegal:
// Error! Nonnested types cannot be marked private!

private class SportsCar

{}
The First Pillar: C#’s Encapsulation Services
The concept of encapsulation revolves around the notion that an object’s internal data should not be directly accessible from an object instance. Rather, class data is defined as private. If the caller wants to alter the state of an object, the user does so indirectly using public members. To illustrate the need for encapsulation services, assume you have created the following class definition:
// A class with a single public field.

class Book

{

  public int numberOfPages;

}
The problem with public data is that the data itself has no ability to “understand” whether the current value to which they are assigned is valid with regard to the current business rules of the system. As you know, the upper range of a C# int is quite large (2,147,483,647). Therefore, the compiler allows the following assignment:
// Humm. That is one heck of a mini-novel!

static void Main(string[] args)

{

  Book miniNovel = new Book();

  miniNovel.numberOfPages = 30000000;

}
Although you have not overflowed the boundaries of an int data type, it should be clear that a mini-novel with a page count of 30,000,000 pages is a bit unreasonable. As you can see, public fields do not provide a way to trap logical upper (or lower) limits. If your current system has a business rule that states a book must be between 1 and 1,000 pages, you are at a loss to enforce this programmatically. Because of this, public fields typically have no place in a production-level class definition.
![]() Note To be more specific, members of a class that represent an object’s state should not be marked as public. As you will see later in this chapter, public constants and public read-only fields are a-okay.
Note To be more specific, members of a class that represent an object’s state should not be marked as public. As you will see later in this chapter, public constants and public read-only fields are a-okay.
Encapsulation provides a way to preserve the integrity of an object’s state data. Rather than defining public fields (which can easily foster data corruption), you should get in the habit of defining private data, which is indirectly manipulated using one of two main techniques:
- Define a pair of public accessor (get) and mutator (set) methods.
- Define a public .NET property.
Whichever technique you choose, the point is that a well-encapsulated class should protect its data and hide the details of how it operates from the prying eyes of the outside world. This is often termed black box programming. The beauty of this approach is that an object is free to change how a given method is implemented under the hood. It does this without breaking any existing code making use of it, provided that the parameters and return values of the method remain constant.
Encapsulation Using Traditional Accessors and Mutators
Over the remaining pages in this chapter, you will be building a fairly complete class that models a general employee. To get the ball rolling, create a new Console Application named EmployeeApp and insert a new class file (named Employee.cs) using the Project Add class menu item. Update the Employee class with the following fields, methods, and constructors:
class Employee

{

  // Field data.

  private string empName;

  private int empID;

  private float currPay;


  // Constructors.

  public Employee() {}

  public Employee(string name, int id, float pay)

  {

    empName = name;

    empID = id;

    currPay = pay;

  }


  // Methods.

  public void GiveBonus(float amount)

  {

    currPay += amount;

  }


  public void DisplayStats()

  {

    Console.WriteLine("Name: {0}", empName);
    Console.WriteLine("ID: {0}", empID);

    Console.WriteLine("Pay: {0}", currPay);

  }

}
Notice that the fields of the Employee class are currently defined using the private keyword. Given this, the empName, empID, and currPay fields are not directly accessible from an object variable. Therefore, the following logic in Main() would result in compiler errors:
static void Main(string[] args)

{

  // Error! Cannot directly access private members

  // from an object!

  Employee emp = new Employee();

  emp.empName = "Marv";

}
If you want the outside world to interact with a worker’s full name, a traditional approach (which is very common in Java) is to define an accessor (get method) and a mutator (set method). The role of a “get” method is to return to the caller the current value of the underlying state data. A “set” method allows the caller to change the current value of the underlying state data, as long as the defined business rules are met.
To illustrate, let’s encapsulate the empName field. To do so, add the following public methods to the Employee class. Notice that the SetName() method performs a test on the incoming data, to ensure the string is 15 characters or less. If it is not, an error prints to the console and returns without making a change to the empName field:
![]() Note If this were a production level class, you would also make to check the character length for an employee’s name within your constructor logic. Ignore this detail for the time being, as you will clean up this code in just a bit when you examine .NET property syntax.
Note If this were a production level class, you would also make to check the character length for an employee’s name within your constructor logic. Ignore this detail for the time being, as you will clean up this code in just a bit when you examine .NET property syntax.
class Employee

{

  // Field data.

  private string empName;

  ...


  // Accessor (get method).

  public string GetName()

  {

    return empName;

  }


  // Mutator (set method).

  public void SetName(string name)

  {

    // Do a check on incoming value

    // before making assignment.
    if (name.Length > 15)

      Console.WriteLine("Error!  Name must be less than 16 characters!");

    else

      empName = name;

  }

}
This technique requires two uniquely named methods to operate on a single data point. To test your new methods, update your Main() method as follows:
static void Main(string[] args)

{

  Console.WriteLine("***** Fun with Encapsulation *****
");

  Employee emp = new Employee("Marvin", 456, 30000);

  emp.GiveBonus(1000);

  emp.DisplayStats();


  // Use the get/set methods to interact with the object's name.

  emp.SetName("Marv");

  Console.WriteLine("Employee is named: {0}", emp.GetName());

  Console.ReadLine();

}
Because of the code in your SetName() method, if you attempted to specify more than 16 characters (see the following), you would find the hard-coded error message printed to the console:
static void Main(string[] args)

{

  Console.WriteLine("***** Fun with Encapsulation *****
");

...

  // Longer than 16 characters! Error will print to console.

  Employee emp2 = new Employee();

  emp2.SetName("Xena the warrior princess");


  Console.ReadLine();

}
So far, so good. You have encapsulated the private empName field using two public methods named GetName() and SetName(). If you were to further encapsulate the data in the Employee class, you would need to add various additional methods (such as GetID(), SetID(), GetCurrentPay(), SetCurrentPay()). Each of the mutator methods could have within it various lines of code to check for additional business rules. While this could certainly be done, the C# language has a useful alternative notation to encapsulate class data.
Encapsulation Using .NET Properties
Although you can encapsulate a piece of field data using traditional get and set methods, .NET languages prefer to enforce data encapsulation state data using properties. First of all, understand that properties are just a simplification for “real” accessor and mutator methods. Therefore, as a class designer, you are still able to perform any internal logic necessary before making the value assignment (e.g., uppercase the value, scrub the value for illegal characters, check the bounds of a numerical value, and so on).
Here is the updated Employee class, now enforcing encapsulation of each field using property syntax rather than traditional get and set methods:
class Employee

{

  // Field data.

  private string empName;

  private int empID;

  private float currPay;


  // Properties!

  public string Name

  {

    get { return empName; }

    set

    {

      if (value.Length > 15)

        Console.WriteLine("Error!  Name must be less than 16 characters!");

      else

        empName = value;

    }

  }


  // We could add additional business rules to the sets of these properties;

  // however, there is no need to do so for this example.

  public int ID

  {

    get { return empID; }

    set { empID = value; }

  }

  public float Pay

  {

    get { return currPay; }

    set { currPay = value; }

  }

...

}
A C# property is composed by defining a get scope (accessor) and set scope (mutator) directly within the property itself. Notice that the property specifies the type of data it is encapsulating by what appears to be a return value. Also take note that, unlike a method, properties do not make use of parentheses (not even empty parentheses) when being defined. Consider the commentary on your current ID property:
// The 'int' represents the type of data this property encapsulates.

// The data type must be identical to the related field (empID).

public int ID  // Note lack of parentheses.

{

  get { return empID; }

  set { empID = value; }

}
Within a “set” scope of a property, you use a token named value, which is used to represent the incoming value used to assign the property by the caller. This token is not a true C# keyword, but is what is known as a contextual keyword. When the token value is within the set scope of the property, it always represents the value being assigned by the caller, and it will always be the same underlying data type as the property itself. Thus, notice how the Name property can still test the range of the string as so:
public string Name

{

  get { return empName; }

  set

  {

    // Here, value is really a string.

    if (value.Length > 15)

      Console.WriteLine("Error! Name must be less than 16 characters!");

    else

      empName = value;

  }

}
After you have these properties in place, it appears to the caller that it is getting and setting a public point of data; however, the correct get and set block is called behind the scenes to preserve encapsulation:
static void Main(string[] args)

{

  Console.WriteLine("***** Fun with Encapsulation *****
");

  Employee emp = new Employee("Marvin", 456, 30000);

  emp.GiveBonus(1000);

  emp.DisplayStats();


  // Set and get the Name property.

  emp.Name = "Marv";

  Console.WriteLine("Employee is named: {0}", emp.Name);

  Console.ReadLine();

}
Properties (as opposed to accessors and mutators) also make your types easier to manipulate, in that properties are able to respond to the intrinsic operators of C#. To illustrate, assume that the Employee class type has an internal private member variable representing the age of the employee. Here is the relevant update (notice the use of constructor chaining):
class Employee

{

...

  // New field and property.

  private int empAge;

  public int Age

  {

    get { return empAge; }

    set { empAge = value; }

  }


  // Updated constructors.

  public Employee() {}
  public Employee(string name, int id, float pay)

    :this(name, 0, id, pay){}


  public Employee(string name, int age, int id, float pay)

  {

    empName = name;

    empID = id;

    empAge = age;

    currPay = pay;

  }


  // Updated DisplayStats() method now accounts for age.

  public void DisplayStats()

  {

    Console.WriteLine("Name: {0}", empName);

    Console.WriteLine("ID: {0}", empID);

    Console.WriteLine("Age: {0}", empAge);

    Console.WriteLine("Pay: {0}", currPay);

  }

}
Now assume you have created an Employee object named joe. On his birthday, you want to increment the age by one. Using traditional accessor and mutator methods, you would need to write code such as the following:
Employee joe = new Employee();

joe.SetAge(joe.GetAge() + 1);
However, if you encapsulate empAge using a property named Age, you are able to simply write
Employee joe = new Employee();

joe.Age++;
Using Properties Within a Class Definition
Properties, specifically the “set” portion of a property, are common places to package up the business rules of your class. Currently, the Employee class has a Name property that ensures the name is no more than 15 characters. The remaining properties (ID, Pay, and Age) could also be updated with any relevant logic.
While this is well and good, also consider what a class constructor typically does internally. It will take the incoming parameters, check for valid data, and then make assignments to the internal private fields. Currently, your master constructor does not test the incoming string data for a valid range, so you could update this member as so:
public Employee(string name, int age, int id, float pay)

{

  // Humm, this seems like a problem...

  if (name.Length > 15)

    Console.WriteLine("Error! Name must be less than 16 characters!");

  else

    empName = name;


  empID = id;

  empAge = age;
  currPay = pay;

}
I am sure you can see the problem with this approach. The Name property and your master constructor are performing the same error checking! If you were also making checks on the other data points, you would have a good deal of duplicate code. To streamline your code, and isolate all of your error checking to a central location, you will do well if you always use properties within your class whenever you need to get or set the values. Consider the following updated constructor:
public Employee(string name, int age, int id, float pay)

{

  // Better! Use properties when setting class data.

  // This reduces the amount of duplicate error checks.

  Name = name;

  Age = age;

  ID = id;

  Pay = pay;

}
Beyond updating constructors to use properties when assigning values, it is good practice to use properties throughout a class implementation, to ensure your business rules are always enforced. In many cases, the only time when you directly make reference to the underlying private piece of data is within the property itself. With this in mind, here is your updated Employee class:
class Employee

{

  // Field data.

  private string empName;

  private int empID;

  private float currPay;

  private int empAge;


  // Constructors.

  public Employee() { }

  public Employee(string name, int id, float pay)

    :this(name, 0, id, pay){}

  public Employee(string name, int age, int id, float pay)

  {

    Name = name;

    Age = age;

    ID = id;

    Pay = pay;

  }


  // Methods.

  public void GiveBonus(float amount)

  { Pay += amount; }


  public void DisplayStats()

  {

    Console.WriteLine("Name: {0}", Name);

    Console.WriteLine("ID: {0}", ID);

    Console.WriteLine("Age: {0}", Age);
    Console.WriteLine("Pay: {0}", Pay);

   }


  // Properties as before...

...

}
Read-Only and Write-Only Properties
When encapsulating data, you might want to configure a read-only property. To do so, simply omit the set block. Likewise, if you want to have a write-only property, omit the get block. For example, assume you wanted a new property named SocialSecurityNumber, which encapsulates a private string variable named empSSN. If you want to make this a read-only property, you could write:
public string SocialSecurityNumber

{

  get { return empSS; }

}
Now assume our class constructor has a new parameter to let the caller set the SSN of the object. Since the SocialSecurityNumber property is read only, we cannot set the value as so:
public Employee(string name, int age, int id, float pay, string ssn)

{

  Name = name;

  Age = age;

  ID = id;

  Pay = pay;

  // OOPS! This is no longer possible if the property is read

  // only.

  SocialSecurityNumber = ssn;

}
Unless we are willing to redesign the property as read/write, your only choice would be to use the underlying empSSN member variable within your constructor logic as so:
public Employee(string name, int age, int id, float pay, string ssn)

{

...

  empSSN = ssn;

}
To wrap up the story thus far, recall that C# prefers properties to encapsulate data. These syntactic entities are used for the same purpose as traditional accessor (get)/mutator (set) methods. The benefit of properties is that the users of your objects are able to manipulate the internal data point using a single named item.
![]() Source Code The EmployeeApp project can be found under the Chapter 5 subdirectory.
Source Code The EmployeeApp project can be found under the Chapter 5 subdirectory.
Revisiting the static Keyword: Defining Static Properties
Earlier in this chapter, you examined the role of the static keyword. Now that you understand the use of C# property syntax, we can formalize static properties. In the StaticDataAndMembers project, our SavingsAccount class had two public static properties to get and set the interest rate. However, it would be more standard to wrap this data point in a property. Thus, if you would rather not have two methods to get and set the interest rate, you could instead define this following class property (note the use of the static keyword):
// A simple savings account class.

class SavingsAccount

{

  // Instance-level data.

  public double currBalance;


  // A static point of data.

  private static double currInterestRate = 0.04;


  // A static property.

  public static double InterestRate

  {

    get { return currInterestRate; }

    set { currInterestRate = value; }

  }

...

}
If you want to use this property in place of the previous static methods, you could update your Main() method as so:
// Print the current interest rate via property.

Console.WriteLine("Interest Rate is: {0}", SavingsAccount.InterestRate);
Understanding Automatic Properties
When you are building properties to encapsulate your data, it is common to find that the set scopes have code to enforce business rules of your program. However, in some cases you may not need any implementation logic beyond simply getting and setting the value. This means you can end up with a lot of code looking like the following:
// A Car type using standard property

// syntax.

class Car

{

  private string carName = "";

  public string PetName

  {

    get { return carName; }

    set { carName = value; }

  }

}
In these cases, it can become rather verbose to define private backing fields and simple property definitions multiple times. By way of an example, if you are modeling a class that requires 15 private points of field data, you end up authoring 15 related properties that are little more than thin wrappers for encapsulation services.
To streamline the process of providing simple encapsulation of field data, you may use automatic property syntax. As the name implies, this feature will offload the work of defining a private backing field and the related C# property member to the compiler using a new bit of syntax. To illustrate, create a new Console Application named AutoProps. Now, consider the reworking of the Car class, which uses this syntax to quickly create three properties:
class Car

{

  // Automatic properties!

  public string PetName { get; set; }

  public int Speed { get; set; }

  public string Color { get; set; }

}
![]() Note Visual Studio provides the
Note Visual Studio provides the prop code snippet. If you type “prop” and press the Tab key twice, the IDE will generate starter code for a new automatic property! You can then use the Tab key to cycle through each part of the definition to fill in the details. Give it a try!
When defining automatic properties, you simply specify the access modifier, underlying data type, property name, and empty get/set scopes. At compile time, your type will be provided with an autogenerated private backing field and a fitting implementation of the get/set logic.
![]() Note The name of the autogenerated private backing field is not visible within your C# code base. The only way to see it is to make use of a tool such as
Note The name of the autogenerated private backing field is not visible within your C# code base. The only way to see it is to make use of a tool such as ildasm.exe.
Unlike traditional C# properties, however, it is not possible to build read-only or write-only automatic properties. While you might think you can just omit the get; or set; within your property declaration as follows:
// Read-only property? Error!

public int MyReadOnlyProp { get; }


// Write only property? Error!

public int MyWriteOnlyProp { set; }
this will result in a compiler error. When you are defining an automatic property, it must support both read and write functionality. Recall the following:
// Automatic properties must be read and write.

public string PetName { get; set; }
Interacting with Automatic Properties
Because the compiler will define the private backing field at compile time, the class defining automatic properties will always need to use property syntax to get and set the underlying value. This is important to note because many programmers make direct use of the private fields within a class definition, which is not possible in this case. For example, if the Car class were to provide a DisplayStats() method, it would need to implement this method using the property name:
class Car

{

  // Automatic properties!

  public string PetName { get; set; }

  public int Speed { get; set; }

  public string Color { get; set; }


  public void DisplayStats()

  {

    Console.WriteLine("Car Name: {0}", PetName);

    Console.WriteLine("Speed: {0}", Speed);

    Console.WriteLine("Color: {0}", Color);

  }

}
When you are using an object defined with automatic properties, you will be able to assign and obtain the values using the expected property syntax:
static void Main(string[] args)

{

  Console.WriteLine("***** Fun with Automatic Properties *****
");


  Car c = new Car();

  c.PetName = "Frank";

  c.Speed = 55;

  c.Color = "Red";


  Console.WriteLine("Your car is named {0}? That's odd...",

    c.PetName);

  c.DisplayStats();


  Console.ReadLine();

}
Regarding Automatic Properties and Default Values
When you use automatic properties to encapsulate numerical or Boolean data, you are able to use the autogenerated type properties straightaway within your code base, as the hidden backing fields will be assigned a safe default value that can be used directly. However, be very aware that if you use automatic property syntax to wrap another class variable, the hidden private reference type will also be set to a default value of null.
Consider the following new class named Garage, which makes use of two automatic properties (of course, a real garage class would maintain a collection of Car objects; however, we will ignore that detail for the time being):
class Garage

{

  // The hidden int backing field is set to zero!

  public int NumberOfCars { get; set; }


  // The hidden Car backing field is set to null!

  public Car MyAuto { get; set; }

}
Given C#’s default values for field data, you would be able to print out the value of NumberOfCars as is (as it is automatically assigned the value of zero), but if you directly invoke MyAuto, you will receive a “null reference exception” at runtime, as the Car member variable used in the background has not been assigned to a new object:
static void Main(string[] args)

{

  ...

  Garage g = new Garage();


  // OK, prints default value of zero.

  Console.WriteLine("Number of Cars: {0}", g.NumberOfCars);


  // Runtime error! Backing field is currently null!

  Console.WriteLine(g.MyAuto.PetName);

  Console.ReadLine();

}
Given that the private backing fields are created at compile time, you will be unable to make use of C# field initialization syntax to allocate the reference type directly with the new keyword. Therefore, this work will need to be done with class constructors to ensure the object comes to life in a safe manner. For example:
class Garage

{

  // The hidden backing field is set to zero!

  public int NumberOfCars { get; set; }


  // The hidden backing field is set to null!

  public Car MyAuto { get; set; }


  // Must use constructors to override default

  // values assigned to hidden backing fields.

  public Garage()

  {

    MyAuto = new Car();

    NumberOfCars = 1;

  }

  public Garage(Car car, int number)

  {

    MyAuto = car;

    NumberOfCars = number;

  }

}
With this update, you could now place a Car object into the Garage object as so:
static void Main(string[] args)

{

  Console.WriteLine("***** Fun with Automatic Properties *****
");


  // Make a car.

  Car c = new Car();

  c.PetName = "Frank";

  c.Speed = 55;

  c.Color = "Red";

  c.DisplayStats();


  // Put car in the garage.

  Garage g = new Garage();

  g.MyAuto = c;

  Console.WriteLine("Number of Cars in garage: {0}", g.NumberOfCars);

  Console.WriteLine("Your car is named: {0}", g.MyAuto.PetName);


  Console.ReadLine();

}
As you most likely agree, this is a very nice feature of the C# programming language, as you can define a number of properties for a class using a streamlined syntax. Be aware, of course, that if you are building a property that requires additional code beyond getting and setting the underlying private field (such as data validation logic, writing to an event log, communicating with a database, etc.), you will be required to define a “normal” .NET property type by hand. C# automatic properties never do more than provide simple encapsulation for an underlying piece of (compiler-generated) private data.
![]() Source Code The AutoProps project can be found under the Chapter 5 subdirectory.
Source Code The AutoProps project can be found under the Chapter 5 subdirectory.
Understanding Object Initialization Syntax
As seen throughout this chapter, a constructor allows you specify start-up values when creating a new object. On a related note, properties allow you to get and set underlying data in a safe manner. When you are working with other people’s classes, including the classes found within the .NET base class library, it is not too uncommon to discover that there is not a single constructor that allows you to set every piece of underlying state data. Given this point, a programmer is typically forced to pick the best constructor possible, after which he or she makes assignments using a handful of provided properties.
To help streamline the process of getting an object up and running, C# offers object initializer syntax. Using this technique, it is possible to create a new object variable and assign a slew of properties and/or public fields in a few lines of code. Syntactically, an object initializer consists of a comma-delimited list of specified values, enclosed by the { and } tokens. Each member in the initialization list maps to the name of a public field or public property of the object being initialized.
To see this syntax in action, create a new Console Application named ObjectInitializers. Now, consider a simple class named Point, created using automatic properties (which is not mandatory for this example, but helps us write some very concise code):
class Point

{

  public int X { get; set; }

  public int Y { get; set; }


  public Point(int xVal, int yVal)

  {

    X = xVal;

    Y = yVal;

  }

  public Point() { }


  public void DisplayStats()

  {

    Console.WriteLine("[{0}, {1}]", X, Y);

  }

}
Now consider how we can make Point objects using any of the following approaches:
static void Main(string[] args)

{

  Console.WriteLine("***** Fun with Object Init Syntax *****
");


  // Make a Point by setting each property manually.

  Point firstPoint = new Point();

  firstPoint.X = 10;

  firstPoint.Y = 10;

  firstPoint.DisplayStats();


  // Or make a Point via a custom constructor.

  Point anotherPoint = new Point(20, 20);

  anotherPoint.DisplayStats();


  // Or make a Point using object init syntax.

  Point finalPoint = new Point { X = 30, Y = 30 };

  finalPoint.DisplayStats();

  Console.ReadLine();

}
The final Point variable is not making use of a custom constructor (as one might do traditionally), but is rather setting values to the public X and Y properties. Behind the scenes, the type’s default constructor is invoked, followed by setting the values to the specified properties. To this end, object initialization syntax is just shorthand notations for the syntax used to create a class variable using a default constructor, and setting the state data property by property.
Calling Custom Constructors with Initialization Syntax
The previous examples initialized Point types by implicitly calling the default constructor on the type:
// Here, the default constructor is called implicitly.

Point finalPoint = new Point { X = 30, Y = 30 };
If you want to be very clear about this, it is permissible to explicitly call the default constructor as follows:
// Here, the default constructor is called explicitly.

Point finalPoint = new Point() { X = 30, Y = 30 };
Do be aware that when you are constructing a type using the new initialization syntax, you are able to invoke any constructor defined by the class. Our Point type currently defines a two-argument constructor to set the (x, y) position. Therefore, the following Point declaration results in an X value of 100 and a Y value of 100, regardless of the fact that our constructor arguments specified the values 10 and 16:
// Calling a custom constructor.

Point pt = new Point(10, 16) { X = 100, Y = 100 };
Given the current definition of your Point type, calling the custom constructor while using initialization syntax is not terribly useful (and more than a bit verbose). However, if your Point type provides a new constructor that allows the caller to establish a color (via a custom enum named PointColor), the combination of custom constructors and object initialization syntax becomes clear. Assume you have updated Point as follows:
public enum PointColor

{ LightBlue, BloodRed, Gold }


class Point

{

  public int X { get; set; }

  public int Y { get; set; }

  public PointColor Color{ get; set; }


  public Point(int xVal, int yVal)

  {

    X = xVal;

    Y = yVal;

    Color = PointColor.Gold;

  }


  public Point(PointColor ptColor)

  {

    Color = ptColor;

  }


  public Point()

    : this(PointColor.BloodRed){ }


  public void DisplayStats()

  {

    Console.WriteLine("[{0}, {1}]", X, Y);

    Console.WriteLine("Point is {0}", Color);

  }

}
With this new constructor, you can now create a gold point (positioned at 90, 20) as follows:
// Calling a more interesting custom constructor with init syntax.

Point goldPoint = new Point(PointColor.Gold){ X = 90, Y = 20 };

goldPoint.DisplayStats();
Initializing Inner Types
As briefly mentioned earlier in this chapter (and fully examined in Chapter 6), the “has-a” relationship allows us to compose new classes by defining member variables of existing classes. For example, assume you now have a Rectangle class, which makes use of the Point type to represent its upper-left/bottom-right coordinates. Since automatic properties set all internal class variables to null, you will implement this new class using “traditional” property syntax:
class Rectangle

{

  private Point topLeft = new Point();

  private Point bottomRight = new Point();


  public Point TopLeft

  {

    get { return topLeft; }

    set { topLeft = value; }

  }

  public Point BottomRight

  {

    get { return bottomRight; }

    set { bottomRight = value; }

  }


  public void DisplayStats()

  {

    Console.WriteLine("[TopLeft: {0}, {1}, {2} BottomRight: {3}, {4}, {5}]",

      topLeft.X, topLeft.Y, topLeft.Color,

      bottomRight.X, bottomRight.Y, bottomRight.Color);

  }

}
Using object initialization syntax, you could create a new Rectangle variable and set the inner Points as follows:
// Create and initialize a Rectangle.

Rectangle myRect = new Rectangle

{

  TopLeft = new Point { X = 10, Y = 10 },

  BottomRight = new Point { X = 200, Y = 200}

};
Again, the benefit of object initialization syntax is that it basically decreases the number of keystrokes (assuming there is not a suitable constructor). Here is the traditional approach to establishing a similar Rectangle:
// Old-school approach.

Rectangle r = new Rectangle();

Point p1 = new Point();
p1.X = 10;

p1.Y = 10;

r.TopLeft = p1;

Point p2 = new Point();

p2.X = 200;

p2.Y = 200;

r.BottomRight = p2;
While you might feel object initialization syntax can take a bit of getting used to, once you get comfortable with the code, you’ll be quite pleased at how quickly you can establish the state of a new object with minimal fuss and bother.
To wrap up this chapter, allow me to close with three bite-sized topics that will round out your understanding of building well-encapsulated classes: constant data, read-only fields, and partial class definitions.
![]() Source Code The ObjectInitilizers project can be found under the Chapter 5 subdirectory.
Source Code The ObjectInitilizers project can be found under the Chapter 5 subdirectory.
Working with Constant Field Data
C# offers the const keyword to define constant data, which can never change after the initial assignment. As you might guess, this can be helpful when you are defining a set of known values for use in your applications that are logically connected to a given class or structure.
Assume you are building a utility class named MyMathClass that needs to define a value for the value PI (which you will assume to be 3.14). Begin by creating a new Console Application project named ConstData. Given that you would not want to allow other developers to change this value in code, PI could be modeled with the following constant:
namespace ConstData

{

  class MyMathClass

  {

    public const double PI = 3.14;

  }


  class Program

  {

    static void Main(string[] args)

    {

      Console.WriteLine("***** Fun with Const *****
");

      Console.WriteLine("The value of PI is: {0}", MyMathClass.PI);

      // Error! Can't change a constant!

      // MyMathClass.PI = 3.1444;


      Console.ReadLine();

    }

  }

}
Notice that you are referencing the constant data defined by MyMathClass using a class name prefix (i.e., MyMathClass.PI). This is due to the fact that constant fields of a class are implicitly static. However, it is permissible to define and access a local constant variable within a type member. By way of example:
static void LocalConstStringVariable()

{

  // A local constant data point can be directly accessed.

  const string fixedStr = "Fixed string Data";

  Console.WriteLine(fixedStr);


  // Error!

  fixedStr = "This will not work!";

}
Regardless of where you define a constant piece of data, the one point to always remember is that the initial value assigned to the constant must be specified at the time you define the constant. Thus, if you were to modify your MyMathClass in such a way that the value of PI is assigned in a class constructor as follows:
class MyMathClass

{

  // Try to set PI in ctor?

  public const double PI;


  public MyMathClass()

  {

    // Error!

    PI = 3.14;

  }

}
you would receive a compile-time error. The reason for this restriction has to do with the fact the value of constant data must be known at compile time. Constructors, as you know, are invoked at runtime.
Understanding Read-Only Fields
Closely related to constant data is the notion of read-only field data (which should not be confused with a read-only property). Like a constant, a read-only field cannot be changed after the initial assignment. However, unlike a constant, the value assigned to a read-only field can be determined at runtime and, therefore, can legally be assigned within the scope of a constructor, but nowhere else.
This can be very helpful when you don’t know the value of a field until runtime, perhaps because you need to read an external file to obtain the value, but wish to ensure that the value will not change after that point. For the sake of illustration, assume the following update to MyMathClass:
class MyMathClass

{

  // Read-only fields can be assigned in ctors,

  // but nowhere else.

  public readonly double PI;


  public MyMathClass ()

  {

    PI = 3.14;
  }

}
Again, any attempt to make assignments to a field marked readonly outside the scope of a constructor results in a compiler error:
class MyMathClass

{

  public readonly double PI;

  public MyMathClass ()

  {

    PI = 3.14;

  }


  // Error!

  public void ChangePI()

  { PI = 3.14444;}

}
Static Read-Only Fields
Unlike a constant field, read-only fields are not implicitly static. Thus, if you want to expose PI from the class level, you must explicitly make use of the static keyword. If you know the value of a static read-only field at compile time, the initial assignment looks very similar to that of a constant (however in this case, it would be easier to simply use the const keyword in the first place, as we are assigning the data field at the time of declaration):
class MyMathClass

{

  public static readonly double PI = 3.14;

}


class Program

{

  static void Main(string[] args)

  {

    Console.WriteLine("***** Fun with Const *****");

    Console.WriteLine("The value of PI is: {0}", MyMathClass.PI);

    Console.ReadLine();

  }

}
However, if the value of a static read-only field is not known until runtime, you must make use of a static constructor as described earlier in this chapter:
class MyMathClass

{

  public static readonly double PI;


  static MyMathClass()

  { PI = 3.14; }

}
![]() Source Code The ConstData project is included under the Chapter 5 subdirectory.
Source Code The ConstData project is included under the Chapter 5 subdirectory.
Understanding Partial Types
Last but not least, it is important to understand the role of the C# partial keyword. A production-level class could very easily consist of hundreds and hundreds of lines of code. As well, given that a typical class is defined within a single *.cs file, you could end up with a very long file indeed. When you are creating your classes, it is often the case that much of the code can be basically ignored after it is accounted for. For example, field data, properties, and constructors tend to remain as-is during production, while methods tend to be modified quite often.
If you want, you can partition a single class across multiple C# files, to isolate the boilerplate code from more readily useful members. To illustrate, open up the EmployeeApp project you created previously in this chapter into Visual Studio, and after you have done so, open the Employee.cs file for editing. Currently, this single file contains code of all aspects of the class:
class Employee

{

  // Field Data


  // Constructors


  // Methods


  // Properties

}
Using partial classes, you could choose to move the constructors and field data into a brand new file named Employee.Internal.cs (please note, the name of the file is irrelevant; here I just tacked on the work internal to represent the guts of the class). The first step is to add the partial keyword to the current class definition and cut the code to be placed into the new file:
// Employee.cs

partial class Employee

{

  // Methods


  // Properties

}
Next, assuming you have inserted a new class file into your project, you can move the data fields and constructors to the new file using a simple cut/paste operation. In addition, you must add the partial keyword to this aspect of the class definition. For example:
// Employee.Internal.cs

partial class Employee

{

  // Field data


  // Constructors

}
![]() Note Remember that every aspect of a partial class definition must be marked with the
Note Remember that every aspect of a partial class definition must be marked with the partial keyword!
After you compile the modified project, you should see no difference whatsoever. The whole idea of a partial class is only realized during design time. After the application has been compiled, there is just a single, unified class within the assembly. The only requirement when defining partial types is that the type’s name (Employee in this case) is identical and defined within the same .NET namespace.
To be honest, you will most likely not need to make use of partial class definitions too often. However, Visual Studio uses them in the background all the time. Later in this book, when you start to look into GUI application development using Windows Presentation Foundation or ASP.NET, you’ll see that Visual Studio isolates designer-generated code into a partial class, leaving you to focus on your application-specific programming logic.
![]() Source Code The EmployeeAppPartial project can be found under the Chapter 5 subdirectory.
Source Code The EmployeeAppPartial project can be found under the Chapter 5 subdirectory.
Summary
The point of this chapter was to introduce you to the role of the C# class type. As you have seen, classes can take any number of constructors that enable the object user to establish the state of the object upon creation. This chapter also illustrated several class design techniques (and related keywords). Recall that the this keyword can be used to obtain access to the current object, the static keyword allows you to define fields and members that are bound at the class (not object) level, and the const keyword (and readonly modifier) allows you to define a point of data that can never change after the initial assignment.
The bulk of this chapter dug into the details of the first pillar of OOP: encapsulation. Here you learned about the access modifiers of C# and the role of type properties, object initialization syntax, and partial classes. With this behind you, you are now able to turn to the next chapter where you will learn to build a family of related classes using inheritance and polymorphism.