
C H A P T E R 9
Working with HTML5 Drag-and-Drop
Traditional drag-and-drop has been popular with users since the days of the original Apple Macintosh. But today's computers and mobile devices have much more sophisticated drag-and-drop behavior. Drag-and-drop is used in file management, transferring data, diagramming, and many other operations where moving an object is more naturally envisioned with a gesture than a key command. Ask developers on the street what drag-and-drop encompasses, and you are likely to get a myriad of different answers depending on their favorite programs and current work assignments. Ask non-technical users about drag-and-drop, and they may stare at you blankly; the feature is now so ingrained into computing that it does not often get called out by name anymore.
And yet, HTML has not had drag-and-drop as a core feature in its many years of existence. Although some developers have used the built-in ability to handle low-level mouse events as a way to hack up primitive drag-and-drop, those efforts paled in comparison to the type of drag-and-drop features that have been available in desktop applications for decades. With the arrival of a well-specified set of drag-and-drop functionality, HTML applications have advanced one step closer to matching the capabilities of their desktop counterparts.
Web Drag-and-Drop: The Story So Far
You may have seen examples of drag-and-drop on the Web already and are wondering if these are uses of HTML5 drag-and-drop. The answer? Probably not.
The reason is that HTML and DOM have exposed low-level mouse events since the early days of DOM events, and that has been sufficient for creative developers to craft a rudimentary drag-and-drop capability. When coupled with CSS positioning, it is possible to approximate a drag-and-drop system through the creation of complex JavaScript libraries and a firm knowledge of DOM events.
For example, by handling the following DOM events, it is possible to move items around in a web page if you code a set of logical steps (and some caveats):
mousedown: The user is starting some mouse operation. (Is it a drag or just a click?)mousemove: If the mouse is not up yet, a move operation is starting. (Is it a drag or a select?)mouseover: The mouse has moved over an element. (Is it one of the ones I want to drop on?)mouseout: The mouse has left an element that will no longer be a possible place to drop. (Do I need to draw feedback?)mouseup: The mouse has released, possibly triggering a drop operation. (Should the drop complete on this location based on where it started from?)
Although modeling a crude drag-and-drop system using low-level events is possible, it suffers from some notable drawbacks. First, the logic necessary to handle the mouse events is more complex than you might imagine, as each of the listed events has many edge cases that must be accounted for. Although some were in the previous list, the reality is that there are enough of them to warrant their own chapter. During these events, CSS must be carefully updated to provide feedback to the user about the possibility of dragging or dropping at any particular location.
However, an even more serious drawback is that this type of ad hoc drag-and-drop implementation relies on total control of the system. If you try mixing your app content with other content in the same page, things quickly spiral out of control when different developers start using events for their own means. Similarly, if you try to drag-and-drop content from someone else's code, you may have trouble unless the two codebases are carefully coordinated beforehand. Also, ad hoc drag-and-drop does not interact with the user's desktop or work across windows.
The new HTML5 drag-and-drop API has been designed to address these limitations, borrowing from the way drag-and-drop has been provided in other user interface frameworks.
![]() Note Even when properly implemented, beware of the limitations of drag-and-drop in any application. Mobile devices that use drag gestures to navigate might not function correctly if drag behavior is overridden. Also, drag-and-drop can interfere with drag selection. Take care to use it sparingly and appropriately.
Note Even when properly implemented, beware of the limitations of drag-and-drop in any application. Mobile devices that use drag gestures to navigate might not function correctly if drag behavior is overridden. Also, drag-and-drop can interfere with drag selection. Take care to use it sparingly and appropriately.
Overview of HTML5 Drag-and-Drop
If you have used the drag-and-drop APIs in programming technologies such as Java or Microsoft MFC, then you're in luck. The new HTML5 drag-and-drop API is closely modeled on the concepts of these environments. Getting started is easy, but mastering the new functionality means that you will need to become acquainted with a new set of DOM events, though this time at a higher level of abstraction.
The Big Picture
The easiest way to learn the new API is to map it to the concepts with which you are already familiar. If you are reading a book on pro HTML5 programming, we'll make a bold assumption that you are experienced with using drag-and-drop in your day-to-day computing. Nonetheless, we can start by putting some standard terms on the major concepts.
As shown in Figure 9-1, when you (as a user) start a drag-and-drop operation, you start by clicking and dragging the pointer. The item or region where you began the drag is known as the drag source. When you release the pointer and complete the operation, the region or item you are targeting at the end is known as the drop target. As the mouse moves across the page, you may traverse a series of drop targets before you actually release the mouse.
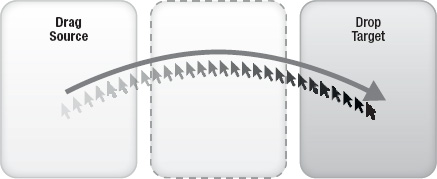
Figure 9-1. Drag sources and drop targets
So far, so good. But simply holding down the mouse and moving it to another part of an application is not what constitutes a drag-and-drop. Rather, it is the feedback during the operation that makes for a successful interaction. Consider your own uses of drag-and-drop in past experiences; the ones that are the most intuitive are those where the system is giving constant updates to let you know what will happen if you release at this point in time:
- Does the cursor indicate that the current position is a valid drop target, or does it imply a rejection with a “forbidden” cursor indicator?
- Does the cursor imply to the user that the operation will be a move, link, or a copy, such as with a “plus” sign indicator on the cursor?
- Does the area or target you are hovering over change its appearance in any way to indicate that it is currently selected as a drop if you release right now?
In order to give similar feedback to users over the course of an HTML drag-and-drop operation, the browsers will emit a whole slew of events over the course of a single drag. This proves quite handy, as during these events we will have full power to change the DOM and style of the page elements to give just the type of feedback that users will be expecting.
Beyond the drag source and drop target, there is one more key concept to learn in the new API: the data transfer. The specification describes the data transfer as the set of objects used to expose the drag data store that underlies a drag-and-drop operation. However, it may be easier just to think of the data transfer as being the central control of drag-and-drop. The operation type (e.g., move, copy, or link), the image to use as feedback during the drag, and the retrieval of the data itself are all managed here.
Regarding the data itself, the dataTransfer mechanism for completing the drop directly addresses one of the limitations of the old ad hoc drag-and-drop techniques described previously. Instead of forcing all drag sources and drop targets to be aware of each other, the data transfer mechanism works similar to a network protocol negotiation. In this case, the negotiation is performed via Multipurpose Internet Mail Exchange (MIME) types.
![]() Note MIME types are the same types used to attach files to e-mail. They are an Internet standard that is used pervasively in all types of Web traffic, and they are very common in HTML5. In short, MIME types are standardized text strings used to classify the type of unknown content, such as “text/plain” for plain text and “image/png” for PNG images.
Note MIME types are the same types used to attach files to e-mail. They are an Internet standard that is used pervasively in all types of Web traffic, and they are very common in HTML5. In short, MIME types are standardized text strings used to classify the type of unknown content, such as “text/plain” for plain text and “image/png” for PNG images.
The purpose of using MIME types is to allow the source and target to negotiate on which format best suits the needs of the drop target. As shown in Figure 9-2, during a drag start, the dataTransfer object is loaded up with data representing all reasonable types, or “flavors,” by which the data can be transferred. Then, when the drop completes, the drop handler code can scan the available types of data and decide which MIME type format best suits its needs.
For example, imagine a list item in a web page representing a person. There are many different ways to represent the data for a person; some are standard, some are not. When a drag starts on a particular person's list item, the drag start handler can declare that the person's data is available in a few formats, as shown in Table 9-1.
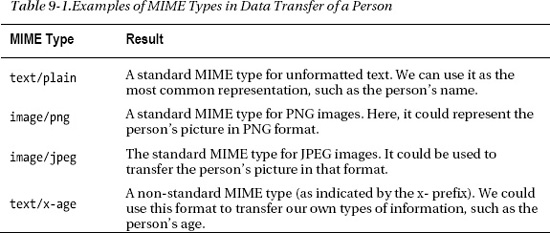
When the drop completes, the drop handler can query for a list of available data types. From the provided list, the handler can choose which type is most appropriate. A text list drop target may choose to grab the text/plain “flavor” of data to retrieve the person's name, while a more advanced control might choose to retrieve and display the person's PNG image as a result of the drop. And, if the source and target have coordinated on non-standard types, the target could also retrieve the person's age at the time of the drop.
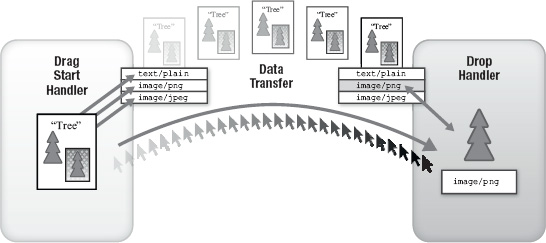
Figure 9-2. Drag and drop negotiation of data “flavors”
It is this negotiation process that allows for drag sources and drop targets to be decoupled. As long as the drag sources provide data in a choice of MIME types, the drop target can choose which format suits its operation the best, even if the two came from different developers. In later sections of this chapter, we'll explore how even more unusual MIME types, such as files, can be used.
Events to Remember
Now that we've explored the key concepts of the drag-and-drop API, let's focus on the events that can be used throughout the process. As you'll see, the events operate at a higher level than the mouse events previously utilized to mock up a drag-and-drop system. However, drag-and-drop events extend the DOM mouse event. Therefore, you still have access to the low-level mouse information, such as coordinates, if you need it.s
Propagation and Prevention
But before we focus on drag and-drop-itself, let's refresh on two DOM event functions that have been around since the browsers standardized on DOM Level 3 events: the stopPropagation and preventDefault functions.
Consider the case where one element in a page is nested inside another element. We will refer to them as the child and parent elements, respectively. The child takes up some, but not all, of the visible space of the parent. Although we are only referring to two elements in our example, in practice a web page often has many levels of nesting.
When a user clicks a mouse on the child, which element should actually receive the event: the child, the parent, or both? And if both, in which order? The answer to this question was settled by the World Wide Web Consortium (W3C) in the DOM events specification. Events flow from a parent, through intermediaries, and down to the most specific child first in a process known as “event capture.” Once the child has had access to the event, the event flows back up the element hierarchy via a process known as “event bubbling.” Together, these two flows allow developers to catch and process the event in the way that is most suitable to their page architecture. Only elements with handlers actually registered will process the event, which keeps the system lightweight. The overall approach is a compromise among different behaviors from multiple browser vendors, and it is consistent with other native development frameworks, some of which capture and some of which bubble.
However, at any time a handler can call the stopPropagation function on the event, which will stop it from further traversing down the event capture chain or up through the bubbling phase.
![]() Note Microsoft has provided a great interactive demo of event models at
Note Microsoft has provided a great interactive demo of event models at http://ie.microsoft.com/testdrive/HTML5/ComparingEventModels
Browsers also have default implementations for how some events will be handled. For example, when a user clicks on a page link, the default behavior is to navigate the browser to the destination specified by the link. Developers can prevent this by intercepting the event in a handler and calling preventDefault on it. This allows code to override the default behaviors of some built-in events. It is also how a developer can cancel a drag-and-drop operation in an event handler.
Both stopPropagation and preventDefault will be handy in our examples of the drag-and-drop API.
Drag-and-Drop Event Flow
When a user initiates a drag-and-drop operation in an HTML5-ready browser, a series of events trigger at the start and continue throughout the course of the whole operation. We will examine them in turn here.
dragstart
The dragstart event is fired on an element in the page when the user begins to drag on it. In other words, once the mouse is down and the user moves the mouse, the dragstart is initiated. The dragstart event is of key importance, as it is the only event where the dataTransfer can have data set on it using the setData call. This means that in a dragStart handler, the possible data types need to be set up so that they can be queried at the end of the drop, as described previously.
Interception!
drag
The drag event can be thought of as the continuous event of a drag operation. As the user moves the mouse cursor around the page, the drag event is called repeatedly on the drag source. The drag event will fire a few times each second during the operation. Although the visuals of the drag feedback can be modified during a drag event, the data on the dataTransfer is off-limits.
dragenter
When the drag crosses into a new element on the page, a dragenter event fires on that element. This event is a good time to set drop feedback on the element based on whether or not it can receive the drop.
dragleave
Conversely, the browser will fire a dragleave event whenever the user moves the drag out of the element where dragenter was previously called. Drop feedback can be restored at this time, as the mouse is no longer over this target.
dragover
The dragover event is called at frequent intervals as the mouse moves over an element during a drag operation. Unlike its counterpart drag event, which is called on the drag source, this event is called on the current target of the mouse.
drop
The drop event is called on the current mouse target when the user releases the mouse. Based on the result of the dataTransfer object, this is where the code to handle the drop should be executed.
dragend
The final event in the chain, dragend fires on the drag source, indicating that the drag completed. It is particularly suitable for cleaning up the state used during the drag, as it is called regardless of whether or not the drop completes.
Altogether, there are plenty of ways for you to intercept the drag-and-drop operations and take action. The drag-and-drop event chain is summarized in Figure 9-3.
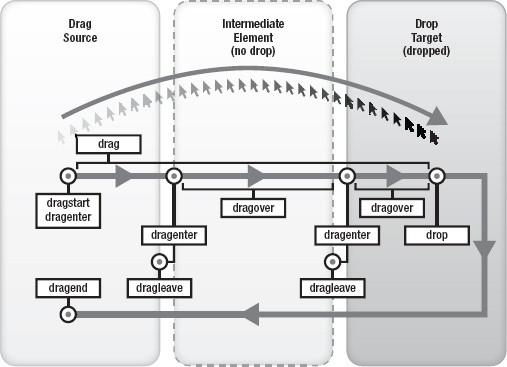
Figure 9-3. Drag-and-drop event flow
Drag Participation
Now that you've seen the different events that can be triggered during a drag-and-drop operation, you might be wondering what it takes to mark elements in your web application as draggable. That's easy!
Aside from a few elements—such as text controls—elements in a page are not draggable by default. In order to mark a specific element as draggable, however, all you need to do is add one attribute: draggable.
<div id=”myDragSource” draggable=”true”>
Simply by adding that attribute, you cause the browser to fire the aforementioned events. Then, you only need to add the event handlers to manage them.
Transfer and Control
Before we move into our example, let's assess the dataTransfer object in more detail. The dataTransfer is available from every drag-and-drop event, as shown in Listing 9-1.
Listing 9-1. Retrieving the dataTransfer Object
Function handleDrag(evt) {

    var transfer = evt.dataTransfer;

    // …

}
As discussed in Listing 9-1, the dataTransfer is used to get and set the actual drop data during the negotiation between source and target. This is done using the following functions and properties:
setData(format, data): Calling this function during dragStart allows you to register one transfer item under a MIME type format.getData(format): This function allows the registered data item for a given type to be retrieved.types: This property returns an array of all currently registered formats.items: This property returns a list of all items and their associated formats together.files: This property returns any files associated with the drop. This is discussed in more detail in a later section.clearData(): Calling this function with no argument clears out all registered data. Calling it with a format argument removes only that specific registration.
Two more functions can be used to alter the feedback during a drag operation:
setDragImage(element, x, y): Tells the browser to use an existing image element as the drag image, which will display alongside the cursor to hint to the user about the drag operation effects. If x and y coordinates are provided, then those coordinates will be considered as the drop point for the mouse.addElement(element): By calling this function with a provided page element, you tell the browser to draw that element as a drag feedback image.
A final set of properties allows the developer to set and/or query the types of drag operations that are allowed:
effectAllowed: Setting this property to one of none, copy, copyLink, copyMove, link, linkMove, move, or all tells the browser that only the type(s) of operations listed here are to be allowed for the user. For example, if copy is set, only copy operations will be allowed, and move or link operations will be prevented.dropEffect: This property can be used to determine which type of operation is currently underway or set to force a particular operation type. The types of operations are copy, link, and move. Or, the value none can be set to prevent any drop from happening at that point in time.
Together, these operations give a fine level of control over drag-and-drop. Now, let's see them in action.
Building an Application with Drag-and-Drop
Using the concepts we've already learned, we'll build a simple drag-and-drop page in the theme of our Happy Trails Running Club. This page lets the club race organizers drag members of the club into one of two lists: racers and volunteers. In order to sort them into competitive groups, racers will be sorted by their age. Volunteers, on the other hand, are only sorted by their names, as their ages don't matter when they are not competing.
The sorting of the lists is done automatically. The application itself will show feedback indicating where proper drop areas are for members into the two lists as shown in Figure 9-4.
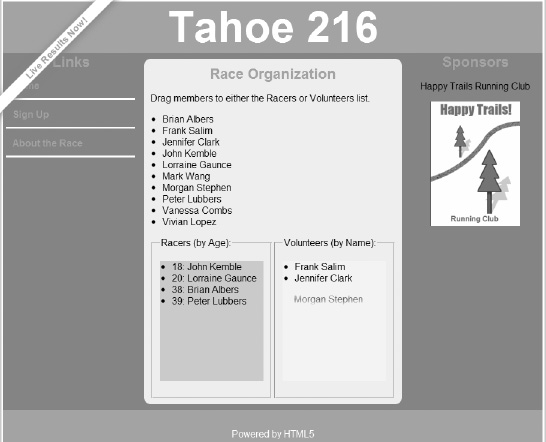
Figure 9-4. Example page showing racers sorted into lists
All of the code for this example is included with the book's samples in the code/draganddrop directory. We'll step through the page and explain how it works in practice.
First, let's look at the markup for the page. At the top, we've declared the data on our club members (see Listing 9-2).
Listing 9-2. Markup Displaying Draggable Member Names and Ages
<p>Drag members to either the Racers or Volunteers list.</p>


<ul id="members">

  <li draggable="true" data-age="38">Brian Albers</li>

  <li draggable="true" data-age="25">Frank Salim</li>

  <li draggable="true" data-age="47">Jennifer Clark</li>

  <li draggable="true" data-age="18">John Kemble</li>

  <li draggable="true" data-age="20">Lorraine Gaunce</li>

  <li draggable="true" data-age="30">Mark Wang</li>

  <li draggable="true" data-age="41">Morgan Stephen</li>

  <li draggable="true" data-age="39">Peter Lubbers</li>
<li draggable="true" data-age="33">Vanessa Combs</li>
<li draggable="true" data-age="54">Vivian Lopez</li>
</ul>
As you can see, each of the member list elements is marked as draggable. This tells the browser to let drags start on each of them. The next thing you'll notice is that the age of a given member is encoded as a data attribute. The data- notation is a standard way to store non-standard attributes on an HTML element.
Our next section contains the target lists (see Listing 9-3).
Listing 9-3. Markup for Drop List Targets
<div class="dropList">

<fieldset id="racersField">

<legend>Racers (by Age):</legend>

<ul id="racers"></ul>

</fieldset>

</div>


<div class="dropList">

<fieldset id="volunteersField">

<legend>Volunteers (by Name):</legend>

<ul id="volunteers"></ul>

</fieldset>

</div>
The unordered lists identified as racers and volunteers are the ultimate destinations where our members will be inserted. The fieldsets surrounding them serve as functional equivalents of a moat around a castle. When the user drags into the fieldset, we'll know that they have exited the contained list and we'll update our visual feedback accordingly.
Speaking of feedback, there are a few CSS styles in our page that are important to note (see Listing 9-4).
Listing 9-4. Styles for Drag-and-Drop Demo
#members li {

    cursor: move;

}


.highlighted {

    background-color: yellow;

}


.validtarget {

    background-color: lightblue;

}
First, we make sure that every member in our source list shows a move cursor. This gives a hint to the user that the items are draggable.
Next, we define two style classes: highlighted and validtarget. These are used to draw background colors on our lists as the drag-and-drop is in progress. The validtarget background will be displayed on our destination lists during the entire drag to hint that they are valid drop targets. When the user actually moves a member over a target list it will change to the highlighted style, indicating that the user is actually over a drop target.
To keep track of the state on our page, we'll declare a few variables (see Listing 9-5).
Listing 9-5. List Item Declarations
    // these arrays hold the names of the members who are

    // chosen to be racers and volunteers, respectively

    var racers = [];

    var volunteers = [];


    // these variables store references to the visible

    // elements for displaying who is a racer or volunteer

    var racersList;

    var volunteersList;
The first two variables will serve as internal arrays, which keep track of which members are in the racers and volunteers lists. The second two variables are only going to be used as handy references to the unordered lists containing the visual display of members in the respective lists.
Now, let's set all of our page items up to handle drag-and-drop (see Listing 9-6).
Listing 9-6. Event Handler Registration
    function loadDemo() {


       racersList = document.getElementById("racers");

       volunteersList = document.getElementById("volunteers");


       // our target lists get handlers for drag enter, leave, and drop

       var lists = [racersList, volunteersList];

       [].forEach.call(lists, function(list) {

           list.addEventListener("dragenter", handleDragEnter, false);

           list.addEventListener("dragleave", handleDragLeave, false);

           list.addEventListener("drop", handleDrop, false);

       });


       // each target list gets a particular dragover handler

       racersList.addEventListener("dragover", handleDragOverRacers, false);

       volunteersList.addEventListener("dragover", handleDragOverVolunteers, false);


       // the fieldsets around our lists serve as buffers for resetting

       // the style during drag over

       var fieldsets = document.querySelectorAll("#racersField, #volunteersField");

       [].forEach.call(fieldsets, function(fieldset) {

           fieldset.addEventListener("dragover", handleDragOverOuter, false);

       });


       // each draggable member gets a handler for drag start and end

       var members = document.querySelectorAll("#members li");

       [].forEach.call(members, function(member) {

           member.addEventListener("dragstart", handleDragStart, false);

           member.addEventListener("dragend", handleDragEnd, false);
});
}
window.addEventListener("load", loadDemo, false);
When the window initially loads, we call a loadDemo function to set up all of our drag-and-drop event handlers. Most of them don't need event capture, and we will set the capture argument accordingly. Both the racersList and the volunteersList will receive handlers for dragenter, dragleave, and drop events, as these are fired on drop targets. Each list will receive a separate dragover event listener, as that will allow us to easily update the drag feedback based on the target the user is currently dragging over.
As mentioned previously, we are also adding dragover handlers on the fieldsets surrounding the target lists. Why do we do this? To make it easier to detect when a drag has exited our target lists. Although it is easy for us to detect that a user has dragged an item over our list, it is not so easy to determine when the user has dragged an item out of our list. This is because the dragleave events fire both when an item is dragged out of our list and when the item is dragged over a child already in the destination list. Essentially, when you drag from a parent element over one of its contained children, the drag exits the parent and enters the child. Although this provides a lot of information, it actually makes it tricky to know when a drag is leaving the outer boundaries of a parent element. Therefore, we will use a notification that we are dragging over an element surrounding our list to inform us that we have exited the list. More information on this will be provided later.
This Way to the eGRESS
Our final set of handlers registers dragstart and dragend listeners on every draggable club member in our initial list. We will use them to initialize and clean up any drag. You might notice that we don't add handlers for the drag event, which fires periodically on the drag source. As we will not be updating the appearance of the dragged item, it will be unnecessary for our example.
Now, we'll go through the actual event handlers in turn, based on the order in which they generally fire (see Listing 9-7).
Listing 9-7. dragstart Event Handler
    // called at the beginning of any drag

    function handleDragStart(evt) {


        // our drag only allows copy operations

        evt.effectAllowed = "copy";


        // the target of a drag start is one of our members

        // the data for a member is either their name or age

        evt.dataTransfer.setData("text/plain", evt.target.textContent);

        evt.dataTransfer.setData("text/html", evt.target.dataset.age);


        // highlight the potential drop targets

        racersList.className = "validtarget";

        volunteersList.className = "validtarget";


        return true;

    }
The handler for dragstart is called on the draggable item where the users begin the operation. It is a somewhat special handler, as it sets up the capabilities of the entire process. First, we set the effectAllowed, which tells the browser that only copies are allowed when dragging from this element—no moves or links.
Next, we preload all of the possible flavors of data that might be requested at the end of a successful drop. Naturally, we want to support a text version of our element, so we set the MIME type text/plain to return the text inside our draggable node, (i.e., the club member's name).
For our second data flavor, we would like the drop operation to transfer another type of data about the drag source; in our case, it is the age of the club member. Unfortunately, due to bugs, not all browsers support user-defined MIME types such as application/x-age yet, which would be the best fit for such an arbitrary flavor. Instead, we will reuse another commonly supported MIME format—text/html—to stand in for an age flavor for now. Hopefully the WebKit browsers will address this limitation soon.
Don't forget that the dragstart handler is the only handler where data transfer values can be set. Attempting to do so in other handlers will fail in order to prevent rogue code from changing the data mid-drag.
Our final action in the start handler is purely for demo purposes. We will change the background color of our potential drop target lists to give the user a hint about what is possible. Our next handlers will process events as the dragged item enters and leaves elements on the page (see Listing 9-8).
Listing 9-8. dragenter and dragleave Event Handlers
    // stop propagation and prevent default drag behavior

    // to show that our target lists are valid drop targets

    function handleDragEnter(evt) {

        evt.stopPropagation();

        evt.preventDefault();

        return false;

    }


    function handleDragLeave(evt) {
return false;
}
The dragleave event is not used by our demo, and we handle it purely for illustrative purposes.
The dragenter event, however, can be handled and canceled by calling preventDefault on it when it is fired over a valid drop target. This informs the browser that the current target is a valid drop target, as the default behavior is to assume that any target is not a valid drop target.
Next, we will look at the dragover handlers (see Listing 9-9). Recall that these fire at regular intervals whenever the drag hovers over the elements in question.
Listing 9-9. dragover Handler for Outer Container
// for better drop feedback, we use an event for dragging
// over the surrounding control as a flag to turn off
// drop highlighting
function handleDragOverOuter(evt) {
// due to Mozilla firing drag over events to
// parents from nested children, we check the id
// before handling
if (evt.target.id == "racersField")
racersList.className = "validtarget";
else if (evt.target.id == "volunteersField")
volunteersList.className = "validtarget";
evt.stopPropagation();
        return false;

    }
Our first of three dragover handlers will be used only to adjust the drag feedback. Recall that it is difficult to detect when a drag has left a target, such as our intended racers and volunteers lists. Therefore, we use a drag movement over the fieldsets surrounding the lists to indicate that the drag has exited the vicinity of the lists. This allows us to turn off the drop highlighting on the lists accordingly.
Note that our simple code, as listed, will change the CSS className repeatedly if the user hovers in the fieldset area. For optimization purposes, it is good practice to only change the className once, as it may cause the browser to do more work than necessary.
Finally, we stop propagation of the event to any other handlers in the page. We don't want any other handlers to override our logic. In the next two dragover handlers, we take a different approach (see Listing 9-10).
Listing 9-10. dragover Handler for Target Lists
    // if the user drags over our list, show

    // that it allows copy and highlight for better feedback

    function handleDragOverRacers(evt) {

        evt.dataTransfer.dropEffect = "copy";

        evt.stopPropagation();

        evt.preventDefault();


        racersList.className = "highlighted";

        return false;
}
function handleDragOverVolunteers(evt) {
evt.dataTransfer.dropEffect = "copy";
evt.stopPropagation();
evt.preventDefault();
volunteersList.className = "highlighted";
return false;
}
These two handlers, while somewhat verbose, are listed in full to clarify our demo. The first handles dragover events in the racers list, and the second handles dragover events identically in the volunteers list.
The first action we take is to set the dropEffect to indicate that only copies are allowed on this node, not moves or links. This is a good practice, even though our original dragstart handler already limited the drag-and-drop operation to be copy-only.
Next we prevent other handlers from accessing the event and cancel it. Canceling a dragover event has an important function: it tells the browser that the default operation—not allowing a drop here—is not valid. Essentially, we are telling the browser that it should not not allow a drop; and so, the drop is allowed. Although this may seem counter-intuitive, recall that preventDefault is used to tell the browser not to do its normal built-in operation for an event. For example, calling preventDefault on a click on a link tells the browser to not navigate to the link's reference. The specification designers could have created a new event or API for this dragover, but they opted to keep to the API patterns that were already used throughout HTML.
We will also give the user visual feedback by changing the background color to yellow via the highlighted CSS class whenever the user drags over our lists. The main work of the drag-and-drop is done in the drop handler, which we examine next in Listing 9-11.
Listing 9-11. Drop Handler for Target Lists
    // when the user drops on a target list, transfer the data

    function handleDrop(evt) {

        evt.preventDefault();

        evt.stopPropagation();


        var dropTarget = evt.target;


        // use the text flavor to get the name of the dragged item

        var text  = evt.dataTransfer.getData("text/plain");


        var group = volunteers;

        var list  = volunteersList;


        // if the drop target list was the racer list, grab an extra

        // flavor of data representing the member age and prepend it

        if ((dropTarget.id != "volunteers") &&

            (dropTarget.parentNode.id != "volunteers")) {

            text = evt.dataTransfer.getData("text/html") + ": " + text;

            group = racers;

            list  = racersList;
}
// for simplicity, fully clear the old list and reset it
if (group.indexOf(text) == -1) {
group.push(text);
group.sort();
// remove all old children
while (list.hasChildNodes()) {
list.removeChild(list.lastChild);
}
// push in all new children
[].forEach.call(group, function(person) {
var newChild = document.createElement("li");
newChild.textContent = person;
list.appendChild(newChild);
});
}
return false;
}
Once again, we start by preventing the default drop behavior and preventing the control from propagating to other handlers. The default drop event depends on the location and type of element dropped. For example, dropping an image dragged in from another source displays it in the browser window, and dropping a link into a window navigates to it by default. We want total control of drop behavior in our demo, so we cancel any default behaviors.
Recall that our demo shows how multiple data flavors set up in the dragstart can be retrieved from a dropped element. Here, we see how that retrieval completes. By default, we get the plain text data representing the club member's name by using the text/plain MIME format. If the user drops into the volunteers list, this is sufficient.
However, if the user is dropping the club member into the racers list, we take one additional step to fetch the age of the club member, which we previously set using the text/html flavor during dragstart. We prepend it to the club member's name to display both age and name in the racers list.
Our final block of code is a simple, albeit unoptimized, routine to clear out all previous members of the target list, add our new member (if he didn't exist already), sort, and refill the list. The end result is a sorted list containing the old members and the newly dropped member, if he was not present before.
Regardless of whether or not the user completed the drag-and-drop, we need a dragend handler to clean up (see Listing 9-12).
Listing 9-12. dragend Handler for Clean Up
    // make sure to clean up any drag operation

    function handleDragEnd(evt) {


        // restore the potential drop target styles

        racersList.className = null;

        volunteersList.className = null;

        return false;

    }
A dragend handler is called at the end of the drag, whether or not a drop actually occurred. If the user canceled the drag or completed it, the dragend handler is still called. This gives us a good place to clean up any state we changed at the beginning of the process. Not surprisingly, we reset the CSS classes of our lists to their default, unstyled state.
Sharing Is Caring
Getting Into the dropzone
If you're thinking that handling all of the drag-and-drop events is complicated, you're not alone. The authors of the specification have designed an alternative, shorthand mechanism to support drop events: the dropzone attribute.
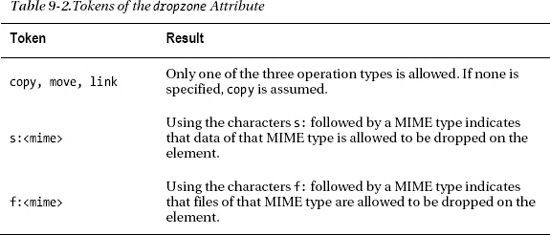
The dropzone provides developers with a compact way to register that an element is willing to accept drops without coding up lengthy event handlers. The attribute consists of a few space-separated patterns that, when provided, allow the browser to automatically wire up the drop behavior for you (see Table 9-2).
Borrowing from our example application, the racers list element could be specified as having the following attribute:
This provides a quick way of telling the browser that copy operations for elements that support either the plain text or HTML data format are allowed to drop on our list.
The dropzone is not supported by most major browser vendors at the time of writing, but support for it is likely forthcoming.
Handling Drag-and-Drop for Files
If you've ever wanted an easier way to add files to your web application, or you've wondered how some of the newest sites allow you to drag files directly into a page and upload them, the answer is the HTML5 File API. Although the size and status of the entire W3C File API is out of scope for this discussion, many browsers already support a subset of the standard, which allows files to be dragged into an application.
![]() Note The W3C File API is documented online at
Note The W3C File API is documented online at www.w3.org/TR/FileAPI.
The File API contains functionality for asynchronously reading files in a web page, uploading them to servers while tracking process, and turning files into page elements. However, affiliated specifications such as drag-and-drop use a subset of the File API, and that is the area where we will focus our attention in this chapter.
Recall that we've already alluded to file drag-and-drop twice in this chapter. First, the dataTransfer object contains a property named files, which will contain a list of files attached to the drag, if appropriate. For example, if a user drags a file or set of files in from the desktop into your application's web page, the browser will fire drag-and-drop events where the dataTransfer.files object has a value. Additionally, browsers that support the previously mentioned dropzone attribute allow files of specific MIME types to be valid drops on an element by using the f: MIME type prefix.
![]() Note Currently, the Safari browser only supports drag-and-drop operations for files. Drags initiated inside a page will fire most drag-and-drop events, but drop events only occur if the type of drag is a file.
Note Currently, the Safari browser only supports drag-and-drop operations for files. Drags initiated inside a page will fire most drag-and-drop events, but drop events only occur if the type of drag is a file.
As usual, you cannot access the files during most drag-and-drop events, because they are protected for security reasons. Although some browsers might let you get access to the list of files during drag events, no browser will let you get access to the file data. In addition, the dragstart, drag, and dragend events that are fired at the drag source element are not triggered in a file drag-and-drop, as the source is the file system itself.
The file items in our file list support the following properties:
- name: The full filename with extension
- type: The MIME type of the file
- size: The size of the file in bytes
- lastModifiedDate: The timestamp for when the file contents were last modified
Let's walk through a simple example of file drag-and-drop where we will show the characteristics of any file dropped onto our page, shown in Figure 9-5. This code is contained in the fileDrag.html example included with the book.
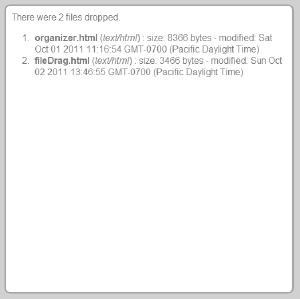
Figure 9-5. Demo page displaying the characteristics of dropped files
The HTML for our demo is actually quite simple (see Listing 9-13).
Listing 9-13. Markup for File Drop Demo
<body>

<div id="droptarget">

<div id="status"></div>

</div>

</body>
We have only two elements in the page. A drop target where files will be dropped and a status display area.
As with our last example, we will register drag-and-drop event handlers during page load (see Listing 9-14).
Listing 9-14. Loading and Initialization Code for File Drop Demo
    var droptarget;


    // set the status text in our display

    function setStatus(text) {

        document.getElementById("status").innerHTML = text;

    }


    // ...


    function loadDemo() {


        droptarget = document.getElementById("droptarget");

        droptarget.className = "validtarget";


        droptarget.addEventListener("dragenter", handleDragEnter, false);

        droptarget.addEventListener("dragover", handleDragOver, false);

        droptarget.addEventListener("dragleave", handleDragLeave, false);

        droptarget.addEventListener("drop", handleDrop, false);


        setStatus("Drag files into this area.");

    }


    window.addEventListener("load", loadDemo, false);
This time, the drop target receives all of the event handlers. Only a subset of handlers is needed, and we can ignore events that take place at the drag source.
When the user drags files into our drop target, we will display what we know about the drop candidates (see Listing 9-15).
Listing 9-15. File Drop Drag Enter Handler
    // handle drag events in the drop target

    function handleDragEnter(evt) {


        // if the browser supports accessing the file

        // list during drag, we display the file count

        var files = evt.dataTransfer.files;


        if (files)

            setStatus("There are " + evt.dataTransfer.files.length +

                " files in this drag.");

        else

            setStatus("There are unknown items in this drag.");


        droptarget.className = "highlighted";


        evt.stopPropagation();

        evt.preventDefault();
return false;
}
Although some browsers allow access to the dataTransfer files mid-drag, we will handle the case where that information is off-limits. When the count is known, we will display it in the status.
Handling dragover and dragleave events is straightforward (see Listing 9-16).
Listing 9-16. File drop dragover and dragleave Handlers
// preventing the default dragover behavior
// is necessary for successful drops
function handleDragOver(evt) {
evt.stopPropagation();
evt.preventDefault();
        return false;

    }
// reset the text and status when drags leave
function handleDragLeave(evt) {
setStatus("Drag files into this area.");
droptarget.className = "validtarget";
return false;
}
As always, we must cancel dragover events to allow drops to be handled by our own code rather than the browser's default behavior, which is usually to display them inline. For a dragleave, we only set the status text and style to indicate that drops are no longer valid when the mouse leaves. The bulk of our work is done in the drop handler (see Listing 9-17).
Listing 9-17. File Drop Handler
    // handle the drop of files

    function handleDrop(evt) {

        // cancel the event to prevent viewing the file

        evt.preventDefault();

        evt.stopPropagation();


        var filelist = evt.dataTransfer.files;


        var message = "There were " + filelist.length + " files dropped.";


        // show a detail list for each file in the drag

        message += "<ol>";


        [].forEach.call(filelist, function(file) {

            message += "<li>";

            message += "<strong>" + file.name + "</strong> ";

            message += "(<em>" + file.type + "</em>) : ";
message += "size: " + file.size + " bytes - ";
message += "modified: " + file.lastModifiedDate;
message += "</li>";
});
message += "</ol>";
setStatus(message);
droptarget.className = "validtarget";
return false;
}
As discussed previously, it is necessary to cancel the event using preventDefault so that the browser's default drop code is never triggered.
Then, because we have more access to data in the drop handler than during the drag, we can inspect the files attached to the dataTransfer and discover the characteristics of the dropped files. In our example, we will merely display the properties of the files, but with full use of the HTML5 File API, you can read in the contents for local display or upload them to the server powering your application.
Practical Extras
Sometimes there are techniques that don't fit into our regular examples but which nonetheless apply to many types of HTML5 applications. We present to you a short, but common, practical extra here.
Customizing the Drag Display
Usually, the browser will default the visual cursor indicator for a drag operation. An image or link will move with the cursor (sometimes sized down for practical viewing), or a ghosted image of the dragged element will hover at the drag position.
However, if you need to change the default drag image display, the API provides you with a simple API for doing just that. It is only possible to change the drag image during the dragstart handler—once again due to security concerns—but you can do so easily by simply passing the element that represents the appearance of the cursor to the dataTransfer.
        var dragImage = document.getElementById("happyTrails");

        evt.dataTransfer.setDragImage(dragImage, 5, 10);
Note the offset coordinates passed to the setDragImage call. These x and y coordinates tell the browser which pixel inside the image to use as the point underneath the mouse cursor. For example, by passing in the values 5 and 10 for x and y, respectively, the image will be positioned such that the cursor is 5 pixels from the left and 10 pixels from the top, as shown in Figure 9-6.
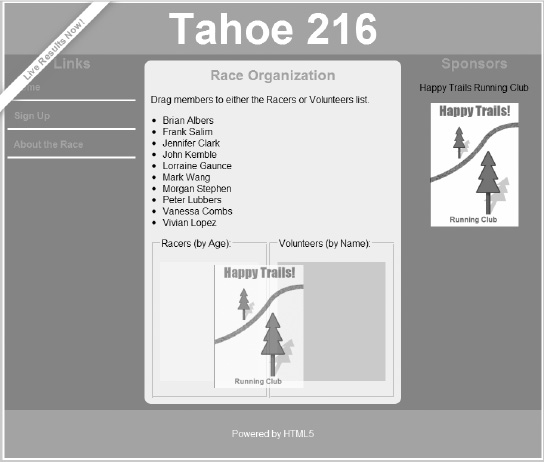
Figure 9-6. Demo page with a drag image set to the Happy Trails logo
The drag image does not need to be an image, however. Any element can be set as the drag image; if it is not an image, the browser will create a visual snapshot of it to serve as the cursor display.
Summary
The drag-and-drop API can be a tricky one to master. It involves the correct handling of many events, some of which may be hard to manage if your drop target layout is complex. However, if you are looking for drag operations that cross windows or browsers, or even interact with the desktop, you will need to learn the subtleties of the API. By design, it combines the power of native application drag-and-drop while still working inside the security restrictions of an environment where data must be protected from third-party code.
For more information on using dropped files as application data, make sure to check out the W3C File API. In the next chapter, we will examine the Web Workers API, which will allow you to spawn background scripts outside of your main page to speed up execution and improve the user experience.