C H A P T E R 5
![]()
Managing Control Files and Online Redo Logs
An Oracle database consists of three types of mandatory files: datafiles, control files, and online redo logs. Chapter 4 focused on tablespaces and datafiles. This chapter focuses on managing control files and online redo logs. The first part of this chapter discusses typical control-file maintenance tasks such adding, moving, and removing control files. The latter part of the chapter focuses on how to manage online redo log files. You learn how to rename, resize, and relocate these critical files.
Managing Control Files
A control file is a small binary file that stores the following types of information:
- Database name
- Names and locations of datafiles
- Names and locations of online redo log files
- Current online redo log sequence number
- Checkpoint information
- Names and locations of Oracle Recovery Manager (RMAN) backup files (if using)
You can query much of the information stored in the control file from data-dictionary views. The following example displays the types of information stored in the control file by querying V$CONTROLFILE_RECORD_SECTION:
SQL> select distinct type from v$controlfile_record_section;
Here's a partial listing of the output:
TYPE

----------------------------

FILENAME

TABLESPACE

RMAN CONFIGURATION

BACKUP CORRUPTION

PROXY COPY

FLASHBACK LOG
REMOVABLE RECOVERY FILES

DATAFILE
You can view database information stored in the control file via the V$DATABASE view:
SQL> select name, open_mode, created, current_scn from v$database;
Here is the output for this example:
NAME      OPEN_MODE            CREATED   CURRENT_SCN

--------- -------------------- --------- -----------

ORC11G    READ WRITE           01-JAN-10     5077636
Every Oracle database must have at least one control file. When you start your database in nomount mode, the instance is aware of the location of the control files from the CONTROL_FILES parameter:
-- locations of control files are known to the instance

SQL> startup nomount;
At this point, the control files haven't been touched by any processes. When you alter your database into mount mode, the control files are read and opened for use:
-- control files opened

SQL> alter database mount;
If any of the control files listed in the CONTROL_FILES initialization parameter aren't available, then you can't mount your database.
When you successfully mount your database, the instance is aware of the locations of the datafiles and online redo logs, but hasn't yet opened them. After you alter your database into open mode, the datafiles and online redo logs are opened:
-- datafiles and online redo logs opened

SQL> alter database open;
The control file is created when the database is created. As you saw in Chapter 2, you should create at least two control files when you create your database (to avoid a single point of failure). If possible, you should have multiple control files stored on separate storage devices controlled by separate controllers.
Oracle writes to all control files specified by the CONTROL_FILES initialization parameter. If Oracle can't write to one of the control files, an error is thrown:
ORA-00210: cannot open the specified control file
If one of your control files becomes unavailable, shut down your database and resolve the issue before restarting. Fixing the problem may mean resolving a storage-device failure or modifying the CONTROL_FILES initialization parameter to remove the control-file entry for the control file that isn't available.
DISPLAYING THE CONTENTS OF A CONTROL FILE
Viewing Control File Names and Locations
If your database is in a nomount state, a mounted state, or an open state, you can view the names and locations of the control files as follows:
SQL> show parameter control_files
You can also view control-file location and name information by querying the V$CONTROLFILE view. This query works while your database is mounted or open:
SQL> select name from v$controlfile;
If for some reason you can't start your database at all, and you need to know the names and locations of the control files, you can inspect the contents of the initialization file to see where they're located. If you're using an spfile, even though it's a binary file, you can still open it with a text editor. The safest approach is to make a copy of the spfile and then inspect its contents with an OS editor:
$ cp $ORACLE_HOME/dbs/spfileO11R2.ora $ORACLE_HOME/dbs/spfileO11R2.copy

$ vi $ORACLE_HOME/dbs/spfileO11R2.copy
If you're using a text-based initialization file, you can view the file directly with an OS editor or use the grep command:
$ grep -i control_files $ORACLE_HOME/dbs/initO11.ora
Adding a Control File
Adding a control file means copying an existing control file and making your database aware of the copy by modifying your CONTROL_FILES parameter. This task must be done while your database is shut down. This procedure only works when you have a good existing control file that can be copied. Adding a control file isn't the same thing as creating or restoring a control file.
If your database uses only one control file, and that control file becomes damaged, you need to either restore a control file from a backup (if available) and perform a recovery, or re-create the damaged control file. If you're using two or more control files, and one becomes damaged, you can use the remaining good control file(s) to quickly get your database into an operating state.
If a database is using only one control file, the basic procedure for adding a control file is as follows:
- Alter the initialization file
CONTROL_FILESparameter to include the new location and name of the control file. - Shut down your database.
- Use an OS command to copy an existing control file to the new location and name.
- Restart your database.
Depending on whether you use an spfile or an init.ora file, the previous steps varies slightly. The next two subsections detail these different scenarios.
Spfile Scenario
If your database is open, you can quickly determine whether you're using an spfile with the following SQL statement:
SQL> show parameter spfile
Here is some sample output:
NAME           TYPE        VALUE

-------------- ------- ------------------------------

spfile         string  /oracle/app/oracle/product/11. 2.0/db_1/dbs/spfileO11R2.ora
When you've determined that you're using an spfile, use the following steps to add a control file:
- Determine the
CONTROL_FILESparameter's current value:SQL> show parameter control_filesThe output shows that this database is using only one control file:
NAME                                 TYPE        VALUE

------------------------------------ ----------- ------------------------------

control_files string /ora01/dbfile/O11R2/control01.ctl - Alter your
CONTROL_FILESparameter to include the new control file that you want to add, but limit the scope of the operation to thespfile(you can't modify this parameter in memory). Make sure you also include any control files listed in step 1:SQL> alter system set control_files='/ora01/dbfile/O11R2/control01.ctl',
'/ora01/dbfile/O11R2/control02.ctl' scope=spfile; - Shut down your database:
SQL> shutdown immediate; - Copy an existing control file to the new location and name. In this example, a new control file named
control02.ctlis created via the OScpcommand:$ cp /ora01/dbfile/O11R2/control01.ctl /ora01/dbfile/O11R2/control02.ctl - Start up your database:
SQL> startup;
You can verify that the new control file is being used by displaying the CONTROL_FILES parameter:
SQL> show parameter control_files
Here is the output for this example:
NAME                                 TYPE        VALUE

------------------------------------ ----------- ------------------------------

control_files                        string      /ora01/dbfile/O11R2/control01.ctl,

                                                 /ora01/dbfile/O11R2/control02.ctl
Init.ora Scenario
Run the following statement to verify that you're using an init.ora file. If you're not using an spfile, the VALUE column is blank:
SQL> show parameter spfile

NAME                                 TYPE        VALUE

------------------------------------ ----------- ------------------------------

spfile                               string
To add a control file when using a text init.ora file, perform the following steps:
- Shut down your database:
SQL> shutdown immediate; - Edit your
init.orafile with an OS utility (such asvi), and add the new control-file location and name to theCONTROL_FILESparameter. This example opens theinit.orafile usingvi, and addscontrol02.ctlto theCONTROL_FILESparameter:$ vi $ORACLE_HOME/dbs/initO11R2.oraListed next is the
CONTROL_FILESparameter aftercontrol02.ctlis added:control_files='/ora01/dbfile/O11R2/control01.ctl',
'/ora01/dbfile/O11R2/control02.ctl' - From the OS, copy the existing control file to the location and name of the control file being added:
$ cp /ora01/dbfile/O11R2/control01.ctl /ora01/dbfile/O11R2/control02.ctl - Start up your database:
SQL> startup;
You can view the control files in use by displaying the CONTROL_FILES parameter:
SQL> show parameter control_files
For this example, here is the output:
NAME                                 TYPE        VALUE

------------------------------------ ----------- ------------------------------

control_files                        string      /ora01/dbfile/O11R2/control01.ctl,

                                                 /ora01/dbfile/O11R2/control02.ctl
![]() Note See Chapter 4 for an example of re-creating a control file from a trace file.
Note See Chapter 4 for an example of re-creating a control file from a trace file.
Moving a Control File
You may occasionally need to move a control file from one location to another. For example, if new storage is added to the database server, you may want to move an existing control file to the newly available location.
The procedure for moving a control file is very similar to adding a control file. The only difference is that you rename the control file instead of copying it. This example shows how to move a control file when you're using an spfile:
- Determine the
CONTROL_FILESparameter's current value:SQL> show parameter control_filesThe output shows that this database is using only one control file:
NAME                                 TYPE        VALUE

------------------------------------ ----------- ------------------------------

control_files string /ora01/dbfile/O11R2/control01.ctl - Alter your
CONTROL_FILESparameter to reflect that you're moving a control file. In this example, the control file is currently in this location:/ora01/dbfile/O11R2/control01.ctlYou're moving the control file to this location:
/ora02/dbfile/O11R2/control01.ctlAlter the
spfileto reflect the new location for the control file. You have to specifySCOPE=SPFILEbecause theCONTROL_FILESparameter can't be modified in memory: - Shut down your database:
SQL> shutdown immediate; - At the OS prompt, move the control file to the new location. This example uses the OS
mvcommand:$ mv /ora01/dbfile/O11R2/control01.ctl /ora02/dbfile/O11R2/control01.ctl - Start up your database:
SQL> startup;You can verify that the new control file is being used by displaying the
CONTROL_FILESparameter:SQL> show parameter control_files
Here is the output for this example:
NAME                                 TYPE        VALUE

------------------------------------ ----------- ---------------------------------

control_files                        string      /ora02/dbfile/O11R2/control01.ctl
Removing a Control File
You may run into a situation where you experience a media failure with a storage device that contains one of your multiplexed control files:
ORA-00205: error in identifying control file, check alert log for more info
In this scenario, you still have at least one good control file. To remove a control file, follow these steps.
- Identify which control file has experienced media failure by inspecting the
alert.logfor information:ORA-00202: control file: '/ora01/dbfile/O11R2/control02.ctl'
ORA-27037: unable to obtain file status - Remove the unavailable control file name from the
CONTROL_FILESparameter. If you're using aninit.orafile, modify the file directly with an OS editor (such asvi). If you're using anspfile, modify theCONTROL_FILESparameter with theALTER SYSTEMstatement. In thisspfileexample, thecontrol02.ctlcontrol file is removed from theCONTROL_FILESparameter:SQL> alter system set control_files='/ora01/dbfile/O11R2/control01.ctl'
scope=spfile;In this example, this database now has only one control file associated with it. You should never run a production database with just one control file. See the section “Adding a Control File” to add more control files to your database.
- Stop and start your database:
SQL> shutdown immediate;

SQL> startup;
If
SHUTDOWN IMMEDIATEdoesn't work, useSHUTDOWN ABORTto shut down your database.
Managing Online Redo Logs
Online redo logs store a record of transactions that have occurred in your database. These logs provide a mechanism for you to recover your database in the event of a failure. You're required to have at least two online redo-log groups in your database. Each online redo log group must contain at least one online redo-log member. The member is the physical file that exists on disk. You can create multiple members in each redo log group, which is known as multiplexing your online redo log group.
![]() Tip I highly recommend that you multiplex your online redo log groups with at least two members in each group and have each member on a separate physical device governed by a separate controller.
Tip I highly recommend that you multiplex your online redo log groups with at least two members in each group and have each member on a separate physical device governed by a separate controller.
The log writer is the background process responsible for writing transaction information from the redo-log buffer to the online redo log files. The online redo-log group that the log writer is actively writing to is the current online redo-log group. The log writer writes simultaneously to all members of a redo-log group. The log writer needs to successfully write to only one member in order for the database to continue operating. Your database ceases operating if the log writer can't write successfully to at least one member of the current group.
When the current online redo-log group fills up, a log switch occurs, and the log writer starts writing to the next online redo-log group. The log writer writes to the online redo-log groups in a round-robin fashion. Because you have a finite number of online redo-log groups, eventually the contents of each online redo-log group are overwritten. If you want to save a history of the transaction information, you must place your database in archivelog mode (see Chapter 16 for details on how to enable archiving).
When your database is in archivelog mode, after every log switch, the archiver background process copies the contents of the online redo-log file to an archived redo-log file. In the event of a failure, the archived redo-log files allow you to restore the complete history of transactions that have occurred since your last database backup.
PURPOSE OF OPEN RESETLOGS
Figure 5-1 displays a typical setup for the online redo-log files. This figure shows three online redo-log groups, with each group containing two members. The database is in archivelog mode. In the figure, group 2 has recently been filled with transactions, a log switch has occurred, and the log writer is now writing to group 3. The archiver process is copying the contents of group 2 to an archived redo-log file. When group 3 fills up, another log switch will occur, and the log writer will begin writing to group 1. At the same time, the archiver process will copy the contents of group 3 to archive log sequence 3 (and so forth).
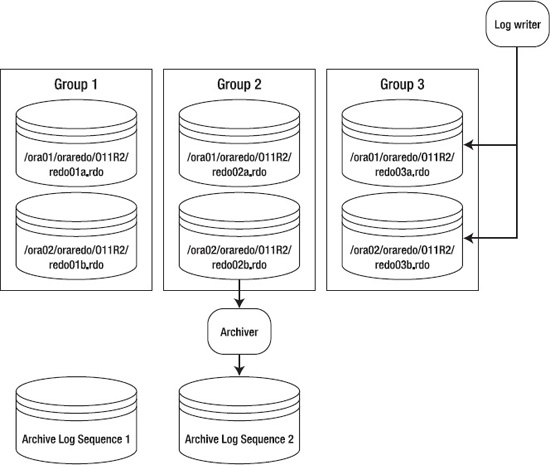
Figure 5-1. Online redo-log configuration
The online redo-log files aren't intended to be backed up. These files contain only the most recent redo-transaction information generated by the database. When you enable archiving, the archived redo-log files are the mechanism for protecting your database transaction history.
The contents of the current online redo-log files aren't archived until a log switch occurs. This means that if you lose all members of the current online redo-log file, you lose transactions. Listed next are several mechanisms you can implement to minimize the chance of failure with the online redo-log files:
- Multiplex groups to have multiple members.
- Never allow two members of the same group to share the same controller.
- Never put two members of the same group on the same physical disk.
- Ensure that OS file permissions are set appropriately.
- Use physical storage devices that are redundant (that is, RAID).
- Appropriately size the log files so that they switch and are archived at regular intervals.
- Set the
ARCHIVE_LAG_TARGETinitialization parameter to ensure that the online redo logs are switched at regular intervals.
![]() Note The only tool provided by Oracle that can protect you and preserve all committed transactions in the event you lose all members of the current online redo-log group is Oracle Data Guard implemented in Maximum Protection Mode. For more details, see the Data Guard Concepts and Administration guide, available on Oracle's Oracle Technology Network (OTN) website.
Note The only tool provided by Oracle that can protect you and preserve all committed transactions in the event you lose all members of the current online redo-log group is Oracle Data Guard implemented in Maximum Protection Mode. For more details, see the Data Guard Concepts and Administration guide, available on Oracle's Oracle Technology Network (OTN) website.
The online redo-log files are never backed up by an RMAN backup or by a user-managed hot backup. If you did back up the online redo-log files, it would be meaningless to restore them. The online redo-log files contain the latest redo generated by the database. You wouldn't want to overwrite them from a backup with old redo information. For a database in archivelog mode, the online redo-log files contain the most recently generated transactions that are required to perform a complete recovery.
Displaying Online Redo-Log Information
Use the V$LOG and V$LOGFILE views to display information about online redo-log groups and corresponding members:
select a.group#,a.member,b.status,b.archived,bytes/1024/1024 mbytes

from v$logfile a, v$log b

where a.group# = b.group#

order by 1,2;
Here is some sample output:
GROUP# MEMBER                              STATUS     ARCHIVED    MBYTES

-------- ----------------------------------- ---------- -------- ---------

       1 /ora01/oraredo/O11R2/redo01a.rdo    INACTIVE   YES            100

       1 /ora02/oraredo/O11R2/redo01b.rdo    INACTIVE   YES            100

       2 /ora01/oraredo/O11R2/redo02a.rdo    CURRENT    NO             100

       2 /ora02/oraredo/O11R2/redo02b.rdo    CURRENT    NO             100
When you're diagnosing online redo-log issues, the V$LOG and V$LOGFILE views are particularly helpful. You can query these views while the database is mounted or open. Table 5-1 briefly describes each view.
Table 5-1. Useful Views Related to Online Redo Logs
| View | Description |
V$LOG |
Displays the online redo-log group information stored in the control file |
V$LOGFILE |
Displays online redo-log file member information |
The STATUS column of the V$LOG view is particularly useful when you're working with online redo-logs groups. Table 5-2 describes each status and meaning for the V$LOG view.
Table 5-2. Status for Online Redo-Log Groups in the V$LOG View
| Status | Meaning |
CURRENT |
The log group is currently being written to by the log writer. |
ACTIVE |
The log group is required for crash recovery and may or may not have been archived. |
CLEARING |
The log group is being cleared out by an ALTER DATABASE CLEAR LOGFILE command. |
CLEARING_CURRENT |
The current log group is being cleared of a closed thread. |
INACTIVE |
The log group isn't needed for crash recovery and may or may not have been archived. |
UNUSED |
The log group has never been written to; it was recently created. |
The STATUS column of the V$LOGFILE view also contains useful information. This view contains information about each physical online redo-log file member of a log group. Table 5-3 provides descriptions of the status of each log-file member.
Table 5-3. Status for Online Redo-Log File Members in the V$LOGFILE View
| Status | Meaning |
INVALID |
The log-file member is inaccessible or has been recently created. |
DELETED |
The log-file member is no longer in use. |
STALE |
The log-file member's contents aren't complete. |
NULL |
The log-file member is being used by the database. |
It's important to differentiate between the STATUS column in V$LOG and the STATUS column in V$LOGFILE. The STATUS column in V$LOG reflects the status of the log group. The STATUS column in V$LOGFILE reports the status of the physical online redo-log file member. Refer to these tables when diagnosing issues with your online redo logs.
Determining the Optimal Size of Online Redo-Log Groups
Try to size the online redo logs so they switch anywhere from two to six times per hour. The V$LOG_HISTORY contains a history of how frequently the online redo logs have switched. Execute this query to view the number of log switches per hour:
select count(*)

,to_char(first_time,'YYYY:MM:DD:HH24')

from v$log_history

group by to_char(first_time,'YYYY:MM:DD:HH24')

order by 2;
Here's a snippet of the output:
COUNT(*) TO_CHAR(FIRST

---------- -------------

         1 2010:03:23:20

         2 2010:03:23:22

        19 2010:03:23:23

        17 2010:03:24:00

        25 2010:03:24:01

        35 2010:03:24:02

        23 2010:03:24:03

         5 2010:03:24:04

        11 2010:03:24:05

         2 2010:03:24:06
From the previous output, you can see that a lot of redo generation occurred on March 24 from about midnight to 3:00 a.m. This could be due to a nightly batch job or users in different time zones updating data. For this database, the size of the online redo logs should be increased. You should try to size the online redo logs to accommodate peak transaction loads on the database.
The V$LOG_HISTORY derives its data from the control file. Each time there is a log switch, an entry is recorded in this view that details information, such as the time of the switch and the system change number (SCN). As mentioned earlier, a general rule of thumb is that you should size your online redo-log files so that they switch about two to six times per hour. You don't want them switching too often because there is overhead with the log switch. Oracle initiates a checkpoint as part of a log switch. During a checkpoint, the database-writer background process writes modified (also referred to as dirty) blocks to disk, which is resource-intensive.
On the other hand, you don't want online redo-log files to never switch, because the current online redo log contains transactions that you may need in the event of a recovery. If a disaster causes a media failure in your current online redo log, you can lose those transactions that haven't been archived yet.
![]() Tip Use the
Tip Use the ARCHIVE_LAG_TARGET initialization parameter to set a maximum amount of time (in seconds) between log switches. A typical setting for this parameter is 1800 seconds (30 minutes). A value of 0 (default) disables this feature. This parameter is commonly used in Oracle Data Guard environments to force log switches after the specified amount of time elapses.
You can also query the OPTIMAL_LOGFILE_SIZE column from the V$INSTANCE_RECOVERY view to determine if your online redo-log files have been sized correctly:
SQL> select optimal_logfile_size from v$instance_recovery;
Here is some sample output:
OPTIMAL_LOGFILE_SIZE

--------------------

349
This reports the redo-log file size (in megabytes) that is considered optimal based on the initialization parameter setting of FAST_START_MTTR_TARGET. Oracle recommends you configure all online redo logs to be at least the value of OPTIMAL_LOGFILE_SIZE. However, when sizing your online redo logs, you must take into consideration information about your environment (such as the frequency of the switches).
Determining the Optimal Number of Redo-Log Groups
Oracle requires at least two redo-log groups to function. But having just two groups sometimes isn't enough. To understand why two groups may not be enough, remember that every time a log switch occurs, it initiates a checkpoint. As part of a checkpoint, the database writer writes all modified (dirty) blocks from the system global area (SGA) to the datafiles on disk. Also recall that the online redo logs are written to in a round-robin fashion, and eventually the information in a given log is overwritten. Before the log writer can begin to overwrite information in an online redo log, all modified blocks in the SGA associated with the redo log must first be written to a datafile. If all modified blocks haven't been written to the datafiles, you see this message in the alert.log file:
Thread 1 cannot allocate new log, sequence <sequence number>

Checkpoint not complete
Another way to explain this issue is that Oracle needs to store in the online redo logs any information that would be required to perform a crash recovery. To help visualize this, see Figure 5-2.
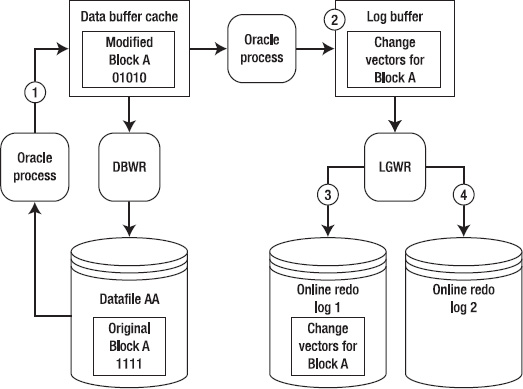
Figure 5-2. Redo protected until the modified (dirty) buffer is written to disk.
At time 1, Block A is read from Datafile AA into the buffer cache and modified. At time 2, the redo-change vector (how the block changed) information is written to the log buffer. At time 3, the log-writer process writes the Block A change-vector information to online redo log 1. At time 4, a log switch occurs, and online redo log 2 becomes the current online redo log.
Now, suppose that online redo log 2 fills up quickly and another log switch occurs, at which point the log writer attempts to write to online redo log 1. The log writer isn't allowed to overwrite information in online redo log 1 until the database writer writes Block A to Datafile AA. Until Block A is written to datafile AA, Oracle needs information in the online redo logs to recover this block in the event of a power failure or shutdown abort. Before Oracle overwrites information in the online redo logs, it ensures that blocks protected by redo have been written to disk. If these modified blocks haven't been written to disk, Oracle temporarily suspends processing until they have been written to disk. There are a few ways to resolve this issue:
- Add more redo-log groups.
- Lower the value of
FAST_START_MTTR_TARGET. Doing so causes the database-writer process to write older modified blocks to disk in a smaller timeframe. - Tune the database-writer process (modify
DB_WRITER_PROCESSES).
If you notice that the Checkpoint not complete message is occurring often (say, several times a day), I recommend that you add one or more log groups to resolve the issue. Adding an extra redo log gives the database writer more time to write modified blocks in the database buffer cache to the datafiles before the associated redo with a block is overwritten. There is little downside to adding more redo-log groups. The main concern is that you could bump up against the MAXLOGFILES value that was used when you created the database. If you need to add more groups and have exceeded the value of MAXLOGFILES, then you must re-create your control file and specify a high value for this parameter.
If adding more redo-log groups doesn't resolve the issue, you should carefully consider lowering the value of FAST_START_MTTR_TARGET. When you lower this value, you can potentially see more I/O because the database-writer process is more actively writing modified blocks to datafiles. Ideally, it would be nice to verify the impact of modifying FAST_START_MTTR_TARGET in a test environment before making the change in production. You can modify this parameter while your instance is up; this means you can quickly modify it back to its original setting if there are unforeseen side effects.
Finally, consider increasing the value of the DB_WRITER_PROCESSES parameter. Carefully analyze the impact of modifying this parameter in a test environment before you apply it to production. This value requires that you stop and start your database; so, if there are adverse effects, it requires downtime to set this value back to the original setting.
Adding Online Redo-Log Groups
If you determine that you need to add an online redo-log group, use the ADD LOGFILE GROUP statement. In this example, the database already contains four online redo-log groups that are sized at 500M each. An additional log group is added that has two members and is sized at 500MB:
alter database add logfile group 5

('/ora01/oraredo/O11R2/redo05a.rdo',

 '/ora02/oraredo/O11R2/redo05b.rdo') SIZE 500M;
In this scenario, I highly recommend that the log group you add be the same size and have the same number of members as the existing online redo logs. If the newly added group doesn't have the same physical characteristics as the existing groups, it's harder to accurately determine performance issues with the online redo-log groups.
For example, if you have two log groups sized at 20MB, and you add a new log group sized at 200MB, this is very likely to produce the Checkpoint not complete issue described in the previous section. This is because flushing all modified blocks from the SGA that are protected by the redo in a 200MB log file can potentially take much longer than flushing modified blocks from the SGA that are protected by a 20MB redo-log file.
Resizing Online Redo-Log Groups
You may need to change the size of your online redo logs (see also the section “Determining the Optimal Size of Online Redo-Log Groups” earlier in this chapter). You can't directly modify the size of an existing online redo log (as you can a datafile). To resize an online redo log, you have to first add online redo-log groups that contain the size you want, and then drop the online redo logs that are the old size.
Say you want to resize the online redo logs to be 200MB each. First, you add the new groups that are 200MB using the ADD LOGFILE GROUP statement. The following example adds log group 4 with two members sized at 200MB:
alter database add logfile group 4

('/ora02/oraredo/O11R2/redo04a.rdo',

 '/ora03/oraredo/O11R2/redo04b.rdo') SIZE 200M;
![]() Note You can specify the size of the log file in bytes, kilobytes, or megabytes.
Note You can specify the size of the log file in bytes, kilobytes, or megabytes.
After you've added the log files with the new size, you can drop the old online redo logs. A log group must have an INACTIVE status before you can drop it. You can check the status of the log group, as shown here:
SQL> select group#, status, archived, thread#, sequence# from v$log;
You can drop an inactive log group with the ALTER DATABASE DROP LOGFILE GROUP statement:
SQL> alter database drop logfile group >group #>;
If you attempt to drop the current online log group, Oracle returns an ORA-01623 error stating that you can't drop the current group. Use the ALTER SYSTEM SWITCH LOGFILE statement to switch the logs and make the next group the current group:
SQL> alter system switch logfile;
After a log switch, the log group that was previously the current group retains an active status as long as it contains redo that Oracle requires to perform crash recovery. If you attempt to drop a log group with an active status, Oracle throws an ORA-01624 error stating that the log group is required for crash recovery. Issue an ALTER SYSTEM CHECKPOINT command to make the log group inactive:
SQL> alter system checkpoint;
Additionally, you can't drop an online redo-log group if doing so leaves your database with only one log group. If you attempt to do this, Oracle throws an ORA-01567 error and informs you that dropping the log group isn't permitted because it would leave you with less than two log groups for your database (Oracle requires at least two log groups to function).
Dropping an online redo-log group doesn't remove the log files from the OS. You have to use an OS command to do this (such as the rm Linux/Unix command). Before you remove a file from the OS, ensure that it isn't in use and that you don't remove a live online redo-log file. For every database on the server, issue this query to view which online redo-log files are in use:
SQL> select member from v$logfile;
Before you physically remove a log file, first switch the online redo logs enough times so that all online redo-log groups have recently been switched; doing so causes the OS to write to the file and thus give it a new timestamp. For example, if you have three groups, ensure that you perform at least three log switches:
SQL> alter system switch logfile;

SQL> /

SQL> /
Now, verify at the OS prompt that the logfile you intend to remove doesn't have a new timestamp:
$ ls -altr
When you're absolutely sure the file isn't in use, you can remove it. The danger in removing a file is that if it happens to be an in-use online redo log and the only member of a group, you can cause serious damage to your database. Make sure you have a good backup of your database and that the file you're removing isn't used by any databases on the server.
Adding Online Redo-Log Files to a Group
You may occasionally need to add a log file to an existing group. For example, if you have an online redo-log group that contains only one member, you should consider adding a log file (to provide a higher level of protection against a single log-file member failure). Use the ALTER DATABASE ADD LOGFILE MEMBER statement to add a member file to an existing online redo-log group. You need to specify the new member file location, name, and group to which you want to add the file:
SQL> alter database add logfile member '/ora02/oraredo/O11R2/redo04c.rdo'

to group 4;
Ensure that you follow standards with regard to the location and names of any newly added redo-log files.
Removing Online Redo-Log Files from a Group
Occasionally, you may need to remove an online redo-log file. For example, your database may have experienced a failure with one member of a multiplexed group, and you want to remove the apostate member. First, make sure the log file you want to drop isn't in the current group:
SELECT a.group#, a.member, b.status, b.archived, SUM(b.bytes)/1024/1024 mbytes

FROM v$logfile a, v$log b

WHERE a.group# = b.group#

GROUP BY a.group#, a.member, b.status, b.archived

ORDER BY 1, 2
If you attempt to drop a log file that is in the group with the CURRENT status, you receive the following error:
ORA-01609: log 4 is the current log for thread 1 - cannot drop members
If you're attempting to drop a member from the current online redo-log group, then force a switch as follows:
SQL> alter system switch logfile;
Use the ALTER DATABASE DROP LOGFILE MEMBER statement to remove a member file from an existing online redo-log group. You don't need to specify the group number because you're removing a specific file:
SQL> alter database drop logfile member '/ora02/oraredo/O11R2/redo04a.rdo';
You also can't drop the last remaining log file of a group. A group must contain at least one log file. If you attempt to drop the last remaining log file in a group, you receive the following error:
ORA-00361: cannot remove last log member
Moving or Renaming Redo-Log Files
Sometimes, you need to move or rename online redo-log files. For example, you may have added some new mount points to the system, and you want to move the online redo logs to the new storage. You can use two methods to accomplish this task:
- Add the new log files in the new location, and drop the old log files.
- Physically rename the files from the OS.
If you can't afford any downtime, consider adding new log files in the new location and then dropping the old log files. See the section, “Adding Online Redo-Log Groups,” for details on how to add a log group. Also see the section “Resizing Online Redo-Log Groups” for details on how to drop a log group.
You can also physically move the files from the OS. You can do this with the database open or closed. If your database is open, ensure that the files you move aren't part of the current online redo-log group (because those are actively written to by the log-writer background process). It's dangerous to try to do this task while your database is open because on an active system, the online redo logs may be switching at a rapid rate, which creates the possibility that you attempt to move a file at the same time it's switched to be the current online redo log.
The next example shows how to move the online redo-log files with the database shut down. Here are the steps:
- Shut down your database:
SQL> shutdown immediate; - From the OS prompt, move the files. This example uses the
mvcommand to accomplish this task:$ mv /ora02/oraredo/O11R2/redo01a.rdo /ora03/oraredo/O11R2/redo01a.rdo
$ mv /ora02/oraredo/O11R2/redo02a.rdo /ora03/oraredo/O11R2/redo02a.rdo
$ mv /ora02/oraredo/O11R2/redo03a.rdo /ora03/oraredo/O11R2/redo03a.rdo - Start up your database in mount mode:
SQL> startup mount; - Update the control file with the new file locations and names:
SQL> alter database rename file '/ora02/oraredo/O11R2/redo01a.rdo'

to '/ora03/oraredo/O11R2/redo01a.rdo';

SQL> alter database rename file '/ora02/oraredo/O11R2/redo02a.rdo'

to '/ora03/oraredo/O11R2/redo02a.rdo';

SQL> alter database rename file '/ora02/oraredo/O11R2/redo03a.rdo'

to '/ora03/oraredo/O11R2/redo03a.rdo'; - Open your database:
SQL> alter database open;
You can verify that your online redo logs are in the new locations by querying the V$LOGFILE view. I also recommend that you switch your online redo logs several times and then verify from the OS that the files have recent time stamps. Also check the alert.log file for any pertinent errors.
Summary
This chapter described how to configure and manage control files and online redo-log files. Control files and online redo logs are critical database files; a normally operating database can't function without them.
Control files are small binary files that contain information about the structure of the database. Any control files specified in the initialization file must be available for you to mount the database. If a control file becomes unavailable, then your database will cease operating until you resolve the issue. I highly recommend that you configure your database with at least three control files. If one control file becomes unavailable, you can replace it with a copy of a good existing control file. It's critical that you know how to configure, add, and remove these files.
Online redo logs are crucial files that record the database's transaction history. If you have multiple instances connected to one database, then each instance generates its own redo thread. Each database must be created with two or more online redo-log groups. You can operate a database with each group having just one online redo-log member. However, I highly recommend that you create your online redo-log groups with two members in each group. If an online redo log has at least one member that can be written to, your database will continue to function. If all members of an online redo-log group are unavailable, then your database will cease to operate. As a DBA, you must be extremely proficient with creating, adding, moving, and dropping these critical database files.
The chapters up to this point in the book have covered tasks such as installing the Oracle software, creating databases, and managing tablespaces, datafiles, control files, and online redo log files. The next several chapters concentrate on how to configure a database for application use, including topics such as creating users and database objects.