
This chapter discusses the Spring Actuator module and explains how you can use all its features to monitor your Spring Boot applications.
A common task during and after development that every developer does is to start checking out the logs. Developers check to see if the business logic works as it supposed to, or check out the processing time of some services, and so on. Even though they should have their unit, integration, and regression tests in place, they are not exempt from externals failures like network (connections, speed, etc.), disk (space, permissions, etc.), and more.
When you deploy to production, it’s even more critical. You must pay attention to your applications and sometimes to the whole system. When you start depending on some non-functional requirements like monitoring systems that check for the health of the different applications, or maybe that set alerts when your application gets to a certain threshold or even worse, when your application crashes, you need to act ASAP.
Developers depend on many third-party technologies to do their job, and I’m not saying that this is bad, but this means that all the heavy lifting is in the dev-ops teams. They must monitor every single application and the entire system as a whole.
Spring Boot Actuator
Spring Boot includes an Actuator module , which introduces production-ready non-functional requirements to your application. The Spring Boot Actuator module provides monitoring, metrics, and auditing right out of box.
What makes the Actuator module more attractive is that you can expose data through different technologies, like HTTP (endpoints), JMX, and SSH (using CRaSH at http://www.crashub.org/ ).
Let’s start with a basic web application. Open a terminal and execute the following commands:
$ mkdir spring-boot-web-actuator$ cd spring-boot-actuator$ spring init -d=web,actuator -g=com.apress.spring -a=spring-boot-web-actuator --package-name=com.apress.spring -name=spring-boot-web-actuator -x
As you can see, the dependencies are web and actuator, and this will include the spring-boot-starter-web and the spring-boot-starter-actuator poms. See Listing 11-1.
Listing 11-1. pom.xml
<?xml version="1.0" encoding="UTF-8"?><project xmlns="http://maven.apache.org/POM/4.0.0" xmlns:xsi="http://www.w3.org/2001/XMLSchema-instance"xsi:schemaLocation="http://maven.apache.org/POM/4.0.0 http://maven.apache.org/xsd/maven-4.0.0.xsd"><modelVersion>4.0.0</modelVersion><groupId>com.apress.spring</groupId><artifactId>spring-boot-web-actuator</artifactId><version>0.0.1-SNAPSHOT</version><packaging>jar</packaging><name>spring-boot-web-actuator</name><description>Demo project for Spring Boot</description><parent><groupId>org.springframework.boot</groupId><artifactId>spring-boot-starter-parent</artifactId><version>1.3.2.RELEASE</version><relativePath/> <!-- lookup parent from repository --></parent><properties><project.build.sourceEncoding>UTF-8</project.build.sourceEncoding><java.version>1.8</java.version></properties><dependencies><dependency><groupId>org.springframework.boot</groupId><artifactId>spring-boot-starter-web</artifactId></dependency><dependency><groupId>org.springframework.boot</groupId><artifactId>spring-boot-starter-actuator</artifactId></dependency><dependency><groupId>org.springframework.boot</groupId><artifactId>spring-boot-starter-test</artifactId><scope>test</scope></dependency></dependencies><build><plugins><plugin><groupId>org.springframework.boot</groupId><artifactId>spring-boot-maven-plugin</artifactId></plugin></plugins></build></project>
Listing 11-1 shows the pom.xml file with the web and actuator starter poms. Now, let’s open the main app and create a basic web controller and endpoint. See Listing 11-2.
Listing 11-2. src/main/java/com/apress/spring/SpringBootWebActuatorApplication.java
package com.apress.spring;import org.springframework.boot.SpringApplication;import org.springframework.boot.autoconfigure.SpringBootApplication;import org.springframework.web.bind.annotation.RequestMapping;import org.springframework.web.bind.annotation.RestController;@RestController@SpringBootApplicationpublic class SpringBootWebActuatorApplication {public static void main(String[] args) {SpringApplication.run(SpringBootWebActuatorApplication.class, args);}@RequestMapping("/")public String index(){return "Spring Boot Actuator";}}
Listing 11-2 shows the main application. As you can see, there is nothing new. It’s just a simple web application that maps to the root and returns the string "Spring Boot Actuator". It’s based on what you already know about the @RestController and the @RequestMapping annotations.
Let’s start the application by executing the following:
$ ./mvnw spring-boot:runAfter running the application, you should see these mappings in your logs:
...INFO - [m] o.s...M: Mapped "{[/]}"...INFO - [m] o.s...E: Mapped "{[/health || /health.json],produces=[application/json]}"INFO - [m] o.s...E: Mapped "{[/beans || /beans.json],methods=[GET],produces=[application/json]}"INFO - [m] o.s...E: Mapped "{[/info || /info.json],methods=[GET],produces=[application/json]}"INFO - [m] o.s...E: Mapped "{[/mappings || /mappings.json],methods=[GET],produces=[application/json]}"INFO - [m] o.s...E: Mapped "{[/env/{name:.*}],methods=[GET],produces=[application/json]}"INFO - [m] o.s...E: Mapped "{[/env || /env.json],methods=[GET],produces=[application/json]}"INFO - [m] o.s...E: Mapped "{[/metrics/{name:.*}],methods=[GET],produces=[application/json]}"INFO - [m] o.s...E: Mapped "{[/metrics || /metrics.json],methods=[GET],produces=[application/json]}"INFO - [m] o.s...E: Mapped "{[/autoconfig || /autoconfig.json],methods=[GET],produces=[application/json]}"INFO - [m] o.s...E: Mapped "{[/trace || /trace.json],methods=[GET],produces=[application/json]}"INFO - [m] o.s...E: Mapped "{[/configprops || /configprops.json],methods=[GET],produces=[application/json]}"INFO - [m] o.s...E: Mapped "{[/dump || /dump.json],methods=[GET],produces=[application/json]}"...
First, you should see the RequestMappingHandlerMapping class mapped to the endpoint / from the @RequestMapping annotation you have in the index method. Also you will see, the EndpointHandlerMapping class mapped to several endpoints that belong to the Actuator module. Let’s see each endpoint in detail.
/actuator
This endpoint is not listed by the EndpointHandlerMapping class, but let’s see what it does and how to activate it. You can stop your application by pressing Ctrl+C on your keyboard.
The /actuator endpoint will provide a hypermedia-based discovery page for all the other endpoints, but it will require the Spring HATEOAS in the classpath, so if you include this in your pom.xml:
<dependency><groupId>org.springframework.hateoas</groupId><artifactId>spring-hateoas</artifactId></dependency>
You can rerun your application and you will see that now is listed by the EndpointHandlerMapping class logs and you can access it through the URL /actuator. So, if you go to http://localhost:8080/actuator, you should see something similar to Figure 11-1.

Figure 11-1. http://localhost:8080/actuator
Figure 11-1 shows all the links that you can access through the Actuator module. The Actuator gives you all the possible endpoints that you can access. Remember, you need to add the Spring HATEOAS dependency to your pom.xml file as well.
/autoconfig
This endpoint will display the auto-configuration report. It will give you two groups: positiveMatches and negativeMatches. Remember that the main feature of Spring Boot is that it will auto-configure your application by seeing the classpath and dependencies. This has everything to do with the starter poms and extra dependencies that you add to your pom.xml file. If you go to http://localhost:8080/autoconfig, you should see something similar to Figure 11-2.

Figure 11-2. http://localhost:8080/autoconfig
/beans
This endpoint will display all the Spring beans that are used in your application. Remember that even though you add a few lines of code to create a simple web application, behind the scenes Spring starts to create all the necessary beans to run your app. If you go to http://localhost:8080/beans, you should see something similar to Figure 11-3.

Figure 11-3. http://localhost:8080/beans
/configprops
This endpoint will list all the configuration properties that are defined by the @ConfigurationProperties beans, which is something that I showed you in earlier chapters. Remember that you can add your own configuration properties prefix and that they can be defined and accessed in the application.properties or YAML files. Figure 11-4 shows an example of this endpoint.

Figure 11-4. http://localhost:8080/configprops
You can stop you application by pressing Ctrl+C.
/docs
This endpoint will show HTML pages with all the documentation for all the Actuator module endpoints. This endpoint can be activated by including the spring-boot-actuator-docs dependency in pom.xml:
<dependency><groupId>org.springframework.boot</groupId><artifactId>spring-boot-actuator-docs</artifactId></dependency>
After adding this dependency to your application, you can rerun it and see in the logs that the /docs endpoint is listed. See Figure 11-5 as the result of including the spring-boot-actuator-docs (http://localhost:8080/docs). Very useful!

Figure 11-5. http://localhost:8080/docs
/dump
This endpoint will perform a thread dump of your application. It shows all the threads running and their stack trace of the JVM that is running your app. Go to http://localhost:8080/dump endpoint. See Figure 11-6.

Figure 11-6. http://localhost:8080/dump
/env
This endpoint will expose all the properties from the Spring’s ConfigurableEnvironment interface. This will show any active profiles and system environment variables and all application properties, including the Spring Boot properties. Go to http://localhost:8080/env. See Figure 11-7.

Figure 11-7. http://localhost:8080/
/flyway
This endpoint will provide all the information about your database migration scripts; it’s based on the Flyway project ( https://flywaydb.org/ ). This is very useful when you want to have full control of your database by versioning your schemas. If you are familiar with Ruby on Rails, this is very similar to the active record migrations.
Before you continue, you can stop your application. To activate this endpoint you need to include the following dependencies:
<dependency><groupId>org.springframework.boot</groupId><artifactId>spring-boot-starter-data-jpa</artifactId></dependency><dependency><groupId>org.flywaydb</groupId><artifactId>flyway-core</artifactId></dependency><dependency><groupId>com.h2database</groupId><artifactId>h2</artifactId><scope>runtime</scope></dependency>
Because this is related to the database app, you need to include the previous dependencies, but let’s use the main app to add simple code to enable a database application. Create a Person domain class. See Listing 11-3.
Listing 11-3. src/main/java/com/apress/spring/domain/Person.java
package com.apress.spring.domain;import javax.persistence.Entity;import javax.persistence.GeneratedValue;import javax.persistence.Id;@Entitypublic class Person {@Id@GeneratedValueprivate Long id;private String firstName;private String lastName;public String getFirstName() {return this.firstName;}public void setFirstName(String firstName) {this.firstName = firstName;}public String getLastName() {return this.lastName;}public void setLastName(String lastname) {this.lastName = lastname;}@Overridepublic String toString() {return "Person (firstName=" + this.firstName + ", lastName=" + this.lastName + ")";}}
Listing 11-3 shows a basic class annotated with the @Entity, @Id, and @GeneratedValue annotations, something that you already know and that I showed you in earlier chapters. Next, let’s create the repository interface. See Listing 11-4.
Listing 11-4. src/main/java/com/apress/spring/repository/PersonRepository.java
package com.apress.spring.repository;import org.springframework.data.repository.CrudRepository;import com.apress.spring.domain.Person;public interface PersonRepository extends CrudRepository<Person, Long> { }
Listing 11-4 shows the PersonRepository.java interface. This time, instead of extending from JpaRepository, you are extending from the CrudRepository interface. This interface doesn’t have the paging and sorting functionality, but for this example with basic CRUD operation it’s more than enough.
Next, let’s add the following properties to the application.properties. See Listing 11-5.
Listing 11-5. src/main/resources/application.properties
spring.jpa.hibernate.ddl-auto=validatespring.h2.console.enabled=true
Listing 11-5 shows the two properties you are going to use—the first one validates the schemas/data you are going to use and the second enables the /h2-console endpoint for you to see the table structure and the queries.
Next, modify the main app to look like Listing 11-6.
Listing 11-6. src/main/java/com/apress/spring/SpringBootWebActuatorApplication.java
package com.apress.spring;import org.slf4j.Logger;import org.slf4j.LoggerFactory;import org.springframework.boot.CommandLineRunner;import org.springframework.boot.SpringApplication;import org.springframework.boot.autoconfigure.SpringBootApplication;import org.springframework.context.annotation.Bean;import org.springframework.web.bind.annotation.RequestMapping;import org.springframework.web.bind.annotation.RestController;import com.apress.spring.repository.PersonRepository;@RestController@SpringBootApplicationpublic class SpringBootWebActuatorApplication {public static void main(String[] args) {SpringApplication.run(SpringBootWebActuatorApplication.class, args);}@RequestMapping("/")public String index(){return "Spring Boot Actuator";}private static final Logger log = LoggerFactory.getLogger(SpringBootWebActuatorApplication.class);@BeanCommandLineRunner findAll(PersonRepository repo){return args ->{log.info("> Persons in Database: ");repo.findAll().forEach(person -> log.info(person.toString()));};}}
Listing 11-6 shows the SpringBootWebActuatorApplication.java class. Note the last few lines, where you are defining a log (to print out the database records) and the @Bean CommandLineRunner, where it will run after Spring Boot finalizes its auto-configuration and executes the findAll method. It receives the PersonRepository that will be auto-wired and will return the output of calling the repo.findAll from the database.
Now, before you run the application, you need to create the db/migration structure under src/main/resources and add two versions of an init SQL scripts. This structure (db/migration) is required for this application to work. See Figure 11-8.

Figure 11-8. The directory structure with the db/migration SQL scripts
Figure 11-8 shows the final structure for your current application and it’s important to notice the two SQL scripts used to initialize the database. Note that they have versions V1 and V2. The naming convention of using versions is required for this to work. See Listings 11-7 (V1) and 11-8 (V2).
Listing 11-7. src/main/resources/db/migration/V1__init.sql
DROP TABLE IF EXISTS PERSON;CREATE TABLE PERSON (id BIGINT GENERATED BY DEFAULT AS IDENTITY,first_name varchar(255) not null,last_name varchar(255) not null);insert into PERSON (first_name, last_name) values ('Red', 'Lobster');
Listing 11-7 shows very simple SQL that will define the table and one record.
Listing 11-8. src/main/resources/db/migration/V2__init.sql
insert into PERSON (first_name, last_name) values ('Ronald', 'McDonald');insert into PERSON (first_name, last_name) values ('Jack', 'InTheBox');insert into PERSON (first_name, last_name) values ('Carl', 'Jr');
Listing 11-8 shows version 2 of the init SQL script. As you can see, the only difference is that V2 has more records to add. Now, if you run your application as usual:
$ ./mvnw spring-boot:runYou will find the following output in the logs:
...INFO 87925 --- [m] o.f.. : Flyway 3.2.1 by BoxfuseINFO 87925 --- [m] o.f.. : Database: jdbc:h2:mem:testdb (H2 1.4)INFO 87925 --- [m] o.f.. : Validated 2 migrations (execution time 00:00.013s)INFO 87925 --- [m] o.f.. : Creating Metadata table: "PUBLIC"."schema_version"INFO 87925 --- [m] o.f.. : Current version of schema "PUBLIC": << Empty Schema >>INFO 87925 --- [m] o.f.. : Migrating schema "PUBLIC" to version 1 - initINFO 87925 --- [m] o.f.. : Migrating schema "PUBLIC" to version 2 - initINFO 87925 --- [m] o.f.. : Successfully applied 2 migrations to schema "PUBLIC" (execution time 00:00.090s).INFO 87925 --- [m] .... : Building JPA container EntityManagerFactory for persistence unit 'default'...INFO 87925 --- [m] ...E : Mapped "{[/flyway || /flyway.json]...INFO 87925 --- [m] ...App: > Persons in Database:INFO 87925 --- [m] ...App: Person (firstName=Red, lastName=Lobster)INFO 87925 --- [m] ...App: Person (firstName=Ronald, lastName=McDonald)INFO 87925 --- [m] ...App: Person (firstName=Jack, lastName=InTheBox)INFO 87925 --- [m] ...App: Person (firstName=Carl, lastName=Jr)...
As you can see from this output, the Flyway will kick in and execute the migration script in order based on its version, so it will execute the V1__init.sql first, then the V2__init.sql. That’s why at the end you will see the four persons in the output. Also it’s been mapped to the /flyway endpoint, so if you go to http://localhost:8080/flyway, you will see the information about the scripts executed and its state after its execution. See Figure 11-9.
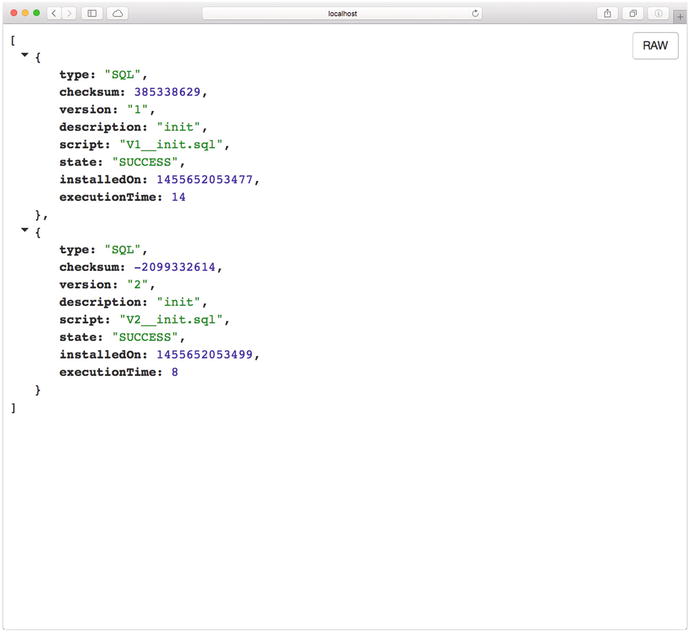
Figure 11-9. http://localhost:8080/flyway
As you can see, you have now the power of using database migrations by adding the flyway-core dependency together with the Actuator module. As an exercise, consider what you would need to do to enable the flyway in your Spring Boot journal application.
/health
This endpoint will show the health of the application. If you are doing a database app like in the previous section (/flyway) you will see the DB status and by default you will see also the diskSpace from your system. If you are running your app, you can go to http://localhost:8080/health. See Figure 11-10.

Figure 11-10. http://localhost:8080/health
Figure 11-10 shows the result of the health not only of your app but of the database connectivity. This is very useful if you want to find about external services, such as in this example the database.
/info
This endpoint will display the public application info. This means that you need to add this information to application.properties. It’s recommended that you add it if you have multiple Spring Boot applications. So, before you continue, stop your application. Next, modify your application.properties file so that it looks like Listing 11-9.
Listing 11-9. src/main/resources/appplication.properties
info.app.name=Spring Boot Web Actuator Applicationinfo.app.description=This is an example of the Actuator moduleinfo.app.version=1.0.0spring.jpa.hibernate.ddl-auto=validatespring.h2.console.enabled=true
After adding the properties to your application.properties file, go to http://localhost:8080/info. You should see something similar to Figure 11-11.

Figure 11-11. http://localhost:8080/info
Figure 11-11 shows the information about your application, but it’s necessary to modify the application.properties with the info.app properties.
/liquibase
This endpoint will show all the Liquibase ( http://www.liquibase.org/ ) database migrations that have been applied. This is very similar to Flyway. If you are running your application, you can stop it now.
You need to add the liquibase-core pom in order to enable the /liquibase endpoint:
<dependency><groupId>org.liquibase</groupId><artifactId>liquibase-core</artifactId></dependency>
Modify your pom.xml to look like Listing 11-10.
Listing 11-10. pom.xml
<?xml version="1.0" encoding="UTF-8"?><project xmlns="http://maven.apache.org/POM/4.0.0" xmlns:xsi="http://www.w3.org/2001/XMLSchema-instance"xsi:schemaLocation="http://maven.apache.org/POM/4.0.0 http://maven.apache.org/xsd/maven-4.0.0.xsd"><modelVersion>4.0.0</modelVersion><groupId>com.apress.spring</groupId><artifactId>spring-boot-web-actuator</artifactId><version>0.0.1-SNAPSHOT</version><packaging>jar</packaging><name>spring-boot-web-actuator</name><description>Demo project for Spring Boot</description><parent><groupId>org.springframework.boot</groupId><artifactId>spring-boot-starter-parent</artifactId><version>1.3.2.RELEASE</version><relativePath /> <!-- lookup parent from repository --></parent><properties><project.build.sourceEncoding>UTF-8</project.build.sourceEncoding><java.version>1.8</java.version></properties><dependencies><dependency><groupId>org.springframework.boot</groupId><artifactId>spring-boot-starter-web</artifactId></dependency><dependency><groupId>org.springframework.boot</groupId><artifactId>spring-boot-starter-actuator</artifactId></dependency><dependency><groupId>org.springframework.hateoas</groupId><artifactId>spring-hateoas</artifactId></dependency><dependency><groupId>org.springframework.boot</groupId><artifactId>spring-boot-actuator-docs</artifactId></dependency><dependency><groupId>org.springframework.boot</groupId><artifactId>spring-boot-starter-data-jpa</artifactId></dependency><dependency><groupId>com.h2database</groupId><artifactId>h2</artifactId><scope>runtime</scope></dependency><dependency><groupId>org.liquibase</groupId><artifactId>liquibase-core</artifactId></dependency><dependency><groupId>org.springframework.boot</groupId><artifactId>spring-boot-starter-test</artifactId><scope>test</scope></dependency></dependencies><build><plugins><plugin><groupId>org.springframework.boot</groupId><artifactId>spring-boot-maven-plugin</artifactId></plugin></plugins></build></project>
Listing 11-10 shows the pom.xml. If you were doing the flyway example, that’s the only one you need to comment out or remove and replace it with the liquibase-core dependency. One of the requirements of Liquibase is to have a db/changelog directory and a db.changelog-master.yaml file where you do your migrations. Let’s see that file. See Listing 11-11.
Listing 11-11. src/main/resources/db/changelog/db.changelog-master.yaml
databaseChangeLog:- changeSet:id: 1author: mrfoodchanges:- createTable:tableName: personcolumns:- column:name: idtype: intautoIncrement: trueconstraints:primaryKey: truenullable: false- column:name: first_nametype: varchar(255)constraints:nullable: false- column:name: last_nametype: varchar(255)constraints:nullable: false- changeSet:id: 2author: mrfoodchanges:- insert:tableName: personcolumns:- column:name: first_namevalue: Bobs- column:name: last_namevalue: Burguers
Listing 11-11 shows the db.changelog-master.yaml file. In this file you have two groups—the first one will create the table with their columns and types and the second group will insert a record in the table. If you need to know about the format and the types, take a look at the Liquibase documentation at http://www.liquibase.org/documentation/ . You should have the structure shown in Figure 11-12.

Figure 11-12. Project structure with the db/changelog directory
Next, you need to make a small change to application.properties. Change the property spring.jpa.hibernate.ddl-auto=validate to spring.jpa.hibernate.ddl-auto=none; this is because you don’t want the JPA to generate your table, this now should be handle by Liquibase. And that’s it; you can run your application and you will see in the logs that Liquibase triggers the changelog file and there is only one record in the database. Go to http://localhost:8080/liquibase to see something similar to Figure 11-13.

Figure 11-13. http://localhost:8080/liquibase
Figure 11-13 shows the result of executing the db.changelog-master.yaml file. So now you have at least two options for database migrations.
/logfile
This endpoint will show the contents of the log file specified by the logging.file property, where you specify the name of the log file (this will be written in the current directory). You can also set the logging.path, where you set the path where the spring.log will be written. By default Spring Boot writes to the console/standard out, and if you specify any of these properties, it will also write everything from the console to the log file.
You can stop your application. Go to src/main/resources/application.properties and add this to the very end:
logging.file=mylog.logNow you can rerun your application. If you go to the http://localhost:8080/logfile endpoint, you should have something to Figure 11-14, which shows the contents of the mylog.log file.

Figure 11-14. http://localhost:8080/logfile
/metrics
This endpoint shows the metrics information of the current application, where you can determine the how much memory it’s using, how much memory is free, the uptime of your application, the size of the heap is being used, the number of threads used, and so on.
One of the important features about this endpoint is that it has some counters and gauges that you can use, even for statistics about how many times your app is being visited or if you have the log file enabled. If you are accessing the /logfile endpoint, you will find some counters like counter.status.304.logfile, which indicates that the /logfile endpoint was accessed but hasn’t change. And of course you can have custom counters.
If you are running the application, you can stop it. Let’s create one simple example by reusing the same example application and modifying the main app. See Listing 11-12.
Listing 11-12. src/main/java/com/apress/spring/SpringBootWebActuatorApplication.java
package com.apress.spring;import org.slf4j.Logger;import org.slf4j.LoggerFactory;import org.springframework.beans.factory.annotation.Autowired;import org.springframework.boot.CommandLineRunner;import org.springframework.boot.SpringApplication;import org.springframework.boot.actuate.metrics.CounterService;import org.springframework.boot.autoconfigure.SpringBootApplication;import org.springframework.context.annotation.Bean;import org.springframework.web.bind.annotation.RequestMapping;import org.springframework.web.bind.annotation.RestController;import com.apress.spring.repository.PersonRepository;@RestController@SpringBootApplicationpublic class SpringBootWebActuatorApplication {public static void main(String[] args) {SpringApplication.run(SpringBootWebActuatorApplication.class, args);}@AutowiredCounterService counter;@RequestMapping("/")public String index(){counter.increment("counter.index.invoked");return "Spring Boot Actuator";}private static final Logger log = LoggerFactory.getLogger(SpringBootWebActuatorApplication.class);@BeanCommandLineRunner findAll(PersonRepository repo){return args ->{log.info("> Persons in Database: ");repo.findAll().forEach(person -> log.info(person.toString()));};}}
Listing 11-12 shows the modified main app. Let’s examine it:
@Autowired CounterService. CounterService is a service interface that can be used to increment, decrement, and reset a named counter value. The counter instance will be auto-wired by the Spring container.
counter.increment("counter.index.invoked"). This instance method creates a counter variable with the name counter.index.invoked (it can be whatever name you want, just make sure it makes sense) and it will increment (by one) its value every time it’s executed. So every time the index page is refreshed, the counter.index.invoked counter will be incremented by one.
There is also another service interface you can use, especially designed for gauges, called the org.springframework.boot.actuate.metrics.GaugeService service interface. It can be used to submit a named double value for storage an analysis. This is very useful when you want to get some statistics. For example, you can create a smart system where you are connected to a climate sensor, and you are displaying the temperature using the GaugeService. Then you can set alarms by setting a threshold that automatically increases or decreases the temperature.
You can rerun your application after the change (from Listing 11-12) and if you visit http://localhost:8080 several times (do a Refresh) and then go to the http://localhost:8080/metrics endpoint, you should see something similar to Figure 11-15.

Figure 11-15. http://localhost:8080/metrics
Figure 11-15 shows the /metrics endpoint. If you take a look at the very last counter, you will see listed that counter.index.invoked has six hits. I think this is a nice way to have statistics and analysis of your application that work out-of-the-box. The only thing you need to do is use the CounterService or GaugeService service interfaces.
/mappings
This endpoint shows all the lists of all @RequestMapping paths declared in your application. This is very useful if you want to know more about what mappings are declared. If your application is running, you can go to the http://localhost:8080/mappings endpoint. See Figure 11-16.

Figure 11-16. http://localhost:8080/mappings
/shutdown
This endpoint is not enabled by default. It allows the application to be gracefully shut down. This endpoint is sensitive, which means it can be used with security, and it should be. If your application is running, you can stop it now. If you want to enable the /shutdown endpoint, you need to add the following to the application.properties.
endpoints.shutdown.enabled=trueIt’s wise to have this endpoint secured. You’d need to add the spring-boot-starter-security pom dependency to your pom.xml:
<dependency><groupId>org.springframework.boot</groupId><artifactId>spring-boot-starter-security</artifactId></dependency>
Remember that by adding the security starter pom, you enable security by default. The username will be user and the password will be printed out in the logs. Also you can establish a better security by using in-memory, database, or LDAP users; see the Spring Boot security chapter for more information.
For now, let’s add the endpoints.shutdown.enabled=true and the spring-boot-starter-security pom and rerun the application. After running the application, take a look at the logs and save the password that is printed out so it can be used with the /shutdown endpoint:
...Using default security password: 2875411a-e609-4890-9aa0-22f90b4e0a11...
Now if you open a terminal, you can execute the following command:
$ curl -i -X POST http://localhost:8080/shutdown -u user:2875411a-e609-4890-9aa0-22f90b4e0a11HTTP/1.1 200 OKServer: Apache-Coyote/1.1X-Content-Type-Options: nosniffX-XSS-Protection: 1; mode=blockCache-Control: no-cache, no-store, max-age=0, must-revalidatePragma: no-cacheExpires: 0X-Frame-Options: DENYStrict-Transport-Security: max-age=31536000 ; includeSubDomainsX-Application-Context: applicationContent-Type: application/json;charset=UTF-8Transfer-Encoding: chunkedDate: Wed, 17 Feb 2016 04:22:58 GMT{"message":"Shutting down, bye..."}
As you can see from this output, you are using a POST method to access the /shutdown endpoint, and you are passing the user and the password that was printed out before. The result is the "Shutting down, bye.." message. And of course your application is terminated. Again, it’s important to know that this particular endpoint must be secured at all times.
/trace
This endpoint shows the trace information, which is normally the last few HTTP requests. This endpoint can be useful to see all the request info and the information returned to debug your application at the HTTP level. You can run your application and go to http://localhost:8080/trace. You should see something similar to Figure 11-17.

Figure 11-17. http://localhost:8080/trace
Sensitive Endpoints
I mentioned that the /shutdown is a sensitive endpoint, meaning that if you add security to your pom.xml it will be secured by default. Every time you want to access an endpoint, it will prompt you for the username and password.
The only endpoints that are not sensitive are /docs, /info and /health. So, if you want to disable the sensitive feature, you can configure them in the application.properties file. For example, imagine that you already have security and you don’t want to be prompted for the username and password for the /beans and /trace endpoints. What you need to do is add the following to your application.properties file:
endpoints.beans.sensitive=falseendpoints.trace.sensitive=false
If your application is running, you can stop it now and then rerun it to see the changes. Try to access the /beans and /trace endpoint; you won’t be asked for credentials. The key here is to set the endpoints.<endpoint-name>.sensitive to false.
Sensitive also means that you can display certain information. For example, if you are not using security, and you set the endpoints.beans.health.sensitive=true, you will only see in the /health endpoint the status UP. But if you set the sensitive=false you will have a little more information. You can get more information about which endpoints are sensitive by default at https://docs.spring.io/spring-boot/docs/current/reference/html/production-ready-endpoints.html .
Changing the Endpoint ID
You can configure the endpoint ID, which will change the name. Imagine that you don’t like the /beans endpoint, at the end this is referring to the Spring beans, so what about if you change this endpoint to /spring.
You make this change in the application.properties file in the form of:
endpoints.<endpoint-name>.id=<new-name>. Example:
endpoints.beans.id=springIf you rerun your application (stop and restart to apply the changes), you can access the /beans endpoint using the /spring endpoint instead.
Actuator CORS Support
With the Spring Boot Actuator module, you can configure CORS (Cross-Origin Resource Sharing), which allows you to specify what cross-domains are authorized to use the Actuator’s endpoints. Normally this allows inter-application connect to your endpoints, and due to security reasons, only the domains authorized must be able to execute these endpoints.
You configure this in the application.properties file:
endpoints.cors.allowed-origins=*endpoints.cors.allowed-methods=GET,POST
If your application is running, stop it and rerun it.
Normally in the endpoints.cors.allowed-origins, you should put a domain name like http://mydomain.com or maybe http://localhost:9090 (not the *), which allows access your endpoints to avoid any hack to your site. This would be very similar to using in any controller the @CrossOrigin(origins = "http://localhost:9000") annotation.
Changing the Management Endpoints Path
By default the Spring Boot Actuator has its management in the root, which means that all the Actuator’s endpoints can be accessed from the root /. For example: /beans, /health, and so on. Before you continue, stop your application. You can change its management context path by adding the following property to the application.properties file:
management.context-path=/monitorIf you rerun your application, you will see that the EndpointHandlerMappingis mapping all the endpoints by adding the /monitor/<endpoint-name> context path. You can now access the /trace endpoint through http://localhost:8080/monitor/trace.
You can also disable security, change the address, or change the port for the endpoints:
management.context-path=/monitormanagement.security.enabled=falsemanagement.port=8081management.address=127.0.0.1
This configuration will have its endpoint with the context-path /monitor/<endpoint-name>, the security will be disabled, the port will be 8081 (this means that you will have two ports listening—one is the 8080 of your application and 8081 is for your management endpoints), and the endpoints or management will be bind to the 127.0.0.1 address.
If you want to disable the endpoints (for security reasons), add the following property to the application.properties file.
management.port=-1if you stop your application and rerun it with the management.port=-1, you won’t see the endpoints anymore.
Using Spring Boot Actuator in a Non-Web Application
Maybe you are wondering if you can use the Spring Boot Actuator module in a non-web application, and the answer is, yes you can! You will sometimes need to create specialty services that do very specific tasks, such as batch processing, or create some integration apps that don’t require a web interface.
In this section, you are going to create a simple standalone application from scratch and see how the Spring Actuator works in a non-web environment.
Let’s start by executing the following commands:
$ mkdir spring-boot-actuator$ cd spring-boot-actuator$ spring init -d=actuator,remote-shell -g=com.apress.spring -a=spring-boot-actuator --package-name=com.apress.spring -name=spring-boot-actuator -x
Did you notice what is new? The remote-shell dependency tool is CRaSH ( http://www.crashub.org/ ) and it’s a shell for Java. You are going to connect to your application using ssh and you will see how to interact with the Actuator.
Let’s start by looking at the pom.xml. See Listing 11-13.
Listing 11-13. pom.xml
<?xml version="1.0" encoding="UTF-8"?><project xmlns="http://maven.apache.org/POM/4.0.0" xmlns:xsi="http://www.w3.org/2001/XMLSchema-instance"xsi:schemaLocation="http://maven.apache.org/POM/4.0.0 http://maven.apache.org/xsd/maven-4.0.0.xsd"><modelVersion>4.0.0</modelVersion><groupId>com.apress.spring</groupId><artifactId>spring-boot-actuator</artifactId><version>0.0.1-SNAPSHOT</version><packaging>jar</packaging><name>spring-boot-actuator</name><description>Demo project for Spring Boot</description><parent><groupId>org.springframework.boot</groupId><artifactId>spring-boot-starter-parent</artifactId><version>1.3.2.RELEASE</version><relativePath/> <!-- lookup parent from repository --></parent><properties><project.build.sourceEncoding>UTF-8</project.build.sourceEncoding><java.version>1.8</java.version></properties><dependencies><dependency><groupId>org.springframework.boot</groupId><artifactId>spring-boot-starter-actuator</artifactId></dependency><dependency><groupId>org.springframework.boot</groupId><artifactId>spring-boot-starter-remote-shell</artifactId></dependency><dependency><groupId>org.springframework.boot</groupId><artifactId>spring-boot-starter-test</artifactId><scope>test</scope></dependency></dependencies><build><plugins><plugin><groupId>org.springframework.boot</groupId><artifactId>spring-boot-maven-plugin</artifactId></plugin></plugins></build></project>
Listing 11-13 shows the pom.xml. The only new part is the spring-boot-starter-remote-shell dependency. Next, run your application as usual, and there is nothing to do with your main app or adding classes:
$ ./mvnw spring-boot:runAfter you execute this command you will see two things. First, the logs print out a password:
...Using default password for shell access: 7cb536e1-6c2b-4f71-a9ac-d07b3a85d791...
Second, this program never ends. That’s because the CRaSH tool is listening by default at port 2000. Open a terminal and execute the following command:
$ ssh -p 2000 user@localhostPassword authenticationPassword:. ____ _ __ _ _/\ / ___'_ __ _ _(_)_ __ __ _( ( )\___ | '_ | '_| | '_ / _` |\/ ___)| |_)| | | | | || (_| | ) ) ) )' |____| .__|_| |_|_| |_\__, | / / / /=========|_|==============|___/=/_/_/_/:: Spring Boot :: (v1.3.2.RELEASE) on liukang.local>
In the password prompt you will enter the password from the logs output (from this example: 7cb536e1-6c2b-4f71-a9ac-d07b3a85d791). If you type help and press Enter, you should have the following output:
> helpTry one of these commands with the -h or --help switch:NAME DESCRIPTIONautoconfig Display auto configuration report from ApplicationContextbeans Display beans in ApplicationContextcron manages the cron plugindashboard a monitoring dashboardegrep search file(s) for lines that match a patternendpoint Invoke actuator endpointsenv display the term envfilter a filter for a stream of mapjava various java language commandsjmx Java Management Extensionsjul java.util.logging commandsjvm JVM informationsless opposite of moremail interact with emailsman format and display the on-line manual pagesmetrics Display metrics provided by Spring Bootshell shell related commandsleep sleep for some timesort sort a mapsystem vm system properties commandsthread JVM thread commandshelp provides basic helprepl list the repl or change the current repl
Next, use the command endpoint and list all the available endpoints:
> endpoint listenvironmentEndpointhealthEndpointbeansEndpointinfoEndpointmetricsEndpointtraceEndpointdumpEndpointautoConfigurationReportEndpointconfigurationPropertiesReportEndpoint
Now that you now what endpoint you can invoke, invoke the healthEndpoint:
> endpoint invoke healthEndpoint{status=UP, diskSpace={status=UP, total=750046937088, free=20512227328, threshold=10485760}}
As an exercise you can experiment with all the other endpoints. As you can see, you have the same behavior as a web interface. If you want to add your own security or change the default port (2000), you can do so by adding all the properties to your application.properties file, for example:
shell.ssh.enabled: trueshell.ssh.port: 2222shell.auth: simpleshell.auth.simple.user.password: password
If you rerun your application, you now can connect with the following:
$ ssh -p 2222 user@localhostUse password as the password. I covered only basic properties for the shell, but you can get more information about other properties that you can apply by visiting https://docs.spring.io/spring-boot/docs/current/reference/html/common-application-properties.html .
Now you have a good understanding of how the Spring Boot Actuator module works, including what its endpoints are and how to use them. Of course, you can create your own endpoint and health monitor, but I will cover this in a later chapter.
Summary
This chapter showed you how the Spring Boot Actuator works, including what its endpoints are and how customizable it can be. With the Actuator module, you can monitor your Spring Boot application, from using the /health endpoint to using the /trace for more granular debugging.
The next chapter talks about deploying your Spring Boot applications, including how to create JAR and WAR files and use them as a service.