
Cloud Computing is nowadays one of the most important concepts in the IT industry. Companies that want to be at the edge of the latest technology are looking to be fast by increasing the speed of their services, they want to be safe, by recovering from errors or mistakes as fast as possible without the client knowing about it, they want to be scalable by growing horizontally (typically refers to scaling infrastructure capacity outward such as spawning more servers to shared the load) instead of vertically (refers to the ability to increase available resources (cpu, memory, disk space, etc) for an existing entity like a server); but what kind of concept or technology can provide all these concepts?.
The term “Cloud-Native” architectures is begining to emerge, because allows you as developer follow some patterns that will provide speed, safety and scalability with ease. In this chapter I will show you how you can create and deploy Spring Boot applications for the Cloud by following some of these patterns.
The Cloud and Cloud-Native Architectures
I imagine you have heard about these companies: Pivotal, Amazon, Google, Heroku, NetFlix, Uber that are applying all the concepts I mentioned before; but how these companies have accomplished to be fast, safe and scalable at the same time?
One of the first pioneers of the Cloud Computing was Amazon , which started using virtualization as primary tool to create resource elasticity; this means that any deployed application can have more computer power, by increasing the number of virtual boxes, memory, processors, etc, without any IT person involved. All these new ways to scale an application was the result satisfying all the user demand that has been and keep growing.
How NetFlix can satisfy all these user demands, and we are talking about millions of users daily that are streaming media content? All these companies have now the IT insfrastructure required for the Cloud era, but don’t you think that, any application that wants to be part of the cloud needs to be some how adaptable to this new technology? What I mean with this comments is that, you need to start thinking on how scaling resources will impact my application, you need to start thinking more on distributed systems, right? How my applications will communicate to legacy systems or between each other in this kind of environments, what happened if one of my systems is down and how to recover, or how the users (and if I have millions) can take advantage of the Cloud?
The new cloud-native architecture responds to all the above questions. Remember that now your applications need to be fast, safe and scalable:
First, you need to have some visibility in this new cloud environment, meaning that you need to have a better way to monitor your applications, by setting alerts, have dashboards, etc. Fault isolation and tolerance, where you need to have applications that are context-bounded, meaning that the applications shouldn’t have any dependency between each other; if one of your applications is down, the other apps should keep running, or if you are deploying continuously an application, that shouldn’t affect the entire system; this means also that you need to think about some kind of auto-recovery, where the entire system is capable to identify the failure and recover.
Twelve-Factor Applications
Following what you need to create a cloud-native architecture, the engineers at Heroku start to identify a lot of patterns that became the twelve-factor application guide. This guide shows how an application (a single unit) need to be architect focusing on declarative configuration, being stateless and deployment independent; this is what I mentioned before: your application need to be fast, safe and it can scale.
This is the summary of the twelve-factor application guide:
Codebase. One codebase tracked in VCS, many deploys. One app has a single code base and its tracked by a version control system like Git, Subversion, Mercurial, etc. You can do many deployments (from the same code base) to development, testing, staging and production environments.
Dependencies. Explicity declare and isolate dependencies. Some times your environments don’t have internect connection (if is a private system), so you need to think about packaging your dependencies (jars, gems, shared-libraries, etc) or if you have an internal repository of libraries, you can declared manifest like poms, gemfile, bundles, etc. Never rely that you will have everything in your final environment.
Configuration. Store config in the environment. You should’t hardcode anything that varies. Use the environment variables or a configuration server.
Backing Services. Treat backing services as attached resources. Connect to services via URL or configuration.
Build, Release, Run. Strictly separate build and run stages. Related to a CI/CD (Continuous Integration, Continuous Delivery)
Processes. Execute the app as one or more stateless processes. Processess should not store internal state. Share nothing. Any necessary state should be considered as a Backing Service.
Port binding. Export services via port port binding. Your application is self-container, and these apps are exposed via port binding. An application can become another App’ service.
Concurrency. Scale out via the process model. Scale by adding more application instances. Individual processes are free to multithread.
Disposability. Maximize robustness with fast startup and graceful shutdown. Processes should be disposable (remember they are stateless). Fault tolerant.
Environment parity. Keep development, staging and production environments as similar as possible. This is a result of High Quality, ensures continuous delivery.
Logs. Treat logs as event streams. Your apps should write to stdout. Logs are streams of aggregated, time-ordered events.
Admin processes. Run admin and managemenr tasks as one-off processes. Run admin processes on the platform: DB migrations, one time scripts, etc.
Microservices
The term Microservices has been around for the last two years, trying to define a new way to create applications. You need to see Microservices just as a way to decompose monolithic applications into different and independent components that follow the twelve-factor app guide and when deployed they just work. See the following Figure 13-1:

Figure 13-1. Monolithic vs. Microservices
I think Microservices has been around since the invention of Unix, because you can use one of the command line tools, like for example: grep, that is just a single unit that do its job well. And if you combine several of these commands (eg. find . -name microservices.txt | grep -i spring-boot) you can create a better app or system; but have in mind that these commands are independent of each other and the way of communication is through the Unix pipe |. This analogy can be the same within your applications.
Microservices help you to accelate development, why? Because you can designate a small team that can work in one and only one feature of the application, with a bounded-context and that follows the twelve-factor application guidelines.
I know there is a lot to say about Microservices and guides on how migrate existing architectures into Microservices, but the idea here is explore Spring Boot and see how can you deploy it into a cloud environment.
Preparing the Spring Boot Journal App as Microservice
What would you need to do in order to convert the Spring Boot Journal App as a Microservice? Actually, nothing! Yes, nothing, because Spring Boot was thought as a way to create Microservices with ease.
So, you are going to use the same Spring Boot Journal App and be able to deploy it to a cloud platform. Which platform? You are going to use Cloud Foundry!
Let’s start by generating first our application. Execute the following commands:
$ mkdir spring-boot-journal-cloud$ cd spring-boot-journal-cloud$ spring init -d=web,thymeleaf,data-jpa,data-rest,actuator,h2,mysql -g=com.apress.spring -a=spring-boot-journal-cloud --package-name=com.apress.spring -name=spring-boot-journal-cloud -x
from the above command, notice that, just for now you are removing the security (you can add it later). Next, copy all the files that you are already familiar with, all the src/main/resources/templates (without the login.html), src/main/resource/static, src/main/resources/application.properties and the Java sources. You should have something similar to Figure 13-2. Don’t worry too much, I will tell you if you need to do any change in the files.

Figure 13-2. Spring Boot Journal project
Figure 13-2 shows you the directory structure, you can see that there is no config directory anymore, because the security configuration is no longer needed, also notice that there only two properties file, one is the default, the one that you should test (this will have the H2 in memory database). And the other property file has the cloud word, meaning that you are going to use it for deploying using the cloud profile.

Figure 13-3. Journal App home page after restage
Note
You can find the example of the chapter in the Book’s source code from the Apress Site or you can download it from github at: https://github.com/felipeg48/pro-spring-boot .
See Listing 13-1 the default properties file.
Listing 13-1. src/main/resources/application.properties
spring.datasource.url=jdbc:h2:mem:tesdb;DB_CLOSE_DELAY=-1;DB_CLOSE_ON_EXIT=FALSEspring.datasource.driverClassName=org.h2.Driverspring.datasource.username=saspring.datasource.password=spring.datasource.testWhileIdle = truespring.datasource.validationQuery = SELECT 1spring.jpa.show-sql = truespring.jpa.hibernate.ddl-auto = create-dropspring.jpa.hibernate.naming-strategy = org.hibernate.cfg.ImprovedNamingStrategyspring.jpa.properties.hibernate.dialect = org.hibernate.dialect.MySQL5Dialectspring.data.rest.basePath=/apimanagement.context-path=/monitorendpoints.shutdown.enabled=true
Listing 13-1 shows you the application.propertiesfile (the default profile) that you are going to use to run it locally. So, if your copy is ok, try to run you application; you should have the Journal App up and running. All the data is in Memory. Also, try to get into the /api and /monitor endpoint, just to make sure they work.
Next, let’s review the application-cloud.properties file. See Listing 13-2.
Listing 13-2. src/main/resources/application-cloud.properties
spring.data.rest.basePath=/restmanagement.context-path=/insightendpoints.shutdown.enabled=true
Listing 13-2 shows you the contents of the application-cloud.properties. This would be cloud profile. Notice that, there are no datasource properties, only the rest base path and the actuator management.context-path declared. There is a meaning for this, but you are going to see why in the next sections.
Before you deploy this to the cloud you need to know more about the Platform you are going to use.
Cloud Foundry
Cloud Foundry has been around since 2008, a PaaS (Platform As A Service) company that was acquired by Spring Source and that Spring Source was itself acquired by VMWare, and since then, Cloud Foundry was and still is the most used Open Source PaaS. It’s worth to mention that Cloud Foundry as an open source solution has the largerst community support and it’s backed up by several large IT companies, like IBM (with BlueMix), Microsoft, Intel, SAP and of course Pivotal (with Pivotal Cloud Foundry) and VMware among others.
Cloud Foundry is the only open source solution that you can actually download and run it without any problems, it just work! You can find two versions of Cloud Foundry, the open source: https://www.cloudfoundry.org/ and the commercial version: http://pivotal.io/platform . If you are interested in download the commercial version, you can actually do it without any trials or limited time: https://network.pivotal.io/products/pivotal-cf , actually is a free version, but if you want to have support or help on how to install it, that’s when you need to contact a Pivotal sales representative.
Cloud Foundry
Cloud Foundry is built on Open Architecture, and it offers the following features:
Router. Routes incoming traffic to the appropriate component, usually the Cloud Controller or a running application on a DEA node.
Authentication. The OAuth2 server and Login server work together to provide indentity management.
Cloud Controller. The cloud controller is responsible for managing the lifecycle of application.
HM9000. Monitors, determines and reconciles application to determine their state, version and number of instances, and redirects to the Cloud Controller to take action to correct any discrepancies.
Application Execution (DEA). The Droplet Execution Agent manages application instances, tracks started instances and broadcasts state messages.
Blob Store. The blob store: resources, application code, build packs and droplets.
Service Brokers. When a developer provisions and binds a service to an application, the service broker for that service is responsible for providing the service instance.
Message Bus. Cloud Foundry uses NATS (this is different from the network nats), a lightweight publish-subscribe and distributed queueing messaging system, for internal communication between components.
Logging and Statistics. The metrics collector gathers metrics from the components. Operators can use this information to monitor an instance of Cloud Foundry.
Pivotal Cloud Foundry Features
Pivotal Cloud Foundry®, powered by Cloud Foundry (Open Source), delivers a turnkey PaaS experience on multiple infrastructures with leading application and data services.
Commercially supported release based on Cloud Foundry open source.
Fully automated deployment, updates and 1-click horizontal and vertical scaling on vSphere, vCloud Air, AWS or Openstack with minimal production downtime.
Instant, horizontal application tier scaling.
Web console for resource management and administration of applications and services.
Applications benefit from built-in services like load balancing and DNS, automated health management, logging and auditing.
Java Spring support through provided Java buildpack.
Optimized developer experience for Spring framework.
MySQL Service for rapid development and testing.
Automatic application binding and service provisioning for Pivotal Services such as Pivotal RabbitMQ and MySQL for Pivotal Cloud Foundry.
what is the difference between the Open Source from the Commercial version? Well, all the features listed above. In the Open Source version you need to do everything manually, using the command line mostly (to install, configure, upgrade, etc), but in the Commercial version, you can use a Web console to manage your infrastructure and run your applications. It’s important to know that you can install Cloud Foundry in Amazon AWS, Open Stack and VSphere.
Cloud Foundry CLI - Command Line Interface
Before you start using Cloud Foundry , you must install a command line tool that will be useful for deploying and do a lot of other tasks. If you are using a Windows OS you can get the latest version from https://github.com/cloudfoundry/cli#downloads .
If you are using Mac OS/Linux you can use brew:
$ brew update$ brew tap cloudfoundry/tap$ brew install cf-cli
after you install it, you can test it by running:
$ cf --versioncf version 6.15.0
now you are ready to use Cloud Foundry. Spoiler alert coming! As a final example, you will use the Pivotal Web Service platform, this is the commercial version of Pivotal Cloud Foundry.
Development Enviroment - PCFDev
I’ve just given you the spoiler alert; you will use the Pivotal’s public PaaS. You can think of as a production environment for your applications, but maybe you are wondering if there is something in between, I mean, you want to test first your application, right? So, it should be something that emulates the Cloud environment. Of course you are ready to probe that, by creating profiles and adding your database connections to a properties file or even putting some variables in the environment variables’ OS; or by installing Cloud Foundry (but for that you need to have ready your infrastructure and read about the Cloud Foundry internal before installing it); and again, it should be easier way to deploy apps into a local machine.
I’m glad there is. The Pivotal Cloud team did a very hard work to bring a Vagrant file with a VM ready to use, that is actually a micro-instance of the actual Cloud Foundry; no need to pull off your hair trying to install Cloud Foundry, just use the PCFDev (Pivotal Cloud Foundry Dev) and deploy your applications in your local machine.
PCFDev is one of the latest iterations of the Pivotal Cloud team, before PCFDev, it was: Lattice ( http://lattice.cf/ ) and before that: BoshLite ( https://github.com/cloudfoundry/bosh-lite - this is still very active in the community, but is more related to the internal parts of Cloud Foundry, related to the BOSH technology) and before that: (part of the VMware team) the Micro Cloud Foundry ( https://micro.cloudfoundry.com/ - That url is no longer valid, it will re-direct to the Pivotal Platform. This was also a VM image). So, as you can see it’s being a lot of hard work to get into this point, where you can have an amazing technology running in your local machine.
Installing PCFDev
What are the requirements?
Vagrant 1.7+ - https://www.vagrantup.com/
Cloud Foundry CLI (you already have this) - https://github.com/cloudfoundry/cli
Internet Connection required (for DNS)
Around 3 to 4GB of Disk space free.
One of the following:
VirtualBox: 5.0+ - https://www.virtualbox.org/
VMware Fusion: 8+ - https://www.vmware.com/products/fusion
VMware Workstation: 11+ - https://www.vmware.com/products/workstation
Note
VMware requires the Vagrant VMware plugin that is sold by Hashicorp. https://www.hashicorp.com/ .
after you install the requirements from above, you can now install PCFDev:
Download pcfdev-<version>.zip from: https://network.pivotal.io/products/pcfdev
Unzip the pcfdev-<version>.zip
Open a terminal and go to the pcfdev-<version> folder.
Run: vagrant up --provider=<provider> where <provider> can be: virtualbox, vmware_fusion or vmware_workstation.
(Optional) There are already some scripts that can be used instead of the previous command. These scripts optimized the resources needed for your environment. These scripts are:
start-osx/stop-osx for Mac Users.
start-windows.ps1/stop-windows.ps1 for Windows users.
if you are using VirtualBox, then you do:
$ vagrant up --provider=virtualboxAfter you run the above command, you should have in the last lines the following output:
Bringing machine 'default' up with 'virtualbox' provider...==> default: Importing base box pcfdev/pcfdev'...==> default: Matching MAC address for NAT networking...==> default: Checking if box pcfdev/pcfdev is up to date.........==> default: Waiting for services to start...==> default: 0 out of 48 running==> default: 3 out of 48 running...==> default: PCF Dev is now running.==> default: To begin using PCFDev, please run:==> default: cf login -a api.local.pcfdev.io --skip-ssl-validation==> default: Email: admin==> default: Password: admin
the first time it will take a few minutes (well, around 15 to 45 minutes depending on your system), and this is because the PCFDev is downloading, setting everything up, so be patient! The above output tells you that your PCFDev vm is up and running, so let’s start playing around with it.
Login into PCFDev
Let’s login into the PCFDev. Execute the following commands:
$ cf login -a api.local.pcfdev.io --skip-ssl-validationAPI endpoint: api.local.pcfdev.ioEmail> adminPassword>Authenticating...OKTargeted org pcfdev-orgTargeted space pcfdev-spaceAPI endpoint: https://api.local.pcfdev.io (API version: 2.54.0)User: adminOrg: pcfdev-orgSpace: pcfdev-space
the cf login command sets the target api url, this means that every subsequent command using cf will use that URL by default. This is a one-time only command (this will change when you target the public Pivotal Web Services or if you company already has Pivotal Cloud Foundry, you can target your provided api url). The output above shows you that you successfully have logged in.
Note
Just for the curious, once you set the target URL and login, the cf command will write into your home directory in the ∼/.cf/config.json file. You can take a look at it (but don’t modify it), you will see the target URL and some other keys. Now you are ready to deploy.
By default PCFDev will assign a target Organization (pcfdev-org) and a target Space (pcfdev-space). You can see the organizations and spaces as way to structure your development. You can have as many organizations as you want. Every organization has one or more spaces. For example, you can create a “Journal” organization and have “Prod”, “QA”, “Dev” spaces attach to the “Journal” organization.
Now, I’m assuming you test you application before, so let’s package the Journal app with:
$ ./mvnw clean package -DskipTests=truethe above command will create the target/spring-boot-journal-cloud-0.0.1-SNAPSHOT.jar file. Now your Journal app is ready the be deployed.
Deploying to PCFDev
To deploy your Journal app to PCFDev just execute the following command:
$ cf push journal -p target/spring-boot-journal-cloud-0.0.1-SNAPSHOT.jarCreating app journal in org pcfdev-org / space pcfdev-space as admin...OKCreating route journal.local.pcfdev.io...OKBinding journal.local.pcfdev.io to journal...OKUploading journal...Uploading app files from: target/spring-boot-journal-cloud-0.0.1-SNAPSHOT.jarUploading 37.2M, 185 filesDone uploadingOKStarting app journal in org pcfdev-org / space pcfdev-space as admin...Downloading php_buildpack...Downloading staticfile_buildpack...Downloading ruby_buildpack...Downloading binary_buildpack...Downloading nodejs_buildpack...Downloading go_buildpack...Downloading python_buildpack...Downloading java_buildpack...Downloaded binary_buildpack (8.3K)Downloaded staticfile_buildpack (2.4M)Downloaded nodejs_buildpack (44.3M)Downloading ruby_buildpack failedDownloading go_buildpack failedDownloaded java_buildpack (239.9M)Downloaded python_buildpack (254M)............Showing health and status for app journal in org pcfdev-org / space pcfdev-space as admin...OKrequested state: startedinstances: 1/1usage: 1G x 1 instancesurls: journal.local.pcfdev.iolast uploaded: Tue Feb 23 04:47:47 UTC 2016stack: cflinuxfs2buildpack: java-buildpack=v3.5.1-offline-http://github.com/pivotal-cf/pcf-java-buildpack.git#d6c19f8 java-main open-jdk-like-jre=1.8.0_65 open-jdk-like-memory-calculator=2.0.1_RELEASE spring-auto-reconfiguration=1.10.0_RELEASE.......
the above output tells you that you deployed your app to PCFDev, but let’s see what actually happen. First you executed this command (Do not execute this command, Im explaining what you did):
$ cf push journal -p target/spring-boot-journal-cloud-0.0.1-SNAPSHOT.jar the syntax for pushing an application is:
$ cf push <app-name> [-p <path>]so, you are pushing your application by given a name: journal, and you are telling where to get the file, by the -p parameter passing the relative path of the jar, in this case: target/spring-boot-journal-cloud-0.0.1-SNAPSHOT.jar. Then the PCFDev responds by entering into the internal deployment process. It will download the necessary tools (buildpacks) that will identify the type of application (in this case a Spring/Java app) and it will try to run the journal app by assigning a URL, in this case: journal.local.pcfdev.io.
Now, you can go to your browser and see your Journal app in action. Congratulations, you just deploy your app in your local Cloud environment, PCFDev!
Cloud Profile
Did you try to go to the /api and /monitor endpoints? Did you get an error? If you packaged the Journal app with the two properties files, application.properties and application-cloud.properties, you should get an error going to the /api and /monitor endpoint, but why?
By default, when you deploy to PCFDev or Pivotal Cloud Foundry, the active profile is set to “cloud”, this means that your Journal app will use the application-cloud.properties file, then, your endpoints are different, remember? Your application-cloud.properties file sets the rest endpoint to: /rest and the actuator endpoint set to: /insight. So, you can go to your browser and see that the endpoints work.
If you want to see that actually these endpoints are mapped to the /rest and /insight, you can execute the following command:
$ cf logs journal --recentwith the above command you can review all the logs of your app.
Adding a new entry to the Journal
Let’s try to add a new entry to the Journal app through the /rest endpoint. So far you have only 4 records, the ones taken from the src/main/resources/data.sql file.
To add a new record, in your terminal window execute the following command:
$ curl -i -X POST -H "Content-Type:application/json" -d '{ "title":"Cloud Foundry","summary":"Learn about Cloud Foundry and push a Spring Boot Application","created":"2016-04-05"}' http://journal.local.pcfdev.io/rest/journalthe above cURL command will add a new record to your Journal through the endpoint http://journal.local.pcfdev.io/rest/journal . You can now go to the home page and refresh, you should see the new record added.
Backing Services: Creating and Binding Service Instances
If you stop your Journal app from the PCFDev with the command:
$ cf stop journaland start it again with the command:
$ cf start journalor you can do a simple:
$ cf restart journalyou will find out that the recent entry you posted is now gone, why? Because Spring Boot recognized that you have in your dependencies the H2 (in-memory DB) so it will use it; but how about using the MySQL, because you have that dependency too. One of the good things is that you can create a Backing Service (remember from the twelve factor app guide?), this means that you can create a MySQL service and use it within your application.
What is the difference here about using MySQL? First of all, Cloud Foundry offers you services that are plugin into the platform, ready to be used. You don’t need to worry about installation or anything like that, just use them and that’s it, and MySQL is one of those services that Cloud Foundry offers your that work out-of-the-box.
How can you use these Services, and in this case the MySQL service? You need to create an instance of that MySQL and give it a name; this means that Cloud Foundry will create a dedicated Database instance ready to be used. After creating the service instance, you need to bind it to your application.
Let’s start by seeing that Services the PCFDev has . Execute the following command:
$ cf marketplaceGetting services from marketplace in org pcfdev-org / space pcfdev-space as admin...OKservice plans descriptionp-mysql 512mb, 1gb MySQL databases on demandp-rabbitmq standard RabbitMQ is a robust and scalable high-performance multi-protocol messaging broker.p-redis shared-vm Redis service to provide a key-value storeTIP: Use 'cf marketplace -s SERVICE' to view descriptions of individual plans of a given service.
from the above command you can see that PCFDev has 3 available backing services with their plans (plans are a way to control what you consume from a service, for example if you choose a plan with 1GB, you only have that storage size for your persistence, and if you pass that threshold you won’t be able to persiste data anymore) and description, ready to be used. The Marketplace is where normally you will find all the available services for Cloud Foundry. Now, let’s create the MySQL service instance with the following command:
$ cf create-service p-mysql 512mb mysqlCreating service instance mysql in org pcfdev-org / space pcfdev-space as admin...OK
the syntax to create a service instance is:
cf create-service SERVICE PLAN SERVICE_INSTANCE [-c PARAMETERS_AS_JSON] [-t TAGS]where the SERVICE=p-mysql (name from the marketplace), PLAN=512mb and SERVICE_INSTANCE=mysql (any name you want). The above command will create a “mysql” service instance from the “p-mysql” backing service.
If you execute the following command:
$ cf servicesit will list the service you just created. Next, let’s bind the “mysql” service instance to the journal app with the command:
$ cf bind-service journal mysqlBinding service mysql to app journal in org pcfdev-org / space pcfdev-space as admin...OKTIP: Use 'cf restage journal' to ensure your env variable changes take effect
the syntax for binding a service instance is:
cf bind-service APP_NAME SERVICE_INSTANCE [-c PARAMETERS_AS_JSON]where the APP_NAME=journal (this is the app name from the cf push command) and the SERVICE_INSTANCE=mysql. The above command will bind the mysql service instance to the Journal app. Because you bind a service to an application it’s required to restage the application to take the changes. To restage the Journal app execute the following command:
$ cf restage journalRestaging app journal in org pcfdev-org / space pcfdev-space as admin.......
after it’s re-stage you can go to the home page of your Journal app. You should see something similar to Figure 13-3.
Figure 13-3 shows you the Journal app after restage, but what happen to the data? Because you have bound a service (MySQL service), and because the application-cloud.properties doesn’t have any of the spring.jpa.* properties declared it will get the defaults, making the table drop every time you start/restart the Journal application.
Let’s fix that. Add the following properties to your application-cloud.properties file:
spring.jpa.hibernate.ddl-auto=createspring.jpa.generate-ddl=true
the above properties will create the table once, without droping when stop or restart. After that change, you need to repackage the Journal app:
$ ./mvnw clean package -DskipTests=truethen, you need to push your app back again:
$ cf push journal -p target/spring-boot-journal-cloud-0.0.1-SNAPSHOT.jarrefresh your browser (you should see still Figure 13-3), then you can try to insert an entry:
$ curl -i -X POST -H "Content-Type:application/json" -d '{ "title":"Cloud Foundry","summary":"Learn about Cloud Foundry and push a Spring Boot Application","created":"2016-04-05"}' http://journal.local.pcfdev.io/rest/journalafter executing the above command you can refresh the home page. You should see something similar to Figure 13-4.

Figure 13-4. Journal App - after inserting a new entry
Figure 13-4 shows you the result of adding a new entry using the cURL command. Now if you stop and start the Journal app:
$ cf restart journaland refresh your browser, you should still have your entry you previously added. Congrats! Now you push an application that has a backing service!
Note
If you want to know more about the Cloud Floundry CLI, just execute the command: $ cf help this will bring a very well documented commands. Or, you can execute: $ cf help <command-name> to get detail help about a particular command. So, remember, cf help is your friend. If you also need more information about Vagrant, you can go here: https://www.vagrantup.com/ .
Pivotal Cloud Foundry
Even though you can download Pivotal Cloud Foundry and install it ( https://network.pivotal.io/products/pivotal-cf ) you need to have the infrastructure ready for it, but don’t worry; Pivotal also offers you the infrastructure where you can make use of the actual Pivotal Cloud Foundry commercial version, Pivotal Web Services http://run.pivotal.io/ . See Figure 13-5.
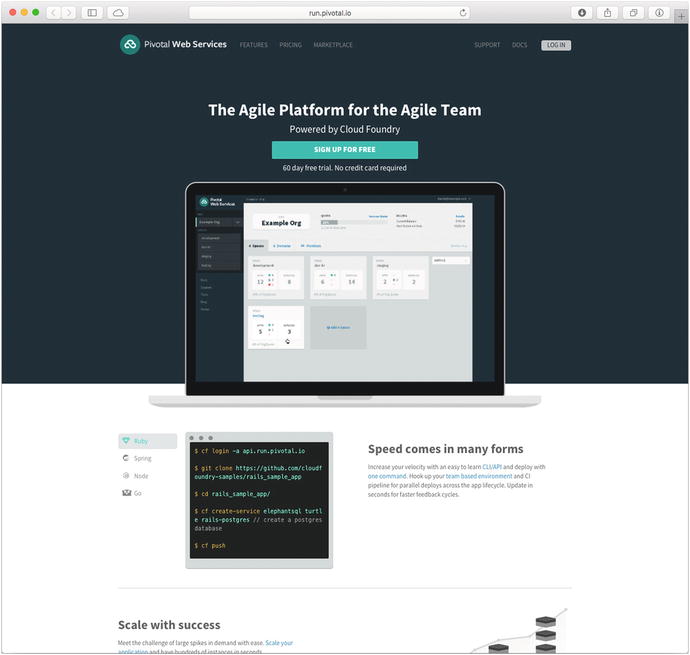
Figure 13-5. Pivotal Web Services http://run.pivotal.io/
Pivotal Web Services offers you a 60 trial, I think enough to get to know the power of Cloud Foundry. You can sign up for it. In order to get the frial trial, you need to add your Mobile Number, because Pivotal require SMS verification for claiming free trials to ensure responsible use of their platform and protect all the current users. Your number is only used for claiming your free trial, and it will never be distributed to third-parties or used for marketing purposes.
Note
Users are limited to one free trial org per user account. If you have any issues or questions, please contact [email protected].
Once you signed up, you will login with your email provided and your username, and the first screen that you will see, will be something similar to Figure 13-6.

Figure 13-6. Pivotal Web Services - Welcome Page
Figure 13-6 shows you the welcome page, and is letting you know that you can download the CLI (you already did) as Step 1, and in Step 2, you can see the commands that you need to execute in order to login into Pivotal Web Services, as shown below:
$ cf login -a https://api.run.pivotal.ioEmail: <your email>Password: <your password>
Now, you are ready to use Pivotal Web Services, the commercial version of Pivotal Cloud Foundry. As you already know, Pivotal Web Services offers you a Marketplace that allows you to add/bind services to your applications. You can choose Market place from the left menu, and see what is available for you, or you can go directly to this url: https://console.run.pivotal.io/marketplace . See Figure 13-7.

Figure 13-7. Pivotal WebServices Marketplace
Figure 13-7 shows you the Marketplace. You can use the ClearDB for testing your MySQL, similar what you did with the PCFDev where you added the service instance and bind it to the Journal application. Here, you can either use the command line (as before) or use the Web ui.
Deploying to Pivotal Web Services
You are already logged in into Pivotal Web Services, now you can follow the same steps from the PCFDev deployment, with just a small change:
$ ./mvnw clean package -DskipTests=true$ cf push journal -p target/spring-boot-journal-cloud-0.0.1-SNAPSHOT.jar --random-route
the above command will push your Journal app to the Pivotal Web Services, but notice the --random-route, you need to add that, because the the url must be unique. By default, Pivotal Web Services will generate a URL in the form of: https://<app-name>.cfapps.io for every single application hosted there (of course you can bind your own domain) and because there are a thousand apps running, probably the name “journal” (URL: https://journal.cfapps.io/ ) is already taken, and probably you will have some collision names. That’s why you need to add the --random-route (until you register your own domain and point to the app), this will generate a URL of the form: https://<app-name>-<random-name>.cfapps.io/. In the example about the URL was: http://journal-glenoid-anticlericalism.cfapps.io/ , so you can go ahead an dive into your app.
After you push you app you should see something like Figure 13-8.

Figure 13-8. Pivotal Web Services (CloudFoundry) - Journal Application up and running
if you click in the row where it says: “journal”, you can see something similar to Figure 13-9.

Figure 13-9. Journa l App
Figure 13-9 shows you your app and some other details. If you click below, in the “Services” tab, you should have something similar to Figure 13-10.

Figure 13-10. Services tab detail
Figure 13-10 shows you the “Services” tab, and as you can see there is no Backing Service bound to the Journal app, so, go ahead an click the “+ Add from Marketplace”. You will see the Marketplace. Select the ClearDB MySQL Database tile . ClearDB ( https://www.cleardb.com/ ) is a company that optimize MySQL for cloud infrastructure providing its services to Cloud Foundry and other cloud services like Heroku. See Figure 13-11.

Figure 13-11. Marketplace - ClearDB MySQL Database tile
after you select the tile, you will be redirect to select the plan of this Service. See Figure 13-12.
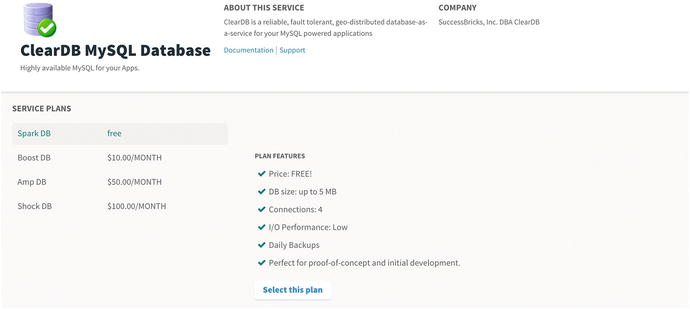
Figure 13-12. ClearDB MySQL Database Service Plans
Figure 13-12 shows you the Service Plans. Select the “Spark DB free” plan. After you select the plan, it will take you to fillout some information about it, the Instance Configuration. See Figure 13-13.
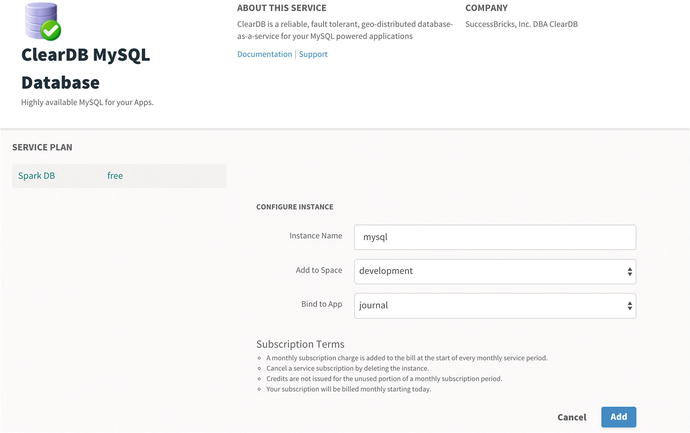
Figure 13-13. ClearDB MySQL Database - Instance Configuration
Figure 13-13 shows you the Instance Configuration form. As you can see you need to add the Instance Name: mysql and choose the default values. It will bind to the journal automatically. Click the “Add” button. See Figure 13-14.

Figure 13-14. Journal App after the Service Instance was created and bound
Figure 13-14 shows you the Journal app after you created the mysql service instance. Now is necessary to restage. So, go to a terminal window and execute the following command:
$ cf restage journalwhile the above command is executing, you can see your Journal app going down. See Figure 13-15.

Figure 13-15. Journal app in a restage status
Figure 13-15 shows you the Journal app with a down status because the “restage” is happening. After a few seconds, you app will be up and running. Add some entries to your Journal App, and you should have something similar to Figure 13-16.

Figure 13-16. Journal App
Of course you can do everything in the command line as before. You just did it using the Pivotal Web Services console. And of course this is not the end, there is still more to learn about the Cloud Foundry. For example, imagine that you have a lot of users for the Journal app, and you realize that you need more instances and more memory for each instance. So, you can actually increase the number of instances by going into the upper corner of the Journal app, where it says: “Scale App”. So, scale it to 2 instances and reduce the memory to 512MB each(this is just to no exceed the quota, by default as a trial user you only have 1GB of memory available) See Figure 13-17.

Figure 13-17. Scale App
after you save it, you should have 2 instances. Cloud Foundry will create 2 separated instances and it will assign 512MB each, and it will create an internal router so you have a load balancer out-of-the-box and working. See Figure 13-18.

Figure 13-18. Journal Application dashboard
Figure 13-18 shows you the 2 instances up and running. Please, be curious and dig a little more into the Pivotal Web Services console. You have a lot of power using the Cloud Foundry Platform.
If you or your company has Pivotal Cloud Foundry, I totally recommend that you install more Services and test them, specially the Spring Cloud Services tile (from https://network.pivotal.io/products/p-spring-cloud-services ) a new way to bring Spring app into a new level. The Spring Cloud Services brings a Configuration Server, Service Registry and , Circuit Breaker pattern. After you have a small taste of them, you won’t go back. You can get more info at: http://docs.pivotal.io/spring-cloud-services/ .
I know that this chapter was a small taste of what Pivotal Cloud Foundry is, or maybe I missed to mention other solutions, but by far, Cloud Foundry is the best Cloud PaaS out there, there is no comparison to make.
Summary
In this chapter I talked about the cloud and what you need to do in order to create you application as native-cloud. I mentioned also about the twelve-factor application guidelines that are just a patterns that you can apply for developing for the cloud.
I also talked about one of the best open source PaaS solutions, Cloud Foundry. I mentioned some of the features and difference between the open source and the commercial version.
I showed you how to deploy your Spring Boot application into Cloud Foundry, first by using the PCFDev as development tool and then to the Pivotal Cloud Foundry. Also, I mentioned about the Spring Cloud Service and how you can use them to get most of the Platform.
In the next chapter I will show you how to extend Spring Boot by creating your own starter and health endpoint.