
This chapter discussed a Spring Boot tool that can help you create prototypes and production-ready applications. This tool is part of the Spring Boot installation you performed in the first chapters. This is not a Maven or Gradle plugin or dependency.
I’m talking about the Spring Boot Command Line Interface (CLI). Just to recap, in previous chapters, you learned that you can get the CLI from the binary installation at http://repo.spring.io/release/org/springframework/boot/spring-boot-cli/ or, if you are using a Mac/Linux, you can use homebrew ( http://brew.sh/ ) with the following command:
$ brew tap pivotal/tap$ brew install springboot
If you are using Linux, you can use the sdkman tool ( http://sdkman.io/ ) and install it with the following command:
$ sdk install springbootAll the examples will be in Java and Groovy. There is no real distinction between one language or another in the sense of compile, run, or package. The only difference is some extra parameters that will pass to the command line, but don’t worry too much; you’ll see those in a moment.
Spring Boot CLI
The first time I started to learn Spring Boot, which was around three years ago, it was the first alpha release, and the only available command was the run. What else do you need, right? It was amazing that with a few lines of code you can have a web application written in Groovy up and running. It was simple and awesome.
Now in version 1.3.X-GA and 1.4.X-SNAPSHOT, it has more options and an interactive shell that you’ll see soon. To see the CLI in detail, you need to consider some simple examples. Let’s start with the one in Listing 4-1, which shows the Groovy example from previous chapters.
Listing 4-1. app.groovy
@RestControllerclass WebApp{@RequestMapping("/")String greetings(){"Spring Boot Rocks"}}
Listing 4-1 shows you the simplest Groovy web application you can have and that you can run with Spring Boot. Now, let’s see the same web application but in Java. See Listing 4-2.
Listing 4-2. WebApp.java
package com.apress.spring;import org.springframework.boot.SpringApplication;import org.springframework.boot.autoconfigure.SpringBootApplication;import org.springframework.web.bind.annotation.RequestMapping;import org.springframework.web.bind.annotation.RestController;@RestController@SpringBootApplicationpublic class WebApp {@RequestMapping("/")public String greetings(){return "Spring Boot Rocks in Java too!";}public static void main(String[] args) {SpringApplication.run(WebApp.class, args);}}
Listing 4-2 shows you the Java version of the simplest web application. As I mentioned, Spring Boot enables you to choose Java or Groovy in order to create enterprise and production-ready applications with ease.
Let’s start using all the CLI commands.
The run Command
The run command will allow you to run Java or Groovy Spring Boot applications. Its syntax is the following:
spring run [options] <files> [--] [args]The available options are:
Option | Description |
|---|---|
--autoconfigure [Boolean] | Adds the auto-configuration compiler transformation. Remember the auto-configuration features and how everything works by adding the @EnableAutoConfiguration or the composed @SpringBootApplication annotations. This is the same idea (default is true). |
--classpath, -cp | Adds the classpath entries, and it’s useful when you have third-party libraries. As a recommendation, you can create a lib/ folder in the root of your program and add all the classes or JARs there. |
--no-guess-dependencies | Does not attempt to guess the dependencies. This is useful when you already use the @Grab annotation in your application. |
--no-guess-imports | Does not attempt to guess the imports. This is useful when you have already included some of the imports in your Groovy application. For example, in a Java app you can use this option because you are importing the classes you need. There is more about this in Chapter 3 (in the auto-configuration section). |
-q, --quiet | Quiets logging. In other words, it won’t print anything to the console. |
-v, --verbose | Logs everything. It is useful for seeing what’s going on, because it shows you even the code introspection and what is adding to the program. See Chapter 3 for more information. |
--watch | Sets a watch to the file(s) for changes. It is useful when you don’t want to stop and run the app again. |
To run the Groovy application (shown in Listing 4-1), you simply execute:
$ spring run app.groovyExecuting this command, you will have a web application up and running and listening to port 8080 by default, but you can override this by executing the following command:
$ spring run app.groovy -- --server.port=8888This command will run the web application and it will be listening in port 8888. Now, if you want to add some third-party library and load the dependencies, you simply execute:
$ spring run -cp lib/mylib.jar app.groovyIf you want to run the Java application (Listing 4-2), you just execute:
$ spring run WebApp.javaNote
You can stop your application by pressing Ctrl+C in your keyboard.
If you are running a Java application, it’s important to add the package keyword. You don’t need to have a hierarchy or create any directories. If you don’t add a package to Spring Boot scanning it will be impossible to run your app because it needs to scan all the available dependencies of Spring. It will start scanning all the dependencies used and start from the root of every dependency, so be careful!
If you have several files, you can use the wildcard * to compile all of them. Just execute this command:
$ spring run *.groovyIf, for some reason, you need to tweak the JVM and its options, you can execute the following command:
$ JAVA_OPTS=-Xmx2g spring run app.groovyThis command will increase the memory heap up to 2GB for the app.groovy application.
The test Command
The test command runs a Spring Groovy script and Java tests. Its syntax is the following:
spring test [options] files [--] [args]The available options are:
Option | Description |
|---|---|
--autoconfigure [Boolean] | Adds the auto-configuration compiler transformation (default is true). |
--classpath, -cp | Adds the classpath entries, which is useful when you have third-party libraries. As a recommendation, you can create a lib/ folder in the root of your program and add all the classes or JARs there. |
--no-guess-dependencies | Does not attempt to guess the dependencies. This is useful when you already use the @Grab annotation in your application. |
--no-guess-imports | Does not attempt to guess the imports. This is useful when you already include some of the imports in your Groovy application. For example, in a Java app you can use this option because you are importing the classes you need. See more in Chapter 3 (in the auto-configuration section). |
To run a test, you need a test, right? Listings 4-3, 4-4, and 4-5 show examples using the well known JUnit and Spock frameworks.
Listing 4-3. test.groovy
class MyTest{@Testvoid simple() {String str= "JUnit works with Spring Boot"assertEquals "JUnit works with Spring Boot",str}}
Listing 4-3 shows you the simplest unit test, and if you can see you don’t need to use any imports, Spring Boot will take care of that. To run it, you execute:
$ spring test test.groovyTake a look at the Spock unit test shown in Listing 4-4.
Listing 4-4. spock.groovy
@Grab('org.spockframework:spock-core:1.0-groovy-2.4')import spock.lang.Specificationimport org.springframework.boot.test.OutputCaptureclass SimpleSpockTest extends Specification {@org.junit.RuleOutputCapture capture = new OutputCapture()def "get output and capture it"() {when:print 'Spring Boot works with Spock'then:capture.toString() == 'Spring Boot works with Spock'}}
Listing 4-4 shows you the use of the Spock Framework by extending the Specification class and defining the methods. In order to use the Spock Framework it’s necessary to import the necessary dependencies and to include those dependencies by adding the @Grab annotation that will include the Spock dependency for Groovy. The intention of this section is to show the usage of Spock. But if you are looking for more information about it, you can go to http://spockframework.org/ . All its documentation is found at http://spockframework.github.io/spock/docs/1.0/index.html .
Listing 4-4 also shows you one of the new features of Spring Boot, which is the OutputCapture class. It allows you to capture output from System.out and System.err. In order to run this test, you execute the same instruction but change the name of the file:
$ spring test spock.groovyIt’s important to know that Spring Boot won’t always figure it out when you are using third-party libraries, so you must use the @Grab annotation and the correct import.
Take a look at the unit test in Java, shown in Listing 4-5.
Listing 4-5. MyTest.java
import org.junit.Rule;import org.junit.Test;import org.springframework.boot.test.OutputCapture;import static org.hamcrest.Matchers.*;import static org.junit.Assert.*;public class MyTest {@Rulepublic OutputCapture capture = new OutputCapture();@Testpublic void stringTest() throws Exception {System.out.println("Spring Boot Test works in Java too!");assertThat(capture.toString(), containsString("Spring Boot Test works in Java too!"));}}
Listing 4-5 shows you a unit test written in Java. The assertThat statement belongs to the org.junit.Assert class that can be accessed as static. The containsString is a static method from the org.hamcrest.Matchers class, and it will match the capture string. This unit test also uses the OutputCapture class. To run it, you just execute this command:
$ spring test MyTest.javaIf you want to test the web application (Listing 4-1—app.groovy), you can create the code in Listing 4-6.
Listing 4-6. test.groovy
class SimpleWebTest {@Testvoid greetingsTest() {assertEquals("Spring Boot Rocks", new WebApp().greetings())}}
To test this, just execute the following command:
$ spring test app.groovy test.groovyThis command will use the previous class—the WebApp (from Listing 4-1—app.groovy)—and it will call the greetings method to get the string back.
Although these examples are extremely simple, it’s important to see how easy is to create and run tests using the command-line interface. A special chapter includes a more elaborated unit and integration test using all the power of Spring Boot.
The grab Command
The grab command will download all the Spring Groovy scripts and Java dependencies to the ./repository directory. Its syntax is the following:
spring grab [options] files [--] [args]The available options are:
Option | Description |
|---|---|
--autoconfigure [Boolean] | Adds the auto-configuration compiler transformation (default is true). |
--classpath, -cp | Adds the classpath entries, which is useful when you have third-party libraries. As a recommendation, you can create a lib/ folder in the root of your program and add all the classes or JARs there. |
--no-guess-dependencies | Does not attempt to guess the dependencies. This is useful when you already use the @Grab annotation in your application. |
--no-guess-imports | Does not attempt to guess the imports. This is useful when you already include some of the imports in your Groovy application. For example, in a Java app you can use this option because you are importing the classes you need. For more information, see Chapter 3 (in the auto-configuration section). |
You can use any of the listings you’ve seen so far to execute the grab command. For Listing 4-4, you can execute:
$ spring grab MyTest.javaIf you check out the current directory, you will see the repository subdirectory created with all the dependencies. The grab command is useful when you want to execute a Spring Boot application that doesn’t have an Internet connection and the libraries are needed. The grab command is also used to prepare your application before you can deploy it to the cloud. (You’ll see this useful command in Chapter 13, “Spring Boot in the Cloud.”)
The jar Command
The jar command will create a self- contained executable JAR file from a Groovy or Java script. Its syntax is the following:
spring jar [options] <jar-name> <files>The available options are:
Option | Description |
|---|---|
--autoconfigure [Boolean] | Adds the auto-configuration compiler transformation (default is true). |
--classpath, -cp | Adds the classpath entries, which is useful when you have third-party libraries. As a recommendation, you can create a lib/ folder in the root of your program and add all the classes or JARs there. |
--exclude | A pattern to find the files and exclude them from the final JAR file. |
--include | A pattern to find the files and include them in the final JAR file. |
--no-guess-dependencies | Does not attempt to guess the dependencies. This is useful when you already use the @Grab annotation in your application. |
--no-guess-imports | Does not attempt to guess the imports. This is useful when you already include some of the imports in your Groovy application. For example, in a Java app you can use this option because you are importing the classes you need. For more information, see Chapter 3 (the auto-configuration section). |
You can use Listing 4-1 (app.groovy) and execute the following command:
$ spring jar app.jar app.groovyNow you can check out your current directory and see that there are two files—one named app.jar.original and another named app.jar. The only difference between the files is that the app.jar.original is the one created by the dependency management (Maven) to create the app.jar. It’s a fat JAR that can be executed with the following:
$ java -jar app.jarBy executing this command, you will have a web application up and running. The jar command enables application portability, because you can ship your application and run it in any system that has Java installed, without worrying about an application container. Remember that Spring Boot will embed the Tomcat application server in a Spring Boot web application.
The war Command
This is very similar to the previous command. The war command will create a self-contained executable WAR file from a Groovy or Java script. Its syntax is the following:
spring war [options] <war-name> <files>The available options are:
Option | Description |
|---|---|
--autoconfigure [Boolean] | Adds the auto-configuration compiler transformation (default is true). |
--classpath, -cp | Adds the classpath entries, which is useful when you have third-party libraries. As a recommendation, you can create a lib/ folder in the root of your program and add all the classes or JARs there. |
--exclude | A pattern to find the files and exclude them from the final JAR file. |
--include | A pattern to find the files and include them in the final JAR file. |
--no-guess-dependencies | Does not attempt to guess the dependencies. This is useful when you already use the @Grab annotation in your application. |
--no-guess-imports | Does not attempt to guess the imports. This is useful when you already include some of the imports in your groovy application. For example, in a Java app you can use this option because you are importing the classes you need. For more information, see Chapter 3 (the auto-configuration section). |
You can use Listing 4-1 (app.groovy) to run the war command by executing the following:
$ spring war app.war app.groovy After executing this command, you will have in your current directory the app.war.original and the app.war files. You can run it with the following command:
$ java -jar app.warIn the previous command I mentioned the word portability, right? So what would be the case for a WAR file? Well, you can use the WAR file in existing application containers like Pivotal tcServer, Tomcat, WebSphere, Jetty, etc.
Note
You can use either command to create a portable and executable application. The only difference is that when you use the war command, it will create a “transportable” WAR, which means that you can run your application as a standalone or you can deploy it to a J2EE-compliant container. You are going to see a complete example in the following chapters.
The install Command
The install command is very similar to the grab command; the only difference is that you need to specify the library you want to install (in a coordinate format groupId:artifactId:version; the same as the @Grab annotation). It will download it and the dependencies in a lib directory. Its syntax is the following:
spring install [options] <coordinates>The available options are:
Option | Description |
|---|---|
--autoconfigure [Boolean] | Adds the auto-configuration compiler transformation (default is true). |
--classpath, -cp | Adds the classpath entries, which is useful when you have third-party libraries. As a recommendation, you can create a lib/ folder in the root of your program and add all the classes or JARs there. |
--no-guess-dependencies | Does not attempt to guess the dependencies. This is useful when you already use the @Grab annotation in your application. |
--no-guess-imports | Does not attempt to guess the imports. This is useful when you already include some of the imports in your groovy application. For example, in a Java app you can use this option because you are importing the classes you need. For more information, see Chapter 3 (the auto-configuration section). |
Take for example Listing 4-4 (spock.groovy). If you execute the following command:
$ spring install org.spockframework:spock-core:1.0-groovy-2.4You will have in the lib directory the Spock library and its dependencies.
Note
If you are using the SDKMAN tool ( http://sdkman.io/ ), it will download the libraries in the $HOME/.sdkman/candidates/springboot/1.3.X.RELEASE/lib directory.
The uninstall Command
The uninstall command will uninstall the dependencies from the lib directory. Its syntax is the following:
spring uninstall [options] <coordinates>The available options are:
Option | Description |
|---|---|
--autoconfigure [Boolean] | Adds the auto-configuration compiler transformation (default is true). |
--classpath, -cp | Adds the classpath entries, which is useful when you have third-party libraries. As a recommendation, you can create a lib/ folder in the root of your program and add all the classes or JARs there. |
--no-guess-dependencies | Does not attempt to guess the dependencies. This is useful when you already use the @Grab annotation in your application. |
--no-guess-imports | Does not attempt to guess the imports. This is useful when you already include some of the imports in your groovy application. For example, in a Java app you can use this option because you are importing the classes you need. For more information, see Chapter 3 (the auto-configuration section). |
You can test this command by executing the following command:
$ spring uninstall org.spockframework:spock-core:1.0-groovy-2.4It will remove all the Spock dependencies from the lib directory.
The init Command
The init command will help you initialize a new project by using the Spring Initializr ( http://start.spring.io/ ). Whether or not you are using an IDE, this command will help you get everything ready to start developing Spring Boot applications. Its syntax is the following:
spring init [options] [location]The available options are:
Option | Description |
|---|---|
-a, --artifactId | The project coordinate; if it’s not provided it, the default name is demo. |
-b, --boot-version | The Spring Boot version to use; if it’s not provided it will get the latest, defined as the parent-pom. |
--build | The build system to use; the possible values are maven or gradle. If it’s not specified, the default value is maven. |
-d, --dependencies | A comma-separated list of dependency identifiers that will be included. For example, -d=web or -d=web,jdbc,actuator. |
--description | The project description. |
-f, --force | Overwrites existing files. |
--format | A format of the generated content. Useful when you want to import your projects into an IDE like STS. The possible values are build and project. If it’s not provided, the default value is project. |
-g, --groupId | The project coordinates defining the group ID. If it’s not provided, it defaults to com.example. |
-j, --java-version | The language level. If it’s not provided, it defaults to 1.8. |
-l, --language | Specifies the programming language. The possible values are java and groovy. If it’s not provided, it defaults to java. |
-n, --name | The name of the application. If it’s not provided, it defaults to demo. |
-p, --packaging | The project packaging. The values are jar, war, and zip. If it’s not provided, it will generate a ZIP file. |
--package-name | The package name. If it’s not provided, it defaults to demo. |
-t, --type | The project type. The values are maven-project, maven-build, gradle-project, and gradle-build. If it’s not provided, it defaults to maven-project. |
--target | The URL of the service to use. It defaults to https://start.spring.io . This means that you can create your own reference service. |
-v, --version | The project version. If it’s not provided, it defaults to 0.0.1-SNAPSHOT. |
-x, --extract | Extracts the content of the project created in the current directory if the location is not specified. |
You will use this command very often (if you are not using an IDE such as the STS or IntelliJ), so you can get used to it with the following examples.
To create a default project, you just execute:
$ spring initIt will generate a demo.zip file. You can unzip it and take a look at the structure (a Maven project structure), as shown in Figure 4-1, but the most important part will be the pom.xml file. If you look at this file, you can see the minimal dependencies: spring-boot-starter and spring-boot-starter-test.
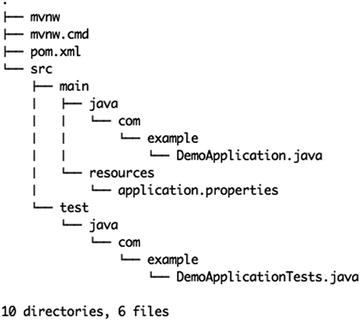
Figure 4-1. The demo.zip contents
Figure 4-1 shows the demo.zip structure. Take a look at the src folder, which contains the main/java/com/example/DemoApplication.java file and of course its unit test. Also you can see that it contains two additional files, mvnw (for UNIX) and mvnw.cmd (for Windows). These commands allow you to run a Maven project without actually having Maven installed on your system.
You can simply execute the following command:
$ ./mvnw spring-boot:runThis command will download the Maven tool (in the .mvn subdirectory) and run it. If you take a look at the DemoApplication.java class, you’ll see that it’s not doing much. It’s simply running the Spring Boot application. With all this you have a template that you can use over and over. If you want to create a web application, the only thing you need to do is add the spring-boot-starter-web dependency.
init Examples
This section includes more examples using the init command. The following command will create a web application with JDBC Gradle project:
$ spring init -d=web,jdbc --build=gradleThis command will generate a demo.zip file, but with its contents using Gradle. It will include the Gradle wrapper so you don’t have to install it.
If you want to generate only the pom.xml (for a Maven project) or build.gradle file (for a Gradle project), just add --format=build and --build=[gradle|maven]:
$ spring init -d=web,data-jpa,security --format=build --build=gradleThis command will create the build.gradle file with the web, JPA, and security dependencies.
$ spring init -d=jdbc,amqp --format=buildThis command will create the pom.xml file. If you don’t add the --build parameter, it defaults to Maven.
To create a project with the name, groupId and artifactId, you need to use the -name, -g, and -a parameters respectively:
$ spring init -d=amqp -g=com.apress.spring -a=spring-boot-rabbitmq -name=spring-boot-rabbitmqThis command will create a spring-boot-rabbitmq.zip file (Maven project) with the groupId and artifactId specified.
By default, when the package name is not specified, it defaults to com.example. If you want to add a package convention, you need to add the --package parameter:
$ spring init -d=web,thymeleaf,data-jpa,data-rest,security -g=com.apress.spring -a=spring-boot-journal-oauth --package-name=com.apress.spring -name=spring-boot-journal-oauthIt’s fine to have a ZIP file for portability, but you can uncompress directly into the current directory. You simply add the -x parameter:
$ spring init -d=web,thymeleaf,data-jpa,data-rest,security,actuator,h2,mysql -g=com.apress.spring -a=spring-boot-journal-cloud --package-name=com.apress.spring -name=spring-boot-journal-cloud -xThis command will uncompress the ZIP file on the fly and the contents will be written to the current directory.
If you are curious and want to know more about the dependencies or other parameter values, you can execute the following command:
$ spring init --listYou will be using the spring init command throughout the entire book, so take a moment and review all its options.
An Alternative to the init Command
There will be times when you need just the pom.xml or build.gradle files, perhaps to check out the dependencies and declarations or to look at the plugins declarations. You execute the following command:
$ curl -s https://start.spring.io/pom.xml -d packaging=war -o pom.xmlYes, you read it right! Remember that the init command calls the Spring Initializr service at https://start.spring.io , so you can use the UNIX cURL command. This command will generate only the pom.xml file. And if you are curious again to see what else you can do by using the UNIX cURL command, just execute the following:
$ curl start.spring.ioThis command will print all the available options and some examples using cURL with the Spring Initializr. You learned in previous chapters that, within the STS (Spring Tool Suite) IDE, you can create a Spring Boot application by selecting Spring Starter Project. This wizard will connect to the Spring Initializr, so either you use an IDE or the command line to get a Spring Boot project structure.
The shell Command
The shell command will start an embedded shell. Execute the following command:
$ spring shellSpring Boot (v1.3.X.RELEASE)Hit TAB to complete. Type 'help' and hit RETURN for help, and 'exit' to quit.$
As you can see from the output, you can type help to get more information about the shell. Actually the spring shell is the previous command, but just executed in an embedded shell. One of the benefits is that it has a TAB completion so you can get all the possible suggestions for the options.
The help Command
The help command will be your best friend. You can execute it as follows:
spring helpusage: spring [--help] [--version]<command> [<args>]
Available commands are:
run [options] <files> [--] [args]Run a spring groovy scripttest [options] <files> [--] [args]Run a spring groovy script testgrabDownload a spring groovy script's dependencies to ./repositoryjar [options] <jar-name> <files>Create a self-contained executable jar file from a Spring Groovy scriptwar [options] <war-name> <files>Create a self-contained executable war file from a Spring Groovy scriptinstall [options] <coordinates>Install dependencies to the lib directoryuninstall [options] <coordinates>Uninstall dependencies from the lib directoryinit [options] [location]Initialize a new project using Spring Initializr (start.spring.io)shellStart a nested shell
Common options:
-d, --debug Verbose modePrint additional status information for the command you are runningSee 'spring help <command>' for more information on a specific command.
As you can see from this output, you can also execute the spring help <command>, which is very handy because you will get more information about the command and in some case some examples on how to use it. For example, if you want to know about the init command, just execute the following:
$ spring help initRemember, the spring help command is your best friend.
Summary
The chapter showed you how to use the Spring Boot Command Line Interface. It explained all the different commands and their options.
You learned mentioned that one of the most important commands is the init command and it will be used in the entire book, either through a terminal in a command line or by using an IDE such as STS or IntelliJ.
In the next chapter, you are going to learn how to create Spring applications and then compare them side by side with Spring Boot applications.