
![]()
Introducing Windows Workflow Foundation
Before jumping into how WF is used, it is important to understand the capabilities that it provides. This chapter gives a brief introduction to WF and how it has changed over the years. Important components of WF will be introduced, such as some of the out-of-box activities that model coding constructs and how activities use the workflow designer for workflow orchestration or arranging activities within a workflow for modeling business logic. Next, WF data modeling will be covered; this is how workflows receive, store, and return data. Each of the WF components covered in this chapter will contribute to building a foundation of how WF works; if you’re already familiar with WF, this chapter will serve as a review of important concepts.
WF establishes a software framework so developers can model code declaratively as workflows for supporting event-driven and long-running processes. Although many developers consider WF to be solely a workflow engine technology because of its built-in functionality for processing workflows, it is actually a software framework. That is, it comprises a set of reusable code “building blocks” that can be assembled and extended to build custom software. When a developer uses a software framework, he does not need to write software from scratch. Another example of a software framework you are probably familiar with is the Microsoft .NET Framework; it contains a collection of runtime libraries that can be used to develop software that is compiled to run within the Microsoft .NET runtime. Just as with any new technology, the goal for WF is to address strategic shortcomings that were difficult to meet using a “code only” approach.
As developers, we develop software by writing code. However, the code itself is not an ideal reference for understanding its functionality because it is written in a special format and uses syntax that usually only developers understand. If there is a lack of standards in documenting the code, it has to be “reverse engineered,” which is the process of using code to understand what functionality it performs. This makes software code difficult to maintain, depending on how many programmers were involved in developing the code and the different technologies and architectures they used.
For example, with the release of ASP.NET Model View Controller (MVC), which introduced a completely different architecture compared to ASP.Net and web forms, web applications can now combine both technologies, making them harder to manage. Another example is the overlapping of data access technologies like ADO.NET, LINQ to SQL, and Entity Framework. It is quite common to see applications that utilize all three of these technologies, making the code very hard to manage. WF provides a natural interpretation of code by representing it through transparent workflows as an alternative to just viewing code alone.
Most software is developed to process information quickly. Users create, read, update, and delete data through manual events and the data is immediately processed. However, there are times when business processes execute over days, months, and even years. These are defined as long-running processes, and implementing them through software poses unique challenges. WF provides a framework (which would otherwise have to be custom built) to address common design goals and characteristics associated with implementing long-running processes. WF functionality includes memory management for persisting the current state or snapshot of a process and tracking custom events for the duration of a process.
Sometimes the complexity of business rules for processes within organizations can be difficult to comprehend, which leads to a huge effort in implementing complicated logic within software. WF provides out-of-the-box workflow activities as the basic building blocks for a workflow that processes a unit of work and defines the flow of logic within the workflow. Workflow activities can be used together within a workflow for modeling the complexity of logic declaratively, making it easier to implement. Workflow activities can also be custom built to define logic for a particular business domain.
Finally, because business processes usually change many times over the period of an application’s life span, it is hard to make changes to the logic within an application to adapt to business process changes. Traditionally, it is a good practice for developers to implement an architectural pattern called “layering” that promotes the segregation of code into designated layers. For example, code that performs data access is usually separated out into its own “Data Access” layer. Business logic is separated out into a “Business” layer. By separating out related code by its functional role, managing code becomes easier because changes are isolated within the layer; this reduces the number of regression bugs. WF takes the layering approach further because it layers business logic through workflows and reduces the responsibility for the application down to simply hosting the workflows so the workflow can execute. The biggest gain from this architecture is that the workflows can then be managed during the runtime of the application that is hosting the workflows.
As WF has matured over the years, so has the integration of workflows and Windows Communication Services (WCF). While WCF has been making headlines for itself as the developer’s tool of choice for implementing services within Microsoft environments, Microsoft started getting creative by looking at how to combine the power of WF for declaratively building code that could run as long running processes, and providing services using WCF, that no longer had to use Internet Information Services (IIS) for hosting across greater boundaries. Pretty soon developers were able to use workflows they had previously built for the logic used to power services for subscribers that could run over long periods of time. In WF3.x, it was quite painful at first, but things started to get easier when implementing WF services using .NET 3.5. The next questions focused on how the services would be hosted. Internet Information Services (IIS) seemed like the best solution but there were still limitations; these were eventually solved using the latest version of IIS, knownn as Windows Server AppFabric, which I will explain in more detail in another chapter.
Today we see another trend emerging where industry leaders like Microsoft and Amazon provide the hardware and software infrastructure that is strategically located within geographic locations around the world, so the same infrastructure does not have to be provided locally within data centers, nor does it require leasing hardware for running software applications. This trend is called cloud computing and the advantage of subscribing to cloud computing is that you only have to pay for the memory space for holding data and processing utilization for the software applications running within the cloud. Microsoft’s cloud solution is a technology called Azure. Azure provides the infrastructure and server technology so developers can focus on what they do best, which is developing the business logic. When developing for the cloud, developers no longer have to worry about setting up, configuring, and supporting servers. Instead, cloud computing providers extend service level agreements (SLAs) for handling the managing the infrastructure and providing a level of uptime for the servers so developers can focus on deploying software and configuring how applications will perform and run. Since cloud computing was a new concept, most developers felt that it seemed a great place to host small applications but not intense line-of-business (LOB) applications. After all, what businesses were going to allow their LOB applications to be run remotely, without the protection of a local or remote private data center?
At first, the most seasoned developers were concerned that they would have a hard time or even fail trying to move or write custom software for clients in the cloud. The fear receded as Microsoft provided more resources for Azure, not only for its infrastructure but also its technology. So today we can take advantage of quickly building workflows that run for long periods of time and expose them as services that are pushed out to the cloud via WCF, without first having to worry about setting up the hardware or configuring the servers used to host them.
WF History
Windows Workflow Foundation made its first appearance in September of 2005 at a Microsoft-hosted event called Professional Developers Conference (PDC). It was announced as an extension of the next release of Microsoft’s .NET Runtime 2.0. Over the years there have been two other releases within the .NET Framework: 3.0 and 3.5. We commonly refer to these releases as WF3.x. Microsoft was planning for the next release of WF within the .NET Framework 4.0, but they ultimately decided to do a complete planning overhaul of WF. However, the retooling of WF4 was not as painful as expected. On the contrary, it was much easier than originally learning WF3.x, but there was much confusion around the why Microsoft decided to do a complete rewrite for such a young technology as WF. Below are the main factors that Microsoft considered important enough to rewrite in WF4:
- Feedback from developers struggling with the complexity for building and hosting workflows in WF3.x.
- Release of Visual Studio 2010 and the .NET 4.0 Framework, which was one of the most significant releases in Visual Studio history, so WF could take advantage of the .NET runtime’s new features.
- Improved performance by re-engineering WF’s runtime engine.
Even though Microsoft decided to rewrite WF, the WF product team still had the responsibility of maintaining interoperability with the existing software that was written using the relatively young WF3.x framework. Therefore the goal for the rebuild also needed to include the functionality from the previous version of WF3.x, with only a couple of “acceptable” caveats around interopting WF4.0 with existing implementations of WF3.x.
Many developers questioned the rewrite of WF4.0 and felt the pain for retooling from WF3.x. However, after cracking open the WF4.0 box, they quickly discovered that the WF Team did a great job in listening to the development community and built a much leaner WF for better performance gains and richer functionality for building workflow solutions, plus an easier learning curve for a better developer experience.
And then there’s the Microsoft .NET Framework 4 Platform Update 1, which was released in April of 2011. It was the last major release in between WF4 and WF4.5, and the majority of the features came from customer requests around WF and building state-machine workflows. Building state-machine workflows was a functionality that the WF team omitted with the release of WF4 because they figured state-machine workflows were no longer needed with the release of flowchart-style workflows. The Microsoft .NET Framework 4 Platform Update 1 contains three packages (see Figure 2-1):
- Microsoft .NET Framework 4 Platform Update 1 (KB2478063), which loads the runtime files for the platform update.
- Multi-Targeting Pack (KB2495638, which loads reference assemblies and IntelliSense files for the platform update.
- Design-time Package for Visual Studio 2010 SP1, which installs the other packages and configures Visual Studio 2010 SP1 with the new targeting profiles and IntelliSense, plus it loads state-machine activities.
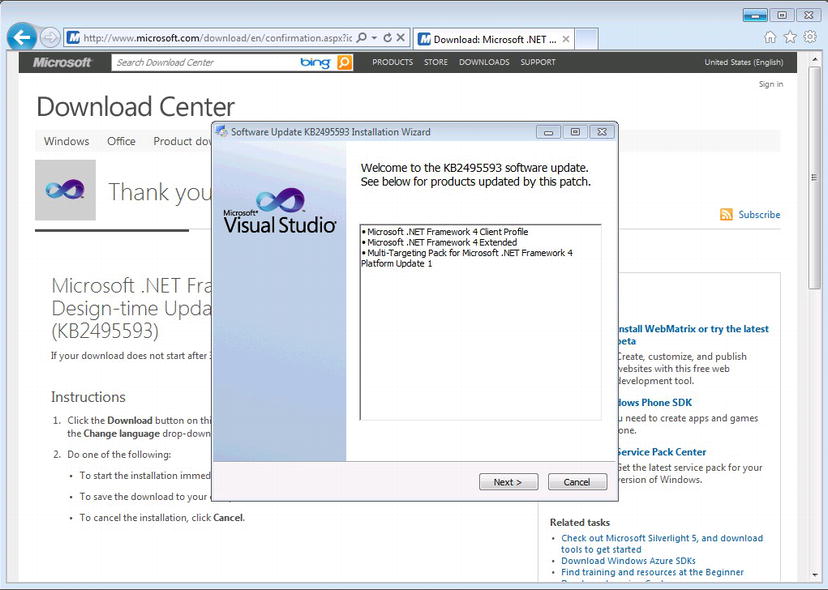
Figure 2-1. Installing Platform Update 1
Once Platform Update 1 is installed, the next time VS 2010 is opened to create a new workflow project, there will be two new choices for frameworks that a project can be compiled against (see Figure 2-2).
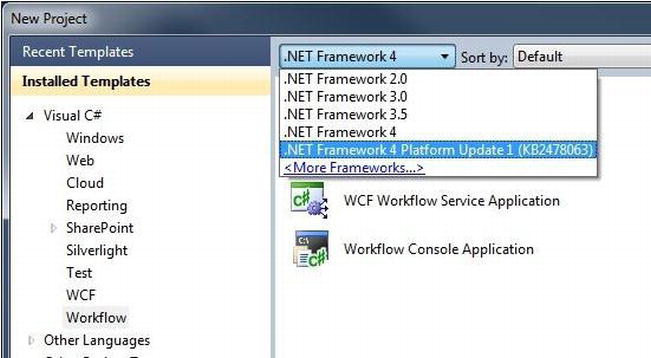
Figure 2-2. Configuring Platform Update 1 for a new project
If a workflow solution already exists, after loading the workflow solution in VS2010, right-click on the solution and change the properties for the Application tab, as shown in Figure 2-3.
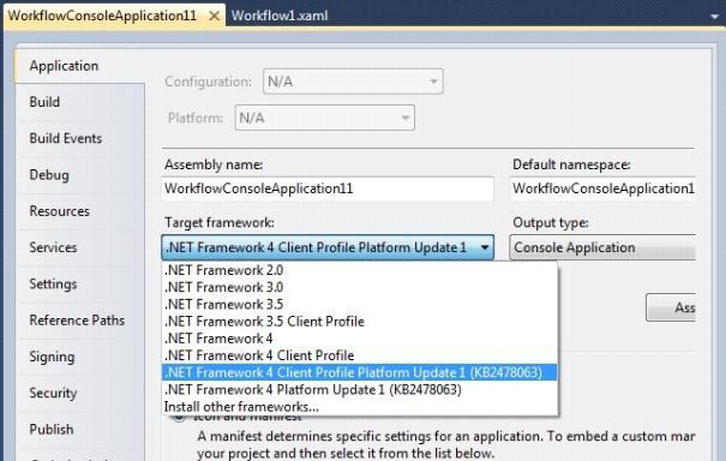
Figure 2-3. Configuring Platform Update 1 for an existing project
The only difference between .NET Framework 4 Platform Update 1 and .NET Framework 4 Client Profile Platform Update 1 is the Client Profile is a smaller set of assemblies than what .NET 4.0 provides, so it is much leaner when running within client applications.
Once Platform Update 1 is chosen for the project to be compiled against, a new category of out-of-box activities is included for building state-machine workflows (see Figure 2-4).
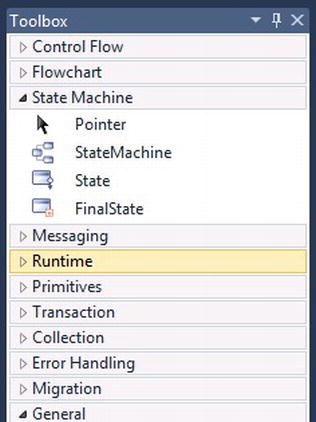
Figure 2-4. State machine activities
Now that workflows are making their way into Azure, another key feature that was released with the platform update was support for the database that handles persistence for workflows and its compatibility when running within SQL Azure. SQL Azure is a relational database that runs within Azure’s cloud for storing data.
Obviously, with the release of WF4.5 and the new .NET Framework 4.5, this platform update is irrelevant because all the capabilities it provides are already included within WF4.5; however, I wanted to make sure it was covered as part of the complete history of WF.
WF Components
There are different components within WF that play significant roles in executing and managing workflows:
- Workflow Runtime
- Activities
- Workflows
- Workflow Designer
- Workflow DataModel
- Persistence
- Monitoring
The WF runtime is considered the heart of WF; without the WF runtime, workflows cannot be executed. The role of the WF runtime is to schedule and coordinate workflows asynchronously or within its own process. Compared to the WF runtime in WF3.5, there are significant changes that are focused around improving the WF runtime’s performance. Also, for WF3.5, the WF runtime was required to be hosted within a .NET executable. This changed with WF4 because it was not practical for some scenarios. For instance, setting up the WF runtime within testing environments was challenging. In WF4, directly calling the WF runtime for hosting workflows is no longer necessary.
There are now better options for hosting workflows, ones that are tailored around the characteristics of the solutions hosting the workflows. Here is a list of some additional options for managing the WF runtime at an abstracted level in WF4:
- WorkflowApplication: Used for hosting workflows within .NET applications that take full advantage of the workflow runtime for managing a workflow instance asynchronously. WorkflowApplication allows applications that host workflows to manage the execution like persisting or cancelling of a workflow and subscribe to notifications on a workflow instance lifecycle. A .NET application can kick off a workflow using WorkflowApplication and then continue processing on a different thread.
- WorkflowServiceHost: Used for managing endpoints and configuration for hosting workflows as WCF services.
- WorkflowInvoker: A sought-after change from the community for easily hosting workflows synchronously, just like a call to a method. Workflows can be spun up quickly and processed on the same thread as the hosting application. WorkflowInvoker is a great way to unit test activities and workflows before they are implemented; however, it can also be used to run asynchronously.
One of the main functions that the WF runtime performs is managing a workflow’s life cycle. When a workflow is spun up within the WF runtime, it creates an instance of that workflow called a WorkflowInstance. A WorkflowInstance is a single instance of a workflow running within the WF runtime. So if an e-commerce site uses WF to process its orders, each order that is created will create a WorkflowInstance. As workflow instances are created one right after the next, it is important to know the state they are in at any given time while they are being processed. This is done by subscribing to events through the WF runtime as the lifecycle of the WorkflowInstance changes over time. The events the WF runtime provides are shown in Table 2-1.
Table 2-1. WorkflowInstance Events
| Event | Description |
|---|---|
| WorkflowCreated | Occurs when workflow instance is created. |
| WorkflowStarted | Occurs when workflow instance is started. |
| WorkflowLoaded | Occurs when workflow instance is loaded into memory. |
| WorkflowAborted | Occurs when a workflow instance is aborted. |
| WorkflowIdled | Occurs when workflow instance enters the idle state, like waiting on an external event. |
| WorkflowUnLoaded | Occurs when workflow instance is unloaded into memory. |
| WorkflowSuspended | Occurs when a workflow instance is suspended. |
| WorkflowResumed | Occurs when execution of a workflow instance is resumed following a suspension. |
| WorkflowTerminated | Occurs when workflow instance is terminated. |
| WorkflowPersisted | Occurs when the state of a workflow instance is persisted, removing it from memory. |
| WorkflowCompleted | Occurs when workflow instance is completed. |
Activities
WF activities are the basic unit of work and are used to execute code within a workflow. Understanding the functionality that each activity provides within WF is half the learning curve. By getting to know each activity, the skill for building efficient workflows becomes easier. WF4.x activities are categorized into 10 areas:
- Control Flow: Models how business processes can flow within a workflow.
- Flowchart: Provides the most transparency for modeling decision-making processes. Flowchart activities were introduced in WF4.
- State-machine: Models possible transitions between the states of a workflow indicating human interaction and events within workflows.
- Messaging: Provides communication functionality for building workflows that are exposed as services and communicate over transport protocols.
- Runtime: Provides instructions to the WF runtime for how to manage workflow behavior.
- Primitives: Provides general functionality around execution.
- Transaction: Provides functionality for allowing activities to execute within a transaction so unwanted results can be reversed.
- Collection: Provides basic functionality for managing data represented as collections within a workflow.
- Error Handling: Provides functionality for hardening workflows by providing logic for managing unanticipated exceptions.
- Migration: Provides functionality for allowing workflows built using WF3.x to execute in WF4.
Tables 2-2 through 2-11 list the activities included in each of these areas.
Table 2-2. Control Flow Activities
| Activity | Description |
|---|---|
| DoWhile | Keeps executing child activities until the conditional expression is met. |
| ForEach | Executes child activities for each iteration of an enumerable collection. |
| If | Executes child activities within a single branch based on a condition. |
| Parallel | Executes more than one branch of child activities at the same time asynchronously. |
| ParallelForEach<T> | Executes child activities for each iteration of an enumerable collection and processes logic asynchronously within each iteration. |
| Pick | Used to receive events outside of a workflow and serves as the trigger for when events occur. Usually a delay is used to wait for an external event for a given time. |
| PickBranch | Branches for a Pick activity that contain a trigger for handing external events and an Action activity for processing logic. |
| Sequence | Holds a collection of child activities that are executed sequentially. |
| Switch | Executes child activities based on a predetermined expression. |
| While | Continuously executes child activities while a condition is met. |
Table 2-3. Flowchart Activities
Table 2-4. State Machine Activities
| Activity | Description |
|---|---|
| StateMachine | Provides the canvas and a default state for a state-machine workflow. |
| State | States represent the transitions that can be made within a state-machine workflow. Child activities can be added to the state activity when a state activity becomes active and when there is a transition to another state. |
| FinalState | Represents the last state for a state-machine workflow. Its icon is different from the other state’s icons, so that it how you identify it as the final state. |
Table 2-5. Messaging Activities
| Activity | Description |
|---|---|
| CorrelationScope | Provides correlation management for child activities. Correlation is way to relate messaging activities. |
| InitializeCorrelation | Usually correlation is established when messages are sent or received; however, sometimes correlation needs to be established before actually sending or receiving a message. |
| Receive | Receives incoming messages sent to a workflow. |
| ReceiveAndSendReply | Follows the same pattern as a common web service that receives an incoming message and produces a reply that is sent back. |
| Send | Sends an outgoing message to a service. |
| SendAndReceiveReply | Correlation is used to send an outgoing message to a service and anticipates receiving a reply from the external service. |
| TransactionReceiveScope | Allows message received to be processed within transactions. |
| Activity | Description |
|---|---|
| Persist | Tells the WF runtime that the workflow should be persisted and removed from memory. |
| TerminateWorkflow | Tells the WF runtime that the workflow should terminate. |
Table 2-7. Primitives Activities
| Activity | Description |
|---|---|
| Assign | Assigns values to objects within a workflow. |
| Delay | Temporary pauses execution of a workflow based on a predetermined amount of time. |
| InvokeMethod | Allows existing code that was written outside of the workflow to be executed within a workflow. |
| WriteLine | Writes a defined string of text that is written to a console window. |
Table 2-8. Transaction Activities
| Activity | Description |
|---|---|
| CancellationScope | Allows cancellation logic to be executed to reverse unwanted execution results. |
| CompensableActivity | Defines work that needs to be done during normal execution of logic and work that needs to be done to compensate or reverse completed execution logic. |
| Compensate | Allows the workflow to start compensation. |
| Confirm | Allows confirmation to occur for normal or compensated work. |
| TransactionScope | Allows work that is executed within child activities to be executed within a transaction so it can be rolled back if needed. |
Table 2-9. Collection Activities
| Activity | Description |
|---|---|
| AddToCollection<T> | Adds objects within a predefined collection. |
| ClearToCollection<T> | Clears all objects within a predefined collection. |
| ExistsInCollection<T> | Checks to see if an object is contained within a predefined collection. |
| RemoveFromCollection<T> | Removes an object contained within a predefined collection. |
| Activity | Description |
|---|---|
| Rethrow | Rethrows or raises an exception that occurs within a workflow. |
| Throw<T> | Throws or raises an exception that occurs within a workflow. |
| TryCatch | Allows unanticipated exceptions to be trapped and handled. |
Table 2-11. Migration
| Activity | Description |
|---|---|
| Interop | Provides a place for WF3.x child activities to execute within a workflow built in WF4. |
Let’s get a little more familiar with the out-of-box activities that are most commonly used. Since workflows are a visualization tool, I included a simple visual representation for the out-of-box activities used the most for building workflows. You will see that the logic patterns follow the same coding patterns used in writing code—except with WF you can declaratively build the logic, rather than using code. Therefore, there is a common pattern for each implementation of a workflow that makes managing workflows much easier than managing code. Activities in WF4.5 also allow C# expressions so the expressions used within the book will focus on using C# instead of VB expressions.
The WriteLine activity works well for pushing text to readable sources like the console window to notify users of a workflows progress. The WriteLine activity can also be used for debugging other activities and workflows, which will be demonstrated while walking through some of the out-of-box activities (see Figure 2-5).
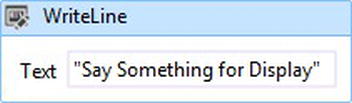
Figure 2-5. Simple WriteLine activity for displaying text
This activity models the code statement DoWhile and has a Condition property that must use an expression resulting in either a True or False value. Expressions used in WF4 must be VB expressions, so instead of using a C# expression like 1==1, a VB expression expressed as 1=1 is required. Figure 2-6 illustrates a DoWhile activity that uses the C# expression 1==1. While the Condition property of the DoWhile activity is met, the WriteLine activity that is contained within the DoWhile activity will write “Execute Me” to the console window as an infinite loop because 1==1 will always result in True. The DoWhile activity is guaranteed to execute its child activities as least once and thereafter until the condition results to False.
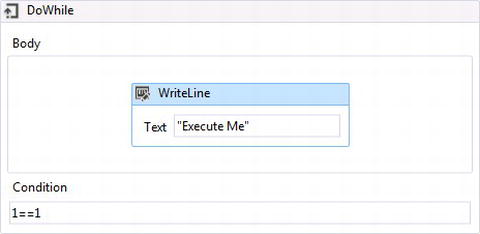
Figure 2-6. DoWhile activity
The ForEach activity models the code statement ForEach. It iterates through an object that implements the interface IEnumerable and executes child activities for each iteration. Figure 2-7 shows the activity iterating through a collection of customers and using the WriteLine child activity with its Text property set to cust.FirstName for writing each customer’s FirstName to the console window. The TypeArgument property defines the type of object that will hold the value for each iteration. Figure 2-7 has its TypeArgument set to Customer.
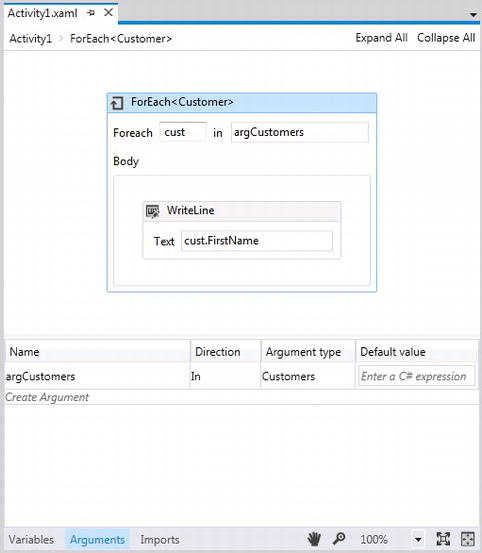
Figure 2-7. ForEach activity
The If activity models the code statement If and uses an expression condition to decide the workflow’s flow. Figure 2-8 uses the condition 1==1, and since this will always result to True, the WriteLine child activity will write “Condition Met” to the console window each time.

Figure 2-8. If activity
The Parallel activity provides a standard way of implementing a logical pattern for scheduling more than one workflow activity or more than one sequence of activities of flow to occur. As long as there only synchronous activities are used within the Parallel activity, the workflow activities will be executed on the same thread as the workflow. Workflow activities within a Parallel activity are scheduled to execute, and multiple activities can be scheduled in sequence. The WF runtime schedules the execution of activities within a Parallel activity, so the activities will execute in an order from left to right. When a sequence of workflow activities are used within branches of a Parallel activity, the first activity within the Sequence activity for each branch is executed from left to right and then the same pattern is used for each activity thereafter. Figure 2-9 shows two WriteLine activities that will be executed, so “Execute 1” will be written first and then “Execute 2” will be written next to the console window. If execution needs to stop during the execution of the Parallel activity, there is also a CompletionCondition property that accepts an expression for when the activity should stop executing.

Figure 2-9. Parallel activity
The ParallelForEach<T> activity models the code statement ForEach and iterates through an object that implements the interface IEnumerable and executes child activities for each iteration, except it processes each iteration asynchronously. However, unless the InvokeMethod activity, messaging activities, or workflow activities that are built using the base object AsyncCodeActivity are used within the Body section of the ParallelForEach activity, the same thread processing the workflow will be used for processing the ParallelForEach activity. This pattern is appropriate when an iteration could cause the workflow to go idle; however, iterations after it can’t wait and still need to be processed. Figure 2-10 shows the workflow activity iterating through a customers collection and using one WriteLine child activity with the expression "Started " + cust.FirstName to indicate the start of an iteration. A Delay activity is used to cause the workflow to go idle and another WriteLine activity with the expression “Finished” +cust.FirstName is used to indicate to the console window when each of the iterations finishes. When the Delay activity is hit and the iteration goes idle, another iteration is then executed.
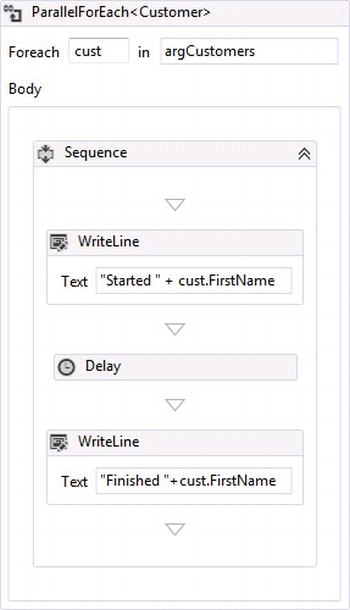
Figure 2-10. ParallelForEach activity
The Pick activity is a way for workflows to handle external events. This pattern is appropriate when a workflow is waiting on feedback and goes idle. Figure 2-11 shows the activity waiting for feedback using a Delay activity, which is set to wait for 30 seconds. The Pick activity also contains a custom Bookmark activity that listens for a predefined external event. If the 30-second timer runs out, the child WriteLine activity writes “External event never happened” to the console. If the external event is received, the other WriteLine child activity writes “External event happened” to the console.
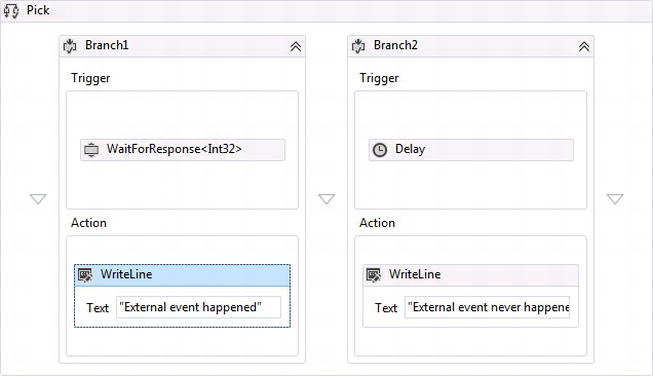
Figure 2-11. Pick activity
Additional PickBranch activities can be added to the Pick activity for handling additional external events, as illustrated in Figure 2-12.
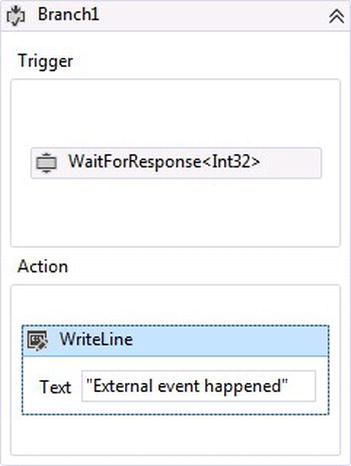
Figure 2-12. PickBranch activity
The Sequence activity is considered a composite activity, which means it is used as a container for holding child activities. Each child activity within a Sequence activity executes in sequence and is primarily used as the base for sequential style of workflows. The Sequence activity in Figure 2-13 has three WriteLine child activities, and each one executes in the order from top down, writing “Process 1”, “Process 2”, “Process 3” to the console.
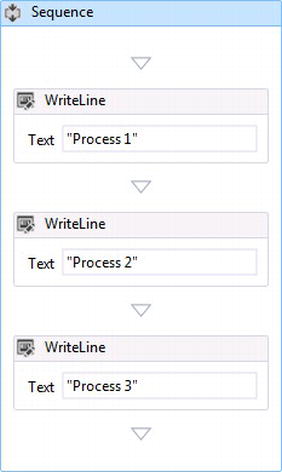
Figure 2-13. Sequence activity
The Switch activity models the code statement Switch and uses an object type as a prescribed condition to decide the workflow’s flow. In Figure 2-14, the condition is a integer value of a CustomerType. When the Case statement is matched, child activities within the Case are executed. If a Case cannot be matched, there is also a Default flow that executes its child activities. For example, if CustomerType=1, the WriteLine child activity will write “Executing Case 1” to the console window. If there is no match, another WriteLine activity writes “No Cases match”.
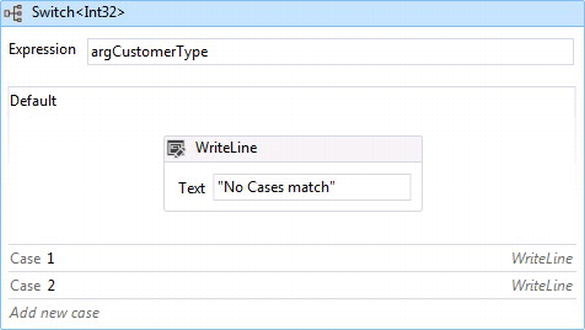
Figure 2-14. Switch activity
The While activity models the code statement While. It has an expression condition of 1==1 for demonstration purposes, which means it is an infinite loop; for each loop that 1==1, the child activity WriteLine will write “Execute Me” to the console window. The While activity will not execute its child activities unless the condition results to true. This is what differentiates it from the DoWhile activity (see Figure 2-15).
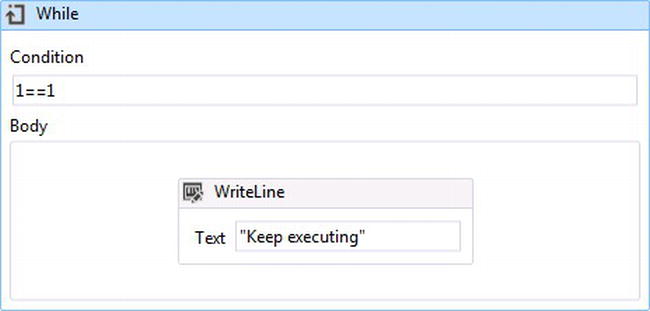
Figure 2-15. While activity
The Flowchart activity sets the canvas for modeling detailed decision-making flows. After adding a Flowchart activity to the workflow, it sets the stage for modeling a flowchart workflow by providing a starting point (see Figure 2-16).
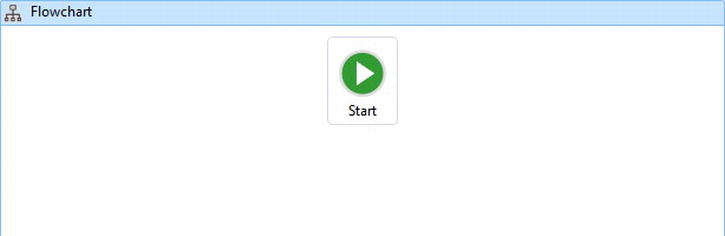
Figure 2-16. Flowchart activity
The FlowDecision activity provides the magic for building flowchart workflows by providing a rich visualization for deciding conditional flow of a workflow. After adding the Flowchart activity, an expression condition can be built that results in true or false. The FlowDecision activity in Figure 2-17 shows that if the condition is false, a WriteLine activity is executed that writes “Condition is False” to the console window; if true, another WriteLine activity writes “Condition is True” to the console window. When adding a FlowDecision activity, make sure to connect it to the Start activity.
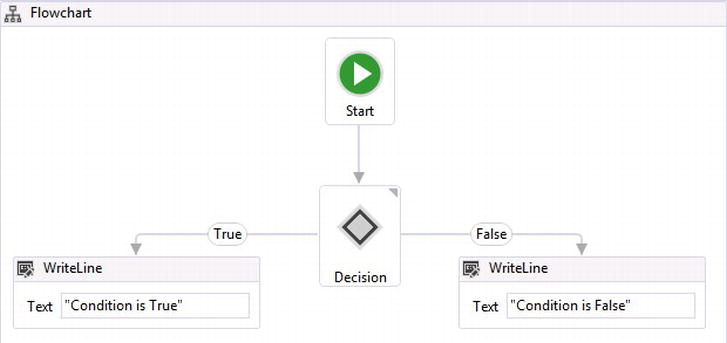
Figure 2-17. FlowDecision activity
FlowSwitch<T> Activity
The FlowSwitch activity is much like the Switch<T> activity; however, it represents the visual flow much better and can only be used within the canvas of flowchart workflows. After adding a Flowchart activity, an object type is used as a prescribed condition that is matched to execute a single flow. If the predefined condition can’t be met, it also has a Default flow that is executed. Figure 2-18 shows that if the condition matches “0” or “1”, the WriteLine activity is executed and writes to the console window; if the condition does not match, the Default flow is executed and writes to the console window.
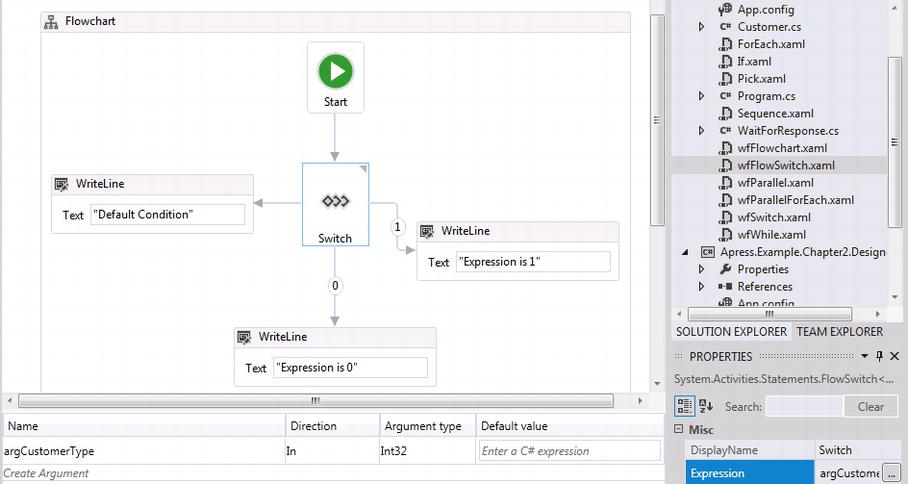
Figure 2-18. FlowSwitch<T> activity
The StateMachine activity sets up the workflow canvas as a state-machine style of workflow and includes a Start and a default state activity. Additional state activities can be dragged to the designer as they are needed, like the State2 and FinalState activities illustrated in Figure 2-19.
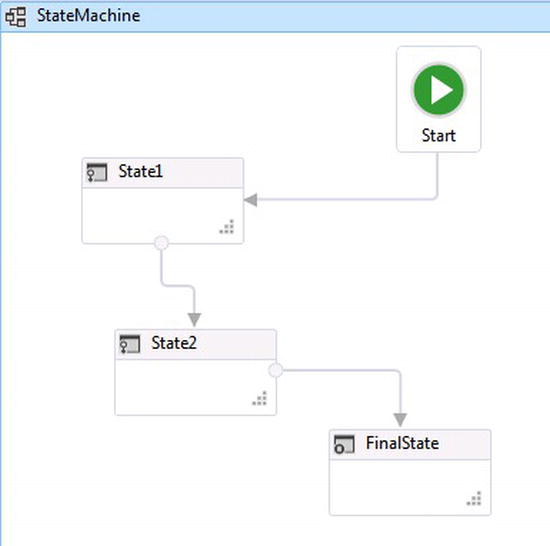
Figure 2-19. StateMachine activity
StateMachine activities can be drilled into deeper by double-clicking on them to reveal Entry and Exit triggers, as illustrated in Figure 2-20. Transitions can also be created to other states to model human interaction with the workflow.
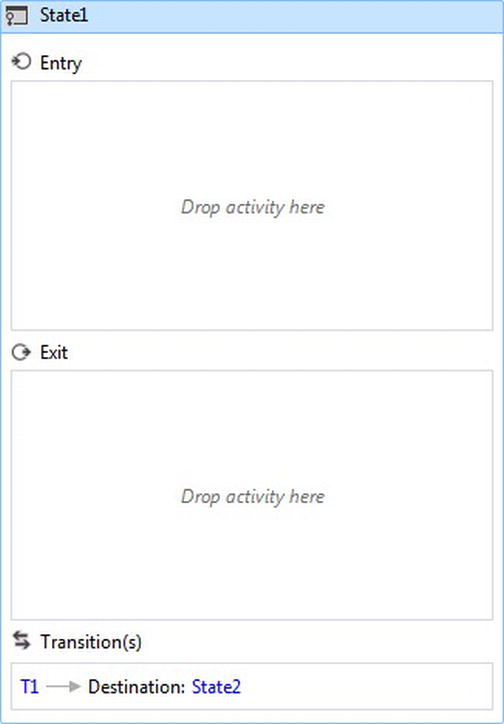
Figure 2-20. State activity
The FinalState activity serves as the last state executed within a state machine workflow. Child activities are executed within it on the Entry trigger for the state (see Figure 2-21).
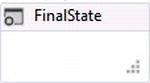
Figure 2-21. FinalState activity
Figure 2-22 illustrates the Assign activity used for assigning values to other objects within a workflow. It shows an output argument that will be returned from the workflow after it has been assigned a new Customer object. The output argument can then be returned to the application hosting the workflow through the WF runtime.
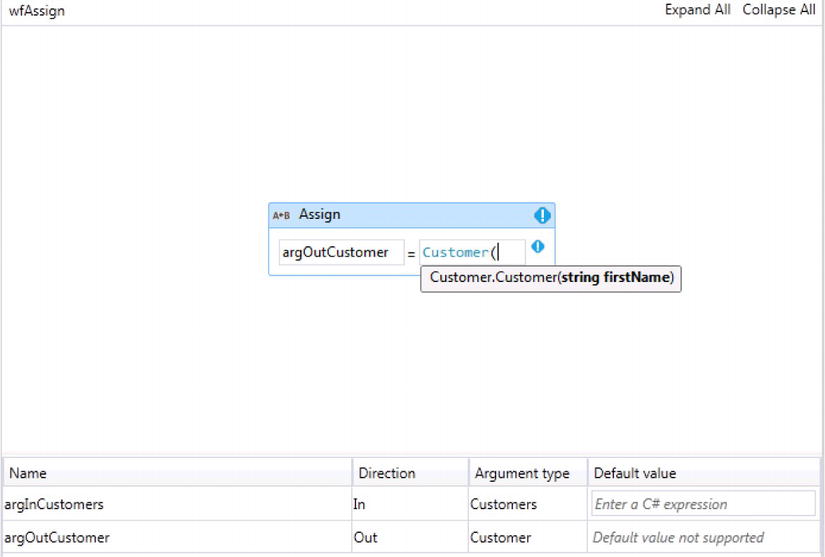
Figure 2-22. Assign activity
In addition to the out-of-box activities, activities can also be custom built to handle business logic that can’t be modeled using existing workflow activities. Note that out-of-box activities are not designed to be inherited from using code because their classes are sealed, so they cannot be used as a base class. The next chapter will explain more about building custom activities; until then, let’s take a quick tour around some of the workflow activities WF provides.
Workflows
Workflows in WF are an orchestration of work modeled from business processes, and there are three different types of workflows that can be built within WF for modeling different types of business process flows based on characteristics of a business process. The three types of workflows within WF4 are
- Sequential: Models flows that are procedural in nature and follow a predictable pattern of starting from the top and following sequential order of steps down. Characteristics of sequential workflows include
- Predetermined flow
- Systematic
- Lack of flexibility
- State-machine: Models flows that cannot be predicted and represent the current state of execution at any given time, while relying on external events based on human decisions for guiding its flow through transitions among other possible states. Characteristics of state-machine workflows include
- Flexible
- Models human behavior
- Reactive
- Flowchart: Models a decision-making process flow that is neither predictable nor requires external events based on human decisions for processing. Characteristics of flowchart workflows include
- Transparent decision options
- Highest level of transparency for decision making
- Natural flow back to previously executed workflow activities
Sequential and state-machine workflows were introduced in WF3.x; however, the flowchart style of workflow was a new feature introduced in WF4. Modeling workflows as flowcharts removed the boundaries of having different types of workflows within WF because it is more natural way for modeling processes. Flowchart workflows provide a higher level of transparency because the goal of a flowchart is to flush out all possible flows within a process. This stems back to the concepts around using workflows, as demonstrated in Chapter 1. WF can now utilize the features of flowchart workflows by executing work based on detailed decision-making flows modeled within the workflow.
To see an example of each of the three workflows, let’s model a process around the legal age for voting within the United States.
The example in Figure 2-23 shows how this logic could be modeled within a sequential workflow. Figure 2-24 shows the voting process as a transitional state using a state-machine workflow.

Figure 2-23. Voting modeled as a sequential workflow
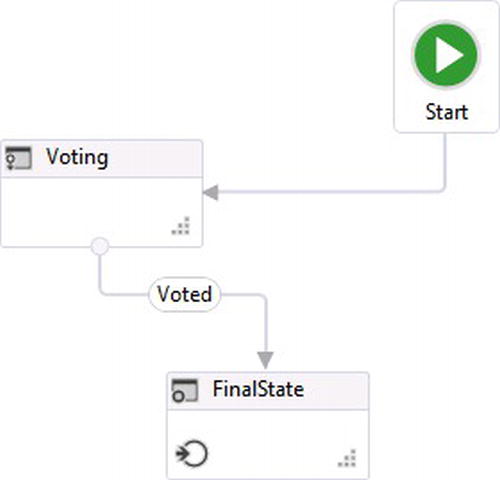
Figure 2-24. Voting modeled as a state-machine workflow
Figure 2-25 shows the logic within the transition Voted, which can be seen by double-clicking on the transition.
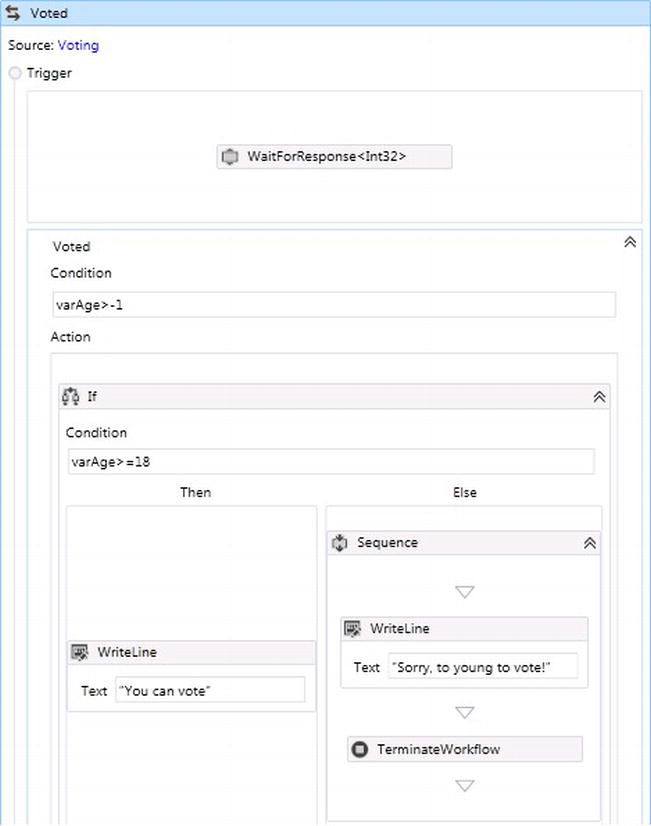
Figure 2-25. State-machine Voting transition logic
Figure 2-26 shows a more natural way of modeling the logic for the legal age of voting; however, in some cases it will make more sense to use sequential or state-machine workflows for modeling business processes. Understanding the characteristics of the process that needs to be modeled is key so they can be matched up with the characteristics mentioned earlier for the type of workflow that should be used to model the process.
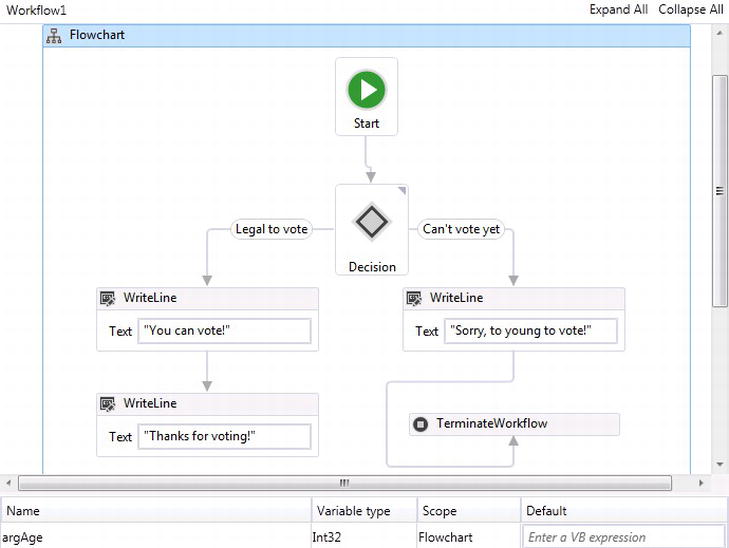
Figure 2-26. Voting modeled as a flowchart workflow
Defining Workflows
Workflows in WF4.x can be represented as XML or defined solely using code. Listing 2-1 shows how to build a workflow using C#.
Listing 2-1. Sequentially Modeled Workflow Represented as C# Code
static void VotingWorkflow()
        {
            Variable<int> varAge = new Variable<int>
            {
                Name = "varAge",
                Default = 18
            };

            Activity wfVoting = new Sequence
            {
                 Variables = {varAge},
                Activities =
                {
                    new ifIf
                    {
                        Condition = new InArgument<bool>((e)=>varAge.Get(e)>=18),
                        Then = new WriteLine
                        {
                            Text = "You can vote!"
                        },
                        Else= new Sequence
                        {
                            Activities =
                            {
                                new WriteLine
                                {
                                    Text = "Sorry, too young to vote"
                                },
                                new TerminateWorkflow
                                {
                                    Exception =  new InArgument<Exception>((ex)=>new
ApplicationException("Too Young"))
                                }
                            }
                        }
                    },

                    new WriteLine
                    {
                        Text = "Thanks for voting"
                    }
                }
            };

            WorkflowInvoker.Invoke(wfVoting);
            Console.Read();
        }
This is a different approach than the originally defined workflows represented in WF3.x. WF3.x workflows required the combination of both code and XML when authored. WF4.x workflows can either be built from code as represented in Listing 2-1 or built using Extensible Application Markup Language (XAML), which also introduces a very powerful feature within WF environments. XAML files are XML-formatted files defined by Microsoft for working directly with objects within the .NET Framework. This allows workflows to be authored using tools outside of WF and executed within any WF environment. Listing 2-2 represents the XML that was used to build the sequential voting workflow in Figure 2-23.
Listing 2-2. Sequentially Modeled Workflow Represented as XML
<Activity mc:Ignorable="sap" x:Class="Apress.Example.Chapter 2.WorkflowType.wfVotingAge"
sap:VirtualizedContainerService.HintSize="531,618" mva:VisualBasic.Settings="Assembly references
and imported namespaces for internal implementation" xmlns=" http://schemas.microsoft.com/netfx/2009/xaml/activities "
xmlns:mc=" http://schemas.openxmlformats.org/markup-compatibility/2006 " xmlns:mv="clr-namespace:Microsoft.
VisualBasic;assembly=System" xmlns:mva="clr-namespace:Microsoft.VisualBasic.Activities;assembly=System.Activities"
xmlns:s="clr-namespace:System;assembly=mscorlib" xmlns:s1="clr-namespace:System;assembly=System"
xmlns:s2="clr-namespace:System;assembly=System.Xml" xmlns:s3="clr-namespace:System;assembly=System.Core"
xmlns:s4="clr-namespace:System;assembly=System.ServiceModel" xmlns:sa="clr-namespace:System.Activities;assembly=System.Activities"
xmlns:sad="clr-namespace:System.Activities.Debugger;assembly=System.Activities"
xmlns:sap=" http://schemas.microsoft.com/netfx/2009/xaml/activities/presentation "
xmlns:scg="clr-namespace:System.Collections.Generic;assembly=System" xmlns:scg1="clr-namespace:System.Collections.Generic;assembly=System.ServiceModel"
xmlns:scg2="clr-namespace:System.Collections.Generic;assembly=System.Core" xmlns:scg3="clr-namespace:System.Collections.Generic;assembly=mscorlib"
xmlns:sd="clr-namespace:System.Data;assembly=System.Data" xmlns:sl="clr-namespace:System.Linq;assembly=System.Core"
xmlns:st="clr-namespace:System.Text;assembly=mscorlib" xmlns:x=" http://schemas.microsoft.com/winfx/2006/xaml ">
<Sequence sad:XamlDebuggerXmlReader.FileName="\WIN-83I06C1NH3RSharedWithVMApressApress
Apress.Example.Chapter 2 .WorkflowTypewfSequentialVoting.xaml"
sap:VirtualizedContainerService.
HintSize="491,578">
<Sequence.Variables>
<Variable x:TypeArguments="x:Int32" Name="varAge" />
</Sequence.Variables>
<sap:WorkflowViewStateService.ViewState>
<scg3:Dictionary x:TypeArguments="x:String, x:Object">
<x:Boolean x:Key="IsExpanded">True</x:Boolean>
</scg3:Dictionary>
</sap:WorkflowViewStateService.ViewState>
<If Condition="[varAge >= 18]" sap:VirtualizedContainerService.HintSize="469,353">
<If.Then>
<WriteLine sap:VirtualizedContainerService.HintSize="211,247" Text="You can vote!" />
</If.Then>
<If.Else>
<Sequence sap:VirtualizedContainerService.HintSize="233,247">
<sap:WorkflowViewStateService.ViewState>
<scg3:Dictionary x:TypeArguments="x:String, x:Object">
<x:Boolean x:Key="IsExpanded">True</x:Boolean>
</scg3:Dictionary>
</sap:WorkflowViewStateService.ViewState>
<WriteLine sap:VirtualizedContainerService.HintSize="211,61" Text="Sorry, too young to vote!" />
<TerminateWorkflow Exception="[New ArgumentException("Too young")]" sap:VirtualizedContainerService.HintSize="211,22" />
</Sequence>
</If.Else>
</If>
<WriteLine sap:VirtualizedContainerService.HintSize="469,61" Text="Thanks for voting!" />
</Sequence>
</Activity>
![]() Note State-machine workflows were not included in the release of WF4. The WF team thought that flowchart workflows would be a better alternative for modeling state-machine processes. However, a huge developer response for adding the style of state-machine workflows into WF4 eventually convinced the WF team to add them to WF4 with the release of the .NET 4 platform update. State-machine workflows are included within WF4.5.
Note State-machine workflows were not included in the release of WF4. The WF team thought that flowchart workflows would be a better alternative for modeling state-machine processes. However, a huge developer response for adding the style of state-machine workflows into WF4 eventually convinced the WF team to add them to WF4 with the release of the .NET 4 platform update. State-machine workflows are included within WF4.5.
Significant improvement was made to the workflow designer in Visual Studio 2010, not only visually but in performance as well. The workflow designer uses Windows Presentation Foundation (WPF) technology for a much richer experience of designing workflows. The workflow designer provides the canvas for building workflows. Let’s get a better look at the workflow designer by seeing it firsthand in Visual Studio 2012.
WORKFLOW DESIGNER WALKTHROUGH
- Open up Visual Studio 2012 and create a new Workflow Project. The next pop-up screen asks the type of project.
- Make sure that .NET Framework 4.5 is chosen for the framework for the project. If you choose .NET Framework 3 or 3.5, you will see different project types then represented in Figure 2-1 for creating a new project using the original workflow designer.
Because the project is a workflow console application, the project by default provides everything it needs for building and executing a workflow. If .NET Framework 3 or 3.5 is selected, the designers for WF3.x also have a template called sequential workflow console application and state machine workflow console; however, each project specifically builds sequential or state-machine workflows (see Figure 2-28 and 2-29).
Figure 2-28. WF3.x sequential workflow
Figure 2-29. WF3.x state machine workflow
- View the Solution Explorer, and open the file Program.cs by double-clicking on it. The code in Listing 2-3 shows that the workflow console application template uses the WorkflowInvoker to easily process the workflow, much like a call to a method in code. The WorkflowInvoker processes the workflow by passing it the workflow object built using the designer as an argument.
Listing 2-3. Default Code within Program.cs, Used for Executing a Workflow
using System;
using System.Linq;
using System.Activities;
using System.Activities.Statements;

namespace WorkflowConsoleApplication1
{
    class Program
    {
        static void Main(string[] args)
        {
            WorkflowInvoker.Invoke(new Workflow1());
        }
    }
}
Figure 2-30 shows that the designer canvas in WF4.x is empty because there is no longer a boundary between templates for different workflows like sequential and state-machine workflows in WF3.x. Combining different types of workflows in WF3.x was a difficult task, but in WF4.x, different types of workflows can be combined within the design of one workflow.
Figure 2-30. Creating a workflow console application
- Expand the Primitives tab within the Toolbox, and click and drag the WriteLine activity to the designer canvas.
- Add “Hello World” to the WriteLine activity’s Text property. If you run the project at this point, the only thing that might happen is maybe a console window will pop up and then go away as quickly as it appeared. This is because of the code in the Program.cs file (see Figure 2-31).

Figure 2-31. Adding “Hello World” to the WriteLine Activity
- Open the Program.cs file and add Console.Read(); right under the WorkflowInvoker.Invoke The code within the Main method should look like Listing 2-4.
Listing 2-4. Adding Console.Read()
static void Main(string[] args)
        {
            WorkflowInvoker.Invoke(new Workflow1());
            Console.Read();
        }
Next, compile the project to make sure everything compiles. Press F5 to run the workflow. The console window will stay open, and within the window it should read, “Hello Workflow”. The line of code Console.Read() tells the program to wait for feedback from the keyboard before closing. - Close the console window by making sure it is active and pressing the Enter key.
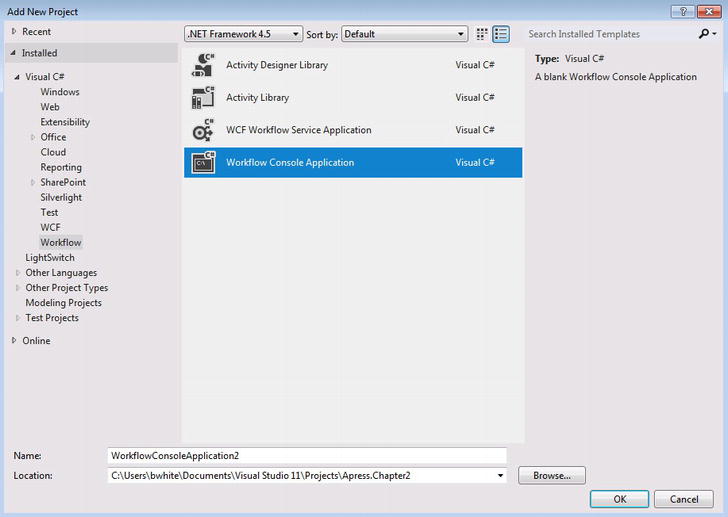
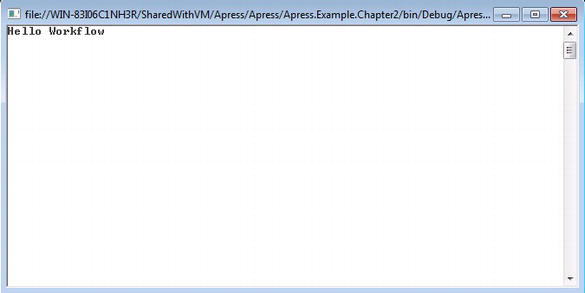
Figure 2-32. “Hello Workflow” Console
This exercise demonstrated the workflow designer and showed how to build a basic workflow and have it run within a console application. The example also showed how a workflow is hosted using the WF runtime by providing the code for calling a workflow using the WorkflowInvoker host. This type of project can be used for building workflows to make sure they are working as expected.
WF Data Model
In order for workflows to process information, the workflow obtains data in three different ways.
- When the workflow is started: Data is supplied to the workflow as it is started within the WF runtime. Input arguments are passed to the workflow through the WF runtime, and the name for each input argument must be explicitly assigned to an argument within the workflow so data can be passed to the workflow.
- Read into the workflow from external events: Workflows can be passed data through external events that occur at random times. An example is a workflow that processes orders. An order-processing workflow is started and then waits to process orders as they are made by customers.
- Received from the workflow through an external event: Workflows can have predefined logic for checking other data sources to see if data exists for being processed. Workflows can read data from pre-configured databases and make calls to services.
Just as any other programming language, WF uses variables, arguments, and expressions for processing data and communicating data with the WF runtime (see Table 2-12).
Table 2-12. Workflow Data Model
WORKFLOW DATA MODEL
Arguments, variables, and expressions can be built into a workflow using the WF designer. Using the same project from the workflow designer walkthrough, this exercise will walk through how to add an Age argument to a workflow and how to add a WF expression using the argument.
- Open the project used in the workflow designer walkthrough. Within the Solution Explorer, double-click the workflow called Workflow.xaml. By default, the workflow designer will open, revealing the workflow and the single WriteLine activity you added to the designer.
- At the bottom of the workflow designer you will notice the words “Variables,” “Arguments,” and “Imports”. These are actually tabs, so by clicking on Arguments, the user interface expands for creating a new workflow argument. It is good practice to use a naming convention for identifying arguments by adding ”arg” to the beginning of the argument name assigned. The naming convention could be taken a step further by indicating the flow of data for the argument. For example, instead of using “arg”, use “argIn” as the predicate for the name when defining an argument.
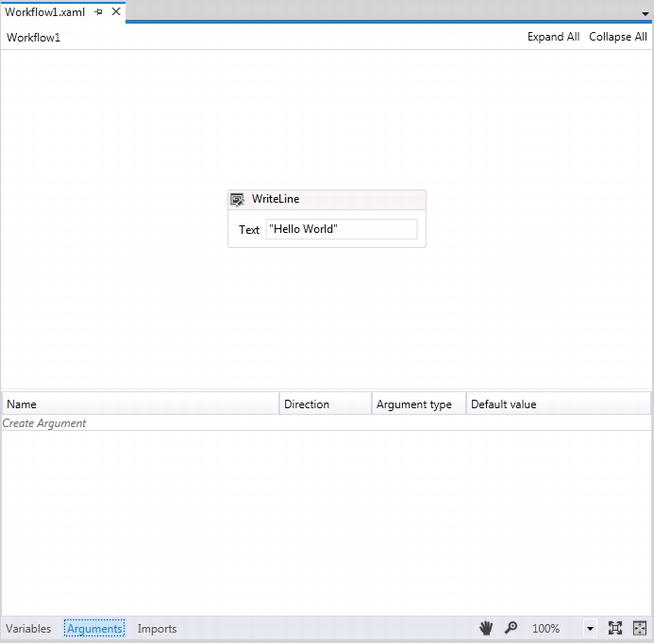
Figure 2-33. Creating an argument
- Click within the Name textbox for the new argument and add argInAge for the argument name. The direction for the new argument defaults to In, which is the direction of the argument needed for passing data into the workflow from the application hosting the workflow.
 Tip The process for removing unwanted arguments is not really clear; however, arguments can be removed once they are highlighted within the argument editor by pressing the Delete key.
The argument type defaults to String and since the new argument is meant to pass in an age, the type needs to be changed to an integer. Click on the argument type drop-down and select Int32. If the logic in the workflow called for a default age to be passed in, that would be set by using the Default value textbox.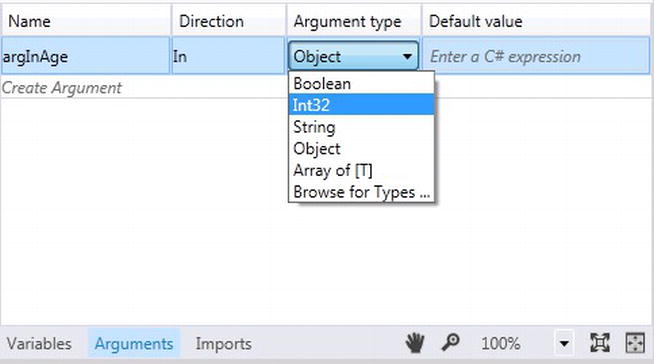
Figure 2-34. Argument types
Now that the workflow has an argument for receiving data, simple logic using a C# expression needs to be added to the workflow that uses the argument to write a message to the console window from the workflow. - Click the WriteLine activity within the workflow, and the Properties window for the activity will display. The WriteLine activity has a property called Text that will be used for building the expression.
- Click the ellipses(“…”) button on the Text property for the WriteLine activity. An Expression Editor will appear that allows an expression to be built for the activity (see Figure 2-35).

Figure 2-35. WriteLine Activity Properties
- Change the text expression from “Hello Workflow” to the following, as shown in Figure 2-36:
String.Format(“Hello Workflow I am {0} years old!”, argInAge)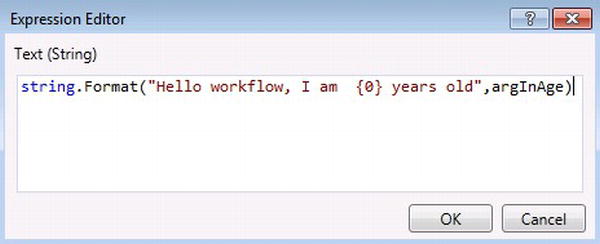
Figure 2-36. Expression Editor
This code formats the string by including the parameter argAge, which is converted to a string since the argument is an integer. There is one more step that needs to happen in order to pass the age argument into the workflow using the WF runtime hosted within the console application. - View the Solution Explorer, and open the file Program.cs by double-clicking on it. Add the code in Listing 2-5.
Listing 2-5. Adding Console.Read()
using System;
using System.Linq;
using System.Activities;
using System.Activities.Statements;
using System.Collections.Generic;
namespace Apress.Example.Chapter2
{
class Program
{
static void Main(string[] args)
{
var wfArg = new Dictionary<string,Object>();
wfArg.Add("argInAge",39);
WorkflowInvoker.Invoke(new Workflow1(), wfArg);
Console.Read();
}
}
}
This code adds the namespace System.Collections.Generic so a Dictionary generic object with the signature of <string,object> can be passed in as an argument using WorkflowInvoker.Invoke. - Press F5 to run the workflow. The workflow will print “Hello Workflow I am 39 years old!” out to the console, as shown in Figure 2-37.
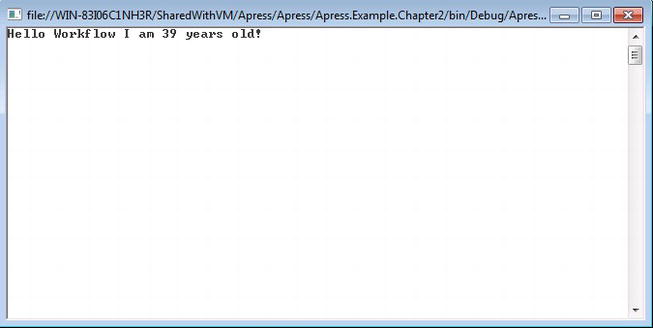
Figure 2-37. Displaying results from the workflow
Note “Browse for Types” allows defined arguments to have custom types. For example, if there is a defined Customer type, it can also be used as the argument type so customer objects can be passed in and out of workflows.
This exercise demonstrated how to implement an argument within a workflow and how to pass the value of an argument through the WF runtime. Finally, an expression was built to show how the workflow could display information about the argument as output within a console window.
Have you ever watched a sci-fi movie where astronauts travel years to other planets and must fall into a deep sleep to reduce aging by slowing the body’s energy expenditure? Workflow persistence is rather like that, in that a workflow is put to sleep to save memory consumption when the workflow becomes idle. The WF runtime realizes that a workflow has become idle and converts the workflow into a data format that can be loaded into a data store like SQL Server. The current state of the workflow becomes much like the astronaut because it has been cryogenically frozen in time with the intention of being thawed at a later point to perform more work. When a business solution implements WF for processing orders, every time a business transaction for an order is started, a workflow presenting the order will be created through the WF runtime as a workflow instance. Each workflow instance that runs requires an allocation of memory and the CPU processing power to run it—just like any other process. However, WF supports running workflows for longer periods, and because there may be times when a workflow needs input and decides to go idle while it waits for feedback, memory is still being held.
Instead of holding on to the allocated memory, which is essentially being wasted while a workflow is idle, WF persistence allows a workflow to save its current state of execution and continuing at a later time. The default behavior for WF when persisting a workflow is to serialize a workflow’s current state into a data format that can be loaded into a predefined database structure within SQL Server and built using provided SQL scripts from WF. When an anticipated event finally occurs, the workflow is rehydrated into the WF runtime so it can continue processing. Persistence in WF4 has been redesigned to provide a more efficient method for how it serializes workflows being persisted. WF uses SQL Server as its data store of choice for persisting workflows, and just like the gains you get for storing data, storing workflows gains scalability and a way to handle unanticipated failures during a workflow instances execution.
Since the WF runtime manages workflow scheduling and execution, persistence can be associated to the WF runtime for access to the SQL Server data store. In addition, custom persistence stores can also be created if SQL Server is not available.
One of the greatest challenges we face as developers is creating ways of understanding what is going on under the hood of running applications. If we could gather custom feedback and certain metrics based on each process to understand how they run, we would be able to build better software. Another key feature building workflows provides is a pattern of how code executes and the flow pattern executed; this provides developers with a visual model of where to track certain events. WF tracking contains tools for gathering data about a workflow’s execution so developers can have insight into the health of how a workflow executes. By default, data retrieved while tracking a workflow is stored in the Event Tracing for Windows (ETW) log, which is provided through the operating system. Once tracking is configured to use a data store, a default tracking profile is provided and can be tailored to return a subset of data that is important to track (see Figure 2-38).

Figure 2-38. WF Tracking physical overview
A Lap Around WF4.5
Now that you have a good basic understanding of WF’s components, let’s look at the cool new features in WF4.5. WF4.5 was released with .NET Framework 4.5. As developers continually use WF to develop workflow applications, we are constantly discovering better ways of making our day-to-day processes easier as we become more comfortable with our development tools. Microsoft has once again done a fantastic job of addressing developer concerns.
Some major improvements have been made around working with activities in WF4.5. The following sections cover some areas that make the experience better while managing activities within workflows.
Multiple activities can now be multi-selected and dragged from one workflow and dropped within another workflow.
Workflows can now be associated with a corresponding outline defined as a hierarchy tree. When an item in the tree is selected, the view is navigated to the corresponding activity within the workflow designer.
Expressions can now be customized so developers can author their own expression experience within the workflow designer.
Annotations
Annotations can now be added to narrate information about activities on a workflow. Annotations can be added by right-clicking on an activity (see Figure 2-39).
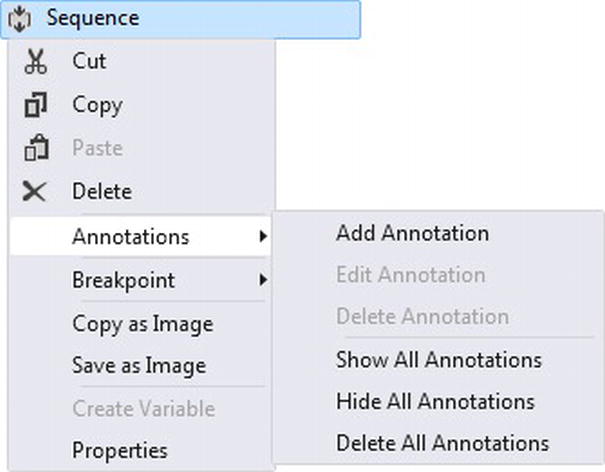
Figure 2-39. Adding annotations
As workflows run for long periods of time, more changes will be introduced to the business process the workflow is modeled around. WF4.5 provides new versioning features where multiple versions of a workflow can be hosted side by side. WorkflowServiceHost can now process many versions of a workflow by reflecting the new changes for a deployed workflow. New workflow instances that are spun up use the latest workflow definition. Dynamic updates can also be applied to persisted workflows.
Building workflow projects sometimes succeed without any validation errors, while there are still validation errors for a workflow. WF4.5 validation errors will now cause the project to fail during the build process.
Centralized View State in XAML
View state for a workflow is now serialized and contained within an element of the XAML file. Developers can now easily find the view state so it can be customized.
Debugging State-Machine States
In WF4, there was no indication when a state activity was being executed during runtime. In WF4.5, breakpoints can be added to state activities themselves, indicating that a state activity is about to be executed.
As mentioned earlier while demonstrating the FlowDecision activity, you had to make sure to connect the FlowDecision activity to the Start activity. This no longer has to be done because in WF4.5, as you drag activities on to the canvas for building flowchart and state-machine, the new activities can automatically be connected by dragging the new activity on an existing activity’s attachment points. Activities will also be automatically connected by adding new activities between existing activity nodes on a workflow (see Figure 2-40).
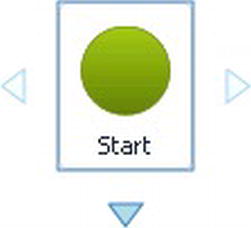
Figure 2-40. Attachment points
In WF4, the decision was made to use Visual Basic syntax for writing expressions that add logic to workflows because of its English-like vocabulary and syntax. This was a pain for developers who primarily use C# as their language of choice, so in WF4.5. C# expressions can now be used.
Sometimes it is important that child activities are not persisted in a logical flow. The concept is that although the workflow has been persisted, something could happen in between to cause the workflow to fail, which would cause the persisted actions of the workflow to be obsolete. By obsolete, I don’t mean that the workflow does not get persisted correctly; it just means that the logic flow of the workflow is compromised because the next time the workflow instance loads from being persisted, logic has already occurred that will cause the process to be invalid. In some cases, WF4.5 provides a No-Persist Scope or No Persist Zone that prevents child activities from persisting.
ValidateUnconnectedNodes is a property included in WF4.5 to check when flowchart workflows have disconnected nodes. When this property is set to True, validation errors occur, indicating that the nodes are not connected.
There is no descriptive way to address the decision-making role it is playing within the workflow. A new DisplayName property can now be added to both the FlowSwitch and FlowDecision activities so that it shows more information around a decision that is being made.
When there is already an activity within a workflow, you often need to use a Sequence activity as a container for holding the already existing activity because other activities need to be added. In this scenario, the existing activity has to be deleted. Alter the existing activity to indicate that the new activity can be placed either before or after the existing WriteLine activity.
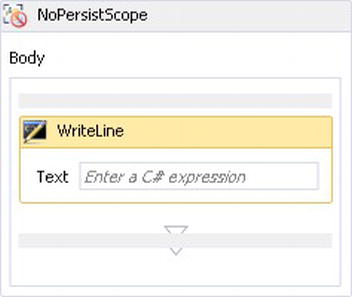
Figure 2-41. Without a sequence activity
Figure 2-39 shows that a new Sequence activity is automatically added, which now serves as a parent activity to both of the WriteLine activities.
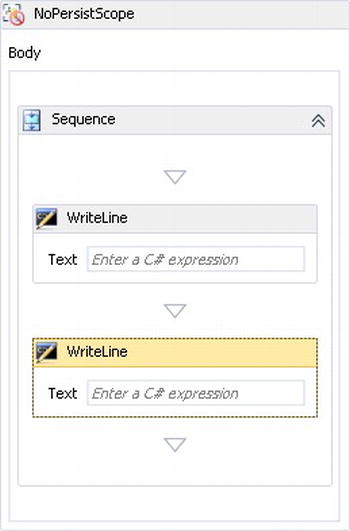
Figure 2-42. Adding a sequence activity
Sometimes workflows are so big that it is hard to find a particular part of the workflow that needs to be identified so changes or maintenance can be applied. WF4.5 offers designer search functionality that allows the workflow to be searched on a keyword. Note that searching is not available when the designer is rehosted. There are two searches.
- Quick search: Ctrl+F or Edit, Find and Replace, or Quick Find.
- Searches on properties for
- Activity
- FlowNode
- State
- Transition
- Custom flow-control items
- Variables
- Arguments
- Expressions
- Find in files: Ctrl+Shift+F or Edit, Find and Replace, Find in Files
Deleting Variables and Arguments
Variables and arguments could only be deleted by clicking over the argument or variable and clicking Delete. This sometimes caused issues because when you click on a variable or argument, the designer thinks you want to edit it. The first time I saw this, I was not sure how to delete them and instead removed them from the XAML. WF4.5 provides the more intuitive solution of a Delete command on the Context menu (see Figure 2-43).
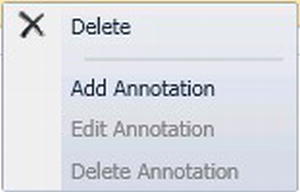
Figure 2-43. Attachment points
Contract-First
When building WF services using the messaging activities, the contract that gets implemented is built on the fly. WF4.5 allows pre-existing contracts to be used and implemented within a workflow service. This is an extremely powerful feature because it works well with code generation tools like T4, Microsoft’s template code generator.
State-Machine
Of course state-machine workflows are also included within WF4.5, so if you skipped the Platform Update 1, which released state-machine workflows, you will still automatically get them in WF4.5.
Summary
This chapter explained the benefits of using a technology like WF. It addressed all of the significant components in WF, including the WF designer, runtime, and activities, by showing how they are used. Key comparisons were made to WF3.x and how some of the pain points were solved by features new to WF4. There was a brief section on the Platform Update 1, released for the .NET Framework and Visual Studio 2012 designer, which offered a much richer way to implement state-machine workflows (which was left out of WF4). Finally, this chapter covered the changes in the latest release of Workflow Foundation, WF4.5 and how these new features continue to make WF the wonderful technology that it has become. The next chapter will focus on activities and how to build them from the ground up. From this point on, we start getting more technical as we dive into the .NET libraries and namespaces of WF4.5.