

Technical Documentation
By this time in the project, you should have a good set of requirements and a clear sense of the project features. You should also be able to confidently maintain project momentum and address common situations that cause delay. Now that you know what to build and how to keep the project moving, it's a good idea to first document the technical aspects of what your team is building.
Some technical documentation is meant to be shared with the client, and some is meant only for consumption by your project team. There are also many flavors of technical documentation—wireframes, design mock-ups, HTML mock-ups, and technical specifications, to name a few—so it's important to understand which documents are helpful when. What each format has in common is that they unify the concepts of what the project will be in a more visual and holistic manner than a dry bullet list of requirements could ever convey.
Technical documentation should not become a time sink. Ideally, it is another efficient step to help manage the expectations of the client and your team. In this chapter, we detail the most common types of technical documentation and guide you through how to create them.
In addition, we cover tips for how best to share work with your client, how to manage a design process that doesn't break the budget, and even how to create and document a database for a project.
Picking the Right Format
The first step in preparing technical documentation is identifying exactly what kind of documentation you need for your project. Let's start by looking at how you can pick the right format.
Design Mock-Up, Wireframes, and HTML Mock-Ups
A technical specification will assume different forms depending on the kind of project you are working on:
- In a public web site project, you are designing or redesigning the online presence of a company, organization, school, effort, project, or other group. In a public design project, the client will be anxious to see and provide feedback on the general look and feel and the branding of the site.
- In a custom software project, you are creating a web- or desktop-based application from scratch. In custom software, it will be critical to see how key screens will work, such as search tools, data input forms, and profile screens.
There are many different kinds of mock-ups you can prepare; these include the following:
- A traditional design mock-up is an image that shows how the project will look when finished, complete with the branding, colors, fonts, styles, visual flourishes, and sample content that will reflect the final project.
- A wireframe is a non-design structural mock-up that shows the visual order of elements on the page and how they relate to each other spatially. Wireframes do not include design elements like color, fonts, or images.
- A set of HTML mock-ups is a visual representation of how the site will look and flow. Links between the pages will work, form elements will generally be populated with typical values, colors and branding are present, and the main features of the site are shown.
In both a public website project and a custom software project, it is best to prepare a set of wireframes and seek client approval before you prepare some kind of mock-up. A visual mock-up (design or HTML mock-up) will take more time to create and more time to refine from client feedback than a wireframe, so it is helpful to nail down the core layout before the design phase.
A wireframe will also set the structure that the design mock-ups will need to follow, meaning the designer can focus on presenting the same structure visually in different ways. The client will be able to focus easily on the visual differences in the mock-ups, rather than the structural elements (which should already be set by the wireframes).
What is the difference between a visual mock-up and a wireframe? Take this example: a visual mock-up for a web site redesign project would include the logo being used for the project in the header of the mock-up. On a wireframe, the logo would likely be a square box labeled, “logo.” See “Preparing Screen Mock-Ups” later in this chapter for some examples of wireframes and their resulting mock-ups.
Don't Mock Me Up
For a public web site project that does not involve much custom development, you can prepare a set of wireframes for client review. Once refined and approved, you can hand these wireframes and the requirements over to the designer, who can prepare the design mock-ups.
For a custom software project, there usually is not as much of a design component (beyond meeting the client's basic branding requirements) so much as an interactive design process. It is vital at this phase to show how the application will work, how the interaction between the user and the application will function, and how the screens will connect the workflow logically in the application. A set of HTML mock-ups will work best in this situation.
In a custom software project, the difference between individual pages will be much greater than the differences between individual pages in a public web site project, where the basic layout of content pages tends to be more consistent. Because of this, in a custom project you will need to create many more HTML mock-ups than traditional wireframes or design mock-ups.
For smaller custom software projects, a set of HTML mock-up screens (and the database schema, discussed later) are probably all you need for technical documentation. The developer will happily take the screens you prepared and start building the business logic to support the implied functionality. A good set of HTML mock-up screens for a smaller custom project can be so instructive that your developers might never open the requirements document during development.
The amount of detail you will need will vary. For wireframes and design mock-ups, prepare a home page and a sample content page. For HTML mock-ups, prepare a mock-up of every page, every form, every filter, and every control in the application.
Figure 7-1 details the HTML mock-up of a student database listing and search screen. Looking at the mock-up, you would not know that none of the functionality is present.
A clear set of mock-up screens has many benefits:
- The client probably will not understand fully what the project entails until seeing it rendered visually.
- Creating the mock-up screens makes preparing the database schema in tandem a snap (if applicable).
- The thought process that goes into the mock-ups will help expose any upcoming project challenges you have not yet anticipated, which will be easier to deal with before development has started.
- You can get the client to sign off on the visual representation of the application to help manage expectations.
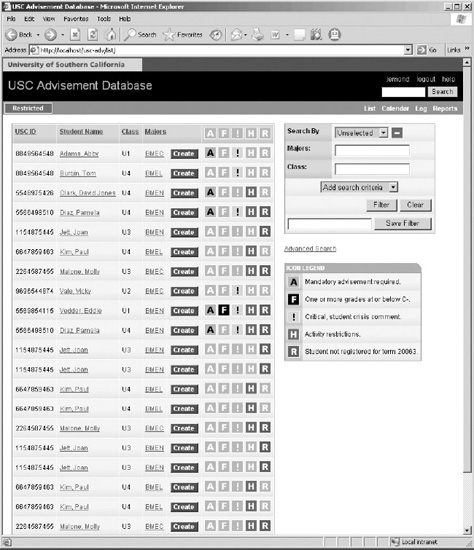
Figure 7-1. An HTML mock-up for the home page of a custom web application. The mock-up is just HTML; there is no functionality in the links and UI elements. (All data shown is random.)
When to Write a Technical Specification
For a more complex custom software project, you will need to prepare a technical specification. A technical specification is actually quite simple. It is a written description of your HTML mock-ups and of all of your project's features, and is intended to serve as a development guide to your project team.
A technical specification describes everything that goes on behind the scenes or that is not immediately apparent in your HTML mock-ups. A spec is most helpful for complex or larger custom software projects. A good way to find out if you need a technical specification is to look at your requirements.
Ask yourself these questions:
- Is there business logic that is required as a foundation to certain requirements that is not explicitly called out as its own requirement? Or is there business logic that supports certain requirements, but is not a requirement itself?
- Are there requirements that could be reasonably achieved with vastly different technical approaches?
- Are there requirements that affect other project decisions, such as the server configuration needed to support the finished project?
- Is there functionality in the project that is unfamiliar to your development team or unlike previous work your team has done?
- Is this project generally larger and more complex than projects completed successfully, on schedule and on budget, in the past?
- Will the project take more than a week of time, or involve more than one programmer?1
If you answered yes to any of these questions, then you probably need a technical specification. Let's look at an example.
Say you have a project to build a series of web forms for editing structured data such as contact records. The HTML mock-up screens you prepare will make it clear where fields go, how the forms are laid out, and how the workflow will work. Additionally, there is really only one way (in a specific technical platform) to create a web form that allows users to edit data. There is not much in the way of discussion or possibilities of “gotchas” in building this kind of project.
However, if you also have a series of requirements to build an e-mail newsletter system into the contact database then you need a technical specification. Why? Because there will be many technical decisions that your programmers will have to make in order to build an e-mail newsletter system that would not be addressed in the requirements document.
______________
1 Joel Spolsky, “Painless Functional Specifications,“ www.joelonsoftware.com/articles/fog0000000036.html, October 2, 2000.
Here are just a few questions: How will e-mails be sent? Will they be queued and sent by an automated process, or sent immediately? Will the process run hourly, daily, every 10 minutes? How will we handle the processes running over each other? How will the process be set up on the server? Do we need a separate machine for handling the queue? How will we handle bounces? Prunes? Unsubscribe requests? Do we need to make any DNS changes so our e-mails do not get flagged as spam?
Too many unanswered questions are deadly to a project. Leaving the wrong kind of decisions to your programmers (and not answering them up front) will likely cause problems of budget, scope creep, schedule, scalability, and fault tolerance (often a challenge in e-mail systems) in your project.
Figure 7-2 is a real technical specification for a large, internal, custom ASP.NET project for a major university.
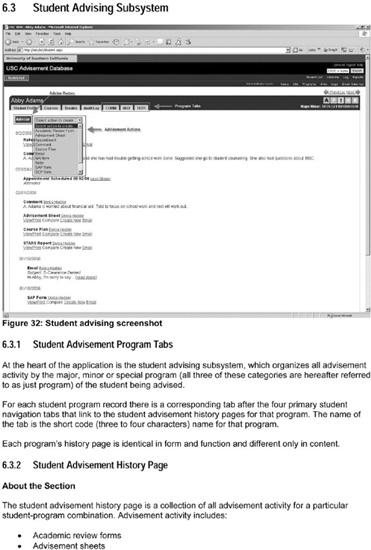
Figure 7-2. A page from a technical specification detailing how a key user interface element will work
All Together Now
To bring it all together, here is what to use when and where and how:
- A design mock-up is an image that shows exactly how a typical page will look. Best used for public web design projects.
- A wireframe is a non-styled mock-up of how the major elements of a web page will be arranged and positioned in relation to each other. Good for most projects before design mock-ups or HTML mock-ups are created.
- An HTML mock-up is a clickable set of screens that work in a browser and look exactly how the application will look. Best used for custom software development.
- A technical specification is a plain-language document that describes in detail what every part of every page will do and typically contains screen shots of the HTML mock-ups. Best for larger custom software projects.
For a typical public design web project, the process would be
- Collect requirements
- Prepare wireframes
- Collect feedback and refine
- Prepare design mock-ups
For a typical midsize custom software project, the process would be
- Collect requirements
- Prepare wireframes
- Collect feedback and refine
- Prepare HTML mock-ups
For a typical larger custom software project, the process would be
- Collect requirements
- Prepare wireframes (optional)
- Collect feedback and refine
- Prepare HTML mock-ups
- Collect feedback and refine
- Prepare technical specification
- Prepare database schema (see “Creating a Database” later in this chapter)
Preparing Screen Mock-Ups
This guide is not about the design process, so we will not delve into tips on the art of design (which is a good thing, because we do not have any). However, here are some general pointers that will help make the mock-up phase a breeze.
For custom software projects:
- Focus on the workflow. When conceptualizing what screens need to be in the application, try to think in terms of what needs to get done, rather than thinking about what screens might need to exist. Let the workflow of the user guide you.
- Show any key screens, such as search forms and input forms, complete with all of the fields you expect to include. This will make the workflow very clear to the client and will help catch any misconceptions.
- Imagine yourself in the office of your client trying to get some work done. How is this tool going to fit into your workflow and make it faster?
- Find a great design to inspire you. There is nothing wrong with starting the mock-up process by finding an application interface that you feel does a great job solving a problem similar to the one your project hopes to solve. Start by building up your first screen by copying the design, and then let it evolve.
- In each project where you design custom interfaces, try to make one specific, measurable improvement in this mock-up over your previous projects. This might be taking an element you often include and making it better by trying something new. This might mean changing the paradigm under which you define the navigation of the application. Whatever it means is not important, as long as you are trying with each project to do something new, which, in the process, becomes something better.
- Run some informal usability tests (sometimes called “hallway usability tests”). Grab a nontechnical member of your organization and put them in front of the mock-up. Point to an area on the mock-up and say, “What will this do if you click here?” Or ask questions about how to do a certain workflow, like, “Where do you go to search by last name?” The answers will be revealing.
For public web site design projects, it is most helpful to have a great checklist of questions to ask in the requirements gathering phase about design, such as
- What are some examples of web sites with designs you like?
- What are some examples of web sites you don't like?
- What colors should we use and not use?
- Do you have existing logos and designs we can use as a basis for the design?
- Do you have any branding or identity requirements?
- Do you want the navigation to appear horizontally across the top or vertically down the left side?
- Do you want a fixed or fluid layout?
When the wireframes are ready, send them to the client to review and set up a meeting to discuss them. Begin the meeting by explaining what each element in the wireframe represents. This helps ensure that everything is clear to the client.
Let's look at several examples. The wireframe in Figure 7-3 was for a dashboard for nonpublic users on a news-driven site. This is really a web application design exercise and not a public web site design exercise, and this page was part of a larger suite of tools to facilitate running a news site. This wireframe was created using Balsamiq Mockups, a wireframing software tool. Figure 7-4 shows the real web page that resulted from this initial wireframe.
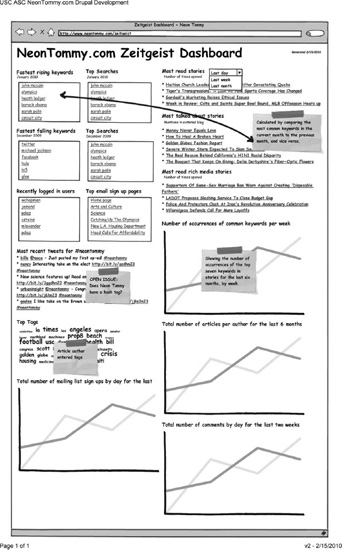
Figure 7-3. A wireframe for the editor's site activity dashboard in NeonTommy.com
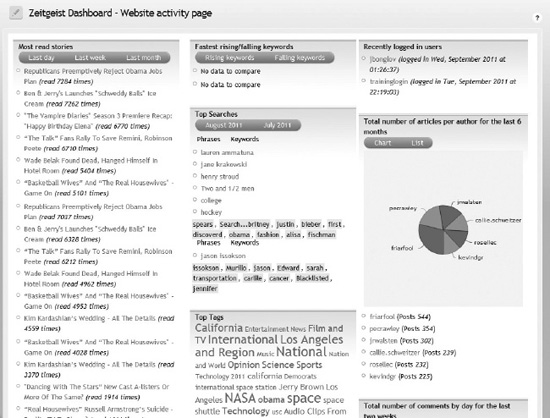
Figure 7-4. The wireframe in Figure 7-3 was turned into this real web page, called the Zeitgeist Dashboard.
The wireframe in Figure 7-5 was for a web development project whose goal was to encourage public participation in the McHenry County, Illinois, 2040 Long Range Transportation Plan. This wireframe was created by Urban Insight project manager Chris Loos using Mockups. Figure 7-6 shows the homepage.
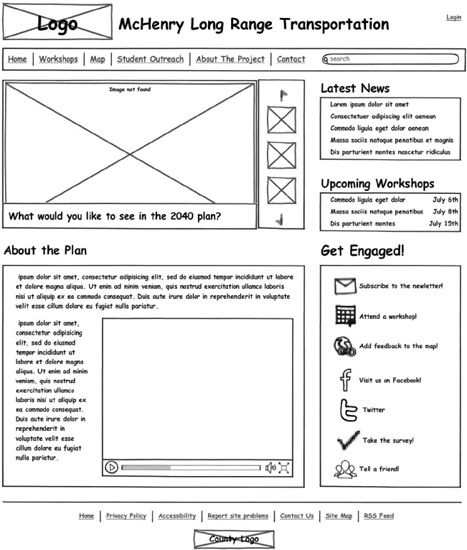
Figure 7-5. A sample homepage wireframe for a web site to encourage public participation
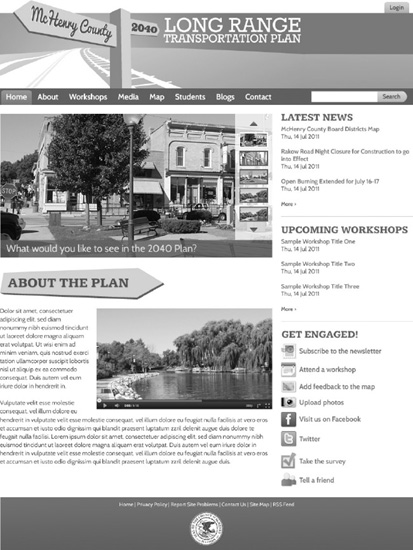
Figure 7-6. A sample design for the McHenry County, Illinois, 2040 Long Range Transportation Plan created based on the wireframe
The wireframe in Figure 7-7 was created to specify a web-based video gallery for the Los Angeles County Museum of Art. This wireframe was created by Urban Insight project manager Kurt Rademakers, PMP, using Microsoft Visio, which is often favored by project managers who have to create many wireframes that share common elements. The web page is shown in Figure 7-8.
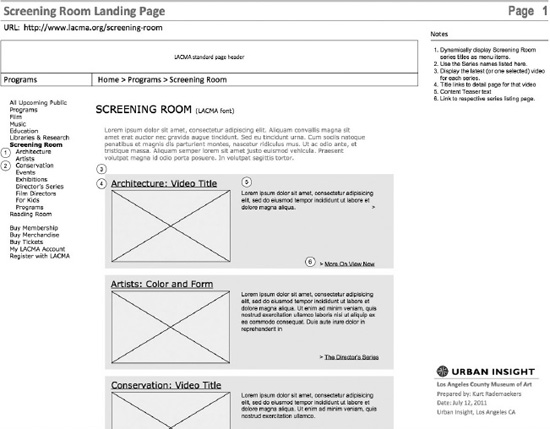
Figure 7-7. A sample wireframe for a web site to present a video library
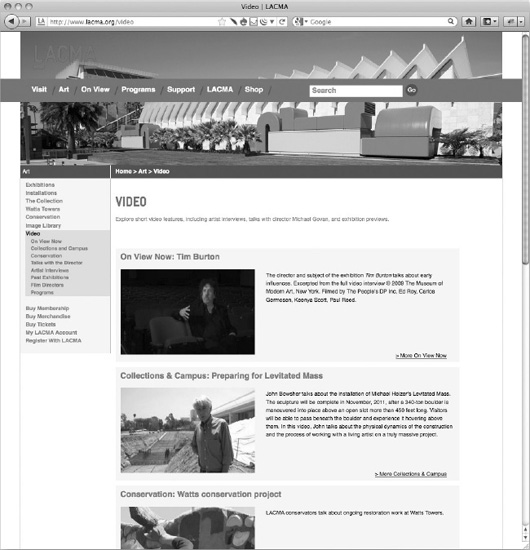
Figure 7-8. The implemented video library page based on the wireframe
In this case, because a clearly defined design for the web site already existed, the project team went directly from wireframes to implementation.
Sharing Your Work with the Client
It is important to present the wireframes and mock-ups to the client in a professional manner:
- Mock-ups are typically exported by a designer in an image format. Consider posting a simple but clean page on your web site (with a private URL) to post them.
- As they are produced, you can post newer versions of the mock-ups at the top of your private page, pushing the older comps down the page chronologically. This provides an easy way to see the progress of refinements and make it clear which is the most current design.
- Show a large thumbnail of each comp that links to a nice, crisp, full-size image.
- Label each mock-up to provide names that can be used by your clients when discussing specific mock-ups.
When preparing wireframes to share with the client, consider the following:
- Export the wireframe as a PDF, not a PNG. PDFs open and display reliably in Adobe Reader, which is widely available on most platforms. PNGs do not reliably open in an application that offers easy review.
- Clean up any extra attributes your wireframe software adds to the PDF. Anything that is not directly related to the wireframe and that might confuse your client should be removed.
- Change the properties of the PDF so that the document opens to show the entire first page.
- Add a header to the PDF with the project title, wireframe title, date, and version number.
- For multiple-page wireframes, add the page number in the footer.
NOTE See the Appendix for neat wireframe and mock-up tools that we have found helpful.
The Design Process
The visual design aspect of a web site development project tends to be the most fun for both you and your client, but it also has the potential to throw the project off track. Let's face it: design is subjective. We have seen perfectly professional and usable designs destroyed by a committee of non-design professionals who all wanted to add their own signature touches during the design review process.
Here are several subtle tactics for keeping the visual design aspect of your project on track.
- Try to remove some of the subjectivity in design by creating two sample home page wireframes before you create the design, so clients can focus on the placement of elements first.
- Include a “design brief” in your requirements gathering process. Recall that a design brief captures the key design requirements about the project, and determines the known design constraints such as the use of logos, whether the page width is fluid or fixed, and other design requirements.
- Review a series of ten preselected designs (not necessarily yours) of well-designed sites, and spend time discussing them. In the process, the client learns something about site design and you learn what they like.
- If you are working with a committee, perform this design discussion with the committee and ask them to reach consensus on the elements they do and do not like. The committee will perceive design development as a collaborative process. Otherwise, if you develop the design without their participation, you increase the risk they will reject it when you present it.
Because it is subjective, the design process can go on for a long time unless you constrain it. The best way to do this is to be explicit about what the design process will include and associate a cost with continued design revisions. Here is a model that we have found can work well:
- Agree to prepare three different initial design mock-ups. These will be based on the client's design goals, wireframes, and a review of other well-designed web sites.
- In addition to the initial design, conduct two rounds of design review and modification based on client feedback.
- State that each round of design review can be replaced by another new or fresh design if the client does not like one of the original three.
- After the home page design is set, create one or two content page designs, which typically reflect the design of the home page.
- Perform one round of design review and modification of the content page designs.
- State that further design refinements will be subject to a time-and-materials fee. Obviously, you can decide to be more lenient and waive the fee for additional designs or rounds of design, but at least you have clearly defined the expected process.
After you have created the initial set of three designs, it is often useful to schedule at least one and probably two design review meetings with your client to carefully walk through each of the designs. Most designers create the initial designs as images using Photoshop or Illustrator, with the mock-ups presented as images on a web page, emulating the look of the finished web site. This presentation can confuse clients, leading them to believe that the application or web site is already completed.
During your design meeting, it is useful to cover the following points:
- Remind the client of the process you used to get here. For example, “These designs are based on the wireframes, design brief requirements, and the review of ten selected designs.”
- Explain that the designs are images, not actual web pages.
- Walk through the header and navigation placement in each design.
- Identify and discuss how each interactive feature is envisioned to work on the finished application. Many web-savvy project managers gloss over elements of the design that seem obvious to them, but which the client may not understand. For example, a series of social media icons may imply to you that these icons link to social media sites, but unless you state this explicitly, the client may not understand why the icons appear on the design.
Here are a few additional things we have learned over the years:
- Don't be defensive. Or, if you have your visual designer or team participating in the meeting, be sure to alert them not be defensive. Clearly explain each and every aspect of the design, but if the client is negative about some aspect of a design, simply note that. Try hard not to argue with the client about the designs. This puts you in a defensive position, instead of being the client's advocate through the design process.
- Unless you happen to be a design expert (many project managers are not), try to withhold your subjective opinions about the designs unless explicitly asked. Instead, try to point out differences among the designs that the client should notice.
- As you proceed through the design meeting, collect the feedback in a written form, so you can present the feedback to your visual designer or team.
- As you wrap up your design meeting, be certain to summarize the feedback you have collected, and briefly explain the next step in the design process. This will help to build confidence with your client that you have understood the feedback, but that the design review is still proceeding inside the overall design process that you already have defined.
Be patient, positive, clear, and concise, and with a little luck, your design process will move ahead flawlessly.
Creating a Database
Creating the database for your custom project should be a very satisfying phase for three important reasons:
- It feels like an accomplishment;
- It looks impressive when printed; and,
- It gives you a strong sense of how the entire application will work at a technical level.
Some technical project managers may be up to the task of creating a database schema for the project on their own. However, database design is not likely to be part of the skill set of most project managers.
If you have limited or no experience with database design, you may want to work alongside a developer to create the database schema or delegate this task to an experienced developer, and have her walk you through the schema she creates.
We do find that project managers should be involved in the database design phase, as it provides three unique benefits:
- It makes the project manager acutely aware of how requirements relate to database design.
- He gets a much deeper understanding of the application you are building.
- He can offer greater insight about how the requirements relate to the data structure.
In most cases, it is easiest to build the database schema after you complete and refine the HTML mock-ups. The mock-ups will go through several revisions, following internal and external feedback, so starting the schema too early may waste time with needed revisions. Once the mock-ups are completed, you can design the database alone or in tandem with writing the technical specification (if you are writing one).
For a project that will not have a technical specification, you can simply go through the HTML mock-ups one at a time and create the necessary database structure for each page in the application. If you are writing a technical specification for the project, write the database schema at the same time. This will help you conceptualize the technical architecture of the application.
As when designing the schema for a project with just mock-ups, try building the parts of the database needed to support each section as you write the technical specification.
Here are some general tips that can help with the database phase, whether you are doing it yourself or working with a developer:
- Create the database schema in the same database being used for the project. Written schemas on paper do not evoke the same thought process as creating it in reality. Besides, in most database management systems, it is less time consuming to do it this way.
- Think in terms of how the database will support a feature during requirements gathering. This will speed up the process of database design and help shape the technical architecture of the project in your head.
- Think or talk through a feature completely, start to finish, and identify every piece of schema needed.
- Seek out problems in how the schema will support a feature. You will likely find problems that can be solved much more cheaply now than later in the development process.
- Identify whether your application is more read-heavy or write-heavy, and structure your data accordingly.
Why bother creating the database schema before you start development? As with writing a technical specification, creating the actual database needed to support all features in the site will likely reveal technical issues you need to discuss with your team and solve now, before development starts. Fixing a problem during development takes more programming hours and costs more money than if it had been fixed earlier. The most expensive line item in your project budget is likely human hours; guard them jealously.
Writing a Specification
A technical specification describes everything that goes on behind the scenes or is not immediately apparent in your HTML mock-ups. The spec should include screenshots of the prototype screens you prepared. This is important when you have a more complex interface with lots of business logic.
This is also a good place to set the tone for the technical architecture and basis from which your developers will write code. Before any coding starts, you can protect the project development from going down paths that are likely to lead to scope creep, poor performance, or scalability issues.
The technical specification document is a companion document to your database schema and your HTML mock-ups, and it typically should include both the schema and mock-ups. It should restate any features mentioned in the requirements document and any functionality implied in the HTML mock-ups, such that the entire set of project requirements exists in the technical specification. Why? Because your developers—no matter how hard you try—will only begrudgingly read one document. You want it to be the technical specification.
The Meat and Potatoes
A basic technical specification includes the following elements:
- Functional description for each module (the meat and potatoes)
- The database schema
- Lots of screen shots of your HTML mock-ups
The pieces of a basic specification are straightforward and include the biggest section by far: the functional description. The functional description should be littered with screen shots from your HTML mock-ups and references to the database schema.
Essentially, this section should step through each major part of the application and describe, in plain language, every little thing the application will do. Just pick the first page of the application, paste in a screen shot, and start describing everything on this page.
- Describe everything that is left unsaid, even the components you assume are implied by the mock-ups, but are not clearly visible. The less ambiguity, the better.
- Use the principles of good web writing in your spec: clarity and brevity, lots of bullet points, and selective bolding.
- Mention the specific database tables and fields that will supply data to various parts of the application.
- Carefully explain the logic that manages the state of a multi-state object, such as context-based buttons, rich data display tables, and drop-down menus.
- Look for logic patterns in the application that will lend easily to creating centralized logic for common routines. The principle of DRY—Don't Repeat Yourself—is often a valuable timesaver.
The full database schema can appear at the end of the specification, in an appendix. For example, Microsoft SQL Server Management Studio includes a handy tool to visually define the primary-foreign key relationships between tables. Screenshots of these diagrams clearly convey how the schema supports the project's functionality.
Think Through a Feature
Consider the entire life cycle of a feature by thinking through all of its implications. This helps you identify any potential “gotchas” that will impact the schedule, scope, and challenge of a task.
Some questions you might ask:
- Does this feature impact search?
- Will the data captured by this feature accumulate over time and need to be trimmed?
- How is this feature used in other (secondary) areas of the application? Will the current method of implementation cause a reduction in performance?
- What might this screen look like after 6 months of data? A year? Three?
- How could this feature be used incorrectly?
- Does this involve a fixed list of values? If so, where are they defined, how are they stored, and how might these values change over time?
Be Specific: An Example
The single most important task in writing a technical specification is to ensure specificity.
The following is an extract from a technical specification for a web site project that involved a complex custom events registration system. This section describes an information box at the top of the user profile page, referencing the specific fields in the database where this information resides:
The user homepage for registered members includes a small information block at the top of the page and an events listing below. The information block displays
- General eligibility status
- CAP eligibility status
- CAP certification status
- Indicates whether a user has attended a CAP orientation event
- Checks whether person actually attended event
- Last CAP workshop date (from Attendee and Event table)
- Next available CAP workshop date
- Number of events missed in last 12 months
- A link on the homepage takes the member to a page to view and update all information from the member registration form (see above)
This next example is from the same project and describes the logic that defines what appears in an RSVP column of a table of upcoming events presented to a logged-in user:
The Status/RSVP column:
- Shows an RSVP button for events that member is eligible for and that are not full
- Shows an “Add to wait list” button when the user is eligible and an event is full
- Shows “RSVP'ed” if the member is RSVP'ed for the event
- A Cancel button appears next to RSVP'ed if the current time is before midnight of the night before the event
- When a user presses Cancel, the next available wait list attendee (based on the date and time added to the wait list) is changed to attendee and sent an e-mail alert:
Congratulations! Due to a cancellation, you have been moved from the wait list to an attendee for [EVENT NAME] on [EVENT DATE AND TIME].
Login at http://example.org for complete event details.
- Changes to CAP eligibility (see outlined Event Eligibility section)
- If an attendee is being added to a CAP workshop-type event, then a CAP ineligibility date is added to the member record for 90 days after the date of the event.
- If the attendee is being added to a CAP orientation-type event, a CAP eligibility date is set to the date of the event.
- When the event is within 24 hours, system outputs, “Please call to cancel your reservation.”
- Shows “Wait list” if the member is on the wait list
- Shows “Ineligible” if the user is not eligible for the event, and the reason why
- Shows “Call to book” if a user is eligible for the event, the event is not full, the user is not RSVP'ed or on the wait list, and the event date is within 24 hours
The Status/RSVP button uses eligibility logic outlined in the Event Eligibility section to control for which events the member may register.
The detail in these examples may look excessive, but these questions need to be asked and answered before the project starts, as part of the requirements document (See “About Requirements” in Chapter 4). If they are not, then programmer hours will be spent fixing these issues after primary development is complete, when it is much more time-consuming to make changes.
The Side Dishes
The additional sections of your technical specification will likely be defined by the requirements of the project and might include sections like the following:
- Data imports (if relevant)2
- Application architecture
- Server/hardware infrastructure
- Development/coding standards (sometimes useful if new employees are on the project team)
- Security considerations
For a larger custom development project, it is helpful to talk a little about the application architecture:
- How will you approach organizing the various elements of whatever language you choose, like functions, methods, classes, and objects?
- Where will the business logic reside?
- Will you use an existing application framework?
- How will you set up a testing environment to support development of tricky features like e-mail or billing systems?
The servers supporting the project will also impact development and should be stated clearly:
- How many servers?
- What will be the software and hardware stack of each server?
- Will they all be behind the same firewall in the same network, or will they be separate?
- Will they be physically separated, with the Internet in between?
If your team has new members, clearly (and briefly) explain how your shop develops software. An experienced team will have made the mistakes that less-experienced programmers tend to make, and will avoid them. But you cannot assume that new members will have had the same experiences.
Finally, consider if there are any security implications in your application:
______________
2 Data imports are almost always harder than you expect. Protect your project budget by throwing a lot of detail and planning into the data import before development starts on any part of the application.
- Are there privacy laws (like HIPAA or FERPA in the United States) that impact your application?
- Do you have data in your database that should never make it into log files or debugging routines?
- Do you need to encrypt the login credentials stored in your code?
- Do you need to encrypt the database?
More Reading
See the Appendix for some great additional reading on writing a technical specification. If you have time to read only one additional article, read Joel Spolsky's “Painless Functional Specifications.”
Wrapping Up
Your planning is done. By now you should have a strong sense of all of the documentation you need for your project, be it requirements documents, HTML mock-ups, wireframes, designs, technical specifications, or database schemas. It's now time—at long last!—to cash in all of your hard work and begin development.
In the next chapter, we cover everything you need to know to keep your sanity during the development phase. We start with a horror story about a developer going rogue. We cover guidance on how to keep your client in the loop, tips for writing professional e-mails, and easy ways to maintain documentation.
We go over the simple but powerful method of using checklists to maintain quality and show you how to avoid the crippling nature of no-win-scenario bugs. We wrap up the chapter by detailing how to conduct weekly developer meetings that keep your team happy and your project on track.