
Quality Assurance and Testing
The Developer Who Refused to Test
Cathy is a programmer for a five-person web development firm. She enjoys her work, although she feels that often there is too little time allocated for her to complete her work.
Cathy has noticed in the past several months that the company's lead developer has been asking her to come up with estimates for specific tasks, and then includes another 20% of her time for “testing.” Cathy is often optimistic about writing code—it is fun, after all—and does not always guess the appropriate amount of time a task will take.
This week Cathy estimated it would take her 3 days to develop a new feature for an existing web application. The lead developer had allocated 4 days, plus a day for testing, for a total of 5 days. Cathy felt sure that she would have no problem finishing the work in that length of time.
The project started off well, and Cathy finished the first half in just a day. She knew that she should do some testing before moving on, but Cathy—like most developers—despises testing, although she recognizes that it must be done. The next morning, she decides to move into the second half of the task now and do the testing later. While working on the second half—which is a little more complex than she had expected—she identifies a few issues in the original application that are causing problems for her. She invests a few hours fixing the original application, which quickly turns into a full day of work because she has to fully understand the original web application. She gets bogged down for still another day before giving up on trying to fix the original problem. She is now in her fourth day of work and struggling to finish the second half of the task. The lead developer checks in midway through the fourth day to see how things are progressing. Cathy is confident she will be able to finish the work soon, so she reports no problems.
Sure enough, Cathy finishes the second component around the middle of the fifth day. Cathy feels that she has done a great job, and for the first time in her work pushes the code onto a staging server, where she can begin testing. Of course, the new module breaks as soon as it hits the development server, and it takes until the end of the day to fix the code so it works on the staging server. By the time she is ready to leave work, she quickly browses through the application to make sure all the pages are working, then resolves the case for her boss to review and heads out for a well-deserved beer.
Midway into her second beer, she gets a text message from the lead developer asking her to check her e-mail. She sees a flood of bug reports filed by the lead developer. Each bug report shows an increasing level of frustration. Sure, she had not exactly tested each field in her application, but anyone can see that she finished building it. Little bugs in field display and validation, or minor issues with workflow are easy to fix. She cannot understand at all when the lead developer sends her a visibly upset e-mail asking her to come in this weekend to finish development.
This chapter explains how to create a realistic testing plan and perform testing early in the development process, with an eye on preventing episodes like the one we just described.
About Testing
Testing is vital for any project you manage. Every project needs some kind of testing, careful review, and quality assurance (QA). Typically, you will have several phases of testing:
- Developer testing: when a developer completes a task, he should conduct his own testing to confirm it is working.
- Project manager review: when a developer reports a task is complete, the project manager should review the feature for completeness and do some testing.
- QA testing: this is when a person runs through a module or the entire application against your testing checklist (see “Creating a Testing Checklist” later in this chapter).
- Beta testing: when testing internally is complete, the client can beta test the project before launch (see ”How to Manage a Beta Test with a Client” later in this chapter for some great tips).
Developer and project manager testing happen throughout the development process as different modules and features of the project are completed. This is also the perfect time for the project manager to be appending the latest feature's components to a growing testing checklist. Putting this checklist together a piece at a time helps ensure that nothing is left out, making the QA testing phase much easier.
Phases of QA testing tend to occur at the end of the project, before beta testing and before launch. A QA test is also a good time to get outsider feedback on the project. For consulting engagement projects, the QA tester is likely not familiar with the project yet, which is good. Their perspective will be very different from yours and your development team's, so the questions they ask or the problems they have will often be telling. Listen closely to what they do, what they cannot do, what they ask about, and what confuses them. Listen less to what they say.
Your Software Is Only as Good as Your Testing
In the process of designing and managing the development of several web-based applications, we have come to learn a critical lesson in software development (which many others in the software industry likely already know):
Your software is only as good as the testing you perform.
Take a real example.
Justin worked on a team that recently released a web-based chat tool. Powered by jQuery, the tool enables college and university admissions recruiters to easily host web chats for talking with prospective students.
The Bug
The application worked great during beta testing, until more than 20 chatters joined a room. Then odd things started to happen: chatters were dropped from the room, some could not join the room at all, and others just got an endless “connection waiting” message when trying to load the room URL.
But none of these issues happened consistently, only intermittently. We could not regularly reproduce the issue, so it was impossible to fix. We focused on other bugs.
A few weeks went by and we still had no luck in finding the cause of the issue. Then we decided to really test out the application by hosting a high-profile chat where we expected more than 75 participants.
What a difference a little pressure makes. We were forced to take a different approach to debugging the issue. So we ran a more complex test on the bug and dug a bit into how Apache, a LAMP application, works. Eventually, we found the source of the bug, fixed the issue, and felt confident that the application would support 80 chatters in one room.
Test, Debug, Refine, and Repeat
If we had not been forced to test the application harder, the true source of the bug would never have been identified, the software would not scale as well as we needed it to, and (worst of all) customers would have had problems with our software.
Your software will not get better on its own; you have to force it to become better with great developers, useful features, and—most of all—hard testing. Over and over again. From different angles and vectors. From different computers, networks, browsers, operating systems, locations, monitors, and processors.
This is not a new revelation, but it is an important one.
Creating a Testing Checklist
Creating testing checklists is actually pretty simple. Start by opening up your application to the home screen. For each screen, try to imagine all of the things a user can do and all of the ways a user can mess things up. You want to test for both.
Tip In essence, your testing checklist is a just a to-do list that should force the tester eventually to visit every part of your application. Your ultimate goal is to point out all of the things that need testing and any special cases.
For example, here are some real entries from a web content management project:
- Use the “forgot password” link and confirm you can login and reset your password.
- In the attendees listing table, sort by various columns and confirm the sorting works.
- Edit a page and confirm editing works.
- Upload and add an attachment to a content page.
- Filter the events management listing screen by various criteria and verify they work.
- View the user home page and verify all upcoming events are listed.
Generally, you want to balance specificity—trying to touch upon every feature of the application—with brevity. You should not need to specify exactly how to test each feature. For example, you should not need to tell a QA tester what kinds of values to use in a text search box to see if there are encoding issues with the form. (If you do need to mention this, you have an inexperienced tester.)
In addition to touching upon each part of the application, be sure to mention in the testing checklist any non-obvious relationships between actions in one section that should impact another section. These are special cases that you want to call out.
For example, imagine you have a filter feature on a search screen. You will have a testing checklist item like, “Perform a variety of different filters with various criteria, and verify the results are consistent with the criteria.” If the system logs these filters and shows them in the log screen of the application, you should mention in your testing document not only the steps to access and use the log screen, but also specifically that verification is needed to confirm that the tester's earlier filter activities are logged here.
Finally, as you become more experienced, you will find there is a (growing) set of actions that tend to be problematic and need to be checked for in the kinds of projects you tend to manage. You do not need to write these down, as a moment spent thinking of past projects should recall these.
Here are a few examples from web-based content management systems:
- Uploading files from a client PC to the system
- Embedding media, like video from YouTube or Blip.tv
- Encoding and escaping issues with HTML1
- Character encoding issues with non-Latin alphabets
- Pasting content from a Microsoft Word document
Here are few additional tips for creating testing checklists:
- Think about problems from similar past projects. Many of these are likely to happen again, so test for them.
- When you start a project, start a blank testing checklist somewhere. A text file, a Word document, your internal wiki documentation; it does not matter where. What is important is that it is written down somewhere. During development—as you review a completed module, section, or feature—you now have a handy place to quickly jot down items that need to be tested, before you forget about them.
- Do not get lost in the testing instruction details. Touch upon every feature, but let the testers do their jobs.
- In the testing document, be clear whether the tester needs to check with a programmer or developer before testing an external-facing component (like an e-mail system).
- When considering a checklist item to test a component, ignore any thought of “this is too obvious to mention.” Something obvious to you is not necessarily obvious to others.
- Do not forget to test for size. If your system has a search feature and you only have ten sample rows in the database, then be sure to have a step that includes testing a search with 10,000 rows. How large? Imagine how much data the client will accumulate using your application over the next 5 years. Multiply that by ten and you have your dataset size.
__________
1 Proper encoding is necessary to protect against cross-site scripting attacks, which are an important security vulnerability.
Testing Checklist Format
The testing document format can be very simple:
- It should have a brief introduction section to state the critical details, such as where to log in to start testing and a two- to three-sentence explanation of the system.
- It should have any testing notes, such as instructions to alert a developer before they begin testing, or any special considerations.
- The testing checklist can be in the form of a table, with three columns:
- Column 1 should be a sequential number. It is helpful to have a way to reference specific items in a long list.
- Column 2 should be the testing checklist item, the task at hand.
- Column 3 should be a small blank box for either checking off the task or including a reference to an issue/case/ticket number if a bug report was filed.
If the testing checklist is long, you can use rows to break up sections, with just a section name in the row. The format of this document is not critical, but a small amount of effort up front means that later in the project, during beta testing, you can share this document with the client to assist them in testing the application thoroughly (a frequent challenge for even the best clients). Figure 9-1 presents a sample testing checklist.
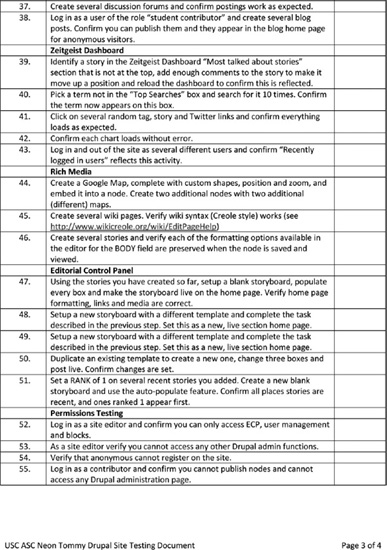
Figure 9-1. A testing checklist for NeonTommy.com
How to Manage a Beta Test with a Client
Eventually, you will show your project to the client and conduct some beta testing. A successful beta testing phase will reveal context-specific bugs that are obvious only to those intimate with the workflow and data in question, as well as obscure bugs that require several conditions to exist in parallel to appear.
A great way to start your beta testing is with a kickoff training meeting where you demo the application to the client team and discuss how beta testing will work. When introducing beta testing to the client, it is important to discuss a few things:
- Recap where the project is in the schedule and what will be the next steps after beta testing is complete.
- State the goals of beta testing plainly: find issues we are not aware of, and fix them.
- If a user breaks the application, the application is at fault, not the user. The client cannot damage anything permanently. Breaking the system is a good thing.
- A beta system has been tested and refined, but there are likely to be issues. That is why we are beta testing.
- Make it clear to the client that more time spent beta testing now will reduce the investment needed to further refine the application after launch, when those refinements will not be in scope.
- Explain that any data entered in the beta system will be wiped and reset.
There are a variety of challenges to client beta testing that often make it hard to capture meaningful feedback:
- Most clients will only spend a trivial amount of time testing. A lack of client engagement is likely to be your biggest challenge.
- Clients find it discouraging that because the beta system will be wiped, any work they do seems to be a wasted effort.
- Clients may not know how to test or what to do with the application.
Here are some tips to improve the chance of success:
- Have the beta run on production hardware with real data. You will wipe the data after testing (be clear about this to the client), but real data makes the application more meaningful to the client, which in turn should make their feedback more meaningful.
- Be up front with the client and tell them that most beta testing fails because a lack of client engagement.
- Identify a good candidate on the client team to be the internal evangelist. An internal evangelist is a computer-literate power user (though not a programmer or technical expert) who is both likely to be a user of the application and happy to help people on his or her team use it. Doing some one-on-one training with the evangelist can ease the amount of questions you get during testing and empower this user to become the office expert.
- Give homework.
Tip Identifying a strong internal evangelist on your client's team is a great way to empower a member of your client's team to help with training and project acceptance.
Homework Is for the Little People
While homework can be a reviled tool for educating young minds, it can be a great method to increase client engagement and force real testing to occur in the beta review period. Beta testing homework can be just a list of specific tasks that need to be completed.
For example, here are a few homework items for a back-end university admissions system:
- Create a report of all students who meet the criteria for three different academic scholarships, for review by the scholarship committee.
- Capture the data needed for a report you regularly turn in to your superior.
- Fully prepare the admissions letters for five random students. Complete the process as you would normally: print the letter, get it signed, and seal it in the real envelopes you use.
Stress the following when assigning the beta testing homework to the client: if you complete each of these tasks, the beta test will be successful. If you do not, it is likely to fail.
The goals should be clear, but also should encourage the real workflow to be carried out from start to finish, even if that means leaving the application itself. You want to capture these “edge” conditions. (In the above example, the third goal helps catch any problems with the aligning text in window-pane envelopes.)
You can create these goals by reviewing your testing checklist and picturing how the various checklist items relate to specific workflows that you can call out as homework tasks.
Horror Story: Who Is the Real Client?
An easy way to turn a bad situation into a positive one is to make it a teachable moment. A teachable moment is an opportunity to reflect on an incident and extract a valuable lesson. And so it was with our project, the topic of our horror story.
The project started off well enough. The exploration meeting (see “Project Kickoff” in Chapter 3 ) was attended by our project sponsor (the IT manager) and a group of higher-level stakeholders. There were no actual users of the application at this meeting. At the time, this seemed normal; in hindsight, this should have been the first indication of a problem.
The initial requirements gathering meeting was attended by our project sponsor and a group of lower-level stakeholders than the initial meeting. This group was more opinionated and outspoken than the group at the initial meeting and provided more specific details on how the system should work. This is a generally a great sign because it usually denotes understanding of the problem. We had our users. . . . or so we thought.
A new group of people was asked to attend the follow-up requirements gathering meetings, where we reviewed and refined the draft requirements document. They attended these meetings along with their supervisors, but were not outspoken and did not provide much feedback. It was not immediately clear, but these new folks had never participated in a project development process before and had likely never seen anything resembling a requirements document. Although it was clear they were a sharp bunch, they were essentially interns at the organization, so we assumed they were not the real stakeholders.
We entered the development phase of the project and happily developed the application over the next several months. Then it came time to schedule the beta test. That was when the problems started.
Based on our explanation of what a beta test is, the client invited back the entire group of interns that were represented by their leadership in the earlier requirements meetings. Unbeknownst to us, the leadership of this group had changed during development, so we were dealing with a leadership team that had not attended the earlier requirements gathering meetings and had not been involved with the entire process.
The feedback was significant during the beta kickoff meeting, and the questions and changes kept coming in during the testing process. Although we responded as quickly and completely as possible to the client, the questions kept coming. We made loads of refinements to the system and answered hundreds of questions by e-mail on functionality in the first week of testing alone. The problems continued after beta testing. Because of all of these challenges, our initial launch attempt was aborted and rescheduled for a week later.
Although the project launched with only a slight delay and is now in successful production use, it was a challenging process toward the end of the project. And challenges at the end of a project are even more frustrating because at that point, your energy level is lower and you just want to be finished.
Though the client never directed frustration toward us, the tone of the e-mails made it clear that the intern team was frustrated at the “surprises” in how the application worked and at not being involved during the decision-making process. You have probably seen this before in your own work: the group felt like this “thing” had been dropped on them by the higher-ups. The issue here was not that something was forced onto this group, but the process by which the system was delivered.
So what went wrong with the project? The main answer is that we did not know who the real users were. At first, we thought the client sponsor was our user. When it was clear that was not the case, we thought the next group—the higher-level supervisors—were our real users. Not until beta testing did it become clear that the real users were the interns who had undergone their own leadership change during the course of development. We entered development with the wrong users in mind!
Only in beta testing—with a new group of interns in place actually using the application—did it become clear who the real users were. Had we focused on this group from the start of the project, the beta testing phase would have been much easier, the feedback level much lower, the number of refinements needed reduced, and the training-based questions fewer.
We learned a few important takeaways from this experience:
- Explicitly ask—even when you are certain you are correct—who the actual users are. If there is some resistance from the client to bring these users to table, then find out why immediately. You need this group involved from the start.
- Ask the client to help you identify who is likely to become the internal client expert on the forthcoming application. This is likely someone to whom members of the client's team go for help and guidance. Ensuring this person feels involved and empowered and well-trained before the rest of the team will help reduce the “surprises” during beta testing and launch.
- If we had known the interns were the actual user base and were told of the leadership change (it was planned), it may have been possible to have the future team leader attend the earlier requirements meetings prior to her leaving that position.
Usability Testing
The goal of usability testing is to make software easier to use by making it a more intuitive experience. From the perspective of a project budget, the entire goal of a usability test is to identify issues in the interaction of your application with people that will be less expensive to fix the earlier they are caught.
The return on investment of usability testing is well-documented. Commerce-driven projects that have never done any usability testing can expect to double conversion rates and other key revenue-centric business metrics by applying the results of the first test.2
For a consulting-driven process, the savings are real, too. If you catch a navigation issue during the screen prototyping phase, it takes a few minutes for that navigation to be changed in the mock-ups. When the application is fully built, it will take a developer more time to fix, test, and deploy modifications to the navigation. Remember the rule of project avoidance: the later a change is made, the more expensive it becomes to complete.
__________
2 Jakob Nielsen, “Return on Investment for Usability,” www.useit.com/alertbox/roi-first-study.html, January 7, 2003.
The great news about usability testing is that it does not take much time, you do not need formal training,3 and you do not need expensive equipment. Research even shows that you can find out most usability problems with as few as five users.4
So What Do You Test?
Your usability test should ask users to complete the kind of tasks users would normally do when using your application. If you have an information-driven site, this might include asking users to find out specific facts that you built your site to disseminate. If you have an e-commerce site, focus your tests on product search, comparison, and purchase. If you are building a web application, focus on the workflow goals you are attempting to streamline in your software.
Watching a real user get stuck, go the wrong way, or misunderstand your interface is very insightful. Indeed, having your development team watch this process is a great way to remind the programmers that humans are eventually going to use this thing you are building.
The different kinds of usability tests available to you are defined by where in the project you would normally use them:
- Paper prototyping. In paper prototyping, you take a piece of paper and quickly draw up how a page in your application might look. You can use cutouts for navigation elements or just draw them with a black marker. It does not matter. Grab someone in the office who is not working on the project, drop the paper in front of them, and watch what they do as you ask questions like, “Using your finger, show me where you would click to do a search,” or, “What do you expect to find when clicking each button?”
- Hallway usability testing. Coined by software blogger Joel Spolsky, this test works very well during development or the screen mock-up phase. As you complete a screen or section of the interface, grab someone walking by your office and have them try it out. You can ask questions similar to those for paper prototyping and just watch what they do.
- Classic usability test. In a classic usability test, you work with an application that is more or less fully functional (a beta is fine). The most effective method is to have the user alone in an office with a computer and a list of tasks they need to complete. It is best to record the screen and the reaction of the user during this process (there are cheap software applications that can do this for you with just a webcam) and to leave the room after a brief introduction.
__________
3 Jakob Nielsen, “Anybody Can Do Usability,” http://www.useit.com/alertbox/anybody-usability.html, December 21, 2009.
4 Jakob Nielsen, “Why You Only Need to Test with 5 Users,” http://www.useit.com/alertbox/20000319.html, March 19, 2000.
You can also obtain valuable insights by evaluating your interface against established usability guidelines. It is easy to find good lists of things to check if you do some simple searching. An added benefit of this process is that it can be instructive for you and your team to learn about the common traps in user interface design that are best avoided in future projects.
For your first classic usability test, start small. Set a goal to recruit and test with five users, use a simple setup (commandeer an office with a computer for a day and purchase a $20 webcam), and have a modest list of tests to conduct. Run the test, review your results, and consider your next steps.
Usability testing is very helpful for iterative design. If you only have time for one or two usability tests, then iterate. Run the first test with five users, refine your application from your findings, and conduct a follow-up test with a site that includes the refinements. This will allow you to both validate the fixes you implemented for the previously identified design flaws, and—if you successfully addressed these earlier design flaws—to identify the next major set of issues that need attention. One or two rounds of iteration will allow you to address all of the low-hanging fruit that will offer the most return on investment for your time.
There is a great amount of reading online about usability testing that goes far deeper into the topic than is appropriate here. A great place to start is Jakob Nielsen's Alertbox (see the reading list in the Appendix), a one-stop shop for everything you need to know to conduct successful usability tests and design amazing, intuitive, and clear interfaces. Also take a look at the reading list at the end of the book for some additional articles we think you will find especially helpful.
Do not be put off by the perceived complexity and cost. Usability testing can be a fun, cheap way to catch problems early on. Good luck and good testing!
Wrapping Up
Once you have completed testing and making refinements to the system, it will be time to deploy your project. By this point, your project budget is nearly depleted and the morale and energy of the team can be low, especially if you had a challenging testing period.
It will be tempting to not apply the same amount of planning rigor to deployment as you did in earlier phases of the project. Resist this urge! Regardless of the quality of the project, a client will judge the entire process negatively if the deployment isn't smooth.
In the next chapter, we look at deployment in detail. We provide real tips you can use when planning deployment, explain the importance of training, and detail a comprehensive launch checklist you can use with your team to become a deployment rock star.
We finish out the chapter by covering the often neglected but vital step of defining post-launch support.