
Modern mobile phones are much more than simple communications devices with a connection to the Internet. With microphones, cameras, accelerometers, compasses, temperature gauges, and brightness detectors, smartphones have become extra-sensory devices, able to augment your own perceptions.
Later chapters will explore use of the camera and microphone; in this chapter you will explore the environmental sensors potentially available on Android devices.
Sensors that detect physical and environmental properties offer an exciting innovation for enhancing the user experience of mobile applications. The incorporation of electronic compasses, gravity sensors, brightness gauges, and proximity sensors in modern devices provides an array of new possibilities for interacting with devices, such as augmented reality and physical movement-based input.
In this chapter you'll be introduced to the sensors available in Android and how to use the Sensor Manager to monitor them. You'll take a closer look at the accelerometer and orientation sensors and use them to determine changes in the device orientation and acceleration. This is particularly useful for creating motion-based user interfaces, letting you add new dimensions to your location-based applications.
You'll also learn how to control device vibration to use force feedback in your applications.
The Sensor Manager is used to manage the sensor hardware available on Android devices. Use getSystemService to return a reference to the Sensor Manager Service, as shown in the following snippet:
String service_name = Context.SENSOR_SERVICE;
SensorManager sensorManager = (SensorManager)getSystemService(service_name);
Like location-based Services, Android abstracts the sensor implementations of each device. The Sensor class is used to describe the properties of each hardware sensor, including its type, name, manufacturer, and details on its accuracy and range.
The Sensor class includes a set of constants used to describe what type of hardware sensor is being represented by a Sensor object. These constants take the form of Sensor.TYPE_<TYPE>. The following section describes each supported sensor-type, after which you'll learn how to find and use those sensors.
The following is a list of the sensor-types currently available; note that the hardware on the host device determines which of these sensors are actually available to your application.
Sensor.TYPE_ACCELEROMETERA three-axis accelerometer sensor that returns the current acceleration along three axes in m/s2. The accelerometer is explored in greater detail later in this chapter.Sensor.TYPE_GYROSCOPEA gyroscopic sensor that returns the current device orientation on three axes in degrees.Sensor.TYPE_LIGHTAn ambient light sensor that returns a single value describing the ambient illumination in lux. A light sensor is commonly used to dynamically control the screen brightness.Sensor.TYPE_MAGNETIC_FIELDA magnetic field sensor that finds the current magnetic field in microteslas along three axes.Sensor.TYPE_ORIENTATIONAn orientation sensor that returns the device orientation on three axes in degrees. The orientation sensor is explored in greater detail later in this chapter.Sensor.TYPE_PRESSUREA pressure sensor that returns a single value, the current pressure exerted on the device in kilopascals.Sensor.TYPE_PROXIMITYA proximity sensor that indicates the distance between the device and the target object in meters. How a target object is selected, and the distances supported, will depend on the hardware implementation of the proximity detector. A typical use for the proximity sensor is to detect when the device is being held up against the user's ear and to automatically adjust screen brightness or initiate a voice command.Sensor.TYPE_TEMPERATUREA thermometer that returns temperature in degrees Celsius. The temperature returned may be the ambient room temperature, device battery temperature, or remote sensor temperature, depending on the hardware implementation.
An Android device can include multiple implementations of a particular sensor-type. To find the default Sensor implementation for a particular type use the Sensor Manager's getDefaultSensor method, passing in the sensor-type required from the constants described in the previous section.
The following snippet returns the default gyroscope. If no default Sensor exists for the given type, the method returns null.
Sensor defaultGyroscope = sensorManager.getDefaultSensor(Sensor.TYPE_GYROSCOPE);Alternatively, use getSensorList to return a list of all the available Sensors of a given type, as shown in the following code, which returns all the available pressure sensor objects:
List<Sensor> pressureSensors = sensorManager.getSensorList(Sensor.TYPE_PRESSURE);
To find every Sensor available on the host platform use getSensorList, passing in Sensor.TYPE_ALL, as shown here:
List<Sensor> allSensors = sensorManager.getSensorList(Sensor.TYPE_ALL);
This technique lets you determine which Sensors, and sensor-types, are available on the host platform.
Listing 14-1 shows the standard pattern for monitoring hardware sensor results. Later sections will take a closer look at orientation and acceleration Sensor implementations in particular.
Implement a SensorEventListener. Use the onSensorChanged method to monitor Sensor values and onAccuracyChanged to react to changes in a Sensor's accuracy.
Example 14-1. Sensor Event Listener skeleton code
final SensorEventListener mySensorEventListener = new SensorEventListener() {
  public void onSensorChanged(SensorEvent sensorEvent) {
    // TODO Monitor Sensor changes.
  }

  public void onAccuracyChanged(Sensor sensor, int accuracy) {
    // TODO React to a change in Sensor accuracy.
  }
};
The SensorEvent parameter in the onSensorChanged method includes four properties used to describe a Sensor event:
sensorThe Sensor object that triggered the event.accuracyThe accuracy of the Sensor when the event occurred (low, medium, high, or unreliable, as described in the next list).valuesA float array that contains the new value(s) detected. The next section explains the values returned for each sensor-type.timestampThe time (in nanoseconds) at which the Sensor event occurred.
You can monitor changes in the accuracy of a Sensor separately, using the onAccuracyChanged method. In both handlers the accuracy value represents feedback from the monitored Sensor's accuracy, using one of the following constants:
SensorManager.SENSOR_STATUS_ACCURACY_LOWIndicates that the Sensor is reporting with low accuracy and needs to be calibratedSensorManager.SENSOR_STATUS_ACCURACY_MEDIUMIndicates that the Sensor data is of average accuracy, and that calibration might improve the readingsSensorManager.SENSOR_STATUS_ACCURACY_HIGHIndicates that the Sensor is reporting with the highest possible accuracySensorManager.SENSOR_STATUS_UNRELIABLEIndicates that the Sensor data is unreliable, meaning that either calibration is required or readings are not currently possible
To receive Sensor events, register your Sensor Event Listener with the Sensor Manager. Specify the Sensor object to observe, and the rate at which you want to receive updates. The following example registers a Sensor Event Listener for the default proximity Sensor at the normal update rate:
Sensor sensor = sensorManager.getDefaultSensor(Sensor.TYPE_PROXIMITY);
sensorManager.registerListener(mySensorEventListener,
                               sensor,
                               SensorManager.SENSOR_DELAY_NORMAL);
The Sensor Manager includes the following constants (shown in descending order of responsiveness) to let you select a suitable update rate:
SensorManager.SENSOR_DELAY_FASTESTSpecifies the fastest possible Sensor update rateSensorManager.SENSOR_DELAY_GAMESelects an update rate suitable for use in controlling gamesSensorManager.SENSOR_DELAY_NORMALSpecifies the default update rateSensorManager.SENSOR_DELAY_UISpecifies a rate suitable for updating UI features
The rate you select is not binding; the Sensor Manager may return results faster or slower than you specify, though it will tend to be faster. To minimize the associated resource cost of using the Sensor in your application you should try to select the slowest suitable rate.
It's also important to unregister your Sensor Event Listeners when your application no longer needs to receive updates:
sensorManager.unregisterListener(mySensorEventListener);
It's good practice to register and unregister your Sensor Event Listener in the onResume and onPause methods of your Activities to ensure they're being used only when the Activity is active.
The length and composition of the values returned in the onSensorChanged event vary depending on the Sensor being monitored.
The details are summarized in Table 14-1. Further details on the use of the accelerometer, orientation, and magnetic field Sensors can be found in the following sections.
Note
The Android documentation describes the values returned by each sensor-type with some additional commentary at http://developer.android.com/reference/android/hardware/Sensor.html
Table 14-1. Sensor Return Values
SENSOR-TYPE | VALUE COUNT | VALUE COMPOSITION | COMMENTARY |
|---|---|---|---|
3 | value[0] : Lateral value[1] : Longitudinal value[2] : Vertical | Acceleration along three axes in m/s2. The Sensor Manager includes a set of gravity constants of the form | |
3 | value[0] : Azimuth value[1] : Pitch value[2] : Roll | Device orientation in degrees along three axes. | |
| 1 | value[0] : Illumination | Measured in lux. The Sensor Manager includes a set of constants representing different standard illuminations of the form |
| 3 | value[0] : Lateral value[1] : Longitudinal value[2] : Vertical | Ambient magnetic field measured in microteslas (µT). |
3 | value[0] : Azimuth value[1] : Roll value[2] : Pitch | Device orientation in degrees along three axes. | |
1 | value[0] : Pressure | Measured in kilopascals (KP). | |
1 | value[0] : Distance | Measured in meters. | |
1 | value[0] : Temperature | Measured in degrees Celsius. |
Using movement and orientation within applications is possible thanks to the inclusion of orientation and accelerometer sensors in many modern devices.
In recent years these sensors have become increasingly common, having found their way into game controllers like the Nintendo Wii and mobile smartphone handsets like the Apple iPhone, Palm Pre, and many Android devices.
Accelerometers and compasses are used to provide functionality based on device direction, orientation, and movement. A recent trend is to use this functionality to provide input mechanisms other than the traditional touchscreen, trackball, and keyboard.
The availability of compass and accelerometer Sensors depends on the hardware on which your application runs. When available, they are exposed through the Sensor Manager, allowing you to do the following:
Determine the current device orientation
Monitor and track changes in orientation
Know which direction the user is facing
Monitor acceleration — changes in movement rate — in any direction: vertically, laterally, or longitudinally
This opens some intriguing possibilities for your applications. By monitoring orientation, direction, and movement, you can:
Use the compass and accelerometer to determine your speed and direction. Use these with a map, camera, and location-based services to create augmented reality interfaces that overlay location-based data over the real-time camera feed.
Create user interfaces that adjust dynamically to suit the orientation of your device. Android already alters the native screen orientation when the device is rotated from portrait to landscape or vice versa.
Monitor for rapid acceleration to detect if a device has been dropped or thrown.
Measure movement or vibration. For example you could create an application that lets you lock your device; if any movement is detected while it's locked it could send an alert SMS that includes the current location.
Create user interface controls that use physical gestures and movement as input.
You should always check for the availability of any required Sensors and make sure your applications fail gracefully if they are missing.
Accelerometers, as their name suggests, are used to measure acceleration. They are also sometimes referred to as gravity sensors.
Note
Accelerometers are also known as gravity sensors because of their inability to differentiate between acceleration caused by movement and gravity. As a result, an accelerometer detecting acceleration on the z-axis (up/down) will read −9.8m/s2 when it's at rest (this value is available as the SensorManager.STANDARD_GRAVITY constant).
Acceleration is defined as the rate of change of velocity, so accelerometers measure how quickly the speed of the device is changing in a given direction. Using an accelerometer you can detect movement and, more usefully, the rate of change of the speed of that movement.
Note
It's important to note that accelerometers do not measure velocity, so you can't measure speed directly based on a single accelerometer reading. Instead you need to measure changes in acceleration over time.
Generally you'll be interested in acceleration changes relative to a rest state, or rapid movement (signified by rapid changes in acceleration) such as gestures used for user input. In the former case you'll often need to calibrate the device to calculate the initial orientation and acceleration to take those effects into account for future results.
Acceleration can be measured along three directional axes: left-right (lateral), forward-backward (longitudinal), and up-down (vertical). The Sensor Manager reports accelerometer Sensor changes along all three axes.
The values passed in through the values property of the Sensor Event Listener's Sensor Event parameter represent lateral, longitudinal, and vertical acceleration, in that order.
Figure 14-1 illustrates the mapping of the three directional acceleration axes in relation to the device at rest. The Sensor Manager considers the device "at rest" when it is sitting face up on a flat surface in portrait orientation.

x-axis (lateral) Sideways (left or right) acceleration, for which positive values represent movement toward the right side of the device, and negative values indicate movement to the left. For example, positive x-axis acceleration would be detected on a device flat on its back, facing up, and in portrait orientation being moved along a surface to your right.
y-axis (longitudinal) Forward or backward acceleration, for which forward acceleration is represented by a positive value. In the same configuration as described for lateral movement, you would create positive longitudinal acceleration by moving the device in the direction of the top of the device.
z-axis (vertical) Upward or downward acceleration, for which positive represents upward movement such as the device being lifted. While at rest the vertical accelerometer will register −9.8m/s2 as a result of gravity.
As described earlier, you monitor changes in acceleration using a Sensor Event Listener. Register an implementation of SensorEventListener with the Sensor Manager, using a Sensor object of type Sensor.TYPE_ACCELEROMETER to request accelerometer updates. Listing 14-2 registers the default accelerometer using the normal update rate.
Example 14-2. Listening to changes to the default accelerometer
SensorManager sm = (SensorManager)getSystemService(Context.SENSOR_SERVICE);
int sensorType = Sensor.TYPE_ACCELEROMETER;
sm.registerListener(mySensorEventListener,
                    sm.getDefaultSensor(sensorType),
                    SensorManager.SENSOR_DELAY_NORMAL);
Your Sensor Listener should implement the onSensorChanged method that will be fired when acceleration in any direction is measured.
The onSensorChanged method receives a SensorEvent that includes a float array containing the acceleration measured along all three axes. Based on a rest state of the device sitting flat on its back in portrait orientation, the first element represents lateral, the second longitudinal, and the final vertical acceleration, as shown in the following extension to Listing 14-2.
final SensorEventListener mySensorEventListener = new SensorEventListener() {
  public void onSensorChanged(SensorEvent sensorEvent) {
    if (sensorEvent.sensor.getType() == Sensor.TYPE_ACCELEROMETER) {
      float xAxis_lateralA = sensorEvent.values[0];
      float yAxis_longitudinalA = sensorEvent.values[1];
      float zAxis_verticalA = sensorEvent.values[2];
      // TODO apply the acceleration changes to your application.
    }
  }
};You can create a simple tool to measure g-force by summing the acceleration in all three directions and comparing it to the value in free fall. In the following example you'll create a simple device to measure g-force using the accelerometers to determine the current force being exerted on the device.
Thanks to gravity the force exerted on the device at rest is 9.8m/s2 toward the center of the Earth. In this example you'll negate the force of gravity by accounting for it using the SensorManager.STANDARD_GRAVITY constant.
Start by creating a new Forceometer project with a
ForceometerActivity. Modify the main.xml layout resource to display two centered lines of large, bold text that will be used to display the current g-force and maximum observed g-force:<?xml version="1.0" encoding="utf-8"?> <LinearLayout xmlns:android="http://schemas.android.com/apk/res/android" android:orientation="vertical" android:layout_width="fill_parent" android:layout_height="fill_parent"> <TextView android:id="@+id/acceleration" android:gravity="center" android:layout_width="fill_parent" android:layout_height="wrap_content" android:textStyle="bold" android:textSize="32sp" android:text="CENTER" android:editable="false" android:singleLine="true" android:layout_margin="10px"/> /> <TextView android:id="@+id/maxAcceleration" android:gravity="center" android:layout_width="fill_parent" android:layout_height="wrap_content" android:textStyle="bold" android:textSize="40sp" android:text="CENTER" android:editable="false" android:singleLine="true" android:layout_margin="10px"/> /> </LinearLayout>Within the
ForceometerActivity, create instance variables to store references to bothTextViewViews and theSensorManager. Also create variables to record the last and maximum detected acceleration values:SensorManager sensorManager; TextView accelerationTextView; TextView maxAccelerationTextView; float currentAcceleration = 0; float maxAcceleration = 0;
Create a new
SensorEventListenerimplementation that sums the acceleration detected along each axis and negates the acceleration caused by gravity. It should update the current and maximum acceleration whenever a change in acceleration is detected:private final SensorEventListener sensorEventListener = new SensorEventListener() { double calibration = SensorManager.STANDARD_GRAVITY; public void onAccuracyChanged(Sensor sensor, int accuracy) { } public void onSensorChanged(SensorEvent event) { double x = event.values[0]; double y = event.values[1]; double z = event.values[2]; double a = Math.round(Math.sqrt(Math.pow(x, 2) + Math.pow(y, 2) + Math.pow(z, 2)));currentAcceleration = Math.abs((float)(a-calibration)); if (currentAcceleration > maxAcceleration) maxAcceleration = currentAcceleration; } };Update the
onCreatemethod to register your new Listener for accelerometer updates using theSensorManager. Take the opportunity to get a reference to the two Text Views:@Override public void onCreate(Bundle savedInstanceState) { super.onCreate(savedInstanceState); setContentView(R.layout.main);accelerationTextView = (TextView)findViewById(R.id.acceleration);maxAccelerationTextView = (TextView)findViewById(R.id.maxAcceleration);sensorManager = (SensorManager)getSystemService(Context.SENSOR_SERVICE);Sensor accelerometer = sensorManager.getDefaultSensor(Sensor.TYPE_ACCELEROMETER);sensorManager.registerListener(sensorEventListener,accelerometer,SensorManager.SENSOR_DELAY_FASTEST);}The accelerometers can be very sensitive, so updating the Text Views for every detected acceleration change can be very expensive. Instead, create a new
updateGUImethod that synchronizes with the GUI thread based on a Timer before updating the Text Views:private void updateGUI() { runOnUiThread(new Runnable() { public void run() { String currentG = currentAcceleration/SensorManager.STANDARD_GRAVITY + "Gs"; accelerationTextView.setText(currentG); accelerationTextView.invalidate(); String maxG = maxAcceleration/SensorManager.STANDARD_GRAVITY + "Gs"; maxAccelerationTextView.setText(maxG); maxAccelerationTextView.invalidate(); } }); };Finally, update the
onCreatemethod to start a timer that's used to update the GUI every 100ms:@Override public void onCreate(Bundle savedInstanceState) { super.onCreate(savedInstanceState); setContentView(R.layout.main); accelerationTextView = (TextView)findViewById(R.id.acceleration); maxAccelerationTextView = (TextView)findViewById(R.id.maxAcceleration); sensorManager = (SensorManager)getSystemService(Context.SENSOR_SERVICE);Sensor accelerometer = sensorManager.getDefaultSensor(Sensor.TYPE_ACCELEROMETER); sensorManager.registerListener(sensorEventListener, accelerometer, SensorManager.SENSOR_DELAY_FASTEST);Timer updateTimer = new Timer("gForceUpdate");updateTimer.scheduleAtFixedRate(new TimerTask() {public void run() {updateGUI();}}, 0, 100);}
Once you're finished you'll want to test this out. Ideally you can do that in an F16 while Maverick performs high-g maneuvers over the Atlantic. That's been known to end badly, so failing that you can experiment with running or driving in the safety of your neighborhood.
Given that keeping constant watch on your handset while driving, cycling, or flying is also likely to end poorly, you might consider some further enhancements before you take it out for a spin.
Consider incorporating vibration or media player functionality to shake or beep with an intensity proportional to your current force, or simply log changes as they happen for later review.
The orientation Sensor is a combination of the magnetic field Sensors, which function as an electronic compass, and accelerometers, which determine the pitch and roll.
If you've done a bit of trigonometry you've got the skills required to calculate the device orientation based on the accelerometer and magnetic field values along all three axes. If you enjoyed trig as much as I did you'll be happy to learn that Android does these calculations for you.
In fact, Android provides two alternatives for determining the device orientation. You can query the orientation Sensor directly or derive the orientation using the accelerometers and magnetic field Sensors. The latter option is slower, but offers the advantages of increased accuracy and the ability to modify the reference frame when determining your orientation. The following sections demonstrate both techniques.
Using the standard reference frame, the device orientation is reported along three dimensions, as illustrated in Figure 14-2. As when using the accelerometers, the device is considered at rest faceup on a flat surface.
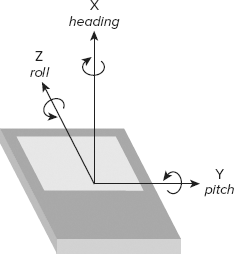
x-axis (azimuth) The azimuth (also heading or yaw) is the direction the device is facing around the x-axis, where 0/360 degrees is north, 90 east, 180 south, and 270 west.
y-axis (pitch) Pitch represents the angle of the device around the y-axis. The tilt angle returned shows 0 when the device is flat on its back, −90 when it is standing upright (top of device pointing at the ceiling), 90 when it's upside down, and 180/-180 when it's facedown.
z-axis (roll) The roll represents the device's sideways tilt between −90 and 90 degrees on the z-axis. Zero is the device flat on its back, −90 is the screen facing left, and 90 is the screen facing right.
The simplest way to monitor device orientation is by using a dedicated orientation Sensor. Create and register a Sensor Event Listener with the Sensor Manager, using the default orientation Sensor, as shown in Listing 14-3.
Example 14-3. Determining orientation using the orientation Sensor
SensorManager sm = (SensorManager)getSystemService(Context.SENSOR_SERVICE);
int sensorType = Sensor.TYPE_ORIENTATION;
sm.registerListener(myOrientationListener,
                    sm.getDefaultSensor(sensorType),
                    SensorManager.SENSOR_DELAY_NORMAL);
When the device orientation changes, the onSensorChanged method in your SensorEventListener implementation is fired. The SensorEvent parameter includes a values float array that provides the device's orientation along three axes.
The first element of the values array is the azimuth (heading), the second pitch, and the third roll.
final SensorEventListener myOrientationListener = new SensorEventListener() {
  public void onSensorChanged(SensorEvent sensorEvent) {
    if (sensorEvent.sensor.getType() == Sensor.TYPE_ORIENTATION) {
      float headingAngle = sensorEvent.values[0];
      float pitchAngle =  sensorEvent.values[1];
      float rollAngle = sensorEvent.values[2];
      // TODO Apply the orientation changes to your application.
    }
  }

  public void onAccuracyChanged(Sensor sensor, int accuracy) {}
};The best approach for finding the device orientation is to calculate it from the accelerometer and magnetic field Sensor results directly.
This technique enables you to change the orientation reference frame to remap the x-, y-, and z-axes to suit the device orientation you expect during use.
This approach uses both the accelerometer and magnetic field Sensors, so you need to create and register two Sensor Event Listeners. Within the onSensorChanged methods for each Sensor Event Listener, record the values array property received in two separate field variables, as shown in Listing 14-4.
Example 14-4. Finding orientation using the accelerometer and magnetic field Sensors
float[] accelerometerValues;
float[] magneticFieldValues;

final SensorEventListener myAccelerometerListener = new SensorEventListener() {
  public void onSensorChanged(SensorEvent sensorEvent) {
    if (sensorEvent.sensor.getType() == Sensor.TYPE_ACCELEROMETER)
      accelerometerValues = sensorEvent.values;
  }

  public void onAccuracyChanged(Sensor sensor, int accuracy) {}
};

final SensorEventListener myMagneticFieldListener = new SensorEventListener() {
  public void onSensorChanged(SensorEvent sensorEvent) {
    if (sensorEvent.sensor.getType() == Sensor.TYPE_MAGNETIC_FIELD)
      magneticFieldValues = sensorEvent.values;
  }

  public void onAccuracyChanged(Sensor sensor, int accuracy) {}
};
Register both with the Sensor Manager, as shown in the following code extending Listing 14-4; this snippet uses the default hardware and UI update rate for both Sensors:
SensorManager sm = (SensorManager)getSystemService(Context.SENSOR_SERVICE);
Sensor aSensor = sm.getDefaultSensor(Sensor.TYPE_ACCELEROMETER);
Sensor mfSensor = sm.getDefaultSensor(Sensor.TYPE_MAGNETIC_FIELD);

sm.registerListener(myAccelerometerListener,
                    aSensor,
                    SensorManager.SENSOR_DELAY_UI);

sm.registerListener(myMagneticFieldListener,
                    mfSensor,
                    SensorManager.SENSOR_DELAY_UI);
To calculate the current orientation from these Sensor values you use the getRotationMatrix and getOrientation methods from the Sensor Manager, as follows. Note that getOrientation returns radians rather than degrees.
float[] values = new float[3];
float[] R = new float[9];
SensorManager.getRotationMatrix(R, null,
                                accelerometerValues,
                                magneticFieldValues);
SensorManager.getOrientation(R, values);

// Convert from radians to degrees.
values[0] = (float) Math.toDegrees(values[0]);
values[1] = (float) Math.toDegrees(values[1]);
values[2] = (float) Math.toDegrees(values[2]);To measure device orientation using a reference frame other than the default described earlier, use the remapCoordinateSystem method from the Sensor Manager.
Earlier in this chapter the standard reference frame was described as the device being faceup on a flat surface. This method lets you remap the coordinate system used to calculate your orientation, for example by specifying the device to be at rest when mounted vertically.
The remapCoordinateSystem method accepts four parameters:
The initial rotation matrix, found using
getRotationMatrix, as described earlierA variable used to store the output (transformed) rotation matrix
The remapped x-axis
The remapped y-axis
Two final parameters are used to specify the new reference frame. The values used specify the new x- and y-axes relative to the default frame. The Sensor Manager provides a set of constants to let you specify the axis values: AXIS_X, AXIS_Y, AXIS_Z, AXIS_MINUS_X, AXIS_MINUS_Y, and AXIS_MINUS_Z.
Listing 14-5 shows how to remap the reference frame so that a device is at rest when mounted vertically — held in portrait mode with its screen facing the user — as shown in Figure 14-3.

Example 14-5. Remapping the orientation reference frame
SensorManager.getRotationMatrix(R, null, aValues, mValues);

float[] outR = new float[9];
SensorManager.remapCoordinateSystem(R,
                                    SensorManager.AXIS_X,
                                    SensorManager.AXIS_Z,
                                    outR);
SensorManager.getOrientation(outR, values);

// Convert from radians to degrees.
values[0] = (float) Math.toDegrees(values[0]);
values[1] = (float) Math.toDegrees(values[1]);
values[2] = (float) Math.toDegrees(values[2]);In Chapter 4 you created a simple CompassView to experiment with owner-drawn controls. In this example you'll extend the functionality of the Compass View to display the device pitch and roll, before using it to display the device orientation.
Open the Compass project you created in Chapter 4. You will be making changes to the
CompassViewas well as theCompassActivity used to display it. To ensure that the view and controller remain as decoupled as possible, theCompassViewwon't be linked to the Sensors directly; instead it will be updated by the Activity. Start by adding field variables and get/set methods for pitch and roll to theCompassView.float pitch = 0; float roll = 0; public float getPitch() { return pitch; } public void setPitch(float pitch) { this.pitch = pitch; } public float getRoll() { return roll; } public void setRoll(float roll) { this.roll = roll; }Update the
onDrawmethod to include two circles that will be used to indicate the pitch and roll values.@Override protected void onDraw(Canvas canvas) { [ ... Existing onDraw method ... ]2.1. Create a new circle that's half filled and rotates in line with the sideways tilt (roll).
RectF rollOval = new RectF((mMeasuredWidth/3)-mMeasuredWidth/7, (mMeasuredHeight/2)-mMeasuredWidth/7, (mMeasuredWidth/3)+mMeasuredWidth/7, (mMeasuredHeight/2)+mMeasuredWidth/7 ); markerPaint.setStyle(Paint.Style.STROKE); canvas.drawOval(rollOval, markerPaint); markerPaint.setStyle(Paint.Style.FILL); canvas.save(); canvas.rotate(roll, mMeasuredWidth/3, mMeasuredHeight/2); canvas.drawArc(rollOval, 0, 180, false, markerPaint); canvas.restore();2.2. Create a new circle that starts half filled and varies between full and empty based on the forward angle (pitch):
RectF pitchOval = new RectF((2*mMeasuredWidth/3)-mMeasuredWidth/7,
                              (mMeasuredHeight/2)-mMeasuredWidth/7,
                              (2*mMeasuredWidth/3)+mMeasuredWidth/7,
                              (mMeasuredHeight/2)+mMeasuredWidth/7
                             );
markerPaint.setStyle(Paint.Style.STROKE); canvas.drawOval(pitchOval, markerPaint); markerPaint.setStyle(Paint.Style.FILL); canvas.drawArc(pitchOval, 0-pitch/2, 180+(pitch), false, markerPaint); markerPaint.setStyle(Paint.Style.STROKE); }
That completes the changes to the
CompassView. If you run the application now it should appear as shown in Figure 14-4.Now update the
CompassActivity. Use the Sensor Manager to listen for orientation changes using the magnetic field and accelerometer Sensors. Start by adding local field variables to store the last magnetic field and accelerometer values, as well as references to theCompassViewandSensorManager.float[] aValues = new float[3]; float[] mValues = new float[3]; CompassView compassView; SensorManager sensorManager;
Create a new
updateOrientationmethod that uses new heading, pitch, and roll values to update theCompassView.private void updateOrientation(float[] values) { if (compassView!= null) { compassView.setBearing(values[0]); compassView.setPitch(values[1]); compassView.setRoll(-values[2]); compassView.invalidate(); } }Update the
onCreatemethod to get references to theCompassViewandSensorManager, and initialize the heading, pitch, and roll.@Override public void onCreate(Bundle savedInstanceState) { super.onCreate(savedInstanceState); setContentView(R.layout.main); compassView = (CompassView)this.findViewById(R.id.compassView); sensorManager = (SensorManager)getSystemService(Context.SENSOR_SERVICE); updateOrientation(new float[] {0, 0, 0}); }Create a new
calculateOrientationmethod to evaluate the device orientation using the last recorded accelerometer and magnetic field values.private float[] calculateOrientation() { float[] values = new float[3]; float[] R = new float[9]; SensorManager.getRotationMatrix(R, null, aValues, mValues); SensorManager.getOrientation(R, values); // Convert from Radians to Degrees. values[0] = (float) Math.toDegrees(values[0]); values[1] = (float) Math.toDegrees(values[1]); values[2] = (float) Math.toDegrees(values[2]); return values; }Implement a
SensorEventListeneras a field variable. WithinonSensorChangedit should check for the calling Sensor's type and update the last accelerometer or magnetic field values as appropriate before making a call toupdateOrientationusing thecalculateOrientationmethod.private final SensorEventListener sensorEventListener = new SensorEventListener() { public void onSensorChanged(SensorEvent event) { if (event.sensor.getType() == Sensor.TYPE_ACCELEROMETER) aValues = event.values; if (event.sensor.getType() == Sensor.TYPE_MAGNETIC_FIELD) mValues = event.values; updateOrientation(calculateOrientation()); } public void onAccuracyChanged(Sensor sensor, int accuracy) {} };Now override
onResumeandonStopto register and unregister theSensorEventListenerwhen the Activity becomes visible and hidden, respectively.@Override protected void onResume() { super.onResume(); Sensor accelerometer = sensorManager.getDefaultSensor(Sensor.TYPE_ACCELEROMETER); Sensor magField = sensorManager.getDefaultSensor(Sensor.TYPE_MAGNETIC_FIELD); sensorManager.registerListener(sensorEventListener, accelerometer, SensorManager.SENSOR_DELAY_FASTEST); sensorManager.registerListener(sensorEventListener,magField, SensorManager.SENSOR_DELAY_FASTEST); } @Override protected void onStop() { sensorManager.unregisterListener(sensorEventListener); super.onStop(); }If you run the application now you should see the three face dials update dynamically when the orientation of the device changes.
An artificial horizon is more useful if it's mounted vertically. Modify the reference frame of the artificial horizon to match this orientation by updating
calculateOrientationto remap the coordinate system.private float[] calculateOrientation() { float[] values = new float[3]; float[] R = new float[9]; float[] outR = new float[9]; SensorManager.getRotationMatrix(R, null, aValues, mValues); SensorManager.remapCoordinateSystem(R, SensorManager.AXIS_X, SensorManager.AXIS_Z, outR); SensorManager.getOrientation(outR, values); // Convert from Radians to Degrees. values[0] = (float) Math.toDegrees(values[0]); values[1] = (float) Math.toDegrees(values[1]); values[2] = (float) Math.toDegrees(values[2]); return values; }

In Chapter 9 you learned how to create Notifications that can use vibration to enrich event feedback. In some circumstances you may want to vibrate the device independently of Notifications. Vibrating the device is an excellent way to provide haptic user feedback, and is particularly popular as a feedback mechanism for games.
To control device vibration, your applications needs the VIBRATE permission. Add this to your application manifest using the following XML snippet:
<uses-permission android:name="android.permission.VIBRATE"/>
Device vibration is controlled through the Vibrator Service, accessible via the getSystemService method, as shown in Listing 14-6.
Example 14-6. Controlling device vibration
String vibratorService = Context.VIBRATOR_SERVICE;
Vibrator vibrator = (Vibrator)getSystemService(vibratorService);
Call vibrate to start device vibration; you can pass in either a vibration duration or a pattern of alternating vibration/pause sequences along with an optional index parameter that will repeat the pattern starting at the index specified. Both techniques are demonstrated in the following extension to Listing 14-6:
long[] pattern = {1000, 2000, 4000, 8000, 16000 };
vibrator.vibrate(pattern, 0); // Execute vibration pattern.
vibrator.vibrate(1000); // Vibrate for 1 second.
To cancel vibration call cancel; exiting your application will automatically cancel any vibration it has initiated.
In this chapter you learned how to use the Sensor Manager to let your application respond to the physical environment. You were introduced to the Sensors available on the Android platform and learned how to listen for Sensor Events using the Sensor Event Listener and how to interpret those results.
Then you took a more detailed look at the accelerometer, orientation, and magnetic field detection hardware, using these Sensors to determine the device's orientation and acceleration. In the process you created a g-forceometer and an artificial horizon.
You also learned:
Which Sensors are available to Android applications
How to remap the reference frame when determining a device's orientation
The composition and meaning of the Sensor Event values returned by each sensor
How to use device vibration to provide physical feedback for application events
In the final chapter, you'll be introduced to some of the advanced Android features. You'll learn more about security, how to use AIDL to facilitate interprocess communication, and using Wake Locks. You'll be introduced to Android's TTS library and learn about Android's User Interface and graphics capabilities by exploring animations and advanced Canvas drawing techniques. Finally, you'll be introduced to the SurfaceView and touch-screen input functionality.