
One of the defining features of mobile phones is their portability, so it's not surprising that some of the most enticing Android features are the services that let you find, contextualize, and map physical locations.
You can create map-based Activities using Google Maps as a user interface element. You have full access to the map, which enables you to control display settings, alter the zoom level, and pan the display. Using Overlays you can annotate maps and handle user input to provide map-contextualized information and functionality.
Also covered in this chapter are the location - based services (LBS), the services that let you find the device's current location. They include technologies like GPS and Google's cell-based location technology. You can specify which location-sensing technology to use explicitly by name, or implicitly by defining a set of criteria in terms of accuracy, cost, and other requirements.
Maps and location-based services use latitude and longitude to pinpoint geographic locations, but your users are more likely to think in terms of an address. Android provides a Geocoder that supports forward and reverse geocoding. Using the Geocoder you can convert back and forth between latitude/longitude values and real-world addresses.
Used together, the mapping, geocoding, and location-based services provide a powerful toolkit for incorporating your phone's native mobility into your mobile applications.
Location-based services is an umbrella term used to describe the different technologies used to find a device's current location. The two main LBS elements are:
Using the Location Manager, you can:
Obtain your current location
Track movement
Set proximity alerts for detecting movement into and out of a specified area
Find available Location Providers
Location-based services are dependent on device hardware to find the current location. When you are developing and testing with the emulator your hardware is virtualized, and you're likely to stay in pretty much the same location.
To compensate, Android includes hooks that let you emulate Location Providers for testing location-based applications. In this section you'll learn how to mock the position of the supported GPS provider.
Warning
If you're planning on doing location-based application development and are using the Android Emulator, this section will show you how to create an environment that simulates real hardware and location changes. For the remainder of this chapter it will be assumed that you have used the examples in this section to update the location for the GPS_PROVIDER within the emulator, or that you are using a physical device.
Use the Location Controls available from the DDMS perspective in Eclipse (shown in Figure 8-1) to push location changes directly into the emulator's GPS Location Provider.
Figure 8-1 shows the Manual and KML tabs. Using the Manual tab you can specify particular latitude/longitude pairs. Alternatively, the KML and GPX tabs let you load KML (Keyhole Markup Language) and GPX (GPS Exchange Format) files, respectively. Once these are loaded you can jump to particular waypoints (locations) or play back each location sequentially.

Note
Most GPS systems record track-files using GPX, while KML is used extensively online to define geographic information. You can handwrite your own KML file or generate one by using Google Earth to find directions between two locations.
All location changes applied using the DDMS Location Controls will be applied to the GPS receiver, which must be enabled and active.
Depending on the device, there may be several technologies that Android can use to determine the current location. Each technology, or Location Provider, will offer different capabilities, including differences in power consumption, monetary cost, accuracy, and the ability to determine altitude, speed, or heading information.
To get an instance of a specific provider, call getProvider, passing in the name:
String providerName = LocationManager.GPS_PROVIDER;
LocationProvider gpsProvider;
gpsProvider = locationManager.getProvider(providerName);
This is generally useful only for determining the abilities of a particular provider. Most Location Manager methods require only a provider name to perform location-based services.
The LocationManager class includes static string constants that return the provider name for the two most common Location Providers:
To get a list of names for all the providers available on the device, call getProviders, using a Boolean to indicate if you want all, or only the enabled, providers to be returned:
boolean enabledOnly = true;
List<String> providers = locationManager.getProviders(enabledOnly);
In most scenarios it's unlikely that you will want to explicitly choose the Location Provider to use. More commonly, you'll specify the requirements that a provider must meet and let Android determine the best technology to use.
Use the Criteria class to dictate the requirements of a provider in terms of accuracy (fine or coarse), power use (low, medium, high), financial cost, and the ability to return values for altitude, speed, and bearing.
Listing 8-1 specifies Criteria requiring coarse accuracy, low power consumption, and no need for altitude, bearing, or speed. The provider is permitted to have an associated cost.
Example 8-1. Specifying Location Provider Criteria
Criteria criteria = new Criteria();
criteria.setAccuracy(Criteria.ACCURACY_COARSE);
criteria.setPowerRequirement(Criteria.POWER_LOW);
criteria.setAltitudeRequired(false);
criteria.setBearingRequired(false);
criteria.setSpeedRequired(false);
criteria.setCostAllowed(true);
Having defined the required Criteria, you can use getBestProvider to return the best matching Location Provider or getProviders to return all the possible matches. The following snippet demonstrates the use of getBestProvider to return the best provider for your criteria where the Boolean lets you restrict the result to a currently enabled provider:
String bestProvider = locationManager.getBestProvider(criteria, true);
If more than one Location Provider matches your criteria, the one with the greatest accuracy is returned. If no Location Providers meet your requirements the criteria are loosened, in the following order, until a provider is found:
Power use
Accuracy
Ability to return bearing, speed, and altitude
The criterion for allowing a device with monetary cost is never implicitly relaxed. If no provider is found, null is returned.
To see a list of names for all the providers that match your criteria you can use getProviders. It accepts a Criteria object and returns a filtered String list of all available Location Providers that match them. As with the getBestProvider call, if no matching providers are found, this call returns null.
List<String> matchingProviders = locationManager.getProviders(criteria,
false);The purpose of location-based services is to find the physical location of the device.
Access to the location-based services is handled by the Location Manager system Service. To access the Location Manager, request an instance of the LOCATION_SERVICE using the getSystemService method, as shown in the following snippet:
String serviceString = Context.LOCATION_SERVICE;
LocationManager locationManager;
locationManager = (LocationManager)getSystemService(serviceString);
Before you can use the Location Manager you need to add one or more uses-permission tags to your manifest to support access to the LBS hardware.
The following snippet shows the fine and coarse permissions. An application that has been granted fine permission will have coarse permission granted implicitly.
<uses-permission android:name="android.permission.ACCESS_FINE_LOCATION"/>
<uses-permission android:name="android.permission.ACCESS_COARSE_LOCATION"/>
Note
The GPS provider requires fine permission, while the Network (Cell ID/Wi-Fi) provider requires only coarse.
You can find the last location fix determined by a particular Location Provider using the getLastKnownLocation method, passing in the name of the Location Provider. The following example finds the last location fix taken by the GPS provider:
String provider = LocationManager.GPS_PROVIDER;
Location location = locationManager.getLastKnownLocation(provider);
Note
Note that getLastKnownLocation does not ask the Location Provider to update the current position. If the device has not recently updated the current position, this value may not exist or be out of date.
The Location object returned includes all the position information available from the provider that supplied it. This can include latitude, longitude, bearing, altitude, speed, and the time the location fix was taken. All these properties are available via get methods on the Location object. In some instances additional details will be included in the extras Bundle.
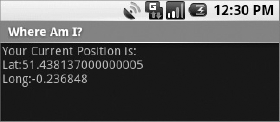
The following example — Where Am I?—features a new Activity that finds the device's current location using the GPS Location Provider. You will expand on this example throughout the chapter as you learn new geographic functionality.
Note
This example assumes that you have enabled the GPS_PROVIDER Location Provider using the techniques shown previously in this chapter, or that you're running it on a device that supports GPS and has that hardware enabled.
Create a new Where Am I? project with a
WhereAmIActivity. This example uses the GPS provider (either mock or real), so modify the manifest file to include the<uses-permission>tags forACCESS_FINE_LOCATIONandINTERNET.<?xml version="1.0" encoding="utf-8"?> <manifest xmlns:android="http://schemas.android.com/apk/res/android" package="com.paad.whereami"> <application android:icon="@drawable/icon"> <activity android:name=".WhereAmI" android:label="@string/app_name"> <intent-filter> <action android:name="android.intent.action.MAIN" /> <category android:name="android.intent.category.LAUNCHER" /> </intent-filter> </activity> </application><uses-permissionandroid:name="android.permission.ACCESS_FINE_LOCATION"/></manifest>Modify the main.xml layout resource to include an
android:IDattribute for theTextViewcontrol so that you can access it from within the Activity.<?xml version="1.0" encoding="utf-8"?> <LinearLayout xmlns:android="http://schemas.android.com/apk/res/android" android:orientation="vertical" android:layout_width="fill_parent" android:layout_height="fill_parent"> <TextViewandroid:id="@+id/myLocationText"android:layout_width="fill_parent" android:layout_height="wrap_content" android:text="@string/hello" /><uses permission android:name="android.permission.INTERNET /> </LinearLayout>Override the
onCreatemethod of theWhereAmIActivity to get a reference to the Location Manager. CallgetLastKnownLocationto get the last location fix value, and pass it in to theupdateWithNewLocationmethod stub.package com.paad.whereami; import android.app.Activity; import android.content.Context; import android.location.Location; import android.location.LocationManager; import android.os.Bundle; import android.widget.TextView; public class WhereAmI extends Activity { @Override public void onCreate(Bundle savedInstanceState) { super.onCreate(savedInstanceState); setContentView(R.layout.main); LocationManager locationManager; String context = Context.LOCATION_SERVICE; locationManager = (LocationManager)getSystemService(context); String provider = LocationManager.GPS_PROVIDER; Location location = locationManager.getLastKnownLocation(provider); updateWithNewLocation(location); } private void updateWithNewLocation(Location location) {} }Fill in the
updateWithNewLocationmethod to display the passed-in Location in the Text View by extracting the latitude and longitude values.private void updateWithNewLocation(Location location) { String latLongString; TextView myLocationText; myLocationText = (TextView)findViewById(R.id.myLocationText); if (location != null) { double lat = location.getLatitude(); double lng = location.getLongitude(); latLongString = "Lat:" + lat + " Long:" + lng; } else { latLongString = "No location found"; } myLocationText.setText("Your Current Position is: " + latLongString); }
When running, your Activity should look like Figure 8-2.
Most location-sensitive applications will need to be reactive to user movement. Simply polling the Location Manager will not force it to get new updates from the Location Providers.
Use the requestLocationUpdates method to get updates whenever the current location changes, using a LocationListener. Location Listeners also contain hooks for changes in a provider's status and availability.
The requestLocationUpdates method accepts either a specific Location Provider name or a set of Criteria to determine the provider to use.
To optimize efficiency and minimize cost and power use, you can also specify the minimum time and the minimum distance between location change updates.
Listing 8-2 shows the skeleton code for requesting regular updates based on a minimum time and distance.
Example 8-2. Requesting location updates
String provider = LocationManager.GPS_PROVIDER;

int t = 5000; // milliseconds
int distance = 5; // meters

LocationListener myLocationListener = new LocationListener() {

  public void onLocationChanged(Location location) {
    // Update application based on new location.
  }

  public void onProviderDisabled(String provider){
    // Update application if provider disabled.
  }

  public void onProviderEnabled(String provider){
    // Update application if provider enabled.
  }

  public void onStatusChanged(String provider, int status,
                              Bundle extras){
    // Update application if provider hardware status changed.
  }
};

locationManager.requestLocationUpdates(provider, t, distance,
                                       myLocationListener);
When the minimum time and distance values are exceeded, the attached Location Listener will execute its onLocationChanged event.
Note
You can request multiple location updates pointing to different Location Listeners and using different minimum thresholds. A common design pattern is to create a single listener for your application that broadcasts Intents to notify other components of location changes. This centralizes your listeners and ensures that the Location Provider hardware is used as efficiently as possible.
To stop location updates, call removeUpdates, as shown in the following code. Pass in the Location Listener instance you no longer want to have triggered.
locationManager.removeUpdates(myLocationListener);
Most GPS hardware incurs significant power cost. To minimize this you should disable updates whenever possible in your application, especially when your application isn't visible and location changes are being used to update an Activity's user interface. You can improve performance further by making the minimum time between updates as long as possible.
Privacy is also a factor when your application tracks the user location. Ensure that your application is using the device location data in a way that respects the user's privacy by:
Only tracking location when necessary for your application
Notifying users of when you are tracking their locations, and how that location information is being used and stored
Allowing users to disable location updates, and respecting the system settings for LBS preferences.
In the following example — the Where Am I? project is enhanced to track your current location by listening for location changes. Updates are restricted to one every two seconds, and only when movement of more than 10 meters has been detected.
Rather than explicitly selecting the GPS provider, in this example you'll create a set of Criteria and let Android choose the best provider available.
Start by opening the
WhereAmIActivity in the Where Am I? project. Update theonCreatemethod to find the best Location Provider that features high accuracy and draws as little power as possible.@Override public void onCreate(Bundle savedInstanceState) { super.onCreate(savedInstanceState); setContentView(R.layout.main); LocationManager locationManager; String context = Context.LOCATION_SERVICE; locationManager = (LocationManager)getSystemService(context);Criteria criteria = new Criteria();criteria.setAccuracy(Criteria.ACCURACY_FINE);criteria.setAltitudeRequired(false);criteria.setBearingRequired(false);criteria.setCostAllowed(true);criteria.setPowerRequirement(Criteria.POWER_LOW);String provider = locationManager.getBestProvider(criteria, true);Location location = locationManager.getLastKnownLocation(provider); updateWithNewLocation(location); }Create a new
LocationListenerinstance variable that fires the existingupdateWithNewLocationmethod whenever a location change is detected.private final LocationListener locationListener = new LocationListener() { public void onLocationChanged(Location location) { updateWithNewLocation(location); } public void onProviderDisabled(String provider){ updateWithNewLocation(null); } public void onProviderEnabled(String provider){ } public void onStatusChanged(String provider, int status, Bundle extras){ } };Return to
onCreateand executerequestLocationUpdates, passing in the new Location Listener object. It should listen for location changes every two seconds but fire only when it detects movement of more than 10 meters.@Override public void onCreate(Bundle savedInstanceState) { super.onCreate(savedInstanceState); setContentView(R.layout.main); LocationManager locationManager; String context = Context.LOCATION_SERVICE; locationManager = (LocationManager)getSystemService(context); Criteria criteria = new Criteria(); criteria.setAccuracy(Criteria.ACCURACY_FINE); criteria.setAltitudeRequired(false); criteria.setBearingRequired(false); criteria.setCostAllowed(true); criteria.setPowerRequirement(Criteria.POWER_LOW); String provider = locationManager.getBestProvider(criteria, true); Location location = locationManager.getLastKnownLocation(provider); updateWithNewLocation(location);locationManager.requestLocationUpdates(provider, 2000, 10,locationListener);}
If you run the application and start changing the device location, you will see the Text View update accordingly.
It's often useful to have your applications react when a user moves toward, or away from, a specific location. Proximity alerts let your applications set triggers that are fired when a user moves within or beyond a set distance from a geographic location.
Note
Internally, Android may use different Location Providers depending on how close you are to the outside edge of your target area. This allows the power use and cost to be minimized when the alert is unlikely to be fired based on your distance from the target area interface.
To set a proximity alert for a given coverage area, select the center point (using longitude and latitude values), a radius around that point, and an expiry time-out for the alert. The alert will fire if the device crosses over that boundary, both when it moves from outside to within the radius, and when it moves from inside to beyond it.
When triggered, proximity alerts fire Intents, most commonly broadcast Intents. To specify the Intent to fire, you use a PendingIntent, a class that wraps an Intent in a kind of method pointer, as shown in the following code snippet:xs
Intent intent = new Intent(MY_ACTION);
PendingIntent pendingIntent = PendingIntent.getBroadcast(this, −1, intent, 0);
The following example sets a proximity alert that never expires and that is triggered when the device moves within 10 meters of its target:
private static String TREASURE_PROXIMITY_ALERT = "com.paad.treasurealert";

private void setProximityAlert() {
  String locService = Context.LOCATION_SERVICE;
  LocationManager locationManager;
  locationManager = (LocationManager)getSystemService(locService);

  double lat = 73.147536;
  double lng = 0.510638;
  float radius = 100f; // meters
  long expiration = −1; // do not expire

  Intent intent = new Intent(TREASURE_PROXIMITY_ALERT);
PendingIntent proximityIntent = PendingIntent.getBroadcast(this, −1,intent,0);locationManager.addProximityAlert(lat, lng, radius,expiration,proximityIntent);}
When the Location Manager detects that you have crossed the radius boundary — that is, you have moved either from outside to within or from inside to beyond the specified proximity radius — the packaged Intent will be fired with an extra keyed as LocationManager.KEY_PROXIMITY_ENTERING set to true or false accordingly.
To handle proximity alerts you need to create a BroadcastReceiver, such as the one shown in Listing 8-3.
Example 8-3. Creating a proximity alert Broadcast Receiver
public class ProximityIntentReceiver extends BroadcastReceiver {

  @Override
  public void onReceive (Context context, Intent intent) {
    String key = LocationManager.KEY_PROXIMITY_ENTERING;

    Boolean entering = intent.getBooleanExtra(key, false);
    [ ... perform proximity alert actions ... ]
  }

}
To start listening for proximity alerts, register your receiver:
IntentFilter filter = new IntentFilter(TREASURE_PROXIMITY_ALERT);
registerReceiver(new ProximityIntentReceiver(), filter);
Geocoding lets you translate between street addresses and longitude/latitude map coordinates. This can give you a recognizable context for the locations and coordinates used in location-based services and map-based Activities.
The geocoding lookups are done on the server, so your applications will require you to include an Internet uses-permission in your manifest, as shown here:
<uses-permission android:name="android.permission.INTERNET"/>
The Geocoder class provides access to two geocoding functions:
Forward geocoding Finds the latitude and longitude of an address
Reverse geocoding Finds the street address for a given latitude and longitude
The results from these calls are contextualized by means of a locale (used to define your usual location and language). The following snippet shows how you set the locale when creating your Geocoder. If you don't specify a locale, it will assume your device's default.
Geocoder geocoder = new Geocoder(getApplicationContext(),
                                 Locale.getDefault());
Both geocoding functions return a list of Address objects. Each list can contain several possible results, up to a limit you specify when making the call.
Each Address object is populated with as much detail as the Geocoder was able to resolve. This can include the latitude, longitude, phone number, and increasingly granular address details from country to street and house number.
Note
Geocoder lookups are performed synchronously, so they will block the calling thread. For slow data connections, this can lead to a Force Close dialog. In most cases it's good form to move these lookups into a Service or background thread, as demonstrated in Chapter 9.
For clarity and brevity, the calls made in the code samples within this chapter are made on the main application thread.
Reverse geocoding returns street addresses for physical locations, specified by latitude/longitude pairs. It provides a recognizable context for the locations returned by location-based services.
To perform a reverse lookup, you pass the target latitude and longitude to a Geocoder's getFromLocation method. It will return a list of possible matching addresses. If the Geocoder could not resolve any addresses for the specified coordinate, it will return null.
Listing 8-4 shows how to reverse-geocode your last known location.
Example 8-4. Reverse-geocoding your last known location
location = locationManager.getLastKnownLocation(LocationManager.GPS_PROVIDER); double latitude = location.getLatitude(); double longitude = location.getLongitude();List<Address> addresses = null;Geocoder gc = new Geocoder(this, Locale.getDefault());try {addresses = gc.getFromLocation(latitude, longitude, 10);} catch (IOException e) {}
The accuracy and granularity of reverse lookups are entirely dependent on the quality of data in the geocoding database; as a result, the quality of the results may vary widely between different countries and locales.
Forward geocoding (or just geocoding) determines map coordinates for a given location.
Note
What constitutes a valid location varies depending on the locale (geographic area) within which you're searching. Generally, it will include regular street addresses of varying granularity (from country to street name and number), postcodes, train stations, landmarks, and hospitals. As a general guide, valid search terms will be similar to the addresses and locations you can enter into the Google Maps search bar.
To do a forward-geocoding lookup, call getFromLocationName on a Geocoder instance. Pass in the location you want the coordinates for and the maximum number of results to return:
List<Address> result = geocoder.getFromLocationName(aStreetAddress, maxResults);
The returned list of Addresses can include multiple possible matches for the named location. Each address result will include latitude and longitude and any additional address information available for those coordinates. This is useful to confirm that the correct location was resolved, as well as for providing location specifics in searches for landmarks.
Note
As with reverse geocoding, if no matches are found, null will be returned. The availability, accuracy, and granularity of geocoding results will depend entirely on the database available for the area you're searching.
When you're doing forward lookups, the Locale object specified during the creation of the Geocoder object is particularly important. The Locale provides the geographical context for interpreting your search requests, as the same location names can exist in multiple areas. Where possible, consider selecting a regional Locale to help avoid place-name ambiguity.
Additionally, try to use as many address details as possible, as shown in Listing 8-5.
Example 8-5. Geocoding an address
Geocoder fwdGeocoder = new Geocoder(this, Locale.US);
String streetAddress = "160 Riverside Drive, New York, New York";

List<Address> locations = null;
try {
  locations = fwdGeocoder.getFromLocationName(streetAddress, 10);xs
} catch (IOException e) {}
For even more specific results, use the getFromLocationName overload, which lets you restrict your search to within a geographical bounding box.
List<Address> locations = null;
try {
  locations = fwdGeocoder.getFromLocationName(streetAddress, 10,
                                              n, e, s, w);
} catch (IOException e) {}
This overload is particularly useful in conjunction with a Map View, as you can restrict the search to within the visible map.
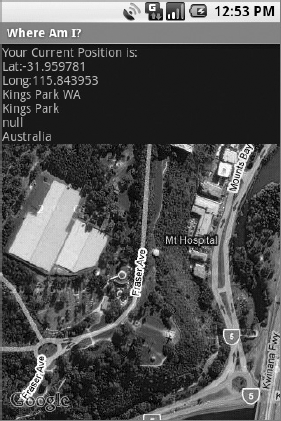
Using the Geocoder you can determine the street address at your current location. In this example you'll further extend the Where Am I? project to include and update the current street address whenever the device moves.
Start by modifying the manifest to include the Internet uses-permission:
<uses-permission android:name="android.permission.INTERNET"/>
Then open the WhereAmI Activity. Modify the updateWithNewLocation method to instantiate a new Geocoder object, and call the getFromLocation method, passing in the newly received location and limiting the results to a single address.
Extract each line in the street address, as well as the locality, postcode, and country, and append this information to an existing Text View string.
private void updateWithNewLocation(Location location) {
  String latLongString;
  TextView myLocationText;
  myLocationText = (TextView)findViewById(R.id.myLocationText);

  String addressString = "No address found";

  if (location != null) {
    double lat = location.getLatitude();
    double lng = location.getLongitude();
    latLongString = "Lat:" + lat + "
Long:" + lng;

    double latitude = location.getLatitude();
    double longitude = location.getLongitude();
    Geocoder gc = new Geocoder(this, Locale.getDefault());
    try {
      List<Address> addresses = gc.getFromLocation(latitude, longitude, 1);
      StringBuilder sb = new StringBuilder();
      if (addresses.size() > 0) {
        Address address = addresses.get(0);

        for (int i = 0; i < address.getMaxAddressLineIndex(); i++)
          sb.append(address.getAddressLine(i)).append("
");

          sb.append(address.getLocality()).append("
");
          sb.append(address.getPostalCode()).append("
");sb.append(address.getCountryName());}addressString = sb.toString();} catch (IOException e) {}} else { latLongString = "No location found"; } myLocationText.setText("Your Current Position is: " + latLongString + " " + addressString); }
If you run the example now, it should appear as shown in Figure 8-3.

The MapView provides an ideal user interface option for presenting geographical data.
One of the most intuitive ways of providing context for a physical location or address is to display it on a map. Using a MapView, you can create Activities that feature an interactive map.
Map Views support annotation using Overlays and by pinning Views to geographical locations. Map Views offer full programmatic control of the map display, letting you control the zoom, location, and display modes — including the option to display satellite, street, and traffic views.
In the following sections you'll see how to use Overlays and the MapController to create dynamic map-based Activities. Unlike online mashups, your map Activities will run natively on the device, enabling you to leverage its hardware and mobility to provide a more customized and personal user experience.
This section introduces several classes used to support Android maps:
MapViewis the Map View control.MapActivityis the base class you extend to create a new Activity that can include a Map View. TheMapActivityclass handles the application life cycle and background service management required for displaying maps. As a result you can use Map Views only withinMapActivity-derived Activities.Overlayis the class used to annotate your maps. Using Overlays, you can use a Canvas to draw onto any number of layers that are displayed on top of a Map View.MapControlleris used to control the map, enabling you to set the center location and zoom levels.MyLocationOverlayis a special Overlay that can be used to display the current position and orientation of the device.ItemizedOverlaysandOverlayItemsare used together to let you create a layer of map markers, displayed using Drawables and associated text.
In order to use a Map View in your application you must first obtain an API key from the Android developer web site at http://code.google.com/android/maps-api-signup.html.
Without an API key the Map View will not download the tiles used to display the map.
To obtain a key you need to specify the MD5 fingerprint of the certificate used to sign your application. Generally, you will sign your application using two certificates — a default debug certificate and a production certificate. The following sections explain how to obtain the MD5 fingerprint of each signing certificate used for your application.
If you are using Eclipse with the ADT plug-in to debug your applications, they will be signed with the default debug certificate. To view map tiles while debugging you will need to obtain a Maps API key registered via the MD5 fingerprint of the debug certificate.
You can find the location of your keystore in the Default Debug Keystore textbox after selecting Windows
Windows Vista users<username>.androiddebug.keystore
Windows XP Documents and Settings<username>.androiddebug.keystore
Linux or Mac ∼/.android/debug.keystore
Note
Each computer you use for development will have a different debug certificate and MD5 value. If you want to debug and develop map applications across multiple computers you will need to generate and use multiple API keys.
To find the MD5 fingerprint of your debug certificate use the keytool command from your Java installation, as shown here:
keytool -list -alias androiddebugkey -keystore <keystore_location>.keystore
-storepass android -keypass android
Before you compile and sign your application for release, you will need to obtain a map API key using the MD5 fingerprint for your release certificate.
Find the MD5 fingerprint using the keytool command and specifying the -list parameter and the keystore and alias you will use to sign your release application.
keytool -list -alias my-android-alias -keystore my-android-keystore
You will be prompted for your keystore and alias passwords before the MD5 fingerprint is returned.
To use maps in your applications you need to extend MapActivity. The layout for the new class must then include a MapView to display a Google Maps interface element. The Android maps library is not a standard Android package; as an optional API, it must be explicitly included in the application manifest before it can be used. Add the library to your manifest using a uses-library tag within the application node, as shown in the following XML snippet:
<uses-library android:name="com.google.android.maps"/>
Warning
The maps package as described here is not part of the standard Android open-source project. It is provided within the Android SDK by Google and is available on most Android devices. However, be aware that because it is a nonstandard package, an Android device may not feature this particular library.
Google Maps downloads the map tiles on demand; as a result, it implicitly requires permission to use the Internet. To see map tiles in your Map View you need to add a <uses-permission> tag to your application manifest for INTERNET, as shown here:
<uses-permission android:name="android.permission.INTERNET"/>
Once you've added the library and configured your permission, you're ready to create your new map-based Activity.
MapView controls can be used only within an Activity that extends MapActivity. Override the onCreate method to lay out the screen that includes a MapView, and override isRouteDisplayed to return true if the Activity will be displaying routing information (such as traffic directions).
Listing 8-6 shows the framework for creating a new map-based Activity.
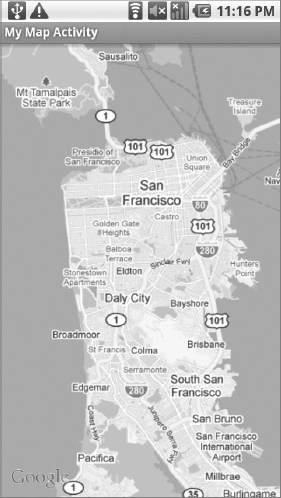
Example 8-6. A skeleton Map Activity
import com.google.android.maps.MapActivity;
import com.google.android.maps.MapController;
import com.google.android.maps.MapView;
import android.os.Bundle;
public class MyMapActivity extends MapActivity {
  private MapView mapView;

  private MapController mapController;

  @Override
  public void onCreate(Bundle savedInstanceState) {
    super.onCreate(savedInstanceState);
    setContentView(R.layout.map_layout);
    mapView = (MapView)findViewById(R.id.map_view);
  }

  @Override
  protected boolean isRouteDisplayed() {
    // IMPORTANT: This method must return true if your Activity
    // is displaying driving directions. Otherwise return false.
    return false;
  }
}
The corresponding layout file used to include the MapView is shown in Listing 8-7. Note that you need to include your map API key (as described earlier in this chapter) to use a Map View in your application.
Example 8-7. A Map Activity layout resource
<?xml version="1.0" encoding="utf-8"?> <LinearLayout xmlns:android="http://schemas.android.com/apk/res/android" android:orientation="vertical" android:layout_width="fill_parent" android:layout_height="fill_parent"><com.google.android.maps.MapViewandroid:id="@+id/map_view"android:layout_width="fill_parent"android:layout_height="fill_parent"android:enabled="true"android:clickable="true"android:apiKey="mymapapikey"/></LinearLayout>
Figure 8-4 shows an example of a basic map-based Activity.
Note
Android currently supports only one MapActivity and one MapView per application.
The MapView class displays the Google map; it includes several options for specifying how the map is displayed.
By default the Map View will show the standard street map, as shown in Figure 8-4. In addition, you can choose to display a satellite view, StreetView, and expected traffic, as shown in the following code snippet:
mapView.setSatellite(true);
mapView.setStreetView(true);
mapView.setTraffic(true);
You can also query the Map View to find the current and maximum available zoom levels, as well as the center point and currently visible longitude and latitude span (in decimal degrees). The latter (shown in the following snippet) is particularly useful for performing geographically limited Geocoder lookups:
int maxZoom = mapView.getMaxZoomLevel();
GeoPoint center = mapView.getMapCenter();
int latSpan = mapView.getLatitudeSpan();
int longSpan = mapView.getLongitudeSpan();
You can also optionally display the standard map zoom controls using the setBuiltInZoomControls method.
mapView.setBuiltInZoomControls(true);
Use the Map Controller to pan and zoom a MapView. You can get a reference to a MapView's controller using getController.
MapController mapController = myMapView.getController();
Map locations in the Android mapping classes are represented by GeoPoint objects, which contain latitude and longitude measured in microdegrees. To convert degrees to microdegrees, multiply by 1E6 (1,000,000).
Before you can use the latitude and longitude values stored in the Location objects returned by location-based services, you'll need to convert them to microdegrees and store them as GeoPoints.
Double lat = 37.422006*1E6;
Double lng = −122.084095*1E6;
GeoPoint point = new GeoPoint(lat.intValue(), lng.intValue());
Re-center and zoom the Map View using the setCenter and setZoom methods available on the Map View's MapController.
mapController.setCenter(point);
mapController.setZoom(1);
When you are using setZoom, 1 represents the widest (or most distant) zoom and 21 the tightest (nearest) view.
The actual zoom level available for a specific location depends on the resolution of Google's maps and imagery for that area. You can also use zoomIn and zoomOut to change the zoom level by one step.
The setCenter method will "jump" to a new location; to show a smooth transition, use animateTo.
mapController.animateTo(point);
In the following code example the Where Am I? project is extended again. This time you'll add mapping functionality by transforming it into a Map Activity. As the device location changes, the map will automatically re-center on the new position.
Start by adding the
<uses-permission>tag for Internet access to the application manifest. Also import the Android maps library within theapplicationtag.<?xml version="1.0" encoding="utf-8"?> <manifest xmlns:android="http://schemas.android.com/apk/res/android" package="com.paad.whereami"> <application android:icon="@drawable/icon"><uses-library android:name="com.google.android.maps"/><activity android:name=".WhereAmI" android:label="@string/app_name"> <intent-filter> <action android:name="android.intent.action.MAIN" /> <category android:name="android.intent.category.LAUNCHER" /> </intent-filter> </activity> </application><uses-permission android:name="android.permission.INTERNET"/><uses-permission android:name="android.permission.ACCESS_FINE_LOCATION"/> </manifest>Change the inheritance of
WhereAmIto descend fromMapActivityinstead ofActivity. You'll also need to include an override for theisRouteDisplayedmethod. Because this Activity won't show routing directions, you can returnfalse.public class WhereAmI
extends MapActivity{@Overrideprotected boolean isRouteDisplayed() {return false;}[ ... existing Activity code ... ] }Modify the main.xml layout resource to include a
MapViewusing the fully qualified class name. You will need to obtain a maps API key to include within theandroid:apikeyattribute of thecom.android.MapViewnode.<?xml version="1.0" encoding="utf-8"?> <LinearLayout
xmlns:android="http://schemas.android.com/apk/res/android" android:orientation="vertical" android:layout_width="fill_parent" android:layout_height="fill_parent"> <TextView android:id="@+id/myLocationText" android:layout_width="fill_parent" android:layout_height="wrap_content" android:text="@string/hello" /><com.google.android.maps.MapViewandroid:id="@+id/myMapView"android:layout_width="fill_parent"android:layout_height="fill_parent"android:enabled="true"android:clickable="true"android:apiKey="myMapKey"/></LinearLayout>Running the application now should display the original geolocation text with a
MapViewbeneath it, as shown in Figure 8-5.Configure the Map View and store a reference to its
MapControlleras an instance variable. Set up the Map View display options to show the satellite andStreetViewand zoom in for a closer look.MapController mapController;@Override public void onCreate(Bundle savedInstance State) { super.onCreate(savedInstanceState); setContentView(R.layout.main);// Get a reference to the MapViewMapView myMapView = (MapView)findViewById(R.id.myMapView);// Get the Map View's controllermapController = myMapView.getController();// Configure the map display optionsmyMapView.setSatellite(true);myMapView.setStreetView(true);myMapView.displayZoomControls(false);// Zoom inmapController.setZoom(17);LocationManager locationManager; String context = Context.LOCATION_SERVICE; locationManager = (LocationManager)getSystemService(context); Criteria criteria = new Criteria();criteria.setAccuracy(Criteria.ACCURACY_FINE); criteria.setAltitudeRequired(false); criteria.setBearingRequired(false); criteria.setCostAllowed(true); criteria.setPowerRequirement(Criteria.POWER_LOW); String provider = locationManager.getBestProvider(criteria, true); Location location = locationManager.getLastKnownLocation(provider); updateWithNewLocation(location); locationManager.requestLocationUpdates(provider, 2000, 10, locationListener); }The final step is to modify the
updateWithNewLocationmethod to re-center the map on the current location using the Map Controller.private void updateWithNewLocation(Location location) { String latLongString; TextView myLocationText; myLocationText = (TextView)findViewById(R.id.myLocationText); String addressString = "No address found"; if (location != null) {// Update the map location.Double geoLat = location.getLatitude()*1E6;Double geoLng = location.getLongitude()*1E6;GeoPoint point = new GeoPoint(geoLat.intValue(),geoLng.intValue());mapController.animateTo(point);double lat = location.getLatitude(); double lng = location.getLongitude(); latLongString = "Lat:" + lat + " Long:" + lng; double latitude = location.getLatitude(); double longitude = location.getLongitude(); Geocoder gc = new Geocoder(this, Locale.getDefault()); try { List<Address> addresses = gc.getFromLocation(latitude, longitude, 1); StringBuilder sb = new StringBuilder(); if (addresses.size() > 0) { Address address = addresses.get(0); for (int i = 0; i < address.getMaxAddressLineIndex(); i++) sb.append(address.getAddressLine(i)).append(" "); sb.append(address.getLocality()).append(" "); sb.append(address.getPostalCode()).append(" "); sb.append(address.getCountryName()); }addressString = sb.toString(); } catch (IOException e) {} } else { latLongString = "No location found"; } myLocationText.setText("Your Current Position is: " + latLongString + " " + addressString); }
Overlays enable you to add annotations and click handling to MapViews. Each Overlay lets you draw 2D primitives, including text, lines, images, and shapes, directly onto a canvas, which is then overlaid onto a Map View.
You can add several Overlays onto a single map. All the Overlays assigned to a Map View are added as layers, with newer layers potentially obscuring older ones. User clicks are passed through the stack until they are either handled by an Overlay or registered as clicks on the Map View itself.
Each Overlay is a canvas with a transparent background that is layered onto a Map View and used to handle map touch events.
To add a new Overlay create a new class that extends Overlay. Override the draw method to draw the annotations you want to add, and override onTap to react to user clicks (generally made when the user taps an annotation added by this Overlay).
Listing 8-8 shows the framework for creating a new Overlay that can draw annotations and handle user clicks.
Example 8-8. Creating a new Overlay
import android.graphics.Canvas;
import com.google.android.maps.MapView;
import com.google.android.maps.Overlay;

public class MyOverlay extends Overlay {
  @Override
  public void draw(Canvas canvas, MapView mapView, boolean shadow) {
    if (shadow == false) {
      [ ... Draw annotations on main map layer ... ]
    }
    else {
      [ ... Draw annotations on the shadow layer ... ]
    }
  }

  @Override
  public boolean onTap(GeoPoint point, MapView mapView) {
// Return true if screen tap is handled by this overlay return false; } }
The canvas used to draw Overlay annotations is a standard Canvas that represents the visible display surface. To add annotations based on physical locations, you need to convert between geographical points and screen coordinates.
The Projection class lets you translate between latitude/longitude coordinates (stored as GeoPoints) and x/y screen pixel coordinates (stored as Points).
A map's Projection may change between subsequent calls to draw, so it's good practice to get a new instance each time. Get a Map View's Projection by calling getProjection.
Projection projection = mapView.getProjection();
Use the fromPixel and toPixel methods to translate from GeoPoints to Points and vice versa.
For performance reasons, you can best use the toPixel Projection method by passing a Point object to be populated (rather than relying on the return value), as shown in Listing 8-9.
You handle Canvas drawing for Overlays by overriding the Overlay's draw handler.
The passed-in Canvas is the surface on which you draw your annotations, using the same techniques introduced in Chapter 4 for creating custom user interfaces for Views. The Canvas object includes the methods for drawing 2D primitives on your map (including lines, text, shapes, ellipses, images, etc.). Use Paint objects to define the style and color.
Listing 8-10 uses a Projection to draw text and an ellipse at a given location.
Example 8-10. A simple Map Overlay
@Override
public void draw(Canvas canvas, MapView mapView, boolean shadow) {
  Projection projection = mapView.getProjection();

  Double lat = −31.960906*1E6;
Double lng = 115.844822*1E6;
GeoPoint geoPoint = new GeoPoint(lat.intValue(), lng.intValue());
if (shadow == false) {
Point myPoint = new Point();
projection.toPixels(geoPoint, myPoint);
// Create and setup your paint brush
Paint paint = new Paint();
paint.setARGB(250, 255, 0, 0);
paint.setAntiAlias(true);
paint.setFakeBoldText(true);
// Create the circle
int rad = 5;
RectF oval = new RectF(myPoint.x-rad, myPoint.y-rad,
myPoint.x+rad, myPoint.y+rad);
// Draw on the canvas
canvas.drawOval(oval, paint);
canvas.drawText("Red Circle", myPoint.x+rad, myPoint.y, paint);
}
}Note
For more advanced drawing features see Chapter 11, where gradients, strokes, and filters are introduced.
To handle map taps (user clicks), override the onTap event handler within the Overlay extension class.
The onTap handler receives two parameters:
A
GeoPointthat contains the latitude/longitude of the map location tappedThe
MapViewthat was tapped to trigger this event
When you are overriding onTap, the method should return true if it has handled a particular tap and false to let another Overlay handle it, as shown in Listing 8-11.
Example 8-11. Handling map-tap events
@Override
public boolean onTap(GeoPoint point, MapView mapView) {
  // Perform hit test to see if this overlay is handling the click
  if ([... perform hit test ... ]) {
    [ ... execute on tap functionality ... ]
    return true;
  }
// If not handled return false return false; }
Each MapView contains a list of Overlays currently displayed. You can get a reference to this list by calling getOverlays, as shown in the following snippet:
List<Overlay> overlays = mapView.getOverlays();
Adding and removing items from the list is thread-safe and synchronized, so you can modify and query the list safely. You should still iterate over the list within a synchronization block synchronized on the List.
To add an Overlay onto a Map View, create a new instance of the Overlay and add it to the list, as shown in the following snippet.
List<Overlay> overlays = mapView.getOverlays(); MyOverlay myOverlay = new MyOverlay();overlays.add(myOverlay);mapView.postInvalidate();
The added Overlay will be displayed the next time the Map View is redrawn, so it's usually a good practice to call postInvalidate after you modify the list to update the changes on the map display.
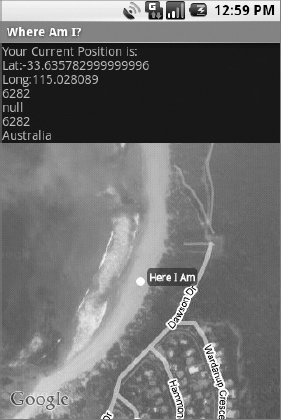
This final modification to "Where Am I?" creates and adds a new Overlay that displays a white circle at the device's current position.
Start by creating a new
MyPositionOverlayOverlay class in the Where Am I? project.package com.paad.whereami; import android.graphics.Canvas; import android.graphics.Paint; import android.graphics.Point; import android.graphics.RectF; import android.location.Location; import com.google.android.maps.GeoPoint; import com.google.android.maps.MapView; import com.google.android.maps.Overlay; import com.google.android.maps.Projection; public class MyPositionOverlay extends Overlay { @Override public void draw(Canvas canvas, MapView mapView, boolean shadow) { } @Override public boolean onTap(GeoPoint point, MapView mapView) {return false; } }
Create a new instance variable to store the current Location, and add setter and getter methods for it.
Location location;

public Location getLocation() {
  return location;
}
public void setLocation(Location location) {
  this.location = location;
}
Override the
drawmethod to add a small white circle at the current location.private final int mRadius = 5; @Override public void draw(Canvas canvas, MapView mapView, boolean shadow) { Projection projection = mapView.getProjection(); if (shadow == false) { // Get the current location Double latitude = location.getLatitude()*1E6; Double longitude = location.getLongitude()*1E6; GeoPoint geoPoint; geoPoint = new GeoPoint(latitude.intValue(),longitude.intValue()); // Convert the location to screen pixels Point point = new Point(); projection.toPixels(geoPoint, point); RectF oval = new RectF(point.x - mRadius, point.y - mRadius, point.x + mRadius, point.y + mRadius); // Setup the paint Paint paint = new Paint(); paint.setARGB(250, 255, 255, 255); paint.setAntiAlias(true); paint.setFakeBoldText(true); Paint backPaint = new Paint(); backPaint.setARGB(175, 50, 50, 50); backPaint.setAntiAlias(true); RectF backRect = new RectF(point.x + 2 + mRadius, point.y - 3*mRadius, point.x + 65, point.y + mRadius); // Draw the marker canvas.drawOval(oval, paint); canvas.drawRoundRect(backRect, 5, 5, backPaint); canvas.drawText("Here I Am",point.x + 2*mRadius, point.y, paint); } super.draw(canvas, mapView, shadow); }Now open the
WhereAmIActivity class, and add theMyPositionOverlayto theMapView.Start by adding a new instance variable to store the
MyPositionOverlay, then overrideonCreateto create a new instance of the class, and add it to theMapView's Overlay list.MyPositionOverlay positionOverlay; @Override public void onCreate(Bundle savedInstanceState) { super.onCreate(savedInstanceState); setContentView(R.layout.main); MapView myMapView = (MapView)findViewById(R.id.myMapView); mapController = myMapView.getController(); myMapView.setSatellite(true); myMapView.setStreetView(true); myMapView.displayZoomControls(false); mapController.setZoom(17);// Add the MyPositionOverlaypositionOverlay = new MyPositionOverlay();List<Overlay> overlays = myMapView.getOverlays();overlays.add(positionOverlay);LocationManager locationManager; String context = Context.LOCATION_SERVICE; locationManager = (LocationManager)getSystemService(context); Criteria criteria = new Criteria(); criteria.setAccuracy(Criteria.ACCURACY_FINE); criteria.setAltitudeRequired(false); criteria.setBearingRequired(false); criteria.setCostAllowed(true); criteria.setPowerRequirement(Criteria.POWER_LOW); String provider = locationManager.getBestProvider(criteria, true); Location location = locationManager.getLastKnownLocation(provider); updateWithNewLocation(location); locationManager.requestLocationUpdates(provider, 2000, 10, locationListener); }Finally, update the
updateWithNewLocationmethod to pass the new location to the Overlay.private void updateWithNewLocation(Location location) { String latLongString; TextView myLocationText;myLocationText = (TextView)findViewById(R.id.myLocationText); String addressString = "No address found"; if (location != null) { // Update my location markerpositionOverlay.setLocation(location);// Update the map location. Double geoLat = location.getLatitude()*1E6; Double geoLng = location.getLongitude()*1E6; GeoPoint point = new GeoPoint(geoLat.intValue(), geoLng.intValue()); mapController.animateTo(point); double lat = location.getLatitude(); double lng = location.getLongitude(); latLongString = "Lat:" + lat + " Long:" + lng; double latitude = location.getLatitude(); double longitude = location.getLongitude(); Geocoder gc = new Geocoder(this, Locale.getDefault()); try { List<Address> addresses = gc.getFromLocation(latitude, longitude, 1); StringBuilder sb = new StringBuilder(); if (addresses.size() > 0) { Address address = addresses.get(0); for (int i = 0; i < address.getMaxAddressLineIndex(); i++) sb.append(address.getAddressLine(i)).append(" "); sb.append(address.getLocality()).append(" "); sb.append(address.getPostalCode()).append(" "); sb.append(address.getCountryName()); } addressString = sb.toString(); } catch (IOException e) {} } else { latLongString = "No location found"; } myLocationText.setText("Your Current Position is: " + latLongString + " " + addressString); }
When run, your application will display your current device location with a white circle and supporting text, as shown in Figure 8-6.
Note
It's worth noting that this is not the preferred technique for displaying your current location on a map. This functionality is implemented natively by Android through the MyLocationOverlay class. If you want to display and follow your current location, you should consider using (or extending) this class, as shown in the next section, instead of implementing it manually as shown here.
The MyLocationOverlay class is a special Overlay designed to show your current location and orientation on a MapView.
To use My Location Overlay you need to create a new instance, passing in the application Context and target Map View, and add it to the MapView's Overlay list, as shown here:
List<Overlay> overlays = mapView.getOverlays();
MyLocationOverlay myLocationOverlay = new MyLocationOverlay(this, mapView);
overlays.add(myLocationOverlay);
You can use My Location Overlay to display both your current location (represented as a flashing blue marker) and your current orientation (shown as a compass on the map display).
The following snippet shows how to enable both the compass and marker; in this instance the Map View's MapController is also passed in, allowing the Overlay to automatically scroll the map if the marker moves offscreen.
myLocationOverlay.enableCompass();
myLocationOverlay.enableMyLocation(mapView.getMapController());
OverlayItems are used to supply simple maker functionality to your Map Views via the ItemizedOverlay class.
ItemizedOverlays provide a convenient shortcut for adding markers to a map, letting you assign a marker image and associated text to a particular geographical position. The ItemizedOverlay instance handles the drawing, placement, click handling, focus control, and layout optimization of each OverlayItem marker for you.
To add an ItemizedOverlay marker layer to your map, start by creating a new class that extends ItemizedOverlay<OverlayItem>, as shown in Listing 8-12.
Note
ItemizedOverlay is a generic class that lets you create extensions based on any OverlayItem-derived subclass.
Within the constructor you need to call through to the superclass after defining the bounds for your default marker. You must then call populate to trigger the creation of each OverlayItem; populate must be called whenever the data used to create the items changes.
Within the implementation, override size to return the number of markers to display and createItem to create a new item based on the index of each marker.
Example 8-12. Creating a new Itemized Overlay
import android.graphics.drawable.Drawable;
import com.google.android.maps.GeoPoint;
import com.google.android.maps.ItemizedOverlay;
import com.google.android.maps.OverlayItem;

public class MyItemizedOverlay extends ItemizedOverlay<OverlayItem> {

  public MyItemizedOverlay(Drawable defaultMarker) {
    super(boundCenterBottom(defaultMarker));
    populate();
  }

  @Override
  protected OverlayItem createItem(int index) {
    switch (index) {
      case 1:
        Double lat = 37.422006*1E6;
        Double lng = −122.084095*1E6;
        GeoPoint point = new GeoPoint(lat.intValue(), lng.intValue());

        OverlayItem oi;
        oi = new OverlayItem(point, "Marker", "Marker Text");
        return oi;
    }
    return null;
  }

  @Override
  public int size() {
    // Return the number of markers in the collection
    return 1;
  }
}
To add an ItemizedOverlay implementation to your map, create a new instance (passing in the Drawable marker image to use for each marker) and add it to the map's Overlay list.
List<Overlay> overlays = mapView.getOverlays();
MyItemizedOverlay markers = new
  MyItemizedOverlay(r.getDrawable(R.drawable.marker));
overlays.add(markers);
Note
Note that the map markers placed by the Itemized Overlay use state to indicate if they are selected. Use the StateListDrawable described in Chapter 4 to indicate when a marker has been selected.
In Listing 8-12, the list of Overlay items is static and defined in code. More typically your Overlay items will be a dynamic ArrayList to which you will want to add and remove items at run time.
Listing 8-13 shows the skeleton class for a dynamic Itemized Overlay implementation, backed by an ArrayList, and supporting the addition and removal of items at run time.
Example 8-13. Skeleton code for a dynamic Itemized Overlay
public class MyDynamicItemizedOverlay extends ItemizedOverlay<OverlayItem>
{
  private ArrayList<OverlayItem> items;

  public MyDynamicItemizedOverlay(Drawable defaultMarker) {
    super(boundCenterBottom(defaultMarker));
    items = new ArrayList<OverlayItem>();
    populate();
  }

  public void addNewItem(GeoPoint location, String markerText,
                         String snippet) {
    items.add(new OverlayItem(location, markerText, snippet));
    populate();
  }

  public void removeItem(int index) {
    items.remove(index);
    populate();
  }

  @Override
  protected OverlayItem createItem(int index) {
    return items.get(index);
  }
@Override
public int size() {
return items.size();
}
}You can pin any View-derived object to a Map View (including layouts and other View Groups), attaching it to either a screen position or a geographical map location.
In the latter case, the View will move to follow its pinned position on the map, effectively acting as an interactive map marker. As a more resource-intensive solution, this is usually reserved for supplying the detail "balloons" often displayed on mashups to provide further detail when a marker is clicked.
You implement both pinning mechanisms by calling addView on the MapView, usually from the onCreate or onRestore methods within the MapActivity containing it. Pass in the View you want to pin and the layout parameters to use.
The MapView.LayoutParams parameters you pass in to addView determine how, and where, the View is added to the map.
To add a new View to the map relative to the screen, specify a new MapView.LayoutParams, including arguments that set the height and width of the View, the x/y screen coordinates to pin to, and the alignment to use for positioning, as shown in Listing 8-14.
Example 8-14. Pinning a View to a map
int y = 10;
int × = 10;

EditText editText1 = new EditText(getApplicationContext());
editText1.setText("Screen Pinned");

MapView.LayoutParams screenLP;
screenLP = new MapView.LayoutParams(MapView.LayoutParams.WRAP_CONTENT,
                                    MapView.LayoutParams.WRAP_CONTENT,
                                    x, y,
                                    MapView.LayoutParams.TOP_LEFT);
mapView.addView(editText1, screenLP);
To pin a View relative to a physical map location, pass four parameters when constructing the new Map View LayoutParams, representing the height, width, GeoPoint to pin to, and layout alignment as shown in Listing 8-15.
Example 8-15. Pinning a View to a geographical location
Double lat = 37.422134*1E6;
Double lng = −122.084069*1E6;
GeoPoint geoPoint = new GeoPoint(lat.intValue(), lng.intValue());
MapView.LayoutParams geoLP;geoLP = new MapView.LayoutParams(MapView.LayoutParams.WRAP_CONTENT,MapView.LayoutParams.WRAP_CONTENT,geoPoint,MapView.LayoutParams.TOP_LEFT);EditText editText2 = new EditText(getApplicationContext()); editText2.setText("Location Pinned");mapView.addView(editText2, geoLP);
Panning the map will leave the first TextView stationary in the upper left corner, while the second TextView will move to remain pinned to a particular position on the map.
To remove a View from a Map View, call removeView, passing in the View instance you wish to remove, as shown here.
mapView.removeView(editText2);
The following step-by-step guide demonstrates how to build a map-based Activity for the Earthquake project you started in Chapter 5. The new MapActivity will display a map of recent earthquakes using techniques you learned within this chapter.
Create a new earthquake_map.xml layout resource that includes a
MapView, being sure to include anandroid:idattribute and anandroid:apiKeyattribute that contains your Android Maps API key.<?xml version="1.0" encoding="utf-8"?> <LinearLayout xmlns:android="http://schemas.android.com/apk/res/android" android:orientation="vertical" android:layout_width="fill_parent" android:layout_height="fill_parent"> <com.google.android.maps.MapView android:id="@+id/map_view" android:layout_width="fill_parent" android:layout_height="fill_parent" android:enabled="true" android:clickable="true" android:apiKey="myapikey" /> </LinearLayout>Create a new
EarthquakeMapActivity that inherits fromMapActivity. UsesetContentViewwithinonCreateto inflate the earthquake_map resource you created in Step 1.package com.paad.earthquake; import android.os.Bundle; import com.google.android.maps.MapActivity;
public class EarthquakeMap extends MapActivity {
  @Override
  public void onCreate(Bundle savedInstanceState) {
    super.onCreate(savedInstanceState);
    setContentView(R.layout.earthquake_map);
  }

  @Override
  protected boolean isRouteDisplayed() {
    return false;
  }
}
Update the application manifest to include your new
EarthquakeMapActivity and import the map library.<?xml version="1.0" encoding="utf-8"?> <manifest xmlns:android="http://schemas.android.com/apk/res/android" package="com.paad.earthquake"> <application android:icon="@drawable/icon"> <activity android:name=".Earthquake" android:label="@string/app_name"> <intent-filter> <action android:name="android.intent.action.MAIN" /> <category android:name="android.intent.category.LAUNCHER" /> </intent-filter> </activity> <activity android:name=".Preferences" android:label="Earthquake Preferences"/><activity android:name=".EarthquakeMap" android:label="View Earthquakes"/><provider android:name=".EarthquakeProvider" android:authorities="com.paad.provider.earthquake" /><uses-library android:name="com.google.android.maps"/></application> <uses-permission android:name="android.permission.INTERNET"/> </manifest>Add a new menu option to the
EarthquakeActivity to display theEarthquakeMapActivity.4.1 Start by adding a new string to the strings.xml resource for the menu text.
<?xml version="1.0" encoding="autf-8"?> <resources> <string name="app_name">Earthquake</string> <string name="quake_feed"> http://earthquake.usgs.gov/eqcenter/catalogs/1day-M2.5.xml </string> <string name="menu_update">Refresh Earthquakes</string> <string name="auto_update_prompt">Auto Update?</string> <string name="update_freq_prompt">Update Frequency</string> <string name="min_quake_mag_prompt"> Minimum Quake Magnitude </string> <string name="menu_preferences">Preferences</string><string name="menu_earthquake_map">Earthquake Map</string></resources>4.2 Then add a new menu identifier before modifying the
onCreateOptionsMenuhandler to add the new Menu Item. It should use the text defined in Step 4.1, and when selected it should fire an Intent to explicitly start theEarthquakeMapActivity.static final private int MENU_EARTHQUAKE_MAP = Menu.FIRST+2;@Override public boolean onCreateOptionsMenu(Menu menu) { super.onCreateOptionsMenu(menu); menu.add(0, MENU_UPDATE, Menu.NONE, R.string.menu_update); menu.add(0, MENU_PREFERENCES, Menu.NONE, R.string.menu_preferences);Intent startMap = new Intent(this, EarthquakeMap.class); menu.add(0, MENU_EARTHQUAKE_MAP, Menu.NONE, R.string.menu_earthquake_map).setIntent(startMap);return true; }
Now create a new
EarthquakeOverlayclass that extendsOverlay. It will draw the position and magnitude of each earthquake on the Map View.package com.paad.earthquake; import java.util.ArrayList; import android.database.Cursor; import android.database.DataSetObserver; import android.graphics.Canvas; import android.graphics.Paint; import android.graphics.Point; import android.graphics.RectF; import com.google.android.maps.GeoPoint; import com.google.android.maps.MapView; import com.google.android.maps.Overlay; import com.google.android.maps.Projection; public class EarthquakeOverlay extends Overlay { @Override public void draw(Canvas canvas, MapView mapView, boolean shadow) { Projection projection = mapView.getProjection(); if (shadow == false) { // TODO: Draw earthquakes } } }5.1. Add a new constructor that accepts a
Cursorto the current earthquake data, and store that Cursor as an instance variable.Cursor earthquakes; public EarthquakeOverlay(Cursor cursor, ContentResolver resolver) { super(); earthquakes = cursor; }5.2 Create a new
refreshQuakeLocationsmethod that iterates over the results Cursor and extracts the location of each earthquake, extracting the latitude and longitude before storing each coordinate in a List ofGeoPoints.ArrayList<GeoPoint> quakeLocations; private void refreshQuakeLocations() { if (earthquakes.moveToFirst()) do { Double lat = earthquakes.getFloat(EarthquakeProvider.LATITUDE_COLUMN) * 1E6; Double lng = earthquakes.getFloat(EarthquakeProvider.LONGITUDE_COLUMN) * 1E6; GeoPoint geoPoint = new GeoPoint(lng.intValue(), lat.intValue()); quakeLocations.add(geoPoint); } while(earthquakes.moveToNext()); }5.3 Call
refreshQuakeLocationsfrom the Overlay's constructor. Also register aDataSetObserveron the results Cursor that refreshes the Earthquake Location list if a change in the Earthquake Cursor is detected.public EarthquakeOverlay(Cursor cursor) { super(); earthquakes = cursor;quakeLocations = new ArrayList<GeoPoint>(); refreshQuakeLocations(); earthquakes.registerDataSetObserver(new DataSetObserver() { @Override public void onChanged() { refreshQuakeLocations(); } });}5.4 Complete the
EarthquakeOverlayby overriding thedrawmethod to iterate over the list ofGeoPoints, drawing a marker at each earthquake location. In this example a simple red circle is drawn, but you could easily modify it to include additional information, such as by adjusting the size of each circle based on the magnitude of the quake.int rad = 5; @Override public void draw(Canvas canvas, MapView mapView, boolean shadow) {Projection projection = mapView.getProjection(); // Create and setup your paint brush Paint paint = new Paint(); paint.setARGB(250, 255, 0, 0); paint.setAntiAlias(true); paint.setFakeBoldText(true);if (shadow == false) { for (GeoPoint point : quakeLocations) { Point myPoint = new Point(); projection.toPixels(point, myPoint); RectF oval = new RectF(myPoint.x-rad, myPoint.y-rad, myPoint.x+rad, myPoint.y+rad); canvas.drawOval(oval, paint); } }}
Return to the
EarthquakeMapclass. Within theonCreatemethod, create a Cursor that returns the earthquakes you want to display on the map. Use this Cursor to create a newEarthquakeOverlaybefore adding the new instance to the Map View's list of Overlays.Cursor earthquakeCursor;@Override public void onCreate(Bundle savedInstanceState) { super.onCreate(savedInstanceState); setContentView(R.layout.earthquake_map);String earthquakeURI = EarthquakeProvider.CONTENT_URI; earthquakeCursor = getContentResolver().query(earthquakeURI, null, null, null, null); MapView earthquakeMap = (MapView)findViewById(R.id.map_view); EarthquakeOverlay eo = new EarthquakeOverlay(earthquakeCursor); earthquakeMap.getOverlays().add(eo);}Finally, override
onResumeto callrequeryon the Earthquake result set whenever this Activity becomes visible. Also, overrideonPauseandonDestroyto optimize use of the Cursor resources.@Override public void onResume() {earthquakeCursor.requery(); super.onResume();} @Override public void onPause() {earthquakeCursor.deactivate(); super.onPause();} @Override public void onDestroy() {earthquakeCursor.close();super.onDestroy(); }If you run the application and select Earthquake Map from the main menu, your application should appear as shown in Figure 8-7.

Location-based services, the Geocoder, and MapViews are available to create intuitive, location-aware applications that feature geographical information.
This chapter introduced the Geocoder and showed how to perform forward and reverse geocoding lookups to translate between map coordinates and street addresses. You were introduced to location-based services, used to find the current geographical position of a device. You also used them to track movement and create proximity alerts.
Then you created interactive map applications. Using Overlays and Views you annotated MapViews with 2D graphics, as well as markers in the form of OverlayItems and Views (including View Groups and layouts).
In Chapter 9 you'll learn how to work from the background. You'll be introduced to the Service component and learn how to move processing onto background threads. To interact with the user while hidden from view, you'll use Toasts to display transient messages and the Notification Manager to ring, vibrate, and flash the phone.
