
6
Factory Pattern
WHAT’S IN THIS CHAPTER?
- What the factory pattern is and why you need it
- How to implement the various flavors of the factory pattern: the factory method and the abstract factory
- How to implement the factory pattern in Java EE using the @Producers and @Inject annotations
- How to create custom annotations and the @Qualifier to disambiguate concrete implementations
WROX.COM CODE DOWNLOADS FOR THIS CHAPTER
The wrox.com code download for this chapter is found at www.wrox.com/go/projavaeedesignpatterns on the Download Code tab. The code is in the Chapter 6 download and individually named according to the names throughout the chapter.
The factory design pattern is one of the widely used core design patterns in modern programming languages. It is used not only by web and application developers, but by the developers of run times and frameworks such as Java and Spring.
The factory pattern has two variations: the factory method and the abstract factory. The intent of these patterns is the same: to provide an interface for creating families of related or dependent objects without specifying their concrete classes. This chapter introduces you to both of these variations and shows you examples of how to implement them.
You will see how the factory pattern has been implemented in Java SE, how that differs from its implementation in Java EE, and how it takes advantage of context dependency injection.
WHAT IS A FACTORY?
As one of the creational patterns, the factory’s purpose is to create objects. The creational logic is encapsulated within the factory and either provides a method that returns a newly created object (factory method pattern) or delegates the creation of the object to a subclass (abstract factory pattern). In both cases, the creation of the object is abstracted away from where it will be used.
The client need not be aware of the different implementations of the interface or class. The client only needs to know the factory (factory method or abstract factory) to use to get an instance of one of the implementations of the interface. Clients are decoupled from the creation of the objects.
The decoupling occurs as the result of applying the dependency inversion principle and brings many practical advantages, of which the most important is the decoupling of higher-level classes from lower-level classes. This decoupling allows the implementation of the concrete classes to be changed without affecting the client, thus reducing coupling between classes and increasing flexibility.
The factory pattern gives us the opportunity to decouple object creation from the underlying system by encapsulating the code responsible for creating the objects. This approach simplifies our life when it comes to refactoring as we now have a single point where the refactoring changes happen.
Often the factory itself is implemented as a singleton or as a static class because normally only one instance of the factory is required. This centralizes factory object creation, allowing for greater organization and maintainability of source code and the reduction of errors when changes and updates are made.
In Java EE, dependency injection is employed to deliver the decoupling of higher-level classes from lower-level classes when implementing the factory pattern. The combined use of the @Producers and @Inject annotations makes their implementation relatively simple.
FACTORY METHOD
The GoF2 book describes the factory method pattern as such: “Defines an interface for creating an object, but lets subclasses decide which class to instantiate.” Head First Design Patterns3 adds that the “factory method lets a class defer instantiation to subclasses.”
Factories minimize the usage of the new keyword and can encapsulate the initialization process and the different concrete implementations. The ability to centralize those needs minimizes the effect of adding or removing concrete classes to the system and the effects of concrete class dependencies.
The factory method class diagram is shown in Figure 6.1.
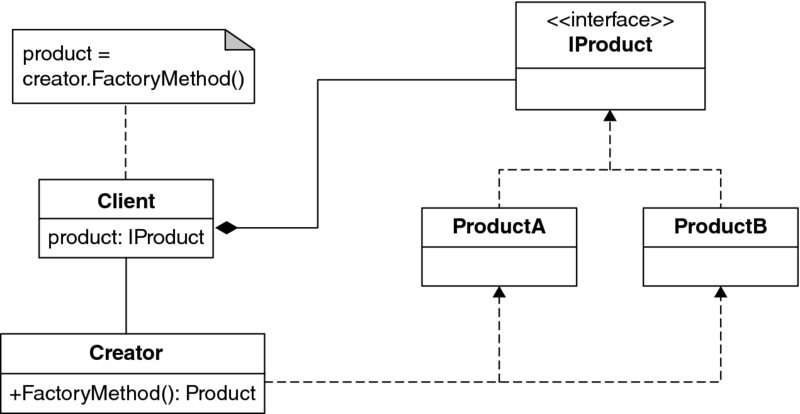
Figure 6.1 The class diagram shows the structure of the factory method pattern. You can see how the object creation is encapsulated in the subclasses.
Implementing the Factory Method in Plain Code
The factory method does not have boilerplate code for its implementation. Listings 6-1 to 6-6 show implementations of the factory pattern using a DrinksMachine that dispenses different types of drinks depending on the implementation of its subclasses.
This implementation shows how the subclasses of the DrinksMachine abstract class determine the drink that is dispensed. This allows any implementation of the DrinksMachine class to dispense any object of the Drink type. Each subclass of the DrinksMachine’s abstract class determines which drinks are dispensed.
This is a simple implementation in which the dispenseDrink method dispenses only one type of drink. A more illustrative example would show the dispenseDrink method receiving the name of a drink and then constructing and returning the requested drink object. Listing 6-7 shows how to achieve this.
For brevity, this chapter shows only a code snippet of the enum type CoffeeType that defines the type of coffee and the dispenseDrink method of the concrete Coffee class.
ABSTRACT FACTORY
The factory method pattern is straightforward and useful to implement, but in more complex systems, you need to organize it. This problem leads you to a new pattern called the abstract factory pattern.
The abstract factory pattern is described in both the GoF book and Head First Design Patterns as “provides an interface for creating families of related or dependent objects without specifying their concrete classes.”
What abstract factories offer is the encapsulation of a group of factories and control over how the client accesses them. This chapter does not go into all the details of how to implement abstract factories but instead offers a brief introduction for basic understanding.
The abstract factory class diagram is shown in Figure 6.2.
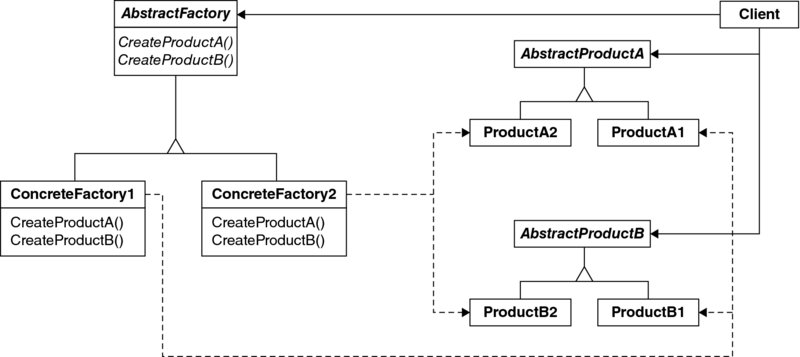
Figure 6.2 As can be seen in the class diagram, you can use the abstract factory pattern to group existing factories and encapsulate how you access them.
Implementing the Abstract Factory in Plain Code
To demonstrate the abstract factory design pattern, this chapter extends the drinks machine example by adding a factory that produces two different types of drinks machine: basic and gourmet.
The “families of related or dependent objects” that the abstract factory creates are the coffee machine and the soft drinks machine. You must create an interface for the factories to implement. In Listing 6-8, you create the AbstractDrinksMachineFactory interface.
The concrete implementations of this interface are the GourmetDrinksMachineFactory and the BasicDrinksMachineFactory classes. For brevity, only the GourmetDrinksMachineFactory is shown in Listing 6-9.
Each factory implements the abstract factory’s create method in a different way and, depending on which factory is instantiated, a different implementation of a coffee and soft drinks machine is created.
AbstractDrinksMachineFactory factory = new GourmetDrinksMachineFactory();
DrinksMachine CoffeeMachine = factory.createCoffeeMachine();
CoffeeMachine.dispenseDrink(CoffeeType.EXPRESSO);
This shows a GourmetDrinksMachineFactory being instantiated. Its coffee machine’s creation method is invoked to create the coffee machine object that this implementation requires.
The full code for this implementation is in the Chapter 6 download.
IMPLEMENTING THE FACTORY PATTERN IN JAVA EE
The factory pattern is not tricky to implement, as you have seen in the preceding examples. Java EE offers a simple and elegant way to implement the factory pattern via annotations and dependency injection. In the Java EE world, you use the @Produces annotation to create an object, and you use @Inject to inject the created object (or resource) where it’s required. The simplest implementation in Java EE of the factory method follows in Listing 6-10.
The getMessage method is annotated with @Produces and results in String objects containing the text Hello World. Although the type produced in this example is a string, you can produce anything you need, including interfaces, classes, primitive data types, Java array types, and core Java types.
To use the produced object, you need to inject the same type into the class where you are going to use it, as demonstrated in Listing 6-11.
When you run and invoke the startService method, the string value in the producer method is injected into the message member of EventService and printed to the console. This is the simplest possible implementation of the factory pattern in Java EE. However, it raises one important question: How does the Context Dependency Injection (CDI) container know that it must inject the string produced by the getMessage method into the message member of EventService?
The answer: The CDI container relies on types to determine where to inject the produced type. In this example, the produced type is a string, as is the injected type. So it matches the produced type with the inject type and injects it.
You might argue that in a real system, you need to produce and inject different instances of the same object type. How does the CDI container know where to inject each produced type? It does this by using an annotation configuration called a qualifier.
In real-world projects, you probably want to return different object types instead of a simple string so that you can create different objects by type.
In this example, you have created two beans: MessageA in Listing 6-12 and MessageB in Listing 6-13. You have annotated them with @Alternative, which disables them so that the container does not attempt to inject their instances when it finds a matching injection point. You annotate them so the factory in Listing 6-14 will produce the instances. If you didn’t annotate, the container would throw an exception while loading the application. It would read something like this:
CDI deployment failure:WELD-001409 Ambiguous dependencies for type [MessageA]. The ambiguity is caused by the two instances of MessageA that are created: one by the container and the other by the @Produces method. The container doesn’t know which instance to inject into the message member of the EventService. You will see a way to resolve this ambiguity later in the chapter.
In the EventService class shown in Listing 6-15, the containers inject the two beans produced by the factory into the messageA and messageB member variables of the EventService class. You can use these objects as you would normally.
An alternative implementation is to use the @Qualifier and @interface annotations to mark the type you want to inject. The example that follows uses custom annotations to create two qualifiers: @LongMessage in Listing 6-16 and @ShortMessage in Listing 6-17.
You use these qualifiers to annotate the producer methods as shown in Listing 6-18 and their matching injection points as shown in Listing 6-19.
The @Target annotation specified on the qualifier interface determines where you can use the qualifier. The values can be one or all of the following—TYPE, METHOD, FIELD, and PARAMETER—and their meanings are self-explanatory.
Alternatively, you can achieve the same implementation via the use of an enum type defined in the @interface class, Listing 6-20 shows this implementation.
With the help of this custom annotation, you can use different methods to create string objects marked with your annotation. In Listing 6-21 strings are produced by the messageAFactory and the messageBFactory methods.
You use these annotations to annotate the producer methods and their matching injection points as shown in Listing 6-22.
A simpler approach would be to use the @Named annotation rather than creating your own annotation type. This is implemented as in Listing 6-23.
You use @Name to annotate the producer methods and their matching injection points, as shown in Listing 6-24.
Although this appears simpler than creating your own annotation type, in complicated systems, it may not be a wise or a type-safe choice. The named annotation works with the String provided in quotes and is far from being type safe. The compiler can’t warn you of potential bugs.
Harness the Power of CDI
If your application has multiple implementations of an interface and you want to implement a factory pattern to produce the required instances of these objects, you are going to have a factory class with multiple methods annotated with the @Produces annotation. This will become verbose and difficult to maintain. Fortunately, Java EE provides a solution in the form of the @Any annotation and the imaginative use of enum types, annotation literals, and the Instance class.
What would take many tens if not hundreds of lines of code to produce each instance, you can accomplish in just four lines of code. You can achieve this by collecting all instances of a particular interface implementation and selecting the one you want to use by using the @Any annotation.
The @Any annotation instructs the container that all beans implementing the given interface should be injected at that injection point. In the listing below the code private Instance<MessageType>,messages injects instances of all dependencies that implement the MessageType interface into the member variable messages.
Once all dependencies have been injected, you need a way to distinguish between them and select the one you want to use. This is where the use of annotation literals and enum types comes into play. In the listings that follow, you define an @Message qualifier and the enum literals SHORT and LONG. These distinguish between the implementations of the MessageType interface.
To select the dependency, compare it with the enum type of the qualifier of each implementation by creating an AnnotationLiteral of the type you are searching for, retrieve it, and return it to the client.
Now you’ll see how this is implemented in code. You will use the example of a factory that produces ShortMessage and LongMessage objects, each implementing the Message interface annotated as either SHORT or LONG.
Each concrete implementation of the MessageType interface, as shown in Listing 6-25, is annotated with an @Message qualifier denoting the message type as either Message.Type.SHORT or Message
.Type.LONG as implemented in Listing 6-26 and Listing 6-27 respectively. The @Message qualifier is implemented in the same manner, as can be seen is Listing 6-28, as the qualifier used in the Custom Annotation Type example shown earlier.
To create the annotation literal that you use to make the comparison between the type you want and the type of the dependency, you extend the abstract class AnnotationLiteral and implement Message as the custom message qualifier. Listing 6-29 shows how this is done.
Now that you have all the parts of the puzzle, you can put it together in the MessageFactory class shown in Listing 6-30.
In the factory class, all dependencies that implement the MessageType interface are injected into the member variable messages. Then, from the method getMessage, you use the Message.Type parameter to create a new MessageLiteral that you use to select the MessageType implementation that you want from messages, which in turn is returned to the client.
The client injects the factory and calls the getMessage method passing in the Message.Type that it requires, as can be seen in Listing 6-31.
This chapter has deviated quite substantially from the original GoF implementation of the factory pattern. In fact, you could argue that this is not really a true factory pattern implementation but rather a select and inject pattern. Nevertheless, the new and dynamic functionality of CDI allows you to be creative in the way you implement traditional patterns and improve on classic design.
WHERE AND WHEN TO USE THE FACTORY PATTERNS
The traditional implementation of the factory pattern has changed substantially since the GoF first espoused its usage.
Abstract factories are considered an effective way to hide object creation, especially if the creation is complex. And the more complex the object creation, the more justifiable is the use of a factory to create the object. If it is important that objects are created in a consistent manner and their creation is strictly controlled, you should consider an implementation of the factory pattern.
However, in the brave new world of the CDI environment, where the container instantiates managed objects, the use of an abstract factory is arguably moot. Your best attempt to implement the factory pattern uses the @Produce annotation that still allows you to hide complicated creational logic in the producer method and inject the resulting object into the client.
Alternatively, you can harness the power of the CDI environment and let the container create the objects and then select the instantiation you want to use from a pool of similar objects. However, you are limited to simple objects that can be instantiated satisfactorily by calling the default constructor.
SUMMARY
In this chapter, you have seen how to implement the various flavors of the factory pattern in a non-CDI environment. And in a CDI environment, you have seen how producer methods and the @Inject annotation have radically changed the way you implement and use the factory pattern in Java EE.
You have discovered how to harness the power of the container’s automatic instantiation of bean objects and how to select and use them in your code.
Hopefully, you have no doubt that the implementation of the factory pattern in a Java EE is substantially more elegant and by far the simpler and cleaner way to generate objects.
EXERCISES
-
Create a vehicle factory that produces different types of cars and vans by using the abstract factory pattern.
-
Implement that same vehicle factory as in the previous exercise but use
@Produce, qualifiers, and enum types. -
By harnessing the power of the CDI container, implement a way to have multiple objects of the same type and to select the type you require based on type-safe logic.