
No Web site should be an island. Joomla makes it easy for a site to interface with outside content for everything from downloading Web feed articles to using Electronic Data Interchange (EDI) for commerce transactions to querying a database for XML data. There are literally dozens of extensions that support numerous types of system interaction. When you can't locate an extension that has the necessary communication capabilities, or you need a custom protocol, Joomla's developer-friendly framework makes it easy to develop your own extensions.
In this chapter, you'll learn how to configure your Joomla site to subscribe to external content and to publish your own on a Web feed. You'll also have a chance to see some of the affiliate programs that can be used effectively with Joomla through extensions created specifically to add the affiliate features to a Joomla site. Finally, you will use the development skills you have already gained to build custom extensions to wrap a Web API (to implement Google Maps), interface with a query server that returns a result set in XML (the U.S. Postal Service ZIP code finder), and develop a simple screen scraper to obtain data from another HTML site.
By connecting to outside content from Web sites and newsfeeds, your Joomla site can supplement native articles. A Joomla site can supplement the existing content using Web feeds that deliver articles automatically for feed publishers.
One technology that has done more for automated exchange of information than any other consumer protocol is Web feed technology (also called newsfeed technology). In a normal consumer situation, users can visit a Web site (such as www.CNN.com) and look at the current site content, as long as they are online. If the visitor desires more of the same type of content in the future (breaking stories, for example) and the site offers a Web feed, then that user can subscribe to a feed of the site.
By clicking on the Web feed link (typically labeled "RSS Feed," "RSS XML," or "Atom Feed"), a desktop application on the user's computer called an aggregator is notified of the subscription. The feed link URL points to the feed file (in XML format), which acts as an electronic table of contents pointing to (or containing) articles on the feed site. Depending on the preferences set for the aggregator, the program will automatically download new articles in the future by checking for additional entries in the newsfeed file. The new stories are saved on the user's local drive for later browsing.
As shown in Figure 12-1, the Mozilla Thunderbird email application includes an aggregator that will display feed content in email format. Simply select File
The Mozilla Firefox browser even includes a simple aggregator program. When the browser accesses a site that features a Web feed, the address bar displays a feed icon, as shown in Figure 12-2. The user only needs to click on the icon and select an option to add a Live Bookmark to access the feed content.
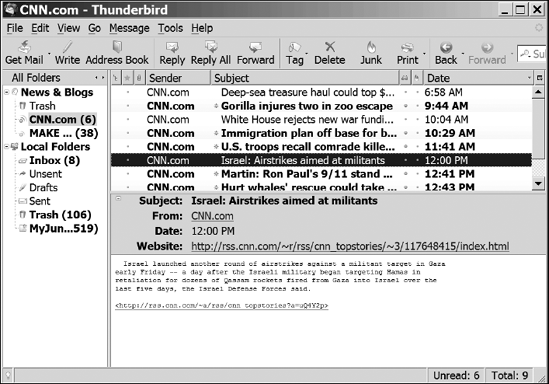

Figure 12-2. When a site provides a Web feed, Firefox displays a feed icon that can be selected for subscription.
There are two standard formats for Web feeds: RSS (Really Simple Syndication) and Atom. Both formats are stored in an XML-formatted file and, although an Atom feed uses the .xml extension (atom.xml, for example), an RSS feed may have either an .xml extension or an .rss extension.
For a long time, the two formats seemed neck and neck in the adoption race. But lately it seems as if RSS has become dominant, with many sites that used to offer both feed types dropping the Atom feed format.
For example, following is the URL to the CNBC feed:
http://rss.msnbc.msn.com/id/3098080/device/rss/rss.xml
The header and a few entries in a RSS feed file for filmmaking Web site looks like this:
<?xml version="1.0"?> <rss version="2.0">

<channel>
<title>Nuts and Bolts Filmmaking and Graphic Design</title>
<link>http://www.cvisual.com</link>
<description>Focused on Nuts and Bolts Filmmaking.</description>
<category>Arts/Movies/Filmmaking</category>
<language>en-us</language>
<copyright>Copyright 2007, Dan Rahmel</copyright>
<pubDate>Thu, 13 Jul 2007 11:10:00 PST</pubDate>
<lastBuildDate>Thu, 13 Jul 2007 11:10:00 PST</lastBuildDate>
<managingEditor>[email protected]</managingEditor>
<webMaster>[email protected]</webMaster>

<image>
<title>Nuts and Bolts Filmmaking Banner</title>
<url>http://www.cvisual.com/cover_test.jpg</url>
<link>http://www.cvisual.com</link>
<description>Nuts and Bolts Filmmaking banner image</description>
</image>

<item>
<title>Free 3D Modeling Checklist</title>
<link>http://www.cvisual.com/graphics-techniques/cgi-3d-modeling-checklist.asp</link>
<guid>http://www.cvisual.com/graphics-techniques/cgi-3d-modeling-checklist.asp</guid>
<description>Revised checklist for planning the creation of 3D models in Maya,
Lightwave, Blender, 3D Studio Max, Cinema 4D, Poser, or any other 3D
application.</description>
<pubDate>Mon, 17 Jul 2007 10:30:21 PST</pubDate>
<category>Arts/Movies/Filmmaking</category>
</item>
The file opens with the header information about the feed itself. The HTML header is followed by a header display section that holds the banner image to display for the feed. Finally, an <item> entry defines a story that can be downloaded or linked to by the aggregator.
Web feeds are becoming even more advanced. Podcasts (audio feeds) and vodcasts (video feeds) use nearly the same feed files as newsfeeds. The popular media aggregators (such as Apple's iTunes) perform exactly the same operations (for example, checking the feed file and automatically downloading the newest content) that a traditional news aggregator performs.
The Feed module in Joomla allows you to integrate feed content directly into your Web site. Figure 12-3 shows the module titled Top Stories, presenting stories from the CNN newsfeed on a Joomla home page. Each time a Web visitor requests a page that includes the Feed module, the module accesses the remote feed file, retrieves the article information, and displays the most current feed entries.
To activate the Feed module, open the Joomla Administrator and display the Module Manager screen. Find the module named Feed Display and click on the entry. The module editor will display the current settings, as shown in Figure 12-4.
Begin configuration of the Web feed by setting the title of the module that will appear above the feed stories. In this example, I modified the Title from Feed Display to Top Stories. Change the Position of the module so that it won't appear at the bottom of the other modules in the left column. You can use the Right setting to have the feed stories appear in the right column. I set the position to User1 so the headlines would appear at the top of the page.
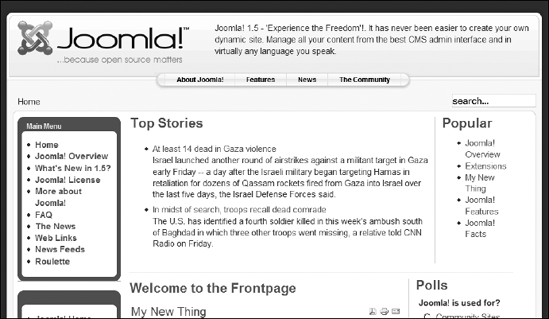
Figure 12-3. Including a Web feed on a Joomla page automatically displays new stories as they are added to the feed.
The Parameters pane on the right side of the screen has the settings that relate to the feed itself. The optional Suffix parameter allows you to set a suffix for a custom style (the suffix would be added to the table.moduletable style) in the CSS that would be used by this module. Enter the URL of the feed that you copied from a Web site. The Feed URL parameter will accept any standard URL pointing to an XML file formatted in either RSS or Atom format. You can also find links to various feeds in an RSS directory. For a list of the most popular directories, check out the RSS Specifications Web site (www.rss-specifications.com/rss-directory.htm). Since the feed in this example is supplied in English, there is no need to turn on the RTL feed (right-to-left) option that is useful if the feed language is provided in a language such as Mandarin.
Turn off the Feed Title and Feed Description parameters. The title and description are included in the feed file by the publisher, so you have no control over them. On a feed from a large company like CNN, you could be pretty confident nothing offensive would appear in these fields. However, a small, noncommercial Web feed (despite having great content) might put up something your visitors might find objectionable. Note that turning off the Feed Title does not turn off the display of the module Title (a text item you control).
Decide whether you want the feed image displayed. In most cases, you'll want to turn this off. It usually displays the logo of the feed originator, and that can cause some confusion for Web visitors. Additionally, I've seen some feeds that have really slow servers, which delays the time your server can return a requested page. Also, if you want a more compact display for the Feed module, turn off this setting.
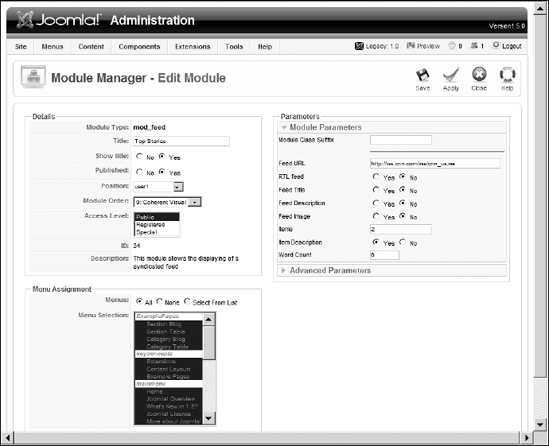
Figure 12-4. The Feed module settings will determine which feed is displayed and how the content is presented.
The Items parameter determines how many of the feed stories will be display. Since this will appear at the top of my page, I set the value to 2. The Items Description lets you determine whether you want to display just the headline links, or the headlines with the article summaries. The Word Count parameter allows you to control the number of words of the description that will be visible. The default setting of zero allows the entire description to be displayed.
To allow the Top Stories feed to be alone at the top of my page, I also unpublished the Latest News module in the Module Manager. The Latest News module was occupying the user1 module position and crowding my page display.
That's it! Every time your page is accessed now, the page will read the newest stories from the configured Web feed and include links to these stories (and summary descriptions, if so set).
Joomla's Web feed capabilities don't end with subscribing to feeds. A Joomla site can also publish a feed of its own.
Joomla also includes the capability to publish your own Web feed so that others can subscribe to your site.
In the Module Manager, click on the Syndication module to display the current settings. Ensure that the module is published and set the Position setting so the feed display appears in the left column. In the Parameters pane, set the Text parameter to the phrase you want to accompany the feed icon on the display page, as shown in Figure 12-5. You can choose the Format of the feed, although I recommend leaving the RSS 2.0 default. Save the settings to the module and your site now has its own Web feed!
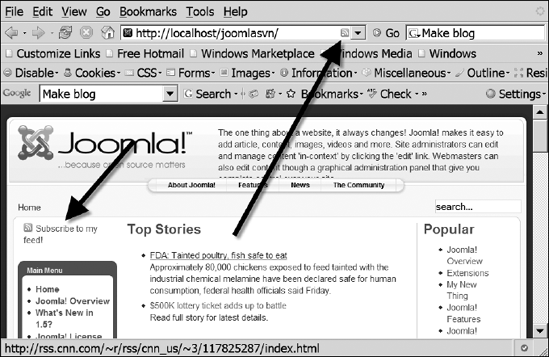
When you view the Joomla page, it shows the feed icon and link. As shown in Figure 12-6, in the Firefox browser, the address bar indicates that this site is Web feed-enabled. When a user subscribes to the feed, the content items from the Frontpage Manager are included in the article list in order of their publication (with the newest content listed first).
If you publish a feed for your site, be sure to register it with one or more of the feed directories (http://www.rss-specifications.com/rss-directory.htm). Unlike Web search engines like Google that search out new content, feed search sites only include feeds that have applied for addition to the site. Before you get listed, though, be sure you have a decent amount of content that is updated regularly. Users on most engines can rate the feeds and, if your feed makes a poor showing, others will hear about it.

For search engine placement, it is questionable if a site gains any rank placement advantage from content supplied by Web feeds. Many search engine optimization (SEO) experts say that the search engines recognize content that is drawn from a feed and ignore it. If that is true, then feed content is not considered part of your site and, therefore, not indexed by the search engine.
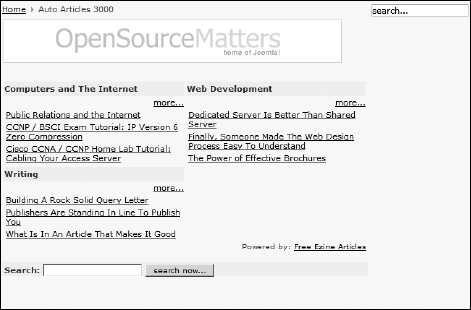
One way to get supplemental content that becomes part of your site (and gains you search advantages) is to use an extension called Auto Articles 3000, which is shown in Figure 12-7. This extension downloads articles on specified topics from an ezine (electronic magazine) article archive and stores the article in your Joomla site database. Unlike a feed that retrieves off-site content dynamically, the Auto Article 3000 content creates an article store on your server that is updated as new articles become available.
Offered as a free service by Elerion, Ltd., Auto Articles 3000 is a package of components (one front-end component and one Administrator component) that can be installed on a Joomla site. The initial component installation includes 230 articles that are written into the Joomla database. New articles are downloaded automatically from the Web site at regular intervals (30 minutes is the default setting). You can download Auto Articles 3000 here:
www.articles3000.com
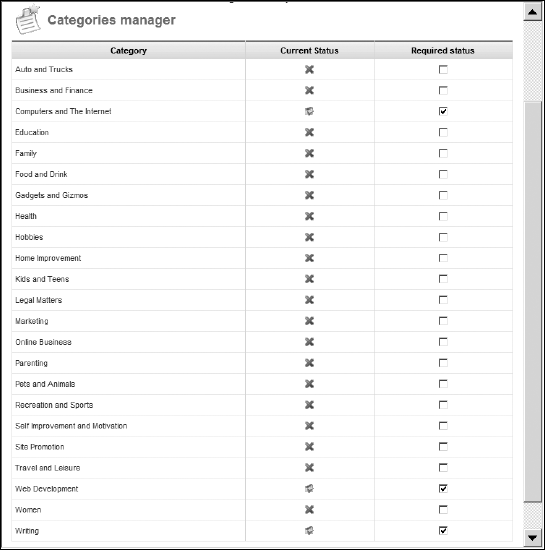
You can determine which topics are downloaded for your site in the Administrator interface, as shown in Figure 12-8.
Unfortunately, the articles provided by the extension are not stored like standard Joomla articles in the Joomla content tables. That means the new material is invisible to Joomla interface features (such as site search) and also to other site extensions (such as sitemap utilities). The extension stores downloaded articles in the jos_a3000_articles table of the Joomla database.
However, one of the wonderful things about the world of open source is that it's open! You have full access to the source code and data for most extensions. In this case, it means that you could manually copy the Auto Articles 3000 content into the normal Joomla jos_content table. You would only need to coordinate the new records to Joomla-specific fields such as the section and category ID fields (sectionid and catid, respectively) so that the articles were properly filed. Copying the article data could be accomplished using the MySQL INSERT INTO statement, as shown here:
http://dev.mysql.com/doc/refman/5.0/en/insert-select.html
Another way you may want to get your hands dirty with this component is to modify the frequency that new articles are requested from the host site. You can set the site query to more or less than the 30-minute default. But to accomplish it, you can't simply modify a parameter in the Administrator interface. Rather, you must alter the component source code. Open the component file in your text editor with a path similar to this:
componentscom_a3000a3000.php
In the file, look for the line that reads as follows:
if(time() - $last_checked > 1800) {The parameter for time is coded in seconds, so the current value of 1800 is equal to 30 minutes. Set this value to any number of seconds you desire.
Affiliate programs are likely the most popular way to make money from a Web site. The Web master of a site signs up with a company such as Google or Amazon to allow advertisements to appear on the host site. Each time the user clicks on an ad or purchases something by following a link to the vendor's site, the Web master earns a fee. These programs can be so lucrative that large sites can earn literally thousands of dollars a month strictly from affiliate income.
Joomla can host most of the popular affiliate programs through extensions that encapsulate the code (HTML and often JavaScript) necessary to display the advertisements on the site. To activate most affiliate technology, you need only install the associated extension, set the parameters to match your service, and specify the location where the affiliate content will appear on your site.
One of the most popular affiliate programs on the Web is Google's AdSense. AdSense provides code that displays Google ads on a Web site that are relevant to the site visitors. Each time a user clicks on an ad, the owner of the Web site is paid a fee. These fees can results in large sums if the site is very popular, or if the content of the site targets a market where the advertisements for that sector are very expensive.
To host AdSense advertisements, you must first sign up for the program here:
www.google.com/adsense
When you first set up your Google account, only public service announcements are displayed (see Figure 12-9) until a Google representative examines your site. Once the site content is confirmed to comply with the user agreement (no pornography, illegal content, and so on), advertisements with links are provided by the Google servers.
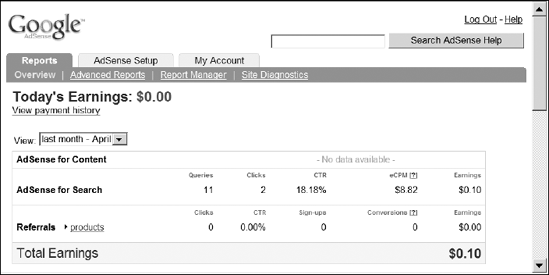
The AdSense program has numerous options, including the capability to categorize content in separate "channels" so that placement of the ads on various parts of the site can be tracked. A Web master manages the account through a Web interface such as the one shown in Figure 12-10.

Figure 12-9. Google ads first appear as public service announcements until the Google team verifies your site.
Through the AdSense administrator, you can generate the link code you will need to add to your site. The code is simple JavaScript and appears like this:
<script type="text/javascript"><!--
google_ad_client = "pub-2440224655555555";
google_ad_width = 728;
google_ad_height = 90;
google_ad_format = "728x90_as";
google_ad_type = "text_image";
google_ad_channel ="1035475555";
//--></script>
<script type="text/javascript"
  src="http://pagead2.googlesyndication.com/pagead/show_ads.js">
</script>
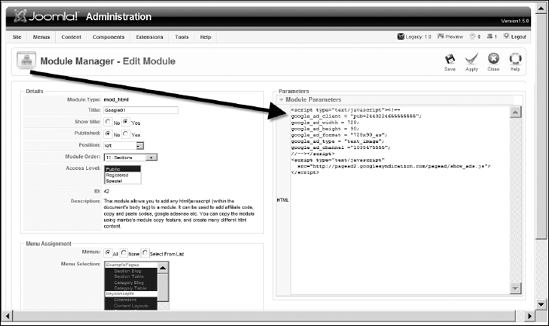
To add the code to display AdSense to your Joomla site, download the extension called Mod HTML (http://fijiwebdesign.com). It is a very simple and straightforward module that allows you to insert any type of HTML and/or JavaScript for display on a Joomla site. By default, when the module is installed, one instance is automatically created called Html Module. You can edit this instance by clicking on the name in the Module Manager and the editor will be displayed, as shown in Figure 12-11.
Set the Title to something relevant (I chose Google01 because this is my first Google ad). Turn off the Show Title parameter, turn on the Published parameter, and choose a Position for the module display. Enter the code into the HTML box. After you click the Save button (in the upper-right corner of the screen), the Google AdSense advertisement should appear in the location you specified.
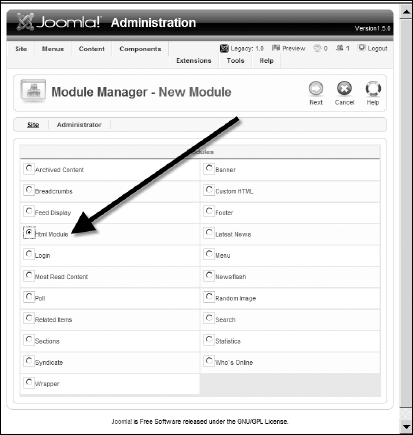
To create another module instance to display another Google ad, click on the New button at the Module Manager screen. Select HTML Module as the module type (see Figure 12-12), and click the Next button. From there, you can configure the module to contain other ad link code.
Like Google, Amazon.com has an affiliate program (http://affiliate-program.amazon.com/gp/associates/join). While Google's program pays for clicks on the ads, Amazon's only pays if the click directly results in a sale. However, if the visitor to your Web site clicks on an item, you will earn a payment for that user if he or she buys anything on the site during that session—not just the item that was linked.
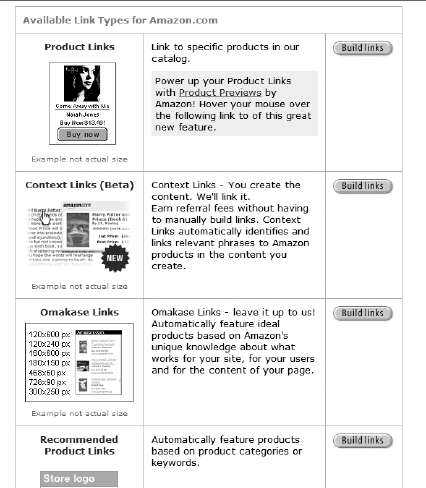
Amazon has a large variety of advertisement styles from specific products to context links. Figure 12-13 shows some of the advertisement links you can build in the affiliate program interface. Click on the "Build links" button next to any one of these items to generate a small segment of JavaScript code that the Web master needs to insert into the page of the Web site.
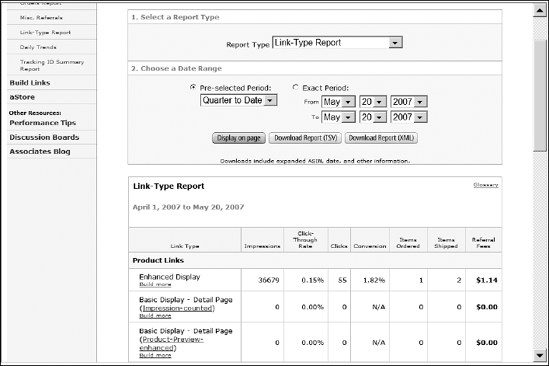
As people purchase goods through links on the site, Amazon includes reporting (see Figure 12-14) that breaks down the purchases and even the effectiveness of the click-through response. You'll want to track this information closely so that you know what products interest your site visitors and which items they never select.
A number of extensions can help you manage the Amazon ads that will appear on your Web site. You can use the Mod HTML that was demonstrated for the Google AdSense code, or select from a variety of Amazon-specific extensions.
The Amazon Associates extension is a plug-in that allows you to embed the affiliate advertisement directly in article text. It works with most international Amazon programs, including Amazon.com, Amazon.co.uk, Amazon.ca, Amazon.de, and Amazon.fr. You can download the plug-in from here:
www.q-square.com/component/option,com_docman/Itemid,37/task,cat_view/gid,23
After you install the extension, you will need to set your affiliate ID by modifying the plug-in parameters through the Plugin Manager (see Figure 12-15). The Amazon ID parameter for the extension is the most important setting since it will tell Amazon when a click was generated through your Web site. The other settings regulate the presentation of the product link.
You will need to know the product ID of any items you want to list on your site. The IDs may be determined by finding the item on the Amazon site and looking at the URL for the currently displayed page. The URL will look something like the following (with the product ID number appearing here in bold):
http://www.amazon.com/o/ASIN/0399154213/ref=s9_asin_title_1/Figure 103-8035767-9056638?pf_
rd_m=ATVPDKIKX0DER&pf_rd_s=center-2&pf_rd_r=0DZV92ZKNE9Z5XJWBJ8J&pf_rd_t=101&pf_rd_
p=279438201&pf_rd_i=507846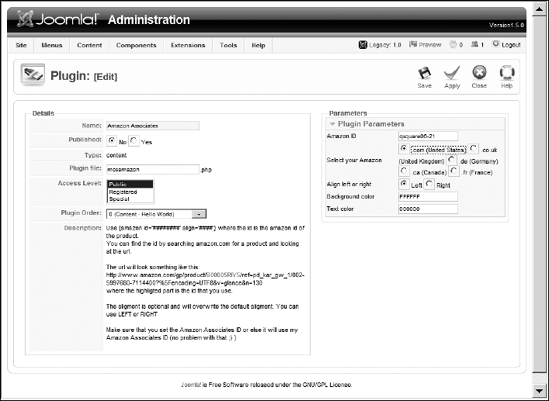
Then, you need only add the following text to your article content with the ID of the desired item and (optionally) setting the justification to either LEFT or RIGHT:
{amazon id='0399154213' align='LEFT'}You can add as many of these references to your content code as desired, although each ad must be retrieved from the Amazon servers. That means the rendering of your page may slow down if your server has a slow Internet connection, or the Amazon server is experiencing heavy traffic.
If your product isn't properly displayed on the page, try selecting No Editor and then reinput the code into the article. Some WYSIWYG editors corrupt the entry when trying to interpret it before the article saves.
Much more powerful is a package called Amazon Products Feed (APF). It is an Open Source, PERL-based application that accesses Amazon's Web services API. It provides a real-time listing of Amazon products on your Web site.
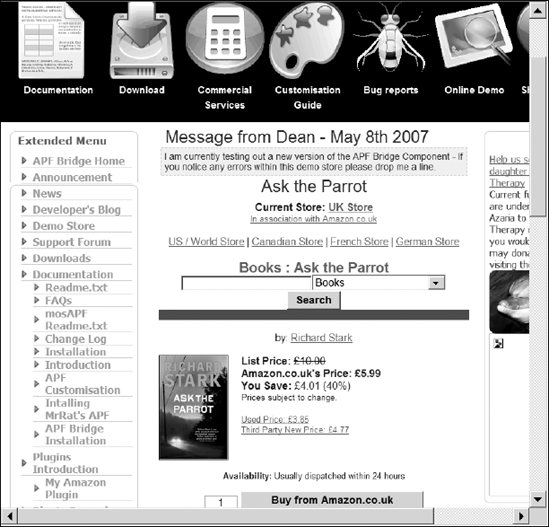
There is an APF Bridge extension that lets you use APF with Joomla. The extension features modules, components, and a plug-in that allows you to create a virtual Amazon store on your site. In Figure 12-16, you can see an example of a Joomla site providing Amazon search capabilities, while displaying a book with picture, pricing information, availability, and more.
APF is available for download here:
www.mrrat.com/aws
The APF Joomla bridge is available here:
www.deanmarshall.co.uk/demo/apf_bridge
The APF Bridge package is made up of a number of different extensions that provide various parts of the Amazon functionality to your Joomla site. The individual extensions include the following:
APF Bridge component—Bridges the APF Perl library into Joomla.
mosAPF_0.5b3 Amazon plug-in—Works in conjunction with the bridge component by scanning article text and replacing defined APF tags with the proper code for displaying Amazon information.
mosAPF_button WYSIWYG Editor Button plug-in—Adds a button to the Joomla editor interface that will insert the various tags for the APF Bridge. Entering the tags through this extension saves typing time and minimizes typo errors.
mod_apf_search—Displays a search box that will search an Amazon store for the selected country.
The APF Perl implementation uses the cURL library for transferring files. If your Web host doesn't have the cURL libraries installed, you won't be able to use APF.
The surge in eCommerce on the Internet over the last decade has been astounding. Billions of dollars of transactions now occur through the Web and its related technologies. Chapter 4 mentions Joomla extensions that provide front-end e-commerce applications such as a shopping cart. However, the lion's share of money changing hands on the Internet occurs through business-to-business (B2B) transactions. Joomla is capable of handling B2B interactions through available extensions.
Electronic Data Interchange (EDI) is a set of standards that are used for transmitting information electronically between organizations. Despite the lack of publicity about this format, it remains the primary data interchange standard used in a vast majority of the electronic commerce transactions worldwide. The business-to-business nature of most implementations of EDI makes it more of a behind-the-scenes player than popularized formats such as XML.
Through an extension, Joomla is able to act as an EDI server.
EDI is often used to automate purchase order commerce transactions. EDI documents can be transmitted by any means, including FTP, HTTP, MIME, direct modem, AS1, AS2, MQ, and value-added networks. Value-added networks (VANs) are private secure networks supplied by companies such as INOVIS, GXS, and BT*EDINET. Increasingly, however, technology is being put in place to allow secure transmission over the Internet to take advantage of free transmission and to minimize costs.
Wal-Mart, in particular, is advancing the Applicability Statement 2 (AS2) standard that sets up a client-server model for EDI communication. This standard specifies a number of requirements (such as a static IP for the base server) that minimize the possibility of system compromise. The AS2 protocol is described in the RFC 4130 document available here:
www.ietf.org/rfc/rfc4130.txt
Most EDI documents mirror the content of the original paper versions they replace. The standards for the document format exist for many industries, including engineering (construction plans, work orders, and so on), medical (patienast records, laboratory results, and so on), and transportation (bill of goods, purchase orders, container information, and so on). You can find descriptions of some of the EDI document standards here:
www.rapidnet.org/Standards_Tools/EDIStandards.asp
There are two primary standards for EDI. The ANSI ASC X12 standard (commonly referred to simply as X12) is the dominant implementation in the United States. Europe uses the United Nations/Electronic Data Interchange For Administration, Commerce, and Transport (UN/EDIFACT) standard, which is endorsed by the United Nations.
The X12 has document standards for a number of industries and are categorized in the set areas shown in Table 12-1 with the associated abbreviation.
Table 12-1. X12 Document Standards Categories
Category | What it Contains |
|---|---|
Order Series (ORD) | Standards for items, including cooperative advertising agreements, coupon notification, grocery products invoice/purchase order/purchase order change, invoice, item maintenance, manufacturer coupon and coupon redemption, sales catalog, purchase order and PO acknowledgment, retail account characteristics, return merchandise authorization and notification, ship notice and manifest, and shipment and billing notice |
Materials Handling Series (MAT) | Standards for asset schedule, item information request, material claim, material obligation validation, price authorization acknowledgment and status, price information, product authorization/deauthorization, request for quotation, requisition, and response to request for quotation |
Tax Services Series (TAX) | Includes definitions for business credit report, electronic filing of tax return data, electronic filing of tax return data acknowledgment, income or asset offset, notice of employment status, notice of power of attorney, notice of tax adjustment or assessment, revenue receipts statement, statistical government information, and tax information exchange |
Warehousing Series (WAR) | Standards for customer call reporting, deduction research report, market development fund allocation, market development fund settlement, response to a load tender, warehouse inventory adjustment advice, warehouse shipping advice, warehouse shipping order, warehouse stock transfer receipt advice, and warehouse stock transfer shipment advice |
Financial Series (FIN) | Includes definitions for account analysis, account assignment/inquiry and service/status, application advice, application control totals, commission sales report, consolidated service invoice/statement, credit/debit adjustment, debit authorization, financial information reporting, financial return notice, freight invoice, functional group totals, invoice, lockbox, operating expense statement, payment cancellation request, and payment order/remittance advice |
Government Series (GOV) | Standards for business entity filings, court and law enforcement notice, court submission, electronic filing of tax return data acknowledgment, Federal Communications Commission (FCC) license application, periodic compensation, royalty regulatory report, statistical government information, tax rate notification, unemployment insurance tax claim or charge information, uniform commercial code filing, and voter registration information |
Manufacturing Series (MAN) | Standards for contractor cost data reporting, delivery/return acknowledgment or adjustment, delivery/return base record, inventory inquiry/advice, order status inquiry, order status report, planning schedule with release capability, product activity data, product transfer account adjustment, product transfer and resale report, production sequence, receiving advice/acceptance certificate, and response to product transfer account adjustment |
Delivery Series (DEL) | Standards for cartage work assignment, consolidators freight bill and invoice, direct store delivery summary information, logistics service request, logistics service response, motor carrier summary freight bill manifest, purchase order shipment management document, response to a cartage work assignment, routing and carrier instruction, ship notice/manifest, shipment and billing notice, shipment delivery discrepancy information, shipment information, and shipping schedule |
Engineering Management & Contract Series (ENG) | Standards for clauses and provisions, component parts content, contract abstract, contract completion status, contract payment management report, contract pricing proposal, contractor cost data reporting, excavation communication, logistics reassignment, maintenance service order, pricing history, procurement notices, product dimension maintenance, project cost reporting, project schedule reporting, specifications/technical information, trading partner profile, vendor performance review, and well information |
Insurance/Health Series (INS) | Standards for annuity activity, automotive inspection detail, benefit enrollment and maintenance, cargo insurance advice of shipment, claim status report and tracer reply, claim tracer, eligibility, coverage or benefit information, eligibility, coverage or benefit inquiry, health care claim, health care claim payment/advice, health care claim status notification, health care claim status request, health care provider information, health care services review information, individual life, annuity and disability application, insurance plan description, insurance producer administration, insurance underwriting requirements reporting, insurance/annuity application status, loss or damage claimmotor vehicle, medical event reporting, patient information, property and casualty loss notification, property damage report, report of injury, illness or incident, underwriting information services, and wage determination |
Miscellaneous ANSI X12 Transactions Series (MIS) | Includes definitions for cryptographic service message, data status tracking, electronic form structure, file transfer, functional acknowledgment, general request, response or confirmation, motion picture booking confirmation, name and address lists, set cancellation, and text message |
Mortgage Series (MOR) | Standards for application for mortgage insurance benefits, loan verification information, mortgage credit report, mortgage credit report order, mortgage loan default status, mortgage note, mortgage or property record change notification, real estate information report, real estate information request, real estate inspection, real estate settlement information, real estate title evidence, real estate title insurance services order, residential loan application, residential mortgage insurance application, residential mortgage insurance application response, secondary mortgage market investor report, and secondary mortgage market loan delivery |
Product Services Series (PSS) | Includes definitions for product registration, product service claim, product service claim response, product service notification, product source information, promotion announcement, and return merchandise authorization and notification |
Quality and Safety Series (QSS) | Standards for animal toxicological data, commercial vehicle credentials, commercial vehicle safety and credentials information exchange, material safety data sheet, nonconformance report, report of test results, and testing results request and report |
Student Information Series (STU) | Includes definitions for student application for admission to educational institutions, educational course inventory, grant or assistance application, request for student educational record (transcript), response to request for student educational record (transcript), student educational record (transcript) and acknowledgement, student enrollment verification, student loan application, student loan guarantee result, student loan pre-claims and claims, and student loan transfer and status verification |
The European standard, UN/EDIFACT, has been adopted by the ISO as standard #9735. The standard doesn't have explicit set categories like X12. Instead, the various document standards are defined as messages with the individual abbreviations shown in Table 12-2.
Table 12-2. UN/EDIFACT Abbreviations
Abbreviation | Meaning |
|---|---|
APERAK | Application error and acknowledgment |
AUTACK | Secure authentication and acknowledgment |
AUTHOR | Authorization |
BANSTA | Banking status |
BAPLIE | Bayplan/stowage plan occupied and empty locations |
BAPLTE | Bayplan/stowage plan total numbers |
BOPBNK | Bank transactions and portfolio transactions report |
BOPCUS | Balance of payment customer transaction report |
BOPDIR | Direct balance of payment declaration |
BOPINF | Balance of payment information from customer |
CALINF | Vessel call information |
CASINT | Request for legal administration action in civil proceedings |
CASRES | Legal administration response in civil proceedings |
CHAMAP | Chart of mappings |
COARRI | Container discharge/loading report |
CODECO | Container gate-in/gate-out report |
CODENO | Permit expiration/clearance ready notice |
COEDOR | Container stock report |
COHAOR | Container special handling order |
COLADV | Advice of a documentary collection |
COMDIS | Commercial dispute |
CONAPW | Advice on pending works |
CONDPV | Direct payment valuation |
CONDRA | Drawing administration |
CONDRO | Drawing organization |
CONEST | Establishment of contract |
CONITT | Invitation to tender |
CONPVA | Payment valuation |
CONQVA | Quantity valuation |
CONRPW | Response of pending works |
CONTEN | Tender |
CONTRL | Syntax and service report |
CONWQD | Work item quantity determination |
COPARN | Container announcement |
COPINO | Container prenotification |
COPRAR | Container discharge/loading order |
COREOR | Container release order |
COSTCO | Container stuffing/stripping confirmation |
COSTOR | Container stuffing/stripping order |
CREADV | Credit advice |
CREEXT | Extended credit advice |
CREMUL | Multiple credit advice |
CURRAC | Current account |
CUSCAR | Customs cargo report |
CUSDEC | Customs declaration |
CUSEXP | Customs express consignment declaration |
CUSREP | Customs conveyance report |
CUSRES | Customs response |
DATRAK | Data tracking |
DEBADV | Debit advice |
DEBMUL | Multiple debit advice |
DELFOR | Delivery schedule |
DELJIT | Delivery just-in-time |
DESADV | Dispatch advice |
DESTIM | Equipment damage and repair estimate |
DIRDEB | Direct debit |
DIRDEF | Directory definition |
DOCADV | Documentary credit advice |
DOCAMA | Advice of an amendment of a documentary credit |
DOCAMI | Documentary credit amendment information |
DOCAMR | Request for an amendment of a documentary credit |
DOCAPP | Documentary credit application |
DOCARE | Response to an amendment of a documentary credit |
DOCINF | Documentary credit issuance information |
FINCAN | Financial cancellation |
FINSTA | Financial statement of an account |
GENRAL | General purpose |
GESMES | Generic statistical |
HANMOV | Cargo/goods handling and movement |
IFCSUM | Forwarding and consolidation summary |
IFTCCA | Forwarding and transport shipment charge calculation |
IFTDGN | Dangerous goods notification |
IFTFCC | International transport freight costs and other charges |
IFTIAG | Dangerous cargo list |
IFTMAN | Arrival notice |
IFTMBC | Booking confirmation |
IFTMBF | Firm booking |
IFTMBP | Provisional booking |
IFTMCS | Instruction contract status |
IFTMIN | Instruction |
IFTMSC | Single consignment forwarding and transport |
IFTRIN | Forwarding and transport rate information |
IFTSAI | Forwarding and transport schedule and availability information |
IFTSTA | International multimodal status report |
IFTSTQ | International multimodal status request |
IHCEBI | Interactive health insurance eligibility and benefits inquiry and response |
INSPRE | Insurance premium |
INVOIC | Invoice |
INVRPT | Inventory report |
ITRGRP | In-transit groupage |
ITRRPT | In-transit report detail |
JAPRES | Job application result |
JIBILL | Joint interest billing report |
JINFDE | Job information demand |
JOBAPP | Job application proposal |
JOBCON | Job order confirmation |
JOBMOD | Job order modification |
JOBOFF | Job order |
MEDADR | Medical adverse drug reaction |
MEDAUT | Medical preauthorization |
MEDPID | Person identification |
MEDREQ | Medical service request |
MEDRPT | Medical service report |
MESGEV | Social event |
MIGRPT | Message implementation guide (MIG) report |
MOVINS | Stowage instruction |
ORDCHG | Purchase order change request |
ORDERS | Purchase order |
ORDRSP | Purchase order response |
PARTIN | Party information |
PAXLST | Passenger list |
PAYDUC | Payroll deductions advice |
PAYEXT | Extended payment order |
PAYMUL | Multiple payment order |
PAYORD | Payment order |
PCPRDR | Property and casualty property damage report |
PRICAT | Price/sales catalogue |
PRODAT | Product data |
PRODEX | Product exchange reconciliation |
PROLST | Promotional list |
PRPAID | Insurance premium payment |
QALITY | Quality data |
QUOTES | Quote |
RDRMES | Raw data reporting |
REBORD | Reinsurance bordereau |
RECADV | Receiving advice |
RECALC | Reinsurance calculation |
RECECO | Credit risk cover |
RECLAM | Reinsurance claims |
REMADV | Remittance advice |
REPREM | Reinsurance premium |
REQDOC | Request for document |
REQOTE | Request for quote |
RESETT | Reinsurance settlement |
RESMSG | Reservation |
RESREQ | Reservation request—interactive |
RESRSP | Reservation response—interactive |
RETACC | Reinsurance technical account |
SAFHAZ | Safety and hazard data |
SANCRT | International movement of goods governmental regulatory |
SCRIPT | Prescriptions and refill request and response—interactive message |
SKDACK | Schedule acknowledgement—interactive |
SLSFCT | Sales forecast |
SLSRPT | Sales data report |
SSCLDE | Social Security claim decision |
SSDREQ | Social Security data request |
SSIMOD | Modification of identity details |
SSRECH | Worker's insurance history |
SSREGW | Notification of registration of a worker |
STATAC | Statement of account |
SUPCOT | Superannuation contributions advice |
SUPMAN | Superannuation maintenance |
SUPRES | Supplier response |
TANSTA | Tank status report |
TESTEX | Test message explicit mode |
TESTIM | Test message implicit mode |
TINREQ | Tourism information request |
TINRSP | Tourism information response |
TRADES | Traffic or travel description definition |
TRADIN | Traffic or travel details of individual traveler |
TRAILS | Traffic or travel route guidance and planning |
TRALOC | Traffic or travel location definition |
TRAREQ | Traffic or travel information request |
TRAVAK | Traffic or travel information acknowledgment |
TRAVIN | Traffic or travel situation information |
VATDEC | Value added tax |
VESDEP | Vessel departure |
WKGRDC | Work grant decision |
WKGRRE | Work grant request |
The Skylark extension turns Joomla into an EDI Server. It allows management of trading partners, business processes, communication protocols, and document format translators. It has no restrictions on the particular document type that is handled, and can process both inbound and outbound documents.
The Skylark extension is actually made up of a number of components and modules. It supports the following transports (or communication protocols):
Generic (including FTP, SMTP and POP3)
ARI (uses HTTP)
Honda (using IBM MQ)
Stihl (uses HTTP)
It also supports the following translators:
ARI
Briggs
GMI
Honda
Stihl
When you complete installation, you will be presented with a screen that has a link to an introduction (see Figure 12-17). Read this introduction because it contains a good explanation of the basic functioning of the component.

As you've seen in previous chapters, creating a simple custom component for the Joomla system doesn't require a great deal of work. Through the Joomla framework, most of the user interface is already in place, so you can focus on the implementation details of the capability that you want to add. That makes extranet interaction through Joomla not only practical, but also inexpensive when compared with creating standalone Web applications.
In this section, you'll implement three extensions that interface with external sites. The first small application will use HTML retrieval capabilities of PHP to retrieve data from a separate Web page, filter data from the page, and format it for display on the Joomla page. The second extension will wrap a remote system's Web interface (the Google Map API) and deliver the content to the Joomla site. The final extension will provide an example of having a component query a remote database and process the returned XML data.
All of these extensions will demonstrate extranet capabilities that can be customized to other real-world tasks. The number of Web APIs is growing constantly, and these examples should allow a developer to easily create an extension that can take advantage of any of these Web services.
The World Wide Web has made text data available like never before. Almost all sites accessible through the Internet can be addressed by either a browser or a program that retrieves the plain-text version of the page containing HTML tags. This availability of raw data has caused a renaissance of programs called screen scrapers. Screen scrapers access data normally targeted at a screen (or browser window) and scrape the desired data from the screen for storage, or repackaging and display.
Between the 1970s era of widespread deployment of text-based mainframe/terminal applications and the twenty-first century browser era came the age of the graphical user interface (GUI). Ushered in by the success of the Macintosh, computer applications began to feature windows, drop-down menus, checkboxes, and other user-interface elements that made using programs much more flexible than their text-based predecessors.
The revolution in GUI adoption caused a problem for organizations that had invested tremendous amounts of time and money in mainframe-based text applications. In less than a decade, these text-based applications went from being cutting edge to antiquated. For productivity reasons, organizations had to rewrite these applications to take advantage of the new GUI paradigm. Even more daunting than the mountain of reprogramming was the conversion of data stored in these mostly custom systems. Few standard data formats existed when they were initially designed, so retrieving and converting the data posed tremendous difficulties.
Enter the screen scraper. A screen scraper was a program that sat between the text-based application and either a user or a more advanced data retrieval program. For GUI applications, the screen scraper acted as a middle layer between the graphical interface in the foreground and the real text-based application in the background. Data would be scraped from the text-based screen and loaded into the front-end graphical interface. A user would work with a modern interface with all of the advantages provided by a GUI, including Undo, Cut, Copy, and Paste (among other functions). When the user clicked the Save button, the screen scraper would interface with the text-based application and act as if the user was punching in the keyboard codes and data by hand.
More commonly, a screen scraper would be used to access a system and "scrape" the screen for data held in the text-based system. The scraper might send a query into the text-based system and then scrape the results displayed by the mainframe and place it in a new data store such as a database management system (DBMS).
As time passed and text-based applications were retired, screen scrapers became less and less common. Organizations upgraded antiquated text-based systems and traded custom data storage for standardized database servers with flexible data stores. Scrapers were no longer needed when data retrieval through many different types of retrieval middleware was available.
The explosive growth of HTML changed all that. Almost overnight, oceans of data were being widely published in an unencrypted, public, and quickly accessible data format. Anything Web sites published for viewing by individual browsers could easily be harvested by a program, stripped of its formatting, and either reformatted for display or stored for later access.
Since PHP comes with built-in HTTP capabilities, it is a fairly easy task to write code to go to a Web site, grab the HTML code from the site, and strip the desired data from the page. Implementing such code as a Joomla component is only a short development step from there.
Whenever you are retrieving content from a remote site and publishing it for the use of your Web site visitors, a number of problems arise—technical, legal, and ethical. These problems should be taken into account before you undertake a screen scraping application.
On the technical side, using a scraper means that you have no access to a standard API for the data you need. That means any changes to the host Web page can instantly cause your scraper to stop functioning properly. Your program will rely on the data to be presented in a particular format. Unlike a human viewer who understands the information whether it is displayed in three columns or changed to four columns, a program must have consistency in order to process the page and retrieve the information. Therefore, a scraping application can go from working flawlessly one day to not working at all the next. Scrapers require constant monitoring.
Further technical problems arise when the site tries to discourage scraper applications. Some organizations hate scraping applications because the programs retrieve the information while expending site bandwidth and other resources. Further, the scrapers eliminate the possibility of obtaining visitor data from the user's browser, and avoid the display of Internet ads that generate revenue for the site.
On the legal side, even though the data may be publicly available, it may be illegal for you to redisplay it on your own Web site in the same way that you can't plagiarize a written article and claim it as your own. For Web-based content, these issues are very cloudy. Some Web data is compiled from numerous sources before being processed and published to the world, making determining the information's provenance difficult. Republishing it through scraping and reformatting further complicates the issue.
Additional legal problems arise when the terms of agreement for use of the site prohibits scraping processes. Google, for example, includes such a clause in their Terms and Conditions site document. That means that, although Google is very easy to scrape, it is illegal to do so.
On the ethical side, even though you may be able to retrieve the information and republish without any legal ramifications, it might not be ethical to do so. There is no question that an automated solution that queries a Web data store uses resources on the target Web server. It is also very likely that the site owner never intended the information published on the site to be accessed by a machine for unknown repurposing.
However, despite these significant pitfalls to screen scraping, there are numerous applications where scraping is not only possible, but extremely useful. Many government Web sites publish information to the Web that is free and in the public domain. The information is provided because the taxpayers have paid for it to be widely disseminated (for example, Center for Disease Control safety alerts). Often, this government data is located in difficult-to-find places, or in such cryptic form that a site republishing the information is performing a public service by making it accessible and usable.
However, even some public databases warn against using them for automated database retrieval. The California Department of Real Estate, for example, has the following on its search page:
The online status inquiry feature is a service for consumers. It is not intended for, nor capable of, automated database searches or sorts. If you desire such database files, contact the Department for information on availability and costs.
Note
While the technology of the scraper presented in this chapter can be used to obtain data from a site whether permission has been granted or not, you should respect the wishes of a site and not apply your scraper there.
To effectively deploy a screen scraper that acts as middleware, the component must be designed to handle four tasks:
Take the request or query from the user—Typically, the user query will be entered into an HTML form displayed by the component. Once the query data has been entered into the form, the user clicks a Submit button and the request is sent to the component.
Retrieve the data from the source Web site—This is the scraping function that forms the heart of the program. The file sockets PHP library will be used to retrieve the entire HTML page from the site.
Process the retrieved information—The power of regular expressions really comes in handy for scraping applications because a simple expression can process a huge amount of text data.
Reformat the data and return to the user—In Joomla, there are a number of different methods of accomplishing this task. Often, the best method when dealing with data is to store the data in XML format and use an XSLT document to provide the formatting services. In the interest of simplicity, this component will simply output the data in an HTML table.
With this general component task outline, you can begin component construction, as shown in Figure 12-18.
The component descriptor file is primitive and simply adds the component to the system. Enter the following file in your text editor, and save it under the name com_scrape.xml:
<?xml version="1.0" encoding="utf-8"?>
<install version="1.5.0" type="component">
     <name>scrape</name>
     <author>Dan Rahmel</author>
     <creationDate>July 2007</creationDate>
     <copyright>(C) 2007 Dan Rahmel. All rights reserved.</copyright>
     <authorEmail>[email protected]</authorEmail>
     <authorUrl>www.joomlajumpstart.org</authorUrl>
     <version>1.0.0</version>
     <description>Accepts a field input and then queries a remote site for the
information and scrapes the returned output.</description>
     <files>
          <filename component="com_scrape">scrape.php</filename>
     </files>
     <administration>
          <menu>Scrape</menu>
         <files>
              <filename component="com_scrape">scrape.php</filename>
         </files>
     </administration>
     <params>
          <param name="url" type="text" default=".gov" label="Target site"
description="URL of the server that will be scraped for information." />
     </params>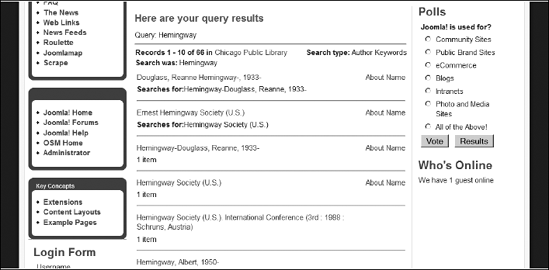
</install>The component will accept query values for book titles and send the request to the target Web site. When the page returns with the necessary data, a function will remove the data from the HTML code, reformat it, and return it to the user's browser.
Enter the following code in your editor and the file as scrape.php:
<?php
/**
* @version $Id: scrape.php 5203 2007-06-15 02:45:14Z DanR $
* @copyright Copyright (C) 2007 Dan Rahmel. All rights reserved.
* @package ScreenScrape
* Accepts a field input and then queries a remote site for the information
* and scrapes the returned output.
*/

// no direct access
defined( '_JEXEC' ) or die( 'Restricted access' );
// Check the task parameter and execute appropriate function
switch( JRequest::getVar( 'task' )) {
    case 'query':
        doExecuteQuery();
        break;
    default:
        displayQueryEntry();
        break;
}

// Process data received from form.
function doExecuteQuery()  {
     // Get query from form posting values
     $fldQuery = JRequest::getVar('query') ;
     // Strip away anything that could be code, carriage returns, and so on
     $fldQuery = preg_replace("/[^a-zA-Z0-9 .?!$()'"]/", "", $fldQuery);
     // "
     $myData = doScrape($fldQuery);
     echo "<h1>Here are your query results</h1>";
     echo "<P> Query: " . $fldQuery . "<P>";
     echo "<hr />";
     echo $myData;
     echo "<a href=index.php?option=com_scrape>" .
          "Return to Scrape</a>";
}

function doScrape($queryStr) {
     $myUrl = "www.chipubweb.org";
     $myPath = "/cgi-bin/cw_cgi?alphaBrowse+8469d+2+−1+" . $queryStr;

     $myGet = "";
     $myAgent = "User-Agent: Mozilla/5.0 (Windows; U; Windows NT 5.1;" .
     " en-US; rv:1.8.1) Gecko/20061010 Firefox/2.0
";
     $myApp = "Content-Type: application/x-www-form-urlencoded";

     $fp = fsockopen($myUrl, 80, $errNum, $errstr, 30);
     if (!$fp) {
          return "Error #". $errNum . "retrieving page.<br />
";
     } else {
        $out = "GET " . $myPath . " HTTP/1.0
";
         $out .= "Host: ". $myUrl . "
";
         $out .= $myAgent . $myApp . "
";
         $out .= "Connection: Close

";

         fwrite($fp, $out);
         while (!feof($fp)) { $myGet .= fgets($fp, 128); }
         fclose($fp);

         $pattern = "/<tablesid=.m(.*)>([.|s]*)</table>/i";
         preg_match($pattern, $myGet, $matches);
         return $matches[0];
     }
}
// Display form for query entry
function displayQueryEntry() {
?>
<h1 class="contentheading">Query form</h1>
<form id="form1" name="form1" method="post"
action="index.php?option=com_scrape&task=query">
<P>Enter your book query here:<br />
<textarea name="query" cols="60" rows="1" id="query"></textarea>
</P>
<P>
<input type="submit" name="Submit" value="Display Results" />
</P>
</form>
<?php } ?>Place both files in a ZIP archive named scrape.zip, and the component can be installed into the Joomla system. You can set the URL of the query site in the component parameters section. This code simply grabs a table with the results generated and places it in the Web page. For your target Web site, you will need to change the regular expression used by preg_match() to excise the portion of HTML code that you need to retrieve.
Google provides a free mapping service where a Web site can display a custom Google street or satellite (or both) map within the Web page. Since the map is retrieved from the Google server, it contains the Google moniker and provides Google with additional demographic and other data. That is the return Google gets for providing this free service.
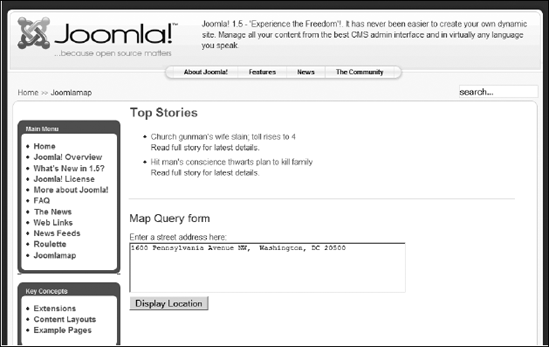
Although there is already a component that wraps the Google Map API for use on Joomla sites, it can be very instructive to create a component so that you can see how it is possible to interface with a remote API for display of information within your Joomla site. The component interface will allow the user to enter a standard address into a text field, as shown in Figure 12-19.
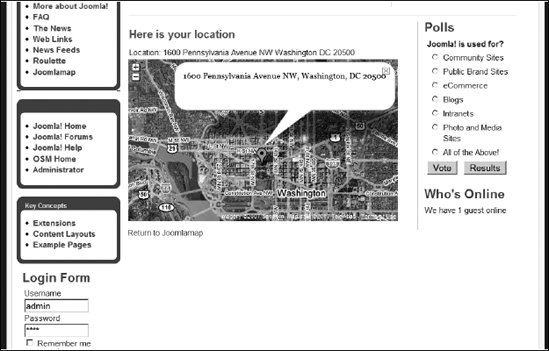
When the user clicks on the Display Location button, the component is called again, although this time with a task parameter of goto and the address information posted from the form. The component reads the form values, uses a geocoding routine to translate the address into latitude and longitude coordinates, and calls the Google Maps API to present the relevant map, as shown in Figure 12-20.
Google has provided an excellent and simple API with which your program can request maps from its site. You can find a complete list of the API functions (as well as example code) here:
www.google.com/apis/maps
The Google Map Web application creates a map object that can be addressed by JavaScript code to govern such display parameters as location, zoom, type of display (street map, satellite, or hybrid), and others. All of these parameters are available for access from JavaScript code.
Each URL where a map will appear must have a unique Google key. In fact, when the map request is made, if the registered URL for the specified key does not match, the Google site will not return a map. That means you will need separate keys for your staging server and deployment server. Additionally, the URL that is registered with the key is case-sensitive, so www.example.com/map is not recognized as being the same as the registered www.example.com/Map.
You can register for a Google Maps API key here:
www.google.com/apis/maps/signup.html
The component descriptor file is primitive and simply adds the component to the system. Enter the following file in your text editor and save it under the name com_joomlamap.xml:
<?xml version="1.0" encoding="utf-8"?>
<install version="1.5.0" type="component">
     <name>Joomlamap</name>
     <author>Dan Rahmel</author>
     <creationDate>July 2007</creationDate>
     <copyright>(C) 2007 Dan Rahmel. All rights reserved.</copyright>
     <authorEmail>[email protected]</authorEmail>
     <authorUrl>www.joomlajumpstart.org</authorUrl>
     <version>1.0.0</version>
     <description>Accepts a field input and then queries a remote site for the
information and scrapes the returned output.</description>
     <files>
          <filename component="com_joomlamap">joomlamap.php</filename>
     </files>
     <administration>
          <menu>Joomlamap</menu>
         <files>
              <filename component="com_joomlamap">jooml amap.php</filename>
         </files>
     </administration>
     <params>
          <param name="key" type="text" default="" label="Google Map Key"
          description="Enter the  Map key configured for this site." />
     </params>
</install>The component must insert two pieces of information into the rendered Joomla page: the Google display script and the map object display tags.
Enter the following code into your text editor and save the file as joomlamap.php:
<?php
/**
* @version $Id: joomlamap.php 5203 2007-06-15 02:45:14Z DanR $
* @copyright Copyright (C) 2007 Dan Rahmel. All rights reserved.
* @package Joomlamap
* This component accesses the Google Map API and displays the
* requested address.
*/
// no direct access
defined( '_JEXEC' ) or die( 'Restricted access' );
// Check the task parameter and execute appropriate function
switch( JRequest::getVar( 'task' )) {
case 'goto':
gotoLocation();
break;
default:
displayAddressEntry();
break;
}
// Process data received from form.
function gotoLocation() {
$userKey = $params->get('key', 0);
// Get location from form posting values
$fldLocation = JRequest::getVar('location') ;
// Strip away anything that could be code, carriage returns, and so on
$fldLocation = preg_replace("/[^a-zA-Z0-9- .?!$()'"]/", "", $fldLocation);
// "
echo "<h1>Here is your location</h1>";
echo "<p>Location: " . $fldLocation . "<p>";
?>
<script src="http://maps.google.com/maps?file=api&v=2&key=" .
$userKey . " type="text/javascript"></script>
<script type="text/javascript">
//<![CDATA[
var map = null;
var geocoder = null;
function load() {
if (GBrowserIsCompatible()) {
map = new GMap2(document.getElementById("map"));
map.setCenter(new GLatLng(37.4419, −122.1419), 13);geocoder = new GClientGeocoder();
}
}
function showAddress(address) {
if (geocoder) {
geocoder.getLatLng(address, function(point) {
if (!point) { alert(address + " not found"); } else {
map.setMapType( G_HYBRID_TYPE ); // default is G_MAP_TYPE
map.setCenter(point, 13);
var marker = new GMarker(point);
map.addOverlay(marker);
map.addControl(new GSmallZoomControl ());
marker.openInfoWindowHtml(address); } } );
}
}
//]]>
load();
showAddress(<?php echo $fldLocation; ?>);
</script>
<?php
echo "<a href=index.php?option=com_joomlamap>" .
"Return to Joomlamap</a>";
} ?>
// Display form for address entry
function displayAddressEntry() {
?>
<h1 class="contentheading">Map Query form</h1>
<form id="form1" name="form1" method="post"
action="index.php?option=com_joomlamap&task=goto">
<P>Enter a street address here:<br />
<textarea name="location" cols="60" rows="1" id="location"></textarea>
</p>
<p>
<input type="submit" name="Submit" value="Display Location" />
<p>
</form>
<?php } ?>Archive the two files in a ZIP called joomlamap.zip and use the Extension Manager to install it into the system. You can set the Google map key in the parameters of the component.
The U.S. Postal Service (USPS) has a free Web tool where automated solutions can query the database for ZIP code and address information. The data is returned as a packet of XML data. Creating an extension that queries this Web tool provides a perfect example of the type of extranet application that you will most commonly need to construct.
Before you begin, you will need to sign up for a free account at the USPS.com Web site to obtain a user ID. You can sign up for the Web tools here:
www.usps.com/webtools/?from=zclsearch&page=webtools
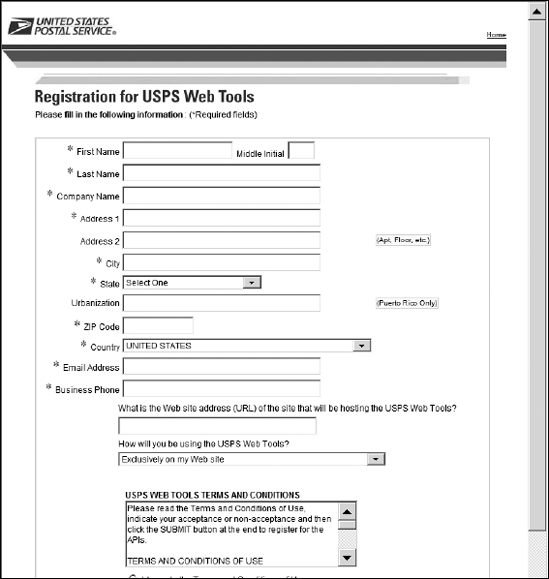
The registration form asks for basic information about you, as shown in Figure 12-21. When you have filled out the form and submitted it, the system will send you an email with your Web Tools User ID. You will need to include this code in all queries to the system.
Also included in the registration email is the URL of your test server. This URL will be something like (but will not match) http://testing.shipping.com/ShippingAPITest.dll or https://secure.shipping.com/ShippingAPITest.dll for secure testing. The USPS wants you to have your application completely tested before you can start querying against the actual database. This saves the USPS resources for all of the queries your system will need to send when getting your extension debugged.
With your user ID, you should do a manual test against the server to see if your browser can display the queried data. From the manual (available on the Web services section of the Web site), I entered the test request #1 that looks like this:
http://SERVERNAME/ShippingAPITest.dll?API=ZipCodeLookup&XML=
<ZipCodeLookupRequest%20USERID="MYID">
<Address ID="0"><Address1></Address1>
<Address2>6406 Ivy Lane</Address2>
<City>Greenbelt</City><State>MD</State>
</Address></ZipCodeLookupRequest>
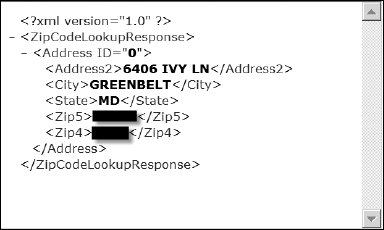
Here, I have broken it up into multiple lines so that it is easier to read, but all the text should be entered into the single line of address bar of your browser. You also need to replace the SERVERNAME and MYID with the values you received in the registration email. When you press the Enter key to have your browser retrieve the information, it should be displayed in the window as XML-formatted text (see Figure 12-22).
If the system doesn't return the information you requested, make sure the user ID and server name are correct as entered. Then, if you entered the code provided here, check the USPS manual in case the query notation has changed.
Note that in the figure I have blacked out the returned ZIP code information because the postal service asks for this information to give you full access to the system—to verify that your application actually works.
Having confirmed that your user ID is working correctly, it's time to implement a test using basic PHP code before attempting to embed the program logic into a complete extension. For extranet interfaces, I always recommend this intermediate step for extension development. Joomla is a complex system, and it is far easier to confirm baseline communication protocols outside a complete system to ensure that they work properly.
This example requires PHP version 5 running on the server. In PHP 5, standardized XML capabilities were added to load and parse an XML DOM. These functions are needed to process the postal data. You can add an XML extension to PHP 4 and adapt the example code to it if your Joomla site is hosted on a PHP 4 installation.
Enter the following code and save the file as ziptest.php at the Web root of your staging server:
<html><body>
<h1>Zip Code Test</h1>
<?php

 $myWTID= "MYID";
 $myAddress = "6406 Ivy Lane";
 $myCity = "Greenbelt";
 $myState = "MD";

 $myUrl = "http://testing.shippingapis.com/ShippingAPITest.dll?" .
      "API=ZipCodeLookup&XML=<ZipCodeLookupRequest USERID='" . $myWTID ."'>" .
     "<Address ID='0'><Address1></Address1>" .
     "<Address2>" . $myAddress . "</Address2>" .
     "<City>" . $myCity . "</City><State>" . $myState . "</State>" .
     "</Address></ZipCodeLookupRequest>";

echo $myUrl;
echo "<hr />";
try {
     @$doc = DOMDocument::load($myUrl);
} catch(DOMException $e) {
     echo '<P>';
     print_r($e);
     echo '</P>';
}
// Echo all of the returned data in HTML
echo htmlspecialchars($doc->saveXML());
echo "<hr />";

$params = $doc->getElementsByTagName('Address'),

foreach ($params as $param) {
       echo "ID=" . $param ->getAttribute('ID').'<br>';
}
echo "<hr />";

$params = $doc->getElementsByTagName('Zip5'),
foreach ($params as $param) {
       echo "Zip 5=". $param ->textContent .'<br>'; // getAttribute('ID')
}
$params = $doc->getElementsByTagName('Zip4'),
foreach ($params as $param) {
echo "Zip 4=". $param ->textContent .'<br>'; // getAttribute('ID')
}
?>
<h2>Done.</h2>
</body>
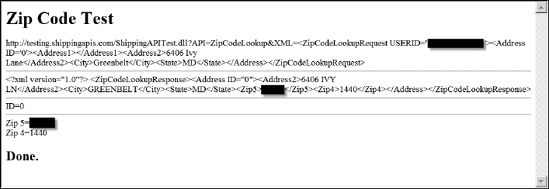
</html>Be sure to set the $myWTID variable to your USPS ID number. When you access this file through your Web browser, it should display a page similar to the one in Figure 12-23. If the test went properly, the Zip 5 and Zip 4 values should appear at the bottom of the page.
If the test failed, you should have enough data provided by the test to begin looking for the problem. The test file outputs the values that it uses as execution progresses. The output first displays the query being sent to the USPS system, then the full resultant XML is displayed, and finally three of the output values are displayed. When a test fails, you'll be able to compare it against the successful one on Figure 12-23 to look for differences.
The component descriptor file is primitive and simply adds the component to the system. Enter the following file in your text editor and save it under the name com_zipfinder.xml:
<?xml version="1.0" encoding="utf-8"?>
<install version="1.5.0" type="component">
     <name>zipfinder</name>
     <author>Dan Rahmel</author>
     <creationDate>July 2007</creationDate>
     <copyright>(C) 2007 Dan Rahmel. All rights reserved.</copyright>
     <authorEmail>[email protected]</authorEmail>
     <authorUrl>www.joomlajumpstart.org</authorUrl>
     <version>1.0.0</version>
     <description>Accepts a field input and then queries a remote site for the
information and formats the XML output.</description>
<files>
<filename component="com_zipfinder">zipfinder.php</filename>
</files>
<administration>
<menu>Zip Finder</menu>
<files>
<filename component="com_zipfinder">zipfinder.php</filename>
</files>
</administration>
<params>
<param name="accessid" type="text" default="" label="USPS Access ID"
description="Enter the Access ID for the USPS web services." />
</params>
</install>The Zipfinder component will accept the address, city, and state values entered into a form. These values are sent in a query to the USPS server, which will return results in XML.
Enter the following in your text editor and save the file as zipfinder.php:
<?php
/**
* @version $Id: zipfinder.php 5203 2007-06-15 02:45:14Z DanR $
* @copyright Copyright (C) 2007 Dan Rahmel. All rights reserved.
* @package ZipFinder
* Accepts a field input and then queries a remote site for the information
* and scrapes the returned output.
*/

// no direct access
defined( '_JEXEC' ) or die( 'Restricted access' );

// Check the task parameter and execute appropriate function
switch( JRequest::getVar( 'task' )) {
    case 'query':
        doExecuteQuery();
        break;
    default:
        displayQueryEntry();
        break;
}

// Process data received from form.
function doExecuteQuery()  {
     // Get query from form posting values
     $fldAddress = JRequest::getVar('address') ;
     $fldCity = JRequest::getVar('city') ;
     $fldState = JRequest::getVar('state') ;
     // Eliminate these 3 lines when you move off the test server
     $fldAddress = "6406 Ivy Lane";
     $fldCity = "Greenbelt";
     $fldState = "MD";
// Strip away anything that could be code, carriage returns, and so on
$fldAddress = preg_replace("/[^a-zA-Z0-9 .?!$()'"]/", "", $fldAddress);
$fldCity = preg_replace("/[^a-zA-Z0-9 .?!$()'"]/", "", $fldCity);
$fldState = preg_replace("/[^a-zA-Z0-9 .?!$()'"]/", "", $fldState);
$myData = getZip($fldAddress, $fldCity, $fldState);
echo "<h1>Zip code results</h1>";
echo "<P>Address: " . $fldAddress . "<p>" . $fldCity . "," . $fldState . "</p>";
echo "<h2>Zip+4: " . $myData . "</h2>";
echo "<a href=index.php?option=com_zipfinder>" .
"Return to Zip Finder</a>";
}
function getZip($myAddress, $myCity, $myState) {
$myWTID= "MYID";
$myUrl = "http://testing.shippingapis.com/ShippingAPITest.dll?" .
"API=ZipCodeLookup&XML=<ZipCodeLookupRequest USERID='" . $myWTID ."'>" .
"<Address ID='0'><Address1></Address1>" .
"<Address2>" . $myAddress . "</Address2>" .
"<City>" . $myCity . "</City><State>" . $myState . "</State>" .
"</Address></ZipCodeLookupRequest>";
try { @$doc = DOMDocument::load($myUrl);
} catch(DOMException $e) {
echo '<p>'. print_r($e) . '</p>';
}
$zip5 = "";
$zip4 = "";
$params = $doc->getElementsByTagName('Zip5'),
foreach ($params as $param) {
if (strlen($zip5) > 0) $zip5 .= ", ";
$zip5 .= $param ->textContent;
}
$params = $doc->getElementsByTagName('Zip4'),
foreach ($params as $param) {
if (strlen($zip4) > 0) $zip4 .= ", ";
$zip4 .= $param ->textContent ;
}
return $zip5 . "-" . $zip4;
}
// Display form for query entry
function displayQueryEntry() {
?>
<h1 class="contentheading">Zip Code Query form</h1>
<form id="form1" name="form1" method="post"
action="index.php?option=com_zipfinder&task=query">
<p>Enter your address here:<INPUT type="text" name="address" size="80" ><BR>
<p>Enter your city here:
<INPUT type="text" name="city" size="30" ><BR>
<p>Enter your state abbreviation here:
<INPUT type="text" name="state" size="2" ><BR>
</p>
<p>
<input type="submit" name="Submit" value="Find Zipcode" />
</p>
</form>
<?php } ?>Archive the two files in a ZIP called zipfinder.zip, and use the Extension Manager to install it into the system. When the component is executed and the user submits an address, in the version presented here, the address is ignored and the single test address used for the test server is used. That address is queried and the resulting ZIP code is displayed, as shown in Figure 12-24.
When you obtain your authorization to access the main ZIP code system, you will need to modify the URL to address that server, and delete the three lines that override the user-entered address.

Accessing external resources from within a Joomla site can broaden the possible applications for the Joomla server. This chapter has provided an overview of the ways to connect Joomla to an extranet by doing the following:
Pulling outside content through Web feeds and using the Auto Articles 3000 extension.
Examining the Web feed format for proper deployment.
Publishing the content on your Web site as an RSS or Atom feed that other users can subscribe to.
Implementing affiliate programs with Google and Amazon to generate revenue for your Web site.
Adopting the Skylark EDI extension to enable Joomla to process EDI interactions and act as an EDI server.
Developing a custom screen scraper component to access text data on the Web.
Encapsulating a Web API (such as the Google Map API) inside a component to add capabilities to the Joomla site.
Creating a component that can query a remote site (in this case, the USPS), process returned XML result data, and format it for site display.
By interfacing with outside content, you can expand the depth of your site and, if your feed is successful, the popularity of your content will increase. Both factors are likely to increase your ranking on search engines where your site is registered. Chapter 13 provides a number of other options that can help you optimize your site for best placement on the search engines.