
In Chapter 5, you developed a few simple extensions to grasp the basic aspects of Joomla's extensibility. You were instructed to construct the various modules with a simple text editor, since the code was rudimentary and already debugged. Professional development, however, requires far greater control of the project. For example, to develop a multi-module and component-based shopping cart application, a developer would need to coordinate multiple development files, and may need to work in conjunction with other programmers.
This chapter outlines the work process of creating an advanced Joomla extension. You will be using a professional development system (Eclipse), source code control (through Subversion), and generating project documentation (through phpDocumentor). By following this development process from beginning to end, you will have a better idea of how professional Joomla applications can be created in an enterprise situation.
Chapter 5 has you use any text editor to create the program files and save them in the Joomla system. The quick-and-dirty use of text files is one of the advantages of creating programs for a PHP system, since you aren't locked into the overhead and complexity of using a complete integrated development environment (IDE).
Approaching the development process by the seat of your pants is fine when you need to throw together a simple module or make a small edit. But any project that is even medium sized (as the creation of most components will be) is a job that can be simplified by using more powerful development tools. Additionally, if the project is being handled by a team of even two members, bringing professional tools to bear may be the difference between completing a project on schedule and having it drag on endlessly.
With that in mind, you'll be using two professional-grade development tools in this chapter to create the example projects. The IDE known as Eclipse has capabilities that far surpass a simple text editor. It is project-based and has a plug-in architecture that benefits Joomla development with plug-ins to support Subversion (SVN), PHP coding, XML, and HTML file definition. SVN is a source code control system that streamlines group development and makes it possible to have an excellent source code archive, even if there is only a sole developer working on the project. Using code control is essential for all but the smallest projects.
You may already be using a development system that suits your needs and have no desire to switch to something else. If so, that's fantastic. Finding a development system you like is like finding a car you like—it's a matter of personal choice. However, you should still skim the sections that detail Eclipse. You may find a new way to use your existing IDE that you haven't considered previously.
Source code control (SCC) should be one of the mostly widely used technologies by software developers. Sadly, many people don't understand the advantages of SCC, and development houses often don't demand its adoption. So, it remains disregarded. Essentially, SCC is like an archivist for source code files, logging all changes made to each file. The changes saved into an archive may be later consulted and, if necessary, the older version can be restored.
One of the most popular programs for SCC or revision control is Subversion (SVN). SVN is a comprehensive server-and-client pair that provides local and network-based revision control for all types of development files. Several developers can work on the same project at the same time. The system handles all merges, and the system provides an interface for examining conflicts and choosing resolutions to those conflicts.
The revision control system that is slightly more popular than SVN is Concurrent Versions System (CVS). SVN was designed to become a successor to CVS because some of the design decisions made when CVS was born created inherent limitations to the system. Despite any foundational handicaps, CVS has gone through significant improvements and maintains its popularity. I use CVS for day-to-day use, primarily for historical reasons and the legacy archives that I have from past projects. However, the Joomla development is all occurring under SVN control, so Joomla developers benefit most if they adopt it for their revision control.
Here are a number of common problems you may encounter while developing an application and how SVN would solve them:
Many changes have been made to a new version when it's discovered that a major feature no longer works — and you can't figure out why. With SVN, you can simply look back at the source code and see what changes were made to a section of code. If necessary, you can have the archive recreate the complete project source code of the last working version, which can then be debugged or monitored to determine the difference from the new version execution.
The current machine crashes, and you don't have a recent backup. Since SVN is server-based, it's common to run it as an archival application on another machine. Committing current file changes to the archive is as simple as right-clicking on the file or folder and then activating the "check in" feature to store the changes. This convenience makes backups much more likely, even for slovenly programmers.
Multiple people are working on the same project, and they need a way to coordinate the work and changes. Applications such as SVN were born out of the need for open source developers who work at different times and places but must have a consistent way of combining changes without breaking the project.
A feature that was removed four months ago is needed again. You don't have to dig through system backups for the proper file, because a version has been tagged within SVN. Simply by accessing the version by name or date, the last source that included the deleted feature can be quickly and easily retrieved.
The stripped-down version of this routine ran much better before all the revisions, so a developer wants to refactor a routine, starting with the initial bare-bones implementation. Retrieving an old version from SCC is painless.
A company is developing a new version of an application that requires drastic changes, but the older version must still be supported with updates and bug fixes. SVN can elegantly manage what is known as a "fork" so that the new version can be created while leaving the older version in place for continued development.
These few examples provide just a handful of situations where SCC can save the day. These situations don't even touch on the potential of refining later development by allowing a historical postmortem of a project to be completed, or the legal protection afforded by a thorough record of development to defend against accusations of code theft.
The SVN system can be installed in several different ways. If you prefer a command line interface, you can install the SVN core system after downloading from the following URL:
http://subversion.tigris.org/
If you would prefer a GUI front end, you can use one of these implementations:
TortoiseSVN — The most popular SVN implementation on the Windows operating system. TortoiseSVN (
http://tortoisesvn.tigris.org) integrates with the Explorer interface so that all functions are available directly at the file/folder level through the right-click context menu in the operating system.eSvn — A Qt-based Subversion client can be found at
http://esvn.umputun.com.JSVN — A proof-of-concept Java Swing client can be found at
http://jsvn.alternatecomputing.com.kdesvn — Another SVN client for KDE can be found at
www.alwins-world.de/wiki/programs/kdesvn.psvn.el — An SVN interface for Emacs can be found at
www.xsteve.at/prg/emacs.QSvn — Another Qt-based SVN client can be found at
http://ar.oszine.de/projects/qsvn.RapidSVN — A cross-platform (Linux-Win32-Mac OS X) GUI front end written in C++ using the wxWidgets framework can be found at
http://rapidsvn.tigris.org.SCPlugin — A Mac OS X plug-in for the Finder can be found at
http://scplugin.tigris.org.SmartSVN — A cross-platform (Linux-Mac OS X-Win32) client for SVN can be found at
www.syntevo.com/smartsvn. This is available as a free Foundation version and as a commercial Professional version. It makes use of the SVNKit library to provide a pure Java implementation of SVN.Subcommander — A cross-platform (Linux-Win32-Mac OS X) GUI front end written in C++ using the Qt framework can be found at
http://subcommander.tigris.org.svnX — A Mac OS X GUI front end to command line SVN can be found at
www.lachoseinteractive.net/en/community/subversion/svnx.tkSVN — A Tcl/Tk-based combined SVN and CVS client can be found at
www.twobarleycorns.net/tkcvs.html.WorkBench — Cross-platform (written with wxPython and pysvn) that provides an alternative object-oriented-style Python binding for the SVN library can be found at
http://pysvn.tigris.org.ZigVersion — A commercial Mac OS X SVN client can be found at
http://zigversion.com.Syncro SVN Client — A cross-platform front end can be found at
www.syncrosvnclient.com.
I recommend that you install TortoiseSVN if you're just getting started. It integrates perfectly with the Windows operating system and allows you to right-click on any file or folder to access the TortoiseSVN menu. Files can be updated and downloaded from the repository with a single click. You can download TortoiseSVN here:
http://tortoisesvn.tigris.org
The installation process is a simple three-step wizard. Once you install the application, you can right-click in any Explorer window. If you don't have any files or folders selected in an Explorer window, the first items in the File menu will provide access to all of the application functions.
Any SCC system needs a repository that acts like a vault to hold the current and archival copies of the files that have been registered with the application. For a single developer, a repository can simply be created as a folder on the local drive. Once the folder is created, SVN can be selected to register it as a repository, and it immediately creates the files and folders that will be needed by the application for housekeeping of the archive.
Create a folder and name it SVN_Repository. This folder may be located on your local drive or, for backup possibilities, may be located on a network drive that is scheduled for automated backup. If you would prefer to set up a SVN Server, you can easily find instructions on that process on the SVN site, although the configurations (particularly in regard to security) are beyond the scope of this book.
Right-click on the folder and, from the context menu, select the TortoiseSVN
Because SVN may be integrated with many development systems (most particularly, Eclipse), you will be able to use this repository from within your development environment.

Eclipse is a professional development system originally created by IBM before it was transferred to the open source community. Eclipse has a complete IDE, and an extension gives the system full support for PHP development. The Eclipse IDE is project-based, so all of the various files of a project can be coordinated.
There is a plug-in for the Eclipse development system called Subclipse that seamlessly integrates SVN version control into the development environment. With a simple right-click and menu selection within the environment, you can check in or check out files for your project.
Rather than downloading Eclipse and performing the necessary installation on all of the various plug-ins, it is generally a good idea to simply download the EasyEclipse for PHP distribution. This installer includes all of the key plug-ins for PHP development, including Subclipse. At the EasyEclipse Web site, you can find the installers for Windows, Mac OS X, and Linux:
www.easyeclipse.org
The package is more than 100MB, so it is best to download it using a fast connection. The installation procedure only requires two steps: accepting the license agreement and choosing the installation directory.
When you first run Eclipse, the application will prompt you for the location of your workspace folder. Select the "Use this as the default" option so that workspace will be used in future executions.
The first time Eclipse opens, it will bring up the Welcome screen, as shown in Figure 6-2.

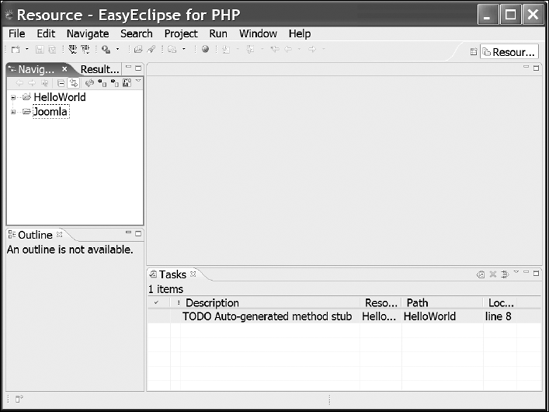
In Eclipse, the development environment is called the workbench. The main workbench window appears as shown in Figure 6-3. The configuration of the workbench display is determined by the current perspective. A perspective governs which windows (or parts, as they are known in Eclipse terminology) are displayed and the current resources available. In the upper-right corner of the window, you can see the perspectives shortcut bar that allows switching between current perspectives, as well as opening other ones. The title bar shows which perspective is currently displayed. In this figure, the Resource perspective is being used.
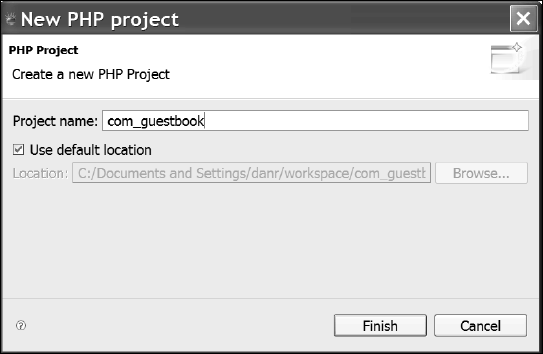
You can create a new project from a variety of templates (such as Java, Static Web, PHP, XML, and so on), all of which include basic templates that cater to the type of project that is being created. The type you will be using for Joomla development will be a PHP project. Before you create a new project, it is useful for Joomla development that all project files have the security code that prevents the file from being executed outside of the Joomla framework.
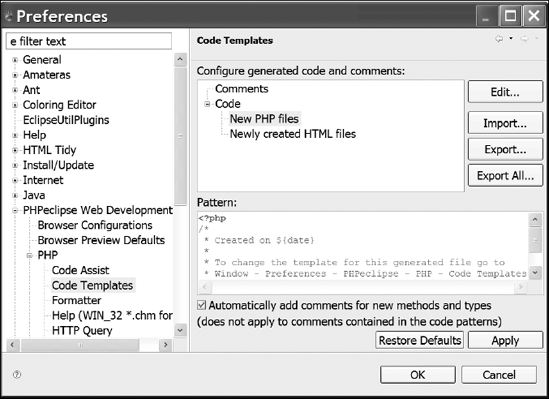
To begin to familiarize yourself with Eclipse, modify the default PHP template to use the Joomla security code. Under the Window menu, select the Preferences option. The preferences are stored within a tree inside the window, as shown in Figure 6-4. Expand the PHPeclipse Web Development node, then expand the PHP node, and finally click on the Code Templates item.
In the right pane of the Preferences window, you can see all of the available template files for this type of project. Select the "New PHP files" item and click the Edit button. You can now add any code you want to be presented in a new file. In this case, enter the following code:
// no direct access
defined('_JEXEC') or die('Restricted access'),
Click the OK button to save the changes. Now, any new PHP files created in Eclipse will automatically have run security included.
The Subclipse plug-in included with the EasyEclipse installation. If you have installed the standard Eclipse application, be sure to download and install Subclipse to give Eclipse access to the SVN functionality. Subclipse is available for download here:
http://subclipse.tigris.org
A traditional Web application that will provide an excellent example of component creation is a guestbook. Guestbook extensions allow users to post comments that can be viewed by other visitors to the Web site. Most often, guestbook entries are compliments to the person that runs the system. They also may be suggestions for improvement or (hopefully rarely) criticism.
In this case, you'll learn how to create a guestbook component that features both a front end part for display of the guestbook entries and the submission form for new postings, as well as an administrative part for editing the existing entries. Most components feature both of these parts to provide a user interface for users and a way to maintain the system from the Administrator interface.
Begin by creating the Guestbook project in Eclipse. Create a new project by selecting File
Guestbook spamming is a common problem. Spammers use automated routines to locate guestbook features on Web sites and post spam links that lead to their sites. These serve two functions for the spammer: the generation of traffic if guestbook viewers click on the link and increased page ranking in the search engines because of the reference link.
This guestbook component protects against spammers by only letting registered users post to the guestbook, and using a regular expression to strip characters such as those that would allow active HTML (including links) to appear in the text of the entry.
However, if you intend to use this component to allow unregistered users to post entries, you should implement a CAPTCHA routine. The CAPTCHA will display a distorted series of numbers and letters within a graphic image and then ask the user to enter the characters into a text field for confirmation. Spam programs can't decipher the warped letters, so they are unable to post the spam.
Routines to generate a CAPTCHA (which stands for "Completely Automated Public Turing test to tell Computers and Humans Apart") image are freely available on the Web. Simply go to a search engine and enter CAPTCHA PHP. You will find many versions of example code. At the time of writing, one such free PHP routine is available at www.cryptographp.com.
The front-end component is the display component. Since a component is a great deal more advanced than a module, a number of extensions (such as the Polls component) use a module to provide the front-end interface. However, modules can be limiting—especially if you want to allow interactive modification of data.
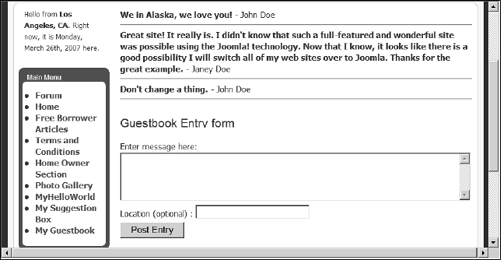
In the case of this guestbook component, the presentation will not only show all current entries, but below them will be a form to allow new entries, as shown in Figure 6-6. The front-end component will be accessible through a menu item.
As you construct the code, you may notice that all variables that are accepted (either from query string parameters or variables posted by a user) are obtained through the getVar() method, rather than through traditional PHP calls. The getVar routine provides valuable security features by scrutinizing the values submitted by the user. Hacker submissions (such as a SQL injection attack) are automatically detected and removed. Be sure to use this routine to take advantage of some of the security built into the Joomla framework.
When a Web-based program accepts a variable from the outside world, you need to protect against a hacker using a technique called an injection attack. Most common is the SQL injection attack. In a SQL injection attack, a complete SQL statement is appended to a SQL instruction. For example, a form might accept the user input of a last name. The hacker enters a last name that reads something like "smith; Select * from PasswordTable" and submits the form. If the PHP code simply inserts the last name input into the SQL update statement, the hacker SQL code will execute and display the information in the table (in this case, a password list). For more information on this and other security concerns, see Chapter 14.
Begin the coding for the project by creating the front-end component. This component will be displayed to registered users and will present all of the current guestbook entries. It will also allow the user to enter a new entry and submit it.
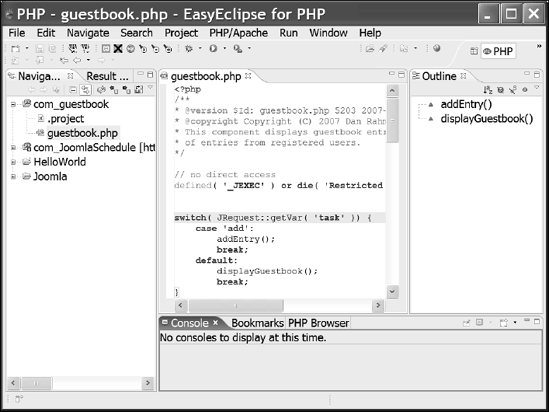
The component is broken into two functions: addEntry() and displayGuestbook(). The addEntry function is actually executed by the displayGuestbook function if the user enters form information and submits it. The displayGuestbook function queries the database and displays any entries it finds in the guestbook table. Following the entries, displayGuestbook includes a form that allows a user to make a new entry.
Note that the database query uses #__guestbook to reference the table name. Most likely, the table will be named jos_guestbook if the user has installed Joomla without changing the default prefix for tables. If the prefix has been changed, however, the database object will substitute the current prefix for the pound (#_) notation.
The guestbook table will not have been created the first time the component is displayed. Only after the first user posts an entry and the addEntry function is executed will the table exist on the server. Although the Create Table routine is executed each time against the MySQL server, if the table already exists on the server, the execution of the table creation command is aborted.
To create the component file, right-click in the Eclipse Navigator window on the project and select the New
<?php
/**
* @version $Id: guestbook.php 5203 2007-06-15 02:45:14Z DanR $
* @copyright Copyright (C) 2007 Dan Rahmel. All rights reserved.
* @package Guestbook
* This component displays guestbook entries and allows the addition
* of entries from registered users.
*/

// no direct access
defined( '_JEXEC' ) or die( 'Restricted access' );

// Check the task parameter and execute appropriate function
switch( JRequest::getVar( 'task' )) {
    case 'add':
        addEntry();
        break;
    default:
        displayGuestbook();
        break;
}

// Process data received from form.
function addEntry()  {
     // Get reference to database object
     $db =& JFactory::getDBO();
     // Get user id for recording with entry.
     $user =& JFactory::getUser();
     $uid     = $user->get(id'),


     // Get message and location from form posting values
     $fldMessage = JRequest::getVar('message') ;
     // Strip away anything that could be code, carriage returns, and so on
     $fldMessage = preg_replace("/[^a-zA-Z0-9 .?!$()'"]/", "", $fldMessage);
// Escape the message so it can be placed in the insert statement
$fldMessage = " ' " . $db->getEscaped($fldMessage) . " ' ";
$fldLocation = " ' " . $db->getEscaped(JRequest::getVar( location' )) . " ' ";
// Obtain userIP and store with entry for security reasons
$userIp = " ' " . $_SERVER['REMOTE_ADDR'] . " ' ";
$insertFields = "INSERT INTO #__guestbook " .
"(message, created_by, location, userip) " .
"VALUES (" . $fldMessage . "," . intval($uid) . "," .
$fldLocation . "," . $userIp . ");";
$db->setQuery( $insertFields, 0);
$db->query();
echo "<h1>Thanks for the entry!</h1>";
echo "<a href=index.php?option=com_guestbook>" .
"Return to guestbook</a>";
}
// Output a list of guestbook entries
function displayGuestbook() {
$db =& JFactory::getDBO();
// Query database and display guestbook entries
$query = "SELECT a.message, u.name" .
" FROM #__guestbook AS a" .
" LEFT JOIN #__users AS u ON u.id=a.created_by" .
" ORDER BY a.created DES"c;
$db->setQuery( $query, 0);
// Make sure rows were returned before outputting
if($rows = $db->loadObjectList()) {
foreach ($rows as $row)
{
// Encode text to HTML formatting
$rowMessage = htmlspecialchars($row->message, ENT_QUOTES);
echo "<b>" . $rowMessage . "</b>";
echo " - " . $row->name;
// Put horizontal rules between entries
echo "<hr />";
}
}
// Display guestbook entry form
?>
<h1 class="contentheading">Guestbook Entry form</h1>
<form id="form1" name="form1" method="post"
action="index.php?option=com_guestbook&task=add">
<P>Enter message here:<br />
<textarea name="message" cols="60" rows="4" id="message"></textarea>
</P>
<P>
<label>Location (optional) : </label>
<input name="location" type="text" id="location" />
</P>
<P><input type="submit" name="Submit" value="Post Entry" /> </P> </form> <?php } ?>
As soon as you've saved the file, Eclipse automatically evaluates the code contained in the file and updates the environment. For example, the Outline window on the right side of the workbench displays all functions or methods contained in the file, as shown in Figure 6-7. These outline entries act as hyperlinks, so if you click on one, the source code window will be immediately scrolled to that item. Click on the displayGuestbook() function. The editor window will highlight the function. Notice just to the left of the function header is a small circle with a minus (−) sign in it. If you click on the circle, the character will change to a plus (+) sign and the code will collapse as if it were the body of an outline. The ability to collapse code lines makes it convenient to manage large source files in Eclipse.
Click on the displayGuestbook() function. The editor window will highlight the function. Notice just to the left of the function header is a small circle with a minus (-) sign in it. If you click on the circle, the character will change to a plus (+) sign and the code will collapse as if it were the body of an outline. The ability to collapse code lines makes it convenient to manage large source files in Eclipse.
The Administrator portion of the component features three different execution paths. The displayEntries() function will create a display table of all the entries that exist in the guestbook table. Each entry in the table will include a link that can be used to edit that entry. Clicking on the link will recall the component, only this time with the task parameter of the query string is set to edit. That will cause the editEntry() function to execute and present a form with the values of the selected entry for modification. Once changes are complete and the administrator clicks the button to post the changes, the updateEntry() routine is executed to make the modifications to the table.
Create another new PHP File in the Eclipse interface, and name it admin.guestbook.php. This file will contain the administrative user interface for the component. Enter the following code:
<?php
/**
* @version $Id: guestbook.php 5203 2007-06-15 02:45:14Z DanR $
* @copyright Copyright (C) 2007 Dan Rahmel. All rights reserved.
* @package Guestbook
* This component displays guestbook entries and allows the addition
* of entries from registered users.
*/

// no direct access
defined( '_JEXEC' ) or die( 'Restricted access' );

// Check the task parameter and execute appropriate function
switch( JRequest::getVar( 'task' )) {
    case 'edit':
        editEntry();
        break;
    case 'update':
        updateEntry();
        break;
    default:
        displayEntries();
        break;
}

// Record data received from form posting
function updateEntry()  {
     // Set title in Administrator interface
     JMenuBar::title( JText::_( 'Update Guestbook Entry' ), 'addedit.png' );

     // Get reference to database object
     $db =& JFactory::getDBO();

     // Retrieve data from form
     $fldMessage = " ' " . $db->getEscaped(JRequest::getVar('message')) . " ' ";
     $fldLocation = " ' " . $db->getEscaped(JRequest::getVar( 'location' )) . " ' ";
     $fldID = " ' " . $db->getEscaped(JRequest::getVar( 'id' )) . " ' ";

     // Record updates to jos_guestbook table
     $insertFields = "UPDATE #__guestbook " .
" SET message=" . $fldMessage . ", " .
" location=" . $fldLocation .
" WHERE id = " . $fldID ;
$db->setQuery( $insertFields, 0);
$db->query();
echo "<h3>Field updated!</h3>";
echo "<a href='index.php?option=com_guestbook'>Return to guestbook list</a>";
}
// Display edit list of all guestbook entries
function displayEntries() {
// Set title in Administrator interface
JMenuBar::title( JText::_( 'Guestbook Entries' ), 'addedit.png' );
// Query database for guestbook entries
$db =& JFactory::getDBO();
$query = "SELECT a.id, a.message,a.created,a.created_by, u.name" .
" FROM #__guestbook AS a" .
" LEFT JOIN #__users AS u ON u.id=a.created_by" .
" ORDER BY created DES"c;
$db->setQuery( $query, 0, 10 );
$rows = $db->loadObjectList();
?>
<table class="adminlist">
<tr>
<td class="title" width=10%>
<strong><?php echo JText::_( 'EntryID' ); ?></strong>
</td>
<td class="title" width=50%>
<strong><?php echo JText::_( 'Entry' ); ?></strong>
</td>
<td class="title" width=10%>
<strong><?php echo JText::_( 'Created' ); ?></strong>
</td>
<td class="title" width=10%>
<strong><?php echo JText::_( 'Created by' ); ?></strong>
</td>
</tr>
<?php
foreach ($rows as $row) {
$link = 'index.php?option=com_guestbook&task=edit&id='. $row->id;
// Truncate row message for display
$rowMessage = $row->message;
if(strlen($rowMessage) > 100) {
$rowMessage = substr($rowMessage, 0, 100) . "...";
}
echo "<tr>" .
"<td>" . $row->id . "</td>" .
"<td><a href=" . $link . ">" . $rowMessage . "</a></td>" .
"<td>" . $row->created . "</td>" .
"<td>" . $row->name . "</td>" .
"</tr>";
}echo "</table>";
echo "<h3>Click on an entry link in the table to edit entry.</h3>";
}
function editEntry() {
JMenuBar::title( JText::_( 'Guestbook Entry Editor' ), 'addedit.png' );
$db =& JFactory::getDBO();
$query = "SELECT a.id, a.message,a.created,a.created_by,a.location" .
" FROM #__guestbook AS a" .
" WHERE a.id = " . JRequest::getVar( id' );
$db->setQuery( $query, 0, 10 );
If($rows = $db->loadObjectList()) {
?>
<form id="form1" name="form1" method="post"
action="index.php?option=com_guestbook&task=update">
<P>Enter message here:<br />
<textarea name="message" cols="60" rows="4" id="message"><?php
echo $rows[0]->message;
?></textarea>
</P>
<P>
<label>Location (optional) : </label>
<input name="location" type="text" id="location"
value='<?php echo $rows[0]->location; ?>'
/>
<input name="id" type="hidden" id="id"
value='<?php echo $rows[0]->id; ?>'
/>
</P>
<P>
<input type="submit" name="Submit" value="Record Changes" />
</P>
</form>
<?php } } ?>Save the file, and you will notice the same postprocessing will occur to file the Outline window.
The descriptor file for this component is more complicated than the simple one created for the Hello World component. This component has both front-end and Administrator files to install.
Since the Eclipse interface doesn't have a default new XML file selection, choose the File
<?xml version="1.0" encoding="utf-8"?>
<install version="1.5.0" type="component">
     <name>Guestbook</name>
     <author>Dan Rahmel</author>
<version>1.0.0</version>
<description>Presents a guestbook and lists all of the current entries
along with an entry form at the bottom for registered user
additions.</description>
<files>
<filename component="com_guestbook">
guestbook.php</filename>
</files>
<install>
<sql>
<file driver="mysql" charset="utf8">install.sql</file>
</sql>
</install>
<uninstall>
<sql>
<file driver="mysql" charset="utf8">uninstall.sql</file>
</sql>
</uninstall>
<administration>
<menu>Guestbook</menu>
<files>
<filename component="admin.guestbook">
admin.guestbook.php</filename>
<filename>install.sql</filename>
<filename>uninstall.sql</filename>
</files>
</administration>
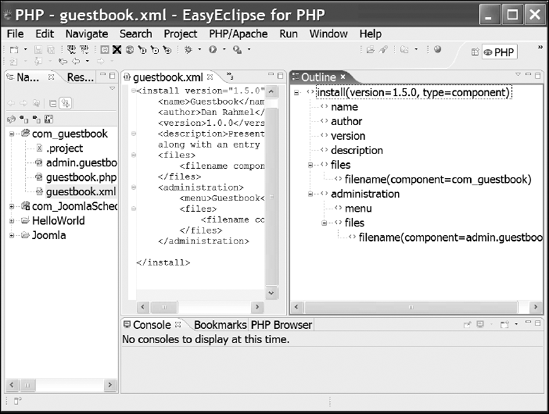
</install>When you save this file, the Outline window will update to show the entire XML schema, as shown in Figure 6-8. Clicking on any of the elements of the schema will highlight that element in the editor window. Eclipse understands the XML format, so if you right-click in the editor window, the context menu provides an option titled Validate. Selecting this option will validate the formatting of the XML and flag errors in the file with small red icons in the left margin.
This XML descriptor file is different from previous descriptors in that it references two SQL script files to create the guestbook table on install, and remove it when the component is uninstalled. You will need to create these two files that will be included in the package.
Create a new file called install.sql, and enter the following code:
CREATE TABLE IF NOT EXISTS '#__guestbook'
          ('id' INTEGER UNSIGNED NOT NULL AUTO_INCREMENT,
          'message' text NOT NULL, 'created_by' INTEGER UNSIGNED NOT NULL,
          'location' VARCHAR(45), 'created' TIMESTAMP NOT NULL,
          'userip' VARCHAR(16), PRIMARY KEY('id'))
Create another new file called uninstall.sql, and enter the following code:
DROP TABLE IF EXISTS '#__guestbook'
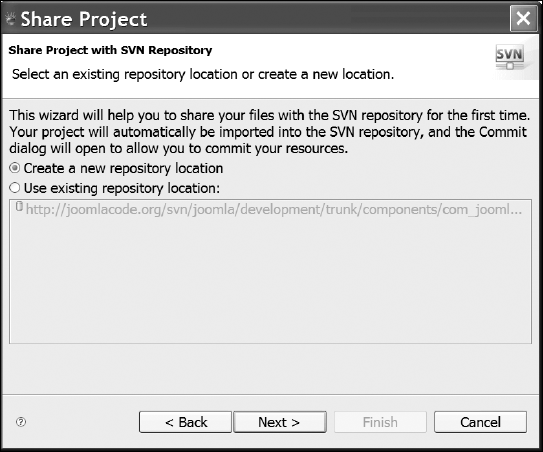
To add the project to the repository that you created earlier, right-click on the project and, from the context menu, select the Team
Select the "Create a new repository location" option, and click the Next button. You will be prompted for the URL of the location of the repository. As of this writing, there was no Browse button available, so you will have to enter the path by hand.
Once complete, your project will be archived in the repository. You can right-click on the individual files to store changes. You can also set a version tag when you have made comprehensive enough changes to warrant it.
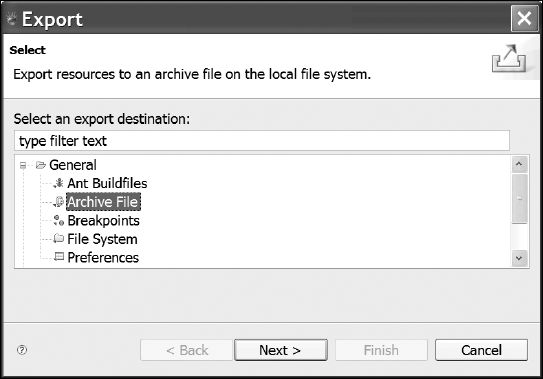
Your project is now ready for archiving and installing on the Joomla system. Eclipse can create the archive file for you! In the Navigator window, right-click on the com_guestbook project, and select the Export... option. The Export options window will be displayed, as shown in Figure 6-10. Expand the General category, select the Archive File option, and click the Next button.
The Archive file option box will display a number of different settings that can be used in creating the archive. In the file selection box, you should see your project checked in the left pane and all of the files selected in the right pane. Unless you want to deselect the project file for inclusion in the archive (it won't hurt anything if it is there), the default selections are fine.
Leave the default selections of "Save in zip format" and "Create directory structure for files." In the "To archive file" text box, enter or browse to a path on your local drive. Title the file com_guestbook.zip, and click the Finish button. Eclipse will create the archive file and store it on the local drive.
Open the Extension Manager in the Joomla Administrator interface, and install the file. The archive created by Eclipse is properly formatted for the Joomla framework to place all the files into their proper locations. One file will be placed in the components folder, while the XML descriptor and the Administrator interface component will be placed in the administratorcomponents folder. In the future, you can edit them in these folders to support live development where testing code only requires a browser refresh.
When the Extension Manager informs you that the installation has succeeded, you should be able to see the Guestbook entry in the Components menu, as shown in Figure 6-11. You don't need to access it right now, since there are no guestbook entries to manage.
Create a menu item to the Guestbook control on the Main Menu. When the component list is presented for the new menu item, you should see the Guestbook item. Select Guestbook, and when the parameter screen is displayed, name the menu entry My Guestbook. For security reasons, be sure to set the menu so it will only be displayed to Registered users, as shown in Figure 6-12.
To try the guestbook, open a browser window and click on the My Guestbook link. There will be no entries, so only the entry form will be displayed. Enter a message in the guestbook as shown in Figure 6-13, and click the Post Entry button to send it into the system.
The guestbook will acknowledge your entry and provide a return link. Click the return link, and you should see the guestbook entries. With some entries in the jos_guestbook table, return to the Administrator interface. Select the Guestbook option from the Components menu. You'll see a row for each entry in the guestbook, as shown in Figure 6-14.
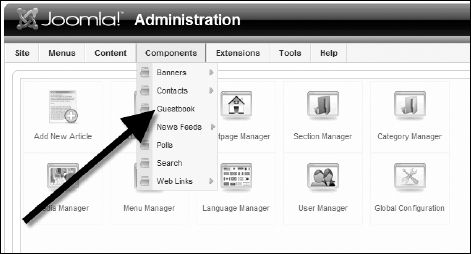
Figure 6-11. The Components menu will display the Guestbook entry that provides access to the guestbook administrative interface.

Figure 6-12. Restrict the users that may access the control to Registered users to prevent spammers from abusing the guestbook.

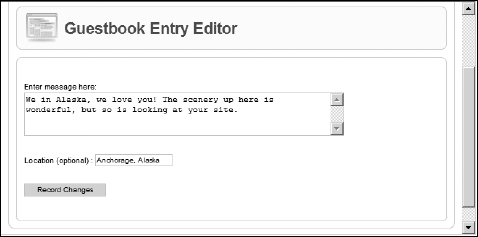
Each row of the table has the first 200 characters of the entry displayed as a link. Clicking on the link will take you to the edit form for that entry, as shown in Figure 6-15.
Any changes to the entry can be posted back into the database by clicking on the Record Changes button. For both security and convenience, nearly all characters beyond alphanumeric and basic punctuation are stripped from the entry when the user enters it through the front-end form. No such protection occurs through the Administrator interface form. It is possible that the Administrator will want to add any number of extras, so that functionality is left intact for those with administrative access.
The guestbook component has both a front-end and administrative interface, creates a custom table to store data, and accesses the data source for a variety of different activities (query, insert, and update). These features make it the perfect foundation from which you can build other database-centric components.

One of the aspects of development that programmers spend the least time executing is creating documentation. It can be a tedious process not only to create documentation but also to keep it up to date as the development progresses and the application evolves. A lack of documentation, however, can mean that the code is difficult to manage in the present and to maintain in the future.
To minimize this problem, the phpDocumentor was created. An open source application, phpDocumentor allows developers to place basic documentation and application structuring information directly in the source code itself. The Documentor can access all of the source code files and harvests the information to generate documentation. The program can output the documentation in a variety of formats, including HTML, PDF, CHM (compiled HTML), and XML.
Since the generation of the documentation is automated, it is possible to simply execute phpDocumentor at any time to create accurate, up-to-the-minute documentation of the current project. That means that the documentation can be kept current, and poorly documented portions of the code can be seen instantly in the overview (and, thus, targeted for supplementing).
Installing phpDocumentor on your Web server is extremely easy. The program doesn't need any database access or rendering technology, so any Web server that can execute PHP code can use it.
First, you will need to download the archive of the latest version from SourceForge. You'll find the link at the phpDocumentor site here:
http://www.phpdoc.org
All you need to do is extract the files and folders into a folder on the Web server. Be sure that you don't locate it in a place that can be addressed by the public Internet, since it is not a secure application. On my staging server, I placed the files in a folder called phpdoc at the root of the Web server. To access the administrative interface, just enter a URL such as the following:
http://localhost/phpdoc
The Web interface displays a Welcome screen with a number of menus (Introduction, Config, Files, Output, and so on). It also displays the working directory and the current status of the application. Generally, the status will read "Awaiting your command."
In this chapter, you'll be using phpDocumentor through the Web interface. However, it can also be executed using the command line interface. If you choose to use it through the command line, you might use the Pear installer, which makes the setup much simpler.
You may have noticed that the source code in this book usually begins with a C++-style comment block that looks something like this:
/**
 *
 */
These comment sections are called DocBlocks and are harvested by phpDocumentor for inclusion in the code documentation. For complete documentation, one DocBlock should precede each element, including functions, classes, methods, and procedures.
The documentation is organized according to packages. A package is a conceptual grouping of classes, methods, and functions. You can explicitly define the package location of an element by using the @package tag. Within a master package, subpackages may also be defined with the @subpackage tag. Here is an example of some Joomla source code that is placed into the Joomla package and the Content subpackage:
/**
* @package Joomla
* @subpackage Content
*/
class TOOLBAR_content
{
     function _EDIT()
     {
To see how all of this works, you can execute phpDocumentor on Joomla itself, since it has the necessary DocBlocks to create basic documentation. Before you do, however, create a directory on your Web server to store the documentation files. The application generates numerous HTML files, so it's best to keep them centralized within a folder.
Joomla regularly updates the complete output of phpDocumentor for the Joomla framework. You can access it on the web at
http://api.joomla.org.
Open the phpDocumentor Web interface, and click on the Output tab link at the top of the page. The first field is labeled Target and specifies the directory where the parsed files will be written. Enter the directory path for the folder that you created a moment ago.
Click on the Files tab link to configure the files that will be parsed by the program. The includes directory of the Joomla system contains numerous classes that have DocBlocks. Enter a path to this folder, which, on the Windows platform, may look something like this:
C:Program FilesApache Software FoundationApache2.2htdocsincludes
To begin the process, click on the Create (new window) button. It may be a few minutes before the window is displayed, since Joomla has a great deal of code that must be processed. When complete, the status output of the documentation process will be presented. This window is very helpful when you have just begun using phpDocumentor because it will contain a list of errors or problems that occurred during the compilation.
Open the directory where the documentation was output, and open the index.html in a browser window. You will see a breakdown of the Joomla files contained in the includes directory. In the left column, there are links to each of the packages defined in the files, followed by a list of files documented, and, finally, the classes found within the packages.
In the classes section, click on the JSite link. You will see the class overview, as well as a list of methods for the class. The file contains class details (including comments from the development team), a breakdown of each class variable and method, and class constants.
Any development project can benefit greatly from having good programmer-level documentation. The few extra moments required to add this information to a file will reap significant rewards when later development is attempted. Be sure to read the phpDocumentor instructions because there are many other features such as the ability to include/exclude information for multiple versions of the documentation (one for developers and another for users, for example) and the functionality to include separate documentation files so source code can remain clean of extensive commentary.
Components are perhaps the most common type of extension in Joomla because they have extensive display capabilities and the capability to include an administrative interface. By using an advanced development system such as Eclipse, coupled with the capabilities of SVN, you can create components by doing the following:
Customizing the default Eclipse templates to include any necessary foundation code.
Defining both a front-end and administrator interface for the functionality desired.
Archiving past versions of your source files with the source code control available through the SVN interface available to Eclipse.
Refining the guestbook interface to include any other form items.
Upgrading the guestbook administrative interface to further integrate with the Joomla framework.
Rendering documentation using comments included in the source code and then processing the files using phpDocumentor.
The components you created in this chapter provide traditional Web interaction. The flowering of the coordination of a number of technologies known as Ajax lies at the heart of the new interactive Web dubbed Web 2.0. In Chapter 7, you will use Ajax technology to create a Joomla application that uses asynchronous access for dynamic user interaction.