
Ajax (which stands for Asynchronous JavaScript and XML) combines a powerful set of technologies for Web 2.0 sites. Using Ajax technology, you can make the user experience far more interactive than previous Web site implementations. In the past, changes to parameters or the selection of buttons on a Web page required the changes be sent back to the Web server for an update. The browser would have to wait for the entire modified page to be returned to display the revisions. Using that process, user interaction with a Web application was fairly clunky.
In a Web application designed with Ajax, near-immediate interaction is possible. User-interface requests such as changing the sort order of a table by clicking on the column headings can be handled on the client with little delay. If the interaction involves requesting additional information (such as help text on a line item), rather than requesting an update of the entire page, Ajax technology allows small amounts of data to be exchanged with the server. Updates can happen dynamically, so the entire Web page doesn't need to be reloaded.
Joomla has incorporated functionality that promotes Ajax technology. A Joomla site can support Ajax background information exchange for a more dynamic and responsive user experience.
Contrary to all of the press regarding the recent birth of Ajax, it is not a new technology. Instead, it is a method of using existing technologies that is nearly ubiquitous to accomplish greater user interaction than in the past. An Ajax system combines the existing Web technologies of HTML, Cascading Style Sheets (CSS), JavaScript, Document Object Model (DOM), XML, and Extensible Stylesheet Language Transformation (XSLT). JavaScript code is executed on the user browser, and it communicates with the Web server in the background. Information can be sent and retrieved, and can be formatted dynamically for displaying in the browser window.
A very simple and increasingly common application of Ajax is the mouse-over pop-up information window such as the one used by Netflix (Figure 7-1). If the user moves the mouse cursor over the title or picture of a product, a pop-up window displays the associated information and images. In the case of Netflix, the information might include a picture of the movie box cover, a summary of the plot, the rating, starring actors, and so on.
The information displayed in the small window is not embedded in the Web page source. Rather than slowing the initial page downloading with lots of information the user will never mouse over, only the basic page is sent with the necessary logic to draw the pop-up and retrieve the information from the server. When the mouse over occurs, JavaScript code activates to query the server for the new information, and then populates the pop-up window with the new information.
For this Ajax magic to happen, a number of pieces of technology must work in conjunction. The browser must be capable of running JavaScript to detect user events and place a request to the server. The server must be able to respond with the specifically formatted information that matches the JavaScript request. JavaScript code must be able to receive the new information, process it, and format it for display via the browser's DOM.
While this may seem like a daunting number of functions, most of the technology is extensively deployed. The two dominant browsers, Internet Explorer (IE) and Mozilla Firefox, have included the features to perform the necessary client-side execution for the last several versions. That means that a large majority of existing browsers can execute Ajax content. On the server side, Joomla has included in the JDocument framework the necessary options so that the Joomla server can respond to an Ajax request through a custom component.

An Ajax system can become complicated very quickly. There are many pieces to the puzzle, so it is easy to get lost at the beginning. Therefore, a beginning demonstration of rudimentary Ajax technology will be useful. This example will essentially provide a "Hello World" style Ajax pop-up to illuminate how the various pieces of the puzzle fit together.
The demonstration will consist of a single Web page that has a bordered paragraph with the text "My Product." When the mouse cursor passes over the paragraph, JavaScript executes a query to a Joomla server for a component. That returns a simple message regarding the inventory status of the product. The received message is displayed in an alert box, as shown in Figure 7-2.
This primitive example supplies a skeleton of a Joomla Ajax solution that you'll soon extend to provide a more substantial Ajax solution. However, it will include all of the most important pieces that will mirror the structure of advanced Ajax applications.
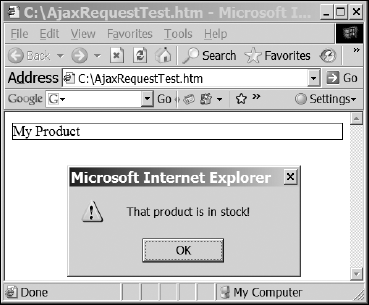
Figure 7-2. The message displayed in the alert box has been dynamically requested and received from a Joomla component.
The first piece in the application is the Joomla component. A Joomla component can be directly queried so that it will provide output without any menus or the other user-interface items that usually surround it. Therefore, the component only must output a single line of text that the Ajax application will display.
Begin by creating a folder com_productinfo on your local drive. Inside the folder, create a file productinfo.php and enter the following code:
<?php
// no direct access
defined( '_JEXEC' ) or die( 'Restricted access' );

echo 'That product is in stock!';
?>
You will need a XML descriptor file to allow Joomla to install the component. Create a file called productinfo.xml and enter the following code:
<?xml version="1.0" encoding="utf-8"?>
<install version="1.5.0" type="component">
     <name>ProductInfo</name>
     <version>1.5.0</version>
    <description>Product Info component for Ajax queries</description>
    <files>
          <filename component="com_productinfo">productinfo.php</filename>
    </files>
</install>
Archive the folder containing the two files as com_productinfo.zip and use the Extension Manager to install it into the Joomla system. You can test the component by performing a direct URL query by typing the following address into your browser:
http://localhost/index.php?option=com_productinfo&format=raw
If the component is working properly, you will see the single line of text output by the component in the browser window, as shown in Figure 7-3. If you view the source of the window, the HTML code will show nothing except the exact text. By setting the format to raw (the second query parameter), Joomla executes the specified component and returns only the output that it has generated. This method is exactly how the Ajax Web page requests information for display.

The Ajax Web page will call upon the component for the product information and then display this information in an alert window. This file will be more complicated because it includes three steps of the Ajax process: user interaction, information request, and information receive/display.
The user interaction consists of a simple onMouseOver event that will be constructed to execute a JavaScript function. In this case, the event will be set up to activate when the user places the mouse cursor within the area specified by a paragraph or <p> tag.
The information request involves executing the displayAjax() function and passing it the URL that will provide the requested information. This function will open an XML request object (data is primarily exchanged using XML) and send a request to the URL that was passed to it.
The displayAjax function first creates an XML request object. As with most browser code, the execution must detect the browser where it is being executed, and then use logic specific for that one. The IE browser both pioneered the XML request interface (through an ActiveX object) and then violated the standard by not implementing the common interface. While this has been resolved in the later versions of IE (post IE-6), the code must take into account the large number of older IE browsers in use.
Once created, the code sets the XML request object's event return function to handle the results, opens the connection, and sends the request. When it sends that request, it will pass a function pointer to indicate the routine to execute when the request is complete. Remember that the first A in Ajax stands for asynchronous, so the rest of the Web page can continue functioning without waiting for the request to be answered.
When the displayReturn() function is activated, it first checks the returned information. The request might have timed-out or been given some other error. The function makes sure there is a valid message, and then displays the message in an alert box.
To see Ajax in action, enter the following code into a text editor, save it as AjaxRequestTest.html, and open it in your browser:
<!DOCTYPE html PUBLIC "-//W3C//DTD XHTML 1.0 Strict//EN"
   "http://www.w3.org/TR/xhtml1/DTD/xhtml1-strict.dtd">
<html xmlns="http://www.w3.org/1999/xhtml">
<head>
<meta http-equiv="Content-Type" content="text/html; charset=UTF-8" />
<script type="text/javascript" language="javascript">

// Create XML request variable
var myRequest = false;

function displayAjax(myURL) {
     // Clear myRequest
     myRequest = false;

     // For browsers: Safari, Firefox, etc. use one XML model
     if (window.XMLHttpRequest) {
myRequest = new XMLHttpRequest();
if (myRequest.overrideMimeType) {
myRequest.overrideMimeType('text/xml'),
}
} else if (window.ActiveXObject) {
// For browsers: IE, version 6 and before, use another model
try {
myRequest = new
ActiveXObject("Msxml2.XMLHTTP");
} catch (e) {
try {
myRequest = new
ActiveXObject("Microsoft.XMLHTTP");
} catch (e) {}
}
}
// Make sure the request object is valid
if (!myRequest) {
alert('Error: Cannot create XMLHTTP object'),
return false;
}
// Link to display function activated when result returned
myRequest.onreadystatechange = displayReturn;
// Open the URL request
myRequest.open('GET', myURL, true);
// Send request
myRequest.send(null);
}
function displayReturn() {
// Check to make sure result came through, 4=complete
if (myRequest.readyState == 4) {
// Check HTTP status code
if (myRequest.status == 200) {
// Display the responseText
alert(myRequest.responseText);
} else {
alert('There was a problem with the request.'),
}
}
}
</script>
</head>
<body>
<p style="border:1px solid black;"
onmouseover=
"displayAjax('http://localhost/index.php?option=com_productinfo&format=raw')">
My Product
</P>
</body>
</html>Place this file at the root directory of your Joomla server to execute it. Note that the URL in the displayAjax() function code currently points to the server activated on localhost. Change the URL to your site URL if you are running the file on a remote server. . When you move the mouse cursor over the paragraph, the message will be displayed in an alert. That wasn't so bad, was it?
With Firefox, the cross-site scripting attack protection will prevent the code from executing on a local drive. When you try to access the page, you will receive an error such as "Error: uncaught exception: Permission denied to call method XMLHttpRequest.open" and the browser will refuse to display the page. Simply transfer the file to your Web server and access it there to have Firefox display it.
With a basic implementation complete, it is time to provide a more complex example. Most real-world Ajax solutions require a combination of dynamic content generation and Ajax interactive technology to allow more information to be retrieved from the same system. In the next sample, you'll create an entire Joomla-based Ajax system.
Using that basic application as a foundation, you'll need to augment the component to make it a truly useful data-retrieval black box. The server-query component presented here will provide the same functionality as the pop-up shown on the Netflix site, but it will return Joomla article content instead of film information. Under this implementation, when the user moves the mouse cursor over an article title displayed by the custom component, a small pop-up window will display the article title and the first 200 characters of the article text.
While this application is not especially useful itself, it can be readily adapted to almost any use. It will demonstrate how to request a dataset from a Joomla component that, once received by the client browser, can be displayed in a pop-up window. This can be applicable to almost any type of site—from an e-commerce solution where extra product display information is presented to the user, to an email application where new messages can be downloaded without the need to refresh a page.
Begin by duplicating the com_productinfo folder and naming the copy com_articleinfo. Rename the productinfo.php and productinfo.xml to read articleinfo.php and articleinfo.xml, respectively. In the articleinfo.php, change the code to match the following:
<?php
/**
* @version $Id: com_articleinfo.php 5203 2007-07-27 01:45:14Z DanR $
* This component will process a request parameter 'articlenum'
* to query the article database and return the title and
* article text in XML format.
*
*/
     // no direct access
     defined( '_JEXEC' ) or die( 'Restricted access' );

     // Get request ID from query string variable
$articleNum = intval(JRequest::getVar( 'articlenum' ));
// Define default values if query fails
$articleTitle = "Error";
$articleBody = "Error";
// Get instance of database object
$db =& JFactory::getDBO();
// Create query to return id, title, and text of article
$query = "SELECT a.id, a.title,a.introtext
" .
" FROM #__content AS a
" .
" WHERE a.id =" . $articleNum . "
";
$db->setQuery( $query, 0);
// Execute query
if ($rows = $db->loadObjectList()) {
// Get first row returned
$row = $rows[0];
// Load article title and text into variables
$articleTitle = $row->title;
$articleBody = $row->introtext;
// Strip all the HTML from the article text
$articleBody = strip_tags($articleBody);
// Strip all non-alpha, numeric, or punctuation
$articleBody = preg_replace(
"/[^a-zA-Z0-9 .?!$()'"]/", "", $articleBody);
// If length is > 200, truncate length
if(strlen($articleBody) > 200) {
$articleBody = substr($articleBody, 0, 200);
}
}
// Return XML of article title and article text
echo "<article><title>" . $articleTitle . "</title><body>" .
$articleBody . "</body></article>";
?>Once you've completed that code, change the XML descriptor file to point to the new code file and name the component. Don't forget to modify the component attribute in the filename tag. I've forgotten before, and when you try to install, Joomla informs you that the component is already installed!
Create an archive of the folder containing the two files named com_articleinfo.zip, and use the Extension Manager to install it into the Joomla system. While you're in the Administrator interface, go to the Article Manager and write down the Article ID of an existing article. You'll see the Article ID values in the main article list in the column titled ID.
Open a Web browser window and enter the following URL:
http://localhost/index.php?option=com_articleinfo&format=raw&articlenum=36
Modify the URL to match your server URL and change the articlenum parameter value on the end to reflect the Article ID number you found in the Article Manager. The browser should display the first 200 characters of the body of the article. Pretty cool, eh? Now that the code works, you can take a close look at it to see how it actually functions.
The first portion of the component performs general setup functions and receives the Article ID sent by the request. In the code, the JRequest::getVar() method is called to obtain the value sent in the query string and then places it in the $articlenum variable. The getVar() method actually executes several functions. Most importantly, it can receive parameter values from all of the different passing methods (GET, POST, and so on). So, whether your component needs to obtain information from a query string or a form posting or elsewhere, it can look for the parameter using this single method.
Also very important, the method will perform basic processing on the value to strip what may be a SQL injection attack (see the section, "Security Risks," later in this chapter) or other hacker attempt. This provides a very important security layer function, so it is best to use this method rather than grabbing the input yourself through a PHP function.
Just in case something slipped through the getVar() method, the intval() function converts the value to an integer rendering anything passed to a harmless number. After the $articlenum variable is set, the $articleTitle and $articleBody are set to default values.
The query uses the standard getDBO() method to obtain a database object reference. The query string is constructed to return only the ID, title, and introtext (which contains the article body) from the database. Note that the FROM statement uses the reference #__content instead of a specific table reference such as jos_content. When the query is executed, Joomla will automatically replace the pound sign (#) and underscores with the necessary table prefixes. This frees the developer from the need to determine the user-configured prefix.
The query is then set and executed. If the object list contains at least one row, the routing processes the record. First, a $row reference is created to the first object in the $rows array. If there are more records returned by the query, the code will simply ignore them.
The routine will need to pass back the information in plain text, so the function calls that follow strip any HTML tags and then non-alpha characters (that will make the pop-up fault). After the content is stripped down to only the basic alphabetic, numeric, and punctuation characters, the string is truncated to a maximum of 200 characters. Since Ajax is supposed to be fast and interactive, it is good to attempt to minimize the amount of information that is returned to the requesting client.
Since only two pieces of information are needed by the client (the title and article summary), there is no need to create a complicated XML model. The echo statement constructs a simple XML tree with a parent element of article that contains a title field and a body field. If multiple records were to be returned, they could easily be encapsulated within a parent articles element.
That's it! The component receives the requested record in a query string, takes the requested articleID and searches the database for that article, renders down the information to basic plain text, and sends it back in a rudimentary XML tree. The module will be more complicated, because it needs to handle three parts of the Ajax relation: user-interface interaction, Ajax request, and information display.
For the module that will display returned Ajax information, you're going to perform the best sort of code reuse. Joomla is overflowing with routines and objects that can be addressed and used within your own Joomla extensions. In this case, rather than implementing a pop-up window from scratch, the code will use the pop-up routine already used by the Joomla system for display.
Joomla includes an excellent pop-up window routine that allows everything from customizing color to setting the display location configuration. The JavaScript routine is overLIB, written by Erik Bosrup (www.bosrup.com/web/overlib), who has graciously allowed it to be included in the Joomla installation. You can visit his Web site for the latest version if you're going to implement it outside of Joomla.
To use it within Joomla, you need add only a single line:
<script type="text/javascript" src="includes/js/overlib_mini.js"></script>
From this reference, you can see the code is stored in the /includes/js/ directory. You should take a look at the code when you have some spare time so that you can see all of the parameters and features it includes.
For your module, create a folder named mod_articleajax. In the folder, create a file named mod_articleajax.xml and enter the following code:
<?xml version="1.0" encoding="utf-8"?>
<install type="module" version="1.5.0">
     <name>Article Ajax</name>
     <version>1.5.0</version>
     <description>This module will display links to 5 current articles. <p />
          Each link has an onMouseOver event to activate an
          Ajax routine to retrieve article information from
          com_articleinfo.
     </description>
     <files>
          <filename module="mod_articleajax">mod_articleajax.php</filename>
     </files>
</install>
This code is the simplest XML descriptor file. You will be able to expand it to include other files and parameters if you want to enhance the application.
Create a file within the folder called mod_articleajax.php and enter the following code:
<?php
/**
* @version $Id: mod_articleajax.php 5203 2007-07-27 01:45:14Z DanR $
* This module will display links to 5 current articles.
* Each link has an onMouseOver event to activate an
* Ajax routine to retrieve article information from
* com_articleinfo.
*/
?>
<script type="text/javascript" src="includes/js/overlib_mini.js"></script>
<script type="text/javascript">
     // Create XML request variable
     var myRequest = false;

function displayAjax(tempArticleID) {
     // Setup component query URL
     var myURL =
      'http://localhost/index.php?option=com_articleinfo&format=raw&articlenum='
      + tempArticleID;
     // Clear myRequest
     myRequest = false;

     // For browsers: Safari, Firefox, etc. use one XML model
     if (window.XMLHttpRequest) {
          myRequest = new XMLHttpRequest();
          if (myRequest.overrideMimeType) {
               myRequest.overrideMimeType('text/xml'),
          }
     } else if (window.ActiveXObject) {
          // For browsers: IE, version 6 and before, use another model
          try {
               myRequest = new ActiveXObject("Msxml2.XMLHTTP");
          } catch (e) {
               try {
                    myRequest = new ActiveXObject("Microsoft.XMLHTTP");
               } catch (e) {}
          }
     }

     // Make sure the request object is valid
     if (!myRequest) {
          overlib('Error: Cannot create XMLHTTP object'),
          return false;
     }

     // Link to display function activated when result returned
     myRequest.onreadystatechange = displayReturn;
     // Open the URL request
     myRequest.open('GET', myURL, true);
     // Send request
     myRequest.send(null);
}

function displayReturn() {
     // Check to make sure result came through, 4=complete
     if (myRequest.readyState == 4) {
          // Check HTTP status code
          if (myRequest.status == 200) {
               // Get head XML object
               var article =
myRequest.responseXML.getElementsByTagName('article'),
// Get title and body elements
myTitle =
article[0].getElementsByTagName('title')[0].firstChild.nodeValue;
myBody =
article[0].getElementsByTagName('body')[0].firstChild.nodeValue;
// Display in popup window
overlib(myBody,CAPTION,myTitle,BELOW,RIGHT);
} else {
// Problem, popup an error
overlib('There was a problem with the request.',
CAPTION,'Retrieval Error',BELOW,RIGHT);
}
}
}
</script>
<small>Ajax enabled module</small><br />
<?php
// no direct access
defined( '_JEXEC' ) or die( 'Restricted access' );
// Define local variables
$db =& JFactory::getDBO();
$user =& JFactory::getUser();
$userId = (int) $user->get(id'),
// Define date parameters to ensure articles are available
$nullDate = $db->getNullDate();
$now = date('Y-m-d H:i:s', time());
// Create search string to display only published articles
$where = 'a.state = 1' .
" AND (a.publish_up = ' " . $nullDate .
"' OR a.publish_up <= '" . $now . "')" .
" AND ( a.publish_down = '" . $nullDate .
"' OR a.publish_down >= '" . $now . "')";
// Create query
$query = "SELECT a.id, a.title
" .
" FROM #__content AS a
" .
" WHERE " . $where . "
" .
" AND a.access <= " . $userId;
// Execute query to return a maximum of 5 records
$db->setQuery( $query, 0,5);
if ($rows = $db->loadObjectList()) {
// Process each article row
foreach ( $rows as $row )
{
// Process article title
$artTitle = JText::_($row->title);// Create mouseover event to call displayAjax function
echo "<span onmouseover=displayAjax(" . $row->id . ");
onmouseout=nd(); >";
// Create link for the current article
echo "<a href=index.php?option=com_content&view=article&id=" .
$row->id . "&Itemid=44>" . $artTitle . "</a><br /></span>
";
}
}
// Display error message if db retrieval failed.
echo $db->getErrorMsg();
?>As with the earlier Ajax code, if you are not running this file on a localhost Web server, you will need to modify the URL that is used in the displayAjax() function.
Once you have the entire code ready, package the module in an archive named mod_articleajax.zip and use the Extension Manager to install it. If you keep the module position set to left, it will appear in the main window.
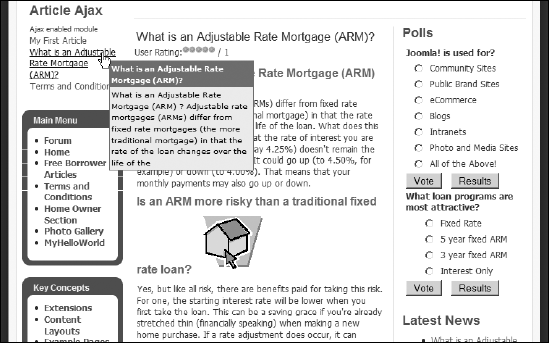
Open a browser window, and access the main page of your site. When the mouse cursor is moved over each of the links, a pop-up window will appear that shows the title and the first 200 characters of the contents of the article, as shown in Figure 7-4. As you can see, Ajax adds a great deal of instantaneous feedback to a user interface.
With the power of this simple example, you most likely want to get started creating your own Ajax solutions. This code, however, is quite a bit more complex than the component. You'll need to review it closely to fully understand the function.
The module code begins with the script statement needed to add the overLIB functionality to the module. With the overLIB library available, a call to the overLIB() function will display the pop-up window. There are a great number of parameters that you may set to control the window display, including height, window, color, window location, and text handling.
The displayAjax() and displayReturn() functions follow the script statement for the overLIB library. The displayAjax function is nearly identical to the one used earlier in the simple product info example. The only significant change is the argument passed to the function. Instead of accepting a URL, the function requires the articleID, from which it creates the URL to access the com_articleinfo component.
In contrast to displayAjax(), the heart of the displayReturn() function is much different. Instead of simply retrieving text from the component (using the responseText object), the new code accesses the responseXML object to gain access to the XML data object tree. The code first creates a reference to the article element. It then retrieves the values of the title and body elements, using the nodeValue property.
The text from these elements is used to call the overLIB() function, submitting them as body text and a caption for the presentation. That's all that is needed for the retrieval portion of the Ajax module.
The user-interface portion is slightly more complex because the Joomla database must be accessed to retrieve the appropriate article references.
The article code cannot simply grab the current article titles and put them in the module display. Since the code is directly addressing the article contents table, complete access to unpublished and unauthorized content is possible. The code needs to protect against making secure content available.
Therefore, after references to the database, user, and user ID are created, the necessary date variables are set for the search. The $nullDate value will be used to search for articles that have no expiration date. The $now variable will allow the display to be limited to articles already available, not those with a publication date that exists in the future.
The $where statement of the query is constructed to ensure that the article is formally published and that its publication lies within the present time period. The Where clause is then added to the $query variable, which only requests the article ID and title columns. For the module, only the table of contents entries need be displayed, so there is no reason to retrieve unnecessary data.
Finally, the setQuery() method is used to execute the query and retrieve five records or less. It could retrieve all of the articles, but then the height of the module display might take up too much screen space. Better to limit the query by record size or data.
The record set that is returned by the query is processed. For each record, a <span> is created that contains an onMouseOver event. From the code, you can see the code that is output into the HTML page calls the displayAjax() function and has the Article ID of the current record hard-coded. If you were to examine the source code of the page once it was displayed in the browser, you would find that each onMouseOver event coding contains its own Article ID. It also contains code for the onMouseOut event to hide any window displayed.
Contained within the HTML span is a custom link for the current row's article. The link is generated to access the standard com_content component to display the article, and the Article ID is passed through the id parameter. The link name is the title retrieved from the row.
Finally, if any error messages were generated by the database retrieval, they would be displayed below the module output.
You should now have a very good grasp of implementing an Ajax solution on the Joomla CMS platform. This basic foundation can be extended in nearly any direction to create further Ajax interactivity.
Given the exciting nature of the Ajax technology, it is easy for developers to overlook the shortcomings. Aside from the complexity that Ajax can add to a Web development project, there are a number of very real problems that will be encountered as Ajax use grows:
Ajax Search Engine Optimized (SEO) invisibility
Information harvesting
Possible security risks
Since Ajax has begun to spread like wildfire, entire sites are using Ajax for everything from menu display to core information presentation. While it is easy to get caught up in the excitement of a new technology, it is important to recognize where that technology can be best applied. So far, the best uses have been for dynamic user-interface widgets for everything from Netflix to Google Maps.
However, all of the content that is displayed by the Ajax widgets is invisible to search engines. A search engine spider will not execute the code contained in an Ajax JavaScript link. Therefore, while the pop-up content may appear slick and inviting to your users, a search engine will be blind to it.
Make certain that any content you use for Ajax is also present somewhere else on the site using traditional HTML. Using this method, your site will not look empty to the search engine spider. Further, to make sure your site is SEO, be sure to have your central site content in HTML prominent on the central pages. If the content is presented by Ajax and simply included in a low-ranked part of the site for completeness, your search engine ranking will suffer.
Most Ajax requests are directly querying for formatted data that is returned to the browser. You have to be careful to prevent unauthorized access and also shield yourself against potential hackers. Most Ajax applications will make a request to your system that you supply with formatted data from within your data stores. This information may be important price/stocking records, or even proprietary company data. With the data returned in XML format, it would take little time or effort for your competitors to author an information harvesting program that simply makes request after request to your Ajax component until all the information it can provide is stored safely in a rogue database.
There are a few ways to guard against this type of information harvesting, but the easiest is to ensure that the requests are not sent with a simple sequential ID number. If you have products numbered 1 through 50, use some other method of ID request so that a harvesting application can't simply loop through the sequence to gain the requested information.
The other danger lies in the potential for a SQL injection attack. In an injection attack, the hacker simply tacks on a full SQL query to the request string. If the receiving program simply passes the parameter received from the request directly to the database, a great deal of private information can be exposed.
Fortunately, Joomla has built-in routines such as getVar() to prevent most of the potentially harmful code from getting through. Be sure to think twice before you decide to circumvent the Joomla security routines because they offer a great deal of tried-and-tested security technology.
Adding Ajax to your Joomla site can bring it up to the cutting edge of Web 2.0 implementation. Implementing the technologies (HTML, XML, JavaScript, and so on) that need to operate in concert for an Ajax application can be frustrating but very rewarding when the site is finally deployed. This chapter has provided an overview of implementing Ajax within Joomla by doing the following:
Explaining how the Ajax technologies work together and can be implemented by Joomla.
Refining your understanding of components, including the capability of a component to output in raw format.
Creating a simple Ajax application so that the rudimentary framework could be understood.
Improving the performance of the server by modifying the debugging and logging settings.
Upgrading that component to a more robust pop-up window application that demonstrates the best in functionality that Ajax has to offer.
Adopting a conservative view of where Ajax can be best applied and what disadvantages the new technology may present.
Ajax implementation can be fairly complicated conceptually. As part of a larger development project, implementation can be downright confusing. A conceptual development tool called design patterns can help you organize application development to minimize bugs and maximize the knowledge gained from past projects. Chapter 8 examines how design patterns can be applied to Joomla development.