
It is a time-honored tradition to start a programming book with a “Hello World” program. In this chapter, we create, compile, and run a simple "Hello World” program written in C#. The analysis of this brief program will introduce key features of the C# language.
Example 2-1 illustrates the fundamental elements of a very elementary C# program.
Example 2-1. A simple “Hello World” program in C#
class Hello
{
    static void Main( )
    {
        // Use the system console object
        System.Console.WriteLine("Hello World");
    }
}
Compiling and running this code displays the words “Hello World” at the console. Before we compile and run it, let’s first take a closer look at this simple program.
The essence of object-oriented programming is the creation of new types. A type represents a thing. Sometimes the thing is abstract, such as a data table or a thread; sometimes it is more tangible, such as a button in a window. A type defines the thing’s general properties and behaviors.
If your program uses three instances of a button type in a window—say, an OK, a Cancel, and a Help button—each button will have a size, though the specific size of each button may differ. Similarly, all the buttons will have the same behaviors (draw, click), though how they actually implement these behaviors may vary. Thus, the details might differ among the individual buttons, but they are all of the same type.
As in many object-oriented programming languages, in C# a type is defined by a class , while the individual instances of that class are known as objects. Later chapters explain that there are other types in C# besides classes, including enums, structs, and delegates, but for now the focus is on classes.
The “Hello World” program declares
a single type: the Hello class. To define a C#
type, you declare it as a class using the class
keyword, give it a name—in this case,
Hello—and then define its properties and
behaviors. The
property and behavior definitions of a
C# class must be enclosed by open and closed braces
({}
).
A class has both properties and behaviors. Behaviors are defined with member methods; properties are discussed in Chapter 3.
A
method
is a function owned by your
class. In fact,
member methods are sometimes called
member
functions. The
member methods define what your class can do or how it behaves.
Typically, methods are given action names, such as
WriteLine( ) or AddNumbers( ). In
the case shown here, however, the class method has a
special name,
Main( ), which doesn’t describe an
action but does designate to the CLR that this is the main, or first
method, for your class.
Tip
C++ programmers take
note: Main( ) is capitalized in C# and
must be a member of a class, not a global member.
Main( ) can also return int or
void.
The CLR calls Main() when your program starts.
Main() is the entry point for your program, and
every C# program must have a Main( )
method.[1]
Method declarations are a contract between the creator of the method and the consumer (user) of the method. It is likely that the creator and consumer of the method will be the same programmer, but this doesn’t have to be so: it is possible that one member of a development team will create the method and another programmer will use it.
Tip
Java programmers take
note: Main( ) is the entry point for
every C# program, similar in some ways to the Java applet
run( ) method or the Java
program’s main() method.
To declare a method, you specify a return value type followed by a name. Method declarations also require parentheses, whether the method accepts parameters or not. For example:
int myMethod(int size)
declares a method named myMethod() that takes one
parameter: an integer that will be referred to within the method as
size. This method returns an integer value. The
return value type tells the consumer of the method what kind of data
the method will return when it finishes running.
Some methods don’t return a value at all; these are
said to return void, which is specified
by the
void keyword. For example:
void myVoidMethod();
declares a method that returns void and takes no
parameters. In C# you must always declare a return type or
void.
A C# program can also contain comments. Take a look at the first line after the opening brace of the main method shown earlier:
// Use the system console object
The text begins with two forward slash marks (//).
These designate a comment. A comment is a note
to the programmer and doesn’t affect how the program
runs. C# supports three types of comments.
The first type, just shown, indicates that all text to the right of the comment mark is to be considered a comment, until the end of that line. This is known as a C++ style comment.
The second type of comment, known as a
C-style
comment, begins with an open comment mark
(/*) and ends with a closed comment mark
(*/). This allows comments to span more
than one line without having to have // characters
at the beginning of each comment line, as shown in Example 2-2.
While you can’t nest C++ style comments, it is possible to nest C++ style comments within C-style comments. For this reason, it is common to use C++ style comments whenever possible, and to reserve the C-style comments for “commenting-out” blocks of code.
The third and final type of comment that C# supports is used to associate external XML-based documentation with your code, and is illustrated in Chapter 13.
“Hello World” is an example of a console program. A console application typically has no graphical user interface (GUI); there are no list boxes, buttons, windows, and so forth. Text input and output are handled through the standard console (typically a command or DOS window on your PC). Sticking to console applications for now helps simplify the early examples in this book, and keeps the focus on the language itself. In later chapters, we’ll turn our attention to Windows and web applications, and at that time we’ll focus on the Visual Studio .NET GUI design tools.
All that the
Main() method does in
this simple example is write the text “Hello
World” to the standard
output
(typically a command prompt window). Standard output is managed by an
object named Console. This
Console
object has a method called
WriteLine( )
that takes a
string
(a set of characters) and writes it to the standard output. When you
run this program, a command or DOS screen will pop up on your
computer monitor and display the words “Hello
World.”
You invoke a method with the
dot operator
(.). Thus, to call the Console
object’s WriteLine() method, you
write Console.WriteLine(...),
filling in the string to be printed.
Console is only one of a tremendous number of
useful types that
are part of the .NET
FCL. Each class has a name, and thus the
FCL contains thousands of names, such as
ArrayList, Hashtable,
FileDialog, DataException,
EventArgs, and so on. There are hundreds,
thousands, even tens of thousands of names.
This presents a problem. No developer can possibly memorize all the
names that the .NET Framework uses, and sooner or later you are
likely to create an object and give it a name that has already been
used. What will happen if you purchase a Hashtable
class from another vendor, only to discover that it conflicts with
the Hashtable class that .NET provides? Remember,
each class in C# must have a unique name and you typically
can’t rename classes in a vendor’s
code!
The solution to this problem is the use of namespaces. A namespace restricts a name’s scope, making it meaningful only within the defined namespace.
Tip
C++
programmers take note: C++ namespaces are delimited with
the scope resolution operator
(::), in C# you use the dot (.)
operator.
Assume that I tell you that Jim is an engineer. The word “engineer” is used for many things in English, and can cause confusion. Does he design buildings? Write software? Run a train?
*Footnote: Apologies to our friends across the pond where the person who drives a locomotive is called a “train driver” rather than an “engineer.”
In English I might clarify by saying
“he’s a
scientist,” or
“he’s a train
engineer.” A C# programmer could tell you that Jim
is a science.engineer rather than a
train.engineer. The namespace (in this case,
science or train) restricts the
scope of the word that
follows. It creates a “space” in
which that name is meaningful.
Further, it might happen that Jim is not just any kind of
science.engineer. Perhaps Jim graduated from MIT
with a degree in software engineering, not civil engineering (are
civil engineers especially polite?). Thus, the
object that is Jim might be defined more
specifically as a science.software.engineer. This
classification implies that the namespace software
is meaningful within the namespace science, and
that engineer in this context is meaningful within
the namespace software. If later you learn that
Charlotte is a transportation.train.engineer, you
will not be confused as to what kind of engineer she is. The two uses
of engineer can coexist, each within its own
namespace.
Similarly, if it turns out that .NET has a
Hashtable class within its
System.Collections namespace, and that I have also
created a Hashtable class within a
ProgCSharp.DataStructures namespace, there is no
conflict because each exists in its own namespace.
In Example 2-1, the Console
class’ name is identified as being in the
System
namespace by using the code:
System.Console.WriteLine();
In Example 2-1, the
dot operator (.) is
used both to access a method (and data) in a class (in this case, the
method WriteLine( )), and to restrict the class
name to a specific namespace (in this case, to
locate
Console
within the System namespace). This works well
because in both cases we are “drilling
down” to find the exact thing we want. The top level
is the System namespace (which contains all the
System objects that the FCL provides); the
Console type exists within that namespace, and the
WriteLine()
method is a member function of the
Console type.
In many cases, namespaces are divided into subspaces. For example,
the System namespace contains a number of
subnamespaces such as Data,
Configuration,
Collections, and so
forth, while the Collections namespace itself is
divided into multiple subnamespaces.
Namespaces can help you organize and compartmentalize your types. When you write a complex C# program, you might want to create your own namespace hierarchy, and there is no limit to how deep this hierarchy can be. The goal of namespaces is to help you divide and conquer the complexity of your object hierarchy.
Rather than writing the word
System before Console, you
could specify that you will be using types from
the
System
namespace by writing the directive:
using System;
at the top of the listing, as shown in Example 2-3.
Example 2-3. The using keyword
using System;
class Hello
{
    static void Main( )
    {
        //Console from the System namespace
        Console.WriteLine("Hello World");
    }
}
Notice the using
System
directive is placed before the Hello class
definition. Visual Studio .NET 2005 defaults to including three
using statements in every console application
(System,
System.Collections.Generic,
System.Text).
Although you can designate that you are using the
System namespace, you can’t
designate that you are using the System.Console
object, as you can with some languages. Example 2-4
won’t compile.
Example 2-4. Code that doesn’t compile (not legal C#)
using System.Console;
class Hello
{
    static void Main( )
    {
        //Console from the System namespace
        WriteLine("Hello World");
    }
}
This generates the compile error:
error CS0138: A using namespace directive can only be applied
to namespaces; 'System.Console' is a type not a namespace
Tip
If you are using Visual Studio, you will know that
you’ve made a mistake, because when you type
using
System followed by the
dot, Visual Studio .NET 2005 will provide a list of valid namespaces,
and Console won’t be among them.
The using keyword can save a great deal of typing,
but it can undermine the advantages of namespaces by polluting the
scope with many undifferentiated names. A
common solution is to use the using keyword with
the built-in namespaces and with your own corporate namespaces, but
perhaps not with third-party components.
C# is
case-sensitive,
which means that writeLine is not the same as
WriteLine, which in turn is not the same as
WRITELINE. Unfortunately, unlike in VB, the C#
development environment will not fix your case mistakes; if you write
the same word twice with different cases, you might introduce a
tricky-to-find bug into your program.
Tip
A handy trick is to hover over a name that is correct in all but case and then hit Ctrl-Space. The Autocomplete feature of Intellisense will fix the case for you.
To prevent such a time-wasting and energy-depleting mistake, you
should develop conventions for naming your variables, functions,
constants, etc. The convention in this book is to name variables with
camel notation (e.g.,
someVariableName), and to name functions,
constants, and properties with Pascal notation (e.g.,
SomeFunction).
The Main( ) method
shown
in Example 2-1 has one more designation. Just before
the return type declaration void (which, you will
remember, indicates that the method doesn’t return a
value) you’ll find the keyword
static:
static void Main()
The static keyword indicates that you can invoke
Main( ) without first creating an object of type
Hello. This somewhat complex issue will be
considered in much greater detail in subsequent chapters. One of the
problems with learning a new computer language is you must use some
of the advanced features before you fully understand them. For now,
you can treat the declaration of the Main( ) method
as tantamount to magic.
There are at least two ways to enter, compile, and run the programs in this book: use the Visual Studio .NET Integrated Development Environment (IDE), or use a text editor and a command-line compiler (along with some additional command-line tools to be introduced later).
Although you can develop software outside Visual Studio .NET, the IDE provides enormous advantages. These include indentation support, Intellisense word completion, color coding, and integration with the help files. Most important, the IDE includes a powerful debugger and a wealth of other tools.
This book tacitly assumes that you’ll be using Visual Studio .NET. However, the tutorials focus more on the language and the platform than on the tools. You can copy all the examples into a text editor such as Windows Notepad or Emacs, save them as text files with the extension .cs, and compile them with the C# command-line compiler that is distributed with the .NET Framework SDK (or a .NET-compatible development toolchain such as Mono or Microsoft’s Shared Source CLI). Note that some examples in later chapters use Visual Studio .NET tools for creating Windows Forms and Web Forms, but even these you can write by hand in Notepad if you are determined to do things the hard way.
To create the “Hello World” program in the IDE, select Visual Studio .NET from your Start menu or a desktop icon, and then choose File→ New→ Project from the menu toolbar. This will invoke the New Project window. (If you are using Visual Studio for the first time, the New Project window might appear without further prompting.) Figure 2-1 shows the New Project window.
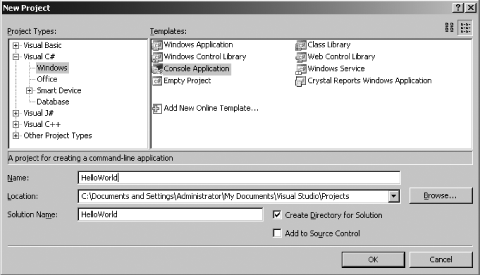
To open your application, select Visual C# in the Project Types window, and choose Console Application in the Templates window (if you use the Express Edition of Visual C#, you don’t need to perform that first step; go directly to the Console Application).
You can now enter a name for the project and select a directory in which to store your files. Click OK, and a new window will appear in which you can enter the code in Example 2-1, as shown in Figure 2-2.
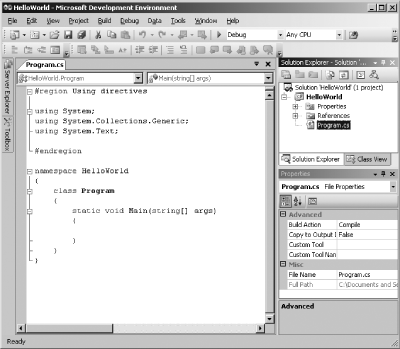
Notice that
Visual Studio .NET creates a
namespace based on the project name you’ve provided
(HelloWorld), and adds a using
directive for System,
System.Collections.Generic, and
System.Text because nearly every program you write
will need types from those namespaces.
Visual Studio .NET
creates a class named Program, which you are free
to rename. When you rename the class, it’s a good
idea to rename the file as well (Class1.cs). If
you rename the file, Visual Studio will automatically rename the
class for you. To reproduce Example 2-1, for
instance, rename the Program.cs file (listed in
the Solution Explorer window) to hello.cs and
change the name of Program to
HelloWorld (if you do this in the reverse order,
Visual Studio will rename the class to hello).
Finally, Visual Studio 2005 creates a program skeleton to get you
started. To reproduce Example 2-1, remove the
arguments (string[]
args) from
the Main( ) method. Then copy the following two
lines into the body of Main():
// Use the system console object
System.Console.WriteLine("Hello World");
If you aren’t using Visual Studio .NET, open Notepad, type in the code from Example 2-1, and save the file as a text file named hello.cs.
There are many ways to compile and run the “Hello World” program from within Visual Studio. Typically you can accomplish every task by choosing commands from the Visual Studio menu toolbar, by using buttons, and, in many cases, by using key-combination shortcuts.
Tip
Keyboard shortcuts can be set by going to Tools→ Options→ Keyboard. This book assumes you have chosen the default settings.
For example, to compile the “Hello World” program, press Ctrl-Shift-B or choose Build→ Build Solution. As an alternative, you can click the Build button on the Build toolbar (you may need to right-click the toolbar to show the Build toolbar). The Build toolbar is shown in Figure 2-3; the Build button is leftmost and highlighted.
To run the “Hello World” program without the debugger, you can press Ctrl-F5 on your keyboard, choose Debug→ Start Without Debugging from the IDE menu toolbar, or press the Start Without Debugging button on the IDE Build toolbar, as shown in Figure 2-4 (you may need to customize your toolbar to make this button available). You can run the program without first explicitly building it; depending on how your options are set (Tools→ Options), the IDE will save the file, build it, and run it, possibly asking you for permission at each step.
Tip
I strongly recommend that you spend some time exploring the Visual Studio 2005 development environment. This is your principal tool as a .NET developer, and you want to learn to use it well. Time invested up front in getting comfortable with Visual Studio will pay for itself many times over in the coming months. Go ahead, put the book down and look at it. I’ll wait for you.
Use the following steps to compile and run the “Hello World” program using the C# command-line compiler that comes with the .NET Framework SDK, Mono (http://www.mono-project.com), or Shared Source CLI (http://msdn.microsoft.com/net/sscli/):
Save Example 2-1 as the file hello.cs.
Open a .NET command window (Start→ Programs→ Visual Studio .NET→ Visual Studio Tools→ Visual Studio Command Prompt. If you’re on Unix, you should start at a text console, xterm, or something that gives you a shell prompt.
From the command line, use this command if you are using the .NET or Shared Source CLI C# compiler:
csc /debug hello.cs
Use this command if you are using Mono:
mcs -debug hello.cs
This step builds the EXE file. If the program contains errors, the compiler reports them in the command window. The
/debugcommand-line switch inserts symbols in the code so that you can run the EXE under a debugger or see line numbers in stack traces. (You’ll get a stack trace if your program generates an error that you don’t handle.)To run the program under .NET, enter:
hello
Use this command with the Shared Source CLI:
clix hello.exe
and this command with Mono:
mono hello.exe
You should now see the venerable words “Hello World” appear in your command window.
Arguably, the single most important tool in any development environment is the debugger. The Visual Studio debugger is very powerful and it will be well worth whatever time you put into learning how to use it well. That said, the fundamentals of debugging are very simple. The three key skills are:
How to set a breakpoint and how to run to that breakpoint
How to step into and over method calls
How to examine and modify the value of variables, member data, and so forth
This chapter doesn’t reiterate the entire debugger documentation, but these skills are so fundamental that it does provide a crash (pardon the expression) course.
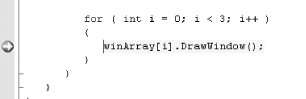
The debugger can accomplish the same thing in many ways, typically via menu choices, buttons, and so forth. The simplest way to set a breakpoint is to click in the left margin. The IDE marks your breakpoint with a red dot, as shown in Figure 2-5.
Tip
Discussing the debugger requires code examples. The code shown here is from Chapter 5, and you aren’t expected to understand how it works yet (though if you program in C++ or Java, you’ll probably get the gist of it).
To run the debugger, you can choose Debug→ Start or just press F5. The program then compiles and runs to the breakpoint, at which time it stops, and a yellow arrow indicates the next statement for execution, as in Figure 2-6.
After you’ve hit your breakpoint it is easy to
examine the values of various objects. For example, you can find the
value of the variable i just by putting the cursor
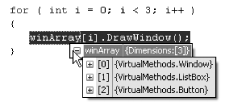
over it and waiting a moment, as shown in Figure 2-7.
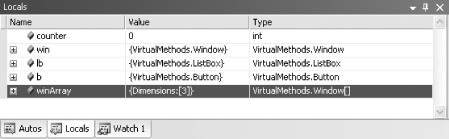
The debugger IDE also provides a number of useful windows, such as a Locals window that displays the values of all the local variables (see Figure 2-8).
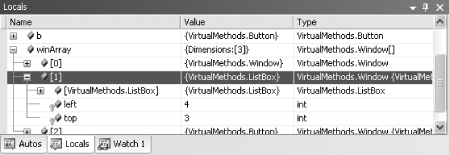
Intrinsic types
such as integers
simply show their value (see i earlier), but
objects show their type and have a plus
(+) sign. You can expand these objects to see
their internal data, as shown in Figure 2-9.
You’ll learn more about objects and their internal
data in upcoming chapters.
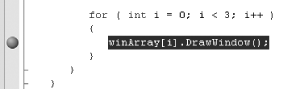
You can step into the next method by pressing F11. Doing so steps
into the DrawWindow( )
method
of the Window class, as shown in Figure 2-10.
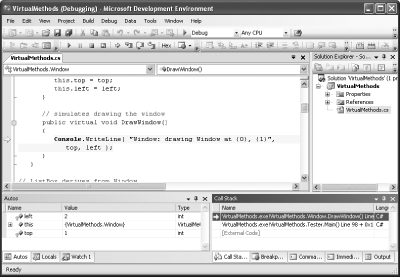
You can see that the next execution statement is now
WriteLine( ) in DrawWindow( ).
The Autos window has updated to show the current state of the
objects.
There is much more to learn about the debugger, but this brief introduction should get you started. You can answer many programming questions by writing short demonstration programs and examining them in the debugger. A good debugger is, in some ways, the single most powerful teaching tool for a programming language.
[1] It’s technically possible
to have multiple Main( ) methods in C#; in that
case you use the /main command-line switch to tell
C# which class contains the Main( ) method that
should serve as the entry point to the program.