
The characteristics of the intranet application are that both the clients and the service use WCF, and that they are deployed in the same intranet. The clients reside behind the firewall, and you can use Windows-based security for transfer security, authentication, and authorization. You can rely on Windows accounts and groups to store the client’s credentials. The intranet scenario addresses a wide range of business applications, from finance to manufacturing to in-house IT applications. The intranet scenario is also the richest scenario of all in the options it offers developers for configuring security.
This section on the intranet scenario will define the terminology, techniques, and types used in the other scenarios.
For the intranet scenario, you should use the intranet
bindings: namely, NetTcpBinding, NetNamedPipeBinding, and NetMsmqBinding. You can rely on Transport
mode for transfer security because the calls are invariably
point-to-point. Conveniently, Transport security is the default
transfer mode of the intranet bindings (see Table 10-1). You can also use
the default for the client credentials type, which is Windows (see
Table 10-2). You need
to configure this on both the client and the service.
Each of the three intranet bindings has a configurable protection level, which is the master switch for Transport protection. The three protection levels are:
- None
When configured for this protection level, WCF does not protect the message on transfer from the client to the service. Any malicious party can read the content of the message, or even alter it.
- Signed
When configured for this protection level, WCF ensures that the message could have come only from an authenticated sender and that the message integrity was not compromised during transfer. To accomplish this, WCF appends an encrypted checksum to the message. Upon receiving the message, the service calculates the checksum and compares it to the original. If the two do not match, the message is rejected. As a result, the message is impervious to tampering. However, the message content is still visible during the transfer.
- Encrypted and Signed
When configured for this protection level, WCF both signs the message and encrypts its content. The Encrypted and Signed protection level provides integrity, privacy, and authenticity.
The Signed protection level offers a clear trade-off between a
measured degree of security and performance. However, I consider
this to be a trade-off to avoid, and I recommend that you always opt
instead for the Encrypted and Signed protection level. WCF
represents the protection level with the ProtectionLevel enum, defined as:
public enum ProtectionLevel
{
   None,
   Sign,
   EncryptAndSign
}
Not all Internet bindings default to the same protection
level. Both the NetTcpBinding
and the NetNamedPipeBinding default to Encrypted
and Signed, yet the NetMsmqBinding defaults to Signed.
NetTcpBinding takes
a construction parameter indicating the desired transfer security
mode:
public class NetTcpBinding : ...
{
   public NetTcpBinding(SecurityMode securityMode);
   public NetTcpSecurity Security
   {get;}
   //More members
}
The Security property of
the type NetTcpSecurity contains
the transfer mode (Transport or Message) and two respective
properties with their specific settings:
public sealed class NetTcpSecurity
{
   public SecurityMode Mode
   {get;set;}
   public MessageSecurityOverTcp Message
   {get;}
   public TcpTransportSecurity Transport
   {get;}
}
In the intranet security scenario, you should select Transport
security for the transfer security mode and set the values of the
Transport property of the type
TcpTransportSecurity:
public sealed class TcpTransportSecurity
{
   public TcpClientCredentialType ClientCredentialType
   {get;set;}

   public ProtectionLevel ProtectionLevel
   {get;set;}
}
The Transfer property
should be initialized with the client credential type set to Windows
using the TcpClientCredentialType
enum, defined as:
public enum TcpClientCredentialType
{
   None,
   Windows,
   Certificate
}
The Transport property should also have the
protection level set to ProtectionLevel.EncryptAndSign. Since both of
those settings are the defaults for this binding, these two
declarations are equivalent:
NetTcpBinding binding1 = new NetTcpBinding();

NetTcpBinding binding2 = new NetTcpBinding(SecurityMode.Transport);
binding2.Security.Transport.ClientCredentialType =
                                              TcpClientCredentialType.Windows;
binding2.Security.Transport.ProtectionLevel = ProtectionLevel.EncryptAndSign;
Alternatively, you can configure the binding using a config file:
<bindings>
   <netTcpBinding>
      <binding name = "TCPWindowsSecurity">
         <security mode = "Transport">
            <transport
               clientCredentialType = "Windows"
               protectionLevel = "EncryptAndSign"
            />
         </security>
      </binding>
   </netTcpBinding>
</bindings>
Note
The NetTcpContextBinding
and the WSHttpContextBinding
also offer the ContextProtectionLevel property of the
type ProtectionLevel, used to
indicate the desired protection level for the custom context.
ContextProtectionLevel defaults to ProtectionLevel.Sign. When using
Transport security, the value of ContextProtectionLevel is ignored (since
the transport protects the whole message during transfer). Due to
a bug in WCF, it is also ignored when using Message security. The
same is true for the NetNamedPipeContextBinding defined in
Appendix B (since it uses the same
WCF facility).
For the sake of completeness, although it’s not required by
the intranet scenario, here is how to configure NetTcpBinding for Message security with
username client credentials:
public enum MessageCredentialType
{
   None,
   Windows,
   UserName,
   Certificate,
   IssuedToken
}
public sealed class MessageSecurityOverTcp
{
   public MessageCredentialType ClientCredentialType
   {get;set;}
   //More members
}
NetTcpBinding binding = new NetTcpBinding(SecurityMode.Message);
binding.Security.Message.ClientCredentialType = MessageCredentialType.UserName;
NetTcpSecurity offers the
Message property of the type
MessageSecurityOverTcp. You’ll
need to set the credentials type using the MessageCredentialType enum. Most bindings
use the MessageCredentialType
enum for representing Message security client credentials.
Figure 10-1 shows the
security-related elements of the NetTcpBinding.
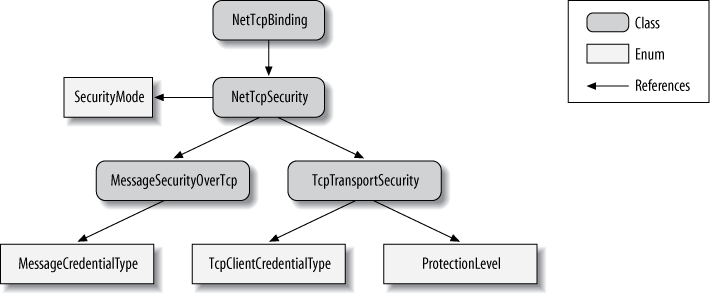
NetTcpBinding has a
reference to NetTcpSecurity,
which uses the SecurityMode enum
to indicate the transfer security mode. When Transport security is
used, NetTcpSecurity will use an
instance of TcpTransportSecurity
containing the client credentials type via the TcpClientCredentialType enum and the
configured protection level via the ProtectionLevel enum. When Message security is
used, NetTcpSecurity will use an
instance of MessageSecurityOverTcp containing the
client credentials type via the MessageCredentialType enum.
NetNamedPipeBinding
takes a construction parameter indicating the desired transfer
security mode:
public class NetNamedPipeBinding : Binding,...
{
   public NetNamedPipeBinding(NetNamedPipeSecurityMode securityMode);

   public NetNamedPipeSecurity Security
   {get;}
   //More members
}
The Security property of the type NetNamedPipeSecurity contains the transfer
mode (Transport or None) and a single property with the specific
Transport settings:
public sealed class NetNamedPipeSecurity
{
   public NetNamedPipeSecurityMode Mode
   {get;set;}
   public NamedPipeTransportSecurity Transport
   {get;}
}
For the intranet security scenario, select Transport security
for the transfer security mode and set
the values of the Transport
property of the type NamedPipeTransportSecurity:
public sealed class NamedPipeTransportSecurity
{
   public ProtectionLevel ProtectionLevel
   {get;set;}
}
The Transfer property
should be initialized with the protection level set to ProtectionLevel.EncryptAndSign. Because
this is the default for the binding, these two declarations are
equivalent:
NetNamedPipeBinding binding1 = new NetNamedPipeBinding();

NetNamedPipeBinding binding2 = new NetNamedPipeBinding(
                                              NetNamedPipeSecurityMode.Transport);
binding2.Security.Transport.ProtectionLevel = ProtectionLevel.EncryptAndSign;
You can also configure the binding administratively, using a config file:
<bindings>
   <netNamedPipeBinding>
      <binding name = "IPCWindowsSecurity">
         <security mode = "Transport">
            <transport protectionLevel = "EncryptAndSign"/>
         </security>
      </binding>
   </netNamedPipeBinding>
</bindings>
There is no need (or option) to set the client credentials
type, since only Windows credentials are supported (see Table 10-2). Figure 10-2 shows the
security-related elements of
the NetNamedPipeBinding.
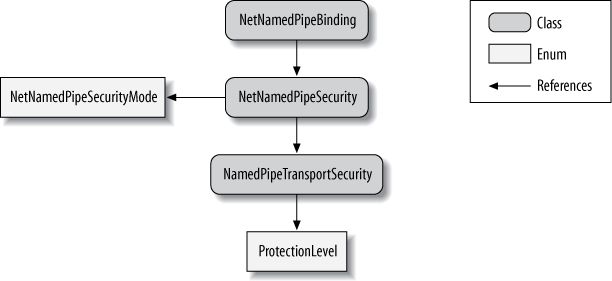
NetNamedPipeBinding has a
reference to NetNamedPipeSecurity, which uses the
NetNamedPipeSecurityMode enum to indicate
the transfer security mode. When Transport security is used,
NetTcpSecurity will use an
instance of NamedPipeTransportSecurity containing the
configured protection level via the ProtectionLevel enum.
NetMsmqBinding
offers a construction parameter for the transfer security mode and a
Security property:
public class NetMsmqBinding : MsmqBindingBase
{
   public NetMsmqBinding(NetMsmqSecurityMode securityMode);
   public NetMsmqSecurity Security
   {get;}
   //More members
}
The Security property of
the type NetMsmqSecurity contains
the transfer mode (Transport or Message) and two respective
properties with their specific settings:
public sealed class NetMsmqSecurity
{
   public NetMsmqSecurityMode Mode
   {get;set;}
   public MsmqTransportSecurity Transport
   {get;}
   public MessageSecurityOverMsmq Message
   {get;}
}
For the intranet security scenario, select Transport security
for the transfer security mode and set the values of the Transport property of the type MsmqTransportSecurity:
public sealed class MsmqTransportSecurity
{
   public MsmqAuthenticationMode MsmqAuthenticationMode
   {get;set;}
   public ProtectionLevel MsmqProtectionLevel
   {get;set;}
   //More members
}
The Transfer property
should be initialized with the client credential type set to Windows
domain using the MsmqAuthenticationMode enum, defined
as:
public enum MsmqAuthenticationMode
{
   None,
   WindowsDomain,
   Certificate
}
Windows domain is the default credentials type. In addition,
you need to set the protection level to ProtectionLevel.EncryptAndSign because the
MSMQ binding defaults to ProtectionLevel.Signed. The following two
definitions are equivalent:
NetMsmqBinding binding1 = new NetMsmqBinding();
binding1.Security.Transport.MsmqProtectionLevel = ProtectionLevel.EncryptAndSign;

NetMsmqBinding binding2 = new NetMsmqBinding();
binding2.Security.Mode = NetMsmqSecurityMode.Transport;
binding2.Security.Transport.MsmqAuthenticationMode =
                                            MsmqAuthenticationMode.WindowsDomain;
binding2.Security.Transport.MsmqProtectionLevel = ProtectionLevel.EncryptAndSign;
Alternatively, you can configure the binding using a config file:
<bindings>
   <netMsmqBinding>
      <binding name = "MSMQWindowsSecurity">
         <security mode = "Transport">
            <transport
               msmqAuthenticationMode = "WindowsDomain"
               msmqProtectionLevel = "EncryptAndSign"
            />
         </security>
      </binding>
   </netMsmqBinding>
</bindings>
Figure 10-3 shows the
security-related elements of the NetMsmqBinding.
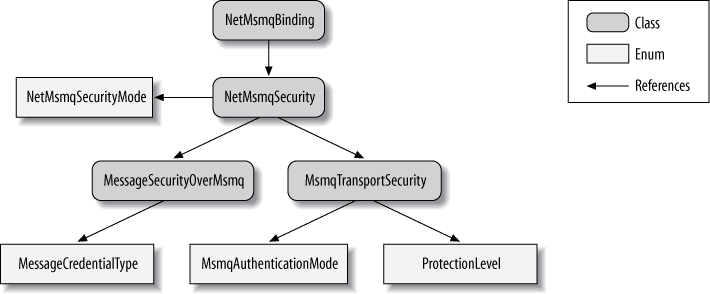
NetMsmqBinding has a
reference to NetMsmqSecurity,
which uses the NetMsmqSecurityMode enum to indicate the
transfer security mode. When Transport security is used, NetMsmqSecurity will use an instance of
MsmqTransportSecurity containing
the client credentials type via the MsmqAuthenticationMode enum, and the
configured protection level via the ProtectionLevel enum. There are similar
references to types controlling Message security.
While a service should ideally use the highest possible
level of security, it is actually at the mercy of its host, because
the host is the one configuring the binding. This is especially
problematic if the service is to be deployed in an unknown environment
with an arbitrary host. To compensate, WCF lets service developers
insist on a protection level, or rather, constrain the minimum
protection level at which their service is willing to operate. Both
the service and the client can constrain the protection level,
independently of each other. You can constrain the protection level in
three places. When constrained at the service contract, all operations
on the contract are considered sensitive and protected. When
constrained at the operation contract, only that operation is
protected; other operations on the same contract are not. Finally, you
can constrain the protection level for an individual fault contract.
This can be required because sometimes the error information returned
to the client is sensitive, containing parameter values, exception
messages, and the call stack. The respective contract attributes offer
the ProtectionLevel property of the
enum type ProtectionLevel:
[AttributeUsage(AttributeTargets.Interface|AttributeTargets.Class,
                Inherited = false)]
public sealed class ServiceContractAttribute : Attribute
{
   public ProtectionLevel ProtectionLevel
   {get;set;}
   //More members
}
[AttributeUsage(AttributeTargets.Method)]
public sealed class OperationContractAttribute : Attribute
{
   public ProtectionLevel ProtectionLevel
   {get;set;}
   //More members
}
[AttributeUsage(AttributeTargets.Method,AllowMultiple = true,
                Inherited = false)]
public sealed class FaultContractAttribute : Attribute
{
   public ProtectionLevel ProtectionLevel
   {get;set;}
   //More members
}
As an example, here is how to set the protection level on a service contract:
[ServiceContract(ProtectionLevel = ProtectionLevel.EncryptAndSign)]
interface IMyContract
{...}
Setting the ProtectionLevel
property on the contract attributes merely indicates the low-water
mark; that is, the minimum protection level accepted by this contract.
If the binding is configured for a lower
protection level, it will result in an InvalidOperationException at the
service load time or the time the proxy is opened. If the binding is
configured for a higher level, the contract will use that level. The
ProtectionLevel property on the contract
attributes defaults to ProtectionLevel.None,
meaning it has no effect.
The desired protection constraint is considered a local implementation detail of the service, so the required protection level is not exported with the service metadata. Consequently, the client may require a different level and enforce it separately from the service.
Note
Even though the Internet bindings do not offer a protection level property, the protection level constraint at the service-, operation-, or fault-contract level is satisfied when using Transport or Message security. The constraint is not satisfied when security is turned off by using the None security mode.
By default, when a client calls a proxy that targets an endpoint whose binding is configured for using Windows credentials with Transport security, there is nothing explicit the client needs to do to pass its credentials. WCF will automatically pass the Windows identity of the client’s process to the service:
class MyContractClient : ClientBase<IMyContract>,IMyContract
{...}

MyContractClient proxy = new MyContractClient();
proxy.MyMethod(); //Client identity passed here
proxy.Close();
When the service receives the call, WCF will authenticate the caller on the service side. If the client’s credentials represent a valid Windows account, the caller will be allowed to access the requested operation on the service.
Instead of using the identity of the process in which it
happens to be running, the client can pass alternative Windows
credentials. The ClientBase<T> base class offers the
ClientCredentials property of the
type ClientCredentials:
public abstract class ClientBase<T> : ...
{
   public ClientCredentials ClientCredentials
   {get;}
}
public class ClientCredentials : ...,IEndpointBehavior
{
   public WindowsClientCredential Windows
   {get;}
   //More members
}
ClientCredentials contains the property
Windows of the type WindowsClientCredential, defined as:
public sealed class WindowsClientCredential
{
   public NetworkCredential ClientCredential
   {get;set;}
   //More members
}
WindowsClientCredential has the property
ClientCredential of the type
NetworkCredential, which is
where the client needs to set the alternative credentials:
public class NetworkCredential : ...
{
   public NetworkCredential();
   public NetworkCredential(string userName,string password);
   public NetworkCredential(string userName,string password,string domain);

   public string Domain
   {get;set;}
   public string UserName
   {get;set;}
   public string Password
   {get;set;}
}
Example 10-3 demonstrates how to use these classes and properties to provide alternative Windows credentials.
Example 10-3. Providing alternative Windows credentials
MyContractClient proxy = new MyContractClient();

proxy.ClientCredentials.Windows.ClientCredential.Domain   = "MyDomain";
proxy.ClientCredentials.Windows.ClientCredential.UserName = "MyUsername";
proxy.ClientCredentials.Windows.ClientCredential.Password = "MyPassword";

proxy.MyMethod();
proxy.Close();
Once you specify an alternative identity and open the proxy, the proxy cannot use any other identity later.
Warning
If you do try specifying alternative credentials after opening the proxy, those credentials will be silently ignored.
Clients can use the technique demonstrated in Example 10-3 when the credentials provided are collected dynamically at runtime, perhaps using a login dialog box.
When working with a channel factory
instead of a proxy class, the ChannelFactory base class offers the
Credentials property of the type
ClientCredentials:
public abstract class ChannelFactory : ...
{
   public ClientCredentials Credentials
   {get;}
   //More members
}
public class ChannelFactory<T> : ChannelFactory,...
{
   public T CreateChannel();
   //More members
}
In this case, simply set the alternative credentials in the
Credentials property, as was done
in Example 10-3:
ChannelFactory<IMyContract> factory = new ChannelFactory<IMyContract>(...);

factory.Credentials.Windows.ClientCredential.Domain   = "MyDomain";
factory.Credentials.Windows.ClientCredential.UserName = "MyUsername";
factory.Credentials.Windows.ClientCredential.Password = "MyPassword";

IMyContract proxy = factory.CreateChannel();
Note that you cannot use the static CreateChannel() methods of ChannelFactory<T>, since you have to
first instantiate a factory in order to access the Credentials property.
All Windows processes run with an authenticated security identity, and the process hosting a WCF service is no different. The identity is actually a Windows account whose security token is attached to the process (and to every thread in the process). However, it is up to the application administrator to decide which identity to use. One option is to have the host run with an interactive user identity; that is, the identity of the user who launched the host process. An interactive identity is typically used when self-hosting and is ideal for debugging, because the debugger will automatically attach itself to the host process when launched from within Visual Studio. However, relying on an interactive identity is impractical for deployment on a server machine, where there will not necessarily be a logged-on user, and if there is a logged-on user that user may not have the necessary credentials to perform the requested work. For production deployment, you typically rely on a designated account, which is a preset Windows account used primarily by your service or services. To launch the service under a designated account, you can use the “Run as” shell option. However, “Run as” is useful only for simple testing. You can also have an NT service as your host and use the Control Panel Services applet to assign a designated identity to the host. If you’re hosting in IIS 5/6 or the WAS, you can use those environments’ configuration tools to assign a designated identity to the process from the pool.
In .NET, the IIdentity
interface (from the System.Security.Principal namespace)
represents a security identity:
public interface IIdentity
{
   string AuthenticationType
   {get;}
   bool IsAuthenticated
   {get;}
   string Name
   {get;}
}
The interface lets you know whether the identity
behind the interface is authenticated (and, if so, which
authentication mechanism was used) and allows you to obtain the name
of the identity. Out of the box, WCF takes advantage of three
implementations of IIdentity
offered by .NET: WindowsIdentity,
GenericIdentity, and X509Identity. The WindowsIdentity class represents a Windows
account. The GenericIdentity
class is a general-purpose class whose main use is to wrap an
identity name with an IIdentity. With both GenericIdentity and WindowsIdentity, if the identity name is
an empty string, that identity is considered unauthenticated, and
any other non-zero-length name is considered authenticated. Finally,
X509Identity is an internal class
that represents an identity that was authenticated using an X509
certificate. The identity behind an X509Identity is always
authenticated.
The WindowsIdentity
class offers a few useful methods above and beyond the mere
implementation of IIdentity:
public class WindowsIdentity : IIdentity,...
{
   public WindowsIdentity(string sUserPrincipalName);
   public static WindowsIdentity GetAnonymous();
   public static WindowsIdentity GetCurrent();
   public virtual bool IsAnonymous
   {get;}
   public virtual bool IsAuthenticated
   {get;}
   public virtual string Name
   {get;}
   //More members
}
The IsAnonymous Boolean
property indicates whether the underlying identity is anonymous and the GetAnonymous() method returns an anonymous
Windows identity, typically used for impersonation to mask the real
identity:
WindowsIdentity identity = WindowsIdentity.GetAnonymous();
Debug.Assert(identity.Name == "");
Debug.Assert(identity.IsAuthenticated == false);
Debug.Assert(identity.IsAnonymous == true);
The GetCurrent() static
method returns the identity of the process where it is called. That
identity is always non-anonymous and authenticated:
WindowsIdentity currentIdentity = WindowsIdentity.GetCurrent();
Debug.Assert(currentIdentity.Name != "");
Debug.Assert(currentIdentity.IsAuthenticated == true);
Debug.Assert(currentIdentity.IsAnonymous == false);
Every operation on a secured WCF service has a security
call context. The security call context is represented by the class
ServiceSecurityContext, defined
as:
public class ServiceSecurityContext
{
   public static ServiceSecurityContext Current
   {get;}
   public bool IsAnonymous
   {get;}
   public IIdentity PrimaryIdentity
   {get;}
   public WindowsIdentity WindowsIdentity
   {get;}
   //More members
}
The main use for the security call context is for custom security mechanisms, as well as analysis and auditing. While it is presented here in the context of the intranet scenario, all other secured scenarios have use for the security call context as well.
Note that in spite of its name, this is the security context of the call, not the service. Two operations on the same service can definitely have different security call contexts.
The security call context is stored in the TLS, so every method
on every object down the call chain from the service can access the
security call context, including your service constructor. To obtain
your current security call context, simply access the Current static property. Another way of
accessing the security call context is via the ServiceSecurityContext property of the
OperationContext:
public sealed class OperationContext : ...
{
   public ServiceSecurityContext ServiceSecurityContext
   {get;}
   //More members
}
Regardless of which mechanism you use, you will get the same object:
ServiceSecurityContext context1 = ServiceSecurityContext.Current;
ServiceSecurityContext context2 = OperationContext.Current.ServiceSecurityContext;
Debug.Assert(context1 == context2);
Warning
Your service has a security call context only if security is
enabled. When security is disabled, ServiceSecurityContext.Current returns
null.
The PrimaryIdentity property
of ServiceSecurityContext contains
the identity of the immediate client up the call chain. If the client
is unauthenticated, PrimaryIdentity
will reference an implementation of IIdentity with a blank identity. When
Windows authentication is used,
the PrimaryIdentity property will
be set to an instance of WindowsIdentity.
The WindowsIdentity property
is meaningful only when using Windows authentication, and it will
always be of the type WindowsIdentity. When valid Windows
credentials are provided, the WindowsIdentity property will contain the
corresponding client identity and will match the value of PrimaryIdentity.
Note
The constructor of a singleton service does not have a security call context, since it is called when the host is launched, not as a result of a client call.
Some resources, such as the file system, SQL Server, sockets, and even DCOM objects, grant access to themselves based on the caller’s security token. Typically, the host process is assigned an identity with elevated permissions that are required to access such resources, so that it can function properly. Clients, however, typically have restricted credentials compared with those of the service. Legacy technologies such as unmanaged Visual Basic or C++ did not offer role-based security support, so developers used impersonation to address this credentials gap. Impersonation lets the service assume the client’s identity, primarily in order to verify whether the client is authorized to perform the work it’s asking the service to do. Impersonation has a number of key detrimental effects on your application, which will be discussed at the end of this section. Instead of impersonation, you should apply role-based security to authorize the callers, coupled with a trusted subsystem pattern across layers. That said, many developers are used to designing systems using impersonation, so both .NET and WCF support this technique.
The service can impersonate its calling client by calling the
Impersonate() method of the
WindowsIdentity
class:
public class WindowsIdentity : IIdentity,...
{
   public virtual WindowsImpersonationContext Impersonate();
   //More members
}
public class WindowsImpersonationContext : IDisposable
{
   public void Dispose();
   public void Undo();
}
Impersonate() returns an
instance of WindowsImpersonationContext containing the
service’s previous identity. To revert back to that identity, the
service calls the Undo() method.
To impersonate a client, the service needs to call Impersonate() on the identity of the
caller, which is available via the WindowsIdentity property of its security
call context, as shown in Example 10-4.
Example 10-4. Explicit impersonation and reversion
class MyService : IMyContract
{
   public void MyMethod()
   {
      WindowsImpersonationContext impersonationContext =
                      ServiceSecurityContext.Current.WindowsIdentity.Impersonate();
      try
      {
         /* Do work as client */
      }
      finally
      {
         impersonationContext.Undo();
      }
   }
}
Note in Example 10-4 that the call to
Undo() is in the finally statement, so the service will
revert to its old identity even if exceptions occur. To somewhat
simplify reverting, the WindowsImpersonationContext implementation
of Dispose() also reverts, which
enables you to use it in a using
statement:
public void MyMethod()
{
   using(ServiceSecurityContext.Current.WindowsIdentity.Impersonate())
   {
      /* Do work as client */
   }
}Instead of impersonating manually, you can instruct WCF to
automatically impersonate the caller of the method. The OperationBehavior attribute offers the
Impersonation property of the
enum type ImpersonationOption:
public enum ImpersonationOption
{
   NotAllowed,
   Allowed,
   Required
}
[AttributeUsage(AttributeTargets.Method)]
public sealed class OperationBehaviorAttribute : Attribute,IOperationBehavior
{
   public ImpersonationOption Impersonation
   {get;set;}
   //More members
}
The default value is ImpersonationOption.NotAllowed. This value
indicates that WCF should not auto-impersonate, but you can write
code (as in Example 10-4)
that explicitly impersonates.
ImpersonationOption.Allowed
instructs WCF to automatically impersonate the caller whenever
Windows authentication is used, but it has no effect with other
authentication mechanisms. When WCF auto-impersonates, it will also
auto-revert to the previous service identity once the method
returns.
The ImpersonationOption.Required value
mandates the use of Windows authentication and will throw an
exception if any other authentication mechanism is used. As its name
implies, with this setting WCF will always auto-impersonate (and
revert) in every call to the operation:
class MyService : IMyContract
{
   [OperationBehavior(Impersonation = ImpersonationOption.Required)]
   public void MyMethod()
   {
      /* Do work as client */
   }
}
Note that there is no way to use declarative impersonation
with the service constructor because you cannot apply the OperationBehavior attribute on a
constructor. Constructors can only use manual impersonation. If you
do impersonate in the constructor, always revert as well in the
constructor, to avoid side effects on the operations of the service
(and even other services in the same host).
In the event that you need to enable impersonation in all the
service operations, the ServiceHostBase class has the Authorization property of the type
ServiceAuthorizationBehavior:
public abstract class ServiceHostBase : ...
{
   public ServiceAuthorizationBehavior Authorization
   {get;}
   //More members
}
public sealed class ServiceAuthorizationBehavior : IServiceBehavior
{
   public bool ImpersonateCallerForAllOperations
   {get;set;}
   //More members
}
ServiceAuthorizationBehavior provides the
Boolean property ImpersonateCallerForAllOperations, which is false by default. Contrary to what its
name implies, when set to true,
this property merely verifies that the service does not have any
operations configured with ImpersonationOption.NotAllowed. This
constraint is verified at service load time, yielding an InvalidOperationException when
violated.
In effect, when Windows authentication is used, this will
amount to the service automatically impersonating the client in all
operations, but all the operations must be explicitly decorated with ImpersonationOption.Allowed or ImpersonationOption.Required. ImpersonateCallerForAllOperations has no
effect on constructors.
You can set the ImpersonateCallerForAllOperations property
programmatically or in the config file. If you set it
programmatically, you can do so only before opening the host:
ServiceHost host = new ServiceHost(typeof(MyService));
host.Authorization.ImpersonateCallerForAllOperations = true;
host.Open();
If you set it using a config file, you need to reference the matching service behavior in the service declaration:
<services>
   <service name = "MyService" behaviorConfiguration= "ImpersonateAll">
      ...
   </service>
</services>
<behaviors>
   <serviceBehaviors>
      <behavior name = "ImpersonateAll">
         <serviceAuthorization impersonateCallerForAllOperations = "true"/>
      </behavior>
   </serviceBehaviors>
</behaviors>
To automate impersonating in all operations without the need
to apply the OperationBehavior
attribute on every method, I wrote the SecurityHelper static class, with the
ImpersonateAll() extension
methods:
public static class SecurityHelper
{
   public static void ImpersonateAll(this ServiceHostBase host);
   public static void ImpersonateAll(this ServiceDescription description);
   //More members
}
The extension methods work on both ServiceHost and ServiceHost<T>.
You can only call ImpersonateAll() before opening the
host:
//Will impersonate in all operations
class MyService : IMyContract
{
   public void MyMethod()
   {...}
}
ServiceHost host = new ServiceHost(typeof(MyService));
host.ImpersonateAll();
host.Open();
Example 10-5
shows the implementation of ImpersonateAll().
Example 10-5. Implementing SecurityHelper.ImpersonateAll()
public static class SecurityHelper
{
   public static void ImpersonateAll(this ServiceHostBase host)
   {
      host.Authorization.ImpersonateCallerForAllOperations = true;
      host.Description.ImpersonateAll();
   }
   public static void ImpersonateAll(this ServiceDescription description)
   {
      foreach(ServiceEndpoint endpoint in description.Endpoints)
      {
         if(endpoint.Contract.Name == "IMetadataExchange")
         {
            continue;
         }
         foreach(OperationDescription operation in endpoint.Contract.Operations)
         {
            OperationBehaviorAttribute attribute = operation.Behaviors.
                                               Find<OperationBehaviorAttribute>();
            attribute.Impersonation = ImpersonationOption.Required;
         }
      }
   }
   //More members
}
In Example 10-5, ImpersonateAll() (for the sake of good
manners) first sets the ImpersonateCallerForAllOperations
property of the provided host to true, then obtains the service description
from the host and calls the other overloaded extension method of
ServiceDescription. This version
explicitly configures all operations with ImpersonationOption.Required, by iterating over the
endpoints collection of the service description. For each endpoint
(except the metadata exchange endpoints), ImpersonateAll() accesses the operations collection
of the contract. For each operation, there is always
exactly one OperationBehaviorAttribute in the
collection of operation behaviors, even if you did not provide one
explicitly. The method then simply sets the Impersonation property to ImpersonationOption.Required.
Authorization and authentication protect the service from being accessed by unauthorized, unauthenticated, potentially malicious clients. However, how should the client be protected from malicious services? One of the ways an adversarial service could abuse the client is by assuming the client’s identity and credentials and causing harm while masquerading as the client. This tactic enables the malicious service both to leave an identity trail pointing back to the client and to elevate its own potentially demoted, less-privileged credentials to the client’s level.
In some cases, the client may not want to allow the service to
obtain its identity at all. WCF therefore lets the client indicate
the degree to which the service can obtain the client’s identity and
how it can use it. Impersonation is actually a range of options
indicating the level of trust between
the client and the service. The WindowsClientCredential class
provides the AllowedImpersonationLevel enum of the type
TokenImpersonationLevel, found in the System.Security.Principal
namespace:
public enum TokenImpersonationLevel
{
   None,
   Anonymous,
   Identification,
   Impersonation,
   Delegation
}
public sealed class WindowsClientCredential
{
   public TokenImpersonationLevel AllowedImpersonationLevel
   {get;set;}
   //More members
}
The client can use AllowedImpersonationLevel to restrict the
allowed impersonation level both programmatically and
administratively. For example, to programmatically restrict the
impersonation level to TokenImpersonationLevel.Identification,
before opening the proxy the client would write:
MyContractClient proxy = new MyContractClient();
proxy.ClientCredentials.Windows.AllowedImpersonationLevel =
                                           TokenImpersonationLevel.Identification;
proxy.MyMethod();
proxy.Close();
When using a config file, the administrator should define the
allowed impersonation level as a custom endpoint behavior and
reference it from the relevant endpoint section:
<client>
   <endpoint behaviorConfiguration = "ImpersonationBehavior"
      ...
   />
</client>
<behaviors>
   <endpointBehaviors>
      <behavior name = "ImpersonationBehavior">
         <clientCredentials>
            <windows allowedImpersonationLevel = "Identification"/>
         </clientCredentials>
      </behavior>
   </endpointBehaviors>
</behaviors>
TokenImpersonationLevel.None simply means
that no impersonation level is assigned, so the client provides no
identity information. This setting therefore amounts to the same
thing as TokenImpersonationLevel.Anonymous, where
the client provides no credentials at all. These two values are, of
course, the safest from the client’s perspective, but they are the
least useful options from the application’s perspective, since the
service cannot perform any authentication or authorization. Not
sharing credentials is possible only if the service is configured
for anonymous access or for having no security, which is not the
case with the intranet scenario. If the service is configured for
Windows security, these two values yield an ArgumentOutOfRangeException on the client
side.
With TokenImpersonationLevel.Identification,
the service can identify the client (i.e., obtain the security
identity of the calling client). The service, however, is not
allowed to impersonate the client—everything the service does must
be done under the service’s own identity. Trying to impersonate will
throw an ArgumentOutOfRangeException on the service
side. Note, however, that if the service and the client are on the
same machine, the service will still be able to impersonate the
client, even when TokenImpersonationLevel.Identification is
used. TokenImpersonationLevel.Identification is
the default value used with Windows security and is the recommended
value for the intranet scenario.
TokenImpersonationLevel.Impersonation
grants the service permission both to obtain the client’s identity
and to impersonate the client. Impersonation indicates a great deal
of trust between the client and the service, since the service can
do anything the client can do, even if the service host is
configured to use a less privileged identity. The only difference
between the real client and the impersonating service is that if the
service is on a separate machine from the client, it cannot access
resources or objects on other machines as the client, because the
service machine does not really have the client’s password. In the
case where the service and the client are on the same machine, the
service impersonating the client can make one network hop to another
machine, since the machine it resides on can still authenticate the
impersonated client identity.
Finally, TokenImpersonationLevel.Delegation
provides the service with the client’s Kerberos ticket. In this
case, the service can freely access resources on any machine as the
client. If service is also configured for delegation, when it calls
other downstream services the client’s identity could be propagated
further and further down the call chain. Delegation-required
Kerberos authentication is not possible on Windows workgroup
installations. Both the client and server user accounts must be
properly configured in Active Directory to support delegation, due
to the enormous trust (and hence security risk) involved. Delegation
uses by default another security service called
cloaking, which propagates the caller’s
identity along the call chain.
Delegation is extremely dangerous from the client’s
perspective, since the client has no control over who ends up using
its identity, or where. When the impersonation level is set to
TokenImpersonationLevel.Impersonation, the
client takes a calculated risk: it knows which services it is
accessing, and if those services are on a different machine, the
client identity cannot propagate across the network. I consider
delegation something that enables the service not just to
impersonate the client, but to act as an imposter; security-wise, as
far as the client is concerned, this is tantamount to waiving
security.
You should design your services so that they do not rely on
impersonation, and your clients should use TokenImpersonationLevel.Identification.
Impersonation is a relic of the ’90s, typically used in classic
two-tier systems in the absence of role-based security support,
where scalability was not a concern and managing a small number of
identities across resources was doable.
As a general design guideline, the further down the call chain from the client, the less relevant the client’s identity is. If you use some kind of layered approach in your system design, each layer should run under its own identity, authenticate its immediate callers, and implicitly trust its calling layer to authenticate its callers, thereby maintaining a chain of trusted, authenticated callers. This is called the trusted subsystem pattern. Impersonation, on the other hand, requires you to keep propagating the identity further and further down the call chain, all the way to the underlying resources. Doing so impedes scalability, because many resources (such as SQL Server connections) are allocated per identity. With impersonation, you will need as many resources as clients, and you will not be able to benefit from resource pooling (such as connection pooling). Impersonation also complicates resource administration, because you need to grant access to the resources to all of the original client identities, and there could be numerous such identities to manage. A service that always runs under its own identity poses no such problems, regardless of how many identities access that service. To control access to the resources, you should use authorization, as discussed next.
Multitier systems that do use impersonation typically
gravitate toward delegation, since that is the only way to propagate
the client identities across tiers and machines. In fact, the main
reason developers today use impersonation has little to do with
resource access authorization (which can easily be accomplished with
role-based security); instead, it is used as a mechanism for
auditing and identity propagation. If the application is required to
provide at lower layers the identity of the topmost client or all
clients up the chain, impersonation (if not full-fledged delegation)
may look like a viable option. There are three good solutions for
these requirements. First, if the business use cases require you to
provide the top-level identity to downstream parties, there is
nothing wrong with providing it as explicit method arguments since
they are part of the required behavior of the system. The second
solution is to use security audits (discussed later) and leave a
trail across the call chain. At any point, you can reconstruct that
chain of identities from the local audits. The third option is to
propagate the identity of the original caller (or the entire stack
of callers) in the message headers. Doing that transparently across
the call chain requires passing the identities out-of-band in the
headers and using the elegant generic interception technique
described in Appendix E. ServiceModelEx
contains those helper classes (look for SecurityCallStackClientBase<T>,
OperationSecurityCallStackAttribute, and
SecurityCallStackBehaviorAttribute).
Finally, relying on impersonation precludes non-Windows authentication mechanisms. If you do decide to use impersonation, use it judiciously and only as a last resort, when there is no other, better design approach.
While authentication deals with verifying that the client is indeed who the client claims to be, most applications also need to verify that the client (or more precisely, the identity it presents) has permission to perform the operation. Since it would be impractical to program access permissions for each individual identity, it is better to grant permissions to the roles clients play in the application domain. A role is a symbolic category of identities that share the same security privileges. When you assign a role to an application resource, you are granting access to that resource to anyone who is a member of that role. Discovering the roles clients play in your business domain is part of your application-requirements analysis and design, just like factoring services and interfaces. By interacting with roles instead of particular identities, you isolate your application from changes made in real life, such as adding new users, moving existing users between positions, promoting users, or users leaving their jobs. .NET allows you to apply role-based security both declaratively and programmatically, if the need to verify role membership is based on a dynamic decision.
For security purposes, it is convenient to lump together an identity and the information about its role membership. This representation is called the security principal.
The principal in .NET is any object that implements the
IPrincipal interface, defined in
the System.Security.Principal
namespace:
public interface IPrincipal
{
   IIdentity Identity
   {get;}
   bool IsInRole(string role);
}
The IsInRole() method
simply returns true if the
identity associated with this principal is a member of the specified
role, and false otherwise. The
Identity read-only property
provides access to read-only information about the identity, in the
form of an object implementing the IIdentity interface. Out of the box, .NET
offers several implementations of IPrincipal. GenericPrincipal is a general-purpose
principal that has to be preconfigured with the role information. It
is typically used when no authorization is required, in which case GenericPrincipal wraps a blank identity.
The WindowsPrincipal class looks up role
membership information inside the Windows NT groups.
Every .NET thread has a principal object associated with it,
obtained via the CurrentPrincipal
static property of the Thread
class:
public sealed class Thread
{
   public static IPrincipal CurrentPrincipal
   {get;set;}
   //More members
}
For example, here is how to discover the username as well as whether or not the caller was authenticated:
IPrincipal principal = Thread.CurrentPrincipal;
string userName = principal.Identity.Name;
bool isAuthenticated = principal.Identity.IsAuthenticated;
As presented earlier, the ServiceHostBase class provides the
Authorization property of the
type ServiceAuthorizationBehavior. ServiceAuthorizationBehavior has the
PrincipalPermissionMode property of the enum type
PrincipalPermissionMode, defined as:
public enum PrincipalPermissionMode
{
   None,
   UseWindowsGroups,
   UseAspNetRoles,
   Custom
}
public sealed class ServiceAuthorizationBehavior : IServiceBehavior
{
   public PrincipalPermissionMode PrincipalPermissionMode
   {get;set;}
   //More members
}
Before opening the host, you can use the PrincipalPermissionMode property to select
the principal mode; that is, which type of principal to install to
authorize the caller.
If PrincipalPermissionMode
is set to PrincipalPermissionMode.None,
principal-based authorization is impossible. After authenticating
the caller (if authentication is required at all), WCF installs
GenericPrincipal with a blank
identity and attaches it to the thread that invokes the service
operation. That principal will be available via Thread.CurrentPrincipal.
When PrincipalPermissionMode is set to PrincipalPermissionMode.UseWindowsGroups,
WCF installs a WindowsPrincipal
with an identity matching the provided credentials. If no Windows
authentication took place (because the service did not require it),
WCF will install a WindowsPrincipal with a blank
identity.
PrincipalPermissionMode.UseWindowsGroups
is the default value of the PrincipalPermissionMode property, so
these two definitions are equivalent:
ServiceHost host1 = new ServiceHost(typeof(MyService));

ServiceHost host2 = new ServiceHost(typeof(MyService));
host2.Authorization.PrincipalPermissionMode =
                                          PrincipalPermissionMode.UseWindowsGroups;
When using a config file, you need to reference a custom
behavior section assigning the
principal mode:
<services>
   <service name = "MyService" behaviorConfiguration = "WindowsGroups">
      ...
   </service>
</services>
<behaviors>
   <serviceBehaviors>
      <behavior name = "WindowsGroups">
         <serviceAuthorization principalPermissionMode = "UseWindowsGroups"/>
      </behavior>
   </serviceBehaviors>
</behaviors>You apply service-side
declarative role-based security using the attribute PrincipalPermissionAttribute, defined in
the System.Security.Permissions
namespace:
public enum SecurityAction
{
   Demand,
   //More members
}

[AttributeUsage(AttributeTargets.Class | AttributeTargets.Method)]
public sealed class PrincipalPermissionAttribute : CodeAccessSecurityAttribute
{
   public PrincipalPermissionAttribute(SecurityAction action);

   public bool Authenticated
   {get;set; }
   public string Name
   {get;set;}
   public string Role
   {get;set;}
   //More members
}
The PrincipalPermission
attribute lets you declare the required role membership. For the
intranet scenario, when you specify a Windows NT group as a role,
you don’t have to prefix the role name with your domain or machine
name (if you wish to authorize against its roles). You can also
explicitly specify another domain, if you have a trust relationship
with it.
In Example 10-6, the
declaration of the PrincipalPermission attribute grants
access to MyMethod() only to
callers whose identities belong to the Managers group.
Example 10-6. Declarative role-based security on the intranet
[ServiceContract]
interface IMyContract
{
   [OperationContract]
   void MyMethod();
}
class MyService : IMyContract
{
   [PrincipalPermission(SecurityAction.Demand,Role = "Manager")]
   public void MyMethod()
   {...}
}
If the caller is not a member of that role, .NET throws an
exception of type SecurityException.
Note
When experimenting with Windows role-based security, you often add users to or remove users from user groups. Because Windows caches user-group information at login time, the changes you make are not reflected until the next login.
If multiple roles are allowed to access the method, you can apply the attribute multiple times:
[PrincipalPermission(SecurityAction.Demand,Role ="Manager")] [PrincipalPermission(SecurityAction.Demand,Role ="Customer")] public void MyMethod() {...}
When multiple PrincipalPermission attributes are used,
.NET verifies that the caller is a member of at least one of the
demanded roles. If you want to verify that the caller is a member of
both roles, you need to use programmatic role membership checks,
discussed later.
While the PrincipalPermission attribute by its very
definition can be applied on methods and classes, in a WCF service
class you can apply it only on methods. The reason is that in WCF,
unlike with normal classes, the service class constructor always
executes under a GenericPrincipal
with a blank identity, regardless of the authentication mechanisms
used. As a result, the identity under which the constructor is
running is unauthenticated and will always fail any kind of
authorization attempt (even if the client is a member of the role
and even when not using Windows NT groups):
//Will always fail
[PrincipalPermission(SecurityAction.Demand,Role = "...")]
class MyService : IMyContract
{...}
Warning
Avoid sensitive work that requires authorization in the
service constructor. With a per-call service, perform such work in
the operations themselves, and with a sessionful service, provide
a dedicated Initialize() operation where you
can initialize the instance and authorize the callers.
By setting the Name
property of the PrincipalPermission attribute, you can
even insist on granting access only to a particular user:
[PrincipalPermission(SecurityAction.Demand,Name = "John")]or to a particular user that is a member of a particular role:
[PrincipalPermission(SecurityAction.Demand,Name = "John",
                     Role = "Manager")]
These practices are inadvisable, however, because it is best to avoid hardcoding usernames.
Note
Declarative role-based security hardcodes the role name. If your application looks up role names dynamically you have to use programmatic role verification, as presented next.
Sometimes you need to programmatically verify role membership.
Usually, you need to do that when the decision as to whether to
grant access depends both on role membership and on some other
values known only at call time, such as parameter values, time of
day, and location. Another case in which programmatic role
membership verification is needed is when you’re dealing with
localized user groups. To demonstrate the first category, imagine a
banking service that lets clients transfer sums of money between two
specified accounts. Only customers and tellers are allowed to call
the TransferMoney() operation,
with the following business rule: if the amount transferred is
greater than 50,000, only tellers are allowed to do the transfer.
Declarative role-based security can verify that the caller is either
a teller or a customer, but it cannot enforce the additional
business rule. For that, you need to use the IsInRole() method of IPrincipal, as shown
in Example 10-7.
Example 10-7. Programmatic role-based security
[ServiceContract]
interface IBankAccounts
{
   [OperationContract]
   void TransferMoney(double sum,long sourceAccount,long destinationAccount);
}
static class AppRoles
{
   public const string Customer = "Customer";
   public const string Teller   = "Teller";
}
class BankService : IBankAccounts
{

   [PrincipalPermission(SecurityAction.Demand,Role = AppRoles.Customer)]
   [PrincipalPermission(SecurityAction.Demand,Role = AppRoles.Teller)]
   public void TransferMoney(double sum,long sourceAccount,long destinationAccount)
   {
      IPrincipal  principal = Thread.CurrentPrincipal;
      Debug.Assert(principal.Identity.IsAuthenticated);

      bool isCustomer = principal.IsInRole(AppRoles.Customer);
      bool isTeller   = principal.IsInRole(AppRoles.Teller);

      if(isCustomer && ! isTeller)
      {
         if(sum > 50000)
         {
            string message = "Caller does not have sufficient authority to" +
                             "transfer this sum";
            throw new SecurityException(message);
         }
      }
      DoTransfer(sum,sourceAccount,destinationAccount);
   }
   //Helper method
   void DoTransfer(double sum,long sourceAccount,long destinationAccount)
   {...}
}
Example 10-7 also
demonstrates a number of other points. First, even though it uses
programmatic role membership verification with the value of the
sum argument, it still uses
declarative role-based security as the first line of defense,
allowing access only to clients who are members of the Customer or
Teller roles. Second, you can programmatically assert that the
caller is authenticated using the IsAuthenticated property of IIdentity. Finally, note the use of the
AppRoles static class to
encapsulate the actual string used for the role to avoid hardcoding
the roles in multiple places.
Note
There is a complete disconnect between role-based security
and the actual principal type. When the PrincipalPermission attribute is asked
to verify role membership, it simply gets hold of its thread’s
current principal in the form of IPrincipal, and calls its IsInRole() method. This is also true of
programmatic role membership verification that uses only IPrincipal, as shown in Example 10-7. The separation
of the IPrincipal interface from its
implementation is the key to providing other role-based security
mechanisms besides Windows NT groups, as you will see in the other
scenarios.
In the intranet scenario, after successful
authentication, WCF will attach to the operation thread a principal
identity of the type WindowsIdentity, which will have the value
of its Name property set to the
username (or Windows account) provided by the client. Since valid
credentials are provided, the security call context’s two
identities—the primary identity and the Windows identity—will be set
to the same identity as the principal identity. All three identities
will be considered authenticated. The identities and their values are
shown in Table 10-4.
Table 10-4. Identity management in the intranet scenario
Identity | Type | Value | Authenticated |
|---|---|---|---|
Thread principal |
| Username | Yes |
Security context primary |
| Username | Yes |
Security context Windows |
| Username | Yes |
Note that while the host processes retain their designated identities, the principal identity will be that of the caller. I call this behavior soft impersonation. When it is used in conjunction with role-based security, it largely negates the need to ever perform real impersonation and replace the security token with that of the client.
When it comes to security on the intranet, there are several key differences between normal service operations and callbacks. First, with a callback contract you can only assign a protection level at the operation level, not the callback contract level. For example, this protection-level constraint will be ignored:
[ServiceContract(CallbackContract = typeof(IMyContractCallback))]
interface IMyContract
{...}

//Demand for protection level will be ignored
[ServiceContract(ProtectionLevel = ProtectionLevel.EncryptAndSign)]
interface IMyContractCallback
{...}
Only the service contract designating the callback contract can set a contract-level protection constraint. WCF deliberately ignores the service contract attribute on the callback contract (as explained in Chapter 5) to avoid a potential conflict between two contract attributes that apply to the same channel.
You can take advantage of operation-level demand for a protection level as follows:
[ServiceContract(CallbackContract = typeof(IMyContractCallback))]
interface IMyContract
{...}

interface IMyContractCallback
{
   [OperationContract(ProtectionLevel = ProtectionLevel.EncryptAndSign)]
   void OnCallback();
}
All calls into the callback object come in with an unauthenticated principal, even if Windows security was used across the board to invoke the service. As a result, the principal identity will be set to a Windows identity with a blank identity, which will preclude authorization and role-based security.
While the callback does have a security call context, the
Windows identity will be set to a WindowsIdentity instance with a blank
identity, which will preclude impersonation. The only meaningful
information will be in the primary identity, which will be set to the
service host’s process identity and machine name:
class MyClient : IMyContractCallback
{
   public void OnCallback()
   {
      IPrincipal principal = Thread.CurrentPrincipal;
      Debug.Assert(principal.Identity.IsAuthenticated == false);

      ServiceSecurityContext context = ServiceSecurityContext.Current;
      Debug.Assert(context.PrimaryIdentity.Name == "MyHost/localhost");

      Debug.Assert(context.IsAnonymous == false);
   }
}
I recommend avoiding any sensitive work in the callback, since you cannot easily use role-based security.