Afterword

After reading this book, especially if you engaged with the Design Time and Big Project exercises, you should have a solid grasp on how to create 3D-printable designs with the OpenSCAD programming language. In closing, we’ll provide some helpful pointers on where to go next, as well as help contextualize how OpenSCAD fits into the larger ecosystems of the open source and maker movements.
Learn More About OpenSCAD
We have covered a significant portion of OpenSCAD’s available features here; however, there are still more advanced features to uncover. A variety of resources are available for you to unlock OpenSCAD’s full creative power:
Visit the OpenSCAD online documentation
Once you’re ready to take your OpenSCAD skills further, your first stop should be the official online OpenSCAD documentation (https://openscad.org/documentation). This is the place to look for other well-structured guides to learning more about OpenSCAD. You’ll find tutorials, a user manual, a more complete language reference, and regularly updated links to many other learning materials, including books, articles, and videos.
Remix someone else’s OpenSCAD design
For slightly less structured learning, try to remix an existing OpenSCAD design. Learning to read code written by other people can result in substantial improvements to your own coding and organizational skills. You can easily search online for OpenSCAD designs and be sure to check out two of the most popular 3D design-sharing websites: https://thingiverse.com/ and https://youmagine.com/. Searching for openscad will result in thousands of OpenSCAD designs available for you to use and remix.
Most of the designs are also available as OpenSCAD code, which you can explore to see how other people solve challenging design problems in code. Creating a remix of someone else’s design by integrating your own customized innovations into their code is a great way to demonstrate that you truly understand how all the pieces of their design fit together.
Join the OpenSCAD community
Engaging with other like-minded people in the thriving OpenSCAD community of designers is another way to supplement your learning. Sometimes your design ideas might present unique challenges that no amount of reading or searching will illuminate. Asking the OpenSCAD community for help could offer the perfect solution.
The official OpenSCAD community page (https://openscad.org/community) has a chat room as well as a mailing list and forum where OpenSCAD users discuss projects, ask for help, and even facilitate development of OpenSCAD itself. OpenSCAD is open source software, and development discussions often take place in the same forums where community members hang out. In addition to finding answers to your most perplexing design problems, participating in the OpenSCAD forum means that you can offer help to others, and you might even be able to influence the development of the OpenSCAD software itself by suggesting new features or reporting bugs.
The Open Source Ethos
As we’ve mentioned several times throughout the book, OpenSCAD is open source software. Proprietary 3D design software is typically expensive and usually carries a steep learning curve. Even “free” web-based 3D-design tools often require creating an account, which can raise concerns about privacy or longevity of the service. The OpenSCAD community of developers wanted to create a truly free and accessible 3D-modeling platform to open the world of solid CAD modeling to everyone, especially people interested in the intersection of coding and 3D design. Hundreds of people have donated their time and effort to create and improve OpenSCAD for you, in the hopes that removing some of these traditional barriers will encourage more people to learn and use 3D modeling to solve problems both big and small.
Motivation and Ecosystem
Why would so many people spend so much time and effort to turn something that is traditionally “hard” and “expensive” into something that is both free and so much more accessible and approachable? Important motivating reasons behind making OpenSCAD open source include the following:
- Supporting communities that celebrate cross-cultural and cross-discipline explorations
- Supporting and engaging with the inclusive teaching, learning, and sharing of important STEM/STEAM skills
- Encouraging individuals to share the benefits of their work and efforts with others
- Empowering individuals to make things better by providing change-making ownership of existing creations through a crowd-based iterative design process
- Believing that paying it forward encourages others also to pay it forward, resulting in a magnified benefit to society
In fact, the OpenSCAD open source project also exists because of the kindness of strangers. The OpenSCAD development community relies upon many other open source projects that were each created so that others could use the technology to (hopefully) make the world a better place. Some of the most prominent are as follows:
- Qt to help build the OpenSCAD user interface (https://qt.io/)
- CGAL for help evaluating constructive solid geometry (CSG) when OpenSCAD designs are rendered (https://cgal.org/)
- OpenCSG and OpenGL to help generate CSG previews for OpenSCAD designs (http://opencsg.org/ and https://www.opengl.org/)
- Boost for its large toolbox of C++ convenience libraries (https://boost.org/)
- Eigen to provide fast and well-tested linear algebra functions (https://eigen.tuxfamily.org/)
We would like to thank the developers of OpenSCAD and every open source project for their time and valuable contributions.
Online Citizenship
It can be easy to forget that real people are on the other side of the screen you use to access the internet. The open source software movement relies heavily upon the idea of online citizenship, making sure that the distributed social network of the internet helps promote positive social change while supporting the advancement of human rights. Here are a few starting principles for online citizenship we hope you’ll take with you as you continue your journey with OpenSCAD and other open source software projects:
Give credit
Provide attribution when you use something someone else has created. This helps support the original creator (even with kudos) and demonstrates that you’re aware of the privileges of “standing on the shoulders of giants.”
Have empathy for others
Remember that the people you interact with online don’t necessarily share your background, language, culture, or inside jokes. Maintain and model a respectful and considerate use of communication in all community spaces. Be respectful of the cultural and environmental impact of the things you create.
Pay it forward
Create things that help solve problems for real people. Share your creations, especially when you’ve created something by using tools that other people have given away for free.
OpenSCAD and the Maker Movement
It would be an oversight to overlook OpenSCAD’s relationship with the maker movement. Making has become an increasingly popular term to describe taking a creative, DIY approach to problem-solving. Making usually involves trying to solve a problem by using an iterative design process and a variety of machines, tools, and materials: cardboard prototyping, 3D printing, laser cutting, electronics, soldering, woodworking, sewing, CNC (computer numeric control) machining, vinyl cutting, screen printing, water-jet cutting, and so on.
OpenSCAD is a key software tool for the maker community. Although this book focuses on designing with OpenSCAD in anticipation of 3D printing, 3D printing only scratches the surface of what the maker community has created with OpenSCAD. Combining OpenSCAD and 3D printing is a great solution for many problems, but it’s not always the best solution. Developing a far-reaching, holistic sense of the design tools and paradigms collected under the maker umbrella provides many benefits.
Making and Creative Problem-Solving
We have used the word design intentionally to describe OpenSCAD creations, because each OpenSCAD project is created for a specific reason, often to solve a physical problem in the real world. Fundamental to the notion of design is the practice of problem-solving. Similar to swimming, problem-solving through design is a skill that can be truly learned only when you are “in the water.” Every time you finish an OpenSCAD project, you increase your capacity to design a specific solution to a specific problem.
The maker movement rightly recognizes creative problem-solving through design as a transferable skill. If you are new to the maker movement, you might find it surprising that designing a sewing kit can help with your ability to create a well-ordered sequence of OpenSCAD code or that creating a multilayered screen print can help you decompose a complicated problem into well-defined smaller parts. You can acquire these higher-order design skills in any medium. In addition to the transferable programming and 3D-printing techniques you’ve learned in this book, we hope that you will consider applying your new problem-solving and design proficiency in a few other interesting directions.
2D Fabrication
The world of 2D fabrication is a vast landscape for applying the skills you’ve learned in this book. Extruding a 2D shadow to create a 3D design is a powerful 3D design tool. However, many maker tools use 2D files (such as .svg or .dxf) to manufacture physical versions of their design. 2D fabrication machines (such as laser cutters, vinyl cutters, water-jet cutters, and so on) essentially cut the outline of the 2D shape into flat pieces of wood, metal, vinyl, felt, cardboard, or most other flat materials. Because OpenSCAD makes it so easy to use variables, arithmetic, loops, and if statements to place and combine shapes, many makers use OpenSCAD to create purely 2D designs specifically for these machines.
Here are a few ideas to inspire your 2D creativity with OpenSCAD:
- Use a collection of loops to generate small, circular holes along the perimeter of a 2D leather sewing pattern you’ve created in OpenSCAD. Then, cut out the pattern with a laser cutter or a cutting machine. Leather is difficult to punch a needle through, but using OpenSCAD loops to generate the holes will help save time and effort.
- Use a CNC wood cutter to cut out a life-size version of a piece of flat-pack furniture you’ve designed with OpenSCAD 2D shapes. Although 3D printers have a relatively small printing area, CNC cutters can cut a rather large surface area. 3D printers can be used for prototyping, while the usable furniture is created on a large CNC machine.
- After you’ve 3D-printed a few prototype versions of a flat 2D gear you’ve designed and extruded with OpenSCAD, use a water-jet cutter to cut it out of metal. Plastic gears don’t last nearly as long as metal gears, especially if you’re actually using them for your bike.
Physical Computing
Many interactive maker projects combine electronics and computers with other physical components to create something with dynamic characteristics. What if your OpenSCAD designs could sense and respond to the world, or even move? A variety of inexpensive, pocket-size computers are available that can supercharge the interactivity of the designs you create with OpenSCAD.
These miniature computing platforms utilize a variety of sensors and output (like microphones, temperature sensors, movement sensors, speakers, motors, and LEDs) to interact with the real world. A few of the most popular small computing platforms are listed here:
- Raspberry Pi (https://raspberrypi.org/)
- Arduino (https://arduino.cc/)
- micro:bit (https://microbit.org/)
- Circuit Playground (https://learn.adafruit.com/introducing-circuit-playground/)
Each of these devices has a large online community with plenty of learning resources available. Combine OpenSCAD with one of these inexpensive pocket-size computers to explore areas like robotics, physical computing, wearable computing, human-robot interaction, or the Internet of Things. Here are some examples of projects you might create with OpenSCAD and one of the preceding devices:
- Automatic plant/garden watering systems
- Totally new, interactive digital instruments
- Physical enclosures for personal, multinode data centers
- Personal assistive devices to help with accessibility for people with disabilities
By using OpenSCAD to invent creative new uses for these electronic devices, you’re setting up your project to be easily customizable, shareable, and extensible. Maybe you can even create something that kick-starts your own open source project.
Makerspaces
Making can happen anywhere, but getting together at a central location so that like-minded creators can share ideas and troubleshoot solutions has become popular for makers. A makerspace is a physical location and community of makers that provides a collection of tools, machines, and learning resources. Makerspaces provide access to equipment that might be too expensive to own personally and serve as a physical community for makers that can offer the same benefits as the virtual communities mentioned previously. You can find makerspaces (big and small, free and fee-based) at libraries, schools, independent venues, and maker faires or festivals (https://makerfaire.com/).
If your local community doesn’t yet provide access to a centralized, shared location for making, some makerspaces have gone virtual. Many online vendors allow you to upload designs for 3D printing or 2D cutting in a variety of materials, providing an affordable stepping-stone for creating a physical version of your design when you don’t have access to a fabrication machine.
Final Ideas for More Practice
We’d like to leave you with some final advice. The key to mastering any skill is a combination of learning and doing. If you have only read this book without actually coding or designing, you’ve skipped a big portion of the learning potential, but it’s not too late! You can put this book down right now and go back to any project.
If you’re looking for more examples of well-defined design exercises, the following screenshots present a few visual ideas from the OpenSCAD community that should work well as inspiration for “next step” projects. You can also check out https://openscad.org/gallery for more curated examples.
Customizable Measuring Spoons
Creating a measuring spoon module is a good intermediate design project (Figure 1). The primary challenge with this project is to create a single OpenSCAD module with the spoon size, units, and configuration (nested stacking spoons or spoons that lay flat) as parameters. The measuring spoon shape and labels can then be generated from those parameters. Can you generate 3D-printed measuring spoons with the exact measurements required to trust when cooking or baking?

Figure 1: A collection of measuring spoons with several sizes and configurations
These measuring spoons were generated from OpenSCAD code originally designed by charliearmorycom. You can find the Customizable Measuring Spoon project at https://www.thingiverse.com/thing:51874/.
Customizable Vacuum Tool
Designing a custom tip to fit the end of a vacuum hose is a good example of a project that needs to interface with an existing physical tool. Creating a well-fit physical connection will require both careful measurement and continued experimentation with a 3D printer in order to perfect dimensions. Additionally, this project offers the opportunity to create a customizable nozzle, which can be generated by one or more module parameters (Figure 2).

Figure 2: A collection of vacuum tool tips with parameterized nozzles
The OpenSCAD code used to generate these customized vacuum nozzle tips was originally designed by Ziv Botzer. The Customizable Vacuum Tool project can be found online at https://www.thingiverse.com/thing:1571860/.
Customizable Flowerpots
Using OpenSCAD to create a flowerpot module will allow you to design something that combines the decorative with the functional. This intermediate-level project will allow you to scale your 3D prints both large and small, depending on the size of the plant you’d like to house (Figure 3). There are several opportunities for parameters in this project, with a bonus challenge of generating both the flowerpot and the saucer tray from the same module. Don’t forget to include a hole in the bottom of the flowerpot for water to drain into the saucer!
The OpenSCAD code used to generate this collection of flowerpots came from the Customizable Flower Pot (classic style) project by Robert Wallace, which is available online at https://www.thingiverse.com/thing:2806583/.

Figure 3: A collection of flowerpots and saucers trays of different sizes and shapes
Drawer Box
Remember the desktop organizer you created as a Big Project in Chapter 2. This box and drawer organizer is a more complex organizer idea, which can be taken in many directions. The initial challenge is to tune the box dimensions in order to make the drawers slide easily, yet firmly, into the box. Customizing sizes and designs of the box, drawers, and drawer layout (ideally via parameterized modules) are also good future challenges. Notice how this project includes useful details like small, spherical nubs on box dividers to keep drawers in place, as well as for loop-generated holes on all three sides of the box to reduce both the time and material required to 3D-print a Drawer Box (Figure 4).

Figure 4: A desktop organizer with several different drawer configurations
The Drawer Box project by Gian Pablo Villamil can be found online at https://www.thingiverse.com/thing:421886/.
Lab Clamps
Designed for use in a physics classroom, this project is a good example of using 3D printing to manufacture replacements for items that are normally cost prohibitive. 3D-printing mechanical parts designed to fit with existing tools or parts is always challenging. In this example, a series of clamps and stands are designed to be mated with metal bolts (Figure 5). Designing an appropriate inner structure to mate firmly with these bolts can require some experimentation. Projects like this are a good example of how OpenSCAD and 3D printing can work together as a service project for a school or community center.
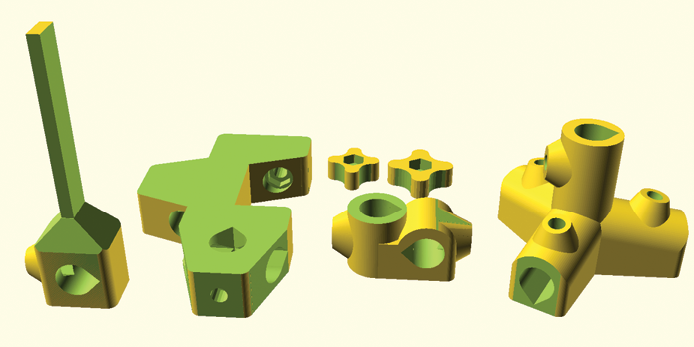
Figure 5: A collection of clamps and stands for physics experiments
The Lab Clamps project was created by Mark Schober. You can find the code used to generate the clamps in this picture (along with more details on how to incorporate metal bolts and mass manufacture these parts with silicone molds) at https://www.modelingscience.org/post/3d-print-your-own-lab-clamps/.
Chess Set
Designing a chess set is a favorite project among both artists and 3D-printing enthusiasts. While the example shown is very close to a classic chess set (Figure 6) and would likely require sourcing a 3D model of a horse’s head, many designs exist online for creating a more contemporary or abstract chess set. Creating a base module would help provide a consistent size and design for your own chess set, while creating a separate module for each piece would make it easy to organize your 3D printing.

Figure 6: A custom chess set
The code used to generate this chess set was designed by Tim Edwards and is available at https://www.thingiverse.com/thing:585218/.
Pegboard Wizard
Have you ever needed to organize a collection of tools or hardware using a pegboard? This last example leverages the modular potential of a standard pegboard to create a library of useful container bins and tool holders (Figure 7). Create a single module with many parameters, or a collection of modules with fewer parameters. Either way, this project will test your ability to apply principles of computational thinking while you also create a useful organizational solution to your offline toolkit.

Figure 7: A collection of pegboard organizers created by the pegboard wizard
Pegstr - Pegboard Wizard was designed by Marius Gheorghescu and is available at https://www.thingiverse.com/thing:537516/.