
Although you can manage many different types of AWS resources with Puppet, the most important is the EC2 instance (the virtual server). In this section, we'll see how to create your first EC2 instance.
In order to run an EC2 instance, which is to say an AWS virtual machine, you need to choose which virtual machine to run out of the many thousands available. Each virtual machine snapshot is called an Amazon Machine Image (AMI) and has a unique ID. It's this ID that you will add to your Puppet manifest to tell it what kind of instance to start.
It doesn't matter much for the purposes of this example which AMI you choose, but we'll be using an official Ubuntu image. To find one, follow these steps:
- Browse to the following URL:
- In the Search box, enter
us-east-1 xenial - You should see a list of Ubuntu Xenial AMIs in the
us-east-1region, of various instance types, looking something like the following screenshot: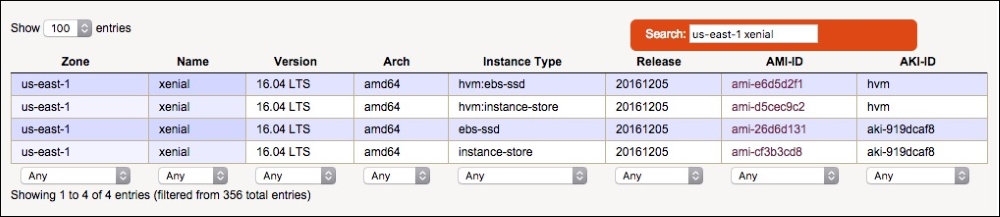
- Find an AMI in the list whose Instance Type is
ebs-ssd. In the preceding screenshot, the third AMI in the list (ami-26d6d131) is suitable.
The hexadecimal code in the AMI-ID column, starting ami- is the AMI ID. Make a note of this for later. Click the link to see the AWS instance type selection page, and check that the AMI you've selected has a label saying Free tier eligible; these AMIs do not incur charges. If you start an instance of a non-free-tier AMI, you will be charged for it.
Now we have chosen a suitable AMI, we're ready to create an EC2 instance with Puppet.
Before we can do that, however, we need to make a couple of changes to the AWS settings, so follow these steps:
- In the AWS console, select VPC from the Services menu.
- Select Your VPCs in the left pane.
- There will be only one VPC listed. Click in the Name field and set its name to
default-vpc - Select Subnets in the left pane.
- There will be several subnets listed, one for each availability zone. Find the one associated with the
us-east-1aavailability zone. - Click the subnet's Name field and set the name to
default-subnetTip
Why do we have to set names for the VPC and subnet before running the example? The
puppetlabs/awsmodule refers to resources by their 'name', which is an arbitrary string, rather than their ID, which is a long hexadecimal code like the AMI ID. Although AWS creates a default VPC and subnet for you automatically, it doesn't assign them a name, which means we can't refer to them in Puppet code until we've set names for them. It doesn't matter what the names actually are so long as the name in your Puppet code is the same as the name assigned in the AWS control panel. We'll find out more about what VPCs and subnets do, and how to use them, later in the chapter. - Edit the file
/examples/aws_instance.pp, and change the value of$amiin the first line to the AMI ID you picked earlier (in our example,ami-26d6d131):sudo vi /examples/aws_instance.pp $ami = 'ami-26d6d131' - Save the file, and run the following command:
sudo puppet apply --environment pbg /examples/aws_instance.pp - You should see some output from Puppet like the following:
Notice: /Stage[main]/Main/Ec2_securitygroup[pbg-sg]/ensure: created
Notice: /Stage[main]/Main/Ec2_instance[pbg-demo]/ensure: changed absent to running
- If you check the EC2 section of the AWS console, you should see that your new instance's status is Initializing, and it will soon be ready to use.
Once the status of the newly-launched instance has changed from Initializing to Running (you may need to click the refresh button on the AWS console), you can connect to it using SSH and the key file you downloaded earlier.
- In the AWS console, look for the Public IP address of the instance and copy it.
- From your own machine (or from the Vagrant VM if you copied the
pbg.pemfile to it) run the following command (replaceYOUR_INSTANCE_IPwith the public IP of the instance):ssh -i ~/.ssh/pbg.pem -l ubuntu YOUR_INSTANCE_IP The authenticity of host 'YOUR_INSTANCE_IP (YOUR_INSTANCE_IP)' can't be established. ECDSA key fingerprint is SHA256:T/pyWVJYWys2nyASJVHmDqOkQf8PbRGru3vwwKH71sk. Are you sure you want to continue connecting (yes/no)? yes Warning: Permanently added 'YOUR_INSTANCE_IP' (ECDSA) to the list of known hosts. Welcome to Ubuntu 16.04.3 LTS (GNU/Linux 4.4.0-1030-aws x86_64)
Tip
Now that you have SSH access to the instance, you can bootstrap it with Puppet in the same way as for physical nodes, or just install Puppet and Git manually and check out the manifest repo. (We'll develop a complete, automated bootstrap process in Chapter 12, Putting it all together.)
Congratulations! You've just created your first EC2 instance with Puppet. In the next section, we'll look at the code and examine the resources in detail.
Let's go through the example manifest and see how it works. But first, we need to know something about AWS resources.
An EC2 instance lives inside a subnet, which is a self-contained virtual network. All instances within the subnet can communicate with each other. Subnets are partitions of a Virtual Private Cloud (VPC), which is a private internal network specific to your AWS account.
An instance also has a security group, which is a set of firewall rules governing network access to the instance.
When you create an AWS account, you get a default VPC, divided into subnets for each AWS availability zone (AZ). We are using the default VPC and one of the default subnets for the example instance, but since we also need a security group, we create that first in Puppet code.
The first part of the example manifest creates the required ec2_securitygroup resource (aws_instance.pp):
ec2_securitygroup { 'pbg-sg':
  ensure      =>  present,
  description => 'PBG security group',
  region      => $region,
  vpc         => 'default-vpc',
  ingress     => [
    {
      description => 'SSH access from world',
      protocol    => 'tcp',
      port        => 22,
      cidr        => '0.0.0.0/0',
    },
    {
      description => 'Ping access from world',
      protocol    => 'icmp',
      cidr        => '0.0.0.0/0',
    },
  ],
}
First of all, an ec2_securitygroup has a title (pbg-sg) which we will use to refer to it from other resources (such as the ec2_instance resource). It also has a description, which is just to remind us what it's for.
It is part of a region and a vpc, and has an array of ingress rules. These are your firewall rules. Each firewall port or protocol you want to allow needs a separate ingress rule.
Each ingress rule is a hash like the following:
{
  description => 'SSH access from world',
  protocol    => 'tcp',
  port        => 22,
  cidr        => '0.0.0.0/0',
}
The protocol specifies the type of traffic (tcp, udp, and so on).
The port is the port number to open (22 is the SSH port, which we'll need in order to log in to the instance).
Finally, the cidr key specifies the range of network addresses to allow access to. (0.0.0.0/0 means 'all addresses'.)
The ec2_instance resource, as you'd expect, manages an individual EC2 instance. Here's the relevant section of the example manifest (aws_instance.pp):
ec2_instance { 'pbg-demo':
  ensure                      => present,
  region                      => $region,
  subnet                      => 'default-subnet',
  security_groups             => 'pbg-sg',
  image_id                    => $ami,
  instance_type               => 't1.micro',
  associate_public_ip_address => true,
  key_name                    => 'pbg',
}
First, ensure => present tells AWS that the instance should be running. (You can also use running as a synonym for present.) Setting ensure => absent will terminate and delete the instance (and any ephemeral storage attached to it).
EC2 instances can also be in a third state, stopped. Stopped instances preserve their storage and can be restarted. Because AWS bills by the instance-hour, you don't pay for instances that are stopped, so it's a good idea to stop any instances that don't need to be running right now.
The instance is part of a region and a subnet, and has one or more security_groups.
The image_id attribute tells AWS which AMI ID to use for the instance.
The instance_type attribute selects from AWS's large range of types, which more or less correspond to the computing power of the instance (different types vary in memory size and the number of virtual CPUs, and a few other factors).
As we're inside a private network, instances will not be reachable from the Internet unless we assign them a public IP address. Setting associate_public_ip_address to true enables this feature. (You should set this to false unless the instance actually needs to expose a port to the Internet.)
Finally, the instance has a key_name attribute which tells AWS which SSH key we are going to use to access it. In this case, we're using the key we created earlier in the chapter, named pbg.
Tip
Before going on to the next example, terminate your instance to avoid using up your free hours. You can do this by selecting the instance in the AWS control panel and clicking Actions | Instance State | Terminate, or reapplying your Puppet manifest with the instance's ensure attribute set to absent.