
Chapter 3 Programming Techniques
In Chapter 2, “Details of the Language,” you were given a quick overview of the core JavaScript language to show you differences and similarities to other computer languages. Now it is time to go to the next level by examining some of the features of the JavaScript language and programming techniques that will make your JavaScript programs more powerful and more resilient to errors and maybe even make you say, “Wow, I didn’t know JavaScript could do that!”
In this chapter we will look at pattern matching and event handling and show you how to use these two pieces of JavaScript functionality to make your JavaScript programs more powerful. This chapter will also examine two programming techniques that will make your JavaScript programs less error prone. You will be introduced to the try…catch block and shown how to use it. You will also be introduced to some free JavaScript debugging programs and techniques.
Pattern Matching
Two of the most common uses of Web pages today are for gathering and distributing data. These two areas, by nature, use data manipulation to understand what the user needs and then return information tailored to the user’s specifications. One of the key tools for processing data is pattern matching. Some scripting languages, such as Perl, are well suited to handle pattern matching, whereas others provide very little pattern matching capabilities. If you are familiar with Perl, you will probably recognize JavaScript pattern matching because it was based on Perl’s implementation of pattern matching. The implementation of pattern matching into JavaScript greatly aids in the processing of data for the Internet.
JavaScript uses the RegExp (short for Regular Expression) object to handle pattern matching. This object holds the pattern definition, as well as provides methods for performing matching. You’ll begin by learning how to define patterns and then by learning how to use the RegExp objects to test for pattern matches.
Defining the RegExp Object
The RegExp object can be created in two different ways, which are similar to defining strings. The first way is to use the RegExp constructor and the keyword new:
var lastName = new RegExp(“Jones”);
This notation creates a new RegExp object called lastName and assigns the pattern Jones. The same functionality could have been accomplished by using a direct assignment:
var lastName = /Jones/;
To differentiate this notation from that used to define strings, the forward slash character (/) is used to designate the beginning and end of the pattern. Notice that forward slashes were not needed in the RegExp() constructor because this could be distinguished from the String() constructor.
Defining Patterns
The syntax used to define patterns in JavaScript could be considered a scripting language in itself because it is so extensive. There are special characters for creating almost any pattern one could imagine, including characters for handling groups, repetition, position, and so on. Table 3.1 shows the special pattern matching characters available in JavaScript.
Table 3.1 Special Pattern Matching Characters
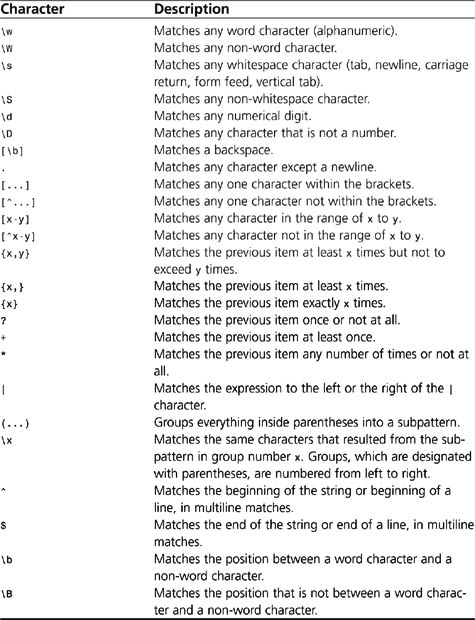
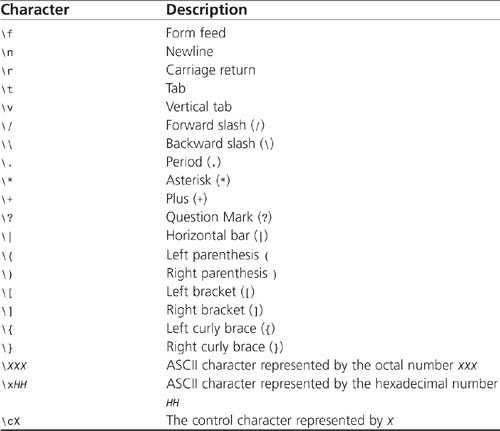
These special pattern matching characters are used within the pattern to aid in defining complex patterns. Looking at Table 3.1, you might notice that characters such as the asterisk (*), plus sign (+), and backslash () hold special meanings that would keep them from being used as a literal. For example, what if you wanted to find all the plus signs (+) in a string? To use a literal plus sign, a backslash () must precede the sign. Table 3.2 shows all the characters that require a backslash character to be taken literally within a pattern.
Table 3.2 Literal Characters Character Description
There is one final piece of syntax that JavaScript provides for creating patterns. Unlike the syntax covered so far, these pieces of syntax appear outside the forward slashes that define the pattern. These attributes are shown in Table 3.3.
Table 3.3 Pattern Attributes

Testing for Pattern Matches
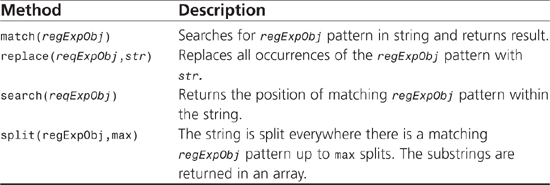
When a pattern has been defined, it can be applied to a string by using special methods that exist in the RegExp and String objects. The pattern matching methods in the String object require RegExp objects, as shown in Table 3.4.
Table 3.4 Pattern Matching Methods in the String Object
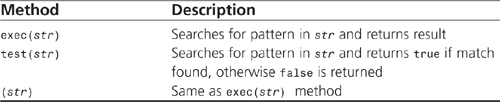
The pattern matching methods in the RegExp object require String objects, as shown in Table 3.5.
Table 3.5 Pattern Matching Methods in the RegExp Object
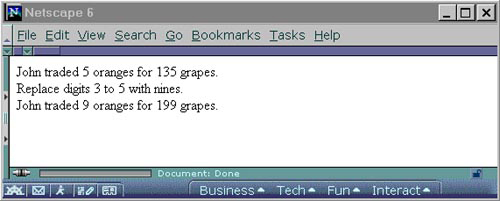
Listing 3.1 uses the RegExp constructor, special pattern syntax, and the String replace() method to replace digits 3 to 5 that exist in the string with nines as seen in Figure 3.1.
Listing 3.1 Using Regular Expressions
<html>
<script type=“text/javascript” language=“JavaScript”>
<!--
//Create a text string
var str = “John traded 5 oranges for 135 grapes.<br>”;
//Create RegExp object
var span3to5 = new RegExp(“[3-5]”,“g”);
document.write(str);
document.write(“Replace digits 3 to 5 with nines.<br>”);
document.write(str.replace(span3to5,“9”));
//-->
</script>
</html>
Figure 3.1 The digits 3 to 5 are replaced with nines.
Events and Event Handlers
If you have ever done any graphical user interface programming, you are already familiar with the concept of events. Events are actions that take place outside of your program yet might or might not directly impact your program. Many events take place within your browser that you never see and never need to worry about. But there are times when you really want to do something in your code when an event takes place.
For example, consider a Web page that provides users with an interface to change their password on some computer system. The Web page has a text box for the username and a text box for the new password as well as a button to submit the new password information. Before the username and password get submitted to some other system, you want to intercept the event that occurs when the user clicks the Submit button and verify that the password adheres to some specific password rules. A password rule might state that passwords must be greater than three characters in length but less than 15 characters. By having access to events that take place behind the scenes of the browser, you can cancel the submit action and alert the user to the problem with the password she entered.
In this section you will see the types of browser events that JavaScript will let you intercept and how to capture and take action based on those events.
Events
Many different types of events take place in browsers. JavaScript provides access to a number of events that would be useful to you, such as the click event, which occurs when the left mouse button is pressed once. Most of the events correspond to an HTML element that a user can see and manipulate such as a button or a check box. Table 3.6 contains a list of events that can be captured by JavaScript and the JavaScript object with which the event is associated.
Table 3.6 Browser Events
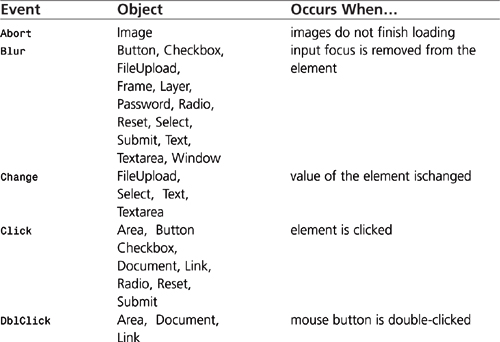

Of the events covered in the previous table, the Error and Abort events deserve a little more explanation because they are not as straightforward as the rest.
The Error event is used by the Window and Image objects to indicate that an error occurred while either loading an HTML page or loading an image. This type of error will result in the browser issuing a JavaScript syntax error or a runtime error.
The Abort event is used by the Image object to indicate that the loading of an image was aborted. This type of event occurs often because users become impatient waiting for a large image to load, so they stop the image load before it completes by clicking the browser’s Stop button or clicking a link to another page.
Event Handlers
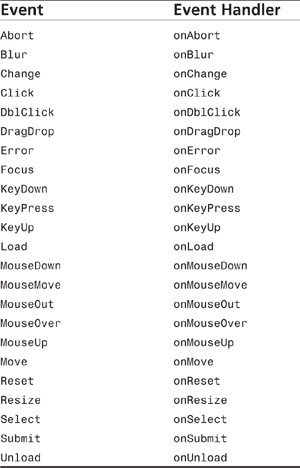
Now that you know the types of events that JavaScript provides, access to them is just a matter of capturing those events. Events are captured using event handlers. By assigning a function or a single line of JavaScript code to an object’s event handler, you can capture an event and take action. Table 3.7 shows all the event handlers and the events they are associated with.
Table 3.7 Event Handlers
Capturing Events
Event handlers can be defined in one of two ways. The first and most common way is to define the handler inside HTML tags much in the same way HTML tag properties are assigned. For example, to display an alert box when a button is clicked, simply assign a JavaScript alert box to the onClick event handler inside the button’s HTML tag as follows:
<form name=“myForm”>
<input
type=“button”
name=“myButton”
value=“Press Me”
onClick=“alert('myButton was pressed')”>
</form>
Anytime myButton is clicked an alert box will be displayed that tells the user that “myButton was pressed”. Remember that not all events are associated with every object. To see what events and event handlers are available to a particular object, look for the object in Chapter 8, “Client-Side.”
The second way to define event handlers is to define the handler inside JavaScript code using dot notation. Listing 3.2 demonstrates how to assign a JavaScript alert box to the onClick event handler using dot notation.
Listing 3.2 Defining Event Handlers Using Dot Notation
<html>
<form name=“myForm”>
<input type=“button” name=“myButton” value=“Press Me”>
</form>
<script type=“text/javascript” language=“JavaScript”>
<!--
document.myForm.myButton.onclick=“alert('myButton was pressed')”;
//-->
</script>
</html>
In listing 3.2 myButton was initially created using standard HTML tags. Directly after creating the button JavaScript dot notation is used to access the button object and assign an alert box to the onclick handler.
Canceling Events
One of the most common uses of event handlers is validation of data entered through an HTML form. For example you might want to verify that a password entered by a user in a password change form is valid before submitting the form to the server. If the password entered by the user is not valid, the user should be notified of the problem and the form should not be submitted. Utilizing the material covered so far, it is easy to capture the Click event of the form’s submit button and alert the user of the problems with the password entered. But how do you prevent the event from continuing and the form from being submitted to the server? The Submit event can be canceled by simply returning false in the event handling routine. Listing 3.3 demonstrates how to cancel the form submission.
Listing 3.3 Canceling the Submit Event
<html>
<script type=“text/javascript” language=“JavaScript”>
<!--
function validatePassword()
{
passwd = document.passwordForm.password.value;
//Password must be between 3 and 15 characters
if((passwd.length < 3) || (passwd.length > 15))
{
alert(“Password must be less than 15 characters but greater than 3!”);
return(false);
}
}
//-->
</script>
<center>
<h1>Password Change Page</h1>
Please enter your user name and new password.<br>
(Password must be between 3 and 15 characters.)<br><br>
<form name=“passwordForm”
action=“success.html”
onSubmit=“return validatePassword()”>
Username: <input type=“text” name=“username”><br>
Password: <input type=“password” name=“password”><br>
<input type=“submit”>
</form>
</html>
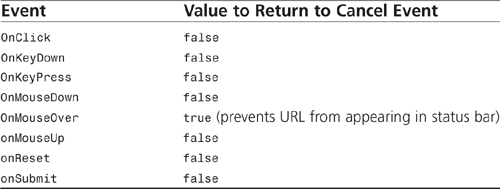
Not all the event handlers allow you to stop an event from taking place, but some do. Of the events that can be stopped, the value used to stop the event varies. Table 3.8 shows the events that acknowledge return codes and what values to return to cancel the event.
Table 3.8 Event Handler Return Values
There are times when you might want to explicitly invoke a particular event handler even though no event took place. This is easy to accomplish because the event handlers are essentially pointers to functions stored as a property of an object that should be executed when a particular event occurs. To invoke an event handler, simply use dot notation to execute the event handler as if it were a function. For example, in the following piece of code, we want to alert the user about a sweepstakes when he moves his cursor over the Lamborghini link. We also want to remind him of the sweepstakes when he goes back to the previous page. To do this, the event handler for the Lamborghini link is executed when the user clicks the Previous Page link.
<a href=“sweepstakes.html”
onMouseOver=“alert('Enter our sweepstakes for a chance to win a brand new
sports car!')”>Lamborghini</a><br>
<a href=“intro.html”
onClick=“document.links[0].onmouseover()”>Previous Page</a>
Timers
Even though JavaScript does not directly provide an event-driven timer, we will discuss timers in this section because timers should generally be thought of in terms of events. Because JavaScript does not directly provide a timer, it is possible to use the Window object’s setInterval() method to serve the same purpose.
The setInterval() method repeatedly calls a function or evaluates an expression each time a time interval (in milliseconds) has expired. This method continues to execute until the window is destroyed or the clearInterval() method is called.
For example, in Listing 3.4 the setInterval() method is executed when the document opens and begins to call the dailyTask() function every 20,000 milliseconds. The dailyTask() function evaluates the time each time it is called, and when it is 8:00 a.m., the code within the if statement is called, alerting the user and then clearing the interval. When the clearInterval() method is called, setInterval() halts execution.
Listing 3.4 Creating a Timed Event with the setInterval() Method
<html>
<script type=“text/javascript” language=“JavaSCript”>
<!--
function dailyTask()
{
var today = new Date();
if ((today.getHours() == 8) && (today.getMinutes() == 0))
{
alert(“It is 8:00 a.m.”);
clearInterval(timerID);
}
}
//Set interval to 20,000 milliseconds
timerID = setInterval(“dailyTask()”,20000);
//-->
</script>
</html>
As mentioned earlier the setInterval() method is only available in JavaScript 1.2 and higher. If you need to support an earlier version of JavaScript, you will have to use the setTimeout() method.
The setTimeout() method is usually used to evaluate an expression after a specific amount of time. Unlike the setInterval() method, the setTimeout() method is a one-time process that is not repeated an infinite number of times. Listing 3.5 produces the same result as Listing 3.4, using the setTimeout() method instead of the setInterval() method.
Listing 3.5 Creating a Timed Event with the setTimeout() Method
<html>
<script type=“text/javascript” language=“JavaScript”>
<!--
function dailyTask()
{
var today = new Date();
if ((today.getHours() == 8) && (today.getMinutes() == 0))
{
alert(“It is 8:00 a.m.”);
}
}
//Set delayed execution of function to 20,000 milliseconds
setTimeout(“dailyTask()”,20000);
//-->
</script>
</html>
Exceptions
As of JavaScript 1.4 exception handling has been added to allow you to capture and handle exceptions that occur in your JavaScript programs. The syntax that was chosen was the typical try…catch, throw, and finally statements that are found in other languages such as Java and C++. With these statements you can now throw your own errors, cleanly capture errors, and take the appropriate action based on the error thrown.
throw
The throw statement allows you to throw your own errors to be captured by the try…catch statement. The actual error that you throw can be any type of object so long as the try…catch statement knows how to handle the object. For example an error could be a number, string, or even a user-defined object that contains a number and an array of strings. The format of the throw statement resembles the following: throw error
try…catch
The try…catch statement marks a block of code to try and a block of code to catch errors if an exception should be thrown. The format of the try…catch statement resembles the following:
try
{
code
}
catch (error)
{
code
}
The try block consists of one or more lines of code enclosed by brackets just below the try statement, whereas the catch block consists of one or more lines of code enclosed by brackets just below the catch statement. The catch block can also be passed the actual error that was thrown by specifying an object to hold the error in parentheses. This error object can then be used within the catch block. The error object and parentheses are optional and are only needed if you intended to access the actual error thrown from the catch block.
If an exception is thrown in the try block or within a function called by a statement in the try block using the throw statement, the code in the catch block is executed immediately to handle the error exception that was just thrown. If no exception is thrown while the try block is executed, the catch block is skipped.
In Listing 3.6, the try…catch and throw statements are used to help validate passwords in a simple password validation program. If a password is less than 5 characters in length or greater than 10, the user is presented with an error message thanks to the try…catch block.
Listing 3.6 Password Validation Using the try…catch Block
<html>
<script type=“text/javascript” language=“JavaScript”>
<!-- hide
function ValidatePassword(password)
{
try
{
//Make sure password has at least 5 characters
if(password.length < 5 )
{
throw “SHORT”;
}
//Make sure password has no more than 10 characters
if(password.length > 10 )
{
throw “LONG”; //too many characters
}
//Password ok
alert(“Password Validated!”);
}
catch(e)
{
if(e == “SHORT”)
{
alert(“Not enough characters in password!”);
}
if(e == “LONG”)
{
alert(“Password contains too many characters!”);
}
}
}
//-->
</script>
<h2>Password Validator</h2>
<form name=“myform”>
Please enter password: <input type=“password” name=“password”><br><br>
<input type=button name=“validate”
value=“Validate!”
onClick=“ValidatePassword(myform.password.value)”>
</form>
</html>
Runtime Errors
In addition to capturing user-defined errors, the try…catch block can also capture runtime errors that JavaScript throws without the assistance of the throw statement. You can capture these errors using the try…catch block much as you would capture your own user-created errors. The ECMA-262 (Third edition) standard defines six types of error objects that can be thrown by JavaScript. These errors are shown in Table3.9 with a short description of the type of error they represent.
Table 3.9 Runtime Errors
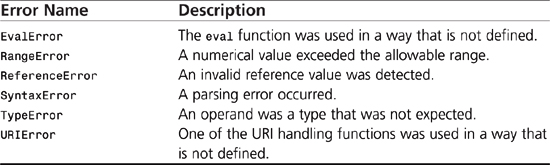
When a runtime error occurs, an Error object is returned. To determine the type of error, simply access the name property. Listing 3.7 purposely creates a runtime error by trying to use an undefined variable. The catch block determines the type error and displays an error message to the user.
Listing 3.7 Catching a Runtime Error
<html>
<script type=“text/javascript” language=“JavaScript”>
<!-- hide
try
{
//The following line will create a type error
//because the variable aNum is undefined.
sum = 5 + aNum;
document.write(“sum=”,sum);
}
catch(e)
{
if(e.name == “TypeError”)
{
alert(“A type error occurred.”);
}
}
//-->
</script>
</html>
finally
The finally block is an optional block of code that is executed each time an exception is thrown. This is especially useful in languages that work with files in which a file handle must be properly closed whether or not an error occurred. In the event that no error occurs, the code in the finally block is executed after the try…catch block but before the code following the try…catch block is executed. When an error is thrown, the finally block executes after the try…catch block. The format of the try…catch block plus the finally block looks as follows:
try
{
code
}
catch (error)
{
code
}
finally
{
code
}
In Listing 3.8, the finally statement ensures that the password field is cleared whether or not the password is valid. If the password field had been cleared below the finally box, the field would only get cleared if the password was valid because there is a return statement in the catch block. If the password field had been cleared inside the catch box, the field would only get cleared if an error was thrown. Because the password field needed to be cleared regardless of errors, the finally block was used.
Listing 3.8 Password Validation Using the finally Block
<html>
<script type=“text/javascript” language=“JavaScript”>
<!-- hide
function ValidatePassword(password)
{
try
{
//Make sure password has at least 5 characters
if(password.length < 5 )
{
throw “SHORT”;
}
//Make sure password has no more than 10 characters
if(password.length > 10 )
{
throw “LONG”; //too many characters
}
}
catch(e)
{
if(e == “SHORT”)
{
alert(“Not enough characters in password!”);
}
if(e == “LONG”)
{
alert(“Password contains too many characters!”);
}
return(1);
}
finally
{
document.myform.password.value=“";
}
//Password ok
alert(”Password Ok!“);
}
//-->
</script>
<h2>PasswordValidator</h2>
<form name=“myform”>
Please enter password: <input type=“password” name=“password”><br><br>
<input type=button
name=“validate”
value=”Validate!“
onClick=”ValidatePassword(myform.password.value)">
</form>
</html>
Debugging
If you are used to doing programming in languages such as C++ and Java, you are probably accustomed to using some type of debugging tool to help you locate and fix problems in your code. Now that JavaScript is finding its place in the coding community, we are finally seeing support of a native and comprehensive third-party scripting and debugging environment that is similar to those found in mature programming languages (such as C++, Visual Basic, and Java).
JavaScript scripting and debugging tools help the developers take advantage of more automated preventive and, to a lesser extent, corrective controls. If you do not have access to JavaScript debugging tools, or the debugging job is very small, a simple JavaScript alert box can work as a debugging tool. In this chapter, you will examine two free JavaScript debugging options that are at your disposal.
Microsoft Script Debugger
The Microsoft Script Debugger (MSSD) is a free downloadable script debugging tool that works as an integrated part of Internet Explorer (version 3.01 and later). MSSD also comes with Windows 2000 and Microsoft’s Personal Web Server. You can use MSSD to write and, most importantly, debug your JavaScript (known as JScript with the Microsoft implementation) or Visual Basic Script (VBScript) code. MSSD has the advantage of being able to handle the debugging demands of ActiveX, Java, JScript, and VBScript. (The MSSD can be downloaded from http://msdn.microsoft.com/scripting/.)
Features
The following are the main features of the Microsoft Script Debugger:
• Dynamic view of HTML structure
• JavaScript, VBScript, and Java can be debugged seamlessly within the same document.
• Code is color coded
• Ability to set breakpoints
• Can step over, through, and out of each line of code
• Call stack
• Immediate expression window
Tips
The MSSD is easy to use, but there are a few things to know that will have you debugging your code quicker in MSSD.
Starting the Debugger
The only way to start MSSD is to first open Internet Explorer and load the desired HTML source file. Then you can activate MSSD by choosing View, Source.
To start the debugging process, choose Edit, Break at Next Statement from Internet Explorer, or choose Debug, Break at Next Statement from MSSD, and execute the script. This starts the debugger and stops it at the first statement in the current script.
The Break at Next Command
The Break at Next Statement command (which appears on the Script Debugger option of the View menu of Internet Explorer and the Debug menu of MSSD) is similar to a step command, in that the debugger executes the next statement in the script and then breaks, except that you can also use it when you are not currently running the script.
This is an important debugging feature of MSSD because a lot of JavaScript code is commonly declared in the header (or <head> tag) section of an HTML file, and this command is the only way to debug that code. This is because the code in the header of the file has already been executed by the time the HTML file is loaded. Also, any breakpoints set after the HTML file has been loaded are lost if you reload the page.
Evaluating Expressions
An expression can be evaluated with the aid of MSSD’s immediate window and the following two methods:
• Debug.write(string)—This method writes a specified string, which is often the value of a variable, to the immediate window with no intervening spaces or characters between each string.
• Debug.writeln([string])—This method is identical to the preceding method, except that a newline character is inserted after each string. Also, the string argument is optional. If it’s omitted, only a newline character is written to the immediate window.
A Final Word on the Microsoft Script Debugger
The Microsoft Script Debugger provides a very helpful environment for you to kick-start your JavaScript debugging and testing. The tools provided in MSSD are similar to tools usually found in full-blown programming language environments such as Visual Basic and C++. Also, MSSD’s interface, setup, and installation are all very user friendly and intuitive.
However, MSSD has some limitations in that you need to switch frequently between Internet Explorer and MSSD to conduct debugging, and that you can’t print source code. If you want more functionality than what MSSD offers, you might want to consider Microsoft’s Visual InterDev 6.0. This product offers all the script-debugging features listed here, plus a full-blown Web developing environment.
At the least, MSSD is certainly a good tool to have in your arsenal, and it’s a great value to boot because it’s free. However, it can’t take the place of writing solid code and systematically testing your code.
The alert() Method
If you have coded in any language for any length of time, you know that one of the simplest and quickest ways to debug functionality problems is to display the content of important variables at various stages of your program’s execution. By doing so, you can determine if your code is executing as you intended. This technique is especially useful when you cannot get your hands on a full-featured JavaScript debugger, or you are short on time and don’t want to fire up a JavaScript debugger to solve a simple functionality problem. JavaScript has a handy method called alert() that lends itself well to stopping the execution of your script to see a value of a variable. With a little thought and proper placement of this method, you can quickly track down functionality problems in scripts.
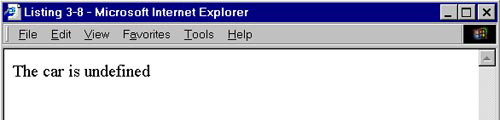
Listing 3.9 contains some JavaScript code that is supposed to set the color and type of a car. One look at the result, as seen in Figure 3.2, and you can see something went wrong. The script was supposed to set the vehicle type to “car” with the setType() function and the vehicle color to “red” with the setColor() function. If these two functions had worked properly, a string would be written to the screen; otherwise, an alert message would be displayed to let you know that one of the assignment operations failed. No alert message was displayed, but the variable representing the vehicle’s color was never set to “red”.
Figure 3.2 There is a problem associated with setting the color of the car.
Listing 3.9 Problem Code
<html>
<script type=“text/javascript” language=“JavaScript”>
//Create two global variables used to describe the vehicles
var vehicleColor;
var vehicleType;
//Set the type of vehicle
function setType()
{
return(vehicleType=“car”);
}
//Set the color of the vehicle
function setColor()
{
return(vehicleColor=“red”);
}
//If the vehicle type and color were not properly set alert the user.
if(setType() || setColor())
{
document.write(“The ” + vehicleType + “ is ” + vehicleColor);
}
else
alert(“The vehicle type and color could not be set”);
</script>
</html>
In Listing 3.10, alert() methods are used to debug the code. An alert() method is placed in each of the variable-setting functions to determine if each function is being executed. More alert() methods are placed before and after the if statement to show how the conditional evaluates.
Listing 3.10 Debugging Using the alert() Method
<html>
<script type=“text/javascript” language=“JavaScript”>
//Create two global variables used to describe the vehicles
var vehicleColor;
var vehicleType;
//Set the type of vehicle
function setType()
{
alert(“Inside the setType function.”); //Debug statement
return(vehicleType=“car”);
}
//Set the color of the vehicle
function setColor()
{
alert(“Inside the setColor function.”); //Debug statement
return(vehicleColor=“red”);
}
//Debug statement
alert(“Before if statement: type=”+vehicleType+“ color=”+vehicleColor);
//If the vehicle type and color were not properly set alert the user.
if(setType() || setColor())
{
//Debug statement
alert(“After if statement: type=”+vehicleType+“ color=”+vehicleColor);
document.write(“The ” + vehicleType + “ is ” + vehicleColor);
}
else
alert(“The vehicle type and color could not be set”);
</script>
</html>
When Listing 3.10 is executed, the first alert box displayed shows that both variables are undefined before the execution of the if statement. The next alert box shows that the setType() function was executed. The final alert box shows the vehicle type set to “car”, but the color is still undefined after the if statement, as you can see in Figure 3.3. What happened to the setColor() function? The alert() method in the setColor() function was never executed, which lets us know that the setColor() function was never called from within the if statement.
Figure 3.3 Debugging using the alert() method.
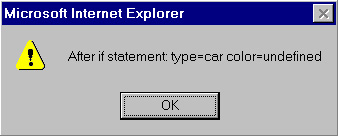
If the first argument in a logical OR operation evaluates to true, the second argument is never evaluated. Because the setType() function returned true, the setColor() function was never executed. The problem is easily corrected by simply changing the logical OR operator to a logical AND operator.
Moving On
In this chapter, you were introduced to some programming techniques that will make your JavaScript programs more powerful and more resilient through the use of JavaScript pattern matching, event handling, exception handling, and debugging. Part II, “Programming in JavaScript,” provides a look at the environments in which JavaScript can be interpreted and into the actual use of the language.