
Chapter 6 Windows Scripting
As many developers know, a big deficiency with Windows was its lack of scripting support for automating tasks. Most other operating systems had some type of built-in scripting engine. Of course there was the batch file support in MS-DOS, but it was very limited in its capability and not very useful in the Windows environment.
Microsoft realized this limitation and introduced the Windows Script specification within Internet Explorer 3.0. This provided an interface for developers to build scripting engines for different browsers. From the Windows Script Interfaces grew what is known today as the Windows Script Host.
Windows Script Host
Windows Script Host (WSH) provides the ability to automate tasks for the Windows environment. Before WSH, batch files were available in MS-DOS. However, they weren’t very powerful and provided little use in the Windows environment. A scripting language was needed for Windows, and WSH was the answer. Suppose that you wanted to get the computer name, add a desktop shortcut, and map a network drive without doing each task individually. With Windows Script Host, all these tasks can be performed through a single script.
WSH can be used with a few different programming languages. VBScript and JScript are supported in the default engine on Windows 98 and NT/2000. This book focuses on the JScript language and will use it in the examples.
The latest version of WSH is 5.6. Although it is still a beta version, the scripting engine can be downloaded from Microsoft’s Web site. The added benefits of this version are improved argument handling, remote script capability, treating processes as objects, access to the current working directory, and an improved security model.
The way Windows Script Host works is you create a script using various methods and properties from the WSH objects and save it to a file with the .wsf extension. This specifies that the file is a Windows Script Host file. Let’s take a look at an example of a simple WSH file. Listing 6.1 shows a WSH file that will display the username of the local machine in which the script is run.
Listing 6.1 Example of a WSH File
<job>
<script language=“JScript”>
var WshNetwork = WScript.CreateObject("Wscript.Network");
WScript.Echo("The User name is: " + WshNetwork.UserName);
</script>
</job>
The syntax of a WSH script is fairly simple. You enclose your functionality between the opening and closing <job><script> tags. This is similar to a normal JScript or JavaScript program. This script can be run a few different ways. These ways are discussed later in the chapter.
Architecture
The architecture of the Windows Script Host is fairly basic. There are only a few components, which operate together, to make WSH scripts come alive. They are the script itself, the Windows Shell, the Windows Registry, and the WSH engine. Figure 6.1 shows a diagram indicating how the components interact with each other to process the script.
Figure 6.1 WSH architecture.

As you can see, the Windows Shell is the first component to encounter the script file. The shell must then determine what this file is and does so by looking up the file association in the Registry. When it has this information, it can then pass the file to the Windows Script Host Engine, which will use the IActiveScriptParse:: ParseScriptText method to determine whether this particular script will go to a JavaScript engine, Visual Basic Script engine, Perl engine, and so on.
Object Model
The WSH is based on an object model hierarchy, which consists of 14 objects. Every object stems from the WScript object (root object). The WSH Object model is shown in Figure 6.2.
Figure 6.2 WSH object model hierarchy.
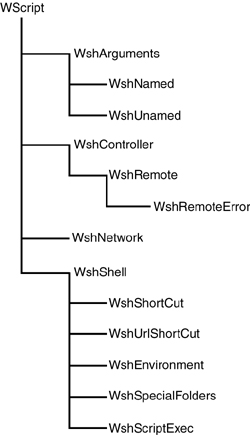
Not every object can be instantiated directly. The WScript object is available in every WSH script and does not need to be instantiated. Other objects that can be instantiated are the WshController, WshNetwork, and WshShell. To create these objects, use the CreateObject method. All other child objects are indirectly created through the top-level objects. The WSH object model exposes various COM objects, which can be manipulated.
Benefits and Limitations
WSH has both its benefits and limitations. Using JScript or VBScript, WSH provides you direct access to a computer and it’s Windows resources. You can directly manipulate the Windows Registry, set default printers, run remote scripts and more. The WSH is a low memory scripting host that works well with scripts that require little user interaction. So for things such as entering logon scripts and batch processes, and performing administrative tasks, WSH is a great tool to use.
However, with it’s power comes disadvantages. Providing a script direct access to your local computers’ resources can be very dangerous. Should a developer decide to write a malicious script, a lot of damage can be caused. For this reason, some choose for their Windows environment to disable WSH.
WSH is limited in some aspects. The graphical components are limited. There are no custom dialogs or anything of that sort. For better UI’s, your program will need to rely on the tools available with whichever language you choose to write your script in.
Windows Script Components
Many different components are tied together to create the whole Windows Script Host object model. In this section we will discuss some of these objects and their capabilities in more detail.
Objects
In the Object Model, you saw that many different objects comprise the Windows Script Host. Each object has its own methods and properties associated with it. The main objects from which all other minor objects stem are WScript, WshController, WshNetwork, and WshShell.
The three most commonly used ones that we’ll discuss are WScript, WshShell, and WshNetwork. They provide the majority of the top-level functionality for Windows Script Host. Let us take a look at what each of them can do.
WScript
The WScript object is the root-level object from which all other objects are created. It does not need to be instantiated and is available from any script file. It can be used for a number of different tasks. You can use it as an informational object to get script filenames, command-line arguments, and host information. It can also be used to create objects, connect to and disconnect from objects, sink events, stop script execution, and output information. Listing 6.1 displays the simplest form of using the WScript object by using its Echo method to output the username.
As mentioned earlier, WScript can create any type of child object by using the CreateObject method. Suppose that you wanted to create a new WshShell object. You could do so by using the following line.
WshShellObj = WScript.CreateObject("WScript.Shell");
By now you are probably saying to yourself, “This is great, but what can I do with a new WshShell object?” Keep reading and you will find out. (See Chapter 15, “Windows Script Host,” for details on all the methods and properties associated with the WScript object.)
WshShell
WshShell is a very useful object. It is used for manipulating the Windows Registry, creating shortcuts, starting new shell processes, and reading system information. It provides the ENVIRONMENT collection for your program, which allows you to access or manipulate environment variables. (See Chapter 15 for details on all the methods and properties associated with the WshShell object.)
Let’s look at a simple example in Listing 6.2, which creates a shortcut on the desktop to the Amazon.com Web site. Using the CreateObject method of the root WScript object, we can create a WshShell object named WshShellObj. Next we need to specify that the shortcut is to be created on the desktop. To accomplish this, the SpecialFolders method is used with “Desktop” as the parameter. Then we call the CreateShortcut method and pass it the path for our shortcut. Finally the target path for the shortcut is specified and the shortcut is saved.
Listing 6.2 Example of Creating a Shortcut with the WshShell Object
<job>
<script language=“JScript”>

// Create a WshShell object.
WshShellObj = WScript.CreateObject("WScript.Shell");

// Specify the Desktop as a folder.
myDesktop = WshShellObj.SpecialFolders(“Desktop”);

// Create a shortcut to the Amazon.com website.
var urlShortcut = WshShellObj.CreateShortcut(myDesktop + "\Amazon.url");
urlShortcut.TargetPath = "http://www.amazon.com";
urlShortcut.Save();

</script>
</job>
WshNetwork
The WshNetwork object is used to perform many different network-related tasks. With this object, you can add printer connections, obtain the computer name, map network drives, set default printers, get user domains, and more. These types of tasks can be very useful to a Windows network administrator. (See Chapter 15 for details on all the methods and properties associated with the WshNetwork object.)
Let’s look at an example. Suppose that a new network printer has been added and the network administrator wants to make it as easy as possible for users to add this printer to their machine. The administrator could create a WSH script that all users can run to add the printer to their machines. In Listing 6.3, we see the code to add a new printer.
Listing 6.3 Adding Printer with WshNetwork Object
<job>
<script language=“JScript”>
// Create Arguments object.
WshArgObj = WScript.Arguments;
// Read in the username and password.
var userName = WshArgObj.Item(0);
var passwd = WshArgObj.Item(1);
// Create a new Network object and add printer.
var WshNetwork = new CreateObject("Wscript.Network");
var printer = "\printersNewPrinter";
var localName = “myNewPrinter”;
WshNetwork.AddPrinterConnection(localName, printer, userName, passwd);
</script>
</job>
Because user input is required for this particular script, it is recommended that the command line method, cscript.exe, is used to execute the script. (For more information on differences between cscript.exe and wscript.exe, refer to the “Methods of Executing Script” section). The user would specify his username and password as the arguments. So assuming that the file is named “addPrinter.wsf”, it would be executed in an MS-DOS Windows as follows:
cscript addPrinter.wsf Betty pass123
Methods of Executing Scripts
To run a WSH script, you need to have the Windows Scripting Engine installed on your operating system. This is included in Windows 98 and NT/2000. For Windows 95 users, the WSH engine can be added by downloading the engine from the Microsoft site and installing it. See http://msdn.microsoft.com/scripting for more information.
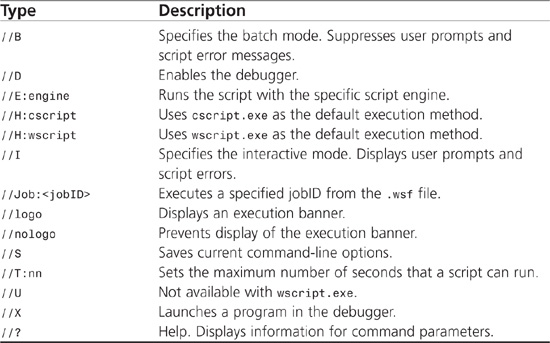
Once installed, WSH scripts can be run in two different modes. They are Windows-based and DOS-(command) based. The mode in which you run your scripts depends on what tasks you intend to accomplish. If you intend to have some user interaction and want to use graphical components, the Windows-based execution is preferred (wscript.exe). If your script needs to perform tasks, which can only be done in MS-DOS or require little user interaction, the command-based execution should be used (cscript.exe). Both methods of execution can be run from a command line and have certain options that can be specified. They are listed in Table 6.1.
Table 6.1 wscript.exe and cscript.exe Options
To execute a script generically from the command line, adhere to the following syntax:
wscript <filename> [//options] [arguments]
cscript <filename> [//options] [arguments]
Arguments should be separated with a space. WSH also supports drag-and-drop functionality for arguments. You can drag and drop a file onto a WSH file, and—provided that your script is written to parse the argument—it will treat your dragged filename as an argument.
Windows-Based Scripts
Windows-based WSH scripts allow you to take advantage of the limited graphical capabilities in WSH. This is particularly useful if your script requires visual user interaction. Keep in mind though that WSH doesn’t have very complex dialog boxes. The graphical components are mostly limited to the tools available in VBScript or JScript and pop-up dialogs.
There are three methods to execute a Windows-based script. The easiest is to locate the script file in Windows Explorer and then double-click it to start. The second method is to use the “Run” option from the Windows Start Menu. Choose the WSH file in the “Run” option and then click the OK button to run. This is shown in Figure 6.3. The third method is to run your script from the command line using wscript.exe.
Any of these methods will work, and it is just a matter of personal preference. Let’s take a look at the example in Listing 6.4.
Figure 6.3 Running script from the Run option.

Listing 6.4 Simple Hello World Script
<job>
<script language=“JScript”>
// Output the Hello World text.
WScript.Echo("Hello World!");
</script>
</job>
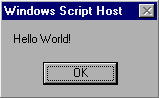
If we were to run the script as a Windows-based script, the output would display a popup window as shown inFigure 6.4.
Figure 6.4 The WSH pop-up display box.
Command-Based Scripts
WSH scripts can also be run from the command prompt. This is performed in the DOS environment using the cscript executable. For example, if you wanted to run a script called “hello.wsf”, you would type the following at a command prompt:
cscript hello.wsf
This example assumes that you are running the script from the same directory it is located. Otherwise, the path to the file will need to be specified. Any arguments or options passed to the script would be added after the script name. So, if you wanted to use the Interactive mode options and pass a string as the first argument, your script call would look similar to this:
cscript hello.wsf //I /arg1
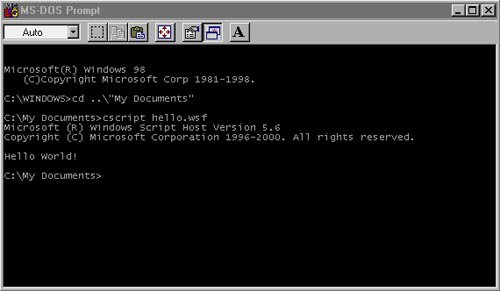
Command-based scripts can also display output, similar to Windows-based scripts. However, unlike the Windows-based pop-up window, the command script output is suppressed to the same DOS Window in which the script is run. This is one of the disadvantages to the command-based scripts. No graphical components are provided. In Figure 6.5, an example of the well-known Hello World program is executed displaying the “Hello World” text to the screen.
Figure 6.5 Command-based output display.
Remote Scripting
With the latest version of WSH (version 5.6), it is possible to execute scripts remotely. This allows you to remotely administer various automation tasks to computers across the network. These tasks can even be executed simultaneously. You can remotely start, stop, and get the status of WSH scripts. If an error occurs through the WshRemoteError object, you can get the character, line number, error description, and even source code for the error.
When a remote script is executed, the local machine actually copies the script to the remote machine before execution. Before a remote script can be executed though, the remote machine must be set up with the proper security settings. To set up remote scripting on your machine, you need to follow three simple steps. First install WSH, version 5.6 (if not already installed). The second step is to add yourself to the remote machine’s local administrators group. The third step is to enable remote WSH through the Poledit.exe executable. After this is taken care of, your machine is ready for remote scripting!
There is a caveat to remote scripting. Remote scripting can only be run in the Windows 2000/NT environment. The Windows 9x scripting engine does not support this functionality. This is because you cannot authenticate users who are not on the NT domain.
How to Use Remote Scripting
So how do you use remote scripting? The WSH has provided the WshRemote object and various properties and methods to control the execution of your remote scripts. The WshRemote object is created through the WshController object. First create an instance of the WshController with the CreateObject method. After you have the controller object, you can use the CreateScript method to specify which script you want to execute remotely. This method actually returns a WshRemote object that can be used with its execute() method to run the script remotely.
As with most computer programs, not all the scripts will run without errors. This is not a problem though. The WSH object model includes the WshRemoteError object, which can be used to obtain various error information. It is not an object that is directly instantiated, but an object that is available as a child object of the WshRemote object.
Remote Scripting Example
Lets take a look at an example of remote scripting. In Listing 6.5, a maintenance script is to be run remotely on a machine named “blue2”. A Controller object, WshCtrlObj, is first created. Then an instance of the WshRemote object is created using the CreateScript method. The path of the script to be run and the machine name are passed as parameters. We set some events to be caught and execute the script. A print statement is added just to check the status. Our current script sleeps while waiting for the remote script to finish execution. Should any errors occur, the function remote_error can be used to display all the error information.
Listing 6.5 Remote Scripting Example
<job>
<script language=“JScript”>

// Create a WshController object.
WshCtrlObj = WScript.CreateObject("WScript.Controller");

// Create a WshRemote object.
remoteScript = WshCtrlObj.CreateScript("c:
emote_tasksmaintenance.wsf", “blue2”);

// Catch events.
WScript.ConnectObject(RemoteScript, "RemoteScript_");

// Start the script.
remoteScript.Execute();

// Print the current status.
WScript.Echo("The current status of the remote script is: " +
remoteScript.Status);

while (remoteScript.Status !=2) {
 WScript.Sleep(100);
}

// Catch errors.
function remote_Error(){

var myError = remoteScript.Error;
var errorString = "An Error occurred in the remote execution
";
errorString += The remote error: " + myError.Description + "
";
errorString += "occurred at line number: " + myError.Line + "
";
errorString += " ,character: " + myError.Character + "
";
errorString += "The Source for the Error is: " + myError.Source +"
";
WScript.Echo(errorString);
}

</script>
</job>
Moving On
In this chapter, we have discussed many aspects of the Windows Script Host. We have taken a look at the object model and a few specific objects in detail. We discussed the two methods of running WSH scripts and even how to run scripts remotely. Although the WSH 5.6 is still in beta version, a lot of things can be done with it. Look for even more to be added as WSH continues to evolve.