
Chapter 2 Details of the Language
For experienced programmers to pick up a new language quickly, they look for similarities at the core of the new language and other languages they have used. These similarities generally include operators that enable programs to function, variables that provide memory, and the ability to apply the same operation to various items. Understanding how to use these core pieces of the language is essential if you want to begin programming in JavaScript.
If you have been programming for a long time, you might be tempted to skip over this chapter. Because JavaScript is still a young scripting language with some wrinkles to be ironed out, it is a good idea to understand these instances for backward compatibility reasons. Taking a little time to make sure that the core elements perform as you are expecting will save a lot of programming time in the future.
Things to Know about JavaScript Syntax
Before getting too deep into the core elements of the language, there are a few things a programmer should know about JavaScript syntax. Understanding these points will get you up and programming in a more timely fashion.
The Semicolon
If you have done any programming in C, C++, or Java, even as simple as a Hello World program, you already know 75% of all there is to know about the JavaScript semicolon (;). Just the same as C and C++, the semicolon is placed at the end of a JavaScript statement to signify that the code between the beginning of the line and the semicolon should be executed before moving to the next portion of code. If you forget a semicolon at the end of a line in C++, you get compile errors, but JavaScript doesn’t complain. Because JavaScript is a loosely typed language, forgetting a semicolon tells JavaScript to assume that you intended for one to appear at the end of the line, and it executes your code accordingly. This does not mean that you should not use semicolons! It is good programming practice to always include semicolons at the end of a line of code except when dealing with statements such as for, while, and if.
Although it is good programming practice to have only one functional piece of code per line, there are times when it is advantageous to put two independent pieces of code on one line. When this case arises, you must use a semicolon to separate the two pieces of code. In Listing 2.1, a semicolon is used to separate two independent pieces of variable declaration code that are placed on one line. Notice that semicolons were placed at the end of each line although JavaScript would do it for you. The result of executing the code is the phrase, "The sales tax on $5 is $.3", being displayed in the browser.
Listing 2.1 Using Semicolons
<html>
<script type=“text/javascript” language=“JavaScript”>
<!--
// Declare 2 numeric variables on the same line
var fiveDollars = 5; var salesTax = 0.06;
// Compute the sales tax on 5 dollars and use the
// document.write() function to display the result.
document.write(“The sales tax on $”);
document.write(fiveDollars);
document.write(“ is $”);
document.write(fiveDollars*salesTax);
//-->
</script>
</html>
Using the <script> Tag
The first time a programmer works with a new language, he’ll want to know the key pieces of syntax needed to start programming. In JavaScript, the HTML <script> tag is that key piece. <script> tags tell the browser that everything between <script> and </script> should be interpreted by the interpreter specified in the type attribute. There is no limit to the number of <script> tags that can be used, as long as they are used in pairs.
Notice that the browser interprets the code between the <script> tags based on the type attribute. Because the type attribute has no default value it is important that the type attribute be set any time the <script> tag is used. To set the content type to the most current version of JavaScript supported by the browser, use the format <script type=“text/javascript”>. It is also possible to force the interpreter to use older versions of JavaScript (<script type=“text/javascript1.2”>, for example) as well as other languages such as Microsoft’s JScript (type=“text/jscript”).
Comments
JavaScript is very generous with its commenting options by providing the /* */ comment tags from C, the // comment tag from C++, and the <!-- --> tags from HTML. Just as in C and C++, the /* */ enables comments to span multiple lines by just placing comments between the two tags. The // comment tag enables comments to be placed between the // and the end of the line. As mentioned earlier, JavaScript provides one other comment tag that might not be familiar to you, the HTML <!-- comment. JavaScript interprets this comment the same way it interprets the // characters. You are probably asking yourself, “Why use two different comment tags that do the same thing?” Some older browsers that did not understand the <script> tags would display all the code between the <script> tags as standard HTML text. To prevent this with non-JavaScript–enabled browsers, <!-- is placed on the line directly below the <script> tag, and //--> is placed on the line directly above the closing </script> tag. This causes non-JavaScript–enabled browsers to treat the code between the tags as HTML comments, but allows browsers with JavaScript interpreters to execute the code. Examples of this style of commenting can be seen in the examples throughout the book.
Data Types and Variables
Before discussing JavaScript operators, conditionals, and loops, one should understand JavaScript data types and variables. These are building blocks that will be important going forward. Fortunately, JavaScript kept its implementation of data types simple and easy to use, unlike other programming languages. In addition to simple data types, variables are much easier to work with because there are no restrictions on the types of values they can hold.
Numbers
JavaScript’s approach to numbers is different from other languages because every number is treated as a floating-point number. JavaScript does support integers, octals, and hexadecimals from a formatting perspective, but, at the lowest level, JavaScript sees numbers as floating-point numbers. The following sections discuss different formats that numbers can have at the higher level.
Integers
Integers are numbers that contain no fractional parts, can be positive or negative, and can be formatted as a decimal, octal, or hexadecimal in JavaScript. Because integers are actually floating-point numbers in JavaScript, it is possible for the numbers to be very large.
• Decimal integers, also referred to as base 10, are probably the most common numerical values programmers use in their code. This type of integer is made up of numbers from 0 to 9 and cannot begin with leading zeros.
• Octal integers, also referred to as base 8, are a little different from decimal integers in that they must begin with a leading zero. Each digit following the leading zero can be 0 to 7.
• Hexadecimal integers, also referred to as base 16, must begin with 0x or 0X. Each digit following the leading zero can be 0 through 15, but 10 through 15 are represented by the letters a (or A) through f (or F).
Floating-Point Numbers
Unlike the integer, floating-point numbers can contain fractional parts and can use exponential notation for added precision. Floating-point numbers are made up of a decimal integer followed by a period (.) and the fractional portion of the number.
Exponential notation can be used by adding an e or E to the end of a floating-point number followed by a decimal integer that does not exceed three digits. This tells JavaScript to multiply the floating-point number by 10 to the exponent of the number following the e.
Built-in Values
Because computer programs are often used to solve scientific problems, the programs must know many of the numerical constants that are used in math and science. To make programming easier for you, JavaScript has included some of the more commonly used numerical constants in the Math object, which are shown in Table 2.1.
Table 2.1 Numerical Constants Provided by JavaScript

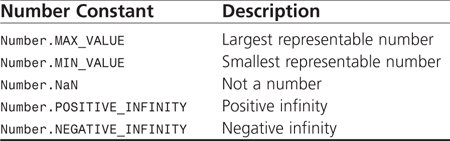
JavaScript also provides some special values that are common in the mathematical world but not so common in the computer world. These special values are available through the Number object, as shown in Table 2.2.
Table 2.2 Special Numerical Values
Strings
Strings provide programs a voice with which to communicate. It would be inconceivable to create a programming language today that did not use strings because they are so important.
JavaScript Strings
In the world of C and C++, dealing with strings is like having to go to the dentist—dreaded! Dealing with strings in JavaScript is like going to a big candy store. A string is made up of any number of characters or a lack of characters. Strings are declared by placing the characters that make up the string between a pair of double quotes (“ ”) or single quotes (' '). What if a string contains double quotes or single quotes? No problem. JavaScript interprets single quotes as part of the string if the single quotes are inside a pair of double quotes. Likewise, double quotes are considered part of the string if they appear between a pair of single quotes. If single quotes are your only option for declaring a string that contains single quotes, or if double quotes must be used to declare a string that contains double quotes, you will you need to use escape sequences (see the next section, “Special Characters”).
Special Characters
Just as in C and C++, escape sequences, which are noted by a backslash character (), allow special characters that cannot normally be stored in a string to be declared. Table 2.3 lists all the possible escape characters.
Table 2.3 Escape Sequences and Their Associated Characters

Other Data Types
Outside of the world of computers, there are uncertainties and indefinable values that we come in contact with daily. When computer programs are written to simulate the world we live in, they must handle uncertainties and values that have no definition. JavaScript provides some special data types to handle these situations.
Boolean
The Boolean data type is much simpler than any of the other data types because it has only two possible values: true and false. Sometimes it is easier to think of true as on or yes and false as off or no when working with some expressions that use the Boolean data type. In JavaScript, true and false are often represented by 1 (true) and 0 (false).
null
JavaScript provides the keyword null for representing a condition in which there is no value. In some languages, null and 0 are considered the same value, but JavaScript sees null and 0 as two completely different values.
Undefined Values
At this point, you might be thinking that undefined and null are essentially the same, but this is not true. In fact, undefined is a concept rather than a keyword like the null data type. Undefined is equivalent to NaN for numbers, the string undefined for strings, and false when dealing with Boolean values.
What to Know About Variables
Computer programs would not do much if they did not have some type of temporary memory. Variables provide a way for data to be stored during the execution of a program. Some languages, such as C and C++, impose many restrictions on how variables are used, but JavaScript keeps variables simple and easy to use.
Naming Variables
One of the keys to writing great code is to use variable names that help you, and programmers that modify your code, remember what data is stored in the variable. Before beginning to think of great variable names, remember the following guidelines imposed on variable names by JavaScript:
• The first character of the name must be a letter or an underscore (_).
• All characters following the first character can be letters, underscore, or digits.
• Letters can be either upper- or lowercase. JavaScript does distinguish between the two cases. For example, a variable called jobTitle is different from a variable called JOBtitle.
Assigning Values
When the perfect variable name has been derived, it is time to declare that variable and assign it a value. To declare a variable, use the keyword var followed by the variable name. Some programmers prefer to keep their code compact by declaring multiple variables using the same var statement. When this is the case, the variable names are separated by commas. At this point, the variable is undefined because no value has been assigned to it. Keep in mind that undefined is a special JavaScript value.
Now that the variable is declared, a value can be assigned to it using the assignment operator (=). In many cases, the declaration and assignment steps are performed in one step. If a value is assigned to a variable that has not been declared using the var keyword, JavaScript will automatically create a global variable. Listing 2.2 demonstrates the ways variable declaration and assignment can be performed. The code displays the sentence “James is 49 and 6 feet tall.” in the browser window.
Listing 2.2 Variable Declaration and Assignment
<html>
<script type=“text/javascript' language=“JavaScript”>
<!--
//Variable declaration without assignment
var firstName;
//Variable assignment without declaration
firstName = “James”;
//Variable declaration and assignment
var age = 49, height = 6;
//Display the results
document.write(firstName,” is “,age,” and “,height,” feet tall.");
//-->
</script>
</html>
Scope
A variable can be either global or local in JavaScript. All variables are global unless they are declared in a function; in which case the variable is local to that function. It is possible for two variables with the same name to exist if one is global and the other is local to a function. When accessing the variable from within the function, you are accessing the local variable. If the variable is accessed outside the function, the global variable is used (see Listing 2.3).
Listing 2.3 Variable Scope Example
<html>
<h2><u>Computer monitor specifications</u></h2>
<script type=“text/javascript” language=“JavaScript”>
<!--
//Initialize global variables
color = “green”;
var size = 15;
//Declare a monitor specification function
function monitorSpecs()
{
//Declare and set variables inside function
color = “purple”;
price = “$300.00”;
var size = 17;
document.write(“The ”,size,“ inch ”,color);
document.write(“ monitor is ”,price);
}
//Display results of monitorSpecs() function
monitorSpecs();
//Display variable values outside of function
document.write(“<br>The ”,size,“ inch ”,color);
document.write(“ monitor is ”,price);
//-->
</script>
</html>
The results of running this script within the body of an HTML document can be seen in Figure 2.1. The code begins by declaring two global variables, color and size. The monitorSpecs() function creates a new variable called size that only exists within the scope of the function. Because the function did not specify var, the global variable color was changed from green to purple. In addition, a new global variable, price, was declared within the function because the word var was not used.
Figure 2.1 The 17-inch monitor has the same color price due to the use of global variables.

Type Conversion
In languages such as C and C++, type conversion is very important and complicated, but, in JavaScript, type conversion is effortless. Unlike other languages, JavaScript allows a variable to hold any data type at any time. This means that a variable can be assigned a string initially, but then could later contain a integer. JavaScript also attempts to perform all necessary type conversions for you, such as strings to numbers and numbers to strings.
Arrays
Arrays enable programmers to store multiple data, based on a numbered position called an index, into one storage structure. The numbering of the index always starts at 0 and goes up. Also, JavaScript supports having arrays within arrays, called multidimensional arrays.
The implementation of arrays in JavaScript has been changing ever since JavaScript was introduced. The original implementation of arrays in JavaScript 1.0 was not really an array at all but rather JavaScript objects with multiple property settings. A true Array object was added in JavaScript 1.1, and additional features added in following versions. Today, arrays are very robust and full featured, but, because of their changing past, you should spend some time digging into the history of arrays as they apply to JavaScript versions. You will begin by understanding how arrays work in the latest versions of JavaScript and then go back and learn how arrays were created in. JavaScript 1.1
One-Dimensional
To create an instance of an array, you must use the new operator along with the Array object. There are four ways to declare an array. First, an empty array that contains no elements can be created by leaving the constructor parameters empty as shown in the following JavaScript statement:
var x new = Array();
The second way to create an array is to fill in the constructor parameters with the array elements. One of the nice things about JavaScript arrays is that an array can contain elements of various types. For example, the following JavaScript statement creates an array that contains three strings, “red”, “yellow”, and “green”, as well as the integers 1, 5, and 8:
var x = new Array(“red”,“yellow”,“green”,1,5,8);
The third way to create an array is to fill in the constructor parameter with just the size of the array. This causes the array to be initialized to hold the number of elements specified, but does not specify the actual elements. For example, the following JavaScript statement creates an array that can hold 6 elements.
var x = new Array(6);
The fourth, and quickest, way to create an array is to use the standard array square brackets to fill in the array elements directly:
var x = [“red”,“yellow”,“green”,1,5,8];
After an array has been created, it can be written to and read from using the [] operator. By placing a position number in this operator, the data stored at this index can be accessed and even overwritten.
String Indexes
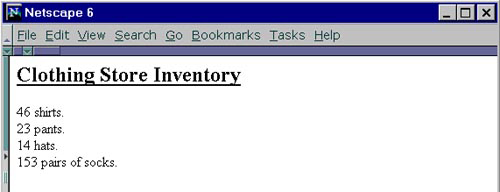
So far, you have only accessed elements in arrays via the numerical index, but it is possible to index arrays using strings. To access an element, a string index value is placed into the [] operator. Listing 2.4 demonstrates the use of strings as indexes for a clothing store’s product quantity array. Figure 2.2 displays the clothing store’s current inventory of products.
Listing 2.4 Using Strings for Array Indexes
<html>
<h2><u>Clothing Store Inventory</u></h2>
<script type=“text/javascript” language=“JavaScript”>
<!--
//Populate an array with product quantities
function populateArray(products)
{
products[‘shirts’]=46;
products[“pants”]=23;
products[‘hats’]=14;
products[‘socks’]=153;
}
//Display product quantities
function displayArray(products)
{
document.write(products[‘shirts’],“ shirts.<br>”);
document.write(products[‘pants’],“ pants.<br>”);
document.write(products[‘hats’],“ hats.<br>”);
document.write(products[‘socks’],“ pairs of socks.”);
}
//Create a product quantity array
var productQty " new Array();
//Set product quantities
populateArray(productQty);
//Display the product quantities
displayArray(productQty);
//-->
</script>
</html>
Figure 2.2 The clothing store’s current inventory of products is displayed using string indexes to access arrays.
Unlike arrays in C and C++, JavaScript allows the size of an array to change dynamically at any time. For example, it is possible to write directly to a position that was not even declared using the [] operator. The length of the array can also be changed by altering the length attribute of the Array object. If the length of an array is originally 10 and is reduced to 5 by changing the value stored in the length attribute, the elements in position 5 through 9 are lost.
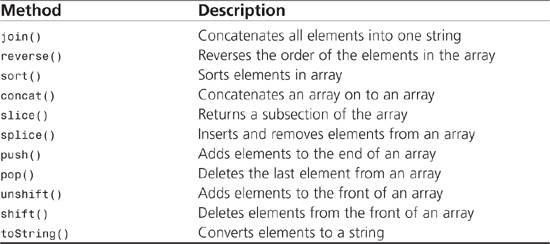
One of the advantages to using the Array object is the methods it provides to manipulate and access itself. Table 2.4 lists some of the methods that are currently available in the Array object. Details of these methods can be found in Chapter 7, “Core Language,” in the “Array” section.
Table 2.4 Methods Available in the Array Object
Multidimensional
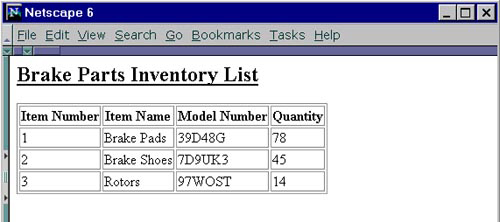
To create multidimensional arrays in JavaScript, the element of an array must be another array. The inner array can be accessed by putting two [] operators back to back. Listing 2.5 uses a multidimensional array to hold an inventory list of brake parts. As seen in Figure 2.3, the brake parts list is accessed by using double [] operators and displayed in a table.
Listing 2.5 Using a Multidimensional Array
<html>
<h2><u>Brake Parts Inventory List</u></h2>
<script type=“text/javascript” language=“JavaScript”>
<!--
//Display brake part inventory in a table
function displayInventory(table)
{
document.write(“<table border=on>”);
document.write(“<th>Model Number</th><th>Quantity</th>”);
//Display each part
for(x=1; x<=3; x++)
{
document.write(“<tr><td>”,x,“</td>”);
//Display all information for each part
for(y=0; y<=2; y++)
{
document.write(“<td>”,table[x][y],“</td>”);
}
document.write(“</tr>”);
}
document.write(“</table>”);
}
//Create a brake parts inventory list using a
//multidimensional array
part1 = new Array(“Brake Pads”,“39D48G”,78);
part2 = new Array(“Brake Shoes”,“7D9UK3”,45);
part3 = new Array(“Rotors”,“97WOST”,“14”);
brakeParts = new Array("",part1,part2,part3);
//Display the inventory of brake parts
displayInventory(brakeParts);
//-->
</script>
</html>
Figure 2.3 Using a multidimensional array to display the inventory list of brake parts.
Arrays as Objects
Because arrays are essentially JavaScript objects, it is possible to access the elements of arrays as properties if a string index is used. Dot notation is used, rather than the [] operators. For example, the clothing store example, in Listing 2.4, could have been created using properties as shown in Listing 2.6. Notice how the [] operators and dot notation are used interchangeably when accessing the contents of the array. The result of executing the code is the same as previously shown in Figure 2.2.
Listing 2.6 Accessing Array Properties
<h2><u>Clothing Store Inventory</u></h2>
<script type=“text/javascript” language=“JavaScript”>
<!--
//Populate an array with product quantities
function populateArray(products)
{
products.shirts=46;
products.pants=23;
products[“hats”]=14;
products[“socks”]=153;
}
//Display product quantities
function displayArray(products)
{
document.write(products[‘shirts’],“ shirts.<br>”);
document.write(products[‘pants’],“ pants.<br>”);
document.write(products.hats,“ hats.<br>”);
document.write(products.socks,“ pairs of socks.”);
}
//Create a product quantity array
var productQty = new Array();
//Set product quantities
populateArray(productQty);
//Display the product quantities
displayArray(productQty);
//-->
</script>
</html>
JavaScript 1.0 Arrays
As mentioned earlier, JavaScript originally used the Object() constructor to create arrays in JavaScript 1.0. Because the properties of an Object() could be accessed by using the [] operator, it was possible to give the illusion of an array.
To create an array using this concept, a new object is created using the Object() constructor. Once created, elements can be assigned to the object using the [] operators. Because this is just a basic object, the programmer is responsible for keeping track of the length of the array. The easiest way to remember the length is to create a property called length. Unfortunately, properties use the same positions that are accessed by the [] operator, so the length property would actually be array position 0.
Listing 2.7 demonstrates how to create an array representing a toolbox using the Object() constructor. The code displays the sentence “The toolbox holds: hammer wrench nails” in the browser window.
Listing 2.7 Creating Arrays in JavaScript 1.0
<html>
<script type=“text/javascript” language=“JavaScript”>
<!--
//Create a toolbox array using the Object() constructor
var toolbox = Object();
toolbox.length=3; //array position zero
toolbox[1]=“hammer”;
toolbox[2]=“wrench”;
toolbox[3]=“nails”;
//Display the items in the toolbox.
document.write(“The toolbox holds: ”);
for(x=1; x<=toolbox.length; x++)
{
document.write(toolbox[x],“ ”);
}
//-->
</script>
</html>
Operators
JavaScript provides most of the common operators that can be found in other programming languages. Because of JavaScript’s way of handling strings, some of these operators are a bit easier to use than in other languages.
Arithmetic
Just the same as other programming languages, JavaScript allows many arithmetic operations. These operations include the common addition and subtraction that all programmers use as well as the less common modulus and incremental.
Those who have programmed in other languages will find that JavaScript is very robust in its support of operators and mathematical functions. This is not only because of the built-in operators, but also because of the access to advanced mathematical operations that are provided through the Math object. The functions of this object are shown in Table 2.5 and are covered in Chapter 7.
Table 2.5 Advanced Mathematical Methods

Addition
The addition operator (+) is, of course, one of the most widely used and common operators. If the values on either side are numerical values, the values are added together. When the values are strings, they are concatenated together. The following line of code
var resultOfAdd = 34 + 12;
would set the variable resultOfAdd equal to 46, whereas this line of code
var resultOfAdd = “a” + “corn”;
would set the variable resultOfAdd equal to the string “acorn”.
Subtraction
The subtraction operator (-) subtracts the number to the right of the operator from the number on the left. When either of the operands are strings, an attempt is made to convert the strings to numbers. For example, the following lines of code
var aNum = String(“102”);
var resultOfSub " 25 = aNum;
convert the string stored in aNum to a number before performing the subtraction operation. The result of the subtraction (-77) is then stored in the variable resultOfSub.
Multiplication
The multiplication operator (*) works the same as it would in any other language by multiplying the left operand by the right operand. The multiplication operator is no different from subtraction in its efforts to handle strings. If either of the values is a string, an attempt is made to convert the string to a number. For example, the following lines of code
var aNum = String(“7”);
var resultOfMult = 5 * aNum;
convert the string stored in aNum to a number before performing the multiplication operation. The result of the multiplication (35) is then stored in the variable resultOfMult.
Division
The division operator (/) is the operator that, although simple, can be confusing when you have been writing code all day and your senses are dulled. You ask yourself, “Which number divides into the other?” Reading the expression from left to right, the left value is divided by the right value. As before, if either of the operands is a string, an attempt is made to convert the string to a number. For example, the following lines of code
var aNum = String(“7”);
var resultOfDiv = 42 / aNum;
convert the string stored in aNum to a number before performing the division operation. The result of the division (6) is then stored in the variable resultOfDiv.
Modulus
Although the modulus operator (%) is not used as often as some of the other operators, I am always excited when I do get to use it because it usually means I am performing a neat math trick. This operator starts similar to the division operator, by dividing the left value by the right, but, instead of returning the normal result of division, only the remainder is returned by the operation. Once again, if either value is a string, an attempt is made to convert the string to a number. For example, the following lines of code
var aNum = String(“3”);
var resultOfMod = 26 % 3;
convert the string stored in aNum to a number before performing the modulus operation. The remainder of 2 is then stored in the variable resultOfMod.
The pre-increment operator (++) combines two very common steps that programmers use over and over again into one, thus making code more concise and readable. This operator is especially handy when working with for loops. In your code, the pre-increment operator is placed directly before the variable to be incremented. The operation begins by incrementing the variable by 1. The new incremented value is returned by the operation to be used in another expression. If the variable is a string, it is converted to a number. For example, the following segment of code
//The price is $5.00 dollars
var price = String(“5”);
//Add the shipping rate ($3.00 dollars) to the price after incrementing price
var pricePlusShipping = (++price) + 3;
converts the string stored in price to a number before performing the pre-increment operation. The pre-increment operation results in the variable price being changed from 5 to 6 dollars, and the value of 9 dollars is stored in the variable pricePlusShipping.
Post-Increment
The post-increment operator (++) has the same operator as the pre-increment operator but it behaves differently based on its position. First, the post-increment operator appears directly after the variable that is to be incremented. Unlike the pre-increment operator, the post-increment operator returns the original value before it is incremented by 1. If either of the values is a string, an attempt is made to convert the string to a number. For example, the following segment of code
//The price is $5.00 dollars
var price = String(“5”);
//Add the shipping rate ($3.00 dollars) to the price before incrementing price
var pricePlusShipping = (price++) + 3;
converts the string stored in price to a number before performing the post-increment operation. The post-increment operation causes the variable price to be changed from 5 to 6 dollars but the original price of 5 dollars is added to the shipping rate resulting in the value of 8 dollars being stored in the variable pricePlusShipping.
Pre-Decrement
The pre-decrement operator (--) is very similar to the pre-increment operator in its placement to the left of a variable and its order of execution. But there is one key difference between the operators: the pre-decrement operator decrements the value by 1. Once again, if the variable is a string, it is converted to a number. For example, the following segment of code
//The price is $20.00 dollars
var price = String(“20”);
//Subtracted discount ($6.00 dollars) from the price after decrementing price
var priceMinusDiscount = (--price) - 6;
converts the string stored in price to a number before performing the pre-decrement operation. The pre-decrement operation would result in the variable price being changed from 20 to 19 dollars, and the value of 13 dollars being stored in the variable priceMinusDiscount.
Post-Decrement
The post-decrement operator (--) is very similar to the post-increment operator in its placement to the right of a variable and its order of execution. But, as the name implies, the post-decrement operator decrements the value by 1. If the variable is a string, it is converted to a number. The following segment of code
//The price is $20.00 dollars
var price = 20
//Subtract the discount ($6.00 dollars) from the price before decrementing
price
var priceMinusDiscount = (price--) - 6;
converts the string stored in price to a number before performing the post-decrement operation. The post-decrement operation causes the variable price to be changed from 20 to 19 dollars but the original price of 20 dollars is used to calculate the value of 14 dollars that is stored in the variable priceMinusDiscount.
Unary Negation
The unary negation operator (-) is usually used when performing a mathematical equation in which a number needs to be changed from positive to negative or vice versa. When negating a variable, keep in mind that the contents of the variable do not change, only the value returned is negated. As with all the other operators, if the value is a string, an attempt is made to convert the string to a number. For example, the following segment of code
var aNumber = String(“67”);
var resultOfNeg = -aNumber;
converts the string stored in aNumber to a number before performing the negation operation. The result of negation on the number results in the value of -67 being stored in the variable resultOfNeg.
String
The addition operator (+) has a special purpose when dealing with strings. If the values on either side of the addition operator are strings, the strings are concatenated together. If only one of the values is a string, the other value is converted to a string and concatenated with the first value. To help understand these various combinations of applying the addition operator to numeric and string values, see Listing 2.8.
Listing 2.8 Using the Addition Operator on Numeric and String Values
<html>
<script type=“text/javascript” language=“JavaScript”>
<!--
// Declare 2 numeric variables and 2 string variables
var sStringVar1 = “Hello”;
var sStringVar2 = “World”;
var nNumVar1 = 5;
var nNumVar2 = 10;
// Apply the addition operator to create 3 totals
var sStringTotal = sStringVar1 + sStringVar2;
var nNumTotal = nNumVar1 + nNumVar2;
var sStringNumTotal = sStringTotal + nNumTotal;
// Use the document.write() function to write the totals to the page
// Notice that we even use the addition operator in place of a comma
// to concatenate the results with some text on the page.
document.write(“<b>The string total is: </b>”+sStringTotal+“<br>”);
document.write(“<b>The numeric total is: </b>”,nNumTotal,“<br>”);
document.write(“<b>The string + numeric total is: </b>”,sStringNumTotal);
//-->
</script>
</html>
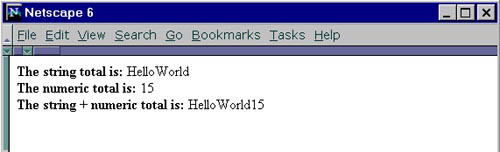
The results of running this script within the body of an HTML document can be seen in Figure 2.4. As the figure shows, when the addition operator is applied to two strings or a string and a numeric value, a string concatenation occurs. As expected, when applying this operator to the two numeric values, the numbers are added.
Figure 2.4 Using the addition operator to add numbers and concatenate strings.
Assignment
What good are variables if data cannot be assigned to them? Similar to all languages, JavaScript provides assignment operators to allow data to be stored in variables. The basic format of the assignment operator is shown in the following example, where a value of 6 is assigned to the variable x:
x = 6;
In addition to this one-to-one assignment, this operator can also be stacked to create simultaneous assignments. Simultaneous means that several variables can be assigned at once. This is demonstrated in the following example, where variables x, y, and z all contain the value o
f 6:
x = y = z = 6;
Anytime multiple assignment operators occur in the same expression, they are evaluated from right to left. So in the previous example, z would be assigned the value 6 first. After the assignment has been made, y would be assigned the value stored in z and, finally, x would be assigned the value stored in y. The overall effect is that all three variables would be assigned a value of 6.
Because the assignment operator is an operator, similar to addition (+) or subtraction (-), it can be used within an expression. This enables a programmer to perform an assignment and evaluate a mathematical expression all in one step.
y =(x = 3) + 4;
In the preceding example, the value 3 is assigned to the variable x, which is then added to the value 4 and assigned to the variable y. After the expression is fully evaluated, y will contain the value 7. This enables programmers to accomplish three operations at once. They are able to assign a value to the x variable, perform addition, and assign the result to the y variable. Features such as this help make JavaScript very versatile and easy to use.
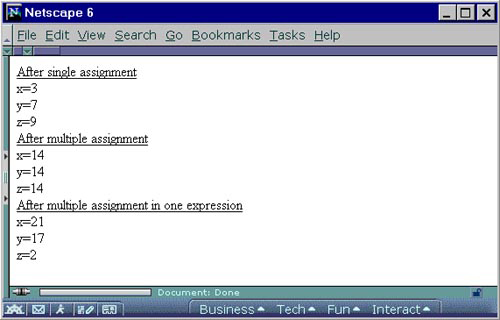
Now that you have looked at how the assignment operator works, look at a more detailed example—one that performs each of the assignments discussed, as well as some more complex ones. Listing 2.9 contains such an example, and Figure 2.5 shows the result.
Listing 2.9 Use of the Assignment Operators in JavaScript
<html>
<script type=“text/javascript” language=“JavaScript”>
<!--
// Declare variables using single assignment
x = 3;
y = 7;
z = 9;
//Display the values stored in the variables after single assignment
document.write(“<u>After single assignment</u><br>”);
document.write(“x=”,x,“<br>y=”,y,“<br>z=”,z,“<br>”);
//Perform multiple assignment on variables
x = y = z = 14;
//Display the values stored in the variables after multiple assignment
document.write(“<u>After multiple assignment</u><br>”);
document.write(“x=”,x,“<br>y=”,y,“<br>z=”,z,“<br>”);
//Perform multiple assignment in one expression
x = (y = 17) + (2 * (z = 2));
//Display the values stored in the variables after multiple assignment
//in one expression.
document.write(“<u>After multiple assignment in one expression</u><br>”);
document.write(“x=”,x,“<br>y=”,y,“<br>z=”,z,“<br>”);
//-->
</script>
</html>
Figure 2.5 The result of various assignment operations.
In addition to the basic assignment operator, JavaScript also offers a number of advanced assignment operators that extend assignment functionality. These operators combine the functionality of basic assignment and other operators into one functional operator. Table 2.6 shows these advanced assignment operators along with their equivalent operations. Details of these assignment operators can be found in Chapter 7.
Table 2.6 Advanced Assignment Operators
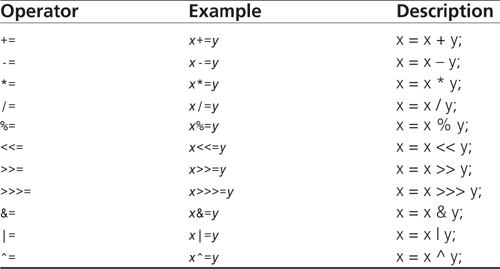
All the advanced assignment operators, except for +=, will attempt to convert strings to numbers before performing the operation. If strings are used with the += operator, the left operand is concatenated to the end of the right operand. For example, in Listing 2.10, the string “lighthouse” would be assigned to the variable y and the phrase “y= lighthouse” is written to the browser.
Listing 2.10 Using the Addition Operator to Perform String Concatenation
<html>
<script type=“text/javascript” language=“JavaScript”>
<!--
// Declare a string
y = “light”;
//Concatenate the string “house” to the
//end of string stored in the variable y
y += “house”;
// Print the output to the screen
document.write(“y= ”,y);
//-->
</script>
</html>
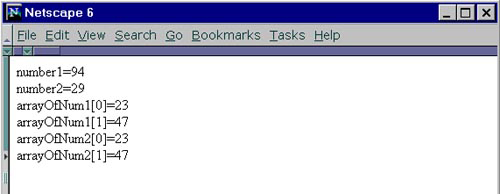
So far, you have only considered assignment of values to variables, but what about assigning a reference to a variable? When the assignment operator works on primitive values (numbers, strings, Boolean, null, and undefined), a copy of the value is made. When the assignment operator works on JavaScript objects, references to the objects are copied. To demonstrate this difference, Listing 2.11 creates a variable and an array to hold numbers. The variable is then copied by value to another variable, and the array is copied by reference to another array. To show the difference, the value stored in one of the variables and one of the arrays is changed, and then all the values are displayed in the browser as seen in Figure 2.6.
Listing 2.11 Assignment by Value Versus by Reference
<html>
<script type=“text/javascript” language=“JavaScript”>
<!--
//Declare a variable and an array object
var number1 = 94;
var arrayOfNum1 = new Array(23,86);
//Assign by value
var number2 = number1;
//Assign by reference
var arrayOfNum2 = arrayOfNum1;
//Modify value stored in copied variable and array.
number2 = 29;
arrayOfNum2[1] = 47;
//Display the values stored in each variable and array
document.write(“number1=”,number1,“<br>”);
document.write(“number2=”,number2,“<br>”);
document.write(“arrayOfNum1[0]=”,arrayOfNum1[0],“<br>”);
document.write(“arrayOfNum1[1]=”,arrayOfNum1[1],“<br>”);
document.write(“arrayOfNum2[0]=”,arrayOfNum2[0],“<br>”);
document.write(“arrayOfNum2[1]=”,arrayOfNum2[1],“<br>”);
//-->
</script>
</html>
Figure 2.6 The variables number1 and number2 are assigned values by value, whereas the arrays arrayOfNum1 and arrayOfNum2 are assigned values by reference.
Logical
JavaScript provides three logical operators. Without these operators, programs would be very long and complex. At first glance, most programmers might think that they already know how these operators work, but it is important to dig a little deeper. Not knowing how the logical operators work can lead to what would appear to be random errors that are impossible to locate and correct. So take the time to read the description of each of the logical operators.
Logical AND
The logical AND operator (&&) returns true if the expression to the left and the expression to the right of the operator evaluate to true. If either the left, right, or both expressions evaluate to false, the result of the operation is false.
Unfortunately, the implementation of the logical AND operator in JavaScript is more complex than what was just mentioned. The AND operation begins by evaluating the left operand. If the left operand evaluates false, the basic logic of the AND operator is complete, so the right operand is never evaluated. But if the left operand evaluates true, the right operand must be evaluated to determine the final result of the AND operation. In either case, the final result returned by the AND operation is actually the result of the last operand to be evaluated.
Logical OR
The logical OR operator (||) returns true if the expression to the left or the expression to the right of the operator evaluates to true. If both the left and the right expressions evaluate to false, the result of the operation is false.
Similar to the logical AND operator, it is important that you understand how JavaScript actually evaluates the logical OR operator. The OR operation begins by evaluating the left operand. If the left operand evaluates true, the basic logic of the OR operator is complete, so the right operand is never evaluated. But if the left operand evaluates false, the right operand must be evaluated to determine the final result of the OR operation. In either case, the final result returned by the OR operation is actually the result of the last operand to be evaluated.
Logical NOT
The logical NOT operator (!) is not as complex as the comparison operators. The result of the expression following the operator is inverted. If the expression evaluates to true, the result of the operation is false. If the expression evaluates to false, the result is true. When the expression evaluates to a non-Boolean value, it is converted to true or false before performing the inversion.
Comparison
JavaScript provides the usual comparison operators found in most languages plus a couple of more unusual ones. JavaScript had some inconsistencies in the operator department during its early years, which resulted in the addition of some unconventional comparison operators. For this reason, it is important to understand how these operators work.
Equal
The equal operator (==) compares the value on the left of the operator to the value on the right of the operator. If the values are equal, true is returned from the operation. If the values are not equal, false is returned from the operation.
Originally, JavaScript attempted to convert the operands of the equality operator to the same type before performing a comparison. For example, if the left operand of an equal operator is a number and the right operand is a string, JavaScript would attempt to convert the string to a number so that two numbers are compared. In an attempt to guess what would be in the then unreleased ECMAScript standard, the decision was made not to do type conversion on the operands of the equality operator in JavaScript 1.2. When the ECMAScript standard was released, it supported type conversion, so JavaScript 1.3 came full circle by once again attempting to convert the operands of the equality operator to the same type before performing a comparison.
JavaScript determines which behavior should be used by the <script> tag. By setting the language attribute of the <script> tag equal to JavaScript, type conversion will be used. If the language attribute is set to “JavaScript1.2”, no type conversion will be used. An example of this behavior is demonstrated in the Listing 2.12.
Listing 2.12 Type Conversion and the Equal Operator
<html>
<script type=“text/javascript” language=“JavaScript”>
<!--
// Type-conversion turned on
document.write(“The == operator with type-conversion turned on returns: ”);
document.write(3==“3”);
// -->
</script>
<script type=“text/javascript1.2” language=“JavaScript1.2”>
<!--
// Type-conversion turned off
document.write(“<br>The == operator with type- ”);
document.write(“conversion turned off returns: ”);
document.write(3==“3”);
// -->
</script>
</html>
So far you’ve seen when type conversion is used with the equality operator, but you haven’t seen how the type conversion operates. Understanding how type conversions work for the equality operators will again save time when trying to find bugs. Type conversion adheres to the following rules:
• True is converted to the number 1, and false is converted to zero before being compared.
• If either of the operands are NaN, the equality operator returns false.
• null and undefined are equal.
• null and undefined are not equal to 0 (zero), "", or false.
• If a string and a number are compared, attempt to convert the string to a number and then check for equality.
• If an object and a string are compared, attempt to convert the object to a string and then check for equality.
• If an object and a number are compared, attempt to convert the object to a number and then check for equality.
• If both operands of an equality operation are objects, the addresses of the two objects are checked for equality.
Not Equal
The not equal operator (!=) compares the value on the left of the operator to the value on the right. If the values are not equal, true is returned from operation. If they are equal, false is returned. The != operator is victim to the same type-conversion bug as the == operator. As with the == operator, use the language attribute of the <script> tag to force the desired behavior.
Greater Than
The greater than operator (>) compares the value on the left of the operator to the value on the right. If the value on the left is greater than the value on the right, true is returned from operation. If the value on the left of the operator is less than or equal to the value on the right, false is returned. If either of the values is a string, it is converted to a number before the comparison takes place.
Less Than
The less than operator (<) compares the value on the left of the operator to the value on the right. If the value on the left is less than the value on the right, true is returned from operation. If the value on the left of the operator is greater than or equal to the value on the right, false is returned. If either of the values is a string, it is converted to a number before the comparison takes place.
Greater Than or Equal
The greater than or equal operator (>=) compares the value on the left of the operator to the value on the right. If the value on the left is greater than or equal to the value to the right of the operator, true is returned from operation. If the value on the left of the operator is less than the value on the right, false is returned. If either of the values is a string, it is converted to a number before the comparison takes place.
Less Than or Equal
The less than or equal operator (<=) compares the value on the left of the operator to the value on the right. If the value on the left is less than or equal to the value on the right, true is returned from the operation. If the value on the left of the operator is greater than the value on the right, false is returned. If either of the values is a string, it is converted to a number before the comparison takes place.
Identity
The identity operator (===), also referred to as strict equal, compares the value on the left of the operator to the value on the right. If the value on the left is equal to the value on the right side of the operator, true is returned from operation. If the values are not equal, false is returned. No type conversion is performed on the operands before the comparison.
Non-Identity
The non-identity operator (!==), also referred to as strict does-not-equal, compares the value on the left of the operator to the value on the right. If the value on the left is not equal to the value on the right side of the operator, true is returned from operation. If the values are equal, false is returned. No type conversion is performed on the operands before the comparison is made.
Conditional
Many programmers are not familiar with the conditional operator (?:), even though it exists in numerous languages. Most individuals will use the standard if statement rather than the conditional operator, even though they do the same thing. The conditional operator is a little harder to read than the standard if statement, but it is much more compact, which is important when download time is a consideration.
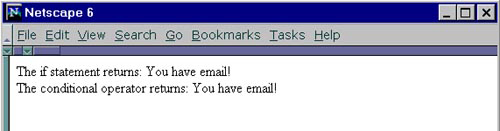
The format of the conditional operator can be a bit confusing. An expression that evaluates to a Boolean is always placed to the left of the question mark (?). If the expression evaluates to true, the value between the question mark and the colon (:) is returned from the operation. If the expression evaluates to false, the value following the colon is returned. In Listing 2.13, a standard if statement is shown, along with same functionality produced by using the conditional operator. Figure 2.7 shows that the same functionality is produced from both the if statement and the conditional operator.
Listing 2.13 The Conditional Operator and if Statement Are Compared
<html>
<script type=“text/javascript” language=“JavaScript”>
<!--
// Set the mail flag to “YES”
mailFlag = “YES”
var message1;
var message2;
//Standard if statement
if (mailFlag == “YES”)
message1 = “You have email!”;
else
message1 = “No email.”;
//Same statement using conditional operator
message2 = (mailFlag == “YES”) ? “You have email!” : “No email.”;
// Print the message to the screen
document.write(“The if statement returns: ”,message1,“<br>”);
document.write(“The conditional operator returns: ”,message2);
//-->
</script>
</html>
Figure 2.7 The result of using the if statement is the same as using the conditional operator.
Bitwise
The bitwise operators look similar to the comparison operators, but their functionality is very different. If you have ever worked with truth tables, you might recognize the operators in this section. Bitwise operators in JavaScript only work with integers that are 32 bits in length. If an integer is not 32 bits, it is turned into a one because the bitwise operators evaluate numbers at the binary level where everything is ones and zeros. Bitwise operations are not used often in programming, but there are times when the operators are indispensable.
Bitwise AND
The bitwise AND operator (&) looks at the integer numbers on both sides of the operator as 32-bit binary numbers. Then the logical AND (&&) operator, discussed earlier in the chapter, individually evaluates each of the 32 bits representing the number to the left of the operator to the corresponding bit of the number to the right of the operator. The 32-bit binary result of logical AND operation is converted to an integer value and returned from the bitwise AND operation.
Bitwise OR
The bitwise OR operator (|) looks at the integer numbers on both sides of the operator as 32-bit binary numbers. Then the logical OR (||) operator, discussed earlier in the chapter, individually evaluates each of the 32 bits representing the number to the left of the operator to the corresponding bit of the number to the right of the operator. The 32-bit binary result of logical OR operation is converted to an integer value and returned from the bitwise OR operation.
Bitwise XOR (exclusive OR)
The bitwise XOR operator (ˆ) looks at the integer numbers on both sides of the operator as 32-bit binary numbers. Unlike the bitwise OR operator, bitwise XOR uses a special version of the logical OR operator, called exclusive OR, to evaluate each bit of a binary number.
The exclusive OR individually evaluates each of the 32 bits representing the number to the left of the bitwise XOR operator to the corresponding bit of the number to the right of the operator. The 32-bit binary result of exclusive OR operation is converted to an integer value and returned from the bitwise XOR operation.
Bitwise NOT
The bitwise NOT operator (~) is simpler than the bitwise AND, OR, and XOR operators. The bitwise NOT operator begins by looking at the number to the right of the operator as a 32-bit binary number. Each bit of the given number is reversed so that all ones become zeros and all zeros become ones. The 32-bit binary result is converted to an integer value and returned from the bitwise NOT operation.
The shift left operator (<<) looks at the integer to the left of the operator as a 32-bit binary number. All the bits in this number are shifted to the left by the number of positions specified by the integer to the right of the operator. As the bits are shifted to the left, zeros are filled in on the right. Because the number can only be 32 bits long, the extra bits on the left are lost. The 32-bit binary result of shifting operation is converted to an integer value and returned from the shift left operation.
Shift Right with Sign
The shift right with sign operator (>>) is similar to the shift left operator. The shift right with sign operator looks at the integer to the left of the operator as a 32-bit binary number. All the bits in this number are shifted to the right by the number of positions specified by the integer to the right of the operator. As the bits are shifted to the right, either ones or zeros are filled in on the left. If the original number is positive, ones are added to the left side of the binary number. On the other hand, if the original number is negative, zeros are used. Because the result can only be 32 bits long, the extra bits on the right are lost. The 32-bit binary result of the shifting operation is converted to an integer value and returned from the shift right with sign operation.
Shift Right Zero Fill
The shift right zero fill operator (>>>) operates the same as the shift right with sign operator, except that the binary number is always padded on the left with zeros, regardless of the sign of the original integer.
Precedence
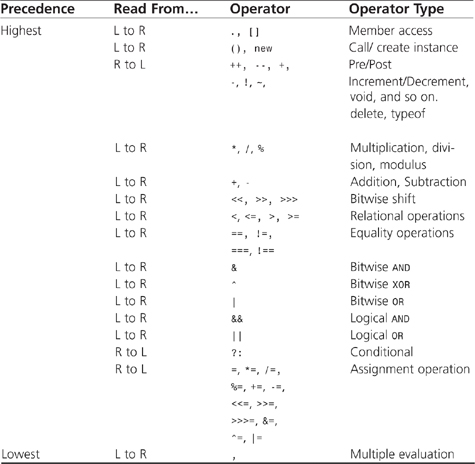
JavaScript, similar to other languages, enables numerous operators to be used in one expression. Because operators can appear just about anywhere within an expression, JavaScript follows guidelines that determine which operator is evaluated first, second, third, and so on. Table 2.7 shows the precedence of all the JavaScript operators. The Read From… column tells what order (left-to-right or right-to-left) operators of equal precedence are evaluated. It is possible to override the precedence of operators by using parentheses.
Table 2.7 Operator Precedence
Loops and Conditionals
Loops and conditionals give programs the power to make decisions and perform tasks multiple times. JavaScript provides the standard conditionals and looping structures that are available in many computer languages. In fact, these structures were patterned after those found in C, C++, and Java, so if you have written code in any of these languages, you will find this section very straightforward.
Conditionals
Conditional statements enable programs to make decisions based on preset conditions that use the operators discussed earlier in the chapter.
if
The if statement is by far the most common conditional statement simply because it is simple and easy to use. The format of a simple if statement looks as follows:
if (expression)
statement;
If the expression in parentheses evaluates to true, the statement is executed; otherwise, the statement is skipped. The statement to be executed can appear on the same line as the if expression, but the code is usually easier to read if the statement appears on the next line as shown in the preceding pseudo code. If two or more lines of code are to be executed, curly braces {} must be used to designate what code belongs in the if statement.
Use the keyword else to extend the functionality of the basic if statement to provide other alternatives if the initial statement should fail. The format of an if…else combination resembles the following:
if (expression)
statement1;
else
statement2;
Now, if the expression evaluates to true, statement1 is executed; otherwise, statement2 is executed. Listing 2.14 demonstrates the use of if and else with a hotel occupancy example. When executed, the code returns the message “There are not enough rooms for 5 guests.”.
Listing 2.14 Basic if…else Structures
<html>
<script type=“text/javascript” language=“JavaScript”>
<!--
//Declare variables
var emptyRooms = 2; //Two people per room
var numberOfGuests = 5;
if (emptyRooms == 0)
document.write(“There are no rooms available.”);
else
{
if ((emptyRooms*2) >= numberOfGuests)
document.write(“There are enough rooms for ”,numberOfGuests,“ guests.”);
else
document.write(“There are not enough rooms for ”);
document.write(numberOfGuests,“ guests.”);
}
}
//-->
</script>
</html>
Notice how Listing 2.14 used curly brackets {} to nest an if…else structure inside another if…else structure. Nesting gives programs more decision-making power, but this power comes at the cost of readability.
The else…if phrase is used in place of nested if…else structures to make code more readable. Each else…if phrase is followed by an expression enclosed in parentheses. Use as many else…if statements as needed. Use a final else statement to execute code when all other conditionals evaluate to false. Listing 2.15 has the same functionality as the code in Listing 2.14, but it uses the else…if structure. This code displays the phrase, “There are not enough rooms for 5 guests.”.
Listing 2.15 Making Nested if…else Statements More Readable with the else…if Phrase
<html>
<script type=“text/javascript” language=“JavaScript”>
<!--
//Declare variables
var emptyRooms = 2; //Two people per room
var numberOfGuests = 5;
if (emptyRooms == 0)
document.write(“There are no rooms available.”);
else if ((emptyRooms*2) >= numberOfGuests)
document.write(“There are enough rooms for ”,numberOfGuests,“ guests.”);
else
document.write(“There are not enough rooms for ”,numberOfGuests,“ guests.”);
//-->
</script>
</html>
switch
JavaScript offers the switch statement as an alternative to using the if…else structure. The switch statement is especially useful when testing all the possible results of an expression. The format of a switch structure resembles the following:
{
case label1 :
statement1 ;
break;
case label2 :
statement2 ;
break;
default:
statement3 ;
}
The switch statement begins by evaluating an expression placed between parentheses, very similar to the if statement. The result is compared to labels associated with case structures that follow the switch statement. If the result is equal to a label, the state-ment(s) in the corresponding case structure are executed. A default structure can be used at the end of a switch structure to catch results that do not match any of the case labels. Listing 2.16 gives an example of the switch structure.
Listing 2.16 Using the switch Structure
<html>
<script type=“text/javascript” language=“JavaScript”>
<!--
//Declare variables
var color = “green”;
//Display the color of the car based on the variable “color”
switch (color)
{
case “red”:
document.write(“The car is red.”);
break;
case “blue”:
document.write(“The car is blue.”);
break;
case “green”:
document.write(“The car is green.”);
break;
default:
document.write(“The car is purple.”);
}
//-->
switch
</script>
</html>
There are a few key points to note about the format of the switch structure in Listing 2.16. First, notice that a colon (:) always follows a label. Second, curly brackets {} are used to hold all the case structures together, but they are not used within a case structure, even when multiple statements are to be executed. Finally, the keyword break is used to break out of the entire switch statement after a match is found, thus preventing the default structure from being executed accidentally. The result of executing the code in Listing 2.16 is the string “The car is green.” being displayed.
Loops
There are times when the same portion of code needs to be executed many times with slightly different values. Use loops that run until a condition is met to create this functionality.
The for loop is a structure that loops for a preset number of times. JavaScript uses the C and C++ for loop structure. This particular structure is flexible, which makes this type of loop very useful.
From a very high level, the for loop is made up of two parts: condition and statement. The condition portion of the structure determines how many times the loop repeats, whereas the statement executes every time the loop occurs.
The condition structure is contained within parentheses and is made up of three parts, each separated by a semicolon (;). The first part of the condition structure initializes a variable to a starting value. In most cases, the variable is declared within this section as well as initialized. The second part is the actual conditional statement that determines how many times the loop will be iterated. The third and final part determines how the variable, which was initialized in the first part, should be changed each time the loop is iterated. This third part gives the for loop its flexibility by causing the variable to be incremented, decremented, factored, or any other adjustment trick you can devise. The format of the for loop appears as follows:
for (initialize; condition; adjust)
{
statement;
}
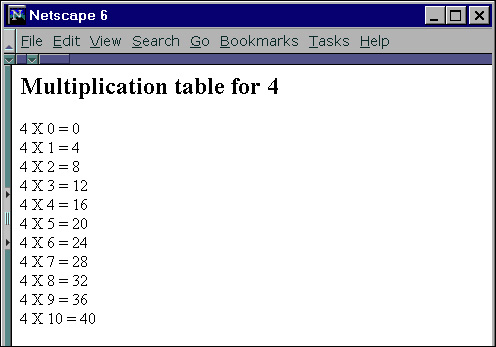
It is important to take time to think about how to implement for loops because it is easy to accidentally create an infinite loop. Specifically, make sure that the conditional will catch the adjusted variable at some point. In many cases, it is advantageous to use the variable in the statement portion of the for loop, but take care not to adjust the variable in such a way that an infinite loop is created. Listing 2.17 makes use of the for loop to create a multiplication table as shown in Figure 2.8.
Listing 2.17 Multiplication Table Using for Loop
<html>
<script type=“text/javascript” language=“JavaScript”>
<!--
document.write(“<h2>Multiplication table for 4</h2>”);
for (var aNum = 0; aNum <= 10; aNum++)
{
document.write(“4 X ”,aNum,“ = ”,4*aNum,“<br>”);
}
//-->
</script>
</html>
Figure 2.8 The multiplication table is created using a for loop.
while
When the for loop is too restrictive for a particular piece of code, consider using the while loop. The while loop can do everything that the for loop can do, but not as cleanly. So why even use the while loop? The while loop goes beyond the for loop’s capabilities by not restricting the number of times the loop will execute.
The while loop is easy to understand if the phrase “While true, loop” is remembered. This phrase means that while the expression in parentheses evaluates to true, execute the statements in the loop. After the last statement in the loop is executed, go back to the top of the loop and evaluate the expression again. When the expression evaluates to false, the next line of code following the while loop structure is executed. To keep the loop from executing indefinitely, a statement must be included in the loop that modifies a variable in the expression. The format of the while loop resembles the following:
while (expression)
{
statement;
}
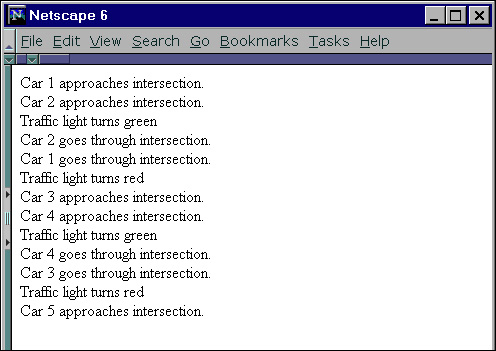
Because the expression is evaluated before the loop, it is possible the loop will never be executed if the expression should evaluate to false the first time. Listing 2.18 simulates an automated traffic light using the while loop.
Listing 2.18 Automated Traffic Light Using while Loop
<html>
<script type=“text/javascript” language=“JavaScript”>
<!--
//Declare variables
var light = “red”; //traffic light
var counter = 1; //create car traffic
var carsInLine = new Array(); //cars in line
//Make 5 cars go through intersection
while (counter <= 5)
{
document.write(“Car ”,counter,“ approaches intersection.<br>”);
carsInLine[carsInLine.length++] = counter;
//When 2 cars are in line light turns green
if (carsInLine.length == 2)
{
light = “green”;
document.write(“Traffic light turns ”,light,“<br>”);
}
//while light is green cars pass through intersection
while (light == “green”)
{
document.write(“Car ”,carsInLine[carsInLine.length-1]);
carsInLine.length--;
document.write(“ goes through intersection.<br>”);
//When no cars are in line light turns red
if (carsInLine.length == 0)
{
light = “red”;
document.write(“Traffic light turns ”,light,“<br>”);
}
}
counter++; //Next car
}
//-->
</script>
</html>
Listing 2.18 uses two while loops to simulate an automated traffic light. The first while loop could have just as easily been created using a for loop, but the second while loop would have been nearly impossible to implement using a for loop. The while loop handles this type of conditional loop with ease. In Figure 2.9, you see that the traffic light automatically turns green when two cars are in line at the intersection. After the two cars go through the intersection, the light turns red.
Figure 2.9 Simulating a traffic light using two while loops.
do…while
The do…while loop is simply a variation of the basic while loop that was just discussed. Other than syntax, the only difference between the do…while loop and the while loop is that the do…while loop always executes the loop once before evaluating the expression for the first time. This difference is seen in the following format:
do
{
statement;
}
while (expression);
After the loop has executed for the first time, the expression in parentheses is evaluated. If true, the loop is executed again. When the expression evaluates to false, the next line of code following the while structure is executed. As was the case with the while loop, a statement must be included in the loop that modifies a variable in the expression to prevent an infinite loop. Also, notice that a semicolon (;) must be placed after the rightmost parenthesis. Listing 2.19 is the same automated traffic light simulator as shown in Listing 2.18, except do…while loops are used instead of while loops.
Listing 2.19 Automated Traffic Light Using do…while Loop
<html>
<script type=“text/javascript” language=“JavaScript”>
<!--
//Declare variables
var light = “red”; //traffic light
var counter = 1; //create car traffic
var carsInLine = new Array(); //cars in line
//Make 5 cars go through intersection
while (counter <= 5)
{
document.write(“Car ”,counter,“ approaches intersection.<br>”);
carsInLine[carsInLine.length++] = counter; //If light green then execute loop more than once
do
{
//When 2 cars are in line light turns green
if (carsInLine.length == 2)
{
light = “green”;
document.write(“Traffic light turns ”,light,“<br>”);
}
//When no cars are in line light turns red
if (carsInLine.length == 0)
{
light = “red”;
document.write(“Traffic light turns ”,light,“<br>”);
}
//Cars pass through intersection while light is green
if (light == “green”)
{
document.write(“Car ”,carsInLine[carsInLine.length-1]);
carsInLine.length--;
document.write(“ goes through intersection.<br>”);
}
}
while (light == “green”);
counter++; //Next car
}
//-->
</script>
</html>
The output generated from running Listing 2.19 is exactly the same as executing Listing 2.18.
for…in
The for…in loop should not be confused with the for loop because they are quite different. The only similarity is that both iterate through the loop a set number of times, but this is as far as the similarity goes. The for…in loop is a special looping construct found only in JavaScript to provide access to all the enumerated properties of a JavaScript object. This includes elements of the Array object because they are stored the same way that property names are stored in JavaScript object. The statement(s) in the loop are executed for each property of an object until every property has been accessed. Any parts of an object—such as methods and some properties—that are not enumerated are not accessed by this looping structure. The format of the for…in loop appears as follows:
for (variable in object)
{
statement;
}
Before the statements in the loop are executed, a property name of the object specified to the right of the keyword in is assigned to the variable on the left side of the keyword in. The variable would then be used within the loop code. This process will continue until all the properties have been accessed. Unfortunately, the order in which the properties are accessed can vary, so do not assume a particular order. Listing 2.20 shows the properties of a simple HTML button.
Listing 2.20 Accessing Property Names of the Button Object Using a for…in Loop
<html>
<form name=“aForm”>
<input type=“button”
name=“Big_Button”
value=“Big Button”
onClick=“alert('The Big Button was pressed!')”;
>
</form>
<script type=“text/javascript” language=“JavaScript”>
<!--
var aProperty;
for (aProperty in document.aForm.Big_Button)
{
document.write(aProperty,“<br>”);
}
//-->
</script>
</html>
Notice that in Figure 2.10, the name of the properties in the Big Button object, rather than the values stored in those properties, was returned.
Figure 2.10 The properties of the Big Button object.

break
The keyword break provides a way for JavaScript to exit out of loop structures and switch conditionals prematurely. Most of the time, the word break appears on a line by itself, but there are times when a label will follow the keyword. When a label is used, JavaScript completely breaks out of the area designated by label and proceeds to the code that follows the area.
JavaScript labels can be thought of as placeholders. To label a statement, simply place the label name followed by a colon (:) in front of the code that needs to be broken out of during code execution. Labels are useful when working with nested loops, as shown in Listing 2.21.
Listing 2.21 Using Breaks and Labels
<html>
<script type=“text/javascript” language=“JavaScript”>
<!--
//Create outerloop
forLoop1:
for (var counter1 = 1; counter1 <= 5; counter1++)
{
//Create innerloop
for (var counter2 = 1; counter2 <= 5; counter2++)
{
//Display values in counters for both loops
document.write(“Counter1=”,counter1);
document.write(“ Counter2=”,counter2,“<br>”);
//Determine when to break out of loop
if (counter2 == 3)
break;
if (counter1 == 3)
break forLoop1;
}
}
document.write(“All done!”);
//-->
</script>
</html>
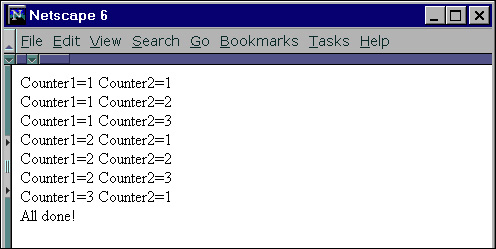
Notice how the break statement with no label (see Figure 2.11) breaks out of just the inner loop. When the break statement is used with a label, JavaScript knows at which level to break.
Figure 2.11 Result of using labels and nested loops.
continue
Unlike the JavaScript break structure, the continue statement forces the execution of the code to continue at the beginning of the loop. Similar to the keyword break, the continue keyword usually appears on a line by itself, but there are times when a label will follow the keyword. When a label is used, JavaScript immediately jumps to the beginning of the loop designated by a label and begins executing code.
The beginning of a loop varies depending on the type of loop structure. Table 2.8 shows where each looping structure jumps when a continue structure is encountered.
Table 2.8 Where the continue Statement Jumps

As discussed in the break section, JavaScript labels can be thought of as placeholders. To label a statement, simply place the label name followed by a colon (:) in front of the code where code execution should continue. Listing 2.22 demonstrates the use of label and continue.
Listing 2.22 Using the continue Statement and Labels
<html>
<script type=“text/javascript” language=“JavaScript”>
<!--
//Create outerloop
outerLoop:
for (var counter1 = 1; counter1 <= 2; counter1++)
{
document.write(“Top of outerLoop.<br>”);
//Create innerloop
innerLoop:
for (var counter2 = 1; counter2 <= 2; counter2++)
{
//Display values stored in counters of both loops
document.write(“Top of innerLoop.<br>”);
document.write(“Counter1=”,counter1,“<br>”);
document.write(“Counter2=”,counter2,“<br>”);
//Determine where to continue looping
if (counter2 == 2)
{
document.write(“Continue at top of innerLoop.<br>”);
continue;
}
if (counter1 == 2)
{
document.write(“Continue at top of outerLoop.<br>”);
continue outerLoop;
}
document.write(“Bottom of innerLoop.<br>”);
}
document.write(“Bottom of outerLoop.<br>”);
}
document.write(“All done!”);
//-->
</script>
</html>
This example is a bit complicated, so take time to compare Listing 2.22 to the output in Figure 2.12. Notice how the phrase “Bottom of innerLoop” was not printed after the “Continue at top of innerLoop” because code execution jumped back to beginning of the innermost loop. When a label was attached to the continue keyword, code execution jumped back to the beginning of the loop labeled outerLoop.
Figure 2.12 Result of using the continue statement in nested loops.

with
The object-oriented design of JavaScript quite often requires long lines of code to access properties and methods of objects. JavaScript provides a special with statement to help reduce the length of code needed to access these properties and methods. The with statement works by placing the repetitive portion of the object’s path in parentheses after the with keyword. Now, any properties or methods used within the with statement will automatically have the repetitive portion of the object’s path (located in parentheses) added to the front of the string. Listing 2.23 shows how the with statement can save time when resetting text fields to their default values.
Listing 2.23 The with Statement Reduces Repetitive Code
<html>
<!--Create a form that has 3 text fields and a reset button-->
<form name=“personalInfoForm”>
Name<input type=“text” name=“nameBox”><br>
Occupation<input type=“text” name=“occupationBox”><br>
Age<input type=“text” name=“ageBox”><br>
<input type=“button” name=“ResetButton”
value=“Reset” onClick=“ResetFields()”>
</form>
<script type=“text/javascript” language=“JavaScript”>
<!--
//Set text field values initially
ResetFields();
//Reset text fields to default values
function ResetFields()
{
with(document.personalInfoForm)
{
nameBox.value=“[Enter your name]”;
occupationBox.value=“Student”;
ageBox.value="";
}
}
//-->
</script>
</html>
In Figure 2.13, you see that the text fields contain default data that appear initially as well as any time the Reset button is clicked. To achieve this functionality, the Reset button is connected to a function, called ResetFields(), that assigns default values to the text fields. To reduce repetitive code, the with statement was used in setting the default values, as seen in Listing 2.23.
Figure 2.13 Using the with statement reduces the amount of code needed to set the default text box values.

Functions
One of the strengths of JavaScript is that it provides support for functions, which is uncommon among scripting languages. On the other hand, JavaScript functions are not as fully developed as those found in languages such as C and C++. The functionality that JavaScript does provide through its functions is more than enough to make Web pages come alive.
Syntax
The syntax of JavaScript functions is very straightforward. All function declarations must begin with the keyword function followed by the name of the function. The name of the function is the name that will be used to call on the function within code. Parentheses are placed after the function name to hold arguments that are to be passed into the function. If more than one argument is to be passed into the function, use commas to separate the arguments. On the other hand, if no arguments need to be passed into the function, leave the space between the parentheses empty. Finally, curly brackets are used to contain the code related to the function. Curly brackets are not optional: They are required in JavaScript, even if the function is only made up of one line of code.
Call By Value Versus Call By Reference
If you have done programming in C or C++, you are probably familiar with the phrases call by value and call by reference as related to function arguments. In very basic terms, call by reference passes the location of the actual argument to the function, whereas call by value makes a copy of the argument to be used just within the function. JavaScript keeps the functionality of passing arguments simple by just using call by value. Using call by value gives the freedom to manipulate the arguments within the function without fear of changing the argument’s values outside the function. Listing 2.24 shows an example of JavaScript call by value.
Listing 2.24 Call By Value
<html>
<script type=“text/javascript” language=“JavaScript”>
<!--
//Declare variables
var aString = “banana”
var aNumber = 15;
//Function declaration
function test(aString, aNumber)
{
aString = “orange”;
aNumber = 124;
//Display values stored in function variables.
document.write(“During function call:<br>”);
document.write(“aStringCopy=”,aString,“<br>”);
document.write(“aNumberCopy=”,aNumber,“<br>”);
}
//Display variables before function call
document.write(“Before function call:<br>”);
document.write(“aString=”,aString,“<br>”);
document.write(“aNumber=”,aNumber,“<br>”);
//Call on function
test(aString,aNumber);
//Display variables after function call
document.write(“After function call:<br>”);
document.write(“aString=”,aString,“<br>”);
document.write(“aNumber=”,aNumber,“<br>”);
//-->
</script>
</html>
In Figure 2.14, you see that the values stored in aString and aNumber appeared to be changed while in the function test. But after exiting the function, the values reverted back to their initial value. What actually happened was that a local copy of the variables was made for use within the function. These new variables even have the same name as the ones that were passed into the function. After execution of the function was completed, the local variables no longer existed, so final values displayed were of the original variables.
Figure 2.14 Result of using call by value.

If you need to pass in a large number of arguments but do not want to assign each one to a variable, it is possible to access the arguments as an array. To do this, leave the area in parentheses blank and use the arguments object and the array operator [] to access each argument. Listing 2.25 displays the arguments passed into the function using the arguments array as shown in Figure 2.15.
Listing 2.25 Accessing Function Arguments with the arguments Array
<html>
<script type=“text/javascript1.2” language=“JavaScript1.2”>
<!--
//Create a function that displays the arguments it receives.
function displayArguments()
{
document.write(“The following arguments were passed:<br>”);
for(i=0; i<arguments.length; i++)
{
document.write(i,“ = ”,arguments[i],“<br>”);
}
}
//Pass some arguments into function
displayArguments(34,“hat”,-7945,“shoes”);
//-->
</script>
</html>
Figure 2.15 The arguments passed into the displayArguments() function using the arguments array.

Returning Values
What if a value needs to be passed back from a function to be used later in the code? JavaScript provides a return statement that can be used in a function to return a value back to the statement that called the function. The value to be returned is simply placed after the keyword return. The undefined value is returned from a function if no value is specified after the keyword return or if the return statement is not used at all.
A value returned from a function can be assigned to a variable or used within an expression. In Listing 2.26, the value returned from the function is used in an expression to write the phrase “3*5=15” to the browser window.
Listing 2.26 Returning a Value from a Function
<html>
<script type=“text/javascript” language=“JavaScript”>
<!--
//Function declaration
function multiplyByFive(aNumber)
{
return aNumber*5;
}
//Display variables before function call
document.write(“3*5=”,multiplyByFive(3));
//-->
</script>
</html>
Functions as Objects
The functions that have been described so far are created statically when the Web page is loaded, but there is also a dynamic function that is not created until it is called, which enables functions to be objects. The syntax for this type of function is very similar to the declaration of a variable.
var varName = new Function(argument1,…,lastArgument);
The keyword Function is used to create a new function dynamically from the arguments. All the arguments must be strings, and the last argument should always contain the functionality of the function. Listing 2.27 shows a simple example of using the Function object. Once again the phrase “3*5=15” is written to the browser window.
Listing 2.27 Returning a Value from a Function
<html>
<script type=“text/javascript” language=“JavaScript”>
<!--
//Create the dynamic Function
var multiplyByFive = new Function(“y”,“return y*5”);
document.write(“3*5=”,multiplyByFive(3));
//-->
</script>
</html>
Moving On
In this chapter, you were introduced to the details of the JavaScript language that are common across many computer languages. Armed with an understanding of JavaScript data types, variables, operators, loops, conditionals, functions, and basic syntax, which were covered in this chapter, you could start constructing JavaScript programs right now. But don’t you want to learn some JavaScript specific programming techniques that will help you tap into JavaScript’s full potential? In the next chapter, we will do just that by diving into some JavaScript programming techniques that take JavaScript beyond just a plain computer scripting language.