
Chapter 8 Client-Side
This chapter contains all the items and elements making up the JavaScript language in browsers. As with the other chapters in this section of the book, each entry includes the version, browser support, syntax, a description, an example, as well as many other details.
JavaScript objects are in alphabetical order to provide you with quick, easy access. The methods, properties, functions, and event handlers of every object appear alphabetically after the respective parent object using the simple dot notation used in all the reference chapters.
Anchor
JavaScript 1.2+, JScript 3.0+ Nav4+, IE4+, Opera5+
Syntax
document. anchors
Description
An instance of the Anchor object is created with each instance of the <a> tag with the name attribute (or id attribute) set. An anchor itself is a point in an HTML document that can be reached by using a hypertext link. The hypertext link that references an anchor can appear within the same document as the anchor or in a completely different Web page. In either case, anchors allow access to specific parts of Web pages rather than always displaying the top of a document when a Web page is loaded in a browser. For an anchor to act like an anchor, the name attribute (or id attribute) must be set for hyperlinks to reference the anchor’s position in the document.
In HTML, the <a> tag is usually accompanied by an href attribute that contains a hypertext link. This is the complete opposite of the definition of an anchor because when the href is used in conjunction with the <a> tag, it is a link rather than an anchor. In fact, JavaScript uses the Link object to access the anchor tag when the tag is used as a link.
Table 8.1 lists the properties and methods available from the Anchor object.
Table 8.1 Properties and Methods Used by the Anchor Object

Example
Listing 8.1 demonstrates how anchors are created and used in HTML documents by creating a dictionary of fruit. The heading for each letter of the dictionary is designated as an anchor. At the bottom of the document, some properties of the anchors are accessed using JavaScript.
Listing 8.1 Creating Anchors in a Document
<html>
<center>
<h1><u>Fruit Dictionary</u></h1>
Pick a letter:
<a href="#A">A</a>|<a href="#B">B</a>|<a href="#C">C</a>
</center>
<br><a name="A"><h4>The Letter A</h4></a>
Apple = A round, juicy fruit that comes in red, yellow, and green.<br>
Apricot = A round yellow-orange fruit.<br>
<br><a name="B"><h4>The Letter B</h4></a>
Banana = A long, yellow, curved fruit with a soft core.<br>
Blackberry = A black, tart fruit from a prickly bush.<br>
Blueberry = A small, round, blue berry that grows on a bush.<br>
<br><a name="C"><h4>The Letter C</h4></a>
Cantaloupe = A large orange melon with hard outer surface.<br>
Coconut = A large round fruit with a hard, fuzzy outer surface.<br>
<script type="text/javascript" language="JavaScript">
<!--
document.write("<br>The Anchor Properties:<br>");
// Display the values of the properties associated with each anchor.
for(var counter=0; counter<document.anchors.length; counter++)
{
document.write("anchors[",counter,"].name=");
document.write(document.anchors[counter].name,"<br>");
document.write("anchors[",counter,"].text=");
document.write(document.anchors[counter].text,"<br>");
document.write("anchors[",counter,"].x=");
document.write(document.anchors[counter].x,"<br>");
document.write("anchors[",counter,"].y=");
document.write(document.anchors[counter].y,"<br>");
}
// -->
</script>
</html>
Anchor.name
JavaScript 1.2+, JScript 3.0+
Nav4+, IE4+, Opera5+
Syntax
document. anchors[num].name
Description
The name property holds the name of the anchor and is the way hyperlinks reference the anchor’s position. This property is originally set by the name attribute in the <a> tag.
Example
Listing 8.2 creates a dictionary of fruit where the heading for each letter of the dictionary is designated as an anchor. At the bottom of the document, the name property of each anchor is used to create the hyperlink text and reference each anchor.
Listing 8.2 Accessing the name Property of the Anchor Object
<html>
<center>
<h1><u>Fruit Dictionary</u></h1>
Pick a letter:
<a href="#A">A</a>|<a href="#B">B</a>|<a href="#C">C</a>
</center>
<br><a name="A"><h4>The Letter A</h4></a>
Apple = A round, juicy fruit that comes in red, yellow, and green.<br>
Apricot = A round yellow-orange fruit.<br>
<br><a name="B"><h4>The Letter B</h4></a>
Banana = A long, yellow, curved fruit with a soft core.<br>
Blackberry = A black, tart fruit from a prickly bush.<br>
Blueberry = A small, round, blue berry that grows on a bush.<br>
<br><a name="C"><h4>The Letter C</h4></a>
Cantaloupe = A large orange melon with hard outer surface.<br>
Coconut = A large round fruit with a hard, fuzzy outer surface.<br>
<script type="text/javascript" language="JavaScript">
<!--
document.write("<br>Pick a letter:");
// Create a link for each anchor using the Anchor object.
for(var counter=0; counter<document.anchors.length; counter++)
{
document.write("<a href='#",document.anchors[counter].name,"'>");
document.write(document.anchors[counter].name,"</a>|");
}
// -->
</script>
</html>
Anchor.text
JavaScript 1.2-1.4
Nav4-4.5
Syntax
document. anchors[num].text
Description
The text property contains the text that appears between the <a> and </a> tags. If other HTML tags appear within these two anchor tags, the text property might not contain all the text between the anchor tags.
Example
Listing 8.3 creates a dictionary of fruit where the heading for each letter of the dictionary is designated as an anchor. At the bottom of the document, the text property of the anchors is used to create hyperlink text that points to each anchor.
Listing 8.3 Accessing the text Property of the Anchor Object
<html>
<center>
<h1><u>Fruit Dictionary</u></h1>
Pick a letter:
<a href="#A">A</a>|<a href="#B">B</a>|<a href="#C">C</a>
</center>
<br><a name="A"><h4>The Letter A</h4></a>
Apple = A round, juicy fruit that comes in red, yellow, and green.<br>
Apricot = A round yellow-orange fruit.<br>
<br><a name="B"><h4>The Letter B</h4></a>
Banana = A long, yellow, curved fruit with a soft core.<br>
Blackberry = A black, tart fruit from a prickly bush.<br>
Blueberry = A small, round, blue berry that grows on a bush.<br>
<br><a name="C"><h4>The Letter C</h4></a>
Cantaloupe = A large orange melon with hard outer surface.<br>
Coconut = A large round fruit with a hard, fuzzy outer surface.<br>
<script type="text/javascript" language="JavaScript">
<!--
document.write("<br>Pick a letter:<br>");
// Create a link for each anchor using the Anchor object.
for(var counter=0; counter<document.anchors.length; counter++)
{
document.write("<a href='#",document.anchors[counter].name,"'>");
document.write(document.anchors[counter].text,"</a><br>");
}
// -->
</script>
</html>
Anchor.unwatch()
JavaScript 1.2+
Nav4+, NES3+
Syntax
document.anchors[num]. unwatch(property)
Description
The unwatch() method of the Anchor object is used to turn off the watch for a particular property specified by property.
Example
Listing 8.4 shows how the unwatch() method is used to stop watching the name property of the Anchor object after its name has changed to "juice".
Listing 8.4 Example of the unwatch() Method of the Anchor Object
<html>
<a name="oranges">Oranges</a> are orange.<br>
<a name="apples">Apples</a> are red.<br><br>
<script type="text/javascript" language="JavaScript">
<!--
function alertme(id,oldValue,newValue)
{
document.write(id + " changed from " + oldValue + " to ");
document.write(newValue + "<br>");
return newValue;
}
// Start watch.
document.anchors[0].watch("name",alertme);
document.write("Original anchor name: " + document.anchors[0].name + "<br>");
// Change anchor name associated with oranges.
document.anchors[0].name = "juice";
// End watch.
document.anchors[0].unwatch("name");
document.write("New anchor name: " + document.anchors[0].name + "<br>");
// Change anchor name associated with oranges.
document.anchors[0].name = "orange juice";
document.write("Final anchor name: " + document.anchors[0].name);
// -->
</script>
</html>
Anchor.watch()
JavaScript 1.2+
Nav4+, NES3+
Syntax
document.anchors[num]. watch(property,function)
Description
The watch() method of the Anchor object is used to turn on the watch for a particular property specified by property. Any time the specified property is changed after the watch() method has been called, the specified function is called.
Example
Listing 8.5 shows how the watch() method is used to start watching the name property of the Anchor object.
Listing 8.5 Example of the watch() Method of the Anchor Object
<html>
<a name="oranges">Oranges</a> are orange.<br>
<a name="apples">Apples</a> are red.<br><br>
<script type="text/javascript" language="JavaScript">
<!--
function alertme(id,oldValue,newValue)
{
document.write(id + " changed from " + oldValue + " to ");
document.write(newValue + "<br>");
return newValue;
}
// Start watch.
document.anchors[0].watch("name",alertme);
document.write("Original anchor name: " + document.anchors[0].name + "<br>");
// Change anchor name associated with oranges.
document.anchors[0].name = "juice";
document.write("New anchor name: " + document.anchors[0].name + "<br>");
// -->
</script>
</html>
Anchor.x
JavaScript 1.2-1.4
Nav4-4.5
Syntax
document. anchors[num].x
Description
The x property contains the x coordinate of the anchor, in pixels, from the left edge of the document to the anchor.
Example
Listing 8.6 creates a single anchor out of a header at the top of the document. The x property is used to display the horizontal position of the Anchor object on the bottom of the page.
Listing 8.6 Accessing the x Property of the Anchor Object
<html>
<center><a name="A"><h4>Apple</h4></a></center>
A round, juicy fruit that comes in red, yellow, and green.<br>
<script type="text/javascript" language="JavaScript">
<!--
// Display the x property of the anchor.
document.write("The x property is equal to ",document.anchors[0].x);
// -->
</script>
</html>
Anchor.y
JavaScript 1.2-1.4
Nav4-4.5
Syntax
document. anchors[num].y
Description
The y property contains the y coordinate of the anchor, in pixels, from the top edge of the document to the anchor.
Example
Listing 8.7 creates a single anchor out of a header at the top of the document. The y property is used to display the vertical position of the Anchor object on the bottom of the page.
Listing 8.7 Accessing the y Property of the Anchor Object
<html>
<center><a name="B"><h4>Banana</h4></a></center>
A long, yellow, curved fruit with a soft core.<br>
<script type="text/javascript" language="JavaScript">
<!--
// Display the y property of the anchor.
document.write("The y property is equal to ",document.anchors[0].y);
// -->
</script>
</html>
Applet
JavaScript 1.1+, JScript 3.0+
Nav3+, IE4+
Syntax
Core client-side JavaScript object.
Description
In JavaScript, applets embedded in HTML Web pages are represented by the Applet object. This object, which is created with each instance of the <applet> tag in a document, allows access to the public fields and methods of the applet through JavaScript properties and methods. Table 8.2 lists the properties and methods used by the Applet object.
Table 8.2 Properties and Methods of the Applet Object

Example
Assume, for the sake of the example code in Listing 8.8, that you have a calculator applet that you want to embed in an HTML document. Also assume that this applet has a method called add(), which adds two numbers and returns the result. If you wanted to access this method from within JavaScript, you would begin by defining the applet using <applet> tags. Then the JavaScript code would pass the numbers 2 and 5 into the add() method, using dot notation, and the result of 7 would be returned and displayed in the browser.
Listing 8.8 Accessing the Method of an Applet Object
<html>
<applet name="calculator" code="calculator.class" width=50 height=50></applet>
<script type="text/javascript" language="JavaScript">
<!--
// Use the calculator applet to add two numbers.
document.write("2+5=",calculator.add(2,5); // 7 is returned
// -->
</script>
</html>
Area
JavaScript 1.1+, JScript 1.0+
Nav3+, IE3+, Opera3+
Syntax
Core client-side JavaScript object.
Description
An instance of the Area object is created with each occurrence of the <area> tag within an HTML document. In HTML documents, the <area> tag is used in conjunction with the <map> tag to define an area within a picture that will act as a hyperlink. Because the Area object is a hyperlink, it is equivalent to the Link object in JavaScript. In fact, the Area object is stored in the same array where Link objects are stored. Table 8.3 lists the properties, methods, and event handlers of the Area object.
Table 8.3 Properties, Methods, and Event Handlers Used by the Area Object

Example
Listing 8.9 creates a paint store Web page complete with a box of colors that contains hyperlinks to bogus color sites. The hyperlinks are created over the graphic using the <map>, <img>, and <area> tags. When the mouse is moved over an area, the properties associated with that area are displayed in the text fields at the bottom of the screen. Figure 8.1 shows what happens when the mouse pointer is placed in the green box.
Listing 8.9 Creating Areas and Accessing Their Properties
<html>
<body>
<h2>The Paint Store</h2>
Select one of the 4 colors to find out more about the colors we carry.<br>
<map name="colorMap">
<area name="redArea"
coords="1,1,48,48"
href="http://www.red.com:1234/red.html?query=red#RED"
target="_top"
onMouseOver="overBox(0)"
onMouseOut="clearBox()">
<area name="greenArea"
coords="51,1,99,49"
href="http://www.green.com:5678/green.html?query=green#GREEN"
target="_top"
onMouseOver="overBox(1)"
onMouseOut="clearBox()">
<area name="yellowArea"
coords="1,51,51,99"
href="http://www.yellow.com:9876/yellow.html?query=yellow#YELLOW"
target="_top"
onMouseOver="overBox(2)"
onMouseOut="clearBox()">
<area name="blueArea"
coords="51,51,99,99"
href="http://www.blue.com:5432/blue.html?query=blue#BLUE"
target="_top"
onMouseOver="overBox(3)"
onMouseOut="clearBox()">
</map>
<img src="box4.gif" align="top"
height="100" width="100" usemap="#colorMap">
<br><br><b><u>AREA Properties</u></b>
<form name="myForm">
hash=<input name="tHash" type="textarea"><br>
host=<input name="tHost" type="textarea"><br>
hostname=<input name="tHostName" type="textarea"><br>
href=<input name="tHref" type="textarea"><br>
pathname<input name="tPathName" type="textarea"><br>
port=<input name="tPort" type="textarea"><br>
protocol=<input name="tProtocol" type="textarea"><br>
search=<input name="tSearch" type="textarea"><br>
target=<input name="tTarget" type="textarea"><br>
</form>
<script type="text/javascript" language="JavaScript">
<!--
// Fill in the text area fields.
function overBox(num)
{
document.myForm.tHash.value = document.links[num].hash;
document.myForm.tHost.value = document.links[num].host;
document.myForm.tHostName.value = document.links[num].hostname;
document.myForm.tHref.value = document.links[num].href;
document.myForm.tPathName.value = document.links[num].pathname;
document.myForm.tPort.value = document.links[num].port;
document.myForm.tProtocol.value = document.links[num].protocol;
document.myForm.tSearch.value = document.links[num].search;
document.myForm.tTarget.value = document.links[num].target;
}
// Clear text in the text area fields.
function clearBox()
{
document.myForm.tHash.value = "";
document.myForm.tHost.value = "";
document.myForm.tHostName.value = "";
document.myForm.tHref.value = "";
document.myForm.tPathName.value = "";
document.myForm.tPort.value = "";
document.myForm.tProtocol.value = "";
document.myForm.tSearch.value = "";
document.myForm.tTarget.value = "";
}
// -->
</script>
</body>
</html>
Figure 8.1 Accessing an area’s properties.

Area.handleEvent()
JavaScript 1.2+
Nav4+
Syntax
document. links[num].handleEvent(event)
Description
The handleEvent() method invokes the event handler, specified by the event argument, that is associated with link specified by the num argument. The method returns the value associated with the specified event argument.
Example
Listing 8.10 creates a Web page for learning more about the toppings used on a pizza. When an area is clicked, the user is taken to a place within the document to learn more about the pizza topping. The handleEvent() method is used to pass all the mouse events from the first area (represented by peppers) to the event handlers of the second area (represented by onion). Normally, you would want to display a special notice when the mouse moves over the pepper area, but the handleEvent() method is used to make the pepper area do the same thing as the onion area. Notice that "onion" is placed in the text box when the mouse is moved over either of the two defined areas, thanks to the handleEvent() method.
Listing 8.10 Passing Events to Other Area Objects to be Handled
<html>
<body>
<center><h1><u>
Learn more about the toppings we use on our pizza
</u></h1></center>
<h3>Choose a pizza topping from the pictures to learn more.</h3>
<map name="toppingsMap">
<area name="peppers"
coords="1,1,48,48"
href="#PEPPERS"
target="_top"
onMouseOver="fillTextField(event)"
onMouseOut="fillTextField(event)"><br>
<area name="onion"
coords="51,1,99,49"
href="#ONION"
target="_top"
onMouseOver="document.pizzaForm.textbox.value='onion'"
onMouseOut="document.pizzaForm.textbox.value=''">
</map>
<img src="toppingsBox.gif"
align="top"
height="50"
width="100"
usemap="#toppingsMap">
<br>
<form name="pizzaForm">
<input type="text"
name="textbox">
</form>
<script type="text/javascript" language="JavaScript">
<!--
// This function passes event to another Area object to handle.
function fillTextField(event)
{
// Pass event to 2nd area link.
document.links[1].handleEvent(event);
}
// -->
</script>
<a name="PEPPERS"><h3>The peppers we use:</h3></a>
<ul>
<li>Yellow</li>
<li>Red</li>
<li>Green</li>
</ul>
<a name="ONION"><h3>The onions we use:</h3></a>
<ul>
<li>Mild</li>
<li>Hot</li>
</ul>
</body>
</html>
Area.hash
JavaScript 1.1+, JScript 1.0+
Nav3+, IE3+, Opera3+
Syntax
document. links[num].hash
Description
The hash property associated with an Area object contains the anchor specified in the URL including the leading hash symbol (#).
Example
Listing 8.11 creates a truck parts page that allows users to find model numbers of parts by clicking a picture of the part. When the user selects a part, she is presented with an alert window that contains the value of the hash property for the selected link. In this example the value displayed will be one of the following strings: "#SPARKPLUGS", "#TIRES", "#HEADLIGHTS", and "#FUSES". After the alert window is closed, the browser moves to the portion of the document specified by the hash property.
Listing 8.11 Displaying the hash Property of the Area Object
<html>
<body>
<center><h1><u>Wild Bill's Truck Parts</u></h1></center>
<h3>Select a part from the picture.</h3>
<map name="partsMap">
<area name="sparkPlug"
coords="1,1,48,48"
href="#SPARKPLUGS"
target="_top"
onClick="alert(document.links[0].hash)">
<area name="tires"
coords="51,1,99,49"
href="#TIRES"
target="_top"
onClick="alert(document.links[1].hash)">
<area name="headlights"
coords="1,51,51,99"
href="#HEADLIGHTS"
target="_top"
onClick="alert(document.links[2].hash)">
<area name="fuses"
coords="51,51,99,99"
href="#FUSES"
target="_top"
onClick="alert(document.links[3].hash)">
</map>
<img src="partsBox.gif"
align="top"
height="100"
width="100"
usemap="#partsMap">
<br>
<a name="SPARKPLUGS"><h3>Spark Plugs</h3></a>
<ul>
<li>SP93654</li>
<li>SP34710</li>
<li>SP19374</li>
</ul>
<a name="TIRES"><h3>Tires</h3></a>
<ul>
<li>Mud Stompers</li>
<li>Low Riders</li>
<li>Standard</li>
</ul>
<a name="HEADLIGHTS"><h3>Headlights</h3></a>
<ul>
<li>Night Vision bulbs</li>
<li>Standard</li>
</ul>
<a name="FUSES"><h3>Fuses</h3></a>
<ul>
<li>Red</li>
<li>Yellow</li>
<li>Green</li>
<li>Blue</li>
</ul>
</body>
</html>
Area.host
JavaScript 1.1+, JScript 1.0+
Nav3+, IE3+, Opera3+
Syntax
document. links[num].host
Description
The host property associated with an Area object contains the hostname and port that is specified in the URL separated by a colon (:).
Example
Listing 8.12 creates a truck parts page that allows users to find model numbers of parts by clicking a picture of the part. When the user selects a part, she is presented with an alert window that contains the string "www.wildbillstruckparts.com:4000", which is the value of the host property for the selected link. After the alert window is closed, the browser will attempt to load the specified file located on the fictitious Web site.
Listing 8.12 Displaying the host Property of the Area Object
<html>
<body>
<center><h1><u>Wild Bill's Truck Parts</u></h1>
<h3>Select a part from the picture.</h3>
<map name="partsMap">
<area name="sparkPlug"
coords="1,1,48,48"
href="http://www.wildbillstruckparts.com:4000/sparkplugs.html"
target="_top"
onClick="alert(document.links[0].host)">
<area name="tires"
coords="51,1,99,49"
href="http://www.wildbillstruckparts.com:4000/tires.html"
target="_top"
onClick="alert(document.links[1].host)">
<area name="headlights"
coords="1,51,51,99"
href="http://www.wildbillstruckparts.com:4000/headlights.html"
target="_top"
onClick="alert(document.links[2].host)">
<area name="fuses"
coords="51,51,99,99"
href="http://www.wildbillstruckparts.com:4000/fuses.html"
target="_top"
onClick="alert(document.links[3].host)">
</map>
<img src="partsBox.gif"
align="top"
height="100"
width="100"
usemap="#partsMap">
</center>
</body>
</html>
Area.hostname
JavaScript 1.1+, JScript 1.0+
Nav3+, IE3+
Syntax
document. links[num].hostname
Description
The hostname property associated with the Area object contains just the hostname that is specified in the URL.
Example
Listing 8.13 creates a truck parts page that allows users to find model numbers of parts by clicking a picture of the part. When the user selects a part, she is presented with an alert window that contains the string "www.wildbillstruckparts.com", which is the value of the hostname property for the selected link. After the alert window is closed, the browser will attempt to load the file located on the fictitious Web site.
Listing 8.13 Displaying the hostname Property of the Area Object
<html>
<body>
<center><h1><u>Wild Bill's Truck Parts</u></h1>
<h3>Select a part from the picture.</h3>
<map name="partsMap">
<area name="sparkPlug"
coords="1,1,48,48"
href="http://www.wildbillstruckparts.com:4000/sparkplugs.html"
target="_top"
onClick="alert(document.links[0].hostname)">
<area name="tires"
coords="51,1,99,49"
href="http://www.wildbillstruckparts.com:4000/tires.html"
target="_top"
onClick="alert(document.links[1].hostname)">
<area name="headlights"
coords="1,51,51,99"
href="http://www.wildbillstruckparts.com:4000/headlights.html"
target="_top"
onClick="alert(document.links[2].hostname)">
<area name="fuses"
coords="51,51,99,99"
href="http://www.wildbillstruckparts.com:4000/fuses.html"
target="_top"
onClick="alert(document.links[3].hostname)">
</map>
<img src="partsBox.gif"
align="top"
height="100"
width="100"
usemap="#partsMap">
</center>
</body>
</html>
Area.href
JavaScript 1.1+, JScript 1.0+
Nav3+, IE3+, Opera3+
Syntax
document. links[num].href
Description
The href property associated with the Area property contains the entire URL specified by the href attribute of the <area> tag. This property is a read/write string.
Example
In Listing 8.14, a sports car picture site is created. Selecting your location determines from which site a large picture of the sports car is retrieved. This is accomplished by modifying the href property to link to a completely different site based on the user’s choice of cars.
Listing 8.14 Modifying the href Property of the Area Object
<html>
<body>
<center><h1><u>Sports Car Pictures</u></h1></center>
<h3>Step 1: Choose a car.</h3>
<form name="question">
<input name="carType"
type="radio"
checked
onClick="updateLinks('LAMBORGHINI')">Lamborghini<br>
<input name="carType"
type="radio"
onClick="updateLinks('FERRARI')">Ferrari
</form>
<h3>Step 2: Click on the picture to see the car.</h3>
<map name="carMap">
<area name="car"
coords="1,1,48,48"
href="http://www.cars.com:5678/cars.html ?query=fast#LAMBORGHINI"
target="_top">
</map>
<img src="cars.gif" align="top"
height="50" width="50" usemap="#carMap">
<br>
<script type="text/javascript" language="JavaScript">
<!--
// update the picture host links based on the radio box settings
function updateLinks(car)
{
// Set to Lamborghini site
if(car=="LAMBORGHINI")
document.links[0].href="http://www.cars.com:5678/cars.html?query=fast#LAMBORGHINI";
// Set to Ferrari site
if(car=="FERRARI")
document.links[0].href="http://www.sportscars.com:2020/fastcars.html ?query=fast#FERRARI";
}
// -->
</script>
</body>
</html>
Area.onDblClick
JavaScript 1.2+, JScript 1.0+
Nav4+, IE3+
Syntax
onDblClick="command"
Description
The onDblClick event handler associated with the Area object is invoked when the user double-clicks the mouse pointer while in the region defined by the <area> tag.
Example
Listing 8.15 creates a clothing site with a picture of a shirt. Double-clicking the shirt displays a message about red shirts, thanks to the onDblClick event handler.
Listing 8.15 Using the onDblClick Property of the Area Object
<html>
<body>
<h2>The Clothes Site</h2>
<map name="clothesMap">
<area name="redShirt"
coords="1,1,48,48"
target="_top"
onDblClick="alert('You must like red shirts.')">
</map>
<img src="clothes.gif" align="top"
height="100" width="100" usemap="#clothesMap">
</body>
</html>
Area.onMouseOut
JavaScript 1.1+, JScript 1.0+
Nav3+, IE3+, Opera3+
Syntax
onMouseOut="command"
Description
The onMouseOut event handler associated with the Area object is invoked when the user moves the mouse pointer into the region defined by the <area> tag.
Example
Listing 8.16 creates a clothing site with a picture of a shirt. Clicking the shirt graphic takes you to a site about red shirts. If the mouse is moved out of the region, an alert box posts a message to the screen, thanks to the onMouseOut event handler.
Listing 8.16 Using the onMouseOut Property of the Area Object
<html>
<body>
<h2>The Clothes Site</h2>
<map name="clothesMap">
<area name="redShirt"
coords="1,1,48,48"
href="http://www.clothes.com/redShirts.html"
target="_top"
onMouseOut="alert('You did not want to go the red shirt site?')">
</map>
<img src="clothes.gif" align="top"
height="100" width="100" usemap="#clothesMap">
</body>
</html>
Area.onMouseOver
JavaScript 1.1+, JScript 1.0+
Nav3+, IE3+, Opera3+
Syntax
onMouseOver="command"
Description
The onMouseOver event handler is invoked when the user moves the mouse pointer over the region defined by the <area> tag.
Example
Listing 8.17 creates a clothing site with a picture of a shirt. Clicking the shirt graphic takes you to a site about red shirts. Simply moving the mouse over the region causes an alert box to be posted alerting the user that a mouseover event occurred.
Listing 8.17 Using the onMouseOver Property of the Area Object
<html>
<body>
<h2>The Clothes Page</h2>
Click on the sales tag to see the clothes that are on sale:<br>
<map name="clothesMap">
<area name="sale"
coords="1,1,100,100"
href="http://www.clothes.com/specials.html"
target="_top"
onMouseOver="alert('An onMouseOver event occured.')">
</map>
<img src="sale.gif" align="top"
height="100" width="100" usemap="#clothesMap">
</body>
</html>
Area.pathname
JavaScript 1.1+, JScript 1.0+
Nav3+, IE3+, Opera3+
Syntax
document.links[num]. pathname
Description
The pathname property contains the path of the file specified in the URL, including the leading slash (/).
Example
Listing 8.18 creates a truck parts page that allows users to find model numbers of parts by clicking a picture of the part. When the user selects a part, she is presented with an alert window that contains the value of the pathname property for the selected link. After the alert window is closed, the browser attempts to load the specified file.
Listing 8.18 Displaying the pathname Property of an Area Object
<html>
<body>
<center><h1><u>Wild Bill's Truck Parts</u></h1>
<h3>Select a part from the picture.</h3>
<map name="partsMap">
<area name="sparkPlug"
coords="1,1,48,48"
href="sparkplugs.html"
target="_top"
onClick="alert(document.links[0].pathname)">
<area name="tires"
coords="51,1,99,49"
href="tires.html"
target="_top"
onClick="alert(document.links[1].pathname)">
<area name="headlights"
coords="1,51,51,99"
href="headlights.html"
target="_top"
onClick="alert(document.links[2].pathname)">
<area name="fuses"
coords="51,51,99,99"
href="fuses.html"
target="_top"
onClick="alert(document.links[3].pathname)">
</map>
<img src="partsBox.gif"
align="top"
height="100"
width="100"
usemap="#partsMap">
</center>
</body>
</html>
Area.port
JavaScript 1.1+, JScript 1.0+
Nav3+, IE3+
Syntax
document.links[num]. port
Description
The port property contains just the port specified in the URL.
Example
Listing 8.19 creates a truck parts page that allows users to find model numbers of parts by clicking a picture of the part. When the user selects a part, she is presented with an alert window that contains the string "4000", which is the value of the port property for the selected link. After the alert window is closed, the browser will attempt to load the specified Web site.
Listing 8.19 Displaying the port Property of an Area Object
<html>
<body>
<center><h1><u>Wild Bill's Truck Parts</u></h1>
<h3>Select a part from the picture.</h3>
<map name="partsMap">
<area name="sparkPlug"
coords="1,1,48,48"
href="http://www.wildbillstruckparts.com:4000/sparkplugs.html"
target="_top"
onClick="alert(document.links[0].port)">
<area name="tires"
coords="51,1,99,49"
href="http://www.wildbillstruckparts.com:4000/tires.html"
target="_top"
onClick="alert(document.links[1].port)">
<area name="headlights"
coords="1,51,51,99"
href="http://www.wildbillstruckparts.com:4000/headlights.html"
target="_top"
onClick="alert(document.links[2].port)">
<area name="fuses"
coords="51,51,99,99"
href="http://www.wildbillstruckparts.com:4000/fuses.html"
target="_top"
onClick="alert(document.links[3].port)">
</map>
<img src="partsBox.gif"
align="top"
height="100"
width="100"
usemap="#partsMap">
</center>
</body>
</html>
Area.protocol
JavaScript 1.1+, JScript 1.0+
Nav3+, IE3+
Syntax
document.links[num]. protocol
Description
The protocol property contains the protocol (http:, file:, ftp:, and so on) specified in the URL, including the ending colon (:).
Example
In Listing 8.20, the protocol property containing http: is displayed below the area link.
Listing 8.20 Accessing the protocol Property of an Area Object
<html>
<h2>The Color Page</h2>
<map name="colorMap">
<area name="greenArea"
coords="1,1,48,48"
href="http://www.green.com:5678/green.html?query=green#GREEN"
target="_top">
</map>
<img src="box4.gif" align="top"
height="100" width="100" usemap="#colorMap">
<script>
<!--
// Display the protocol associated with the area
document.write("protocol = ",document.links[0].protocol);
// -->
</script>
</html>
Area.search
JavaScript 1.1+, JScript 1.0+
Nav3+, IE3+
Syntax
document.links[num]. search
Description
The search property contains the search string specified in the URL, including the leading question mark (?).
Example
Listing 8.21 creates a truck parts page that allows users to find model numbers of parts by clicking a picture of the part. When the user selects a part, she is presented with an alert window that contains the value of the search property for the selected link. In this example, the value displayed will be one of the following strings: "?sparkplugs", "?tires", "?headlights", or "?fuses". After the alert window is closed, the browser attempts to load the fictitious page.
Listing 8.21 Displaying the search Property of an Area Object
<html>
<body>
<center><h1><u>Wild Bill's Truck Parts</u></h1>
<h3>Select a part from the picture.</h3>
<map name="partsMap">
<area name="sparkPlug"
coords="1,1,48,48"
href="parts.html?sparkplugs"
target="_top"
onClick="alert(document.links[0].search)">
<area name="tires"
coords="51,1,99,49"
href="parts.html?tires.html"
target="_top"
onClick="alert(document.links[1].search)">
<area name="headlights"
coords="1,51,51,99"
href="parts.html?headlights.html"
target="_top"
onClick="alert(document.links[2].search)">
<area name="fuses"
coords="51,51,99,99"
href="parts.html?fuses.html"
target="_top"
onClick="alert(document.links[3].search)">
</map>
<img src="partsBox.gif"
align="top"
height="100"
width="100"
usemap="#partsMap">
</center>
</body>
</html>
Area.target
JavaScript 1.1+, JScript 1.0+
Nav3+, IE3+, Opera3+
Syntax
document.links[num]. target
Description
The target property contains the name of the target window or frame in which the URL should be displayed. This property is a read/write string.
Example
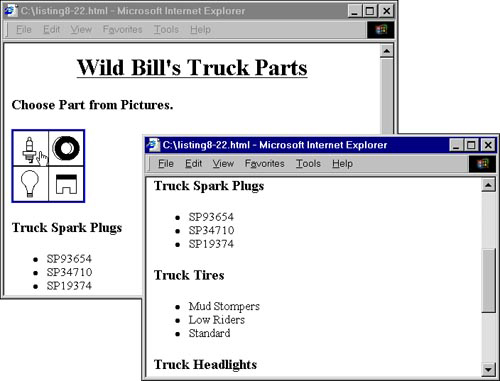
In Listing 8.22, a truck parts site is created that allows the user to find out what parts the store carries. The target of the spark plugs and tires link is modified to make the information appear in a new browser window. Figure 8.2 shows the result of selecting the sparkplug image.
Listing 8.22 Modifying the target Property of an Area Object
<html>
<body>
<center><h1><u>Wild Bill's Truck Parts</u></h1></center>
<h3>Choose Part from Pictures.</h3>
<map name="partsMap">
<area name="sparkPlug"
coords="1,1,48,48"
href="#SPARKPLUGS"
target="_top">
<area name="tires"
coords="51,1,99,49"
href="#TIRES"
target="_top">
<area name="headlights"
coords="1,51,51,99"
href="#HEADLIGHTS"
target="_top">
<area name="fuses"
coords="51,51,99,99"
href="#FUSES"
target="_top">
</map>
<img src="partsBox.gif" align="top"
height="100" width="100" usemap="#partsMap">
<br>
<script type="text/javascript" language="JavaScript">
<!--
// Make the result of the sparkplugs and tires appear in a new window.
document.links[0].target="_blank"; // sparkplugs
document.links[1].target="_blank"; // tires
// -->
</script>
<a name="SPARKPLUGS"><h3>Truck Spark Plugs</h3></a>
<ul>
<li>SP93654</li>
<li>SP34710</li>
<li>SP19374</li>
</ul>
<a name="TIRES"><h3>Truck Tires</h3></a>
<ul>
<li>Mud Stompers</li>
<li>Low Riders</li>
<li>Standard</li>
</ul>
<a name="HEADLIGHTS"><h3>Truck Headlights</h3></a>
<ul>
<li>Night Vision bulbs</li>
<li>Standard</li>
</ul>
<a name="FUSES"><h3>Truck Fuses</h3></a>
<ul>
<li>Red</li>
<li>Yellow</li>
<li>Green</li>
<li>Blue</li>
</ul>
</body>
</html>
Figure 8.2 A new window opens as a result of clicking the spark plug image.
Area.unwatch()
JavaScript 1.2+
Nav4+, NES3+
Syntax
document.links[num]. unwatch(property)
Description
The unwatch() method of the Area object is used to turn off the watch for a particular property specified by property.
Example
Listing 8.23 shows how the unwatch() method is used to stop watching the href property of the Area object after its name has changed to "http://www.toys.com ".
Listing 8.23 Example of the unwatch() Method of the Area Object
<html>
<h2>The Department Store</h2>
Select a department<br>
<map name="storeMap">
<area name="toyArea"
coords="1,1,100,50"
href="toys.html"
target="_top"
<area name="clothesArea"
coords="1,50,100,100"
href="clothes.html"
target="_top"
</map>
<img src="menu.gif" align="top"
height="100" width="100" usemap="#storeMap">
<br><br>
<script type="text/javascript" language="JavaScript">
<!--
function alertme(id,oldValue,newValue)
{
document.write(id + " changed from " + oldValue + " to ");
document.write(newValue + "<br>");
return newValue;
}
// Start watch
document.links[0].watch("href",alertme);
document.write("Original toy department href: ");
document.write(document.links[0].href + "<br>");
// Change href
document.links[0].href = "http://www.toys.com";
document.write("New toy department href: " + document.links[0].href + "<br>");
// Stop watch
document.links[0].unwatch("href",alertme);
// Change href again
document.links[0].href = "http://www.toysrus.com";
document.write("Final toy department href: ");
document.write(document.links[0].href + "<br>");
// -->
</script>
</html>
Area.watch()
JavaScript 1.2+
Nav4+, NES3+
Syntax
document.links[num]. watch(property,function)
Description
The watch() method of the Area object is used to turn on the watch for a particular property specified by property. Any time the specified property is changed after the watch() method has been called, the specified function is called.
Example
Listing 8.24 shows how the watch() method is used to start watching the href property of the Area object.
Listing 8.24 Example of watch() Method of the Area Object
<html>
<h2>The Department Store</h2>
Select a department<br>
<map name="storeMap">
<area name="toyArea"
coords="1,1,100,50"
href="toys.html"
target="_top"
<area name="clothesArea"
coords="1,50,100,100"
href="clothes.html"
target="_top"
</map>
<img src="menu.gif" align="top"
height="100" width="100" usemap="#storeMap">
<br><br>
<script type="text/javascript" language="JavaScript">
<!--
function alertme(id,oldValue,newValue)
{
document.write(id + " changed from " + oldValue + " to ");
document.write(newValue + "<br>");
return newValue;
}
// Start watch
document.links[0].watch("href",alertme);
document.write("Original toy department href: ");
document.write(document.links[0].href + "<br>");
// Change href
document.links[0].href = "http://www.toys.com";
document.write("New toy department href: " + document.links[0].href + "<br>");
// -->
</script>
</html>
Button
JavaScript 1.0+, JScript 1.0+
Nav2+, IE3+, Opera3+
Syntax
Core client-side JavaScript object.
Description
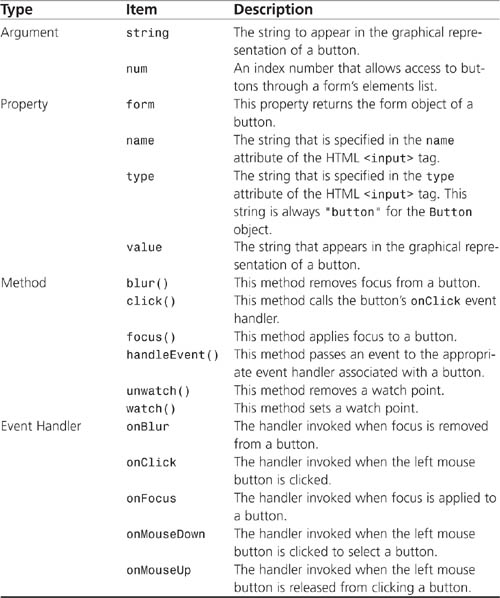
The Button object represents a graphical button that the user can click to initiate an action. Buttons are created as part of a form by using the <input> tag with the type attribute set to "button" in an HTML document. Once created, buttons can be accessed in JavaScript as an element of a form using dot notation. The arguments, properties, methods, and event handlers for the Button object are listed in Table 8.4.
Table 8.4 Arguments, Properties, Methods, and Event Handlers Associated with the Button Object
Example
In Listing 8.25, a button is created by using the <input> tag. When the button is clicked, the button’s name is displayed in the adjacent text box.
Listing 8.25 Creating a Button and Displaying Its Name
<html>
<h2>The Button's NAME Property</h2>
<form name="myForm">
<input type="button"
value="Press here to see the name of this button"
name="myBigButton"
onClick="displayButtonName()">
<input type="text"
name="textBox">
</form>
<script type="text/javascript" language="JavaScript">
<!--
// This function displays the button's name in the textbox.
function displayButtonName()
{
// Display button name in textbox.
document.myForm.textBox.value=document.myForm.myBigButton.name;
}
// -->
</script>
</html>
Button.blur()
JavaScript 1.1+, JScript 1.0+
Nav3+, IE3+
Syntax
document.form.button. blur()
Description
The blur() method removes the focus from a button.
Example
In Listing 8.26, two buttons are created by using the <input> tag to demonstrate focus. The first button retains focus after being clicked, but the second button loses focus as soon as it is clicked due to the use of the blur() method. There are not a lot of uses for this method, but it is provided for your use all the same.
Listing 8.26 Removing Focus from a Button with the blur() Method
<html>
<h2>The Button Focus Game</h2>
Click both buttons. Notice that the second button does not
hold its focus after being clicked.
<form name="myForm">
<input type="button"
value="I hold my focus after a click"
name="button1"><br>
<input type="button"
value="I cannot hold my focus after a click"
name="button2"
onClick="removeFocus()">
</form>
<script type="text/javascript" language="JavaScript">
<!--
// This function takes the focus off of button2.
function removeFocus()
{
// Remove the focus from button2.
document.myForm.button2.blur();
}
// -->
</script>
</html>
Button.click()
JavaScript 1.0+, JScript 1.0+
Nav2+, IE3+
Syntax
document.form.button. click()
Description
The click() method simulates the click event.
Example
In Listing 8.27, two buttons are created by using the <input> tag. The first button displays an alert box when it is clicked. When the second button is clicked, it causes the first button’s onClick event handler to be activated, displaying the alert box associated with the first button.
Listing 8.27 Simulating a click Event with the click() Method
<html>
<form name="myForm">
<input type="button"
value="Display alert box"
name="button1"
onClick="alert('You clicked the first button.')"><br>
<input type="button"
value="Call on button 1"
name="button2"
onClick="clickFirstButton()">
</form>
<script type="text/javascript" language="JavaScript">
<!--
// This function activates the first button's onClick handler.
function clickFirstButton()
{
// Click first button
document.myForm.button1.click();
}
// -->
</script>
</html>
Button.focus()
JavaScript 1.1+, JScript 1.0+
Nav3+, IE3+
Syntax
document. Form. button. focus()
Description
The focus() method applies focus to the button without invoking the button’s onFocus event handler.
Example
In Listing 8.28, two buttons are created to demonstrate focus. Choosing the second button causes the focus to shift to the first button instead of the focus staying on the second button, thanks to the focus()method.
Listing 8.28 Shifting the Focus to a Button Using the focus() Method
<html>
<h2>The Button Focus Game</h2>
Click both buttons. Notice that when the second button is clicked
focus is shifted to the first button.
<form name="myForm">
<input type="button"
value="I hold my focus after a click"
name="button1"><br>
<input type="button"
value="I shift my focus when clicked"
name="button2"
onClick="moveFocus()">
</form>
<script type="text/javascript" language="JavaScript">
<!--
// This function puts button1 in focus.
function moveFocus()
{
// Give button1 the focus.
document.myForm.button1.focus();
}
// -->
</script>
</html>
Button.form
JavaScript 1.0+, JScript 1.0+
Nav2+, IE3+, Opera3+
Syntax
document. Form. button. form
Description
The form property provides access to the button’s parent Form object.
Example
Listing 8.29 proves that the button’s form property contains the parent form object by evaluating the if statement to true. The sentence "myButton's form property is equal to myForm object" is displayed in the browser.
Listing 8.29 Accessing a Button’s Parent with the form Property
<html>
<form name="myForm">
<input type="button"
value="Big Button"
name="myButton">
</form>
<script type="text/javascript" language="JavaScript">
<!--
// Does the parent of the myButton equal myForm?
if(document.myForm.myButton.form == document.myForm)
alert("myButton's form property is equal to myForm object"); // Equal
else
alert("myButton's form property is NOT equal to myForm object"); // Not equal
// -->
</script>
</html>
Button.handleEvent()
JavaScript 1.2-1.3
Nav4-4.5
Syntax
document. form.button.handleEvent(event)
Description
The handleEvent() method provides a way to invoke a button’s event handler, even though the event was not triggered by the user. The event argument specifies the Event object associated with the event handler to be invoked.
Example
The code in Listing 8.30 provides information about a car that is for sale. By choosing one of the buttons labeled Doors, Engine, or Transmission, the related information is entered into the text boxes. The text boxes can be cleared by clicking the Clear All Info button. Unlike the other buttons, the Show All Info button passes the click event along to each of the other buttons using the handleEvent() method. This way, each button takes care of filling in its respective text box.
Listing 8.30 Handling the click Event with the handleEvent() Method
<html>
<center><h2>Car For Sale!</h2></center>
Click on a button for more information:
<form name="myForm">
<input type="button"
value="Doors"
name="doorsButton"
onClick="document.myForm.doorsBox.value='4 doors'">
<input type="text"
name="doorsBox"><br>
<input type="button"
value="Engine"
name="engineButton"
onClick="document.myForm.engineBox.value='4 cylinder'">
<input type="text"
name="engineBox"><br>
<input type="button"
value="Transmission"
name="transmissionButton"
onClick="document.myForm.transmissionBox.value='manual transmission'">
<input type="text"
name="transmissionBox"><br>
<input type="button"
value="Clear All Info"
name="clearAllButton"
onClick="clearAll()">
<input type="button"
value="Show All Info"
name="showAllButton"
onClick="showAll(event)">
</form>
<script type="text/javascript" language="JavaScript">
<!--
// This function clears all the text boxes.
function clearAll()
{
document.myForm.doorsBox.value="";
document.myForm.engineBox.value="";
document.myForm.transmissionBox.value="";
}
// This function passes the click event to all of the buttons.
// Each button then fills its respective information into the text boxes.
function showAll(event)
{
document.myForm.doorsButton.handleEvent(event);
document.myForm.engineButton.handleEvent(event);
document.myForm.transmissionButton.handleEvent(event);
}
// -->
</script>
</html>
Button.name
JavaScript 1.0+, JScript 1.0+
Nav2+, IE3+, Opera3+
Syntax
document. Name. button. name
Description
The name property provides access to the name attribute of the button as specified by the <input> tag. This property is a read-only string.
Example
In Listing 8.31, a button is created. When the button is clicked, the button’s name property is displayed.
Listing 8.31 Accessing a Button’s Name with the name Property
<html>
<form name="myForm">
<input type="button" value="Big Button"
name="myButton"
onClick="displayMessage()">
</form>
<script type="text/javascript" language="JavaScript">
<!--
// This function displays an alert box the contains the name of the button. function displayMessage()
{
// Create a string with name of button.
var alertString = String("You pressed the button named ");
alertString += document.myForm.myButton.name;
// Create alert box.
alert(alertString);
}
// -->
</script>
</html>
Button.onBlur
JavaScript 1.1+, JScript 1.0+
Nav3+, IE3+
Syntax
onBlur="command"
Description
The onBlur event handler is defined in an <input> tag and specifies what to do when the button loses focus.
Example
The code in Listing 8.32 uses the onBlur event handler to display an alert box any time the button loses focus.
Listing 8.32 Use the onBlur Event Handler to Display an Alert Box When the Button Loses Focus
<html>
<form name="myForm">
<input type="button"
value="Big Button"
name="myButton"
onBlur="alert('Blur event occurred')">
</form>
</html>
Button.onClick
JavaScript 1.0+, JScript 1.0+
Nav2+, IE3+, Opera5+
Syntax
onClick="command"
Description
The onClick event handler is defined in an <input> tag and specifies what to do when the button is clicked.
Example
The code in Listing 8.33 uses the onClick event handler to display an alert box any time the button is clicked.
Listing 8.33 Use the onClick Event Handler to Display an Alert Box When the Button Is Clicked
<html>
<form name="myForm">
<input type="button"
value="Big Button"
name="myButton"
onClick="alert('Click event occurred')">
</form>
</html>
Button.onFocus
JavaScript 1.1+, JScript 1.0+
Nav3+, IE3+
Syntax
onFocus="command"
Description
The onFocus event handler is defined in an <input> tag and specifies what to do when the button gains focus.
Example
The code in Listing 8.34 uses the onFocus event handler to display an alert box any time the button gains focus.
Listing 8.34 Use the onFocus Event Handler to Display an Alert Box When the Button Gains Focus
<html>
<form name="myForm">
<input type="button"
value="Big Button"
name="myButton"
onFocus="alert('Focus event occured')">
</form>
</html>
Button.onMouseDown
JavaScript 1.0+, JScript 1.0+
Nav2+, IE3+
Syntax
onMouseDown="command"
Description
The onMouseDown event handler is defined in an <input> tag and specifies what to do when the left mouse button is clicked.
Example
The code in Listing 8.35 uses the onMouseDown event handler to display an alert box any time the button is clicked.
Listing 8.35 Use the onMouseDown Event Handler to Display an Alert Box When the Button Is Clicked
<html>
<form name="myForm">
<input type="button"
value="Big Button"
name="myButton"
onMouseDown="alert('MouseDown event occured')">
</form>
</html>
Button.onMouseUp
JavaScript 1.0+, JScript 1.0+
Nav2+, IE3+
Syntax
onMouseUp="command"
Description
The onMouseUp event handler is defined in an <input> tag and specifies what to do when the left mouse button is released while over the button.
Example
The code in Listing 8.36 uses the onMouseUp event handler to display an alert box any time the left mouse button is released while over the button.
Listing 8.36 Use the onMouseUp Event Handler to Display an Alert Box When the Mouse Button Is Released over the Button
<html>
<form name="myForm">
<input type="button"
value="Big Button"
name="myButton"
onMouseUp="alert('MouseUp event occured')">
</form>
</html>
Button.type
JavaScript 1.1+, JScript 1.0+
Nav3+, IE3+, Opera3+
Syntax
document. Form. Button. type
Description
The type property provides access to the type attribute of the button. This property is a read-only string that always contains "button".
Example
Listing 8.37 creates buttons that relate to various math problems. The type property is used to determine the number of buttons on the page. This number is then used in the instructions that are displayed on the bottom of the page.
Listing 8.37 Accessing a Button’s type Property
<html>
<h2>The Math Page</h2>
<form name="mathForm">
<input type="button"
name="4plus2"
value="(4 + 2)"
onClick="document.mathForm.answer.value='(4 + 2) = 6'">
<input type="button"
name="4minus2"
value="(4 - 2)"
onClick="document.mathForm.answer.value='(4 - 2) = 2'"><hr>
Answer:
<input type="text"
name="answer">
</form>
<script type="text/javascript" language="JavaScript">
<!--
// Create a counter to count the number of buttons in mathForm.
var buttonCount = 0;
// Loop through all the elements of mathForm.
for(var x=0; x<document.mathForm.length; x++)
{
// Is element a button?
if(document.mathForm.elements[x].type=="button")
buttonCount++; // Increment buttonCount
}
// Display the number of buttons in the mathForm.
document.write("Please select one of the ",buttonCount); // 2 buttons
document.write(" buttons above to find out the answer to the math problem.");
// -->
</script>
</html>
Button.unwatch()
JavaScript 1.2
Nav4, NES3+
Syntax
document. form.button. unwatch(property)
Description
The unwatch() method of the Button object is used to turn off the watch for a particular property specified by property.
Example
Listing 8.38 shows how the unwatch() method is used to stop watching the value property of the Button object after its name has changed to "Blue".
Listing 8.38 Example of the unwatch() Method of the Button Object
<html>
<form name="colorForm">
<input type="button" name="colorButton" value="Red">
</form>
<script type="text/javascript" language="JavaScript">
<!--
function alertme(id,oldValue,newValue)
{
document.write(id + " changed from " + oldValue + " to ");
document.write(newValue + "<br>");
return newValue;
}
// Start watch
document.colorForm.colorButton.watch("value",alertme);
document.write("Original button value: ");
document.write(document.colorForm.colorButton.value + "<br>");
// Change button text
document.colorForm.colorButton.value = "Blue";
document.write("New button value: ");
document.write(document.colorForm.colorButton.value + "<br>");
// Stop watch
document.colorForm.colorButton.unwatch("value");
// Change button text
document.colorForm.colorButton.value = "Green";
document.write("Final button value: ");
document.write(document.colorForm.colorButton.value + "<br>");
// -->
</script>
</html>
Button.value
JavaScript 1.0+, JScript 1.0+
Nav2+, IE3+, Opera3+
Syntax
document. form. button. value
Description
The value property provides access to the value attribute of the button. This property is a read-only string that is displayed in the graphical button.
Example
Listing 8.39 uses the value property to customize the text in a button. To modify the button value, enter your name into the text field and then click the Customize the Button button. The button at the bottom of the document will no longer contain just the word "Press".
Listing 8.39 Modifying Text in a Button Using the value Property
<html>
<h2>Customize the Button</h2>
<form name="myForm">
Please enter your name:
<input type="text"
name="nameBox">
<input type="button"
name="customizeTheButton"
value="Customize the button"
onClick="customizeButton()"><br>
<input type="button"
name="theButton"
value="Press "
onClick="displayAlert()">
</form>
<script type="text/javascript" language="JavaScript">
<!--
// This function customizes the button.
function customizeButton()
{
// Create a string using the name entered in text box.
var aString = document.myForm.nameBox.value;
aString += " press this button!";
// Change the value displayed in the button.
document.myForm.theButton.value=aString;
}
// This function creates an alert box.
function displayAlert()
{
// Create an alert box.
alert("You pressed the button.");
}
// -->
</script>
</html>
Button.watch()
JavaScript 1.2+
Nav4+, NES3+
Syntax
document. form. button .watch(property,function)
Description
The watch() method of the Button object is used to turn on the watch for a particular property specified by property. Any time the specified property is changed after the watch() method has been called, the specified function is called.
Example
Listing 8.40 shows how the watch() method is used to start watching the value property of the Button object.
Listing 8.40 Example of the watch() Method of the Button Object
<html>
<form name="colorForm">
<input type="button" name="colorButton" value="Red">
</form>
<script type="text/javascript" language="JavaScript">
<!--
function alertme(id,oldValue,newValue)
{
document.write(id + " changed from " + oldValue + " to ");
document.write(newValue + "<br>");
return newValue;
}
// Start watch
document.colorForm.colorButton.watch("value",alertme);
document.write("Original button value: ");
document.write(document.colorForm.colorButton.value + "<br>");
// Change button text
document.colorForm.colorButton.value = "Blue";
document.write("New button value: ");
document.write(document.colorForm.colorButton.value + "<br>");
// -->
</script>
</html>
Checkbox
JavaScript 1.0+, JScript 1.0+
Nav2+, IE3+, Opera3+
Syntax
Core client-side JavaScript object.
Description
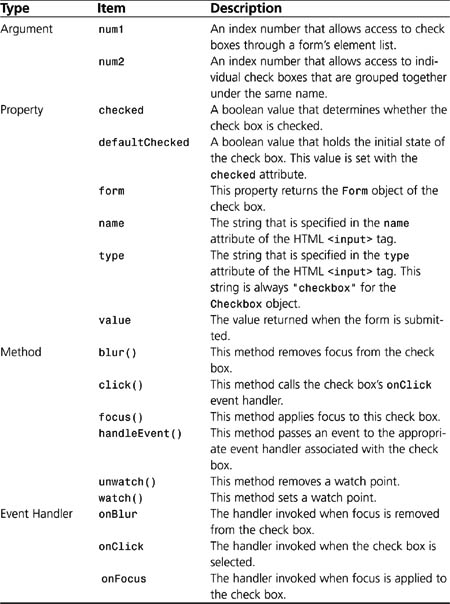
The Checkbox object represents a graphical check box that the user can click to toggle the check on or off. Check boxes are created as part of a form by using the <input> tag with the type attribute set to checkbox in an HTML document. Once created, check boxes can be accessed in JavaScript as an element of a form using dot notation. Check boxes can also be grouped together under the same name and accessed as an array by using brackets. The arguments, properties, methods, and event handlers of the Checkbox object are listed in Table 8.5
Table 8.5 Arguments, Properties, Methods, and Event Handlers Associated with theCheckbox Object
Example
Listing 8.41 creates a hamburger order page. Check boxes are used to select toppings for the hamburger. When the Submit Order button is clicked, an alert box is displayed with the selected toppings.
Listing 8.41 Creating Check Boxes and Accessing Some of Their Properties
<html>
<h2>Hamburger Order</h2>
Step 1: Please select the toppings you would like on your hamburger:<br>
<form name="orderForm">
Lettuce
<input type="checkbox"
value="lettuce"
name="lettuceCB"><br>
Cheese
<input type="checkbox"
value="cheese"
name="cheeseCB"><br>
Tomato
<input type="checkbox"
value="tomato"
name="tomatoCB"><br>
Step 2:
<input type="button"
value="Submit Order"
name="orderButton"
onClick="submitOrder()">
</form>
<script type="text/javascript" language="JavaScript">
<!--
// This function creates an alert box to display which toppings were selected.
function submitOrder()
{
// Create a string to display in the alert box
var alertString = String("Order: Hamburger ");
if(document.orderForm.lettuceCB.checked == true)
alertString += " with lettuce "; // Add lettuce to string
if(document.orderForm.cheeseCB.checked == true)
alertString += "with cheese "; // Add cheese to string
if(document.orderForm.tomatoCB.checked == true)
alertString += "with tomato "; // Add tomato to string
// Create alert box
alert(alertString);
}
Checkbox.blur()
JavaScript 1.1+, JScript 3.0+
Nav3+, IE4+
Syntax
document. form .checkbox. blur()
Description
The blur() method removes the focus from a check box.
Example
In Listing 8.42, two check boxes are created by using the <input> tag. The first check box retains focus after being clicked, but the second check box loses focus as soon as it is clicked because of the use of the blur() method. Do not be surprised if you do not see a difference between the check boxes in this example. In some browsers, you will not be able to detect the difference between a check box that is focused versus one that is not focused. For this reason, you will probably find very little use for this method.
Listing 8.42 Removing Focus from a Check Box with the blur() Method
<html>
<h2>The Checkbox Focus Test</h2>
Click both check boxes. Notice that the second check box does not
hold its focus after being clicked.
<form name="myForm">
I hold my focus after a click
<input type="checkbox"
name="checkBox1"><br>
I cannot hold my focus after a click
<input type="checkbox"
name="checkBox2"
onClick="removeFocus()">
</form>
<script type="text/javascript" language="JavaScript">
<!--
// This function takes the focus off of checkBox2.
function removeFocus()
{
// Remove the focus from checkBox2
document.myForm.checkBox2.blur();
}
// -->
</script>
</html>
Checkbox.checked
JavaScript 1.0+, JScript 3.0+
Nav2+, IE4+, Opera3+
Syntax
document. form.checkbox. checked
Description
The checked property holds the current state of a check box. Because this property is a read/write Boolean, the state of the check box can be altered by changing this property.
Example
In Listing 8.43, the user is asked to select the door style wanted on her new car. When the order is submitted, the checked property of each check box is analyzed to determine whether two different door styles were selected or none at all. If two styles were selected, the check boxes are reset by altering the checked property.
Listing 8.43 Modifying the checked Property of a Check Box
<html>
<h2>Car Purchase Sheet</h2>
Step1: Please select the door style you want on your new car:<br>
<form name="orderForm">
<input type="checkbox"
name="door4">4 doors<br>
<input type="checkbox"
name="door2">2 doors<br>
Step 2:
<input type="button"
value="Submit Order"
name="orderButton"
onClick="submitOrder()">
</form>
<script type="text/javascript" language="JavaScript">
<!--
// This function creates a box alerting what door styles were selected.
function submitOrder()
{
// Check for duplicate door selections
if((document.orderForm.door4.checked == true) &&
(document.orderForm.door2.checked == true))
{
// Create alert box.
alert("You selected two different door the styles. Reselect door style.");
// Uncheck check boxes for door styles.
document.orderForm.door4.checked = false;
document.orderForm.door2.checked = false;
}
// Check for no door selection.
else if((document.orderForm.door4.checked == false) &&
(document.orderForm.door2.checked == false))
{
// Create alert box.
alert("You did not select a door style! Please select a door style.");
}
// Display the car order
else
{
// Create a string to display in alert box.
var alertString = String("Order: Car with ");
if(document.orderForm.door4.checked == true)
alertString += "4 doors."; // Add 4 doors to string
if(document.orderForm.door2.checked == true)
alertString += "2 doors."; // Add 2 door to string
// Create alert box.
alert(alertString);
}
}
Checkbox.click()
JavaScript 1.1+, JScript 3.0+
Nav3+, IE4+, Opera5+
Syntax
document. form .checkbox. click()
Description
The click() method simulates the click event. The clicked property is adjusted accordingly when this method is used.
Example
In Listing 8.44, the user can select options for her new car. If the user selects the Alloy Wheel option, she is told that alloy wheels are great. If the Sports package is selected, a message is posted to let the user know that alloy wheels come with the sports package. In addition to this message, the message about allow wheels being great is displayed and the Alloy Wheels options is checked, thanks to the click() method.
Listing 8.44 Using the Check Box’s click() Method
<html>
<h2>Car Purchase Sheet</h2>
Step1: Please select options for your new car:<br>
<form name="orderForm">
<input type="checkbox"
name="alloy"
onClick="alert('Alloy wheels look great!')">Alloy Wheels
<br>
<input type="checkbox"
name="sporty"
onClick="displayNote()">Sports Package<br>
Step 2:
<input type="button"
value="Submit Order"
name="orderButton"
onClick="alert('Your order has been submitted')">
</form>
<script type="text/javascript" language="JavaScript">
<!--
//This function calls on another click handler
function displayNote()
{
if(!document.orderForm.alloy.checked)
{
//Alert user that allow wheels come with the sports package
alert("Alloy wheels come with the sports package");
//Display the alloy wheel note using click() method.
document.orderForm.alloy.click();
}
}
// -->
</script>
</html>
Checkbox.defaultChecked
JavaScript 1.0+, JScript 3.0+ Nav2+, IE4+
Syntax
document. form. checkbox. defaultChecked
Description
The defaultChecked property holds the initial state of a check box as defined by the checked attribute of the <input> tag. Because this property only holds the initial state of the check box, it is a read-only boolean value.
Example
In Listing 8.45, the defaultChecked property is used to reset the car door check boxes to their initial state.
Listing 8.45 Resetting Check Boxes with the defaultChecked Property
<html>
<h2>Car Purchase Sheet</h2>
Step1: Please select the door style you want on your new car:<br>
<form name="orderForm">
<input type="checkbox"
name="door4">4 doors<br>
<input type="checkbox"
name="door2"
checked>2 doors<br>
Step 2:
<input type="button"
value="Submit Order"
name="orderButton"
onClick="alert('Your order has been submitted')">
<input type="button"
value="Reset Checkboxes"
name="resetButton"
onClick="resetCheckboxes()">
</form>
<script type="text/javascript" language="JavaScript">
<!--
// This function resets the check boxes back to their initial state
function resetCheckboxes()
{
// Access initial state with the defaultChecked property.
document.orderForm.door4.checked = document.orderForm.door4.defaultChecked;
document.orderForm.door2.checked = document.orderForm.door2.defaultChecked;
}
// -->
</script>
</html>
Checkbox.focus()
JavaScript 1.0+, JScript 3.0+
Nav2+, IE4+
Syntax
document. form .checkbox. focus()
Description
The focus() method applies focus to a check box without invoking the check box’s onFocus event handler.
Example
In Listing 8.46, two check boxes are created by using the <input> tag. Click the Option 1 check box and then the Option 2 check box. Finally, click the Move Focus button to move the focus back to the first check box. Do not be surprised if you do not see a difference in the check boxes in this example. In some browsers, you will not be able to detect the difference between a check box that is focused versus one that is not focused. For this reason, you will probably find very little use for this method.
Listing 8.46 Applying Focus to a Check Box Using the focus() Method
<html>
<h2>The Checkbox Focus Test</h2>
Click both checkboxes and then click the button to return focus to
the first checkbox.
<form name="myForm">
<input type="checkbox"
name="checkBox1">Option 1<br>
<input type="checkbox"
name="checkBox2">Option 2<br>
<input type="button"
name="focusButton"
value="Move Focus"
onClick="moveFocus()">
</form>
<script type="text/javascript" language="JavaScript">
<!--
// This function moves the focus to checkBox1.
function moveFocus()
{
// Move the focus to from checkBox1
document.myForm.checkBox1.focus();
}
// -->
</script>
</html>
Checkbox.form
JavaScript 1.0+, JScript 3.0+ Nav2+, IE4+, Opera3+
Syntax
document. form. checkbox. form
Description
The form property provides access to a check box’s parent Form object.
Example
The code in Listing 8.47 proves that the check box’s form property contains the parent Form object by evaluating the if statement to true.
Listing 8.47 Accessing a Check Box’s Parent with the form Property
<html>
<form name="myForm">
<input type="checkbox"
value="YES"
name="myCheckBox"
checked>
</form>
<script type="text/javascript" language="JavaScript">
<!--
// Does the parent of the myCheckBox equal myForm?
if(document.myForm.myCheckBox.form == document.myForm)
alert("myCheckBox's form property is equal to myForm object");
else
alert("myCheckBox's form property is NOT equal to myForm object");
// -->
</script>
</html>
Checkbox.handleEvent()
JavaScript 1.2-1.3
Nav4-4.5
Syntax
document. form. checkbox. handleEvent(event)
Description
The handleEvent() method provides a way to invoke a check box’s event handler, even though the event never happened. The event argument specifies the Event object associated with the event handler that is to be invoked.
Example
In Listing 8.48, the user is asked to select the engine wanted in her new car. If the user selects the V6 engine, she is alerted that the V6 has lots of power. If the 4-cylinder engine is selected, a message is posted to encourage the user to consider the V6. The click event is passed to the first check box via the handleEvent() method. This causes the message about more power to be displayed.
Listing 8.48 Passing Events to a Check Box with the handleEvent() Method
<html>
<h2>Car Purchase Sheet</h2>
Step1: Please select the engine style you want on your new car:<br>
<form name="orderForm">
<input type="checkbox"
name="v6"
onClick="alert('The V6 has lots of power!')">V6<br>
<input type="checkbox"
name="cylinder4"
onClick="displayNote(event)">4 Cylinder<br>
Step 2:
<input type="button"
value="Submit Order"
name="orderButton"
onClick="alert('Your order has been submitted')">
</form>
<script type="text/javascript" language="JavaScript">
<!--
// This function passes the click event along to another check box
// using the check box's handleEvent method.
function displayNote(event)
{
// Display note about V6 engine
alert("Have you considered the V6 engine?");
// Pass event along to first V6 check box.
document.orderForm.v6.handleEvent(event);
}
// -->
</script>
</html>
Checkbox.name
JavaScript 1.0+, JScript 3.0+
Nav2+, IE4+, Opera3+
Syntax
document. form. checkbox. name
Description
The name property provides access to the name attribute of the check box. This property is a read-only string.
Example
Listing 8.49 uses the name property of the check boxes to display what engine type was selected.
Listing 8.49 Display the Name of the Check Box with the name Property
<html>
<h2>Truck Purchase Sheet</h2>
Step1: Please select the engine style you want on your new truck:<br>
<form name="orderForm">
<input type="checkbox"
name="V6"
onClick="duplicateCheck(V6,V8)">V6<br>
<input type="checkbox"
name="V8"
onClick="duplicateCheck(V8,V6)">V8<br>
Step 2:
<input type="button"
value="Submit Order"
name="orderButton"
onClick="submitOrder()">
</form>
<script type="text/javascript" language="JavaScript">
<!--
//This function uses the name property to let the user
//know what options were selected.
function submitOrder()
{
//Create a string to be displayed in the alert box
var alertString = String("You have selected a ");
//Determine what type of engine was selected.
if(document.orderForm.V6.checked == true)
{
alertString += document.orderForm.V6.name; //Display V6
alertString += " truck.";
alert(alertString);
}
else if(document.orderForm.V8.checked == true)
{
alertString += document.orderForm.V8.name; //Display V8
alertString += " truck.";
alert(alertString);
}
else
alert("You have not selected an engine type!"); //No Engine
}
//This function removes the check from the other
//checkbox if both checkboxes are about to be selected.
function duplicateCheck(theCheckBox,otherCheckBox)
{
//Determine if both boxes are checked
if(theCheckBox.checked && otherCheckBox.checked)
otherCheckBox.checked = 0;
}
// -->
</script>
</html>
Checkbox.onBlur
JavaScript 1.1+, JScript 3.0+
Nav3+, IE4+
Syntax
onBlur="command"
Description
The onBlur event handler is defined in an <input> tag and specifies what to do when a check box loses focus.
Example
The code in Listing 8.50 uses the onBlur event handler to display a message alerting the customer that the peppers she is ordering on her pizza are hot.
Listing 8.50 Use the onBlur Event Handler to Display an Alert Box When the Check Box Loses Focus
<html>
<h2>Pizza Machine</h2>
Step 1: Please select your pizza toppings:<br>
<form name="orderForm">
<input type="checkbox"
name="peppers"
onBlur="pepperAlert()">Peppers<br>
<input type="checkbox"
name="sausage">Sausage<br>
Step 2:
<input type="button"
value="Order Pizza"
name="orderButton"
onClick="alert('Your pizza has been ordered.')">
</form>
<script type="text/javascript" language="JavaScript">
<!--
// This function alerts the customer that peppers are hot!
function pepperAlert()
{
// If peppers are selected then display alert.
if(document.orderForm.peppers.checked == true)
{
// Create alert box.
alert("These are extremely hot peppers.");
}
}
// -->
</script>
</html>
Checkbox.onClick
JavaScript 1.1+, JScript 3.0+
Nav3+, IE4+, Opera5+
Syntax
onClick="command"
Description
The onClick event handler is defined in an <input> tag and specifies what to do when a check box is clicked.
Example
The code in Listing 8.51 uses the onClick event handler to display a message alerting the customer that sausage goes well with peppers.
Listing 8.51 Use the onClick Event Handler to Display a Message
<html>
<h2>Pizza Machine</h2>
Step 1: Please select your pizza toppings:<br>
<form name="orderForm">
<input type="checkbox"
name="peppers"
onClick="recommendSausage()">Peppers<br>
<input type="checkbox"
name="sausage">Sausage<br>
Step 2:
<input type="button"
value="Order Pizza"
name="orderButton"
onClick="alert('Your pizza has been ordered.')">
</form>
<script type="text/javascript" language="JavaScript">
<!--
// This function recommends that the customer consider ordering sausage.
function recommendSausage()
{
// If peppers are selected, display alert.
if(document.orderForm.peppers.checked == true)
{
// Create alert box
alert("Sausage goes well with peppers.");
}
}
// Display the event handler associated with onClick.
document.write("The pepper checkbox onClick event handler: ");
document.write(document.orderForm.peppers.onclick);
// -->
</script>
</html>
Checkbox.onFocus
JavaScript 1.1+, JScript 3.0+
Nav3+, IE4+
Syntax
onFocus="command"
Description
The onFocus event handler is defined in an <input> tag and specifies what to do when a check box gains focus.
Example
The code in Listing 8.52 uses the onFocus event handler to automatically select extra cheese when the customer selects sausage.
Listing 8.52 Using the onFocus Event Handler to Select Extra Cheese
<html>
<h2>Pizza Machine</h2>
Step1: Please select your pizza toppings:<br>
<form name="orderForm">
<input type="checkbox"
name="peppers">Peppers<br>
<input type="checkbox"
name="sausage"
onFocus="chooseExtraCheese()">Sausage<br>
<input type="checkbox"
name="cheese">Extra Cheese<br>
Step 2:
<input type="button"
value="Order Pizza"
name="orderButton"
onClick="alert('Your pizza has been ordered.')">
</form>
<script type="text/javascript" language="JavaScript">
<!--
// This function chooses the extra cheese checkbox.
function chooseExtraCheese()
{
// If sausage is selected, select extra cheese.
if(document.orderForm.sausage.checked == false)
{
// select extra cheese
document.orderForm.cheese.checked = true;
}
}
// -->
</script>
</html>
Checkbox.type
JavaScript 1.1+, JScript 3.0+
Nav3+, IE4+, Opera3+
Syntax
document. form. checkbox. type
Description
The type property provides access to the type attribute of the check box. This property is a read-only string that always contains "checkbox".
Example
Listing 8.53 instructs the customer to select only two toppings (check boxes) of all those offered. To determine the number of toppings, the type property of the check box is used to determine how many check boxes are in orderForm. The program finds four check boxes that represent the possible pizza toppings.
Listing 8.53 Accessing a Check Box’s type Property
<html>
<h2>Pizza Machine</h2>
Step 1: Please select your pizza toppings:<br>
<form name="orderForm">
<input type="checkbox"
name="peppers">Peppers<br>
<input type="checkbox"
name="sausage">Sausage<br>
<input type="checkbox"
name="onion">Onion<br>
<input type="checkbox"
name="bacon">Bacon<br>
Step 2:
<input type="button"
value="Order Pizza"
name="orderButton"
onClick="alert('Your pizza has been ordered.')">
</form>
<script type="text/javascript" language="JavaScript">
<!--
// Initialize a counter to zero.
var counter = 0;
// Count the number of check boxes in orderForm.
for(var x=0; x<document.orderForm.length; x++)
{
// Is element a check box?
if(document.orderForm.elements[x].type == "checkbox")
{
// Increment the counter.
counter++;
}
}
// Display the topping instructions.
document.write("Please select no more than 2 of the ");
document.write(counter," possible toppings."); // Insert 4
// -->
</script>
</html>
Checkbox.unwatch()
JavaScript 1.2+
Nav4+, NES3+
Syntax
document. form. checkbox .unwatch(property)
Description
The unwatch() method of the Checkbox object is used to turn off the watch for a particular property specified by property.
Example
Listing 8.54 shows how the unwatch() method is used to stop watching the value property of the Checkbox object after its value has changed to "Blue".
Listing 8.54 Example of the unwatch() Method of the Checkbox Object
<html>
<form name="myForm">
<input type="checkbox" name="myCheckbox" value="Red">
</form>
<script type="text/javascript" language="JavaScript">
<!--
function alertme(id,oldValue,newValue)
{
document.write(id + " changed from " + oldValue + " to ");
document.write(newValue + "<br>");
return newValue;
}
// Start watch
document.myForm.myCheckbox.watch("value",alertme);
document.write("Original checkbox value: ");
document.write(document.myForm.myCheckbox.value + "<br>");
// Change checkbox value
document.myForm.myCheckbox.value = "Blue";
document.write("New checkbox value: ");
document.write(document.myForm.myCheckbox.value + "<br>");
// Stop watch
document.myForm.myCheckbox.unwatch("value");
// Change checkbox value
document.myForm.myCheckbox.value = "Green";
document.write("Final checkbox value: ");
document.write(document.myForm.myCheckbox.value + "<br>");
// -->
</script>
</html>
Checkbox.value
JavaScript 1.0+, JScript 3.0+
Nav2+, IE4+, Opera3+
Syntax
document. form. checkbox. value
Description
The value property provides access to value attribute of the check box. This property is a read/write value that is sent to the server when the form is submitted.
Example
Listing 8.55 uses the value property of each check box to create instructions for the customer on how to order her custom pizza.
Listing 8.55 Accessing a Check Box’s value Property
<html>
<h2>Pizza Machine</h2>
Step1: Please select your pizza toppings:<br>
<form name="orderForm">
<input type="checkbox"
name="onion"
value="hot onion">Onion<br>
<input type="checkbox"
name="bacon"
value="spicy bacon">Bacon<br>
Step 2:
<input type="button"
value="Order Pizza"
name="orderButton"
onClick="alert('Your pizza has been ordered.')">
</form>
<script type="text/javascript" language="JavaScript">
<!--
// Display instructions using the check box value property.
document.write("Please select either ");
document.write(document.orderForm.onion.value); // Insert hot onion
document.write(" or ",document.orderForm.bacon.value); // Insert spicy bacon
document.write(" on your custom pizza!");
Checkbox.watch()
JavaScript 1.2+
Nav4+, NES3+
Syntax
document. form. checkbox. watch(property,function)
Description
The watch() method of the Checkbox object is used to turn on the watch for a particular property specified by property. Any time the specified property is changed after the watch() method has been called, the specified function is called.
Example
Listing 8.56 shows how the watch() method is used to start watching the value property of the Checkbox object.
Listing 8.56 Example of the watch() Method of the Checkbox Object
<html>
<form name="myForm">
<input type="checkbox" name="myCheckbox" value="Red">
</form>
<script type="text/javascript" language="JavaScript">
<!--
function alertme(id,oldValue,newValue)
{
document.write(id + " changed from " + oldValue + " to ");
document.write(newValue + "<br>");
return newValue;
}
// Start watch
document.myForm.myCheckbox.watch("value",alertme);
document.write("Original checkbox value: ");
document.write(document.myForm.myCheckbox.value + "<br>");
// Change checkbox value
document. myForm. myCheckbox. value = "Blue";
document write("New checkbox value: ");
document. write(document. myForm. myCheckbox. value + "<br>");// -->
</script>
</html>
Document
JavaScript 1.0+, ECMAScript 1.0+, JScript 1.0+
Nav2+, IE3+, Opera3+
Syntax
Core client-side JavaScript object.
Description
The Document object represents a Web page that is displayed in a browser window, frame, or layer. An instance is created with each document that is loaded by the browser. This object has many properties and methods that vary greatly between JavaScript and JScript. Table 8.6 lists all the properties, methods, and event handlers associated with the Document object.
Table 8.6 Properties, Methods, and Event Handlers Associated with theDocument Object
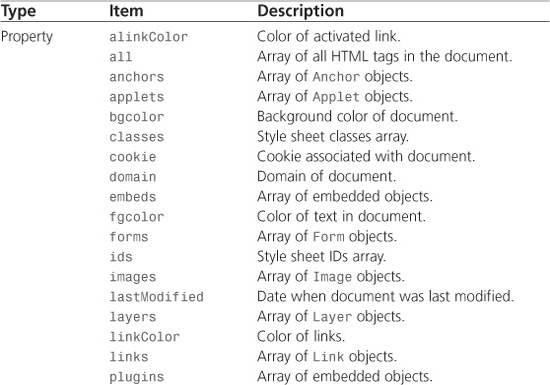

document.alinkColor
JavaScript 1.0+, JScript 1.0+
Nav2+, IE3+
Syntax
document. alinkColor
Description
The alinkColor property specifies the color of activated links. A link is considered activated between the time the mouse button is clicked and released over a link. The color is expressed as a string in hexadecimal digits or as one of the HTML standard color names. The hexadecimal form is made up of six digits that follow the pattern “RRGGBB.”
Example
The sample code in Listing 8.57 sets the activated link’s color to green for all links on the page, even if they are placed before the <script> tags.
Listing 8.57 Setting the Document alinkColor Property
<html>
<a href="myGreenPage.html">The Green Site</a><br>
<script type="text/javascript" language="JavaScript">
<!--
// Set the activated links color to green.
document.alinkColor="00ff00";
// -->
</script>
<a href="myGreenGrassPage.html">The Green Grass Page</a>
</html>
document.all
JScript 3.0+
IE4+
Syntax
document.all[index]
Description
The document.all property is an array of all the HTML elements that are in the document. The elements appear in the array in the order in which they were created. Table 8.7 lists the methods associated with document.all array.
Table 8.7 Methods Associated with thedocument.all Array

Example
Listing 8.58 uses the document.all property array and array notation (brackets) to access the Paint anchor, which happens to be the fourth HTML element on the page. Using dot notation, the name of the anchor is used to create a link to the top of the page.
Listing 8.58 Using document.all
<html>
<a name="Paint"><h2><u>Paint Colors</u></h2></a>
Red<br>
Green<br>
Blue<br>
Orange<br>
<br>
<script type="text/javascript" language="JavaScript">
<!--
// Create a link using the name associated with the Paint anchor (4th element).
document.write("<a href='",document.all[4].name,"'>"); // Insert "Paint"
document.write(document.all[4].name,"</a>"); // Insert "Paint"
// -->
</script>
</html>
document.all.item()
JScript 3.0+
IE4+
Syntax
document.all.item(name)
Description
The item() method provides a way to retrieve an HTML element out of the document.all array without having to know its position in the array. Instead of using an index position, the item() method allows you to just pass in the name of the element as specified by the name or id attribute of HTML tags. Normally, the method returns the element, but, if more than one element is found with the same name, an array of elements is returned.
Example
Listing 8.59 uses the item() method to access the Paint anchor. Using dot notation, the name of the anchor is used to create a link to the top of the page.
Listing 8.59 Using the item() Method to Find a Particular HTML Element
<html name="top">
<a name="Paint"><h2><u>Paint Colors</u></h2></a>
Red<br>
Green<br>
Blue<br>
Orange<br>
<br>
<script type="text/javascript" language="JavaScript">
<!--
// Create a link using the name associated with HTML element 4.
document.write("<a href='#") // Create first part of link tag
document.write(document.all.item("Paint").name,"'>"); // Insert "Paint"
document.write(document.all.item("Paint").name,"</a>"); // Insert "Paint"
// -->
</script>
</html>
document.all.tags()
JScript 3.0+
IE4+
Syntax
document.all.tags(tag)
Description
The tags() method provides a way to retrieve all HTML elements of a particular tag type from the document.all array. The method returns an array of elements.
Example
Listing 8.60 uses the tags() method to create an array of all the anchor tags in the document. Using dot notation, the name of the first anchor in the temporary array is used to create a link to the top of the page.
Listing 8.60 Using the tags() Method to Find HTML Elements with a Particular Tag
<html>
<a name="Paint"><h2><u>Paint Colors</u></h2></a>
Red<br>
Green<br>
Blue<br>
Orange<br>
<br>
<script type="text/javascript" language="JavaScript">
<!--
// Get all the anchor tags.
var arrayOfAnchors = document.all.tags("a");
// Create a link using name of the first element in the arrayOfAnchors.
document.write("<a href='#",arrayOfAnchors[0].name,"'>"); // Insert "Paint"
document.write(arrayOfAnchors[0].name,"</a>"); // Insert "Paint"
// -->
</script>
</html>
document.anchors
JavaScript 1.2+, JScript 3.0+
Nav4+, IE4+, Opera5+
Syntax
document.anchors
document.anchors[index]
Description
The anchors property is an array that contains all the Anchor objects that appear within the HTML document when using the <a name="string"> tag. The anchors property has one property of its own, called length, which contains the number of Anchor objects in the array. The index number ranges from zero to the length of the array minus one. See “Anchor,” earlier in the chapter, for a detailed explanation of all the properties associated with anchors.
Example
Listing 8.61 demonstrates how to access anchor names using the document’s anchors array.
Listing 8.61 Accessing Anchor Names Using the anchors Array
<html>
<a name="A"><h4>The Letter A</h4></a>
apple<br>
alligator<br>
<a name="B"><h4>The Letter B</h4></a>
baby.<br>
basketball<br>
banana<br>
<script type="text/javascript" language="JavaScript">
<!--
document.write("Anchor Names:<br>"); // Title
// Set up a loop to display the name of each anchor in document.
for(var x=0; x<=document.anchors.length; x++)
{
// Display the name of each anchor.
document.write(document.anchors[x].name,"<br>");
}
// -->
</script>
</html>
document.anchors.length
JavaScript 1.2+, JScript 3.0+
Nav4+, IE4+, Opera5+
Syntax
document.anchors.length
Description
The length property contains the number of Anchor objects that are in the document.
Example
Listing 8.62 uses the anchor length property to loop through all the anchors in the document. During each pass through the loop, a link to each anchor in the document is created.
Listing 8.62 Using the Anchor length Property to Create Hyperlinks
<html>
<center><h1><u>The Music Instrument Page</u></h1></center>
<br><a name="Trumpet"><h4>Trumpet</h4></a>
The trumpet is a brass instrument that can create bright, loud tones. The
trumpet has 3 valves for changing the tone being played.<br>
<br><a name="Guitar"><h4>Guitar</h4></a>
The guitar is a stringed instrument that has a hollow wooden body with a long
wooden neck. Most guitars have 6 strings each tuned to a different tone.
By pressing different combinations of strings chords can be created.<br>
<br><a name="Piano"><h4>Piano</h4></a>
The piano has one of the largest tonal ranges of any instrument. Tones
are created by pressing keys which are attached to small wood hammers that
hit strings tuned to specific tones.<br>
<script type="text/javascript" language="JavaScript">
<!--
document.write("<br>Pick an instrument:<br>");
// Create a link for each anchor using the
// Anchor object and the length property
for(var counter=0; counter<=document.anchors.length; counter++)
{
document.write("<a href='#",document.anchors[counter].name,"'>");
document.write(document.anchors[counter].text,"</a><br>");
}
// -->
</script>
</html>
document.applets
JavaScript 1.1+, JScript 1.0+
Nav3+, IE3+
Syntax
document.applets
document.applets[index]
Description
The applets property is an array that contains all the Applet objects that appear within the HTML document from using the <applet> tag. The applet property has one property of its own, called length, which contains the number of Applet objects in the array. The index number ranges from zero to the length of the array minus one. See "Applet," earlier in this chapter, for a detailed explanation of all the properties associated with applets.
Example
Listing 8.63 includes two fictitious calculator applets that are embedded in the HTML document. Using the applets array, the names of the calculators are displayed on the screen.
Listing 8.63 Accessing Applets with the applets Array
<html>
<applet name="Home Calculator"
code="homeCalculator.class"
width=50
height=50
mayscript></applet>
<applet name="Office Calculator"
code="officeCalculator.class"
width=50
height=50
mayscript></applet>
Special thanks goes to the individuals who
provided us with the following calculators:<br>
<script type="text/javascript" language="JavaScript">
<!--
// Display the names of the calculator applets.
document.write(document.applets[0].name,"<br>");
document.write(document.applets[1].name);
// -->
</script>
</html>
document.applets.length
JavaScript 1.1+, JScript 3.0+
Nav3+, IE4+
Syntax
document.applets.length
Description
The length property contains the number of Applet objects that are in a document.
Example
Listing 8.64 uses the length property to display the number of applets in a HTML document.
Listing 8.64 Accessing the Number of Applets in a Document with the
<html>
<h2>The Applets Page</h2>
<applet name="myAddApplet"
code="add.class"
width=50
height=50
mayscript></applet>
<applet name="mySubtractApplet"
code="subtract.class"
width=50
height=50
mayscript></applet>
<script type="text/javascript" language="JavaScript">
<!--
// Tell the user how many applets are currently available.
document.write("There are currently ",document.applets.length);
document.write(" applets available on this page. Check back as");
document.write(" new applets are added daily.");
// -->
</script>
</html>
document.bgColor
JavaScript 1.0+, JScript 1.0+
Nav2+, IE3+, Opera3+
Syntax
document.bgColor
Description
The bgColor property specifies the background color of the HTML document. The color is expressed as a string in hexadecimal digits or as one of the HTML standard color names. The hexadecimal form is made up of six digits that follow the pattern “RRGGBB.” The color of the background can also be set with bgcolor attribute of the <body> tag.
Example
Listing 8.65 changes the document’s background color based on which button is chosen.
Listing 8.65 Modifying the Document bgColor Property
<html>
<form>
<input type="button"
value="Yellow"
name="Yellow"
onClick="changeBG('yellow')">
<input type="button"
value="Green"
name="Green"
onClick="changeBG('green')">
<input type="text"
name="color">
</form>
<script type="text/javascript" language="JavaScript">
<!--
// This function changes the background color and fills in the text box.
function changeBG(color)
{
document.bgColor=color; // Change background color
document.myForm.color.value=color; // Display the color
}
// -->
</script>
</html>
document.captureEvents()
JavaScript 1.2+
Nav4+
Syntax
document.captureEvents(eventMask)
Description
The captureEvents() method specifies the type of events that should be passed to the document rather than to the object for which they were intended. The eventMask argument(s) specifies what events to capture. The following list shows all the possible event masks. Multiple events can be captured by using the bitwise OR (|) operator:
• Event.BLUR
• Event.CHANGE
• Event.CLICK
• Event.DBCLICK
• Event.DRAGDROP
• Event.ERROR
• Event.FOCUS
• Event.KEYDOWN
• Event.KEYPRESS
• Event.KEYUP
• Event.LOAD
• Event.MOUSEDOWN
• Event.MOUSEMOVE
• Event.MOUSEOUT
• Event.MOUSEOVER
• Event.MOUSEUP
• Event.MOVE
• Event.RESET
• Event.RESIZE
• Event.SELECT
• Event.SUBMIT
• Event.UNLOAD
Example
Listing 8.66 attempts to change the background color from yellow to purple when the mouse button is clicked and released. Before the Event.MOUSEDOWN and Event.MOUSEUP events can be handled by the button, they are intercepted by Document's captureEvent() method and routed to special functions that change the background colors to red and blue.
Listing 8.66 Capture Events with the captureEvent() Method
<html>
Normally the button below would toggle the background color between
yellow and purple but since the mouseup and mousedown events are captured
and handled by the document the events are never allowed to reach the button
level.
<form>
<input type="button"
value="Yellow/Purple"
onMouseDown="document.bgColor='yellow'"
onMouseUp="document.bgColor='purple'">
</form>
<script>
<!--
// Intercept all mouseup and mousedown events and handle them
// by document event handlers. This will cause the button event handlers
// to be intercepted.
document.captureEvents(Event.MOUSEDOWN | Event.MOUSEUP);
// Define event handlers within document to handle the mousedown
// and mouseup events.
document.onmousedown = function(event){document.bgColor='red'};
document.onmouseup = function(event){document.bgColor='blue'};
// -->
</script>
</html>
document.classes
JavaScript 1.2-1.3
Nav4-4.5
Syntax
document.classes.className.tagName.style
Description
The classes property is an associative array that contains classes associated with Netscape style sheets. Using dot notation, className specifies the class attribute and associated HTML tag (tagName) for which the style is applied. When tagName is set to all, the style is applied to all tags with a class attribute of className. The style sheet classes are created within <style> or <script> using JavaScript or HTML. The style specified can be any one of the style properties or methods shown in Table 8.8. For more information on any of the properties, see the Style object entries in this chapter.
Table 8.8 Properties and Methods of theStyleObject that Can Be Used with the classes Property
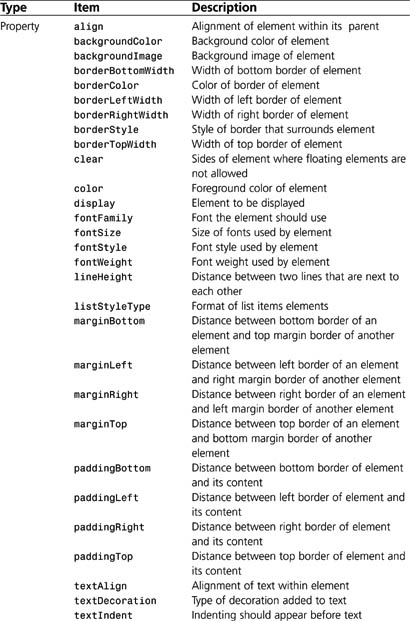
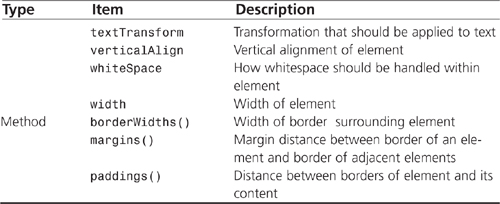
Example
Listing 8.67 demonstrates three different ways to create style sheet classes using JavaScript and HTML within <style> and <script> tags. Notice how the order in which the classes are declared and used ultimately affects the style result.
Listing 8.67 Creating New Style Sheet Classes
<html>
<style type="text/css">
all.TEXTFORMAT {font-style: italic;}
</style>
<p CLASS=TEXTFORMAT>After first STYLE tag.<p>
<style type="text/javascript">
classes.TEXTFORMAT.all.fontWeight = "bold";
</style>
<p class=TEXTFORMAT>After second STYLE tag.<p>
<script>
<!--
document.classes.TEXTFORMAT.all.textDecoration = "underline";
// -->
</script>
<p class=TEXTFORMAT>After SCRIPT tag.<p>
</html>
document.close()
JavaScript 1.0+, JScript 1.0+
Nav2+, IE3+, Opera3+
Syntax
document.close()
Description
The close() method closes the output stream to the document. Any output that has not been written prior to calling the method will be displayed.
CAUTION
The implementation of the close() method varies greatly between browsers and their versions. In some browsers, output continues to be streamed after calling the close() method, so it is best to avoid using this method if possible. If you must use this function, test it carefully on all the browsers you intended to support.
Example
Listing 8.68 uses the close() method to close the output stream to a document.
Listing 8.68 Close Document Output Stream with the close() Method
<html>
<script type="text/javascript" language="JavaScript">
<!--
// Write some text to the screen and then close the document.
document.write("This line is a long line that should wrap around the ");
document.write("browser. If it does not wrap around the screen then ");
document.write("resize your browser window so that it does wrap and ");
document.write("reexecute this code.<br>");
// Close document and write all lines that are currently in the buffer.
document.close();
// Write another paragraph.
document.write("If the paragraph above wrapped around the browser then "); document.write("you will notice that this paragraph was only written after ");
document.write("the close method was called.");
// Create an alert box so you can see where the close operation takes place. alert("Press to continue");
// -->
</script>
</html>
document.contextual()
JavaScript 1.2-1.4
Nav4
Syntax
document.contextual(context1,…,[contextN], style)
Description
The contextual() method provides a way to apply a style to HTML elements based on the context of the HTML elements. For example it is possible to specify that the color of text within an <i> tag that appears in an <h2> tag is set to green. The final argument passed to the method is the style to be to effected. The context arguments can also be used to specify other styles in which the final style should exist in order to be effected.
Example
The code in Listing 8.69 uses the contextual() method to make all italic text that appears within 2nd level header tags green.
Listing 8.69 Making All Italic Text Green with the contextual() Method
<html>
<script type="text/javascript" language="JavaScript">
document.contextual(document.tags.h2, document.tags.i).color="green";
</script>
<h2>This word is <i>Green</i></h2>
</html>
document.cookie
JavaScript 1.0+, JScript 1.0+
Nav2+, IE3+
Syntax
document.cookie
Description
The cookie property provides the ability to read and write cookies. A cookie represents a small amount of data that a Web browser stores to allow information to be shared among Web pages.
Example
Listing 8.70 creates a cookie and then reads back the result.
Listing 8.70 Create a Cookie and Read It Back Using the cookie Property
<html>
<script>
<!--
// Create a cookie.
document.cookie = "temperature=75";
// Display the contents of the cookie.
document.write("The cookie contains: ",document.cookie);
// -->
</script>
</html>
document.domain
JavaScript 1.1+, JScript 1.0+
Nav3+, IE3+, Opera3+
Syntax
document.domain
Description
The domain property initially contains the hostname of the server from which the document was loaded. The document is allowed to change the value to the domain minus the subdomain. For example, if a Web page originated from www.example.com, the document could change this to example.com. The reason this is allowed is so different pages that come from various servers within the same Web site can share properties. The restrictive quality of this property keeps unrelated documents from wrongfully seeing the data each document might have collected.
Example
No example is provided because the document would have to originate from a server that has a domain name for this property not to be empty.
document.embeds
JavaScript 1.1+, JScript 1.0+
Nav3+, IE3+, Opera3+
Syntax
document.embeds
document.embeds[index]
Description
The embeds property is an array that contains all the embedded objects and plug-ins that appear within the HTML document when using the <embed> tag. The embeds property has one property of its own, called length, which contains the number of items in the array. The index number ranges from zero to the length minus one.
Note
The embeds array property accesses the same data as the document.plugins array property.
Example
Listing 8.71 uses the length property to display the number of embedded objects in a HTML document.
Listing 8.71 List the Number of Embedded Objects Using the embeds Property
<html>
<h2>Learn your shapes</h2>
<h2>A Circle</h2>
<embed src="circle.gif">
<h2>A Square</h2>
<embed src="square.gif">
<script type="text/javascript" language="JavaScript">
<!--
// Display the length of the embeds array.
document.write(document.embeds.length," embedded objects.");
// -->
</script>
</html>
document.embeds.length
JavaScript 1.1+, JScript 1.0+
Nav3+, IE3+, Opera3+
Syntax
document.embeds.length
Description
The length property contains the number of objects that are in the embeds[] array.
Example
Listing 8.72 uses the length property to display the number of embedded objects in an HTML document.
Listing 8.72 List the Number of Embedded Objects Using the length Property
<html>
<h2>A Circle</h2>
<embed src="circle.gif">
<h2>A Square</h2>
<embed src="square.gif">
<script type="text/javascript" language="JavaScript">
<!--
// Display the length of the embeds array.
document.write(document.embeds.length," embedded objects.");
// -->
</script>
</html>
document.fgColor
JavaScript 1.0+, JScript 1.0+
Nav2+, IE3+, Opera3+
Syntax
document.fgColor
Description
The fgColor property specifies the default text color of all the text that appears in a Web document. This is equivalent to assigning the color to the text attribute in the <body> tag. The color is expressed as a string in hexadecimal digits or as one of the HTML standard color names. The hexadecimal form is made up of six digits that follow the pattern “RRGGBB.”
Example
Listing 8.73 sets the default color of all the text on the page to blue.
Listing 8.73 Set the Text Color with the fgColor Property
<html>
<script type="text/javascript" language="JavaScript">
<!--
// Set the text color to blue.
document.fgColor="0000ff";
// -->
</script>
<body>
The color of all text on this page is blue.
</body>
</html>
document.formName
JavaScript 1.1+, JScript 1.0+ Nav3+, IE3+, Opera3+
Syntax
document.formName
Description
The formName property is actually the name of any form that exists in the HTML document. By simply placing the name of a particular form after the word document., you gain access to the specified form object. It is also possible to access forms using the forms property and array notation. See the document.forms entry in this chapter for more information.
Example
Listing 8.74 accesses the action of each form by simply specifying its name using the document object and dot notation.
Listing 8.74 Accesses Form Actions Using Forms’ Names
<html>
<form name="Form1" action="green">
<input type="button"
value="Green"
onClick = "document.bgColor='green'">
</form>
<form name="Form2" action="blue">
<input type="button"
value="Blue"
onClick = "document.bgColor='blue'">
</form>
<script type="text/javascript" language="JavaScript">
// Display the action of each of the form objects.
document.write("The action associated with the Form1 object is ");
document.write(document.Form1.action, "<br>");
document.write("The action associated with the Form2 object is ");
document.write(document.Form2.action);
</script>
</html>
document.forms
JavaScript 1.1+, JScript 1.0+
Nav3+, IE3+, Opera3+
Syntax
document.forms
document.forms[index]
Description
The forms property is an array that contains all the forms that exist within the HTML document from using the <form> tag. The forms property has one property of its own, called length, which contains the number of items in the array. The index number ranges from zero to the length minus one.
Example
Listing 8.75 accesses the names of each form using the forms[] array.
Listing 8.75 Access Form Names Using the forms Array
<html>
<form name="Form1">
<input type="button"
value="Green"
onClick = "document.bgColor='green'">
</form>
<form name="Form2">
<input type="button"
value="Blue"
onClick = "document.bgColor='blue'">
</form>
<script type="text/javascript" language="JavaScript">
<!--
// Display the name of the form objects.
for(i=0;i<document.forms.length;i++)
{
document.write("The name of form object ",(i+1));
document.write(" is <i><b>",document.forms[i].name,"</b></i><br>");
}
// -->
</script>
</html>
document.forms.length
JavaScript 1.0+, JScript 1.0+
Nav2+, IE3+, Opera3+
Syntax
document.forms.length
Description
The length property contains the number of Form objects that are in the forms[] array.
Example
Listing 8.76 uses the length property to display the number of Form objects in the document.
Listing 8.76 Access the Number of Forms in the Document with the length Property
<html>
<form name="Form1">
<input type="button"
value="Green"
onClick = "document.bgColor='green'">
</form>
<form name="Form2">
<input type="button"
value="Blue"
onClick = "document.bgColor='blue'">
</form>
<script type="text/javascript" language="JavaScript">
<!--
// How many items in forms[] array?
document.write(document.forms.length," Form objects in document.");
// -->
</script>
</html>
document.getSelection()
Syntax
document.getSelection()
Description
The getSelection() method returns the text that is selected within the HTML document.
Example
Listing 8.77 uses the getSelection() method to display all captured text in a text box. The result of selecting "JavaScript is Great!" from the text is shown in Figure 8.3.
Figure 8.3 Selecting a portion of text and displaying it in a text box.
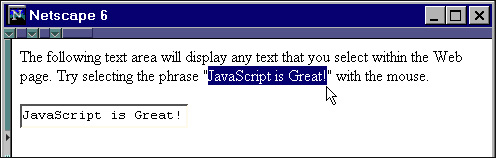
Listing 8.77 Displaying the Selected Text
<html>
The following text area will display any text that you select within the Web page. Try selecting the phrase "JavaScript is Great!" with the mouse.<br><br>
<form name="Form1"> <input type="text" name="TextArea"> </form>
<script type="text/javascript" language="JavaScript"> <!--
// Fill in textarea when mouse button is released.
document.captureEvents(Event.MOUSEUP);
document.onmouseup = function(event){document.Form1.TextArea.value =
document.getSelection()};
// -->
</script>
</html>
document.handleEvent()
JavaScript 1.2-1.3
Nav4-4.5
Syntax
document.handleEvent(event)
Description
The handleEvent() method provides a way to invoke a document’s event handler, even though the event never happened. The event argument specifies the Event object associated with the event handler that is to be invoked.
Example
In Listing 8.78, an event handler is designated to handle all document Click events. When the user selects the button labeled 9, the clickHandler() method is used to route the event to the document’s event handler.
Listing 8.78 Pass Events to Document with the handleEvent() Method
<html>
<h2>Math Quiz</h2>
What is 6+3?
<form name="answerForm">
<input type="button"
value=" 8 "
name="answer8"
onClick="alert('Incorrect. Try again.')">
<input type="button"
value=" 9 "
name="answer9"
onClick="document.handleEvent(event)">
</form>
<script type="text/javascript" language="JavaScript">
<!--
// Function designated to handle click events.
function clickHandler(event)
{
// Display an alert box.
alert("A click event occured within the document.");
}
// Register the Click event with the document event handler. document.onClick = clickHandler;
// --> </script>
</html>
document.ids
JavaScript 1.2-1.3
Nav4-4.5
Syntax
document.ids.idName.style
Description
The ids property is an associative array that contains IDs associated with Netscape style sheets. Using dot notation,idName specifies an ID associated with a style. The style sheet IDs are created within the <style> or <script> tags using JavaScript or HTML. The style specified can be any one of the style properties or methods shown in Table 8.9. For more information on any of the properties, see the Style object entries in this chapter.
Table 8.9 Properties and Methods of the Style Object that Can Be Used with the ids Property

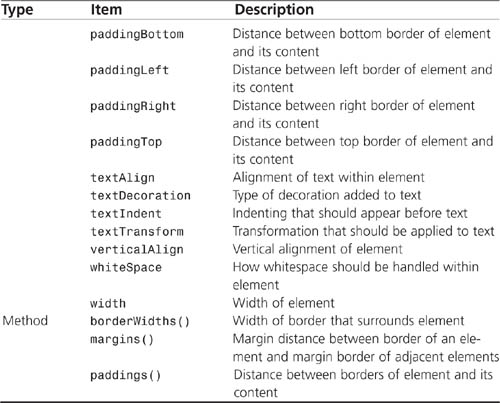
Example
Listing 8.79 demonstrates three different ways to create style sheet IDs using JavaScript and HTML within <style> and <script> tags. Notice how the order in which the IDs are declared and used ultimately affects the style result.
Listing 8.79 Creating Style Sheet IDs
<html>
<style type="text/css">
#TEXTFORMAT {font-style: italic;} </style>
<p id=TEXTFORMAT>After first STYLE tag.<p>
<style type="text/javascript">
ids.TEXTFORMAT.fontWeight = "bold"; </style>
<p id=TEXTFORMAT>After second STYLE tag.<p>
<script> <!-- document.ids.TEXTFORMAT.textDecoration = "underline"; // --> </script>
<p id=TEXTFORMAT>After SCRIPT tag.<p>
</html>
document.images
JavaScript 1.1+, JScript 1.0+
Nav3+, IE3+, Opera3+
Syntax
document.images
document.images[index]
Description
The images property is an array that contains all the objects that appear within the HTML document from using the <img> tag. The images property has one property of its own, called length, which contains the number of items in the array. The index number ranges from zero to the length of the array minus one.
Example
The code in Listing 8.80 accesses the source of each image using the images array.
Listing 8.80 Accessing Images with the images Array
<html>
<h2>A Circle</h2>
<img src="circle.gif">
<h2>A Square</h2>
<img src="square.gif"><br>
<script type="text/javascript" language="JavaScript">
<!--
// Display the source of the image objects.
for(i=0;i<document.images.length;i++)
{
document.write("The source of image object ",(i+1));
document.write(" is <i><b>",document.images[i].src,"</b></i><br>");
}
// -->
</script>
</html>
document.images.length
JavaScript 1.1+, JScript 1.0+
Nav3+, IE3+, Opera 5+
Syntax
document.images.length
Description
The length property contains the number of objects that are in the images[] array.
Example
The code in Listing 8.81 uses the length property to display the number of images in the HTML document.
Listing 8.81 Display the Number of Images in Document Using the length Property
<html>
<h2>A Circle</h2>
<img src="circle.gif">
<h2>A Square</h2>
<img src="square.gif"><br>
<script type="text/javascript" language="JavaScript">
<!--
// Display the length of the images array.
document.write(document.images.length," image objects.");
// -->
</script>
</html>
document.lastModified
JavaScript 1.0+, JScript 3.0+
Nav2+, IE3+, Opera3+
Syntax
document.lastModified
Description
The lastModified property contains the date and time the document was last modified on the server. This property can be very useful when dealing with documents that contain information that is very date-specific. Be careful when using this date because Web servers are not required to provide this timestamp. If the timestamp is not provided, JavaScript will set the lastModified property to midnight, January 1, 1970 (GMT).
Example
The code in Listing 8.82 lists limited discount prices on clothing, starting with when the document was last modified.
Listing 8.82 Display Prices Based on the lastModified Property
<html>
<center>
<h2>LIMITED TIME SALE ON CLOTHING</h2>
<script type="text/javascript" language="JavaScript">
<!--
document.write("Starting ",document.lastModified," the following ");
document.write("clothing items will be on sale for one week ");
document.write("so order now!<br>");
// -->
</script>
<table border=ON>
<tr>
<th>Item</th>
<th>Retail Price</th>
<th>Sale Price</th>
</tr>
<tr>
<td>T-shirt</td>
<td>$20.00</td>
<td><font color="RED">$10.99</font></td>
</tr>
<tr>
<td>Jeans</td>
<td>$60.00</td>
<td><font color="RED">$30.99</font></td>
</tr>
<tr>
<td>Hats</td>
<td>$25.00</td>
<td><font color="RED">$15.00</font></td>
</tr>
</table>
</center>
</html>
document.layers
JavaScript 1.2-1.4
Nav4-4.7
Syntax
document.layers
document.layers[index]
Description
The layers property is an array that contains all the objects that appear within the HTML document from using the <layer> tag. The layers property has one property of its own, called length, which contains the number of items in the array. The index number ranges from zero to the length.
Example
The code in Listing 8.83 creates two layers and then displays their names at the bottom of the page using the layers[] array.
Listing 8.83 Accessing the Layer Objects Using the layers[] Array
<html>
<layer name="Layer1" PAGEX=50 PAGEY=50 width=100 height=100 bgcolor="blue">Layer 1</layer> <layer name="Layer2" PAGEX=150 PAGEY=150
width=100
height=100
bgcolor="red">Layer 2</layer>
<script type="text/javascript" language="JavaScript">
<!--
// Display the name of the layer objects.
for(i=0;i<document.layers.length;i++)
{
document.write("The name of layer object ",(i+1));
document.write(" is <i><b>",document.layers[i].name,"</b></i><br>");
}
// -->
</script>
</html>
document.layers.length
JavaScript 1.2-1.4
Nav4-4.7
Syntax
document.layers.length
Description
The length property contains the number of objects that are in the layers[] array.
Example
Listing 8.84 creates two layers and then displays the number of layers on the bottom of the page using the length property.
Listing 8.84 Display the Number of Layers in the Document Using the length Property
<html>
<layer name="Layer1"
pagex=50
pagey=50
width=100
height=100
bgcolor="blue">Layer 1</layer> <layer name="Layer2"
pagex=150
pagey=150
width=100
height=100
bgcolor="red">Layer 2</layer>
<script type="text/javascript" language="JavaScript"> <!--
// Display the length of the layers array. document.write(document.layers.length," layer objects.");
// --> </script>
</html>
document.linkColor
JavaScript 1.0+, ECMAScript 1.0+, JScript 1.0+
Nav2+, IE3+
Syntax
document.linkColor
Description
The linkColor property specifies the color of unvisited links. The color is expressed as a string in hexadecimal digits or as one of the HTML standard color names. The hexadecimal form is made up of six digits that follow the pattern “RRGGBB.”
Example
Listing 8.85 sets all the unvisited links on the page to the color green.
Listing 8.85 Setting Link Colors with the linkColor Property
<html>
<a href="myGreenPage.html">The Green Site</a><br>
<script type="text/javascript" language="JavaScript">
<!--
// Set the unvisited links color to green.
document.linkColor="00ff00";
// -->
</script>
<a href="myGreenGrassPage.html">The Green Grass Page</a>
</html>
document.links
JavaScript 1.0+, JScript 1.0+
Nav2+, IE3+, Opera3+
Syntax
document.links
document.links[index]
Description
The links property is an array that contains all the Link objects that appear within the HTML document from using the <a href="source"> tag. The links property has one property of its own, called length, which contains the number of Link objects in the array. The index number ranges from zero to the length minus one. See the Link object earlier in this chapter for a detailed explanation of all the properties associated with links.
Example
Listing 8.86 displays the URL of each link using the links[] array.
Listing 8.86 Display the URL of each Link in the Document using the link array
<html>
<a href="EmployeeList.html">The Employee List Page</a><br>
<a href="EmployeeBenefits.html">The Employee Benefits Page</a><br>
<script type="text/javascript" language="JavaScript">
<!--
// Display the URL of the link objects.
for(i=0;i<document.links.length;i++)
{
document.write("The URL of link object ",(i+1));
document.write(" is <i><b>",document.links[i].href,"</b></i><br>");
}
// -->
</script>
</html>
document.links.length
JavaScript 1.0+, JScript 1.0+
Nav2+, IE3+, Opera3+
Syntax
document.links.length
Description
The length property contains the number of Link objects that are in the document.links array.
Example
Listing 8.87 uses the length property to display the number of links in the HTML document.
Listing 8.87 Display the Number of Links in the Document Using the length Property
<html>
<a href="EmployeeList.html">The Employee List Page</a><br>
<a href="EmployeeBenefits.html">The Employee Benefits Page</a><br>
<script type="text/javascript" language="JavaScript">
<!--
// Display the length of the links array.
document.write(document.links.length," links.");
// -->
</script>
</html>
document.onClick
JavaScript1.0+, JScript 1.0-3.0
Nav2+, IE3-4
Syntax
document.onClick
Description
The onClick event handler specifies what should happen when the mouse is clicked within the Document object.
Example
In Listing 8.88, the script in the <head> of the document specifies a function to handle all Click events in the document. To be able to do this, the document’s captureEvents() method is used to capture all events of type Event.CLICK. When the page itself is clicked, Document’s event handler generates an alert box notifying the user of the event.
Listing 8.88 Handle the Click Event with the onClick Event Handler
<html> <head> <script type="text/javascript" language="JavaScript1.2">
<!--
// Tell the browser you want to intercept ALL click events
// on the page and then define a function to handle them.
document.captureEvents(Event.CLICK);
document.onClick = myClickHandler;
// Define the myClickHandler function to handle click events
function myClickHandler(e){
alert("The document was clicked!");
}
// -->
</script>
</head>
<body>
Any time you click anywhere within this document you will
get a message alerting you that a Click event has taken place.
</body>
</html>
document.onDblClick
JavaScript1.0+, JScript 1.0-3.0
Nav2+, IE3-4
Syntax
document.onDblClick
Description
The onDblClick event handler specifies what should happen when the mouse is double-clicked within the Document object.
Example
In Listing 8.89, the script in the <head> of the document specifies a function to handle all DblClick events in the document. To be able to do this, the document’s captureEvents() method is used to capture all events of type Event.DBLCLICK. When the page itself is double-clicked, Document’s event handler generates an alert box notifying the user of the event.
Listing 8.89 Handle the DblClick Event with the onDblClick Event Handler
<html>
<head>
<script type="text/javascript" language="JavaScript1.2">
<!--
// Tell the browser you want to intercept ALL DblClick events
// on the page and then define a function to handle them.
document.captureEvents(Event.DBLCLICK);
document.onDblClick = myDblClickHandler;
// Define the myDblClickHandler function to handle DblClick events.
function myDblClickHandler(e){
alert("The document was double clicked!");
}
// -->
</script>
</head>
<body>
Any time you double-click anywhere within this document, you will
get a message alerting you that a DblClick event has taken place.
</body>
</html>
document.onKeyDown
JavaScript1.0+, JScript 1.0-3.0
Nav2+, IE3-4
Syntax
document.onKeyDown
Description
The onKeyDown event handler specifies what should happen when any key is pressed when the Document object is in focus.
Example
In Listing 8.90, the script in the <head> of the document specifies a function to handle all KeyDown events in the document. To be able to do this, the document’s captureEvents() method is used to capture all events of type Event.KEYDOWN. When any key is pressed within the page, the document’s event handler generates an alert box notifying the user of the event.
Listing 8.90 Handle the KeyDown Event with the onKeyDown Event Handler
<html>
<head>
<script type="text/javascript" language="JavaScript1.2">
<!--
// Tell the browser you want to intercept ALL key down events
// on the page and then define a function to handle them.
document.captureEvents(Event.KEYDOWN);
document.onKeyDown = myKeyDownHandler;
// Define the myKeyDownHandler function to handle
// key down events.
function myKeyDownHandler(e){
alert("A key down event took place within the document!");
}
// -->
</script>
</head>
<body>
Anytime you press a key within this document, you will
get a message alerting you that a KeyDown event has taken place.
</body>
</html>
document.onKeyPress
JavaScript1.0+, JScript 1.0-3.0
Nav2+, IE3-4
Syntax
document.onKeyPress
Description
The onKeyPress event handler specifies what should happen when any key is pressed when the Document object is in focus.
Example
In Listing 8.91, the script in the <head> of the document specifies a function to handle all KeyPress events in the document. To be able to do this, the document’s captureEvents() method is used to capture all events of type Event.KEYPRESS. When any key is pressed within the page, the document’s event handler generates an alert box notifying the user of the event.
Listing 8.91 Handle the KeyPress Event with the onKeyPress Event Handler
<html> <head> <script type="text/javascript" language="JavaScript1.2"> <!-- // Tell the browser you want to intercept ALL key press events // on the page and then define a function to handle them. document.captureEvents(Event.KEYPRESS); document.onKeyPress = myKeyPressHandler; // Define the myKeyPressHandler function to handle // key press events. function myKeyPressHandler(e){ alert("A key press event took place within the document!"); } // --> </script> </head> <body> Anytime you press a key within this document, you will get a message alerting you that a KeyPress event has taken place. </body> </html>
document.onKeyUp
JavaScript1.0+, JScript 1.0-3.0
Nav2+, IE3-4
Syntax
document.onKeyUp
Description
The onKeyUp event handler specifies what should happen when any key is pressed and then released when the Document object is in focus.
Example
In Listing 8.92, the script in the <head> of the document specifies a function to handle all KeyUp events in the document. To be able to do this, the document’s captureEvents() method is used to capture all events of type Event.KEYUP. When any key is pressed and then released within the page, the document’s event handler generates an alert box notifying the user of the event.
Listing 8.92 Handle the KeyUp Event with the onKeyUp Event Handler
<html>
<head>
<script type="text/javascript" language="JavaScript1.2">
<!--
// Tell the browser you want to intercept ALL key up events
// on the page and then define a function to handle them.
document.captureEvents(Event.KEYUP);
document.onKeyUp = myKeyUpHandler;
// Define the myKeyUpHandler function to handle
// key up events.
function myKeyUpHandler(e){
alert("A key up event took place within the document!");
}
// -->
</script>
</head>
<body>
Anytime you press a key and release it within this document, you will
get a message alerting you that a KeyUp event has taken place.
</body>
</html>
document.onLoad
JavaScript1.0+, JScript 1.0+
Nav2+, IE3+
Syntax
onLoad="command"
Description
The onLoad event handler of the Document object is fired when the page has finished loading in that particular window instance. This event handler actually belongs to the Window object but is accessible through the Document object.
Example
The sample of code in Listing 8.93 pops up an alert box when the page has finished loading using the onLoad event handler.
Listing 8.93 Handle the Load Event with the onLoad Event Handler
<html> <body onLoad='alert("The document has completely loaded.")'> <h2>The document.onLoad entry</h2> </body> </html>
document.onMouseDown
JavaScript1.0+, JScript 1.0-3.0
Nav2+, IE3-4
Syntax
document.onMouseDown
Description
The onMouseDown event handler specifies what should happen when the mouse button is clicked within the Document object.
Example
In Listing 8.94, the script in the <head> of the document specifies a function to handle all MouseDown events in the document. To be able to do this, the document’s captureEvents() method is used to capture all events of type Event.MOUSEDOWN. When the mouse button is clicked within the page, the document’s event handler generates an alert box notifying the user of the event.
Listing 8.94 Handle the MouseDown Event with the onMouseDown Event Handler
<html>
<head>
<script type="text/javascript" language="JavaScript1.2">
<!--
// Tell the browser you want to intercept ALL mouse
// down events on the page and then define a function
// to handle them.
document.captureEvents(Event.MOUSEDOWN);
document.onMouseDown = myMouseDownHandler;
// Define the myMouseDownHandler function to handle
// mouse down events.
function myMouseDownHandler(e){
alert("A mouse down event took place within the document!");
}
// -->
</script>
</head>
<body>
Anytime you press the mouse button down within this document, you will
get a message alerting you that a MouseDown event has taken place.
</body>
</html>
document.onMouseUp
JavaScript1.0+, JScript 1.0-3.0
Nav2+, IE3-4
Syntax
document.onMouseUp
Description
The onMouseUp event handler specifies what should happen when the mouse button is clicked and then released within the Document object.
Example
In Listing 8.95, the script in the <head> of the document specifies a function to handle all MouseUp events in the document. To be able to do this, the document’s captureEvents() method is used to capture all events of type Event.MOUSEUP. When the mouse button is clicked and then released within the page, the document’s event handler generates an alert box notifying the user of the event.
Listing 8.95 Handle the MouseUp Event with the onMouseUp Event Handler
<html>
<head>
<script type="text/javascript" language="JavaScript1.2">
<!--
// Tell the browser you want to intercept ALL mouse
// up events on the page and then define a function
// to handle them.
document.captureEvents(Event.MOUSEUP);
document.onMouseUp = myMouseUpHandler;
// Define the myMouseUpHandler function to handle
// mouse up events.
function myMouseUpHandler(e){
alert("A mouse up event took place within the document!");
}
// -->
</script>
</head>
<body>
Anytime you press the mouse button and then release it within this
Document, you will get a message alerting you that a MouseUp
event has taken place.
</body>
</html>
document.onUnLoad
JavaScript 1.0+, JScript 1.0+
Nav2+, IE3+, Opera3+
Syntax
onUnLoad="command"
Description
The onUnLoad event handler of a Document object is fired when the page is unloaded in that particular window instance. This occurs when the user leaves the page for another page. This event handler actually belongs to the Window object but is accessible through the Document object. See Window.onUnLoad, later in this chapter, for more information.
NOTE
The onUnLoad event handler in the <body> of a document that is loaded in a frame will fire before an event loaded in the <frameset> tag that loaded the document.
Example
The code in Listing 8.96 pops up an alert box when the user clicks the bogus link to leave the current HTML page, thanks to the onUnLoad event handler.
Listing 8.96 Handle the UnLoad Event with the onUnLoad Event Handler
<html>
<body onUnLoad='alert("Please do not leave!")'>
<a href="nextpage.html">Press this link to go to the next page.</a>
</body>
</html>
document.open()
JavaScript1.0+, JScript 1.0+
Nav2+, IE3+, Opera3+
Syntax
document.open()
document.open(mimetype)
Description
The open() method of the Document object clears the current document and opens a stream for new data to be placed in the document. This method accepts one argument, mimetype, that specifies what type of data will be written to the document. The argument can be one of the following standard mimetypes: text/html, text/plain, image/gif, image/jpeg, or image/x-bitmap.
Example
Listing 8.97 opens a document with the open() method and then writes text to the document.
Listing 8.97 Open a Document with the open() Method
<script type="text/javascript" language="JavaScript">
<!--
document.open()
document.write("Stream text to document");
document.close()
// -->
</script>
document.plugins
JavaScript 1.1+, JScript 1.0+
Nav3+, IE3+, Opera3+
Syntax
document.plugins
document.plugins[index]
Description
The plugins property is an array that contains all the embedded objects and plug-ins that appear within the HTML document from using the <embed> tag. The plugins property has one property of its own, called length, which contains the number of items in the array. The index number ranges from zero to the length minus one.
Example
Listing 8.98 uses the length property to display the number of embedded objects in the HTML document.
Listing 8.98 Display the Number of Plug-ins Using the plugins Property
<html>
<h2>Learn Shapes</h2>
<h2>A Circle</h2>
<embed src="circle.gif">
<h2>A Square</h2>
<embed src="square.gif">
<script type="text/javascript" language="JavaScript">
<!--
// Display the length of the plugins array.
document.write(document.plugins.length," embedded objects.");
// -->
</script>
</html>
document.plugins.length
JavaScript 1.1+, JScript 1.0+
Nav3+, IE3+
Syntax
document.plugins.length
Description
The length property contains the number of objects that are in the plugins[] array.
Example
Listing 8.99 uses the length property to display the number of embedded objects in the HTML document.
Listing 8.99 Display the Number of Plug-ins in the Document using the length property
<html>
<h2>A Circle</h2>
<embed src="circle.gif">
<h2>A Square</h2>
<embed src="square.gif">
<script type="text/javascript" language="JavaScript">
<!--
// Display the length of the plugins array.
document.write(document.plugins.length," embedded objects.");
// -->
</script>
</html>>
document.referrer
JavaScript 1.0+, JScript 3.0+
Nav2+, IE4+
Syntax
document.referrer
Description
The referrer property contains the URL of the document that was used to reach the current document. If the URL was typed directly in to the browser’s location field, this property will be empty.
Example
In Listing 8.100, the referrer property is used to create a link back to the previous document from within the current document in the example.
Listing 8.100 Create a Link Back to the Calling Document Using the referrer Property
<script type="text/javascript" language="JavaScript">
<!--
// Create a link back to the referring document.
document.write("<a href='",document.referrer,"'>Go back</a>");
// -->
</script>
document.releaseEvents()
JavaScript1.2-1.3
Nav4-4.5
Syntax
document.releaseEvents(event)
document.releaseEvents(event1 | event2 | eventN)
Description
The releaseEvents() method of the Document object releases all previously captured events of the event type passed. These events can be captured with the Document.captureEvents() method. The following events can be released:
• Event.ABORT
• Event.BLUR
• Event.CHANGE
• Event.CLICK
• Event.DBLCLICK
• Event.DRAGDROP
• Event.ERROR
• Event.FOCUS
• Event.KEYDOWN
• Event.KEYPRESS
• Event.KEYUP
• Event.LOAD
• Event.MOUSEDOWN
• Event.MOUSEMOVE
• Event.MOUSEOUT
• Event.MOUSEOVER
• Event.MOUSEUP
• Event.RESET
• Event.RESIZE
• Event.SELECT
• Event.SUBMIT
• Event. UNLOAD
After one of these events has been captured, you can define a function to replace the built-in method for handling the event. Use the releaseEvents() method to free the event after a capture.
Example
Listing 8.101 has a single text box and a button. The script in the <head> of the document specifies a function to handle all Click events in the document. To be able to do this, the captureEvents() method had to be used to capture all events of type Event.CLICK. When the page itself is clicked, a counter, which is displayed in the text box, is incremented.
When the mouse button is clicked, the MouseDown event is fired, the Event.CLICK is released, and the counter no longer increments when the page is clicked.
Listing 8.101 Using the releaseEvents() Method to Stop Capturing Specific Events
<html>
<head>
<script type="text/javascript" language="JavaScript1.2">
<!--
// Define a click counter variable.
var counter = 0;
// Tell the browser you want to intercept ALL click events
// on the page. Then define a function to handle them.
document.captureEvents(Event.CLICK);
document.onClick = myClickHandler;
// Define the myClickHandler function to handle click events.
function myClickHandler(e){
// Pass all click events to the onClick event of the text box.
document.myForm.myText.handleEvent(e);
}
// Function is called by onClick of text box. Displays the number
// of clicks that have occurred.
function changeText(){
document.myForm.myText.value = counter++;
}
// Releases the click event capturing
function releaseClick(){
document.releaseEvents(Event.CLICK);
document.onClick="";
}
// -->
</script>
</head>
<body>
<form name="myForm">
<input type=TEXT size=2 value="" name="myText" onClick="changeText()">
<input type=BUTTON value="Release Event" onMouseDown="releaseClick()">
</form>
</body>
</html>
document.routeEvent()
JavaScript1.2+
Nav4+
Syntax
document.routeEvent(event)
Description
The routeEvent() method of the Document object passes all previously captured events of the event type passed through their normal event processes. The events that can be passed are as follows:
• Event.ABORT
• Event.BLUR
• Event.CHANGE
• Event.CLICK
• Event.DBLCLICK
• Event.DRAGDROP
• Event.ERROR
• Event.FOCUS
• Event.KEYDOWN
• Event.KEYPRESS
• Event.KEYUP
• Event.LOAD
• Event.MOUSEDOWN
• Event.MOUSEMOVE
• Event.MOUSEOUT
• Event.MOUSEOVER
• Event.MOUSEUP
• Event.RESET
• Event.RESIZE
• Event.SELECT
• Event.SUBMIT
• Event.UNLOAD
After one of these events has been captured using the Document.captureEvents() method, you can define a function to replace the built-in method for handling the event. Use the releaseEvents() method to free the event after a capture, and use routeEvent() to allow normal processing to take place.
Example
Listing 8.102 has a single text box and a link. The script in the <head> of the document specifies a function to handle all Click events in the window. To be able to do this, the captureEvents() method had to be used to capture all events of type Event.CLICK. When the page itself is clicked, a counter, which is displayed in the text box, is incremented.
When the link is clicked, the MouseDown event is fired, the Event.CLICK is routed through its normal means, and the counter no longer increments when the page is clicked.
Listing 8.102 Using the routeEvent() Method to Continue Routing a Captured Event
<html>
<head>
<script type="text/javascript" language="JavaScript1.2">
<!--
// Define a click counter variable.
var counter = 0;
// Tell the browser you want to intercept ALL click events
// on the page. Then define a function to handle them.
document.captureEvents(Event.CLICK);
document.onClick = myClickHandler;
// Define the myClickHandler function to handle click events.
function myClickHandler(e){
// Pass all click events to the onClick event of the text box.
document.myForm.myText.handleEvent(e);
}
// Function is called by onClick of text box. Displays the number
// of clicks that have occurred.
function changeText(){
document.myForm.myText.value = counter++;
}
// Releases the click event capturing
function releaseClick(){
document.routeEvent(Event.CLICK);
}
// -->
</script>
</head>
<body>
<form name="myForm">
<input type="TEXT" size="2" value="" name="myText" onClick="changeText()">
<a href="http://www.purejavascript.com"
onMouseDown="window.routeEvent(Event.CLICK)">Click Here!</a>
</form>
</body>
</html>
document.tags
JavaScript 1.2+
Nav4+
Syntax
document.tags.tagName.style
Description
The tags property is an associative array that contains tags associated with Netscape style sheets. Using dot notation,tagName specifies a tag associated with a style. The style sheet tags are created within the <style> or <script> tags using JavaScript or HTML. The style specified can be any one of the style properties or methods shown in Table 8.10. For more information on any of the properties, see the Style object entries in this chapter.
Table 8.10 Properties and Methods of the Style Object that Can Be Used with the tags Property
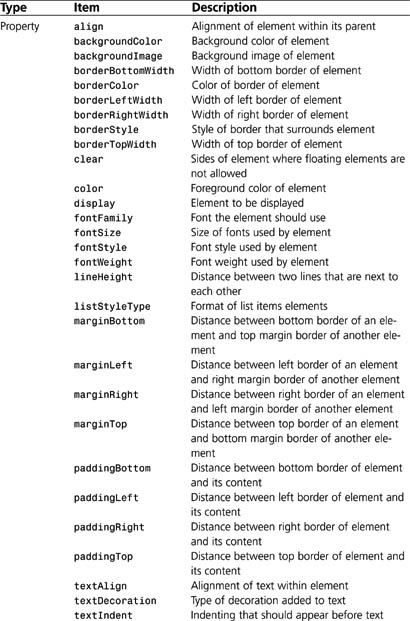

Example
Listing 8.103 demonstrates three different ways to create style sheet tags using JavaScript and HTML within <style> and <script> tags. Notice that the order in which the tags are declared and used ultimately affects the style result.
Listing 8.103 Creating New Style Sheet Tags
<html>
<style type="text/css">
P {font-style: italic;}
</style>
<p>After first STYLE tag.<p>
<style type="text/javascript">
tags.P.fontWeight = "bold";
</style>
<p>After second STYLE tag.<p>
<script>
<!--
document.tags.P.textDecoration = "underline";
// -->
</script>
<p>After SCRIPT tag.<p>
</html>
document.title
JavaScript 1.0+, JScript 1.0+
Nav2+, IE3+, Opera3+
Syntax
document.title
Description
The title property is a read-only string that specifies the title of the document. This property is commonly set with the <title> tag.
Example
In Listing 8.104, the title of the Web page is written to the screen using the title property.
Listing 8.104 Accessing the title Property of a Document
<html>
<head><title>My Web Page</title></head>
<script>
<!--
// Output the title of the document.
document.write("The title of this page is <i>");
document.write(document.title,"</i>");
// -->
</script>
document.unwatch()
JavaScript 1.2+
Nav4+, NES3+
Syntax
document.unwatch(property)
Description
The unwatch() method of the Document object is used to turn off the watch for a particular property specified by property.
Example
Listing 8.105 shows how the unwatch() method is used to stop watching the fgColor
property of the Document object after its value has changed to "Blue".