Chapter 6
Paying the Bills
IN THIS CHAPTER
![]() Using the Write Checks window to pay bills
Using the Write Checks window to pay bills
![]() Using the accounts payable method to pay bills
Using the accounts payable method to pay bills
![]() Deleting and editing bill payments
Deleting and editing bill payments
![]() Reminding yourself to pay bills
Reminding yourself to pay bills
![]() Tracking vehicle mileage
Tracking vehicle mileage
![]() Paying sales tax
Paying sales tax
QuickBooks gives you two ways to pay and record your bills. And you have many options when it comes to deciding when to pay your bills, how to pay your bills, and how to record your bills for the purposes of tracking inventory and expenses.
In this chapter, I explain not only how to pay vendor bills, but also how to pay that all-important bill that so many businesses owe to their state and local governments. I’m talking, of course, about sales tax.
Pay Now or Pay Later?
When it comes to paying bills, you have a fundamental choice to make. You can either record and pay your bills simultaneously, or you can record your bills as they come in and then pay them when they’re due. The first method is easier, as you might guess, because you do everything at once. The second method, called the accounts payable method, gives you more accurate financial records and makes for more precise management of your cash and outstanding bills.
If you have a small business with little overhead, you may just as well record and pay bills simultaneously. If you need precise measurement of your expenses and bills, though — if you want to use what’s termed accrual-basis accounting — you should use the accounts payable method of paying bills. I should note, too, that using the accounts payable method with QuickBooks isn’t as difficult as it may seem at first.
And now you’re ready to begin. In the next section, I describe how to pay bills by writing checks. A little later in the chapter, in the “Recording Your Bills the Accounts Payable Way” section, you find out how to pay bills by using the accounts payable method.
Recording Your Bills by Writing Checks
When you record bills by writing checks, you’re doing cash-basis accounting. In a nutshell, this means that you count bills as expenses when you write the check to pay the bill.
I talk a little bit about cash-basis accounting in Appendix B, but let me say here that a trade-off is implicit in the choice to use cash-basis accounting. If you use cash-basis accounting — which is what I do in my little business — you greatly simplify your bookkeeping, but you lose precision in your measurement of your expenses. Also, you don’t keep track of your unpaid bills inside QuickBooks; they just stack up in a pile next to your desk.
As long as you understand this trade-off and are comfortable with it, you’re ready to begin using this method, which you do by following the steps I provide in the coming paragraphs.
The slow way to write checks
You can write checks either from the register or from the Write Checks window. Using the Write Checks window is the slow way, but it enables you to record your expenses and the items (if any) that you purchase. Using the Write Checks window is the best choice in the following situations:
- You’re paying for an inventory item.
- You’re paying for something for which you have a purchase order.
- You plan to be reimbursed for the bill that you’re paying.
- You want to record what job or class the bill falls under.
To use the Write Checks window to write checks, follow these steps:
Choose Banking ⇒ Write Checks.
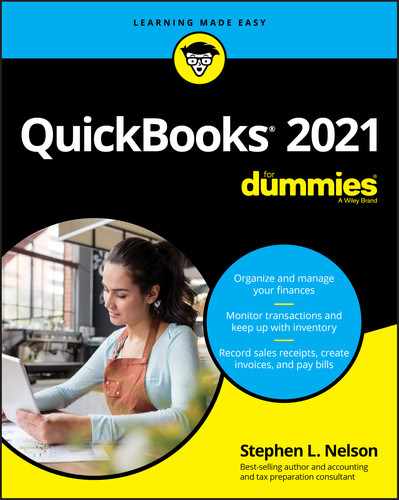
Alternatively, click the Write Checks icon in the Banking section of the home screen. The Write Checks window appears, as shown in Figure 6-1. Notice that this window has three parts:
- The check part on the top, which you no doubt recognize from having written thousands of checks in the past.
- The buttons on the top and bottom.
- The Expenses and Items tabs near the middle of the window. This part is for recording what the check is for, as I explain in Steps 7, 8, and 9.
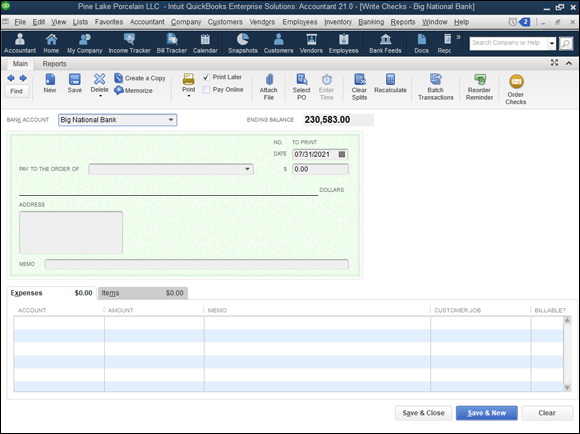
FIGURE 6-1: The Write Checks window.
Click the Bank Account drop-down menu, and choose the account from which you want to write this check.
 This step is very important if you have more than one account. Make sure that you choose the correct account; otherwise, your account balances in QuickBooks will be incorrect.
Specify the check date.
Click the Date field, and type the check date. I don’t keep reminding you about this, but because I’m still in the early part of this book, remember that you can enter today’s date by pressing the T key. You can also click the button to the right of the Date box to get a pop-up calendar. To select a date from the pop-up calendar, click the calendar day that you want to use.
Fill in the Pay to the Order Of line.
If you’ve written a check to this person or party before, the AutoFill feature fills in the name of the payee in the Pay to the Order Of line for you after you start typing the name. (AutoFill does so by comparing what you type with names shown in the Customer, Vendor, Employee, and Other lists.) AutoFill also puts the payee’s address in the Address text box.
 The AutoRecall feature can even fill out the entire check for you, based on the last check that you wrote to this vendor. (You can enable AutoRecall by choosing Edit ⇒ Preferences, clicking the General icon, and using the Automatically Recall Information box and buttons.)
Does the check look all right? Maybe all you need to do is tab around, adjusting numbers. Otherwise, read the next 12 steps. (Another 12-step program?) In these steps, I explain how to record information about a new vendor and pay a check to that vendor in one fell swoop.
If you’ve never paid anything to this person before, the program displays a Name Not Found message box after you enter the name on the Pay to the Order Of line. You can click either Quick Add or Set Up to add the payee name to one of your lists. (To find out how to do so, check out the “To Quick Add or to Set Up?” sidebar later in this chapter.)
Type the amount of the check.
Now comes my favorite part. I’ve always found it a big bother to write out the amount of checks. I mean, if you write a check for $12,345.67, how do you fit “twelve thousand, three hundred forty-five dollars, and sixty-seven cents” on the line? Where do you put those hyphens, anyway?
All you have to do with QuickBooks is enter the amount next to the dollar sign and press Tab. When you press Tab, QuickBooks writes the amount for you on the Dollars line. At moments like this, I’m grateful to be alive in the 21st century, when computer technology can do these marvelous things for me.
(Optional) Fill in the Address text box.
You need to fill in this field only if the address isn’t there already and if you intend to send the check by mail in a window envelope.
(Optional) Fill in the Memo line.
You can put a message to the payee on the Memo line — a message, such as Quit bleeding me dry. But you usually put an account number on the Memo line so that the payee can record your account number.
If you try to click the Save & New button and close the dialog box now, QuickBooks tells you that you can’t and tries to bite your leg off. Why? Because you can’t write a check unless you fill in the Expenses and Items tabs. You use these tabs to describe what the check pays.Move the cursor down to the Account column of the Expenses tab and then enter an expense account name.
Chances are good that you want to enter the name of an account that’s already in the Chart of Accounts list. If that’s the case, move the cursor to a field in the Account column; QuickBooks turns the field into a drop-down menu. Click the down arrow to see a list of all your accounts. You’ll probably have to scroll down to get to some accounts. Click the one that this check applies to — perhaps Rent. If you need to create a new expense account category for this check, choose Add New from the top of the menu to see the New Account dialog box. Fill in the information and then click OK.
What if the money that you’re paying with this check can be distributed across two, three, or four expense accounts? Simply click below the account that you just entered. The down arrow shoots down next to the cursor. Click the down arrow and enter another expense account, and another, and another, if you need to.
Tab over to the Amount column, if necessary, and change around the numbers.
If you’re distributing this check across more than one account, make sure that the numbers in the Amount column correctly distribute the check to the appropriate accounts. Figure 6-2 shows a completed check.
(Optional) Enter words of explanation or encouragement in the Memo column.
Someday, you may have to go back to this check and try to figure out what these expenses mean. The Memo column may be your only clue. Enter some wise words here, such as August rent, copier repair, or company party.
(Optional) Assign the expense to the Customer:Job column.
If you plan to be reimbursed for these expenses, or if you just want to track your expenses by job, enter the name of the customer who’s going to reimburse you. Click the down arrow to find the customer. Enter an amount for each customer or job if necessary. If you do assign a Customer:Job, you also have the option to bill these expenses or items being purchased to the client. To do so, click the Billable column; you should see a check mark. Next time you invoice this job, you should see the option to add these items to the invoice automatically.
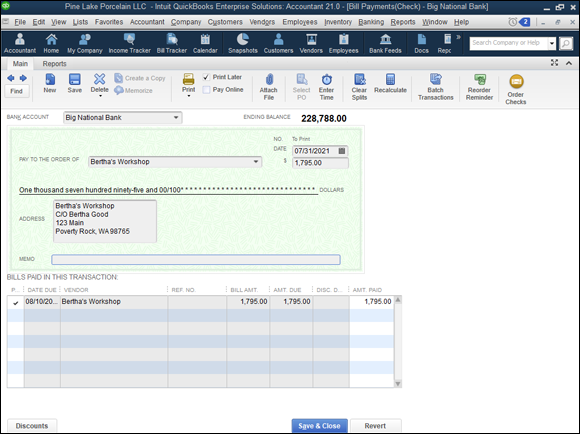
FIGURE 6-2: A completed check.
(Optional) Assign the expense to a class.
You also can track expenses by class by making entries in the Class column. Notice the usual down arrow, which you click to see a list of classes. You won’t see the Class column, however, unless you told QuickBooks that you wanted to use classes when you created your company. (You create the company when you work your way through the QuickBooks Setup process; see Chapter 2.)
If you want to have QuickBooks track expenses by class, you have to set it up to do so. To set up QuickBooks to track expenses, choose Edit ⇒ Preferences. When QuickBooks displays the Preferences dialog box, click the Accounting icon, click the Company Preferences tab, and then select the Use Class Tracking check box.Use the Items tab to record what you’re purchasing.
You may be purchasing inventory items, or you may already have filled out a purchase order for the items for which you’re paying. If either of these cases is so, click the Items tab. If you don’t have a purchase order for the items, go on to Step 14. If you do have a purchase order for the items, click the Select PO button to see a list of purchases on order with this vendor. Select those for which you’re paying, and click OK.
QuickBooks doesn’t show its purchase order (PO) feature unless you told it during QuickBooks Setup that you want to use purchase orders. If you now think you want to use them, choose Edit ⇒ Preferences. When QuickBooks displays the Preferences dialog box, click the Items & Inventory button, click the Company Preferences tab, and then select the Inventory and Purchase Orders Are Active check box.Move the cursor to the Item column, and enter a name for the item.
Notice the down arrow in this column. Click the arrow to see the Items list. Does the item that you’re paying for appear in this list? If so, click it. If not, choose Add New from the top of the list and fill out the New Item window. (Read about this in Chapter 3.)
Fill in the rest of the rows of items on the Items tab.
You can enter all the items that you’re purchasing on this tab. Make sure that the Items tab accurately shows the items that you’re purchasing, their cost, and the quantity.
When you finish adding items, you may want to use one of the following options that appear in the Write Checks window:
- Print: Click the Print button to print the check in the Write Checks window. This option doesn’t print all the checks that you’ve written and marked to be printed, however. (I explain how to print more than one check at a time in Chapter 10.)
- Clear Splits: The Clear Splits button deletes any individual amounts that you entered for separate expenses or items on the Expenses and Items tabs. Then QuickBooks enters the total amount of the check in the Amount column of the Expenses tab.
- Recalculate: The Recalculate button totals the items and expenses in the window. It also puts the total on both the numeric and text amount lines of the check.
- Print Later: The Print Later check box designates the check for printing. Select this check box if you want to print the check with QuickBooks by using your printer and preprinted check forms. Deselect this check box if you’re recording a handwritten check.
- Pay Online: The Pay Online check box (if you’ve enabled online bill pay) lets you specify that the particular check you’re describing is an online payment. See Chapter 13 for more information about online banking.
Click the Save & New button or the Save & Close button to finish writing the check.
Click Save & Close to tell QuickBooks that you want to save the check and close the check form. Click Save & New to tell QuickBooks that you want to save the check and then display another blank check form. If you don’t want to save the check, close the dialog box and then click No when QuickBooks asks whether you want to save the check.
You can also use the Next and Previous buttons to move to previously written checks or to a blank check form. If you write check number 101, for example, clicking Next takes you to check 102 so that you can write that one. (Clicking Previous moves you to check 100, in case you need to edit a check that you’ve written earlier.)
Well, that’s over with. For a minute there, I thought that it would never end.
The fast way to write checks
If you want to pay a bill that isn’t for inventory; that you won’t be reimbursed for; or that you don’t need to track in any way, shape, or form, you can write your check directly from the register. This method is the fast and easy way to go. Follow these steps:
Choose Banking ⇒ Use Register.
Alternatively, click the Register icon in the Banking section on the home page. The register appears, as shown in Figure 6-3. (If you have more than one bank account, you have to choose the proper account from the drop-down menu and click OK.) The cursor is at the end of the register, ready and waiting for you to enter check information.

FIGURE 6-3: The register.
Fill in the information for the check.
Notice that the entries you make are the same ones that you’d make on a check. You need to note three things about the register:
- If you enter a Payee name that QuickBooks doesn’t recognize, you see the Name Not Found message box, and you’re asked to give information about this new, mysterious vendor. To see what to do next, read the preceding set of instructions on writing a check the slow way.
- You have to choose an account name. Chances are good that you can find the right one on the Account drop-down menu; if you can’t, though, enter one of your own. QuickBooks displays the Account Not Found message box and asks you to fill in the information about this new account.
- To record a check that pays more than a single expense, click the Splits button (in the bottom-left corner of the window) to display a little box that you can use to input multiple expense accounts and amounts.
As you fill out the register, if you decide that you want to be reimbursed for this check or that you want to track expenses and items, click the Edit Transaction button on the ribbon. You see the Write Checks window; refer to Figure 6-1. Follow Steps 3–14 in the preceding section on how to write a check the slow way to fill in the Write Checks window. When you finish filling in the Write Checks window, click Save & Close. You’re back where you started, in the register window.
When you finish filling in the check information, click the Record button.
You click Record, of course, to record the check.
By the way, if you realize that you made a mistake and haven’t yet clicked Record to record the check, you can click the Restore button to go back to square one. Clicking Restore blanks out what you just entered so that you can start over.
If you want to print the check (or checks) that you’ve just entered, flip to Chapter 10 for details. In the meantime, in Chapter 8, I give you the lowdown on keeping your checkbook, so turn there if this discussion of checks has you really excited.
Recording Your Bills the Accounts Payable Way
The accounts payable (A/P) way of paying bills involves two steps. The first is a trifle on the difficult side, and the second step is as easy as pie. First, you record your bills. If you read the section earlier in this chapter on writing checks the slow way, you’re already familiar with using the Expenses tab and the Items tab to record bills. You need to fill out those tabs for the A/P method as well if you want to distribute a bill to accounts, customers, jobs, classes, and items. If you read the first half of this chapter, some of what follows is old hat.
After you record your bills, you can go on to the second step: telling QuickBooks which bills to pay. Then QuickBooks writes the checks. You print them. You mail them.
To make the A/P method work, you have to record your bills as they come in. That doesn’t mean that you have to pay them right away. By recording your bills, you can keep track of how much money you owe and how much money your business really has. QuickBooks reminds you when your bills are due so that you don’t have to worry about forgetting to pay a bill.
When you record bills the accounts payable way, you’re using accrual-basis accounting. I explain accrual-basis accounting in Appendix B.
Recording your bills
When a bill comes in, the first thing to do is record it. You can record bills through the Enter Bills window or the Accounts Payable register. If you plan to track bills by expense and item, you need to use the Enter Bills window. I describe that method first. If you have a simple bill to pay that doesn’t need to be reimbursed or tracked, skip ahead to the “Paying Your Bills” section later in this chapter.
To record a bill through the Enter Bills window, follow these steps:
Choose Vendors ⇒ Enter Bills.
Alternatively, click the Enter Bills icon in the Vendors area on the home page. Figure 6-4 shows the Enter Bills window. You no doubt notice that the top half of this window looks a great deal like a check, and that’s because much of the information that you put here ends up on the check that you write to pay your bill. (If you see the word Credit at the top of the form rather than Bill, select the Bill option button in the top-left corner. You also can use this screen to enter credit memos from vendors.)
Select the name of the vendor you’re paying.
If you want to pay this bill to a vendor who’s already on the Vendor list, click the down arrow at the end of the Vendor line and choose the vendor. (Then QuickBooks automatically fills the Enter Bills window with as much information as it can remember.) If this vendor is new, QuickBooks asks you to Quick Add or Set Up some information about the vendor: the address, credit limit, payment terms, and so on. You provide this information in the New Vendor window. If you aren’t familiar with this window, make a brief visit to Chapter 3.
If you have one or more unfilled purchase orders with the vendor that you select, QuickBooks asks you whether you want to receive against a purchase order. Click Yes if you do or No if you don’t. If you choose to receive against a purchase order, QuickBooks displays the Open Purchase Orders dialog box, as shown in Figure 6-5. It lists the open purchase orders you’ve recorded. When you select one or more purchase orders to receive against, QuickBooks fills in the items and amounts from these orders for you, which you can modify as necessary. When you finish with the Open Purchase Orders dialog box, click OK to get back to the Enter Bills window.
FIGURE 6-4: The Enter Bills window.

FIGURE 6-5: Paying a bill against a purchase order.
Hey, you know what? I don’t talk about purchase orders until Chapter 7. But here’s the CliffsNotes version: To create a purchase order, which is a record of items you order from vendors, choose Vendors ⇒ Create Purchase Orders. When QuickBooks displays the Create Purchase Orders window, describe your order. You print and edit purchase orders, by the way, in the same manner as you print invoices and credit memos.Select the payment terms describing when the bill is due.
On the Terms line, open the drop-down menu and choose the payment terms (if the information isn’t already there from when you set up the vendor).
(Optional) Enter the vendor’s reference number.
If you enter the vendor’s reference number for the bill — probably just the invoice number or your account number — the reference number prints on the voucher that’s part of the printed check.
(Optional) Enter a memo to describe the bill.
You can enter a note in the Memo text box. The note that you enter appears on the A/P register.
Move the cursor down to the Account column of the Expenses tab, and enter an expense account name.
Chances are good that you want to enter the name of an expense account that’s already on the chart of accounts. If that’s the case, click the down arrow to see a list of all your accounts. You probably have to scroll down the list to get to the expense accounts. (A fast way to move down the list is to start typing the account name; you go straight down the list.) Click the account that this bill represents. (Most likely, it’s Supplies or something like that.)
If you need to create a new expense account category for this bill, choose Add New from the top of the list. You see the New Account dialog box (not shown). Fill in the information, and click OK.
What if the money that you’re paying out because of this bill can be split among two, three, or four expense accounts? Simply click below the account that you just entered. The down arrow appears. Click it to enter another expense account, and another, and another if you need to.
Tab over to the Amount column, if necessary, and change the numbers.
If you’re splitting this bill among several accounts, make sure that the numbers in the Amount column add to the total of the bill.
- (Optional) Enter words of explanation or wisdom in the Memo column.
(Optional) Assign the expense to a Customer:Job.
If you plan to be reimbursed for these expenses, or if you just want to track your expenses by job, enter the customer who’s going to reimburse you. Enter an amount for each account if necessary. You can use the down arrow to find customers and then click them. If you do assign a Customer:Job, you also have the option to bill these expenses or items being purchased to the client. To do so, click the Billable column; you should see a check mark now. Next time you invoice this job, you should see the option to add these items to the invoice automatically.
(Optional) Assign the expense to a class.
You also can track expenses by class by making entries in the Class column. Notice the usual down arrow, and click it to see a list of classes. (You don’t see a Class column unless you told QuickBooks that you want to use classes.)
If you want to have QuickBooks track expenses by class, you can set it up to do so. To set up QuickBooks to track expenses, choose Edit ⇒ Preferences. When QuickBooks displays the Preferences dialog box, click the Accounting icon, click the Company Preferences tab, and then select the Use Class Tracking check box.
If you want, click the Recalculate button to total the expenses.
Use the Items tab to record the various items that the bill represents.
Click the Items tab. Enter the items you purchased and the prices you paid for them.
If you realize after partially completing the bill that the bill does indeed pay a purchase order, click the Select PO button, which appears on the main ribbon of the Enter Bills window.From the Vendor drop-down menu, choose the name of the vendor who sent you the bill. In the list of open purchase orders, click the column on the left to put a check mark next to the purchase order (or orders) for which you’re paying. Easy enough? Click OK when you’re done; QuickBooks fills out the Items tab for you automatically.
Move to the Item column, and enter a name for the item.
Notice the down arrow in this column. Click it to see the Item list. Does the item that you’re paying for appear on this list? If so, click that item. If not, choose Add New from the top of the list and fill out the New Item window. (See Chapter 3.)
Fill in the rest of the rows of items on the Items tab.
You can enter all the items you’re purchasing here. Make sure that the Items tab accurately shows the items that you’re purchasing, their costs, and their quantities. If you want to, click the Recalculate button to total the items.
Save the bill.
Click Save & New to save your record of the bill and then enter another bill. Or click Save & Close to record your bill but not enter another bill.
Just as in the case with customer-related windows (such as the Create Invoices window), QuickBooks displays historical information about a vendor in the right sidebar. You can toggle between the Vendor and Transactions, run quick reports, and quickly link to previous or outstanding bills, invoices, and other notes on a client you do business with.
Entering your bills the fast way
You also can enter bills directly in the Accounts Payable register. This method is faster, but it makes tracking expenses and items more difficult.
If you want to enter bills directly in the Accounts Payable register, follow these steps:
Choose Lists ⇒ Chart of Accounts or click the Chart of Accounts icon on the home page.
The Chart of Accounts opens.
Open the Accounts Payable account.
When QuickBooks displays your Chart of Accounts, double-click the Accounts Payable account in the list. You see the Accounts Payable register window, as shown in Figure 6-6. The cursor is at the end of the register, ready and waiting for you to enter the next bill.

FIGURE 6-6: The Accounts Payable register window.
Fill in the information for your bill.
Enter the same information that you would if you were filling in the Enter Bills window, which I describe at the beginning of this chapter. In the Vendor text box, click the down arrow and choose a name from the Vendor drop-down menu.
If you enter a vendor name that QuickBooks doesn’t recognize, you see the Vendor Not Found message box, and QuickBooks asks you to give information about this new, mysterious vendor. Click Quick Add to have the program collect the information from the register as you fill it out, or click Set Up to see the New Vendor dialog box. (I describe the choice between Quick Add and Set Up in the “To Quick Add or to Set Up?” sidebar earlier in this chapter. I explain how to set up new vendors in Chapter 3.)
You have to select an account name. You can probably find the right one in the Account drop-down menu; if you can’t, enter one of your own. You see the Account Not Found message box, and QuickBooks asks you to fill in information about this new account.
If you decide while you fill out the register that you want to be reimbursed for this check or that you want to track expenses and items, click the Edit Transaction button to see the Enter Bills window. (Refer to Figure 6-4.) Follow Steps 2–12 in the “Recording your bills” section (earlier in this chapter) to fill in the Enter Bills window. When you finish filling in the window, click Save & New. You’re back where you started: in the Accounts Payable window.
See the Splits button? This Splits button works the same as the Splits button in the bank account register window. When you click Splits, QuickBooks provides additional rows for inputting expense and class information.When you fill in all the information, click Record.
The Restore button, located just right of Record, is there in case you fill out the register but decide that you want to start all over again before you’ve recorded the transaction. Click Restore to clear the information onscreen, and you have a clean slate.
Deleting a bill
Suppose that you accidentally enter the same bill twice or enter a bill that was really meant for the business next door. (Just because you’re tracking bills by computer doesn’t mean that you don’t have to look things over carefully anymore.) Here’s how to delete a bill that you entered in the Accounts Payable register:
Locate the bill in the Accounts Payable register by using one of the following methods:
- If you know roughly what day you entered the bill, you can scroll through the list to find it. The entries are listed in date order. (Select the 1-Line check box to display each bill on one line rather than on two lines to make the scrolling go faster.)
- If you don’t remember the date, choose Edit ⇒ Find.
And now, back to the Accounts Payable register window that you have in progress …
- Select the bill that you want to delete by clicking anywhere in the bill.
Choose Edit ⇒ Delete Bill.
QuickBooks confirms that you really, truly want to delete the transaction. If you click OK, QuickBooks dutifully deletes the bill from the A/P register.
Remind me to pay that bill, will you?
You could tie a string around your finger, but the best way to make sure that you pay your bills on time is to have QuickBooks remind you. In fact, you can make the Reminders message box the first thing that you see when you start QuickBooks.
To adjust the QuickBooks reminder options, you must be logged on as the administrator in single-user mode. Then choose Edit ⇒ Preferences. When QuickBooks displays the Preferences dialog box, click the Reminders icon in the list on the left and then click the Company Preferences tab to access the dialog box shown in Figure 6-7.
FIGURE 6-7: The Reminders section of the Preferences dialog box.
Make sure that either the Show Summary or Show List option button is selected (you can’t choose Don’t Remind Me and expect to get a reminder) and then give yourself several days’ notice before you need to pay bills by typing a number (10 is the default and usually works well) in the Days Before Due Date text box, located in the Remind Me column.
If you select the Show Summary option (the first button to the right of the option), you get a summary of the bills that you owe each time you start QuickBooks. If you select Show List (the second button to the right of the option), you get the details about each bill.
You may want to review the Reminders window when you start QuickBooks or open a new company file. The window lists reminders (such as forms you need to print and payments you need to transmit) and tells you which unpaid bills you’re supposed to pay. You can see this list by choosing Company ⇒ Reminders. Note that you can also tell QuickBooks to display any reminders when opening the company file. To do this, choose the Edit ⇒ Preferences command, click Reminders, click My Preferences, and then select the check box titled Show Reminders List When Opening a Company File.
Paying Your Bills
If you’ve done everything right and recorded your bills correctly, writing checks is a snap. Just follow these steps:
Choose Vendors ⇒ Pay Bills.
Alternatively, click the Pay Bills icon located on the home page. You see the Pay Bills window, as shown in Figure 6-8.

FIGURE 6-8: The Pay Bills window.
Change the Payment Date (at the bottom) to the date that you want to appear on the checks.
By default, this field shows today’s date. If you want another date on the payment check — perhaps you’re postdating the check — change this date. (See the online Cheat Sheet at
https://www.dummies.comfor some secret date-editing codes.)Set a cutoff date for showing bills.
In the Show Bills Due On or Before date field, tell QuickBooks which bills to show by entering a date. If you want to see all the bills, select the Show All Bills option button.
Use the Sort By drop-down menu to tell QuickBooks how to sort the bills.
You can arrange bills by due date with the oldest bills listed first, arrange them alphabetically by vendor, or arrange them from largest to smallest.
Identify which bills to pay.
If you want to pay all the bills in the dialog box, click the Select All Bills button. If you want to clear all the bills you marked, click the Clear Selections button. If you want to pick and choose, click to the left of the bill’s due date to pay the bill. A check mark appears where you click. Note that after you apply a payment, the Clear Selections button replaces the Select All Bills button.
Change the Amt. to Pay figure if you want to pay only part of a bill.
That’s right — you can pay only part of a bill by changing the number in the Amt. to Pay column. (The payee can always just send you another bill, of course.)
Get the early-payment discount rate on your bills, if any.
You may be eligible for an early-payment discount on some bills. To find out how much of a discount you get, click the Amt. to Pay field and then click the Set Discount button to see the Discount tab of the Discount and Credits dialog box. Use the Discount tab’s Amount of Discount box to give the dollar amount of the discount. Use the Discount tab’s Discount Account box to specify which account should be used for recording the money saved through the discount.
Get a list of credit memos that you can apply to the payment.
Click the Set Credits button to see the Credits tab of the Discount and Credits dialog box. If you want to use one of the credits listed to reduce the amount of the bill, click it and then click Done.
Select a payment date, method, and bank account.
Use the Payment area’s Date field to specify when the bill should be paid, the Method drop-down menu to select the payment method you want to use (Check or Credit Card), and the Account drop-down menu to select the bank account from which payment will be made. (Note: If you’ve subscribed to and set up the QuickBooks online bill payment feature, you have another payment method choice: online payment. I describe making online payments in Chapter 13.)
If you plan to print the check, select the To Be Printed option button.
Many businesses use QuickBooks to keep track of checks, but instead of printing the checks, they have employees write them by hand. If your business uses this method, select the Assign Check Number option button. Then, when QuickBooks asks how it should number the check, give the number by typing it in the appropriate box or tell QuickBooks to number the check automatically.
Click the Pay Selected Bills button to pay the bills.
QuickBooks displays a Payment Summary dialog box (not shown) that lists the bills you’ve paid and tallies the payments. You can click the Payment Summary’s Pay More Bills button to return to the Pay Bills window and select other bills for payment. Or you can click the Payment Summary’s Print Checks button to take the next bill payment step: printing checks to pay the bills. If you do click Print Checks, QuickBooks steps you through the process for printing checks. (I’m not going to describe how to print checks here. Chapter 10 goes into great detail about this activity.)
One other little bit of accounting trivia: When you do pay a bill, QuickBooks goes into the Accounts Payable register and notes that you paid these bills; then it goes into the register and “writes” the check or checks. Figures 6-9 and 6-10 show you exactly what I mean. (The two figures show a $1,795 bill from Bertha’s Workshop being paid.)

FIGURE 6-9: How a paid bill looks in the Accounts Payable register (oooh – cool).
QuickBooks shows the original bill amount as the amount that’s paid, not the original bill amount minus the early-payment discount. It needs to use this method to completely pay off the bill.
In the Accounts Payable register, you see BILLPMT in the Type column and Paid in the due date column. The Billed columns are now empty.
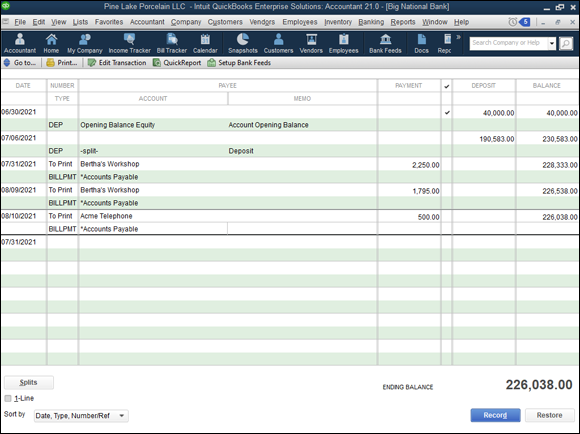
FIGURE 6-10: How the check that pays a bill looks in the Big National Bank account register.
In the bank account register, you again see BILLPMT in the Type column.
Don’t kid yourself, though — these bills aren’t really paid yet. Sure, they’re paid in the mind of QuickBooks, but the mind of QuickBooks extends only as far as the metal (or trendy plastic) box that holds your computer. You still have to write or print the checks and deliver them to the payees.
If you’re going to write the checks by hand, enter the check numbers from your own checkbook in the QuickBooks register Number column. You want these numbers to jibe, not jive. (I know: A pun is the lowest form of humor.)
If you plan to print the checks, see Chapter 10.
And another thing: If you enter a bill, you absolutely must use the Pay Bills command to record the payment that pays off the bill. If you don’t do this, the unpaid bill sits there forever, lonely and forlorn.
Tracking Vehicle Mileage
QuickBooks includes a vehicle mileage-tracking feature that lets you track your business miles. To track vehicle mileage in QuickBooks, choose Company ⇒ Enter Vehicle Mileage. Then, in the Enter Vehicle Mileage dialog box that appears, record the vehicle, date, miles driven, odometer settings, and reason for the trip. (I talk a bit more about tracking vehicle mileage in Chapter 18, so check that out if this is something you’re really interested in.)
May I briefly tell you the IRS rules for deducting business miles? Essentially, you have two approaches to choose between. The easier method — and the one that I use, because I’m lazy — is to record as a business expense an amount per business mile driven. The rate per mile is roughly 60 cents, which is far less than the actual cost of driving most cars. But, hey — that’s the price of slothfulness.
The hard method for tracking business miles is to track all your vehicle expenses — including gas, oil, repairs, insurance, and vehicle depreciation — and then record as a business expense the business-use portion of these expenses.
To get the business-use portion of your vehicle, use the ratio of business miles to total miles. If during the year, you drive 6,000 business miles and your total miles are 12,000, your business-use percentage equals 50 percent. In this case, you can record as a business expense 50 percent of your vehicle expenses.
Usually with the hard “actual expenses” method, you get a higher business vehicle expense deduction. Note, however, that the IRS limits the amount you can include as vehicle depreciation, so you don’t get as high a deduction as you may at first think. (You may want to consult your tax adviser for details.)
No matter which method you use, you want a record of your actual business miles, which the Enter Vehicle Mileage command enables you to do. By law, you need a good record of business mileage to legitimately claim the deduction.
Paying Sales Tax
To ingratiate itself with your retailers, QuickBooks includes a special dialog box for paying sales tax. To use this dialog box, you must have sales tax items or a sales tax group already set up. See Chapter 3 for a thorough explanation of items and groups.
To see how much sales tax you owe and to write checks to government agencies in one fell swoop, choose Vendors ⇒ Sales Tax ⇒ Pay Sales Tax to access the Pay Sales Tax dialog box, as shown in Figure 6-11. Alternatively, click the Pay Sales Tax icon on the home page in the Vendors area.

FIGURE 6-11: The Pay Sales Tax dialog box.
This dialog box is similar to the Pay Bills window (refer to Figure 6-8). The buttons basically work the same way.
Click in the Pay column to add check marks next to all the items that you want to pay. QuickBooks automatically writes checks in the register. Your payments are likewise recorded in the Sales Tax Payable register.
Are you an online retailer or a bricks-and-mortar retailer who does a healthy website business? If so, you probably want to get more disciplined about the way you handle your sales tax accounting. Here’s why. Although the U.S. Congress has cooled to the idea of changing the federal laws that prevent other states from making you collect and remit sales taxes, state revenue agencies are getting more and more aggressive about asserting that online retailers have liability for sales taxes on sales to customers within their borders if the retailer has any connection to the state. Accordingly, even fairly modest retail operations may in the future find themselves preparing three or four dozen sales tax returns each month to report online sales made to customers outside a home state. If this occurs in your business, you’ll definitely want to be using QuickBooks to automate and ease the work of sales tax accounting.