
3 |
The QuickTime Player and Plug-in |
“The QuickTime team came up with a revolutionary notion—the ability to capture video in real time using inexpensive video-capture hardware and edit it right on the Macintosh. It brought the power of movie creation to the masses.”
—Dawn C. Chmielewski3
QuickTime has two primary playing components: the QuickTime Player and the QuickTime Plug-in (in addition, an ActiveX component comes into play for Internet Explorer 5.5 and above on the Windows platform; see Chapter 8 for more details). These components are placed on your hard drive at the time of installation. The QuickTime Plug-in will install itself automatically into any browser you have installed, such as Internet Explorer or Netscape Navigator. The Player is a stand-alone application that plays movies by itself without the aid of a browser. The plug-in, on the other hand, plays content through your browser but it is not essential for playing content on the Web; the Player itself will also play content from the Web. The Player has many more functions, however, and you can even go to QuickTime content on the Web and play media through the Player alone.
You can do many of the same things with the QuickTime Plug-in as you can with the Player. For example if you have your browser open, you can simply drag a QuickTime movie or other compatible media file to the browser window and the QuickTime window will open.
The QuickTime Controller Bar
You will find the QuickTime controls in the Controller bar (Figure 3.1). Among these controls are the “Time Line Slider,” the “Play” button, the “Step Forward,” “Step Reverse,” “Audio Level,” and the “Info” buttons. When you press “Play,” the movie plays forward at normal speed whereas the button itself becomes a “Pause” button that will stop the movie at that point, without resetting it to the beginning. If you double-click anywhere in the movie window, the movie will also play; a single-click in the window will pause the movie. Other ways to start and stop the movie are:
![]() Hitting the “Return” (Mac) or “Enter” (Windows) key.
Hitting the “Return” (Mac) or “Enter” (Windows) key.

Figure 3.1 The QuickTime Plug-In controller bar.
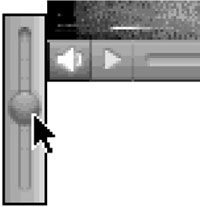
Figure 3.2 Control sound levels by clicking your pointer on the speaker icon.
![]() Holding down the “Control” key (Windows) or the “Command” key (Mac) while pressing the right arrow key to start the movie; conversely, you may reverse the film by Control-clicking (or Command-clicking) the left arrow key; hit “Enter” (Windows) or “Return” (Mac) to stop.
Holding down the “Control” key (Windows) or the “Command” key (Mac) while pressing the right arrow key to start the movie; conversely, you may reverse the film by Control-clicking (or Command-clicking) the left arrow key; hit “Enter” (Windows) or “Return” (Mac) to stop.
The “Step Forward” and “Step Back” buttons allow you to advance or reverse the movie one frame at a time. You can also go straight to the end of the movie by pressing “Alt/Option” simultaneously with the right arrow key. You can go directly to the start of the movie by pressing “Alt/Option” and the left arrow key.
Controlling sound in the QuickTime Plug-in and Player
It is safe to say that sound is half of film and video, and it plays a large role in QuickTime as well. You can control sound levels with the speaker icon button in the far left-hand corner of the control bar (Figure 3.2). Hold down the “Option” key (Mac) or the “Control” and “Alt” keys (Windows) while clicking the speaker icon; you will see that the icon changes to reflect a mute speaker, with no “waves” emitting forth. You can reverse this by repeating the same step, and the sound returns. When you click and hold on the speaker icon, a pop-up menu emerges to show a sound volume level slider where you can adjust the sound level.
Master volume control
The Plug-in offers a feature that the Player lacks: if you hold the “Shift” key and click and hold the “Speaker” button, you will see a slider appear etched with hash marks at approximately the one-third and the two-thirds positions. This feature acts as a kind of master volume slider, where the one-third position represents 100% of the potential audio level and the two-thirds marking denotes 200% of the normal volume. These indications give a rough idea of when you may be overdriving the sound and might hear distortion and noise. Rather than using this as a method of gaining the maximum volume level, you would be better off adjusting this master level at the speaker volume knobs of the computer or amplifier. This feature may be useful, however, to laptop users who do not normally have the luxury of external speakers.
Speed control slider
The elegance of the QuickTime Controller owes much to the clean interface that appears to offer only the most basic features but actually hides many more controls that reveal themselves with various keyboard commands. Such is the case with the variable speed control slider that lets you slow down or speed up the playing of both the visual and audio information of a movie.
The variable speed controller appears when you hold the “Control” (Mac) or “Alt” (Windows) keys and click and hold your pointer on the control bar between the step forward and step back. You will see and hear your movie play at 2![]() times the normal speed when you push this slider to the extreme right, while you can play the movie in reverse at the same 250%. This slider lets you scrub or shuttle through a movie or simply watch in fast or slow motion, forward or reverse.
times the normal speed when you push this slider to the extreme right, while you can play the movie in reverse at the same 250%. This slider lets you scrub or shuttle through a movie or simply watch in fast or slow motion, forward or reverse.
QuickTime chapters
QuickTime movies can contain chapter names that reveal themselves to the user as the movie plays. If the QuickTime movie has been designed with chapters, you will see chapter names appear and change in a space between the time line slider and the step buttons. Further, if you click and hold on the chapter name showing, you will bring up a pop-up list showing all the chapters available. This feature also lets you select any chapter showing in the list and the movie will go to that chapter. This is a convenient way to allow the user to go directly to preselected points in the movie.
Saving QuickTime movies
You can save many of the QuickTime movies that you see on the Web if you click and hold on the small triangular arrow button located on the far-right side of the controller of the movie you wish to keep. While holding on the button, you will see a pop-up menu (Figure 3.3) displaying a list of options. You can either “Save as Source” or “Save as Movie.” You will want to choose the latter option to get the complete self-contained movie. A familiar dialog box will appear asking you to name and choose a folder you wish to save the movie in. Please note that the “Save” option shows up only when the movie has finished downloading. You can see its progress as a dark line that extends along the time line slider as the movie downloads; when the dark line reaches the end of the timeline, the movie has downloaded completely.
Keep in mind that you will find movies on the Web that will not allow you to save them; in this case you will see the “Save” options appear to be grayed out. This is due to the fact that some content providers disable this ability to deter users from keeping copies of their movies. You can also disable the saving properties in your own movies that you put on the Web. Just be aware that many individuals are clever enough to know how to circumvent this safeguard by snatching the movies out of the browser cache that temporarily stores files on the hard drives of their computers.
The QuickTime Player
The QuickTime Player shares many features with the Plug-in. You will soon see, however, that the wealth of features to be found in the menu bar really sets the Player apart. And with QuickTime, as with so many other applications, the “Shift,” “Alt/Option,” and “Control/Command” keys may be used in unison to perform numerous tasks.
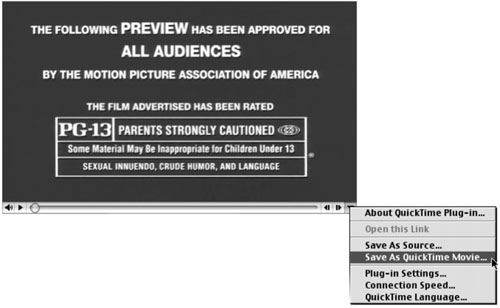
Figure 3.3 You can save QuickTime movies by going to the “QuickTime Options” menu.
Setting your QuickTime preferences
You will want to set your QuickTime preferences before you get too far into exploring some of the QuickTime Player’s features and functions. In Windows and Mac OS 9, you will find the preferences in the menu bar under “Edit/Preferences/Player Preferences” in the form of a flyout menu. Mac OS X users will want to go to the menu bar under “QuickTime Player/Preferences/Player Preferences.”
Note the four categories in the dialog box: “Movies,” “Sound,” “Favorites,” and “Hot Picks,” with options to check boxes:
Movies
![]() Automatically play movies when opened. When this box is checked, any movie will automatically begin playing as soon as it is opened. Generally, this box will be unchecked by default.
Automatically play movies when opened. When this box is checked, any movie will automatically begin playing as soon as it is opened. Generally, this box will be unchecked by default.
![]() Open movies in new player. When this box is unchecked, a newly opened movie will take the place of any movie currently open on the desktop. To allow multiple movies to open on the desktop, make sure this box is unchecked.
Open movies in new player. When this box is unchecked, a newly opened movie will take the place of any movie currently open on the desktop. To allow multiple movies to open on the desktop, make sure this box is unchecked.
Sound
![]() Play sound in background. This allows you to hear the audio of a movie even when it plays behind other applications. This is useful, for instance, when you want to hear MP3 files playing while you work with other programs.
Play sound in background. This allows you to hear the audio of a movie even when it plays behind other applications. This is useful, for instance, when you want to hear MP3 files playing while you work with other programs.
![]() Only front movie plays sound. You may wish to leave this checked if you do not want to hear the sound from several movies you have playing commingle and create a cacophony. If you wish to hear all movies playing, however, go ahead and uncheck this box.
Only front movie plays sound. You may wish to leave this checked if you do not want to hear the sound from several movies you have playing commingle and create a cacophony. If you wish to hear all movies playing, however, go ahead and uncheck this box.
Favorites
![]() Ask before replacing favorites. This is simply a safeguard to prevent you from losing any favorites you have selected.
Ask before replacing favorites. This is simply a safeguard to prevent you from losing any favorites you have selected.
Hot picks
![]() Show “Hot Picks” movie automatically. When this box is checked, a movie from QuickTime’s selected “Hot Picks” will play when the Player is opened.
Show “Hot Picks” movie automatically. When this box is checked, a movie from QuickTime’s selected “Hot Picks” will play when the Player is opened.
An easy way to open mov files you have on your hard drive or removable media is simply to click on the file and the movie will open in QuickTime. You can also go to the menu bar, to “File/Open Movie in New Player,” and browse for the file in the dialog box that appears. Alternately, you can “Command/Control + O” to bring up the same dialog box.
The Player has three large round buttons flanked by two smaller round buttons to perform the following functions:
![]() “Play/Pause” (center button). This lets you stop or start the movie.
“Play/Pause” (center button). This lets you stop or start the movie.
![]() “Fast Forward” and “Rewind” (two large buttons flanking the “Play/Pause”). These let you zip through the movie forward or backward at 2
“Fast Forward” and “Rewind” (two large buttons flanking the “Play/Pause”). These let you zip through the movie forward or backward at 2![]() times the normal rate as long as you press the button.
times the normal rate as long as you press the button.
![]() “Go to End” and “Go to Start” (the smallest buttons flanking the larger three). Pressing these will take you to the end or the beginning of the movie. These are not the step buttons you find in the Plug-in; when you want to step by single frames, you can hit the arrow keys: right arrow for step forward and left arrow for step in reverse.
“Go to End” and “Go to Start” (the smallest buttons flanking the larger three). Pressing these will take you to the end or the beginning of the movie. These are not the step buttons you find in the Plug-in; when you want to step by single frames, you can hit the arrow keys: right arrow for step forward and left arrow for step in reverse.
Playback options with the QuickTime Player
You can set a number of options regarding the playback of a QuickTime movie. You will find them by going to the “Menu” bar, under “Movie”:
![]() “Loop.” This allows you to play the movie as an “endless” loop, constantly repeating itself from beginning to end. (“Control/Command + L”)
“Loop.” This allows you to play the movie as an “endless” loop, constantly repeating itself from beginning to end. (“Control/Command + L”)
![]() “Loop Back and Forth.” This is an odd variation on the loop, playing the movie from start to finish, finish to start, over and over again. This is also known as palindrome mode, named after the special words that read the same forward and backward, such as “kayak.”
“Loop Back and Forth.” This is an odd variation on the loop, playing the movie from start to finish, finish to start, over and over again. This is also known as palindrome mode, named after the special words that read the same forward and backward, such as “kayak.”
![]() “Half Size.” This shrinks the Player window to one half the original saved window size of the movie. (“Control/Command + 0”)
“Half Size.” This shrinks the Player window to one half the original saved window size of the movie. (“Control/Command + 0”)
![]() “Normal Size.” Plays the movie at its intended window size. (“Control/Command + 1”)
“Normal Size.” Plays the movie at its intended window size. (“Control/Command + 1”)
![]() “Double Size.” This allows the movie to play at twice its normal size. It does this by doubling the pixels of the movie, and in some cases interpolating or creating pixels to make the movie play at a bigger screen size. This has the unwanted effect and grain as well as the picture. (“Control/Command + 2”)
“Double Size.” This allows the movie to play at twice its normal size. It does this by doubling the pixels of the movie, and in some cases interpolating or creating pixels to make the movie play at a bigger screen size. This has the unwanted effect and grain as well as the picture. (“Control/Command + 2”)
Note: You can resize a movie by clicking the lower right-hand corner of the Player and dragging up or down (Figure 3.4); you cannot change the proportions of the frame—the movie’s original aspect ratio will remain constant. If you want the movie to play in a “long and squashed” or “tall and skinny” aspect ratio, drag the lower right-hand corner of the Player frame while holding down the “Alt/Option” key. If you want to play the movie at one of several predetermined optimum sizes (with original aspect ratio intact), then press the “Shift” key while dragging the corner of the Player. These optimal sizes use central processing unit (CPU) power most efficiently.
![]() “Full Screen.” Allows the movie to play using the entire computer screen. This is a useful option when you want to show a movie without the distractions of background clutter. (“Control/Command + F”)
“Full Screen.” Allows the movie to play using the entire computer screen. This is a useful option when you want to show a movie without the distractions of background clutter. (“Control/Command + F”)
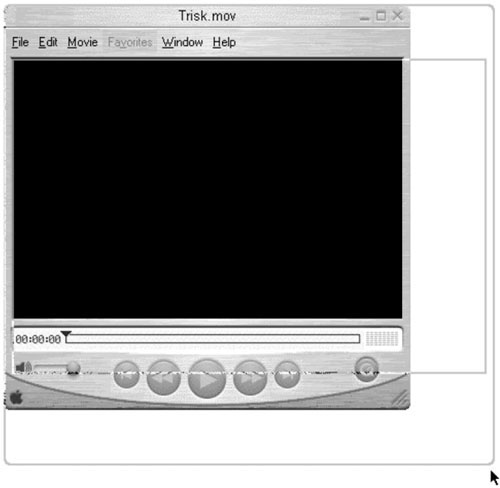
Figure 3.4 You can resize a movie by clicking the lower right-hand corner of the Player and dragging up or down; you cannot change the proportions of the frame—the movie’s original aspect ratio will remain constant.
![]() “Present Movie.” This option brings up a dialog box that allows you to set a movie size (as previously stated), lets you play it as a movie or a slide show (frame by frame), and gives you a schematic of the screen configuration and the position of the movie within the screen. When the “Present Movie” option is selected, a neutral gray or black background appears on the screen for the movie to play in, a handy feature when you want to present it before an audience. When “Present Movie” is selected as the play option, keyboard commands such as step forward and reverse are temporarily deactivated; to return to the desktop, press the “Escape” key. (“Command/Control + M”)
“Present Movie.” This option brings up a dialog box that allows you to set a movie size (as previously stated), lets you play it as a movie or a slide show (frame by frame), and gives you a schematic of the screen configuration and the position of the movie within the screen. When the “Present Movie” option is selected, a neutral gray or black background appears on the screen for the movie to play in, a handy feature when you want to present it before an audience. When “Present Movie” is selected as the play option, keyboard commands such as step forward and reverse are temporarily deactivated; to return to the desktop, press the “Escape” key. (“Command/Control + M”)
![]() “Show Sound Controls.” When this option is selected, basic equalization controls will appear in place of the progress slider. These controls allow adjustments to speaker balance (left and right), bass, and treble.
“Show Sound Controls.” When this option is selected, basic equalization controls will appear in place of the progress slider. These controls allow adjustments to speaker balance (left and right), bass, and treble.
![]() “Show (Hide) Video Controls.” When this option is selected, an adjustment panel will appear in the movie frame to facilitate a number of adjustments to color, brightness, contrast, and tint. Only one adjustment is allowed at a time, but you may shuttle through the four adjustment states by clicking on the “Up” or “Down” arrow icons in the adjustment bar directly to the right of the category title (color, brightness, and so on) or by simply using the “Up” and “Down” arrow keys on your keyboard. You can make each of these four adjustments by clicking and dragging on the small division between the wide and narrow striped bars (Figure 3.5), or by using the left and right arrow keys. (“Control/Command + K”)
“Show (Hide) Video Controls.” When this option is selected, an adjustment panel will appear in the movie frame to facilitate a number of adjustments to color, brightness, contrast, and tint. Only one adjustment is allowed at a time, but you may shuttle through the four adjustment states by clicking on the “Up” or “Down” arrow icons in the adjustment bar directly to the right of the category title (color, brightness, and so on) or by simply using the “Up” and “Down” arrow keys on your keyboard. You can make each of these four adjustments by clicking and dragging on the small division between the wide and narrow striped bars (Figure 3.5), or by using the left and right arrow keys. (“Control/Command + K”)
![]() “Get Movie Properties.” This option brings up a dialog box allowing you to see and set the movie’s various properties. We will cover this feature in greater detail in later chapters.
“Get Movie Properties.” This option brings up a dialog box allowing you to see and set the movie’s various properties. We will cover this feature in greater detail in later chapters.
![]() “Play All Frames.” When you are using a slow computer, you may experience dropped frames. The “Play All Frames” option lets you play each frame, but because the playback may slow down to accommodate this with a slow computer or slow connection, you will not hear the sound track.
“Play All Frames.” When you are using a slow computer, you may experience dropped frames. The “Play All Frames” option lets you play each frame, but because the playback may slow down to accommodate this with a slow computer or slow connection, you will not hear the sound track.
Adjusting sound on the Player
There are several ways you can adjust sound quality and amplitude:
Volume controls
You can make simple sound-level adjustments by grabbing the small round knob on the volume slider and dragging to the right (louder) or left (softer), though it may be even easier to use the “Up” and “Down” arrow keys for the same thing. You can make a clip play silently if you hold the “Control” (Mac) or “Alt” (Windows) keys while clicking the “Play” button. Curiously, you can save any balance and volume settings you wish, but not bass or treble, which will return to their original defaults when a new copy of the movie is opened.

Figure 3.5 When the “Show (Hide) Video Controls” option is selected, an adjustment panel will appear in the movie frame to facilitate a number of adjustments to color, brightness, contrast, and tint.
Tone controls
You can reveal tone and balance controls if you go the menu bar and select “Movie/Show Sound Controls.” After this option is selected, basic equalization controls will appear in place of the progress slider. These controls allow adjustments to speaker balance (left and right), bass, and treble.