
5 |
A Filmmaker’s Guide to Compression |
“Everybody says, ‘If you just gave me the settings you used for Star Wars, then I’d be set.’ Well, unfortunately, that setting worked for that clip, but I didn’t even use the same settings for another clip they sent me two weeks later…”
—Doug Werner5
You have a completed film, and it is time to deliver it to your audience. Although theatrical exhibition is still the ultimate goal of most filmmakers, it remains one of the most elusive goals for many independents. CD and DVD distribution are a more realistic alternative for most, though cost factors may still loom large for reaching the potential of sizable audiences. Thus, Web delivery has emerged as one of the best ways to reach large audiences at little cost. Web exhibition is not the ideal medium, however, for several reasons. Bandwidth still dictates small files, often at less-than-ideal frame rates. A computer screen is not the first choice of exhibition venues for most filmmakers. And, like it or not, downloaded movies often become the property of the user. Thus, it may be appropriate to reevaluate the function of the QuickTime movie on the Web. A good example of QuickTime being perfectly suited to distribution is the movie trailer. In most cases, these are advertisements for full-length films that film distributors hope users will copy and replay and even send to friends. In this case, the QuickTime movie is just a part of a film’s overall promotion.
Depending on which avenue of delivery you wish to pursue with your QuickTime movie, you must compress the movie in order to squeeze it through the narrow pipe of the Internet. And whereas disc delivery such as CD-ROMs and hard drives require much less compression for playback, they still require that you apply moderate compression to ensure trouble-free playback. Compressing a movie encompasses choosing the physical frame dimensions, the frame rate, and the mode of compression. And some compression schemes let you pick target data rate, color depth, image quality, and number of key frames. Whatever is compressed must be expanded, or decompressed, once again in order for the user to read or play that file. Hence, we must use a specific COmpressor/DECompressor, or codec, designed for the route of delivery we will use to distribute our movie, whether via CD, DVD, or the Web.
Many professionals use specialized software such as discreet cleaner to compress batches of video. You can, however, do a respectable job of compressing using the QuickTime Pro Player itself, simply by choosing “Export” from the “File” menu, and then selecting “Movie to QuickTime Movie” from the pop-up menu. In this menu, click the “Options” button to bring up a list of compressors and choose your codec.
QuickTime has often been described as a Swiss army knife of compression features, many of which go unused but add to the overall versatility and attractiveness of the package. Thus, whereas the vast majority of codecs QuickTime offers for encoding and decoding may not all prove indispensable to the filmmaker/videographer, they nonetheless increase the versatility of the QuickTime architecture.
Compressing Time-based Video and Audio
If picture files tend to be large, moving picture files tend to be gargantuan in size, consuming lots of bandwidth. Full-screen 30-fps NTSC video chews through about 30MB/second, which far exceeds the capacity of network lines and hard-drive delivery speeds. Thus, all video must be compressed, and the rate and mode of compression is largely dictated by the delivery mode you wish to use. There are codecs designed especially for video, audio, and different types of still image files. There are codecs optimized for Web and CD delivery. Most codecs compress files by discarding information considered superfluous or imperceptible to most people, and these are referred to as “lossy.” There also exist a small number of “loss-less” codecs that do not discard file information; most of these are limited in their compression abilities, however, and do not provide files small enough for Web deployment.
QuickTime allows the use of a multitude of different codecs all designed for specific uses that allow for great versatility in choosing and honing a compression method for a specific application. Indeed, the uninitiated filmmaker can be confused by the vast array of codecs available, most of which are for very limited use only. Thankfully, you can accomplish most common compression and deployment tasks with the use of a few select codecs. The number of applications that provide compression tools vary in sophistication, from Apple’s basic QuickTime Pro, to nonlinear editing applications such as Final Cut Pro and Adobe Premiere, to other specialized programs such as Totally Hip’s HipFlics, Sorenson Squeeze, and discreet cleaner.
Although it is often a good idea to encode video/audio files within their native QuickTime .mov format, it may be wise to encode in a different format depending on the movie’s deployment. For example, although the MPEG-4 standard has been touted as a scalable, versatile protocol for presenting and storing media for the Internet, you may also want to encode your files in a format such as Kinoma movie for the Palm OS to gain maximum exposure. Below is a discussion of the various types of standards that QuickTime supports.
The MPEG Codecs
The Motion Picture Experts Group (MPEG) protocols—MPEG-1, MPEG-2, and MPEG-4—were developed as standards for disc and Internet digital media. MPEG, which unveiled its first eponymous codec for compressed digital video in 1991, has been around as long as QuickTime. The codec found widespread use in CD-ROM multimedia and video CDs. The video CD format made a big splash in Asia, where it became an alternative to VHS for marketing cheap copies of feature films (and, in fact, fueled a wave of bootlegged movies there). MPEG-1 never caught on in the United States as a feature film distribution format but found use as a video format for CD-ROM multimedia content and Web-based files in the mid-1990s. QuickTime supported the MPEG-1 format early on.
MPEG-1 video compression works by essentially removing the spatial redundancy—referring to portions of video frames of a given scene or shot often repeated—within a video frame (much like JPEG), and reducing the amount of temporal redundancy—the similarity of picture detail within a sequence of frames—between video frames. Temporal redundancy occurs when successive frames of a video sequence exhibit nearly identical images of a common scene, as with the static backdrop of a talking head subject. The system works on the principle that images in a video sequence do not change dramatically over short periods of time. Each video frame is encoded specifically in relation to other frames that precede and follow it. Thus, the term “spatial” refers to compression involving a single frame, whereas temporal compression recognizes the differences between frames and stores those differences only, leaving unchanged areas to be repeated from previous frames.
Video is digitized in a standard RGB format, 24 bits per pixel (8 bits for each primary color). A frame of video in digital format is essentially a mosaic of pixels measuring 720 × 480 pixels in NTSC (720 × 576 pixels in PAL). A pixel, like a grain particle in film, is the basic building block and smallest discrete element within a picture. Each pixel carries information relating to the intensity of each of the three additive primary colors—red, green, and blue—in one byte of data per color. A byte contains 8 bits, thus, 24 bits are necessary for full color. We refer to a system that sets the order and relationship of colors to one another as color space; examples are RGB (red, green, blue) and CMYK (cyan, magenta, yellow, black). Digital video uses the YUV color space, which recognizes the luminance or brightness (Y) and chrominance or hue (U and V) components of the image. MPEG forms of compression also use the YUV color space and tend to discard more color information than luminance information, as the human eye is less sensitive to chrominance. MPEG-1 compresses the chrominance in video on a ratio of 4:1, whereas the most widely used chrominance compression ratio in MPEG-2 schemes is 2:1.
MPEG-1 was designed to work with images measuring 352 × 288 or less, at 14–30 fps at bit rates not exceeding 1.5MB/second. The popular MP3 audio format is actually based on the MPEG-1 protocol (MPEG-1, Layer 3).
The need for a broadcast-quality digital format spurred the development of a more robust codec, MPEG-2. The format of digital cable transmission and storage, MPEG-2, which can be streamed over intranets, was used as a compression and storage protocol for the newly developed digital versatile disc, or DVD. MPEG-2 enables the employment of encryption that protects content against unapproved copying. Whereas QuickTime is able to play unencrypted content (such as DVD content burned on discs by home users), encrypted MPEG-2 is a highly guarded format that QuickTime is unfortunately unable to play. And unlike QuickTime’s contiguous sampling mode of formatting content, MPEG-2 programming is fragmented in a way that impedes unauthorized copying.
The group originally planned an MPEG-3 (not to be confused with MP3, which is MPEG-1, Layer 3) format for HDTV but determined that the quality of MPEG-2 was good enough for this format. Thus, MPEG-3 was dropped as a standard.
The next step was the creation of a high-quality video compression standard for Web media, MPEG-4, the successor to MPEG-1 and MPEG-2. The idea behind the MPEG-4 protocol, a media architecture in its own right, was the creation of an open standard to encourage swift adoption and ready compatibility. Open-source protocols (e.g., the Linux operating system) reassure programmers and content producers because they can encode files without the fear of certain obsolescence. MPEG-4 incorporates scalability, meaning that producers will encode once for all formats and bandwidths rather than create multiple versions of the same file. MPEG-4 also supports an audio codec known as AAC that allows for much greater compression while preserving much higher fidelity than the MP3 standard. Despite the promise, however, MPEG-4 has come up short in some comparisons with newer codecs, and hurdles loom in the road to complete acceptance for MPEG-4 (see sideboard).
What’s with MPEG-4?
“It’s all about standards.”
—Frank Casanova, director of QuickTime product marketing, Apple Computer
It makes a lot of sense. MPEG-1 is the standard for video CD content. MPEG-2 is the standard for DVD content. So why not a standard for Internet media, so that we can all receive streaming and downloadable media encoded and played with one technology? Why do we still need three different mutually exclusive players (Real, WMP, and QuickTime) to play all forms of Internet media? Chalk it up to licensing and proprietary dominance—the corporation whose technology vanquishes the others becomes the de facto standard, and stands to make billions as a consequence. Don’t believe it? Just look at what happened with JVC’s VHS home videorecording protocol—its proprietary format became the only half-inch videotape recording system that mattered. The problem with proprietary schemes is that usually the scheme remains closed—that is, not available for tinkering and improvement by independent programmers and others. You need to simply follow the corporation and hope that the scheme continues to improve and remain relevant.
The Windows Media Player threatens to become the de facto industry standard for Internet media—and Microsoft’s set of WMP 9 series products looks good indeed. The main problem is that Windows products are proprietary—closed—so the faithful have to follow Windows where the corporation sees fit to lead them. Thus, the Microsoft Windows Media Player does not support MPEG-4 or its standards. In fact Microsoft continues to assert that its WMP MP4-V3 codec is superior in quality, despite the fact that the technology is based in part on the MPEG-4 protocol.
The MPEG-4 standard is made up of eight parts, some still under development, that handle video and audio encoding and rendition, file format selection, and transfer protocols. Much of the MPEG-4 standard was established back in 1999, with various improvements and additions added over the years. The protocol got a big boost in late 2001 when Real offered to support the MPEG-4 architecture, combined with the founding of the Internet Streaming Media Alliance (ISMA)—a group that both RealNetworks and Microsoft have so far refused to join. Indeed, the ISMA has staked its hopes that MPEG-4’s AAC protocol will supplant MP3 as an audio format. Hoping to circumvent the kind of out-of-control peer-to-peer file sharing that occurred with the MP3 codec, a consortium formed to hammer out patent and licensing issues. In fact the inability of a key group—the MPEG-LA—to agree on such issues held up the official release of QuickTime 6 for nearly six months in the summer of 2002 after its originally planned unveiling at the 2002 QuickTime Live! Conference in February. The final version was released the day the MPEG-LA officially announced MPEG-4 licensing fees.
If this belated debut has not hurt the reception of MPEG-4 in the Internet media community enough, there is the repeated allegations, echoed in a February 2003 DV Magazine article, that QuickTime 6 and its implementation of MPEG-4 are inferior to its rivals. So where does this leave the standard carriers for QuickTime and MPEG-4?
Many claim that Sorenson Video® 3 (SV3)—available to QuickTime users—is a higher-quality codec than MPEG-4; Sorenson also has released a version of the MPEG-4 codec said to be superior in nearly every way to Apple’s MPEG-4. Two-pass variable bit technology available in cleaner, Sorenson Squeeze, and other compression/decompression technologies is not even available as part of the QuickTime MPEG-4 package at the time of writing.
The future success of MPEG-4 may lie in a new extension of the MPEG-4 protocol known as Recommendation H.264, or MPEG-4 Part 10, finalized in December 2002. Its proponents have claimed that H.264 offers streaming video at DVD quality at much-reduced bandwidth and obviates any advantages attributed to Windows Media Player 9. The promise of H.264—still not a completed standard at time of writing—threatens to stop the slowly growing acceptance of MPEG-4’s Advanced Simple Profile dead in its tracks as firms wait for the finalization of the new protocol.
The hope among MPEG-4 proponents is that H.264 can be included into a rich feature set with the MPEG-4 standard. In the meantime, QuickTime users have access to an array of basic and add-on codecs, including SV3, Envivio, Streambox, and ZyGoVideo.
QuickTime Codecs
Making an informed choice on what codec to use will be based mostly on where your media is going to screen and how it is going to get there. QuickTime movies destined for CD-ROM delivery can be saved with much less compression than those meant for the Web. In addition, some codecs such as DV are designed for authoring media, whereas others such as Sorenson Video are strictly delivery codecs.
Compressing Your Movie with QuickTime Pro
Compressing your QuickTime movie is practically as easy as saving it as a new media file.
1. If it is not open already, open your movie in QuickTime Pro.
2. Go to “File/Export” to open the “Export” box.
3. When the “Export” dialog box appears, choose “Movie to QuickTime Movie,” located toward the bottom of the dialogue box (Figure 5.1). There are numerous formats you can save to, but in general, it is a good idea to use the “Movie to QuickTime Movie” option.
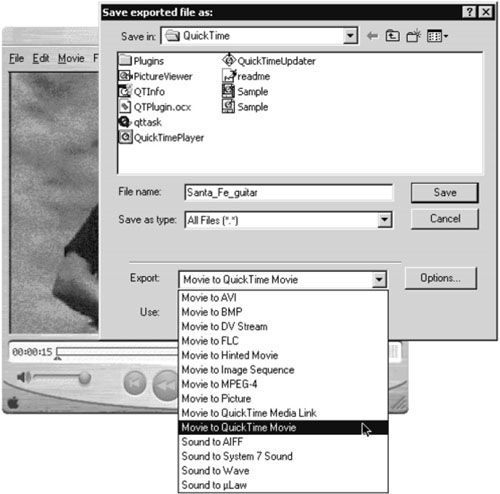
Figure 5.1 When the “Export” dialog box appears, choose “Movie to QuickTime Movie,” located toward the bottom of the dialog box.
Hint: At this point you could go to the next pull-down menu just beneath the “Movie to QuickTime Movie” and pull up one of several presets (Figure 5.2) It is always preferable to compress your movie to your own specifications, however, so go on to the next step.
4. Click the “Options” button.
5. In the “Movie Settings” box that appears, make sure the “Video” check box at the top of the box is checked (Figure 5.3) and click on the “Settings” button.

Figure 5.2 At this point you could go to the next pull-down menu just beneath the “Movie to QuickTime Movie” and pull up one of several presets. It is always preferable to compress your movie to your own specifications.
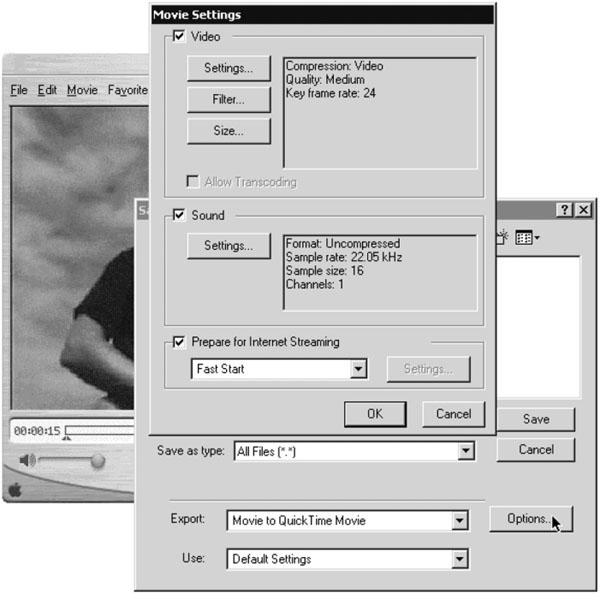
Figure 5.3 Be sure to select “Fast Start—Compressed Header” for all movies except those meant to stream from a streaming server.
6. Consult the listings and following discussion of the various video and audio codecs available to select the best codec setting and movie size for your delivery need, and click “OK” to set the codec and return to “Movie Settings.”
7. Make sure the box “Prepare for Internet Streaming” is checked and select “Fast Start—Compressed Header.” This is the recommended choice for all movies except those that will be handled by a streaming server (see Chapter 8 for more about streaming). Selecting “Fast-Start—Compressed Header” will ensure that the movie loads quickly. Other choices are:
![]() “Fast-Start Movie.” This is a good choice for movies available through hypertext transfer protocol (HTTP). It is adequate for movies that have a hint track.
“Fast-Start Movie.” This is a good choice for movies available through hypertext transfer protocol (HTTP). It is adequate for movies that have a hint track.
![]() “Hinted Streaming Movie.” Choose this option if you are putting the exported file on a streaming server. Hinting refers to a process for adding information to the movie that the streaming server uses to package media data to be sent out over the Internet. The file will not stream without a hint track for each track in the movie (see Chapter 8 for more information regarding hinted movies).
“Hinted Streaming Movie.” Choose this option if you are putting the exported file on a streaming server. Hinting refers to a process for adding information to the movie that the streaming server uses to package media data to be sent out over the Internet. The file will not stream without a hint track for each track in the movie (see Chapter 8 for more information regarding hinted movies).
8. Click “OK” to close the “Movie Settings” box.
9. Give your movie a new name and browse to or otherwise specify the location where the movie will be saved. Click “Save.”
You can see numerous codecs available for saving files in the QuickTime format (Figure 5.4). Depending on your ultimate deployment venue—CD-ROM, Web, DV, or other—the process is pretty much the same. The following is a detailed explanation of the various codecs available as part of QuickTime Pro.

Figure 5.4 QuickTime provides a number of codecs for encoding movies.
Animation
Useful for two-dimensional (2D) animations
As the name implies, the Animation codec is best suited to compressing clips composed of large areas of solid color such as animated cartoons. The settings determine how lossy the compression will ultimately be; 100% quality is essentially lossless, making this an attractive editing codec for storing title sequences and other motion graphics. Although files encoded with the Animation codec may be quite large, they will still be made smaller than those made by choosing “None” for compression. It has some applications for CD-ROM delivery at its lower-quality settings but is suitable for the Web only for slide shows and other mostly still-image programming. Recommended key frame setting is one per second for moving images, blank for slideshows. Data-rate limits cannot be specified with this codec. The Animation codec uses an Apple compression algorithm based on RLE.
BMP
The BMP codec renders a series of Windows bitmap (.bmp) images, and like the Animation codec, yields the best results with clips having large areas of solid color. Because it does not provide any temporal compression, data rates increase with the frame rate. Thus, it is not suitable for Web or CD delivery, and frankly, there are better codec choices for DVD delivery. BMP allows for 2-bit, 4-bit, 8-bit, and 24-bit color. This codec will come into play by default if you open a series of BMP frames into QuickTime, but you will likely never have use for it as an exporting compressor.
Cinepak
Useful for CD-ROM files where backwards compatibility is an issue
In the early days of multimedia before the World Wide Web explosion, Cinepak was the prevailing QuickTime codec. Indeed, it was designed for compressing 24-bit video for CD-ROM discs and found use in compressing downloadable video files. QuickTime video files compressed with Cinepak can play on older versions of Windows Media Player, as well as any version of QuickTime on all supported platforms. Cinepak reaches higher compression ratios and faster playback speeds than other codecs, such as the Video Codec, but though it decompresses quickly, its compression speed is very slow. Notably, it does not work well at less than 30KB/second. Image quality generally is not up to the standards of other codecs. In fact there are better codecs these days, notably Sorenson, so there are not a lot of compelling reasons to use Cinepak, other than the fact that files encoded with it might play better on slow computers. Use one key fps for motion video; for slideshows and still images, use the Animation, Graphics, or Photo-JPEG codec instead.
Component video
Capture and archiving codec
This codec, used in Sony Beta videorecording technology, finds many uses as a capture and storage format. Its low compression ratio of 3:2 yields high quality at the expense of large file sizes that consume large amounts of disc space. This codec is best for digitizing live video from an analog source for streaming broadcasts, where content is immediately discarded or otherwise compressed again with another codec for storage. It is not good as a delivery format.
Digital video (DV NTSC and DV PAL, DVC PRO PAL)
Capture, edit, and storage codec
DV, the codec used by digital camcorders, has become the consumer motion-picture medium of choice. Supported by NTSC and PAL, DV can provide interlaced as well as progressive scanning. DV does not, however, let the user vary the rate of compression (as does Motion-JPEG). This codec provides compression to the tune of 5:1, with a maximum video data rate of 25MB/second. One minute of DV displaces about 200 MB of hard disc space. Thus, although the DV codec facilitates generally high-quality transfers, the compression and decompression afforded are CPU-intensive, making this a poor candidate for Web delivery. A key advantage of DV is its ability to be captured directly from camcorder to computer with Firewire (IEEE 1394) connections. DV material may be shot, edited, and duplicated with little degradation or generation loss. The primary drawback to DV lies in its resolution and sampling regarding color, such as 4:1:1 NTSC or 4:2:0, which do not work well for effects such as blue- or green-screen matting.
DV is a good format for editing, as evidenced by its adoption as a standard in popular nonlinear editing programs such as Final Cut Pro and Avid Xpress. DV-encoded video can also be recompressed as MPEG-2 with little degradation, and thus may be easily incorporated into a DVD using authoring software such as iDVD or DVD Studio Pro.
Graphics
Good for 2D animation
Delivery: hard disc
The Graphics protocol uses a compression scheme not dissimilar to the animated GIF. It generates a compressed image one half the size of the same image as compressed by the Animation codec. The trade-off is its decompression rate, which is slower than the Animation codec. The codec may not always produce the smoothest-playing videos, but it will not place strain on the processor in the same fashion as certain other codecs. Because the Graphics codec accommodates only 8-bit color or grayscale, this could be a good alternative to the Animation codec if your file does not need the extra color depth; it is not generally a good idea to convert a 16- or 24-bit file to 8-bit for this purpose, however, as the image may be degraded significantly. Because this codec does not achieve high video compression ratios, it is suitable for playback from hard disk but not from CD-ROM. Only slideshows or very small movies will perform well with this codec at Web data rates.
H.261
Streaming video
This is an old codec originally designed for ISDN videoconferencing, thus it delivers very poor image quality. It has been superseded by its upgraded version, H.263, and hence offers little of interest to the filmmaker or videographer.
H.263
Streaming video
The successor to the H.261 protocol, H.263 allows for greater image quality at similar data rates. It was designed for low bit-rate communication, of less than 64KB/second, used on slower machines for high bandwidth streams that cannot handle encoding such CPU-intensive codecs, such as—SV3, on the fly. Indeed, with current fast Macs and PCs, it is easy to live encode even SV3, and therefore H.263 is no longer widely used.
Intel Indeo® Video 4.4
CD-ROM
QuickTime still lists this codec as “Intel Indeo,” though the license was sold to Ligos, Inc. some years ago. It provides high-quality images but requires a fast Pentium processor for compression and decompression. This codec is available for Macintosh OS 9 as an extra download component but is incompatible with OS X.
JPEG-2000
Still images, photographs
This is the latest development in the Joint Photographic Experts Group (JPEG) codec, available only on Mac OS X. It delivers superior encoding for still images while dispensing with much of the lossiness of previous JPEG versions and compresses files into much smaller file sizes even while retaining higher quality.
Motion-JPEG
Video editing
This codec is an extension of the popular JPEG standard for compressing and storing still digital images. Using compression algorithms virtually identical to photo JPEG, Motion-JPEG (M-JPEG) imposes no temporal compression, so the data rate increases proportionally to the frame rate. Also like Photo-JPEG, M-JPEG supports 24-bit color or 8-bit grayscale. QuickTime offers the codec in two versions: M-JPEG A and M-JPEG B; they are virtually identical. QuickTime can handle both versions, which are basically different implementations of the same codec, differing from one another only by unique placement of file markers in each. M-JPEG video does not use interframe coding, thus every frame is a key frame; this makes it easier to edit in a nonlinear editing system than full MPEG-encoded video.
M-JPEG accommodates interlaced and progressive content alike, and like the JPEG format for still images, it allows various degrees of compression. A good use for M-JPEG is for encoding files that will go from one application to another; for instance, if you edit material with Final Cut Pro or Premiere and wish to take it to a special effects editor such as Adobe After Effects, you can save it in M-JPEG without too much degradation in overall quality.
MPEG-4 video
Internet
Introduced to QuickTime with Version 6, MPEG-4 was designed to approach MPEG-2 quality video at lower data rates and smaller file sizes. MPEG-4 offers better quality than MPEG-2 at bit rates below 1M-bit, making it a good codec for high-quality Web delivery. MPEG-4 promises to create interoperability for video delivered over the Internet and other distribution channels, as well as play back on many different devices, from satellite television to wireless devices. Apple’s MPEG-4 video codec provides the highest quality results across a wide spectrum of data rates—from narrowband to broadband—ensuring that content providers only need encode once, rather than specifically for each venue (QuickTime, Real, CD-ROM). The codec is said to offer compression times and video quality that rival those of the best proprietary codecs available, yet it provides true interoperability with other MPEG-4 players and devices.
The QuickTime MPEG-4 codec also provides rate control—the encoder can be set to a target data rate that ensures playback at the appropriate data rate for a particular delivery mechanism, and it can use a single-pass variable bit rate (VBR) controller either to maximize accuracy for the highest-quality output or to maximize encoding speed. That said, if MPEG-4 lives up to the hype, this codec may make all others obsolete. The general acceptance of MPEG-4 has been hampered somewhat by haggling over licensing implementations (see sideboard “What’s with MPEG-4?”).
Photo-JPEG
Delivery and storage codec
Use for still images with gradations (e.g., photographs), QTVR
This codec is best for still images that do not contain lots of sharp edges or detail. As a JPEG format, Photo-JPEG is lossy, but the compression can be set to preserve much of the original quality of the file. Using standard JPEG compression, this codec uses YUV color and can provide high-quality results so long as it is used with progressive rather than interlaced video. Like M-JPEG, it makes for a good intermediate codec. Photo-JPEG is the most widely used codec for QTVR movies.
Planar RGB (also known as Photoshop)
Still photographs
This codec is useful for importing photographic graphics with an alpha channel, such as when you have an image that you want to composite with video.
Video (also known as Apple Video)
Real-time video capture
This offers very fast compressing and decompressing of video and has good compression ratios. Use it for real-time capture of video, particularly when hard disk space is at a premium, or for testing clips. It is also OK to use for hard disk playback but image quality is poor when compressing enough for CD-ROM playback.
Sorenson Video
Web and CD-ROM
Sorenson Video (Version 2) has enjoyed a reputation for being the best all-around delivery codec for QuickTime linear movies since it was introduced in 1998 for exclusive inclusion in QuickTime 3. Apple did not develop Sorenson but licensed the rights to incorporate it into the QuickTime Player. You can access the standard version (Figure 5.5) through the “Compression Settings” in QuickTime Pro, though you will not have access to Sorenson’s VBR (see next section) and other functions unless you purchase the Pro version. The Standard edition gives good results for what Sorenson terms “average video content at moderate data rates (50 KB or above).” Sorenson is ideal for low bit-rate movies, and although it compresses slowly, it allows for more efficient use of disc space than almost any other similar codec.
Sorenson 3 Web and CD-ROM
SV3 uses much-improved technology, yielding twice as much compression speed and better color saturation and video (4:2:0 rather than YUV-9 color space) than Sorenson 2 at half the bit rate. Many consider Sorenson 3 to deliver the best quality and some of the smallest file sizes of any codec available for QuickTime, besting even MPEG-4. Its features include data rate tracking, automatic key frame sensitivity control, and bidirectional prediction (using “B-frames” that reference both past and future pictures and provide very high compression rates). SV3 also features video watermarks, QuickTime streaming support, and video masking. One downside to SV3, however, is its incompatibility with QuickTime versions preceding QuickTime 5.

Figure 5.5 The basic Sorenson Video codec in QuickTime allows limited compression options.
When used in conjunction with discreet cleaner, Sorenson’s most important feature is its ability to use VBR when encoding video and audio files. The SV3 Pro version of the software functions as an upgrade (www.sorenson.com, $299) to the basic version included in QuickTime. The robust SV3 is an asymmetrical codec, meaning that encoding is more time-consuming than decoding, which is advantageous for the user. After installing SV3 you may access the codec in QuickTime’s “Compression Settings” dialog box by setting the top pull-down to SV3. Click on the “Options” button (Figure 5.6) to bring up the Sorenson Video “Settings” box. If you have SV3 installed, you will see tabs for “Summary,” “Encode,” “Playback,” “Streaming,” “Masking,” and “Watermark”:
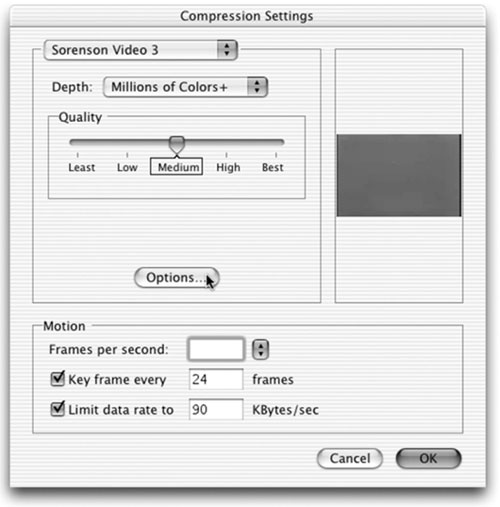
Figure 5.6 Click on the “Options” button to bring up the “Sorenson Video Settings” box.
1. The “Summary” window (Figure 5.7) shows how the SV3 settings are configured and may be changed in SV3 in the other tab windows.
2. The “Encode” window (Figure 5.8) includes SV3’s most important compression settings:
a. “Quick Compress”—If this box is checked, compression time is cut by about 20% with little loss in quality.
b. Leave the “Bidirectional Prediction” pull-down to “Allow” for greater compression efficiency. The “Force for Playback Scalability” turns “Bidirectional Prediction” on at all times and allows for playback scalability. Leave this setting off if you are compressing with two-pass VBR (not an available option in QuickTime Pro) or fixed quality at 15 fps or lower.
c. “Automatic Key Frames” monitors the differences between frames and inserts a new key frame when the difference reaches predetermined settings. This setting lets you choose how frequently you wish such key frames to be inserted. For maximum compression efficiency, the fewer key frames, the better; it is best if you can get away with a setting that inserts just one frame at the beginning of each scene. Sequences with lots of motion usually require more key frames. In general, the default value of 50 is fine for most purposes; Sorenson recommends keeping settings between 35 and 65 for optimum results. You may need to compress several times to achieve the ideal setting.

Figure 5.7 The “Summary” shows how the SV3 settings are configured and may be changed in SV3 in the other tab windows.
d. Finally, you have the option of one of the following three choices:
e. “One-Pass VBR.” Leave this box checked. Sorenson touts this feature as producing video quality close to two-pass VBR in the time it takes to encode non-VBR. Unlike two-pass VBR, it does not require cleaner or Sorenson Squeeze and can be used in QuickTime Pro.
f. “Minimum Quality” lets you sacrifice data rate or frame rate to achieve a certain quality of image. It forces SV3 to keep the video picture quality at a certain level or higher, increasing the data rate as required to maintain quality. If you do not want the data rate to increase, check the “Drop Frames” box. Thus, picture quality is saved at the expense of dropping frames.

Figure 5.8 The “Encode” window includes SV3’s most important compression settings.
g. “Neither Feature.”
3. The “Playback” window (Figure 5.9).
a. “Image Smoothing.” This setting, when checked, reduces the blocky edges that occur in the low data rates used for Web video. Uncheck this box when you are encoding for high-quality video.
b. “Media Key.” Adding a media key can prevent unauthorized persons from viewing a video. To add a media key to the compressed video, type a password of your choice into the “Media Key” text box. Be sure to keep a record of this password in a safe place. Make sure you uncheck this box next time if you do not want to include this key—the setting will remain until you change it.

Figure 5.9 The “Playback” tab.

Figure 5.10 The “Streaming” window.
4. The “Streaming” window (Figure 5.10). If you are encoding for Web streaming media, check the “Streaming” box. You can leave the default settings for “Slice Picture . . .” and “Force Block Refresh . . .” as they are for most instances.
5. The “Masking” window (Figure 5.11) gives you the option of adding chroma-key like effects similar to those seen in news broadcasts, superimposing a foreground subject over another background.
6. The “Watermark” window (Figure 5.12) lets you add your own watermark, or logo, to a video, with adjustments available for position and transparency. The most notable feature about the Sorenson watermark is that the video will no longer play if the watermark is tampered with.
SOME GENERAL TIPS ABOUT SORENSON VIDEO
When setting data rates, the following formula is a good starting point:
Data rate = Width × Height × FPS/48000

Figure 5.11 The “Masking” window.
Thus, if your movie has a size of 320 × 240 at 30 fps, a general data rate would be 48KB/second. Shots with little movement such as an interview could be successfully compressed at a rate as low as 24KB/second, whereas an action sequence might require as high as 96KB/second to look nice. Of course, higher bit rates demand more bandwidth and place more demand on the user’s computer processor. You could also reduce the frame rate or the frame size if you did not want to decrease the data rate.
SOME SV3 TIPS
![]() The codec works best if both the height and width dimensions of the video are divisible by four.
The codec works best if both the height and width dimensions of the video are divisible by four.
![]() Sorenson likes a key frame every 10 seconds for motion video and can also designate additional key frames automatically when needed.
Sorenson likes a key frame every 10 seconds for motion video and can also designate additional key frames automatically when needed.
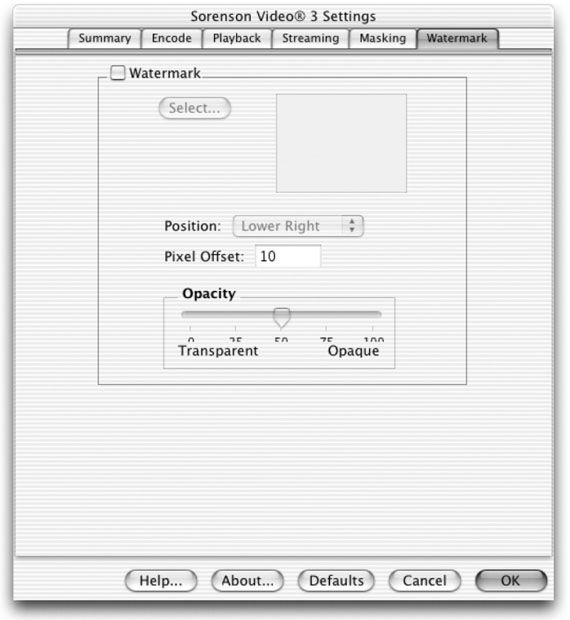
Figure 5.12 The “Watermark” window.
![]() You can specify data rate limits. It is best to be conservative here, particularly in the case of streaming video.
You can specify data rate limits. It is best to be conservative here, particularly in the case of streaming video.
![]() Do not set the key frame rate too high, which can create stuttering playback. High data rates may spur frame dropping, particularly at rates exceeding 200KB/second, thus only the fastest computers can decompress Sorenson at these rates.
Do not set the key frame rate too high, which can create stuttering playback. High data rates may spur frame dropping, particularly at rates exceeding 200KB/second, thus only the fastest computers can decompress Sorenson at these rates.
![]() Compress at half the height and width you want, and then double the size for playback. This preserves an optimum data rate for movies that will play at full-screen settings. You can increase the data rate by about 10% to make sure video retains sharpness when scaled up.
Compress at half the height and width you want, and then double the size for playback. This preserves an optimum data rate for movies that will play at full-screen settings. You can increase the data rate by about 10% to make sure video retains sharpness when scaled up.
Additional Codecs for QuickTime
There are a number of useful codecs supported by QuickTime not included in the standard QuickTime Pro compressor array. Most of these are proprietary codecs that you purchase and download to your hard drive.
VP3
This open-source codec once distributed by On2 gives impressive results when compressing video at Web or CD-ROM data rates, comparing favorably with SV3. One problem with the VP3 codec is that the user needs to have the codec installed. This means that the user will be prompted to download a plug-in in order to play the movie, if he or she does not already have this installed. This inconvenience might be enough to discourage potential viewers, so you may want to weigh this very real disadvantage with the benefits of the VP3 codec.
MPEG-2 Playback codec
Released in conjunction with QuickTime 6, the optional QuickTime 6 MPEG-2 Playback component allows the ability to import and play back MPEG-2 content, albeit for a price: the component costs $19.95 and is downloadable from the Apple QuickTime Products site. Although the QuickTime MPEG-2 component lets you play back MPEG-2 program streams, it will not play encrypted DVDs—including nearly all movies commercially released on DVD—nor will it act as a compressor for MPEG-2 (you need a DVD-burning application such as iDVD or a general media-encoding application such as discreet cleaner for that).
3ivx D4
Currently in Version 4.0.4, 3ivx Delta D4 is based on the MPEG-4 architecture and plays many of its variants. According to the distributor, the decoder available for QuickTime “produces noticeably higher quality video than other decoders due to its high-quality postprocessing filters… and maintains a record-breaking decode speed.” On the other hand, compressionist extraordinaire Ben Waggoner opined that the 3.5 version of this codec offered “mediocre image quality at best” (“Web Video Codecs Compared: An In-depth Examination of the Leading Web Video Codecs,” by Ben Waggoner).
QuickTime can take advantage of numerous components designed and marketed by third-party developers that add increased functionality and versatility to the basic QuickTime architecture.
You can get many of the available QuickTime components through the Quick-Time “Automatic Update.” If you go to the “Control Panel” in Windows or the “System Preferences” panel in Mac OS X, click on the “Update” tab and click the button or check box labeled “Install new 3rd party QuickTime software.” Click on the “Update Now” button and the panel will call up the QuickTime server to check for new updated software. At this point you may see a pop-up (Figure 5.13) with the following message: “All of the QuickTime software you have installed is up to date. No update is necessary. Click Custom to select additional items to install.” This may seem somewhat contradictory, but press the “Custom” button as the pop-up suggests. The next pop-up should show you a list of components available for you to download (Figure 5.14). Simply check the box of each component you desire and the QuickTime panel will begin downloading them. Some of the components are simple decoders rather than codecs, which means you can only play files—not compress them.
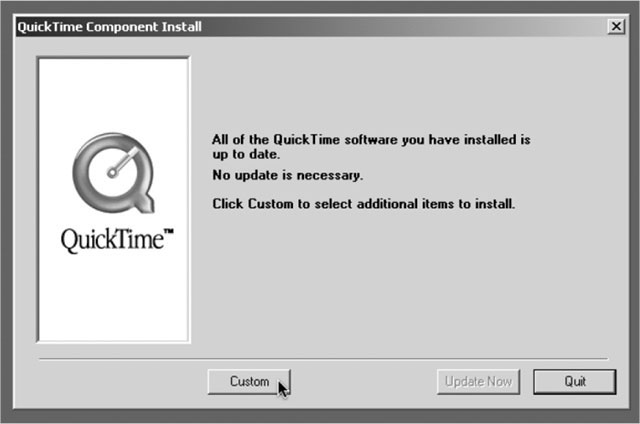
Figure 5.13 The “QuickTime Components” box. Click on the “Update Now” button and the panel will call up the QuickTime server to check for new updated software.

Figure 5.14 This shows a list of components available for you to download. Simply check the box of each component you desire and the QuickTime panel will begin downloading them.
Some of the components available for download that you may see are:
![]() Microcosm. A 32-bit codec for high-quality compression with alpha channels.
Microcosm. A 32-bit codec for high-quality compression with alpha channels.
![]() Axel is a 3D component that, according to distributor MindAvenue, “plays in QuickTime with Axel’s interaction effects intact. For Mac OS 9, OS X, and Windows, Axel’s QuickTime component truly hands over the 3D, with meaningful interactivity, to QuickTime users and viewers.”
Axel is a 3D component that, according to distributor MindAvenue, “plays in QuickTime with Axel’s interaction effects intact. For Mac OS 9, OS X, and Windows, Axel’s QuickTime component truly hands over the 3D, with meaningful interactivity, to QuickTime users and viewers.”
![]() On2. According to the manufacturer, this codec “offers TV-quality video compression and streaming capabilities with support for multiple bit rates within a single file.” See VP3 mentioned previously.
On2. According to the manufacturer, this codec “offers TV-quality video compression and streaming capabilities with support for multiple bit rates within a single file.” See VP3 mentioned previously.
![]() Streambox. A codec for compressing video into small high-quality streams that can be served over broadband networks.
Streambox. A codec for compressing video into small high-quality streams that can be served over broadband networks.
![]() Zoomify. This component allows images to stream, thus allowing on-demand viewing when a user zooms into a still image, as in a QTVR panorama or object. Instead of getting an increasingly pixilated image, the user can zoom in to see high-resolution views of an image.
Zoomify. This component allows images to stream, thus allowing on-demand viewing when a user zooms into a still image, as in a QTVR panorama or object. Instead of getting an increasingly pixilated image, the user can zoom in to see high-resolution views of an image.
![]() ZyGoVideo. A codec for real-time compression of video for broadcast, allowing multiple simultaneous video streams and Extensible Markup Language (XML) information within streams, as well as excellent results at low bandwidths.
ZyGoVideo. A codec for real-time compression of video for broadcast, allowing multiple simultaneous video streams and Extensible Markup Language (XML) information within streams, as well as excellent results at low bandwidths.
Audio Codecs
Much of the same criteria apply to audio production as does to film and video production when it comes to compression: start with the highest-quality track possible. If you are pulling the audio directly from a CD, try to transfer the file digitally rather than through the sound jack of your computer. If you need to record from an analog source, use the highest-quality microphone and sound card possible. Be sure in particular that the input signal does not overmodulate, creating distortion. Monitor the input level via a level meter in your mixer or audio recording application. A good rule of thumb for setting audio input levels is about 2 dB below the full input load levels. Minimizing noise is not only good sound recording practice—absence of background noise and hiss will also result in smaller file sizes when you compress.
Digital audio is recorded by sampling a sound source a given number of times per second. Sound for CD recording is sampled at a rate of 44,100Hz (cycles per second), or 44.1kHz. This translates roughly to a data rate of approximately 150 KB/second—generally too high for most multimedia uses such as the Web and CD. In addition, CD-quality sound displaces 11 MB of storage space for each minute of sound. Music sounds best at 44.1, but is OK at half that. On the other hand, 22 kHz is more than sufficient for speech, which can sound reasonably good at 11 kHz. You should digitize audio at 16-bit at the very least (8-bit audio is not recommended for use with Sorenson and many other codecs).
QuickTime 6 supports a number of codecs you will see when you bring up the “Sound Settings” box in “Export” options (Figure 5.15). Some of the codecs described in the following section use a specific compression ratio (such as 2:1) listed after the codec name. In general, try to use a codec specifically designed for the type of audio in your program, such as speech, music, or multimedia. Avoid codecs intended for telephony (such as aLaw) unless your audio is almost exclusively speech to be delivered over low bit-rate media such as the Web. As with some video compressors such as MPEG-2, QuickTime retains the right to provide playback support for some codecs (like MP3) that it does not supply a compressor for due to licensing agreements. In general, it is always preferable to compress original uncompressed audio; in other words, avoid using previously compressed files such as MP3 files. You will gain double the compression power with a codec if you save the file in monaural rather than stereo, a difference that is not often noticed over the Internet.
Below is a rundown of each of the QuickTime audio codecs; the ones recommended by Sorenson are QDesign Music, Qualcomm PureVoiceTM, and IMA. A newer audio codec that looks promising is the MPEG-4 AAC Audio codec. You can access the various audio codecs by following these steps:
1. Make sure the movie you wish to encode is open in QuickTime Pro.
2. Select “File/Export” and click on the “Options” button. After inputting your video codec settings (see previous section), make sure the “Sound” check box is checked and click on the “Settings” button (Figure 5.16).

Figure 5.15 QuickTime 6 supports a number of codecs you will see when you bring up the “Sound Settings” box in “Export” options.
3. When the “Sound Settings” box appears, you select a codec from the pull-down, set the data rate, file size (whether 8- or 16-bit), and mono or stereo use (Figure 5.17). Some audio codecs, notably MPEG-4 Audio, QDesign Music 2, and Qualcomm PureVoice, allow access to more settings via an active “Options” button.
24-bit integer
32-bit integer
32-bit floating point
64-bit floating point
Uncompressed audio
Saving in these formats actually make the file larger, and hence are not good for Web compression. These protocols are useful if you intend to process or further work with the audio before ultimately compressing it for delivery. If you have sound editing applications that work with these formats, you might use them for signal processing and filtering, and then use QuickTime to compress to a more manageable file size for ultimate delivery.

Figure 5.16 To set an audio codec, make sure the “Sound” check box is checked and click on the “Settings” button.
aLaw 2:1
Voice compression
This codec was developed for digital telephony for cell phones in Europe and thus is useful primarily for human voice compression. It does not offer dramatic compression rates but can be used to compress speech with a minimum of distortion and audible artifacts. There are better codecs if you want to include music and sound effects.

Figure 5.17 The “Sound Settings” box.
IMA 4:1
CD and Intranet applications
A useful cross-platform audio codec for multimedia, this codec gives a 4:1 compression ratio, making it good for CD and local-area network (LAN) applications but less useful for Web delivery. IMA was the only audio encoding option for QuickTime before the unveiling of QuickTime 3. It endures because it does not put too much burden on older computers when decompressing files and thus can be decoded by nearly all users.
MACE 3:1
MACE 6:1
The Macintosh Audio Compression and Expansion codec, also known as MACE, is an old codec built into the Macintosh OS Sound Manager dating from the earliest days of the Mac. Avoid this for the most part unless you need to distribute audio that has been already compressed with MACE and you cannot get your hands on the original uncompressed audio.
MPEG-4 Audio (AAC)
Brand new with QuickTime 6, AAC—the audio component of the MPEG-4 standard (Figure 5.18)—is touted to offer improved compression with higher-quality results with smaller file sizes compressed with MP3. AAC also supports multichannel audio and can provide up to 48 full-frequency channels and higher-resolution audio, yielding sampling rates up to 96 kHz. Finally, AAC provides improved decoding efficiency, requiring less processing power for decoding. AAC looks to be an extremely promising codec.

Figure 5.18 The “MPEG-4 AAC Audio Compressor” control box.
QDesign Music 2
The traditional first choice of QuickTime compressionists, QDesign (Figure 5.19) offers high-quality music compression particularly well-suited for Web distribution. It can deliver high-quality audio at low bit-rate, though not CD-quality audio, despite marketing claims to the contrary. It can handle 16-bit, 44.1 kHz audio over a 28.8 KB/second line. It boasts the same compression abilities as MP3—up to 10:1—with much better sound quality and is unparalleled as a lowbit-rate codec, making it exceptionally well suited for Web applications. QDesign is optimal for music but also offers respectable compression quality for sound effects and human voice recordings. It is a demanding codec in terms of CPU loads, although this can be mitigated somewhat by selecting a lower sampling rate or encoding as a mono rather than stereo track.
Qualcomm PureVoice
As the name suggests, this codec is best suited for speech and is attractive for its extremely low data rates that allow speech to stream over a 28.8 or even a 14.4 modem. Although good for compressing speech (at ratios of 9:1 and 19:1), this codec tends to make music and sound effects sound as if they are reverberating off corrugated sheet metal. Thus, avoid this codec for encoding anything other than “pure voice” sound sources.

Figure 5.19 QDesign Music 2 offers high-quality music compression particularly well suited for Web distribution.
MP3
The MPEG-1, Layer 3 codec for audio—also known as MP3—is not offered as a compression option in QuickTime due to licensing limitations, though Quick-Time retains the ability to play and edit MP3 files. The most popular digital audio format to date, MP3 took the music industry and the Web listenership by storm with help from the infamous file-sharing application Napster and changed the way millions of people acquired and listened to music. The codec features near-CD audio quality and compression ratios ranging from 5:1 to 10:1. Because of its proven propensity as a musicpirating format, the entire industry has been furiously at work developing audio codecs and protocols that would not allow unauthorized duplication and exchange of files. Although more music files (including many obscure titles nearly impossible to find in any other format) have been encoded and made available in this format than any other, it does not mean that you should incorporate MP3 music files into your movie soundtracks. MP3 sound quality, depending on the bit rate used to encode files, is not up to the standards of CD digital recordings, or WAV or AIFF files (which are essentially uncompressed audio). Incorporating such files into a movie to be compressed will degrade them further, something you should avoid if at all possible. Therefore, for the sake of your productions, try to find high-quality CD or uncompressed digitized sound files for your QuickTime movies and you and your audience will be much happier with the results.
Professional Compression with Discreet Cleaner
Discreet cleaner, now available in Version 6 for Macintosh and Version XL for Windows, is possibly the most valuable tool available for compressing digital movies. It excels in batch processing in multiple formats, enabling the filmmaker to deploy movies in Real, Windows Media, and QuickTime streaming and downloadable files, as well as MPEG-1, MPEG-2, and MPEG-4, and digital video streams, as well as myriad audio and still-image file formats.
Cleaner incorporates all of the codecs available in QuickTime Pro and more. Cleaner also lets you crop movies to fit whatever aspect ratio you wish. The following tutorial should get you up to speed with cleaner and its many features for compressing and enhancing your movies. The terms compressing and encoding are used interchangeably throughout this tutorial.
You can download a demo version of discreet cleaner 6 for the Macintosh at www.discreet.com/products/cleaner6 and discreet cleaner XL for Windows at www.discreet.com/products/cleanerxl. Go to the Web site, click on the appropriate link, and you will receive email with instructions for downloading the program. Next download the appropriate installer and follow instructions for installation. The demo will be good for 30 days from the time you start using it; at that time or at any time before, you may purchase the software from Discreet.
“Batch” window
As you open cleaner, the “Batch” window appears, where you can add files by choosing “Batch/Add Files,” or simply drag the QuickTime movies you wish to compress and optimize. Each movie you add will appear as a row with columns that designate project name, setting, destination, priority, and status (Figure 5.20).

Figure 5.20 The discreet cleaner “Batch” window.
The “Project” column shows the title of the source file plus a thumbnail, as well as any icons to indicate cropping, in/out points, settings, modifiers, and metadata. When you click twice on the name of your movie in the “Project” column, a “Project” window will appear (Figure 5.21), allowing you to make several adjustments to your movie.
“Settings” window
Double-clicking on this column entry brings up the “Settings” window, letting you choose presets such as QuickTime and MPEG (Figure 5.22). Cleaner offers a wide array of presets for compressing your movies. You can also modify existing presets to create custom presets by copying settings closest to your desired result and alternating between the various controls.
“Destination” window
The “Destination” window (Figure 5.23) lets you set the place wherein you wish to save your compressed movie. Here you can select a new folder or drive for each project.

Figure 5.21 The “Project” window.

Figure 5.22 The “Settings” window.
“Priority” window
This “Priority” window (Figure 5.24) shows you the priority of files to be compressed, the highest being the ones closest to the top of the window. You can bring up a pop-up menu that lets you pick a priority number between 1 and 10. This handy feature is useful for sorting projects so that higher-priority projects get processed first. You can click the “Priority” title bar to reorder the batch in numerical order.
“Status” window
This column indicates whether the compression is complete—when finished, the word “done” appears in this box. If a problem arises, the word “error” will appear. You can double-click this column to get additional information, including an error dialog box if problems occurred during compression.
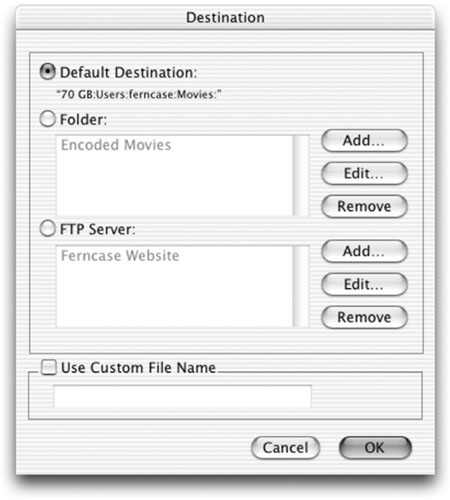
Figure 5.23 The “Destination” window.
Tutorial 5.1: Batch encoding with cleaner
For this tutorial, go to the “Ch05” folder in the CD and find the QuickTime movie file titled “cleanerclip01.mov.” We will start by setting up a batch process using cleaner’s MPEG-4 preset feature:
1. Open up cleaner and drag the movie into the “Batch” window, then click on it to activate (shading the row in blue).
2. Cleaner will place each compressed file in a default folder—generally in your “Movies” folder on your hard drive—until you designate a different destination filter. Double-click on the word “Default” in the “Destination” cell to bring up the “Destination” dialog box. You can change the destination for your encoded files to a folder of your choice. If you check the “FTP Server” box (Figure 5.25), cleaner will also automatically upload files to your FTP server, placing them on the Web as soon as they are encoded.

Figure 5.24 The “Priority” window.

Figure 5.25 You can change the destination for your encoded files to a folder of your choice. If you check the “FTP Server” box, cleaner will also automatically upload files to your FTP server.
3. Double-click in the “Settings” column of the “cleanerclip01.mov” row to open the “Settings” window and see all the presets available for encoding your movies. Because this clip was shot in film and transferred to DV, select “MPEG/MPEG-4/Film/ISMA Profile 0 56K download.” If you want all possible options for the Web using MPEG-4, shift-select the last file in the “Film” folder, “ISMA Profile 1 384 streaming,” and all of these options will appear in the “Settings” window ready for encoding (Figure 5.26). If you encode your movie at all these settings, you will have a Web file ready for download by users with dial-up modems, ISDN accounts, cable modem connections, and high-speed T1 and T3 setups. This is the essence of batch encoding. Click on the green play arrow to begin the encoding process; cleaner will encode the clip at each of the selected settings and place the compressed files in your designated destination folder.

Figure 5.26 If you want all possible options for the Web using MPEG-4, shift-select the last file in the “Film” folder, “ISMA Profile 1 384 streaming,” and all of these options will appear in the “Settings” window ready for encoding.
Watch Folders
A new feature in cleaner 6 lets you designate a watch folder—simply a folder you create that automatically encodes any file you drop into it. This greatly streamlines the compression process. To make a watch folder, select “Batch/Add Watch Folder,” and select or create a new folder. The “Watch Folder” will show up in the “Batch” window where you can assign any setting to that folder just as you did with the single file. Now you have a location where you can export files from applications such as Final Cut Pro. Cleaner then begins encoding the file, leaving you free to work on another project.
Creating custom settings
As useful as the cleaner presets are, you will probably find it necessary to create custom settings to optimize your movie files. The most convenient way to do this is to modify an existing setting:
1. In the “Settings” window, select a setting that presents the most appropriate starting point. For instance, if you want to encode a movie for DVD deployment, select an MPEG-2 preset. In this case, we will encode this movie for Web deployment, so we will begin with a QuickTime file format and SV3 codec.
2. Click the “Duplicate” button.
3. Type a name for the new setting and drag it into the appropriate folder.
Now to create our custom settings in the important next phase: preprocessing.
Preprocessing for Custom Compression
Preprocessing refers to the process of optimizing a file before actual compression takes place. This includes cropping, noise reduction, deinterlacing, and adjusting gamma, brightness, and contrast to ensure the best possible picture and sound. Many filmmakers deride the computer display as a viewing device for video and film but the truth is that the computer monitor can deliver a much better picture than a television monitor ever could. It is capable of higher resolution, better color fidelity and wider color gamut, and deeper blacks and purer whites. The computer can show much more detail in a film or video than a TV set. On the other hand, it will also show any noise inherent in a video much more clearly as well, emphasizing the need for careful preprocessing. Another advantage of computer video is the ability to play back video at any frame rate; NTSC television is always limited to a playback of 30 (29.97) fps.
The fundamental steps for preprocessing are:
![]() Deinterlacing
Deinterlacing
![]() Inverse telecine
Inverse telecine
![]() Cropping
Cropping
![]() Scaling
Scaling
![]() Noise reduction
Noise reduction
![]() Luminance (brightness) adjustment
Luminance (brightness) adjustment
![]() Chrominance (color) adjustment
Chrominance (color) adjustment
Adaptive deinterlacing
As we saw in Chapter 2, traditional video cameras and imaging devices capture motion pictures by sampling scenes at 25 (PAL) or 30 (NTSC) fps. Each frame is composed of two interlacing fields. This creates some distracting artifacts, particularly in motion sequences or freeze-frames where cross-hatching interlace lines become obvious. Computer video, on the other hand, plays video in progressive scan mode—in complete frames. The interlacing in conventional video must be removed for any video intended for computer display, otherwise well-defined horizontal interlace lines will become obvious and moving objects will display as two slightly misaligned images. The video you will be compressing will derive from one of three sources: interlaced video, telecined film (which is also interlaced video), and progressive scan video. The simplest way to deinterlace is to discard a field from every frame. The problem here is that you decrease your resolution by one half. Imagine you begin with NTSC DV video and 480 horizontal lines of resolution; after deinterlacing, however, you end up with a video resolution of 240 lines. Reducing resolution by 50% is, of course, unacceptable, but fortunately there is a better way: adaptive deinterlacing. Adaptive deinterlacing refers to selectively deinterlacing just those parts of the video comprising moving images, while leaving relatively static images intact. Cleaner provides an adaptive interlace filter expressly for this purpose.
Inverse telecine
If your content is film transferred to NTSC video, you will want to undo the telecine process that converted the original frame rate from 24fps to 30fps. The film-to-tape transfer adds six duplicate fps to the film transferred, mixing alternating combinations of three and two video fields. These pull-down frames created by blending frames from the original source in a specific pattern creates what is known as 3:2 pull-down [only NTSC video uses this 3:2 pattern, as European PAL video rolls at 25fps and requires a different solution for this problem (24:1 pull-down)]. This pull-down can create some very annoying stuttering effects in long slow pans and other camera movements. Inverse telecine removes these superfluous unwanted frames, yielding full resolution of 23.976 fps. This invariably adds more resolution and smoother motion. This is one reason why Apple’s QuickTime Movie Trailers look so good: preprocessed with inverse telecine, they boast a full 480 × 720 resolution. Intelecine is the name of cleaner’s primary tool for inverse telecine. Inverse telecine is a nonissue in PAL video, as its frame rate is virtually the same as that of film and requires no pull-down in the transfer process.
Cropping
Video often exhibits rough edges and noise around the periphery of the frame, which goes unseen due to the overscanning playback monitors. Cropping removes the noise and can also serve to tighten up video by cutting away extraneous frame detail, giving you a smaller file. By design, the typical television set overscans the video raster by 10% or more; that is, the TV automatically crops out the messy edges of the video frame the way that a window matte overlays and obscures the edges of a framed photograph. On the other hand, computer displays generally show the entire image area of a video, including the edge blanking (sync info), black edge lines, and general noise. Cropping this peripheral area out of the video picture will greatly improve compression and file size. In cases where you want to encode a movie with a small frame size, say 180 × 240 pixels, you may want to crop well into the image area to enlarge the picture for easier viewing. In fact, in a 720 × 460 image, you can easily crop in 32 pixels on both the left and right sides, 24 pixels top and bottom for action safe video, and twice that for title safe video. You will also want to crop out any black bars that exist in the video image as a result of letterboxing.
Scaling
Scaling means decreasing the size of the video frame of a movie (increasing the frame size yields inferior image quality and is not advised). That said, the aspect ratio of your scaled movie should match the proportions of the video source file. A 720 × 480 video image (remember, NTSC and PAL video images are captured with non-square or rectangular pixels) has a 4:3 aspect ratio, therefore you should always crop to a 4:3 aspect ratio. For example, 320 × 240 would be an appropriate crop size; 360 × 240 would not. HD, with a native aspect ratio of 16:9, would crop nicely to a size of 432 × 240. In general, you should avoid cropping to a size that exceeds 240 pixels in height, otherwise you will be scaling up (remember, any deinterlacing reduces your maximum vertical resolution to 240 lines or pixels). Thus, in general, the more you crop a video image, the smaller the video frame size should be. If you want your video frame to be 320 × 240 or larger, minimize cropping and use adaptive interlacing whenever possible.
Luminance adjustment
Luminance includes all non-color information adjustments, including brightness, gamma, contrast, black restore, and white restore. Whereas computers can use a graduated tonal scale from 0 to 255, video embraces a reduced range from about 16 to 235. This means that video black is more a dirty gray whereas video white is an off-white value. When you reset the black to 0 and white to 255, you extend the tonal range of the image. Setting video black levels to mathematical black (0) greatly enhances the look of video and makes it blend more seamlessly into the surrounding background of a black Web page, for example.
![]() Gamma. As we saw in Chapter 2, gamma—the relative contrast of the middle range of an image—is different on a Windows computer than it is on a Macintosh. Middle tones will always display brighter on a Mac than on a PC. Because there are more PCs out there than Macs, many Mac-based content providers adjust gamma to read correctly on Windows. Perhaps the best option is to create QuickTime alternate or reference movies (see Chapter 8) for Windows and Macintosh platforms to download to the proper user platforms.
Gamma. As we saw in Chapter 2, gamma—the relative contrast of the middle range of an image—is different on a Windows computer than it is on a Macintosh. Middle tones will always display brighter on a Mac than on a PC. Because there are more PCs out there than Macs, many Mac-based content providers adjust gamma to read correctly on Windows. Perhaps the best option is to create QuickTime alternate or reference movies (see Chapter 8) for Windows and Macintosh platforms to download to the proper user platforms.
![]() Brightness. Adjusting brightness is often a matter of personal preference. Increasing the level of luminance will brighten an image, but often at the expense of higher noise levels and weaker blacks. Lower brightness, on the other hand, will yield rich blacks but might darken the overall image unacceptably.
Brightness. Adjusting brightness is often a matter of personal preference. Increasing the level of luminance will brighten an image, but often at the expense of higher noise levels and weaker blacks. Lower brightness, on the other hand, will yield rich blacks but might darken the overall image unacceptably.
![]() Contrast. Unlike gamma, contrast affects the extreme black-and-white portion of an image. High contrast accentuates the darkness of black levels and the brightness of the white levels, with no discernable effect on the middle range. When all is said and done, do not forget that, ultimately, contrast and brightness settings are subjective. There is not even a real consensus among the experts. Master compressionist Doug Werner, for example, favors high brightness settings but often leaves contrast levels intact, whereas compression guru Ben Waggoner leans toward higher contrast settings and low brightness settings.
Contrast. Unlike gamma, contrast affects the extreme black-and-white portion of an image. High contrast accentuates the darkness of black levels and the brightness of the white levels, with no discernable effect on the middle range. When all is said and done, do not forget that, ultimately, contrast and brightness settings are subjective. There is not even a real consensus among the experts. Master compressionist Doug Werner, for example, favors high brightness settings but often leaves contrast levels intact, whereas compression guru Ben Waggoner leans toward higher contrast settings and low brightness settings.
![]() Black restore. This setting lets you set a floor for black values and pushes dark grays beyond the setting to black. For example, a black restore setting of 10 will render all values falling below that numerical value as straight black. This can be a great effect for letterbox bars and black backgrounds behind titles and credits. If you use this setting in video picture areas, however, be sure to set the accompanying smoothness filter to a value such as 5 to create a transition between the blacks and the dark shadows. Be careful, or you will likely get blocked-up shadows in the darker areas.
Black restore. This setting lets you set a floor for black values and pushes dark grays beyond the setting to black. For example, a black restore setting of 10 will render all values falling below that numerical value as straight black. This can be a great effect for letterbox bars and black backgrounds behind titles and credits. If you use this setting in video picture areas, however, be sure to set the accompanying smoothness filter to a value such as 5 to create a transition between the blacks and the dark shadows. Be careful, or you will likely get blocked-up shadows in the darker areas.
![]() White restore. This setting allows you to set a ceiling for white values, where any value exceeding the number you set will render as white. Although less useful than black restore, you may find some instances to use this setting where a strong white graphic effect is desired.
White restore. This setting allows you to set a ceiling for white values, where any value exceeding the number you set will render as white. Although less useful than black restore, you may find some instances to use this setting where a strong white graphic effect is desired.
![]() Hue and saturation.
Hue and saturation.
Noise reduction
Noise in video (sometimes known as “snow”) places more demand on the codec and creates larger file sizes, all while degrading the image. Shooting video under very low light levels with gain set high produces the noisiest video and is best avoided. It is always advisable to start with the cleanest, noise-free video possible. Cleaner offers a noise reduction filter that attempts to remove noise while leaving other image information alone. The trade-off here is that noise reduction filters introduce blurring. Noise reduction is at best a quick fix that makes bad video into OK video—it cannot work miracles with really noisy images. Cleaner’s “Adaptive Noise Reduction” setting is a good solution overall to cleaning up noisy video. The temporal processing filter is available under cleaner’s “Adaptive Noise Reduction”—it custom compares pixels in a frame with those before and after to distinguish noise from the rest of the video image. This process puts a big hit on processor power and speed, lengthening encoding times, and can garble areas of fine detail such as small text.
Preprocessing audio
The audio in your movie should be already mixed and equalized so that all elements are clear and modulated properly. In that case, your tweaking will be minimal. Nonetheless, you will want to optimize the audio in preprocessing with the following in mind:
![]() Normalization. Find the loudest point in your audio and set the volume for this point; it should be about the same level as the given computer beep. The volume normalization filter in cleaner maximizes audio volume without introducing distortion by scanning the movie to find the loudest passage and pegging the maximum volume to this portion; normalizing to 90% is often best for Web video compression.
Normalization. Find the loudest point in your audio and set the volume for this point; it should be about the same level as the given computer beep. The volume normalization filter in cleaner maximizes audio volume without introducing distortion by scanning the movie to find the loudest passage and pegging the maximum volume to this portion; normalizing to 90% is often best for Web video compression.
![]() Sweetening. Cleaner allows a number of audio sweetening and other filters; in general, it is best if you begin with an audio track that is already mixed properly, though you may find the low and high pass, noise removal, dynamic range, reverb, and noise gate filters useful on occasion. The notch filter cuts out sound at a specific frequency, useful for reducing AC hum.
Sweetening. Cleaner allows a number of audio sweetening and other filters; in general, it is best if you begin with an audio track that is already mixed properly, though you may find the low and high pass, noise removal, dynamic range, reverb, and noise gate filters useful on occasion. The notch filter cuts out sound at a specific frequency, useful for reducing AC hum.
Tutorial: Custom compressing a film clip
Now let’s compress a film clip for the Web using SV3. We will encode this for progressive download in three different file output sizes: a small file for 56K dial-up modem users, a medium-size file for DSL users, and a large, high-quality file for cable modem and T1 connections. Let’s start with the large file first:
1. If it is not open already, open up cleaner. Go to the CD, to “Ch06/cleaner-clip02.mov” and drag it into cleaner’s “Batch” window. With the clip appearing in the top row of the “Batch” window, double-click on the icon in the “Project” column to bring up the “Project” window.
In the “Project” window, you will see the film clip—you can scrub through or play the clip to see the various shots that make up this sequence. This clip, from a Chapman University School of Film and Television Location Filmmaking project titled Black Wedding, is a good example of a motion picture designed and shot for theatrical exhibition. Like many neo-noir feature-length films, this clip boasts saturated colors, bold contrasty lighting, and a wide aspect ratio. It is going to take some custom compression to bring out the best in this movie. Let’s crop this clip to start off:
2. Cropping. This clip is letterboxed, so let’s remove the black bars so we can have a true widescreen aspect ratio in our frame. In the QuickTime tab of the “Preview” window, leave the “Display aspect ratio” pull-down alone at 4:3 and change the “Crop aspect ratio” pull-down to “Custom.” In the “Aspect” box that appears (Figure 5.27), type in a width of 444 and a height of 240. This conforms to the 1:1.85 aspect ratio of the original clip; be careful not to select a height exceeding 240 pixels, however, if you wish to avoid upscaling and degrading the image quality. (Note: Resist the urge to change the “Display aspect ratio” to a “Custom aspect ratio” as well; this results in squashing the whole existing 4:3 frame and distorting the image.) Now you may draw a bounding box that crops the black bars from the letterbox image, cropping in a little from the sides (Figure 5.28).

Figure 5.27 Selecting a custom aspect ratio in the “Aspect” box.
3. In the “Batch” window, double-click on the dash in the “Settings” column to open the “Settings” window. The “Settings” window contains an array of presets you may use as starting points for your compressions. We will start with a large download compressed with SV3. Open the “Film” folder within the QuickTime folder and double-click on “SV3FILM large download.” Click on the “Duplicate” button to make a copy of this setting that we can modify to suit our clip.
4. Click on the “Output” button. Leave settings as they are, but put a check in the box labeled “Disable saving” (Figure 5.29). This will deter users from keeping copies of the movie when they download it from the Web.
5. Skip the “Tracks” button and click on the “Image” button. Settings should be as follows (Figure 5.30):
a. “Crop” box checked, pull-down menu: “Manual.”
b. “Image Size” box checked. To preserve the original 1:1.85 aspect ratio of this clip, type in frame proportions as 444 × 240 (use a multiple of the aspect ratio with a vertical measurement not exceeding 240, otherwise you will be upscaling the QuickTime image). Set the pull-down menu “Custom …444 × 240,” “Display size: Normal.”
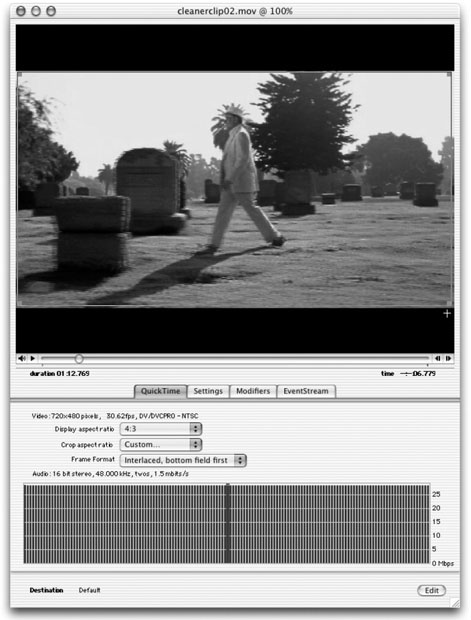
Figure 5.28 Cropping the frame in the “Preview” window.

Figure 5.29 The “Output” window. Leave settings as they are, but put a check in the box labeled “Disable saving.” This will deter users from keeping copies of the movie when they download it from the Web.
c. “Deinterlace” box is checked. Pull-down menu: “Intelecine.” Intelecine is an inverse telecine 3:2 video pull-down removal option you should always use when working with film transferred to video and captured at full frame (640 × 480 or 720 × 486).
d. Do not check the “Shift Fields,” “Telecine,” “Blur,” “Static Masks,” or “Watermark” boxes, but leave the “Sharpen” checked with defaults as “Radius: 1.5” and “Amount: 50.”
e. Leave the “Adaptive Noise Reduce” box checked, with the pull-down menu set to “Mild.” You can try different settings of this and check them out on the “Dynamic Preview”; be careful though—this setting works by defocusing the image.

Figure 5.30 Settings in the “Image” window.
Dynamic Preview in Action
You can check the effects of any filter you try by bringing up the “Dynamic Preview” window (you must click on the “Apply” button at the bottom left-hand corner of the “Settings” window before cleaner will let you bring up the “Dynamic Preview”—and you can always apply your updated settings at any time as you go).
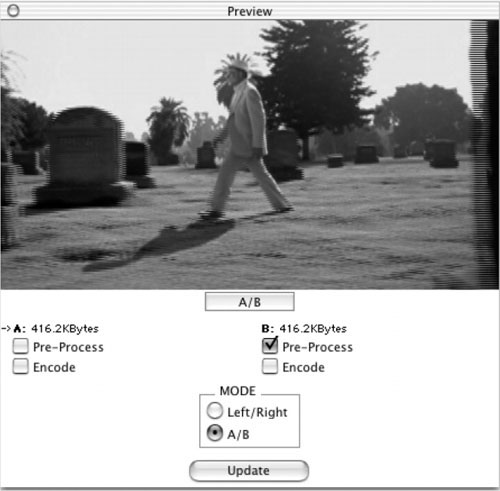
Figure 5.31 In this tracking shot, notice the obvious interlacing artifacts on the trailing edge of the headstone on the far right of the frame. This can be corrected with “Intelecine.”
For example, if you scrub to a frame where the large headstone appears in the tracking shot, you will see some rather obvious interlacing artifacts on the trailing edge of the stone (Figure 5.31). With “Intelecine” checked, choose either the “Left/Right” slider or the “A/B” modes (click on either circle in the “Mode” box) to compare the picture before and after each setting you adjust; you will see the effect of the filter (Figure 5.32) before you commit to encoding. You can use the “Dynamic Preview” to see all filter adjustments in advance. For instance, if you want to try more or less sharpening, you can see the results of the filter before going ahead with the compression. Note: Discreet recommends using the “A/B” mode over the slider mode when compressing with SV3.

Figure 5.32 With “Intelecine” checked, choose either the “Left/Right” slider or the “A/B modes” (click on either circle in the “Mode” box) to compare the picture before and after each setting you adjust; you will see the effect of the filter before you commit to encoding. After applying the filter, the comb-like artifacts on the edge of the headstone have disappeared.
6. Click on the “Adjust” button. In this window you can adjust “Gamma,” “Brightness,” “Contrast,” and other image settings (Figure 5.33). Because these settings are often subjective, feel free to try different settings and check them in the “Dynamic Preview.”
a. Check “Gamma”: Set slider to 30.
b. Check “Brightness”: Leave slider at −5.
c. Check “Contrast”: Leave setting at 5.
d. Leave the “Black and White Restore” boxes unchecked; these are best for deepening the blacks and whites in titles and graphics (for example, deepening the blacks of letterbox bars).
e. Leave “Hue” unchecked.

Figure 5.33 In the “Adjust” window you can adjust “Gamma,” “Brightness,” “Contrast,” and other image settings. Because these settings are often subjective, feel free to try different settings and check them in the “Dynamic Preview.”
f. I found this clip oversaturated (especially for Web compression); check the “Saturation” box and adjust the slider to −15 to −20; check results in the “Dynamic Preview.”
g. Leave “QuickTime Effects” box unchecked.
7. Click on the “Encode” button. Make sure settings are as follows (Figure 5.34):
a. “Codec”: Sorenson Video 3 Compressor
b. “Bit Depth”: Millions of colors
c. “Frame Rate”: 23.975 fps. This will give us smoothest motion but may yield motion artifacts at lower bit rates. When you prepare files at smaller sizes and lower bit rates, use 12 fps.
d. “Keyframes”: Every 240 frames. Ten times the frame rate is a good setting for the Sorenson codec.
e. Leave “Compare Uncompressed Frames” box unchecked; this should not be used with live-action motion pictures.
f. Check “Video Data Rate” box. Select “2-pass VBR” encoding from the pull-down if you have installed Sorenson Video. This greatly enhances encoding by using two passes and setting data rates accordingly. In the first pass, the movie is analyzed to identify difficult and easy segments to encode. On the second pass, cleaner ascribes lower data rates to the easy sections and higher average rates to the difficult portions. This method gives optimum compression results. Because this is a high-quality large-size movie, leave the “Limit to” at 750.0K bits/second, check the “Peak” box, and make sure the “Peak” is set to 1400.0K bits/second.

Figure 5.34 Settings in the “Encode” window.
g. Make sure the “Options” box is checked. The total date rate for this movie will be 1.1 M bits/second.
8. Click on the “Audio” button to bring up the “Audio” window, and use the following settings:
a. “Codec”: Because there is practically no music in this sequence, let’s try using the IMA 4:1 codec. QDesign 2 would be a good choice if there were music, and AAC would be an excellent choice overall provided that all our users are using QuickTime 6 or better.
b. For the “Sample Rate,” let’s try 22.050 kHz, because this clip is mostly dialog; this low sampling rate is less CPU-intensive than the usual 44.100 setting. In cases where there is music or overlapping dialog, however, we would need to use the higher sampling rate.
c. “Depth” will default to 16-bit.
d. “Channels”: We could save bandwidth by checking the “Mono” box without losing much quality (provided the film soundtrack has been mixed to mono), but true “Stereo” sound is often the best choice when there is music and effects.
e. Check “Volume” box and set the pull-down to “Normalize”; the slider should default to 90%.
f. Check “Dynamic Range” and change the pull-down setting to “Limit to 90%,” a good choice for Web video.
g. Leave the other settings unchanged and click on the next button.
9. The “Begin/End” window (Figure 5.35) offers a number of options for the start and end frames of the video, important items to consider for optimization because the user sees the start frame first and the end frame is the one remaining on when the movie ends.
a. For this clip, check the “Video Fades” and “Fade in” boxes, and leave the default settings from “Black at 0.5 seconds”; this will introduce the clip with a half-second fade-in.
b. Check the “Audio Fades” and “Fade in” boxes as well, with the default of 0.5 seconds.
c. Check the “High-Quality Frames” and “Last frame” boxes; change the pull-down to “JPEG track” and leave the slider at 50%. This setting ensures that the last frame is a high-quality image, a good idea because it will be the image that remains after the movie ends.
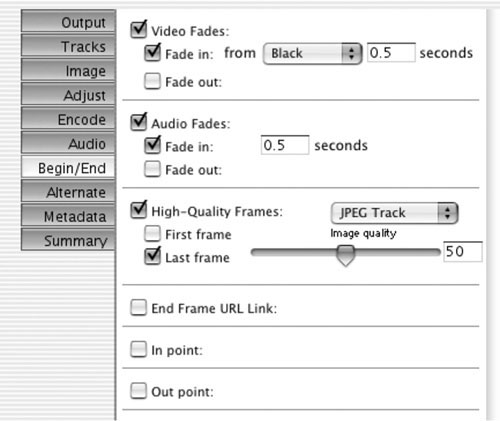
Figure 5.35 Settings in the “Begin/End” window.
d. If you want the last frame to become a clickable link to a URL, you could check the box “End Frame URL Link” and type a URL in the text box.
e. Leave the other boxes unchecked.
10. You can click on the “Alternates” button to prepare alternate movies of different sizes and streaming characteristics. Skip this window for now.
11. In the “Metadata” window, you can type in various information regarding title, author, copyright, and so on.
12. The “Summary” window shows the settings you have created.
13. When you have finished making your settings, go to the “Batch” window and click on the green arrow to begin the encoding process. Cleaner will sound a bell when the encoding has completed.
Kinoma for PDA Video
The most recent development in Web-based video may well be the growing proliferation of hand-held electronic devices equipped to play full-color movies from the Web. The Kinoma movie format for Palm hand-held devices has emerged as a key protocol in this movement. The Kinoma Exporter transcends audio and video encoding, allowing control of video presentation such as background images, color, and layout. To encode using the Kinoma Exporter:
1. Open cleaner if it is not open and drag a movie of your choice to the “Batch” window. Choose the default setting in the “Settings” window.
2. In the “Output” tab, choose “Kinoma Movie for Palm OS” from the pull-down.
3. Check the “Options” box and click on the “Set” button to bring up the Kinoma “Advanced Settings” window.
4. The “Advanced Settings” window features an “Encoding” section that includes a pull-down to select the target device, a video settings box, an audio settings box, and a custom layout section (Figure 5.36).
a. Select a target PDA or cell phone in the “Device” pull-down, in this case, “All color Palm OS devices.”
b. Set the “Video” encoding for:
i. “Format”: “Cinepak.” The Cinepak Mobile is touted as the “most advanced video-encoding format” included in Kinoma, so that is what we will use. For black-and-white target devices, an appropriate codec would be “16 grays.”
ii. Set “frames per second” to “best.”
iii. “Size in pixels”: 160 × 120
iv. “Bit rate: 240 KB/second

Figure 5.36 The Kinoma Movie “Advanced Settings” window.
c. Set “Audio” controls as follows:
i. “Format.” There are three codecs to choose from, though no single format is common to all devices. Select “ADPCM” for greatest compatibility with all Palm units, “CLIÉ Audio” for stereo audio in units featuring Sony’s Audio Adapter plug-in, or “Yamaha ADPCM” for units that include a Yamaha audio chip.
ii. “Audio channels.” The choice of “stereo” or “mono” is available only with the CLIÉ Audio codec.
iii. “Sample rate.” Leave this setting at 8.192 kHz. Increase this if you want to improve sound quality at the expense of greater processor load and larger file sizes.
iv. “Compression ratio.” Choose 2:1 for best fidelity.
v. “Audio boost” is an option to increase volume for potentially better sound quality on Palm hand-helds. It can result in distortion, so be sure to test if you use this option.
d. The “Custom layout” lets you select screen resolution as well as background color and image selection. All Palm devices can display 160 × 160 images so we will leave this default as is. Click OK. Now you can go on to make adjustments in the “Image,” “Adjust,” “Audio,” and “Begin/End” tabs before applying and encoding as you did in the last exercise.
These are just a few workflows you can use in cleaner—there are many more features that you will find as you explore this multifaceted application on your own. You can set up a batch of different encoding settings to encode for streaming on Windows Media or Real servers, compression for MPEG-1 for CDs, MPEG-2 for DVD, MPEG-4 for the Web, and many other settings, depending on your deployment requirements.
As Doug Werner noted in the opening quote to this chapter, there are no magic formulas to achieve optimum results with every movie you compress. Though discreet cleaner provides presets to streamline the process, you will absolutely need to tweak and adjust settings yourself if you want movies that approach the quality of the Apple site trailers. The following is an example of some settings that can give you a starting point for your compression. First of all, remember the axiom you have undoubtedly heard time and again: Garbage in—garbage out.
So, begin with the highest quality video possible. If you are compressing actual film, with hope you will be getting your source transfer in the highest quality video available. The best quality source video to work from is DigiBeta, followed by BetaSP, and then DV. If you have DV source material and access to Apple’s Final Cut Pro, capture the video using this application and save it in the uncompressed QuickTime format.
Compression Summary
Sorenson Video, currently in Version 3.1, remains the codec of choice for motion-picture compression in QuickTime, especially in files destined for the Web. Although the Standard Sorenson Video codec available in QuickTime Pro provides some limited compression abilities, professional compression calls for the Developer version of the software, which works exceptionally well in conjunction with discreet cleaner. The QDesign 2 Music Codec, Professional Edition has been the preferred compressor for audio with voice, music, and sound effects, whereas Qualcomm’s codec is used when only speech appears on a sound-track. The IMA 4 can also be used, especially when a less CPU-intensive audio codec is desired; the quality will not match what can be done with QDesign, however. With QuickTime 6, and its embrace of MPEG-4 and AAC sound codecs, reliance on Sorenson Video may give way to these newer technologies.
Frame Size
Resizing is a necessity for the Web, and in fact all Web video comes to the user at lower frame resolutions than the original source. The key to clean resizing is to choose a size that is one-half to one-fourth the original size of the cropped movie. A good rule of thumb is to size at 160 × 120 pixels for movies intended to be downloaded over a modem; 240 × 180 pixels for DSL and ISDN speeds; and 320 × 240 for high bandwidth connections such as cable modems, T1 lines, and local networks. More and more, movies as big as 480 pixels wide are being offered as an option for very high-end users; high-quality movie trailers are regularly posted at sizes up to 640 pixels wide! In any case, you want to keep your frame proportions consistent with the original aspect ratio—in other words, do not squeeze or smoosh the picture. If you expect your user to view at double the actual size, count on compressing at a higher data rate to preserve a sharp picture at larger scaled sizes.
Frame Rate
Reducing the frame rate will yield video that is much less demanding on bandwidth, and it is an essential part of compressing your movie. Change the frame rate of your movie to one that is one-half, one-third, or one-fourth the original rate. For film, this might be 12 or 8 fps. Video (NTSC) requires a 29.97, 15, 10, or 7.5 rate, whereas PAL video works best with 12.5 or 6.25. In most cases, lower bandwidth users require movies with lower frame rates.
Testing
Before you release anything to the Web or elsewhere, test and test again. Encoding generally takes time and often needs to be repeated with slight tweaks to get it right. Testing, though tedious, is not nearly as laborious as redoing your work when it is not up to par. A good way to go about your compressing is to compress the entire movie first and watch it, noting the most difficult areas where the most degraded picture quality and motion distortion occur most frequently. Now open your original movie in QuickTime Pro, select the area that compressed with the most degradation, and save it as a separate QuickTime movie with dependencies (if you forget how to select and save portions of movies, go back and review Chapter 4). Careful testing will yield Web and CD video that will give your content the quality it deserves.