
4 |
Basic Editing with QuickTime Pro |
“You won’t be up for an Oscar, but you’ll do a decent job.”
—Arnie Keller4
QuickTime is rightly famous for its multimedia playback abilities, but its editing capabilities remain largely unknown. In truth, there are more robust editing systems than QuickTime Pro when it comes to video postproduction, and serious editors would be well advised to stick with an application such as Apple’s Final Cut Pro, Adobe Premiere, Avid Film Composer, DV Xpress, or even Apple’s iMovie for editing content more than a few minutes long. Nonetheless, it is hard to beat QuickTime Pro’s price and simplicity, and you may be surprised at the power that QuickTime packs when it comes to basic editing tasks.
Making Selections
Most editing programs, including QuickTime, use the word processor metaphor in their basic operation; that is, you rearrange, shorten or lengthen, and add or subtract frames and footage in much the same way you would edit letters, words, and sentences in a word processing document, through copying, cutting, and pasting. As with word processing, in order to edit, you need to learn how to make selections.
Open a movie clip you wish to edit and look at the QuickTime time line slider; at the start of the slider just under the black playback head arrow—the playback head—you will see a split gray arrow (Figure 4.1). The left half of this arrow represents the “In Selection Point,” whereas the right half of the arrow denotes the “Out Selection Point.” If you click and drag the “Out Selection” arrow out along the time line, you will see a gray bar appear over the time line between the “In” and “Out” points. Voila! You have just made a selection. You can also click and drag the “In Point Arrow” to trim the size of your selection. Notice that as you drag an “In” or “Out Point Arrow,” you will see the picture change accordingly as you move your pointer across the time line. This indicates where you are in the movie so you know where to place in and out points of your selection; as soon as you release the point, the picture will return the frame of the movie to the position of the playback arrow. Any cutting or copying done now will affect only this area. You can fine-tune the “In” and “Out” points by highlighting one and incrementally nudging the point with the right (forward) or left (backward) arrow keys on your computer keyboard—you can tap or hold the key depending on how much you wish to nudge the point. Another way to set an “Out Point” is to scrub through the time line and when you arrive at the point where you would like to place the point, press the Shift key simultaneously with the right arrow before releasing your mouse button—your “Out Point” will jump to that place in the time line.

Figure 4.1 At the start of the slider just under the black playback head arrow—the playback head—you will see a split gray arrow.
Note: If you use the mouse to make selections, your selection end point will be frame-accurate. That is, if you grab an “Out Point” and drag it back a couple of frames, then that is exactly the selection you will get—frame on. Conversely, if you use the time indicator and scrub to the last frame and use the Shift key + arrow key to set the end point, your selection will actually be one frame before what you are seeing on the screen. Although this is not a big issue, you will want to keep it in mind if you alternate between these two methods for setting end points.
Once you have made a selection, an easy way to move the time line playback indicator around is by holding down the Option key (Mac) or the Control + Alt (Windows) and using the arrow keys to make the playback indicator jump from point to point to start or end. For instance, if you have in and out points selected and your playback indicator is poised at the start of the movie, you can jump to the first point (in), to the second (out), to the end with Option or Control/Alt and right arrow clicking, or jump back through the out and in points to the movie start with Option or Control/Alt + left key clicking.
Copy-and-Paste Editing
You are ready to start editing when you have made a selection (see previous section). Perhaps the simplest form of cut-and-paste editing is taking a selected clip out of its context in the movie and placing it somewhere else.
Remove and replace a clip
![]() Select the segment of the movie you wish to place elsewhere, if you have not already.
Select the segment of the movie you wish to place elsewhere, if you have not already.
![]() To cut the clip out of your movie, go to “Menu Bar/Edit/Cut” (“Control/Command + X”). Note that the options under “Edit” are similar to the “Edit” options in any word processing program. The clip is now being held in the memory of the computer, waiting for the next step.
To cut the clip out of your movie, go to “Menu Bar/Edit/Cut” (“Control/Command + X”). Note that the options under “Edit” are similar to the “Edit” options in any word processing program. The clip is now being held in the memory of the computer, waiting for the next step.
![]() To paste the clip, move the playback indicator to the point where you want to insert this clip, go to “Menu Bar/Edit/Paste” (“Control/Command + V”) and insert the clip. Note that the clip appears in the movie as a grayed selection in case you want to further work with the clip.
To paste the clip, move the playback indicator to the point where you want to insert this clip, go to “Menu Bar/Edit/Paste” (“Control/Command + V”) and insert the clip. Note that the clip appears in the movie as a grayed selection in case you want to further work with the clip.
Note: If you need to undo any step you have executed, you may do so by going to “Menu Bar/Edit/Undo” (“Control/Command + Z”) and rescinding the last step you did. Unfortunately, QuickTime does not allow you to undo more than one step at any given time.
Trimming a clip to specific duration
The method described provides an easy way to edit clips visually. When you need to edit to a specific time length, however, you need to have a little more control. This is important if, say, you have to edit a clip to exactly 20 seconds long. To trim a clip to a given duration:
![]() Go to “Menu Bar/Movie/Get Movie Properties” (“Control/Command + J”), and you will see a “Properties” dialog box.
Go to “Menu Bar/Movie/Get Movie Properties” (“Control/Command + J”), and you will see a “Properties” dialog box.
![]() In the “Properties” box, see that the left pull-down menu reads “Movie” and click on the right pull-down menu (it may be set to “Annotations” by default) and choose “Time.”
In the “Properties” box, see that the left pull-down menu reads “Movie” and click on the right pull-down menu (it may be set to “Annotations” by default) and choose “Time.”
![]() In the “Time” window, you will see four categories:
In the “Time” window, you will see four categories:
![]() “Current Time”: This shows the position of the playback indicator in hours:minutes:seconds:frames.
“Current Time”: This shows the position of the playback indicator in hours:minutes:seconds:frames.
![]() “Duration”: This shows the length of the movie in hours:minutes: seconds:frames.
“Duration”: This shows the length of the movie in hours:minutes: seconds:frames.
![]() “Selection Start”: This shows where the selection start is in hours:minutes: seconds:frames.
“Selection Start”: This shows where the selection start is in hours:minutes: seconds:frames.
![]() “Selection Duration”: This shows where the selection end is in hours:minutes: seconds:frames.
“Selection Duration”: This shows where the selection end is in hours:minutes: seconds:frames.
When you go back to the Player, leave this dialog box open where you can see it. Then drag your in/out points across the time line slider according to the length you want, using the information in the “Selection Start” and “Duration.”
Saving a Movie as a Self-contained File
In most cases, you will want to save a movie as a complete file. To do this, go to “Menu Bar/Save As” (rather than simply “Save”). At the bottom of the box you can see two choices: “Save Normally (allowing dependencies)” followed by a very small file size figure, and “Make Movie Self-Contained” followed by a large file size figure. As you save this file, be sure to check the option “Make Movie Self-Contained.” This will save all of the film’s components so that it will play in any context, rather than just within the directory where the movie currently resides. If you were to simply save the movie in the default “Save Normally (allowing dependencies),” the movie will play in its current state as long as all dependent files—meaning earlier versions or component elements used in editing the movie you are saving—remain in place. Think of these dependent files as components of a Web page, such as graphics and linked pages—the links of the Web page will function properly only as long as the links between it and its components remain intact. Therefore, the movie saved in this form will not play if it is moved or if the dependent files are moved or discarded. Saving the movie as a self-contained file will avoid this potential problem.
Editing Tracks
As we have seen, QuickTime movies are constructed of numerous tracks. You might think of tracks as layers if you are used to using image editing applications such as Adobe Photoshop. In general, the topmost video track at full opacity will obscure all underlying video tracks and thus they will not be seen. But audio tracks will play simultaneously unless they are disabled. So far, we have discussed editing QuickTime movies with a single video and audio track. But QuickTime is a multitrack editor, and you can put its ability to compile a movie from many tracks to good use.
For example, if you open a QuickTime movie, you can check the number of tracks it contains by going to “Menu Bar/Edit/Enable Tracks,” where you will see a box listing the various tracks contained in the movie. If you have a movie with at least one video and one sound track and do a simple cut-and-paste edit, you switch out one portion of video and audio for another, essentially retaining two tracks. You can add new tracks to the existing tracks, however, by editing with the “Edit/Add” command. This action effectively stacks the new tracks on top of the existing tracks, preserving rather than writing over them. You will be able to hear two audio tracks when you play back the movie, even though only one video track will be apparent.
Track information in “Get Movie Properties”
You can learn a lot of useful information about the tracks in a QuickTime movie if you go to “Movie/Get Movie Properties.” In the “Movie Properties” box you can pull down the left menu and see the various tracks in the movie; by selecting one of them, you can then go to the right menu and scroll down to any one of the following categories: “Alternate,” “Annotations,” “Files Format,” “Frame Rate,” “General,” “Graphics Mode,” “High Quality,” “Layer,” “Mask,” “Preload,” and “Size.” When you select one of the audio tracks, you can choose from some of these same categories, including some extra ones such as “Preload” and “Volume.”
Extracting tracks
The simple editing process described so far refers to what is known as assemble editing; that is, assembling clips with all tracks (e.g., video and audio) intact without regard to their component tracks. If you want to pull a single track from a movie, such as audio (or video) only, you can do so by extracting the track:
![]() Go to “Menu Bar/Edit/Extract.”
Go to “Menu Bar/Edit/Extract.”
![]() In the “Extract Tracks” box, select the track of your choice.
In the “Extract Tracks” box, select the track of your choice.
![]() Click “Extract” and a new movie appears that contains only the track just extracted. In this way you can add the sound from one movie to that of another (by going to “Edit/Add”).
Click “Extract” and a new movie appears that contains only the track just extracted. In this way you can add the sound from one movie to that of another (by going to “Edit/Add”).
Replacing tracks
If you want a new track to take the place of an existing track, simply:
![]() Go to “Menu Bar/Edit/Delete Tracks” and a box appears showing the tracks contained in the movie.
Go to “Menu Bar/Edit/Delete Tracks” and a box appears showing the tracks contained in the movie.
![]() Select the track you wish to delete and press “Delete.”
Select the track you wish to delete and press “Delete.”
You have replaced one track with another, which you can verify by going to “Movie Properties” and checking under the left scroll menu.
Extracting multiple tracks
You can extract multiple tracks by doing the following:
![]() Go to “Menu Bar/Edit/Extract Tracks.”
Go to “Menu Bar/Edit/Extract Tracks.”
![]() “Command/Control” click on each of the tracks you wish to extract. (If you “Shift +” click, you can select all the items within the first- and second-selection click you made).
“Command/Control” click on each of the tracks you wish to extract. (If you “Shift +” click, you can select all the items within the first- and second-selection click you made).
![]() Go to the movie where you want to add the tracks and select “Edit/Add,” and the tracks will be added to the movie.
Go to the movie where you want to add the tracks and select “Edit/Add,” and the tracks will be added to the movie.
Turning tracks on and off
You can turn tracks on and off by going to “Menu Bar/Edit/Enable Tracks” and selecting the track(s) you wish to turn off. When you click on the track, you should see the green “On” button change to a red “Off” button. The track is still in the movie, but while it is turned off, it will not be visible or audible.
Stretching or compressing a track to fit a different movie
One cool feature is QuickTime’s ability to let you stretch or compress a track you extract from a movie and insert into another movie to conform to that movie’s length—this is known as scaling. Take, for example, an audio track from a one-minute movie using “Edit/Extract,” select the audio track, and click “Extract.” In the new audio-only movie select “Edit/Select All” and “Edit/Copy,” and close the window without saving. Now if you go to the movie two minutes in length and select from the “Menu Bar Edit/Add Scaled,” the track will stretch to fill the two-minute length of the movie. This will affect the speed of the video or audio track, of course, so you need to decide how much fast- or slow-motion effect you want in your scaled track (generally 5% to 10% is the maximum before the speed difference becomes really noticeable).
Scaled insert edits in QuickTime
You can also use this method for inserting scaled tracks from one movie into selected portions of another:
![]() You will want to specify the length of the track you intend to extract, so make a selection in the time slider of your source movie (see instructions on making selections if you forget how to do this). Now choose “Menu Bar Edit/Extract Tracks,” selecting the track you wish to insert and clicking “Extract.”
You will want to specify the length of the track you intend to extract, so make a selection in the time slider of your source movie (see instructions on making selections if you forget how to do this). Now choose “Menu Bar Edit/Extract Tracks,” selecting the track you wish to insert and clicking “Extract.”
![]() In the new single-track movie that appears, select “Edit/Select All” and “Edit/Copy,” and close the window without saving.
In the new single-track movie that appears, select “Edit/Select All” and “Edit/Copy,” and close the window without saving.
![]() Go to your second movie where you want to make your insert; make a selection in the time slider.
Go to your second movie where you want to make your insert; make a selection in the time slider.
![]() Go to “Menu Bar/Edit/Add Scaled” and the clip you copied will insert into the selection where you want it. The clip you paste will expand or contract to fit the selected space.
Go to “Menu Bar/Edit/Add Scaled” and the clip you copied will insert into the selection where you want it. The clip you paste will expand or contract to fit the selected space.
Resizing and Repositioning a QuickTime Track
Changing the position and size of a QuickTime video track is a snap (note that these effects are not applicable to sound tracks).
![]() Go to “Menu Bar/Movie/Get Movie Properties” and select a video track from the “Movie” pull-down menu.
Go to “Menu Bar/Movie/Get Movie Properties” and select a video track from the “Movie” pull-down menu.
![]() With the “Movie Properties” window open, and “Video Track #” selected, go to the right pull-down menu and scroll down to “Size.” You will see a number of controls to resize and position the video frame (Figure 4.2).
With the “Movie Properties” window open, and “Video Track #” selected, go to the right pull-down menu and scroll down to “Size.” You will see a number of controls to resize and position the video frame (Figure 4.2).
![]() In the lower half of the “Movie Properties” box, press the far-left button to “flop” the image horizontally; press the second-to-the-left button to “flop” the image vertically.
In the lower half of the “Movie Properties” box, press the far-left button to “flop” the image horizontally; press the second-to-the-left button to “flop” the image vertically.
![]() In the lower half of the “Movie Properties” box, press the second button from the right to rotate the image clockwise in 90° increments; press the far-right button to rotate the image counterclockwise in 90° increments.
In the lower half of the “Movie Properties” box, press the second button from the right to rotate the image clockwise in 90° increments; press the far-right button to rotate the image counterclockwise in 90° increments.
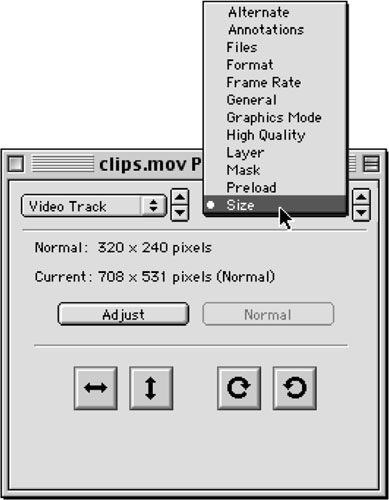
Figure 4.2 Options and controls in the “Movie Properties” window.
![]() You can rotate, scale, or skew the frame in varying degrees by clicking on the “Adjust” button. A red bounding box will appear around the frame with a red circle in the frame’s center (Figure 4.3). “Handles” will appear at each corner of the frame and at the midpoint of each side. Grab one of the “handles” at the corner and pull to skew the picture or grab a corner and scale the picture to any proportion. If you click and drag from the center circle, a stretch handle will appear and allow you to pull the picture around, rotating it on the fly to any point you wish.
You can rotate, scale, or skew the frame in varying degrees by clicking on the “Adjust” button. A red bounding box will appear around the frame with a red circle in the frame’s center (Figure 4.3). “Handles” will appear at each corner of the frame and at the midpoint of each side. Grab one of the “handles” at the corner and pull to skew the picture or grab a corner and scale the picture to any proportion. If you click and drag from the center circle, a stretch handle will appear and allow you to pull the picture around, rotating it on the fly to any point you wish.
Note: QuickTime does not crop the frame when you perform these transformations; rather the movie canvas expands to contain the entire movie framed in its new position.
If you have two or more video tracks in the movie (you can add extra video tracks using the method described), you can move one of them within the frame:
![]() Open the “Movie Properties” window if it is not already open and select one of the video tracks from the left pull-down menu.
Open the “Movie Properties” window if it is not already open and select one of the video tracks from the left pull-down menu.
![]() Click on the “Adjust” button.
Click on the “Adjust” button.
![]() Click within the bounding box that appears around the movie frame and drag the window; you will see that you are separating these video tracks and you can pull the picture up, down, or sideways. You can even drag down into the time slider and beyond; when you release the frame, you will see it in the position where you dragged it, increasing the size of the overall frame to accommodate both tracks. If you like the new configuration you just created, click “Done” in the “Movie Preferences” box; otherwise, you can restore the original dimensions if you click the “Normal” button in “Movie Preferences.”
Click within the bounding box that appears around the movie frame and drag the window; you will see that you are separating these video tracks and you can pull the picture up, down, or sideways. You can even drag down into the time slider and beyond; when you release the frame, you will see it in the position where you dragged it, increasing the size of the overall frame to accommodate both tracks. If you like the new configuration you just created, click “Done” in the “Movie Preferences” box; otherwise, you can restore the original dimensions if you click the “Normal” button in “Movie Preferences.”

Figure 4.3 When you click on the “Adjust” button, you will see a red bounding box appear around the frame. Click on the bounding box and drag to change the frame size and shape.
Picture in a picture
You can get a simple but impressive picture-in-a-picture (PIAP) effect (Figure 4.4) by following this procedure:
![]() Extract a video track from an existing movie.
Extract a video track from an existing movie.
![]() In the extracted track, select “All” and “Copy” and close the extracted movie window without saving.
In the extracted track, select “All” and “Copy” and close the extracted movie window without saving.
![]() Go to the movie where you want to create the PIAP effect and select “Edit/Add.” This stacks the video track above the existing tracks.
Go to the movie where you want to create the PIAP effect and select “Edit/Add.” This stacks the video track above the existing tracks.
![]() Go to “Movie/Get Movie Properties” and select the video track of your choice from the left pull-down menu; click “Adjust.”
Go to “Movie/Get Movie Properties” and select the video track of your choice from the left pull-down menu; click “Adjust.”
![]() A red bounding box should appear; click and drag a corner or edge of the bounding box to scale the track to a smaller size of your choice.
A red bounding box should appear; click and drag a corner or edge of the bounding box to scale the track to a smaller size of your choice.
![]() Now move the track to the position you desire; the movie will play both the insert box and the underlying video track simultaneously.
Now move the track to the position you desire; the movie will play both the insert box and the underlying video track simultaneously.

Figure 4.4 The picture-in-a-picture (PIAP) effect in a QuickTime movie.
Rearranging Video Tracks
You can reorder or layer your video tracks so the underlying obscured track becomes the visible track:
![]() You will want to see both video tracks, so go to the “Movie Properties” window (“Movie/Get Movie Properties”), choose “Video Track 2” from the left pull-down menu, choose “Size” from the right pull-down menu, and click on the “Adjust” button.
You will want to see both video tracks, so go to the “Movie Properties” window (“Movie/Get Movie Properties”), choose “Video Track 2” from the left pull-down menu, choose “Size” from the right pull-down menu, and click on the “Adjust” button.
![]() Drag one track down so you can easily see both in the Player window. Click “Done.”
Drag one track down so you can easily see both in the Player window. Click “Done.”
![]() Now go to the right pull-down menu and select “Layer” (Figure 4.5).
Now go to the right pull-down menu and select “Layer” (Figure 4.5).
Important: QuickTime tracks are numbered according to their layer order, so the higher the number of the layer, the farther down it sits in the layer stack.
![]() Change the number assigned to “Video Track 2” and click on the “Down” arrow until it becomes a number less than the overlying layer, such as “–1.”
Change the number assigned to “Video Track 2” and click on the “Down” arrow until it becomes a number less than the overlying layer, such as “–1.”

Figure 4.5 You can reorder or layer video tracks when you select a video track in the “Movie Properties” dialog and select “Layer” in the right-hand pull-down menu.
Using Masks
QuickTime Player lets you apply a mask to video tracks in a movie so it can play in a frame shape that is not necessarily rectangular. It is easy to create a mask, which is nothing more than a black and white graphic of a blob or patch in the shape you would like to act as the window of your movie. Here is how you put a simple mask in a QuickTime movie:
![]() Make a mask using a graphics program such as Adobe Photoshop or Adobe Illustrator. The mask should be black where you want your video to show through (and preferably extend to the edges of the document), and the rest white. Masks are most effective when they do not incorporate gradients, or soft edges. Be sure to make the mask document the same size of the playback size of the QuickTime movie, or the mask may be distorted as QuickTime scales the mask to fit the Player.
Make a mask using a graphics program such as Adobe Photoshop or Adobe Illustrator. The mask should be black where you want your video to show through (and preferably extend to the edges of the document), and the rest white. Masks are most effective when they do not incorporate gradients, or soft edges. Be sure to make the mask document the same size of the playback size of the QuickTime movie, or the mask may be distorted as QuickTime scales the mask to fit the Player.
![]() In the movie you wish to mask, go to “Movie/Movie Properties” and select the video track in the left pull-down menu.
In the movie you wish to mask, go to “Movie/Movie Properties” and select the video track in the left pull-down menu.
![]() From the right pull-down menu, select “Mask” and in the box that appears click on the “Set” button.
From the right pull-down menu, select “Mask” and in the box that appears click on the “Set” button.
![]() From here you can browse for the mask you made and click “Open.” The frame of your movie will now play in the shape of the mask you made.
From here you can browse for the mask you made and click “Open.” The frame of your movie will now play in the shape of the mask you made.
![]() If you do not like the mask effect, you can go back to “Movie Properties,” scroll to “Mask” in the right pull-down menu, and in the box that appears, click on the “Clear” button. You can try another mask if you like.
If you do not like the mask effect, you can go back to “Movie Properties,” scroll to “Mask” in the right pull-down menu, and in the box that appears, click on the “Clear” button. You can try another mask if you like.
![]() Masks with soft edges or blends may render with unpredictable results as QuickTime attempts to dither the soft edges (much like a GIF file). What’s more, soft-edge masks will take more CPU time to render and make your file size much larger than if you had used a hard-edge mask.
Masks with soft edges or blends may render with unpredictable results as QuickTime attempts to dither the soft edges (much like a GIF file). What’s more, soft-edge masks will take more CPU time to render and make your file size much larger than if you had used a hard-edge mask.
Video Effects Using QuickTime’s Graphics Mode
QuickTime will let you add all kinds of visual effects to your movie in the “Graphics Mode” property, including blended video tracks, keyed-in graphics, and alpha channels.
Blended video tracks
You can apply layer blends to your video tracks, much like you can blend with layer modes in Adobe Photoshop. You will need a movie with two video tracks; in this tutorial we will add a scaled video track to an existing movie and save it as a new file:
![]() Open the two movie files found in the “Ch04/Blend/” folder of the CD: nuages1.mov and orb.mov (Figure 4.6). With the orb.mov movie open, select “All” and copy.
Open the two movie files found in the “Ch04/Blend/” folder of the CD: nuages1.mov and orb.mov (Figure 4.6). With the orb.mov movie open, select “All” and copy.
![]() Open the nuages1.mov file (Figure 4.7), and select “Edit/Add Scaled” to add the orb as a second video track.
Open the nuages1.mov file (Figure 4.7), and select “Edit/Add Scaled” to add the orb as a second video track.

Figure 4.6 With the orb.mov movie open, select “All” and copy.
![]() Now go to “Movie/Get Movie Properties.” In the “Movie” menu, select a video track from the left pull-down menu and “Graphics Mode” from the right pull-down menu.
Now go to “Movie/Get Movie Properties.” In the “Movie” menu, select a video track from the left pull-down menu and “Graphics Mode” from the right pull-down menu.
![]() In the “Graphics Mode” box that appears, you will see a list of properties. From the “Graphics Mode” properties, select “Blend” and you will see the top video layer become transparent (Figure 4.8).
In the “Graphics Mode” box that appears, you will see a list of properties. From the “Graphics Mode” properties, select “Blend” and you will see the top video layer become transparent (Figure 4.8).
To vary the opacity and hue (transparency) of the video track, click on the “Color” button and a “Color Settings” box will appear (Figure 4.9). Click and drag on the slider to add or subtract transparency; the more black the color circle becomes, the greater the transparency in the video track. You can also vary the overall hue of the track by clicking in the appropriate area of color in the color circle and thereby tinting the video track.
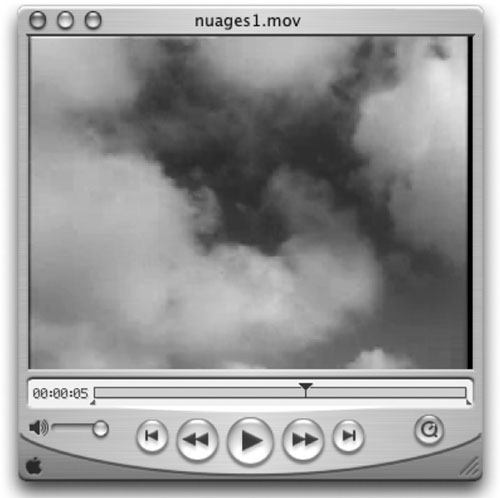
Figure 4.7 Open the nuages1.mov file and select “Edit/Add Scaled” to add the orb as a second video track.
Keyed graphics with transparent colors
You can key graphics such as titles or logos over a video track by importing the graphics and making one color transparent. This effect is most successful with images containing solid areas of flat color.
![]() Start with a graphic containing a color you would like to become transparent (transparent areas will show video).
Start with a graphic containing a color you would like to become transparent (transparent areas will show video).
![]() Open your graphic in the QuickTime Player by going to “File/Import.”
Open your graphic in the QuickTime Player by going to “File/Import.”
![]() Navigate to the desired graphic file and open the graphic as a QuickTime movie within the Player.
Navigate to the desired graphic file and open the graphic as a QuickTime movie within the Player.
![]() With this movie selected, go to “Edit/Select All” and “Edit/Copy” to copy the track.
With this movie selected, go to “Edit/Select All” and “Edit/Copy” to copy the track.
![]() Go to the movie where you want to add the graphic, select “Edit/Select All” and “Edit/Add Scaled” if you want to reduce the size of this graphic.
Go to the movie where you want to add the graphic, select “Edit/Select All” and “Edit/Add Scaled” if you want to reduce the size of this graphic.

Figure 4.8 When you select “Blend” from “Graphics Mode Properties,” you will see through the track to the ones below it.

Figure 4.9 To vary the opacity and hue (transparency) of the video track, click on the “Color” button and a “Color Settings” box will appear.
![]() Go to “Movie/Get Movie Properties” and from the left pull-down menu, select the video track of the graphic (Track 2 in this case) and choose “Graphics Mode” from the right pull-down menu.
Go to “Movie/Get Movie Properties” and from the left pull-down menu, select the video track of the graphic (Track 2 in this case) and choose “Graphics Mode” from the right pull-down menu.
![]() Scroll down in the right pull-down menu to “Transparent.”
Scroll down in the right pull-down menu to “Transparent.”
![]() Click the “Color” button and you see the “Colors” dialog box appear. Click on the “Magnifying Glass” icon in the upper right-hand corner of the “Colors” box and you will see a large magnifier appear (Figure 4.10); then choose a color in the image area you want to make transparent by clicking in the appropriate area of the graphic. Click “OK” and the color will become transparent.
Click the “Color” button and you see the “Colors” dialog box appear. Click on the “Magnifying Glass” icon in the upper right-hand corner of the “Colors” box and you will see a large magnifier appear (Figure 4.10); then choose a color in the image area you want to make transparent by clicking in the appropriate area of the graphic. Click “OK” and the color will become transparent.
![]() You can scale and reposition the graphic if you like (see “Resizing and Repositioning a QuickTime Track”).
You can scale and reposition the graphic if you like (see “Resizing and Repositioning a QuickTime Track”).
![]() Save the file with a name of your choosing.
Save the file with a name of your choosing.
Alpha channels
Many graphics programs such as Adobe Photoshop can be used to create files to contain hidden alpha channels allowing transparent and gradient effects. Alpha channels go a step further than masks in that they can incorporate pixels in a wide range of opacity, allowing for much more sophisticated composite effects. They tell QuickTime what to show and how much should be transparent in the image.
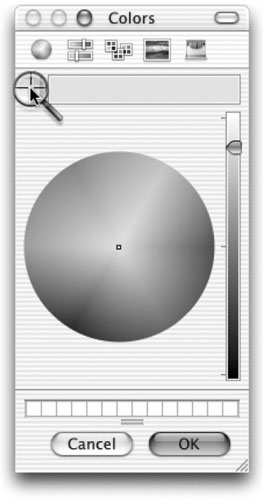
Figure 4.10 Click on the “Magnifying Glass” icon in the upper right-hand corner of the “Colors” box and you will see a large magnifier appear.
![]() If you create an image with Adobe Photoshop, you can save a selection of an area in your image and that becomes an alpha channel. In an alpha channel, the whiter areas are more transparent than darker ones. Be sure to save the image in a format that preserves alpha channels such as TIFF, PNG, TGA, or other 32-bit formats.
If you create an image with Adobe Photoshop, you can save a selection of an area in your image and that becomes an alpha channel. In an alpha channel, the whiter areas are more transparent than darker ones. Be sure to save the image in a format that preserves alpha channels such as TIFF, PNG, TGA, or other 32-bit formats.
![]() In QuickTime Player, open or import the graphic with the alpha channel and add it to your QuickTime in the form of a video track.
In QuickTime Player, open or import the graphic with the alpha channel and add it to your QuickTime in the form of a video track.
In the “Graphics Mode” window, select one of the alpha channel modes in the scrolling menu. In most cases, you will want to select “straight alpha.” If your graphic was created with a premultiplied alpha channel, however, you will want to select “premul white alpha” for images created on a white background, or “premul black alpha” for images incorporating a black background.
Note: Straight alpha channels store the alpha channel separately from the RGB image (video) content. Adobe After Effects provides straight alpha channels, whereas Adobe Photoshop provides premultiplied alpha channels, where the RGB and alpha channel information are intermingled on a pixel-by-pixel basis and the alpha channel has to be subtracted out of the RGB information before either can be processed.
Making a composite movie using alpha channels
In this tutorial, we will combine the orb with the cloudy sky again, but rather than blending it as a transparent image, we will “float” the orb as a solid body in the heavens. In order to use alpha channels, however, we will need to use source files saved as Photoshop TIFFs with saved selections of the white background (alpha channels). For this we can import a series of TIFFs and build a movie from them.
![]() In QuickTime Pro, select “File/Open Image Sequence” and browse to the CD to “Ch04/Alpha.” Note that the TIFF files within are named numerically so that they will line up in the proper sequence. Select the first file, orb01.tif (Figure 4.11). QuickTime Pro will automatically import all the files within the folder. Click “Open” to import the images.
In QuickTime Pro, select “File/Open Image Sequence” and browse to the CD to “Ch04/Alpha.” Note that the TIFF files within are named numerically so that they will line up in the proper sequence. Select the first file, orb01.tif (Figure 4.11). QuickTime Pro will automatically import all the files within the folder. Click “Open” to import the images.
![]() A dialog box, “Image Sequence Settings,” will appear. Since we are importing this series as frames to integrate with another QuickTime movie, select 30 fps (Figure 4.12).
A dialog box, “Image Sequence Settings,” will appear. Since we are importing this series as frames to integrate with another QuickTime movie, select 30 fps (Figure 4.12).
![]() In the movie you have just made, select all and copy.
In the movie you have just made, select all and copy.
![]() Open the nuages1.mov file from the CD and select “File/Add Scaled.” The orb movie will appear as the topmost track in the frame, completely obscuring the clouds track behind it.
Open the nuages1.mov file from the CD and select “File/Add Scaled.” The orb movie will appear as the topmost track in the frame, completely obscuring the clouds track behind it.
![]() Go to “Movie/Get Movie Properties”; in the left pull-down menu, select “Video Track 2.” Now go to the right pull-down menu and select “Graphics Mode.” Click on “straight alpha” in the list of “Graphics Mode” options; though straight alpha is probably the best choice, you can try some of the other alpha settings to see how they look, if you like. You should see the orb floating as an opaque ball against the background (see Figure 4.13 on the next page). The alpha channel in each of the Photoshop TIFFs has let us create a movie with alpha channels to achieve a matte-like special effect.
Go to “Movie/Get Movie Properties”; in the left pull-down menu, select “Video Track 2.” Now go to the right pull-down menu and select “Graphics Mode.” Click on “straight alpha” in the list of “Graphics Mode” options; though straight alpha is probably the best choice, you can try some of the other alpha settings to see how they look, if you like. You should see the orb floating as an opaque ball against the background (see Figure 4.13 on the next page). The alpha channel in each of the Photoshop TIFFs has let us create a movie with alpha channels to achieve a matte-like special effect.

Figure 4.11 Select “File/Open Image Sequence” and browse to the CD to “Ch04/Alpha.” Select the first file, orb01.

Figure 4.12 A dialog box, “Image Sequence Settings,” will appear. Since we are importing this series as frames to integrate with another QuickTime movie, select 30 fps.
Other Graphics Modes
You have probably noticed that there are other options available as part of the QuickTime “Graphics Modes.” Here are the others in a nutshell:
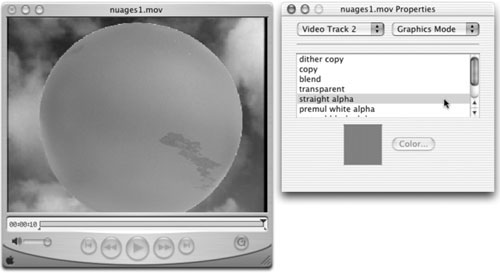
Figure 4.13 You should see the orb floating as an opaque ball against the background.
![]() “Dither Copy.” This adjusts the hue of adjacent pixels, approximating the original image color when the user’s display is set to a lower bit depth such as a 256-color display. If you desire a higher quality (though this occurs at the expense of speed), set this mode and go to “High Quality” in the same pull-down menu (one down from “Graphics Mode”) and check the box labeled “High Quality Enabled.”
“Dither Copy.” This adjusts the hue of adjacent pixels, approximating the original image color when the user’s display is set to a lower bit depth such as a 256-color display. If you desire a higher quality (though this occurs at the expense of speed), set this mode and go to “High Quality” in the same pull-down menu (one down from “Graphics Mode”) and check the box labeled “High Quality Enabled.”
![]() “Copy.” If your image has lots of solid color, you may opt against a dithered appearance; if so, select this rather than “Dither Copy.”
“Copy.” If your image has lots of solid color, you may opt against a dithered appearance; if so, select this rather than “Dither Copy.”
![]() “Transparent.” As it says, this makes a selected hue in the chosen video track transparent. This does not work well with images with graduated tones and hues—like photographic imagery—but does yield good results with solid colors and tones.
“Transparent.” As it says, this makes a selected hue in the chosen video track transparent. This does not work well with images with graduated tones and hues—like photographic imagery—but does yield good results with solid colors and tones.