2
The radio studio
Books on the technical and operational aspects of broadcasting are listed under ‘Further reading’ and the subject is not dealt with in detail here. However, to omit it altogether might appear to indicate a separation of programme production from its functional base. This can never be so. The listener is, after all, dependent on sound alone and must be able to hear clearly and accurately. Any sounds which are distorted, confused or poorly assembled are tiring to understand and will not retain the listener's interest.
The quality of the end product depends in part directly on the engineering and operational standards. It scarcely matters how good the ideas are, how brilliant the production, how polished the presentation, because all will founder on poor operational technique. Whether the broadcaster is using other operational staff or is in the self-operational mode, a basic familiarity with the studio equipment is essential – it must be second nature.
Taking the analogy of driving a car, the good driver is not preoccupied with how to change gear or with which foot pedal does what, but is more concerned with road sense, i.e. the position of the car on the road in relation to other vehicles. So it is with the broadcaster. The proper use of the tools of the trade – the studio mixer, microphones, computers, recorders – these must all be at the command of the producer, who can then concentrate on what broadcasting is really about, the communication of ideas in music and speech.
Good technique comes first, and having been mastered, should not be allowed to obtrude into the programme. The technicalities of broadcasting – editing, fading, control of levels, sound quality and so on – should be so good that they do not show. By being invisible, they allow the programme content to come through.
In common with other performing arts such as film, theatre and television, the hallmark of the good communicator is that the means are not always apparent. Basic craft skills are seldom discernible except to the professional, who recognizes in their unobtrusiveness a mastery of the medium.
There are programme producers who declare themselves uninterested in technical things; they will leave the mixer or computer operation to others so that they can concentrate on ‘higher’ editorial matters. Unfortunately, if you do not know what is technically possible, then you cannot fully realize the potential of the medium. Without knowing the limitations there can be no attempt to overcome them. You simply suffer the frustrations of always having to depend on someone else who does understand. So here we will explore the studio and discuss some of the equipment.
Studio layout
Studios for transmission or rehearsal/recording may consist simply of a single room containing all the equipment, including one or more microphones. This arrangement is designed for use by one person and is called a self-operation or self-op studio.
Where two or more rooms are used together, the room with the mixer and other equipment is often referred to as the control room or cubicle, while the actual studio – containing mostly microphones – is used for interviewees, actors, musicians, etc. If the control cubicle also has a mic it may still be capable of self-operation. In any area, when the mic is faded up the loudspeaker is cut and monitoring must be done on headphones.
The studio desk, mixer, control panel, console or board
Most studios will include some kind of audio mixer – analogue, digital or fully computerized. This is essentially a device for mixing together the various programme sources, controlling their level or volume, and sending the combined output to the required destination – generally either the transmitter or a recorder. Traditionally, it contains three types of circuit function:
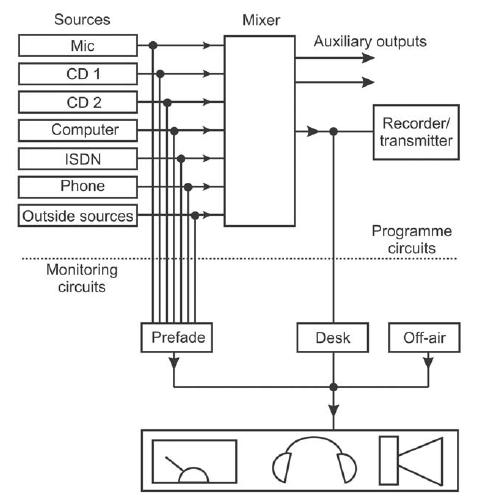
1 Programme circuits. A series of differently sourced audio channels, with their individual volume levels controlled by separate slider faders. In addition to the main output, a second or auxiliary output – generally controlled by a small rotary fader on each channel – can provide a different mix of programme material typically used for public address, echo, foldback into the studio for contributors to hear, a clean feed or separate audio mix sent to a distant contributor, etc.
2 Monitoring circuits. A visual indication (either by a programme meter or a vertical column of lights) and an aural indication (loudspeaker or headphones) to enable the operator to hear and measure the individual sources as well as the final mixed output.
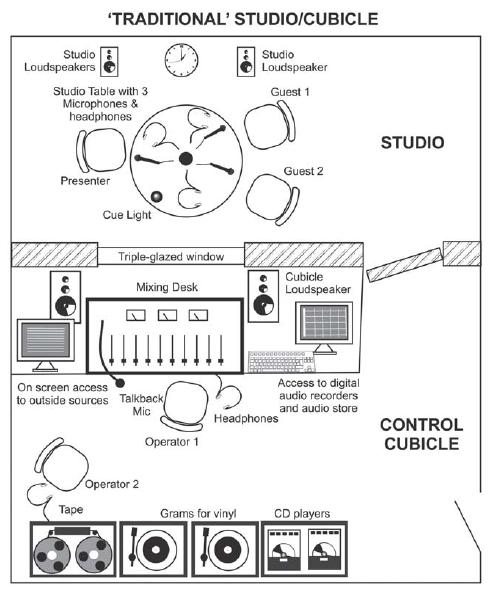
Figure 2.1 A traditional studio, controlled or ‘driven’ by its cubicle. The studio area contains tables and chairs with two or more microphones for interviewing, narration or simple drama. Monitoring is by loudspeaker or, when the mic channels are open, by headphones to each person as required. The monitoring normally carries the output of the mixing desk, but it may be arranged to take any programme feed, e.g. an incoming phone call. The headphones also carry talkback from the cubicle. The cubicle contains the mixing desk with as many channels as programme complexity demands, in this case 10. They can be laid out as the operator requires, e.g. outside sources, mics 1, 2, 3, computer/recorder outputs, CD players 1, 2. The outside sources may include the newsroom, telephone, remote studios, etc. The tape and grams are only connected as required and may be replaced by MiniDisc or DAT machines. A second operator is used to establish and check the outside sources or to set up tapes, MiniDiscs, DATs or CDs ready to play, either on cue or by remote start activated by the fader opening. This studio is designed for the production of high-speed or complex programmes such as a lengthy news show with many speakers, guests and recorded inserts. When not on the air, programmes produced here will be uploaded to the central computer
Figure 2.2 Studio mixer. Typical programme and monitoring circuits illustrating the principle of main and auxiliary outputs, prefade listening and measurement of all sources, desk output and off-air monitoring
3 Control circuits. The means of communicating with other studios or outside broadcasts by means of ‘talkback’ or telephone.
In learning to operate a mixer there is little substitute for first understanding the principles of the individual equipment, then practising until its operation becomes second nature. The following are some operational points for the beginner.
The operator must be comfortable. The correct chair height and easy access to all necessary equipment is important for fluid operation. This mostly calls for a swivel chair on castors.
The first function to be considered is the monitoring of the programme. Nothing on a mixer, which might possibly be on-air, should be touched until the question has been answered – what am I listening to? The loudspeaker is normally required to carry the direct output of the desk, as, for example, in the case of a rehearsal or recording. In transmission conditions it will normally take its programme off-air, although it may not be feasible to listen via a receiver when transmitting on short wave or on the Web. As far as possible, the programme should be monitored as it will be heard by the listener, i.e. after the transmitter, not simply as it leaves the studio.
The volume of the monitoring loudspeaker should be adjusted to a comfortable level and then left alone. It is impossible to make subjective assessments of relative loudness within a programme if the volume of the loudspeaker is constantly being changed. If the loudspeaker has to be turned down – for example, for a phone call – it should be done with a single key operation so that the original volume is easily restored afterwards. If monitoring is done on headphones, care should be taken to avoid too high a level, which can damage the hearing.
In mixing sources together – mics, computer playout, CD players, etc. – the general rule is to bring the new fader in before taking the old one out. This avoids the loss of atmosphere which occurs when all the faders are closed. A slow mix from one sound source to another is the ‘crossfade’.
In assessing the relative sound levels of one programme source against another, either in a mix or in juxtaposition, the most important devices are the operator's own ears. The question of how loud speech should be against music depends on a variety of factors, including the nature of the programme and the probable listening conditions of the audience, as well as the type of music and the voice characteristics of the speech. There will certainly be a maximum level which can be sent to the line feeding the transmitter, and this represents the upper limit against which everything else is judged. Obviously, for an orchestral concert music needs to be louder than speech. However, the reverse is the case where the speech is of predominant importance or where the music is already dynamically compressed, as it is with rock or pop. This ‘speech louder than music’ characteristic is general for most programming or when the music is designed for background listening. It is particularly important when the listening conditions are likely to be noisy – for example, at busy domestic times or in the car.
In a situation of fiercely competing transmitters, maximum signal penetration is obtained by sacrificing dynamic subtlety. The sound level of all sources is kept as high as possible and the transmitter is given a large dose of compression. It is as well for the producer to know about this, otherwise it's possible to spend a good deal of time obtaining a certain kind of effect or perfecting fades, only to have them overruled by an uncomprehending transmitter!
Probably the most important aspect of mixer operation is self-organization. It is essential to have a system for handling any physical items: that is, the running order, scripts, CDs, etc. The second requirement is accurate reading of the computer screens. The good operator is always one step ahead, knowing what has to be done next and, having done it, setting up the next step.
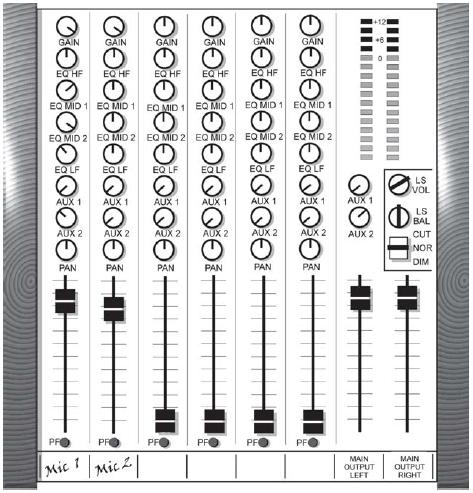
Figure 2.3 The features of a simple six-channel mixing desk. Each programme source is plugged into the mixer so that it has its own channel fader and associated controls. Each plug-in socket (not shown) has a mic/line sensitivity switch to compensate for low-level inputs (e.g. from a microphone) or a high-level input (e.g. from a CD player). Practice varies: some mixers fade up by moving the fader towards the operator, but most use the near position as closed. Moving a fader off its backstop may switch on the red ‘on-air’ light, cut the loudspeaker or operate ‘remote start’ equipment. Each channel also has:
![]() A prefade button, to hear and measure an individual source without fading it up.
A prefade button, to hear and measure an individual source without fading it up.
![]() A pan-pot, for placing a source left or right in a stereo picture.
A pan-pot, for placing a source left or right in a stereo picture.
![]() Two auxiliary outputs, independent of the main programme mix.
Two auxiliary outputs, independent of the main programme mix.
![]() Equalization, to cut or boost the low, middle or high frequencies. In the midrange, one control may select the frequency while the other is used to adjust the amount of cut or boost.
Equalization, to cut or boost the low, middle or high frequencies. In the midrange, one control may select the frequency while the other is used to adjust the amount of cut or boost.
![]() A gain control, to adjust the amplifier in the channel.
A gain control, to adjust the amplifier in the channel.
A designation strip enables the operator to label each channel. The main left and right outputs have faders to adjust the overall level of the mix, as do the auxiliary outputs. The monitoring loudspeakers have their own volume control, left and right balance, dim and cut key. The output level is indicated by vertical rows of lights which change colour to red at the onset of overload distortion. In this example, mic 1 has some mid-boost ‘presence’ and bass roll-off. It also appears on Aux output 2. Both mics are placed centrally for a mono output but could be panned half left and half right for a stereo effect
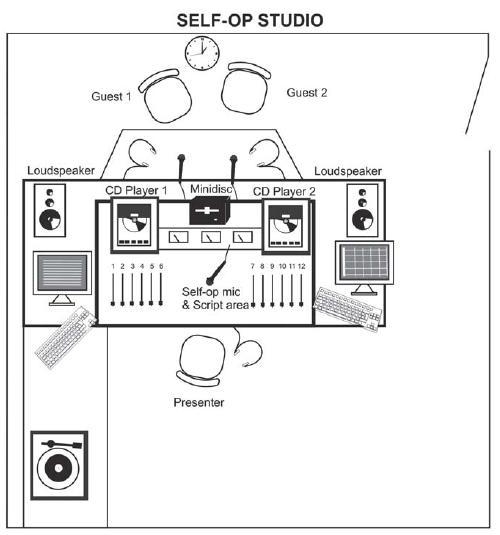
Figure 2.4 A self-op studio with a 12-channel mixer and a variety of programme sources. The computer plays out from its hard disk held in a central store. Any source can be connected to any fader, but a typical layout would be:
1 gram
2 CD 1
3 CD 2
4 computer o/p 1
5 computer o/p 2
6 self-op mic
7 guest mic 1
8 guest mic 2
9 MiniDisc
10 outside source 1
11 outside source 2
12 spare
Monitoring is by stereo and prefade meters, loudspeakers and headphones
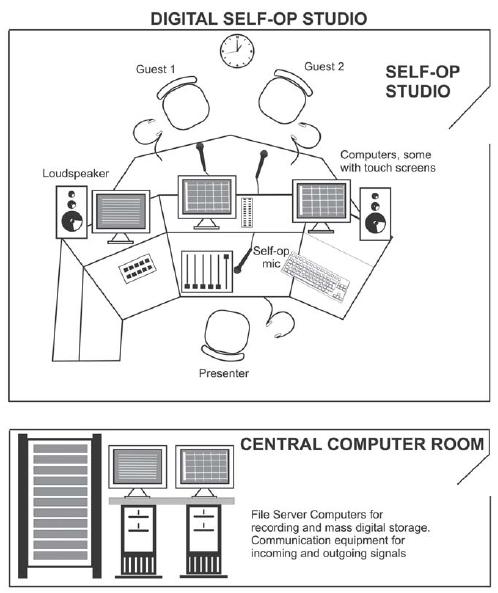
Figure 2.5 A digital self-op studio. Simplicity of operation is achieved by the removal of all programme sources to the central computer room, which also feeds the transmitters and audio stream on-line. Each of the six faders can be assigned to any source – the newsroom, pre-recorded items on hard disk, CDs, outside sources, phone calls, sustaining network, etc. Each channel has its own EQ, echo, digital effects, and can be programmed so that inputting a personal password changes the desk layout to suit the personal preference of the presenter. The information screens provide the programme running order, news bulletin, weather, details of phone-in callers, station schedule, top 40, etc. When not on-air, this arrangement is used as a digital editing suite for making packages, commercials, station promos, etc.
Computers
Capable of recording, editing, storing and replaying audio material in digital form, computers offer very high quality sound and immediate access to any part of the programme held. The computer in this context is used in two different ways:
1 As part of an integrated network system where all the material is stored in a central server and may be accessed or manipulated by any one of a number of terminals. Individual programmes or items may be protected by allowing access only through a password.
2 As a ‘standalone’ terminal capable of editing, storing or broadcasting material, but which is not connected to any other computer.
The advantage of an integrated system is that after editing an item – a news report – on a terminal in the newsroom, it is then immediately available to the on-air broadcaster in the studio. The studio terminal can have access to an immense range of programme items – it simply depends on the presenter understanding the system well enough to know what is available.
As a programme presenter, producer or journalist operating in a live studio, the basic operations are:
![]() to transfer into the database an item from another source, e.g. a recorder
to transfer into the database an item from another source, e.g. a recorder
![]() to retrieve an audio item from the computer database
to retrieve an audio item from the computer database
![]() to edit, rename and save an item
to edit, rename and save an item
![]() to open a programme running order
to open a programme running order
![]() to insert material into a running order
to insert material into a running order
![]() to move items within a running order
to move items within a running order
![]() to delete material from a running order
to delete material from a running order
![]() to play out an item through the desk on-air.
to play out an item through the desk on-air.
The range of software for the recording, editing and playback of audio material is very extensive, including SADiE, Radioman, RCS Master Control, DALET, Soundforge, VCS DiRA, Adobe Audition (formerly Cool Edit Pro), Soundscape, Simian, Pro-Tools, Prisma, D-Cart, etc. Some of these systems are capable of virtually running the station, recording, storing, linking together and playing back music tracks, voice links, commercials, promos, etc. in any desired order. Suffice it to say that no system should be handed over to the operational users until it is thoroughly tested and proved by the installation engineers. Once operational, the software must be totally reliable. Even so, computers can crash and newsrooms in particular will produce bulletin scripts as back-up. Experience has shown that it is also wise to have a DVD/CD player or pre-recorded music on DAT easily and quickly available on one of the mixer channels.
Digital compression
Digital recorders and computers store an audio signal in the form of digital data. A recognized standard was set in 1983 by the compact disc, storing music by using 16-bit samples taken 44100 times per second (44.1 kHz). This involves a large amount of data – about 10 MB per minute of audio. Although this does not pose problems for computers with their fast processors and huge storage disks, large amounts of data are difficult and time-consuming to send on the Internet or by e-mail.
It is possible to reduce the size of an audio file by halving the sampling rate to 22.05 kHz. This limits the frequency response of the audio to around 11 kHz which, while not good enough for music, is quite acceptable for most speech. Here are some sampling rates and the kind of quality they give:
| 8000 Hz | telephone quality |
| 11 025 | poor AM radio quality |
| 22 050 | near FM radio quality |
| 32 000 | better than FM |
| 44 100 | CD quality |
| 48 000 | DAT quality |
| 96 000 | DVD-Audio (typical) |
The ‘Moving Pictures Experts Group’ (MPEG for short) was established with the aim of developing an international standard for encoding full-motion film, video and high-quality audio. They came up with the MP3 format, an abbreviation of MPEG-1 audio layer 3. This shrinks down the original sound data by a factor of 12 or more by cleverly discarding the faint and extreme sounds that the ear is unlikely to hear. The perceived audible effect is therefore minimal. Different rates of MP3 compression can be heard on the CD, Ch 2-4 to 2-6.
Digitally compressed audio is ideal for a reporter sending material from a remote location back to the studio. A report recorded, for example, on MiniDisc, which itself introduces compression, is transferred to a laptop computer, where it is edited and compressed to MP3 format. This file is then sent via a local connection to the Internet or e-mail, and downloaded by the radio station ready for broadcast. One minute of high-quality audio, equivalent now to only 1 MB of data, will take relatively few minutes to transfer on an ordinary telephone line, let alone an ADSL or Broadband connection.
Digital audio workstation
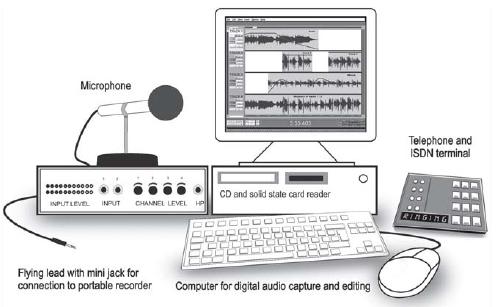
This facility is likely to be in a small area separate from the studio. It could be a ‘stand alone’ terminal complete in itself, or be fully integrated with a network computer system. The example shown is a typical digital audio workstation (Figure 2.6). It comprises an audio mixer, one source of which is the microphone, a computer and keyboard, and a unit for picking up incoming digital ISDN lines. Alternatively, the mixer could be supplied with feeds from the local newsroom, a remote studio, outside broadcast or incoming telephone call. This arrangement can therefore be used for local voice recording, interviewing someone at a remote source, editing material or correcting levels of an already recorded mix. It is an ideal arrangement for mixing items to create a short self-op news package. In the example (Figure 2.7), we are making a programme opening, mixing together three separate sources.
Figure 2.6 A typical digital audio workstation, capable of: downloading from a portable recorder or solid state card; recording from CD, outside sources or mic; mixing and editing. Suitable for making finished packages and writing scripts for cues
Given the appropriate software, different studio items are recorded on the computer to appear as separate tracks. Here is the script we are working on:
| Music | Locally recorded guitar rhythm (fade after 4 seconds and mix with Fx) |
| Fx | Surf waves on seashore (fade up, peak and hold under) |
| Narrator | The Comores Islands. On the map they look like tiny specks in the Indian Ocean. (slowly fade down music) But walking along the white sandy beaches, you're overwhelmed by the mass of lush green vegetation climbing up the huge mountain peaks. But they're not just mountains – they're volcanoes. Ask any passing fisherman. (music out) |
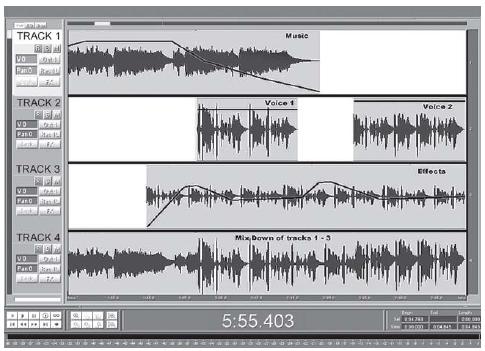
Figure 2.7 Mixing the programme opening. Music starts on Track 1, then effects on Track 3 faded up, both down for Voice 1 on Track 2. Music faded out. Effects up and down for Voice 2 on Track 2 – effects held under. The solid black lines or ‘rubber bands’ show the sound level of each track and are manipulated by the mouse. The final mix appears on Track 4
| Fx | (Briefly up, down, hold under) |
| Fisherman | Oh yes, the last real eruption we had was in 1977 – lava poured down into the sea … |
Here, the music is put on Track 1, the speech on Track 2 and the effects on Track 3. The resulting mix appears on Track 4. At the bottom is a timescale marked off in seconds from the left.
Each of the tracks can be played independently and its level adjusted by clicking the mouse on to the volume line, or envelope. This is the solid line on each track indicating its relative level at any one time – commonly known as ‘the rubber band’. The level is altered by moving it up or down, i.e. ‘rubber banding’.
The music begins on its own and after 3 seconds the seawash is faded up to mix with it. After 5 seconds, this mix is faded down and held under the narrator's voice. The music continues to be faded and is completely out by the time the seawash is briefly peaked before the fisherman – Voice 2 – comes in. Note that the fisherman was recorded at a slightly lower level than the narrator's voice, so that Track 2 is brought up to compensate.
The advantage of this facility is that it allows the mixing to be repeated with 100 per cent accuracy while perhaps changing one of the levels or cues to get the desired result. It provides for split-second timing, it leaves all the original recordings intact, it doesn't tie up a whole studio, and takes only one person to achieve the final programme. If that person is the narrator, who is also the producer, the production method is not only very efficient but can also create a high level of personal job satisfaction.
Tape formats
These are now much less used, but may appear in various forms.
![]() Digital audio tape (DAT) may be used both for the mastering of music recordings, or with small portable machines for the collection of material on location, to be downloaded to a computer for editing and subsequent playback. The disadvantage is that this can only be done in ‘real time’. Employing the same technology as that of video recording – a slow-speed tape scanned by a revolving head – the DAT cassette is smaller than the conventional audio cassette and, as with the video cassette, physical access to the tape is denied. DAT machines may be found in both transmission and recording studios for the recording or playing back of whole programmes rather than short items or programme inserts.
Digital audio tape (DAT) may be used both for the mastering of music recordings, or with small portable machines for the collection of material on location, to be downloaded to a computer for editing and subsequent playback. The disadvantage is that this can only be done in ‘real time’. Employing the same technology as that of video recording – a slow-speed tape scanned by a revolving head – the DAT cassette is smaller than the conventional audio cassette and, as with the video cassette, physical access to the tape is denied. DAT machines may be found in both transmission and recording studios for the recording or playing back of whole programmes rather than short items or programme inserts.
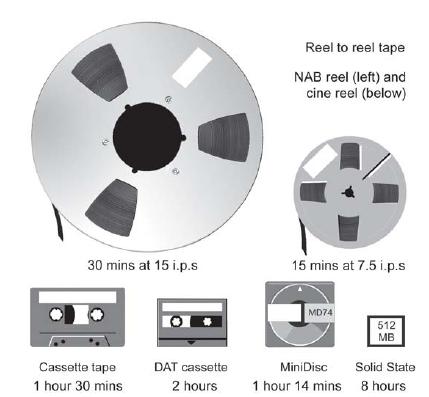
Figure 2.8 The older tape formats compared with the digital recording media. Recording on a CD – the same size as the small spool – gives an 80-minute duration
![]() The audio cassette uses an enclosed reel-to-reel tape 3 mm (⅛inch) wide running at 4.7cm (1⅞ inches) per second. Cassettes, originally developed for the domestic market, may still be used in broadcasting. The professional ‘walkman’ cassette recorder is easily carried and unobtrusive in operation. However, because the mechanical tolerances on such small, relatively low-speed devices are fairly critical, there is no absolute guarantee that a cassette recorded on one machine will replay perfectly on another.
The audio cassette uses an enclosed reel-to-reel tape 3 mm (⅛inch) wide running at 4.7cm (1⅞ inches) per second. Cassettes, originally developed for the domestic market, may still be used in broadcasting. The professional ‘walkman’ cassette recorder is easily carried and unobtrusive in operation. However, because the mechanical tolerances on such small, relatively low-speed devices are fairly critical, there is no absolute guarantee that a cassette recorded on one machine will replay perfectly on another.
![]() Reel-to-reel tape is normally 6 mm (¼inch) wide and is mostly used on spools varying in diameter from 12.5 cm (5 inches) to 25 cm (10 inches). Playing speeds of professional machines are either 19 cm (7½inches) or 38 cm (15 inches) per second. The higher the speed, the better the quality. Reel-to-reel tape may also be found in widths of 1 and 2 inches for multi-track recording. Now seldom used for new recordings, huge stocks of library material exist on ¼-inch tape, which is why many studios keep a reel-to-reel tape machine in the corner.
Reel-to-reel tape is normally 6 mm (¼inch) wide and is mostly used on spools varying in diameter from 12.5 cm (5 inches) to 25 cm (10 inches). Playing speeds of professional machines are either 19 cm (7½inches) or 38 cm (15 inches) per second. The higher the speed, the better the quality. Reel-to-reel tape may also be found in widths of 1 and 2 inches for multi-track recording. Now seldom used for new recordings, huge stocks of library material exist on ¼-inch tape, which is why many studios keep a reel-to-reel tape machine in the corner.
Editing principles
The purpose of editing can be summarized as:
1 To rearrange recorded material into a more logical sequence.
2 To remove the uninteresting, repetitive or technically unacceptable.
3 To reduce the running time.
4 For creative effect to produce new juxtapositions of speech, music, sound and silence.
Editing must not be used to alter the sense of what has been said – which would be regarded as unethical – or to place the material within an unintended context.
There are always two considerations when editing, namely the editorial and the technical. In the editorial sense it is important to leave intact, for example, the view of an interviewee, and the reasons given for its support. It would be wrong to include a key statement but to omit an essential qualification through lack of time. On the other hand, facts can often be edited out and included more economically in the introductory cue material. It is often possible to remove some or all of the interviewer's questions, letting the interviewee continue. If the interviewee has a stammer, or pauses for long periods, editing can obviously remove these gaps. However, it would be unwise to remove them completely, as this may alter the nature of the individual voice. It would be positively misleading to edit pauses out of an interview where they indicate thought or hesitation.
The most frequent fault in editing is the removal of the tiny breathing pauses which occur naturally in speech. There is little point in increasing the pace while destroying half the meaning – silence is not necessarily a negative quantity.
Editing practice
Each recording method has its own editing procedure:
![]() Computer editing. Once audio material has been transferred on to a hard disk, either in the studio or from a portable recorder, it can be manipulated, cut, rearranged or treated in a variety of ways depending on the software used. A general point of technique is almost always to cut on the beginning of a word, rather than at the end of the preceding word. This makes for a much more definite edit point. However, while it is tempting to edit visually using the waveform on the screen, it is essential to listen carefully to the sounds, distinguishing between the end of sentence breath and the mid-sentence breath. These are typically of different length and getting them right gives a naturalness to the end result. An advantage of computer editing over other methods is that it leaves the original recording intact – non-destructive editing. It is therefore possible to do the same edit several times, or to try alternatives, to get it absolutely right. This is a valuable facility for editing both speech and music.
Computer editing. Once audio material has been transferred on to a hard disk, either in the studio or from a portable recorder, it can be manipulated, cut, rearranged or treated in a variety of ways depending on the software used. A general point of technique is almost always to cut on the beginning of a word, rather than at the end of the preceding word. This makes for a much more definite edit point. However, while it is tempting to edit visually using the waveform on the screen, it is essential to listen carefully to the sounds, distinguishing between the end of sentence breath and the mid-sentence breath. These are typically of different length and getting them right gives a naturalness to the end result. An advantage of computer editing over other methods is that it leaves the original recording intact – non-destructive editing. It is therefore possible to do the same edit several times, or to try alternatives, to get it absolutely right. This is a valuable facility for editing both speech and music.
Once edited, the finished recording can be saved to the hard disk or written on to an individual CD or DVD.
![]() DAT. A full editing suite is expensive, requiring at least two DAT machines and an edit controller. This controller uses time-code information on the original recordings as a ‘label’ for each part of the audio. Acting on instructions from the editor these can be reassembled in whatever new order is required. However, the process can be lengthy, since DAT playback has to be done in ‘real time’. DAT editing is more usually done via a computer.
DAT. A full editing suite is expensive, requiring at least two DAT machines and an edit controller. This controller uses time-code information on the original recordings as a ‘label’ for each part of the audio. Acting on instructions from the editor these can be reassembled in whatever new order is required. However, the process can be lengthy, since DAT playback has to be done in ‘real time’. DAT editing is more usually done via a computer.
![]() MiniDisc. A certain amount of initial editing can be done on the machine itself. This entails the renumbering of the inserts or tracks in the required numerical order, the unwanted material being placed at the end. The machine then plays them back in the chosen order. Such reordering can be done any number of times. This is also ‘nondestructive’ editing. It is best not to delete any recording at this stage, in case it may be required. MiniDisc editing is mostly done by transferring to a computer, preferably keeping the signal in the digital domain. However, not all MiniDiscs have a digital or ‘optical’ output, and it is then necessary to convert to analogue. The MiniDisc is particularly useful for recording many separate interviews, as in documentary work, and where items are required to be kept on individual discs.
MiniDisc. A certain amount of initial editing can be done on the machine itself. This entails the renumbering of the inserts or tracks in the required numerical order, the unwanted material being placed at the end. The machine then plays them back in the chosen order. Such reordering can be done any number of times. This is also ‘nondestructive’ editing. It is best not to delete any recording at this stage, in case it may be required. MiniDisc editing is mostly done by transferring to a computer, preferably keeping the signal in the digital domain. However, not all MiniDiscs have a digital or ‘optical’ output, and it is then necessary to convert to analogue. The MiniDisc is particularly useful for recording many separate interviews, as in documentary work, and where items are required to be kept on individual discs.
![]() Quarter-inch tape. Here the tape is actually cut at the edit points and the unwanted tape physically removed; the two ends of the remaining tape are joined with approximately 3 cm of adhesive tape.
Quarter-inch tape. Here the tape is actually cut at the edit points and the unwanted tape physically removed; the two ends of the remaining tape are joined with approximately 3 cm of adhesive tape.
![]() Audio cassette. Editing is generally done by dubbing or copying it to another format – generally a computer. Sometimes only the part or parts required need be copied, so quickly producing the finished result.
Audio cassette. Editing is generally done by dubbing or copying it to another format – generally a computer. Sometimes only the part or parts required need be copied, so quickly producing the finished result.
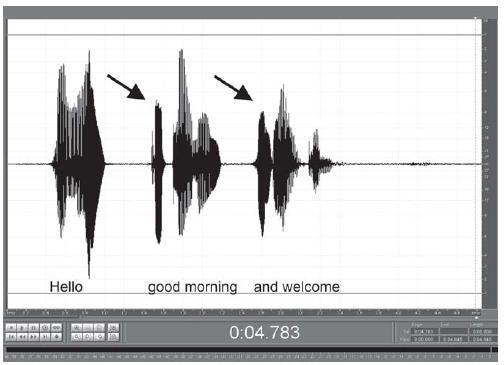
Figure 2.9 Editing. Using the mouse, the arrows are set at the edit points in order to remove the ‘good morning’ for the programme's afternoon repeat
Figure 2.10 The completed edit
CDs, albums and other discs
Music reproduction employs a wide variety of methods. Many stations have all their music on a central hard drive computer system with instant access to any track. A few rely on a library built up over the years of vinyl records – or of cassette tapes. Some use CDs in one form or another, either on individual players or through a jukebox system. It is not surprising, therefore, that studio equipment differs widely from station to station.
Though used as a portable recorder for use on location, the MiniDisc may also feature as a playback system in the studio. Since each disc carries 140 minutes of mono programme, 70 in stereo, it is easily capable of handling a one-hour music programme.
Of all the equipment in a studio, it's as well to remember that music gear is particularly sensitive to banging and vibration. DVD/CD players don't like being knocked in use, neither do discs of any kind like being left out of their cases or sleeves – they are worth looking after and should not be left lying around gathering dust or fingerprints. Compact discs and vinyl records should be held so that the fingers do not touch the playing surface. DVDs and CDs should be cleaned with a soft non-fluffy cloth, not round and round concentrically, since this may affect and damage the tiny pits in the grooves which represent the music. Instead, they should be wiped gently radially from the centre outwards.
Given proper care, the CD has several key attributes:
![]() superb reproduction, perfectly suited to FM stereo transmission
superb reproduction, perfectly suited to FM stereo transmission
![]() easy automatic track location, with track number indicated
easy automatic track location, with track number indicated
![]() precision starting, at the beginning of a track or mid-point, e.g. on a vocal
precision starting, at the beginning of a track or mid-point, e.g. on a vocal
![]() visual readout of ‘time played’ and ‘time remaining’
visual readout of ‘time played’ and ‘time remaining’
![]() fast forward and fast backward ‘audible search’ facility to find a particular cue
fast forward and fast backward ‘audible search’ facility to find a particular cue
![]() long playing time, its one side able to play up to 70 minutes
long playing time, its one side able to play up to 70 minutes
![]() able to withstand mishandling, although care is required
able to withstand mishandling, although care is required
![]() reduced storage requirement.
reduced storage requirement.
In playing a music item, most control desks have a ‘prefade’, ‘pre-hear’ or ‘audition’ facility, which enables the operator to listen to the track and adjust its volume before setting it up to play on-air. This provides the opportunity of checking that it is the right piece of music, but listening only to the beginning may give a false idea of its volume throughout.
Instead of individual DVD/CD players, most stations store their music tracks either on the central computer, offering several thousand tracks, or use a form of CD jukebox, holding perhaps 100 or more discs representing 2000 tracks. This avoids the need for the presenter to handle discs, thereby overcoming several problems. Discs do not get lost, stolen or mislaid, and the playing surface is kept in perfect condition with no finger marks – the main cause of track skipping. The computer or jukebox is likely to be in a separate control room, accessed through a music selection system – for example, a touch-screen computer or keyboard.
A possible argument against the remote operation of CDs is that presenters often prefer to feel in control of their programme through physical contact with their discs. The disadvantage here is that the disc is then separated from its inlay or sleeve notes. However, this information can always be made available from a data store, brought up on a computer screen as required.
A fully digital station, using only CDs or central server as a music source, is wise to keep at least one conventional turntable for vinyl records – even the occasional 78 rpm disc can be brought in by a listener.
Microphones
The good microphone converts acoustic energy into electrical energy very precisely. It reacts quickly to the sudden onset of sound – its transient response; it reacts equally to all levels of pitch – its frequency response; and it operates appropriately to sounds of different loudness – its sensitivity and dynamic response. It should be sensitive to the quietest sounds, yet not so delicate as to be easily broken or susceptible to vibration through its mounting. It should not generate noise of its own. Add to these factors desirable qualities in terms of size, weight, appearance, good handling, ease of use, reliability and low cost, and microphone design becomes a highly specialized scientific art.
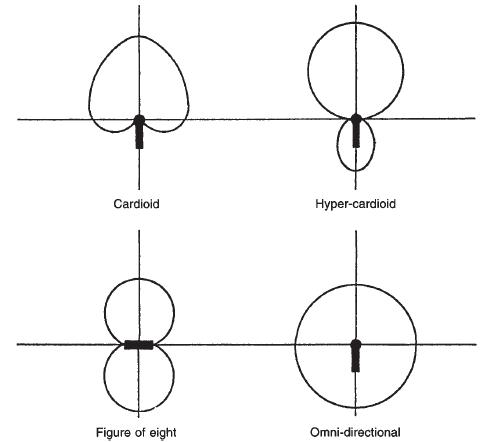
Figure 2.11 Microphone polar diagrams or directivity patterns. A microphone is sensitive to sounds within its area of pick-up, but in selecting one for a particular purpose, consideration must also be given to how well it will reject unwanted sounds from another direction
To the producer, the most useful characteristic of a microphone is probably its directional property. It may be sensitive to sounds arriving from all directions – omnidirectional – and such a microphone is useful for location recording and interviewing, audience reaction and talkback purposes. Alternatively, a directional mic is essential in most types of music balance, quiz shows and where there is any form of public address system.
The choice of mic for a particular job requires some thought and, although it may be possible to rely on the expertise of a technician, it will pay a producer to become familiar with the advantages and limitations of each type available. For example, some mics include on/off switches, or a switch to start a portable recorder. Some incorporate an optional bass-cut facility. Some require a mains unit or battery pack, or have a directivity pattern that can be changed while in use. Some operate better out of doors than others, some will make a presenter sound good when working close to it, others just distort. Producers will need to decide whether a radio mic is necessary, when clip-on personal mics are appropriate, or if a highly directional ‘rifle’ mic is required. The more one knows about the right use of the right equipment, the more the technicalities of programme making become properly subservient to the editorial decisions.
Stereo
Simply stated, the stereo microphone gives two electrical outputs instead of one. These relate to sounds arriving from its left and its right. This ‘positional information’ is carried through the entire system via two transmission channels arriving at the stereo receiver to be heard on left and right loudspeakers. The left channel is generally referred to as the ‘A’ (red) output and the right channel is the ‘B’ (green) output. The meter monitoring the electrical levels may have two needles (red and green) or there may be two meters (left and right). The signal sent to a mono transmitter (the ‘M’ signal) is the combination of both left and right, i.e. A + B, while the stereo information (the ‘S’ signal) consists of the differences between what is happening on the left and on the right, i.e. ‘A — B’. Sometimes a second monitoring meter is available to look at the ‘M’ and ‘S’ signals. Again, it has two needles conventionally coloured respectively white and yellow. Vertical columns of LEDs are an alternative way of indicating the signal level. What does the producer need to know about all this?
First, that if a programme is to be carried by both monaural and stereo transmitters, some thought has to be given to the question of compatibility. Material designed for stereo can sound pointless in mono, or even technically bad. For example, speech and music together can be distinguished in stereo purely because of their positional difference; in mono the same mix may be unacceptable, since a difference in level is needed. The producer will optimize the programme for the primary audience, but also ensure it is compatible for both. It is all too easy to fall in love with the stereo sound in the studio and forget the needs of the mono listener.
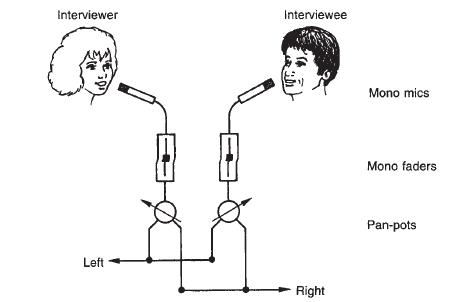
Figure 2.12 Mono mics and faders create a stereo effect when their pan-pots are set to give a left and right placing to each sound source
Second, that stereo mics are fairly uncommon and it is not necessary to use one to generate a stereo signal. Two directional mono mics (or ‘coincident pair’) connected to a stereo mixer in such a way as to simulate left and right signals – for example, through ‘pan-pots’ – will give excellent results. This technique is useful in an interview or phone-in, when the voices can be given some additional left/right separation for the stereo listener.
Third, that a pan-pot can give a mono source both size and position. For example, a mono recording of a sound effect can be placed across part, or all, of the sound picture. Two mono recordings – for example, of rain – can give a convincing stereo picture if one is panned to the left and the other to the right, with some overlap in the middle. When recording music, special effects can be obtained by the deliberate mislocation of a particular source – hence the piano 10 metres wide at the front of the orchestra, or the trumpeter whose fanfare flies around the sound stage simply by a twirl of the pan-pot!
And fourth, that working in stereo is a challenge to the producer's creativity. To establish distance and effect movement in something as simple as a station promo gives it impact. To play three tracks simultaneously – one left, one centre and one right – as a ‘guess the title’ competition is intriguing. A spatial round-table discussion which really separates the speakers has a much more live feel than its mono counterpart. The drama – or commercial – in which voices can be made to appear from anywhere, dart around or ‘float’, literally adds another dimension. For the listener, a stereo station should do more than keep the stereo indicator light on.
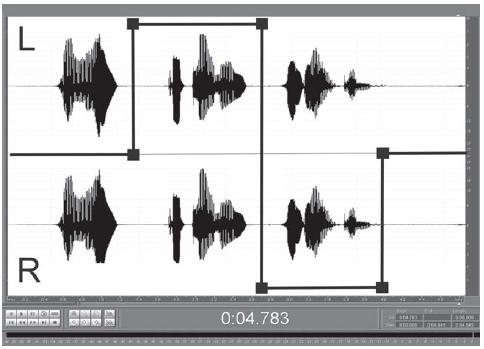
Figure 2.13 Panning for artificial stereo. In this example, ‘Hello’ is left and right, ‘good morning’ is taken to the right, and ‘welcome’ is moved left. The centre is then restored
Equipment faults
Studios are complex places. There is a lot to go wrong – a knob or key on the mixer works loose, a CD player gets out of adjustment, the clock is not absolutely accurate, a small indicator light may blow or a headphone lead break. Perhaps it is something physical like a squeaky door or an unsafe mic stand, or operational like unreliable software or a computer fault. Whatever the problem, it is likely to affect programmes and must be put right. It is up to every studio user to report any problem and the easiest way of doing this is to have a special routine in the computer system for tracking faults and errors. Alternatively, hang a small notebook permanently in a conspicuous place. It is the responsibility of the person who discovers the fault to make a note of its symptoms and the time it happened. Every morning the system is routinely checked by a maintenance technician. Intermittent faults are particularly troublesome and may require a measure of detective work. It is in everyone's interest to record any technical incident, however slight, in order to maintain high operational standards.

