
CHAPTER 9 Using Web Services and Manipulating XML
Web services enable people to consume and provide services over a network. They are commonly used in distributed applications (that is, applications made up of components sitting in different runtime environments). When working with Web services in WebSphere Portlet Factory (WPF), as in other environments, XML is often used to communicate between the Web service and the consumer of the Web service.
This chapter demonstrates how you can use Web services and XML documents in your WPF applications. By the end of this chapter, you will understand how to create and consume Web services in WPF and you will understand some of the methods available in WPF for interacting with XML. You will build a stock-ordering application that utilizes a Web service and demonstrates XML manipulation. This chapter does not cover basic service concepts (such as the service provider/consumer pattern), as these are discussed in Chapter 2, “Providing and Consuming Services.” You don’t necessarily have to read Chapter 2 before you read this chapter, but if you are completely new to services, you may find Chapter 2 a more appropriate starting point.
The models discussed in this chapter are available for download from ibmpressbooks.com/title/9780137134465 under the Chapter 9 folder (instructions for copying these files into your project are included in a readme.txt file in the same folder); however, to increase your understanding of using Web services and XML in WPF, it is recommended that you create the models yourself by following the example in this chapter.
The following topics are covered in this chapter:
• Web services in WPF
• Creating an order stock Web service
• Creating a service provider
• Creating an order stock portlet
• XML Transform builders
Web Services in WPF
A Web service is a service that is provided and consumed over a network, and there are a number of builders in WPF you can use to automate the process of creating and consuming these services. WPF applications use standards such as WSDL, SOAP, and XML when working with Web services, which means that WPF Web services can be provided not only to WPF applications, but to applications developed in other environments as well (for more information on some of the terminology used when discussing Web services, see the “Web Service Terminology” sidebar). Using WPF, you can also consume Web services developed in other environments, in addition to Web services developed in WPF.
When providing or accessing Web services in WPF, you should use the service provider/consumer pattern (this pattern is discussed in Chapter 2). The service provider is not a Web service itself, but acts as an intermediary between the service consumer and any Web services that are required in order to construct the service provider’s functionality. The provider used in the example in this chapter, for instance, calls a Web service to execute stock-ordering functions; the Order Stock portlet accesses these functions from the service provider. Using a service provider in this way enables you to abstract your service implementations from the presentation tier, which means that you can change the mechanics of your service providers (for example, by linking them to different Web services) without having to change the service consumers. Service providers also give you a number of testing features (such as service stubs) that you wouldn’t normally have if you just called Web services directly from your service consumers. A diagram demonstrating the process of consuming Web services through a service provider is shown in Figure 9.1 (note that the Web service in the diagram can be part of a WPF application as well).
Figure 9.1 Web service consumption in WPF.
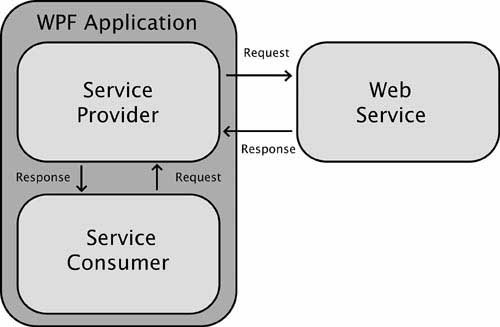
In WPF, XML is normally used to structure communication with Web services. This is done by sending XML request messages to the Web service, which sends back XML response messages to the consumer. These XML structures are commonly defined by schemas, which help to ensure the integrity of the communication. In WPF, a combination of builder calls and Java are used to work with these requests and responses, and WPF provides its own Java interface (called IXml) to access and manipulate XML.
In this chapter, you build two applications. The first contains a model to be published as a Web service, which places stock orders in a simple inventory system; the second application contains a portlet that consumes the Web service. The stock list is stored in an XML variable inside the Web service, and XML is also used to communicate with the Web service. The structure of this communication (a request object and a response object) is defined by several schemas in the Web service. The Web service application is deployed to an application server, and the portlet application is deployed to a portal server.
Creating an Order Stock Web Service
In this section, you build a Web service to provide functionality for ordering stock. The Web service contains a single operation called orderStock, which takes two inputs: the ID of a stock item to order and a quantity to order. The operation, when consumed, orders the stock item in the quantity specified. To keep the example simple, an order consists of incrementing a stock counter for the item ordered by the quantity specified; if the item does not exist in the orders variable, then it is added. After you create the Web service, the next section of this chapter, “Creating a Service Provider,” provides the interface between the Web service and the portlet, and then the “Creating an Order Stock Portlet” section walks you through the process of creating a model to consume the operations in the service (this model is then surfaced to a portal server as a portlet).
Before you begin the steps in this section, you should create a new WPF project, which will house the model that provides the functionality for the orders Web service. You should use a new project even if you already have a project in your workspace from a previous chapter, as this will show you how to use Web services that are not stored in the same project as your service provider and consumer (you can even run the Web service on a remote server if you have another application server available). The Web service runs as a standalone application on an application server rather than as a portlet application, as you don’t need any of the benefits provided by the portlet container. You can still run the application as a standalone Web application on the portal server if it is convenient for you, provided it runs on your local machine; otherwise, it is recommended you use the IBM WebSphere Application Server Community Edition server (WAS CE) that comes with WPF.
Create the Web Service project, and set up its application server deployment configuration (for more information on this process, see Chapter 1, “Introduction to WebSphere Portlet Factory”). The project will be published as a WAR file and deployed to an application server. After you have a project set up, you need to add a model to the project. This model uses the following builders:
• Service Definition
• Schema (x2)
• Variable (x2)
• Method
• Service Operation
Note that the Service Definition and Method builder calls must both precede the Service Operation builder call in your model; if this is not the case, you will get errors indicating that there are missing resources.
Creating a Model
Create a new model called orderStockWebService in your project, under the folder WEB-INF/models/chapter09. The model should be based on the Empty template, which creates a model with no builder calls in it. For more information on creating models, see the example in Chapter 1.
Defining the Service
The first builder call to add is a Service Definition, which defines a name for your service and publishes it as a Web service. To do this, select Service Definition from the Builder Palette (you can open the Builder Palette by clicking the ![]() icon in Outline view) and press OK. Change the name of the builder call to
icon in Outline view) and press OK. Change the name of the builder call to orderStockWebService, and then enable the Generate WSDL checkbox. Finally, expand the Testing Support section and select the checkbox for Add Testing Support, which enables you to test the service after you have created it. Save the builder call.
Defining the Request Object
Now you need a schema for the XML data that is to be sent to the Web service (known as the request object). This schema defines the structure of all the inputs to a particular Web service operation, and it is included in the WSDL document that is generated from your Web service (if the term WSDL is unfamiliar to you, see the “Web Service Terminology” sidebar at the beginning of this chapter). You don’t need to worry about what this WSDL file consists of as WPF creates it for you, but you do need to know how to find it (which you will see how to do later in this section).
Add a Schema builder call to the model, then type the name orderStockRequestSchema for the Schema builder call. Select the ‘Specify explicitly as builder input’ option so that you can type the schema directly into the builder call. In the Schema Source box, type the following XML:
<xsd:schema xmlns:xsd=”http://www.w3.org/2001/XMLSchema”
xmlns:tns=”http://com.ibm.orderStockRequest”
targetNamespace=”http://com.ibm.orderStockRequest”>
<xsd:element name=”OrderStockRequest”>
<xsd:complexType>
<xsd:sequence>
<xsd:element ref=”tns:ID” minOccurs=”1” maxOccurs=”1” />
<xsd:element ref=”tns:Quantity” minOccurs=”1
maxOccurs=”1”/>
</xsd:sequence>
</xsd:complexType>
</xsd:element>
<xsd:element name=”ID” type=”xsd:string” />
<xsd:element name=”Quantity” type=”xsd:int” />
</xsd:schema>
This schema defines the OrderStockRequest object, which is passed into the Web service as a request. The OrderStockRequest element contains two subelements that are used as inputs: an ID and a Quantity, which correspond to the ID of the item to be ordered and the quantity to be ordered. These elements are referenced inside the <xsd:sequence> element, and are not defined until the bottom of the schema. Alternatively, you can define the inputs directly inside the <xsd:sequence> element, but the approach used above is usually easier to read, especially when your schemas contain multiple complex types.
Note also the schema definition at the top of the schema; the xmlns:xsd attribute defines a namespace for types prefixed by xsd, and the xmlns:tns defines a namespace for types prefixed by tns. The targetNamespace attribute declares the namespace for all elements defined in the schema (such as ID and Quantity). For more information on the terms namespace and schema, see the sidebar “Web Service Terminology.”
When you are done editing the schema, save the builder call.
Defining the Response Object
Next, you need to add another schema for the XML data that is to be returned from the Web service (known as the response object). This schema defines the structure of the results that are to be passed back to callers of the Web service, and it is also included in the WSDL document that is generated from your Web service.
Add a Schema builder call to the Web service provider model and name it orderStockResponseSchema. Select the ‘Specify explicitly as builder input’ option as you did with the previous schema. In the Schema Source box, type the following XML:
<xsd:schema xmlns:xsd=”http://www.w3.org/2001/XMLSchema”
xmlns:tns=”http://com.ibm.orderStockResponse”
targetNamespace=”http://com.ibm.orderStockResponse”>
<xsd:element name=”OrderStockResponse”>
<xsd:complexType>
<xsd:sequence>
<xsd:element ref=”tns:Result” minOccurs=”1”
maxOccurs=”1” />
<xsd:element ref=”tns:Fault” minOccurs=”1”
maxOccurs=”1” />
</xsd:sequence>
</xsd:complexType>
</xsd:element>
<xsd:element name=”Result” type=”xsd:string” />
<xsd:element name=”Fault” type=”xsd:string” />
</xsd:schema>
This schema defines the OrderStockResponse object, which is passed back from the Web service as a response. The OrderStockResponse object contains two subelements that are returned to the caller of the Web service: Result and Fault. Result holds the results of the order operation (how many items are currently on order for the ID specified in the orders variable), and Fault holds debugging information if an exception is raised.
Save the builder call when you are finished.
Adding Order Data
Now add a Variable builder call to the model. The variable created by this builder call holds an XML document containing all of the stock items currently on order. Name the variable orders and make it of type XML. In the Initial Value field, enter the following XML, which defines three items with a quantity of zero:
<StockOrders xmlns=”http://com.ibm.orders”>
<Item>
<ID xmlns=””>00001</ID>
<Quantity xmlns=””>0</Quantity>
</Item>
<Item>
<ID xmlns=””>00002</ID>
<Quantity xmlns=””>0</Quantity>
</Item>
<Item>
<ID xmlns=””>00003</ID>
<Quantity xmlns=””>0</Quantity>
</Item>
</StockOrders>
In the Advanced section of the Variable builder call, select ‘Read-only: shared across all users’ for the State and Failover input, and then save the builder call. By default, separate variables are created in memory by the Variable builder for each user, so changing this setting ensures that only a single orders variable is used across all users. This setting also ensures that the variable is stored and recovered if the application fails.
Adding a Method to Place a Stock Order
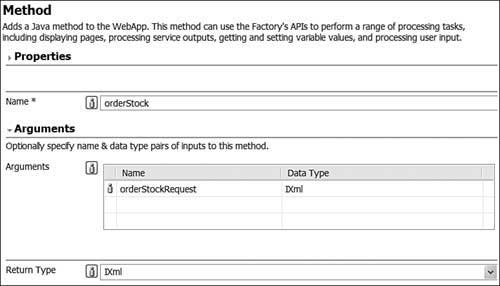
Add a Method builder call to your model. This builder call contains a Java method to place a stock order, which provides the functionality for your Web service orderStock operation. The method takes one input (the XML request object), processes the order based on this input, and then returns one output (the XML response object).
Name the builder call orderStock, and then enter one argument called orderStockRequest of type IXml, as shown in Figure 9.2 (IXml is a Java interface used to access and manipulate XML). This enables the method to access the orderStockRequest XML object that is passed into the function. Change the Return Type as well so that it is IXml.
Figure 9.2 Configuring the Method builder call.
In the Method Body field of the Method builder call, enter the following Java method (note that this method is also available for download from ibmpressbooks.com/title/9780137134465 under the Chapter 9 folder):
{
try
{
//get id and quantity from request object
String id = orderStockRequest.findElement(“ID”).getText();
int quantity =
![]() Integer.parseInt(orderStockRequest.findElement(“Quantity”).getText());
Integer.parseInt(orderStockRequest.findElement(“Quantity”).getText());
//set the total quantity that is on order for the item specified
//this quantity will be increased if there are already orders for this item
int onOrderTotal = quantity;
//get orders variable and put all the elements from it called ‘item’ into a
//list updating this list will update the orders variable
IXml orders = webAppAccess.getVariables().getXml(“orders”);
List ordersList = orders.getChildren(“Item”);
//flag that denotes whether a stock item already exists
boolean stockAlreadyExists = false;
//check if an order for the specified stock item already exists in the list
for (Iterator it = ordersList.iterator(); it.hasNext();)
{
//get order from orders list
IXml order = (IXml)it.next();
//if there is already an order for the id specified...
if (order.findElement(“ID”).getText().equals(id))
{
//the order already exists, increment quantity in orders variable
IXml quantityItem = order.findElement(“Quantity”);
onOrderTotal = quantity+Integer.parseInt(quantityItem.getText());
quantityItem.setText(Integer.toString(onOrderTotal));
//flag that the item already exists
stockAlreadyExists = true;
//exit for loop
break;
}
}
//if the stock item doesn’t already exist in the orders variable
if (! stockAlreadyExists)
{
//order doesn’t exist, create new order
IXml newElement = orders.addChildElement(“Item”);
newElement.addChildWithText(“ID”, id);
newElement.addChildWithText(“Quantity”, Integer.toString(quantity));
}
//place order into orders variable
webAppAccess.getVariables().setXml(“orders”, orders);
//assemble response object
String resultString = “An order was successfully made for “ + quantity + “
![]() items of “ + id + “.<br>” + onOrderTotal + “ items of “ + id + “ are currently
items of “ + id + “.<br>” + onOrderTotal + “ items of “ + id + “ are currently
![]() on order.”;
on order.”;
IXml responseXml = XmlUtil.create(“OrderStockResponse”);
responseXml.addChildWithText(“Result”, resultString);
responseXml.addChildWithText(“Fault”, “”);
//return response object
return responseXml;
}
catch (NumberFormatException e)
{
//an exception was raised, return fault information
IXml errorXml = XmlUtil.create(“OrderStockResponse”);
errorXml.addChildWithText(“Result”, “No result — exception raised.”);
errorXml.addChildWithText(“Fault”, “An invalid quantity was specified.”);
return errorXml;
}
catch (Exception e)
{
//an exception was raised, return fault information
IXml errorXml = XmlUtil.create(“OrderStockResponse”);
errorXml.addChildWithText(“Result”, “No result — exception raised.”);
errorXml.addChildWithText(“Fault”, e.getMessage());
return errorXml;
}
}
Spend a few minutes going over the method to see how it works. (For information on how XML is manipulated in the code, see the “Using the IXml Interface”sidebar. Also, for information on the use of the webAppAccess Java object, see Chapter 8, “Using Java in Portlets”). Essentially, the method takes the ID and Quantity from the request object (which is passed into the Method builder call) and cycles through all of the orders in the orders variable to see if there is a match for the ID specified. If there is a match, then the Quantity specified is added to the Quantity of the matched order in the orders variable; otherwise, a new order is added to the orders variable, with the ID and Quantity specified in the request object. Finally, a response object is created and returned to the caller of the method, which contains the result of the order operation and any fault information. Note also that if an invalid value is specified for the quantity, a NumberFormatException is raised and the ‘An invalid quantity was specified’ message is returned in the Fault output. Any other exceptions are caught and returned as part of the fault output.
Save the Method builder call when you are finished.
Adding a Service Operation
Now, add a Service Operation builder call to the model. Use this builder to define an operation for the Web service; in particular, you declare its request and response objects and what it actually does when it is run (that is, execute the orderStock method). Point the Data Service input to the orderStockWebService Service Definition, and then change the name of the Service Operation to orderStockItem. Specify orderStock for the Action to Call, and type the description Orders a stock item into the Operation Description input (this description is available to consumers of the operation).
Specify the request object for the operation by expanding the Operation Inputs section, and making sure the Input Structure Handling input is set to ‘Specify input schema’. Now, select orderStockRequestSchema/OrderStockRequest for the Input Schema, and fill out the Input Description with the text stock item and quantity to order. The Input Field Mapping input should be set to Automatic. This uses the request schema you created earlier to define the structure of the request object to this operation, and the request inputs passed in will be automatically mapped into your schema.
Specify the response object by expanding the Operation Results section. Select Specify Result Schema for the Result Structure Handling input, and then select orderStockResponseSchema/OrderStockResponse for the Result Schema (this is the response schema you created earlier). Type the description Text describing results of order, and any fault information if an exception was raised into the Result Description input, and save the builder call when you are finished.
To iterate through an entire XML structure, you may find a recursive function useful. For example, the following code iterates through an XML structure passed into it as an argument, and prints the element name and value to the console. The function calls itself to process all of the sibling and child elements of each node in the hierarchy. Copy this code into a Method builder, rename the builder call to iterateThroughXml, and then add one argument called xml of type IXml:
{
for(IXml element = xml.getFirstChildElement(); element != null;
![]() element = element.getNextSiblingElement())
element = element.getNextSiblingElement())
{
System.out.println(“XML element name: “ + element.getName());
System.out.println(“XML element value: “ + element.getText());
iterateThroughXml(webAppAccess, element.getFirstChildElement());
}
}
You have now successfully created a stock-ordering Web service. The next section explains how you can test the service.
Testing the orderStockWebService Web Service
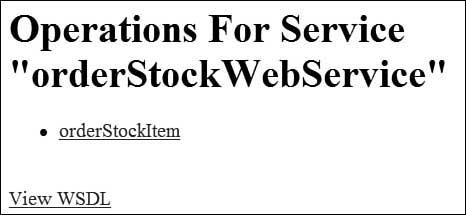
To test the orderStockWebService Web service from your IDE, run your model from the WPF Designer by clicking the ![]() icon on the toolbar. This runs the currently active model (orderStockWebService) with the last run configuration you used. If you have not set up a run configuration before, you are prompted to do so—create a new configuration under the WebSphere Portlet Factory Model category (if you want more information on setting up a run configuration, see the “Testing the Application” section in Chapter 1). A testing interface should display, as shown in Figure 9.3, and it should list the operations in your service.
icon on the toolbar. This runs the currently active model (orderStockWebService) with the last run configuration you used. If you have not set up a run configuration before, you are prompted to do so—create a new configuration under the WebSphere Portlet Factory Model category (if you want more information on setting up a run configuration, see the “Testing the Application” section in Chapter 1). A testing interface should display, as shown in Figure 9.3, and it should list the operations in your service.
Figure 9.3 Testing your Web service.
To test whether the orderStockItem operation correctly orders a stock item when the item doesn’t exist in the orders list, click the orderStockItem link, and an interface for entering inputs into the operation (as shown in Figure 9.4) is displayed. Type an ID for an item that doesn’t exist in the orders XML document (for example, 00004) and a quantity to order (for example, 3), and then press the Submit Order button. The page reloads and will now contain nothing other than the Back button.
Figure 9.4 Ordering a new stock item.
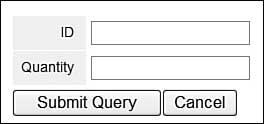
To test whether the operation works when the stock item does exist in the orders list, click the orderStockItem link again and enter the same details as before. When you press the Submit Query button, you should see that the quantity for item 00004 has been incremented by the amount specified (3). Press Back when you are finished.
Finally, to test whether exceptions are correctly handled, click the orderStockItem link again and leave the inputs blank. Press the Submit Query button and you should see that the response returned indicates that an exception was raised (see Figure 9.5).
Figure 9.5 Testing exception handling.

After you have finished testing the Web service, click the View WSDL link on the test page. You should see a WSDL document similar to that shown in Figure 9.6.
Figure 9.6 Displaying the WSDL for the orderStock service.
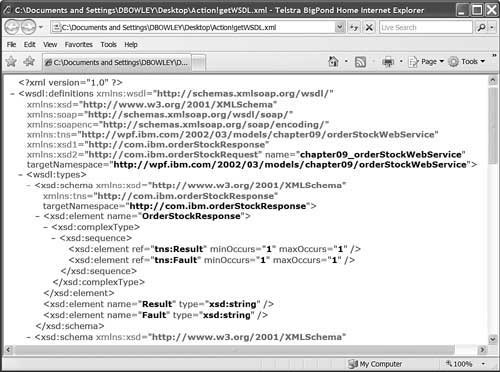
This WSDL document will be used in the service provider you create in the next section. As mentioned earlier, you don’t need to understand how the WSDL works; however, you do need to use the URL for the WSDL and paste it into the service provider (this is covered in the next section).
Note that because WSDL and SOAP are commonly used Web service standards, you can use this Web service not only in WPF, but also in applications developed using environments other than WPF. After you run the Web service, it is accessible to all applications (WPF or otherwise) that have access to the application server you deployed the Web service provider application to.
Creating a Service Provider
Now that you have a Web service, you need another WPF project to house the models for the order stock portlet. Separating the Web service and order stock portlet into two separate projects means that they can be deployed separately, so that the Web service can be run independently of the portlet. If you have a project from a previous chapter, you can use it; otherwise, you should create a new WPF project (for more information on creating projects, see Chapter 1). The project will be published as a WAR file and deployed to a portal server, and you should also deploy the application to a local application server for testing (as with the previous project, you can use the portal server if it runs on your local machine; otherwise, you should preferably use WAS CE, but you can also use another application server such as Tomcat or WAS 6.x).
After you have a project set up, you need to add two models to the project (a service provider and a service consumer). The service provider accesses the Web service directly, and the service consumer then calls this Web service via the service provider. The first model you create is the service provider. It uses the following builders to provide its functionality:
• Service Definition
• Web Service Call
• Service Operation
• Method
Creating a Model and Defining the Service
Create a new model called orderStockService in your project, under the folder WEB-INF/models/chapter09. The model should be based on the Empty template, which creates a model with no builder calls in it. After you have added the model to your project, add a Service Definition builder call to the model and name it orderStockService. Enable the Add Testing Support checkbox in the Testing Support section, and save the builder call.
Calling the Web Service
Add a Web Service Call builder call to your model. This builder call is used to consume the operation on the Web service you created earlier in this chapter. Enter the name consumeStockService for the builder call, and then enter the URL for the WSDL for your Web service into the WSDL URL input (you can obtain this URL by pressing the View WSDL link from the Web service test page). This URL differs depending on your project name and the server you deployed the Web service to, but it should be similar to the following:
http://localhost:10038/WebServiceExample/webengine/Chapter09/
orderStockWebService/Action!getWSDL
You should be able to type this URL into a Web browser and see the WSDL document (as shown earlier in Figure 9.6). After you put in the correct URL, you can press the Fetch WSDL button to fill in the Web Service Call builder call with the values from the WSDL. Note that you can easily consume any WSDL-based Web service simply by specifying the URL for the WSDL in the WSDL URL input. If a WSDL changes, be aware that you will need to refresh the Web Service Call builder call (which you can do by pressing the Fetch WSDL button and saving the builder call).
If you cycle through some of the inputs in the Web Service Call builder call, you can see that they have been populated with values obtained from the WSDL. Enable the AutoCreate Input Vars input in the Request Parameters section, which automatically populates the request object with whatever values are sent in to the Web service call. Save the builder call when you are finished.
Adding a Service Operation
The last builder call for the orderStockService defines an operation for the service. Add a Service Operation builder call to the model and name it orderStockItem. Set the Data Service to orderStockService, and enter the Action to Call as DataServices/consumeStockService/execute (this line is used to execute the operation defined in the Web Service Call).
Expand the Operation Inputs and Operation Results sections, and make sure you take each structure from the called action. This uses the appropriate schemas from the Web Service Call to define the structure of the request and response to the orderStockItem service (the same schemas are used). The field mapping in each section should also be set to Automatic. Save the builder call when you are finished.
Although the request and response objects are automatically created in this example, you can also manually create them using IXml. For example, the following method can be used to construct a request object to send to the Web service:
{
//assemble request object
IXml requestXml = XmlUtil.create(“OrderStockRequest”);
requestXml.setAttribute(“xmlns”,
![]() “http://com.ibm.orderStockRequest”);
“http://com.ibm.orderStockRequest”);
requestXml.addChildWithText(“ID”,
![]() webAppAccess.getRequestInputs().getInputValue(“stockItem”));
webAppAccess.getRequestInputs().getInputValue(“stockItem”));
requestXml.addChildWithText(“Quantity”,
![]() webAppAccess.getRequestInputs().getInputValue(“stockQuantity”));
webAppAccess.getRequestInputs().getInputValue(“stockQuantity”));
//return request object
return requestXml;
}
The service provider is now ready to test.
Testing the Service Provider
To test the service provider, run it from your IDE. The testing interface is exactly the same as for the Web service, with the exception that no link is provided to view the WSDL (because the service provider is not itself a Web service). Step through the same tests for the Web service and make sure you can access the Web service operation correctly.
If you get any errors when testing the service provider, check that you have correctly configured the Web Service Call builder call and that you can access the WSDL document for the Web service in a browser.
Creating an Order Stock Portlet
Now that your service provider is finished, you need to create a consumer for the service, which will be published to a portal server as a portlet. A screenshot of the finished product is shown in Figure 9.10.
The order stock portlet uses the following builders to provide its functionality:
• Action List (x2)
• Page
• Portlet Adapter
• Service Consumer
• Variable
• Data Page (x2)
• Button
Note that the Page builder call should precede the Data Page builder call to improve performance; this is because the Data Page builder call references the results of the Page builder call, and putting the Page builder call first stops the WPF generation engine from making two passes of the builder calls in your model.
Creating a Model
Create a new model called orderStock in your project, under the folder WEB-INF/models/chapter09. The model should be based on the Main and Page template, using a Page Type of Simple Page. For more information on creating models, see the example in Chapter 1. After the model is created, it should have two builders in it: an Action List called main and a Page called page1. The Action List runs automatically whenever the model is run and will open the page1 Page.
Modifying the Page
Open the Page builder, and change the contents of the Page Contents (HTML) input to the HTML listed in the following:
<html>
<head><title>Order Stock</title></head>
<body>
<form name=”myForm” method=”post”>
<div align=”center” style=”font:12pt Arial;font-weight:
bold;color: #336699;”>Order Stock</div>
<br>
<span name=”serviceRequest”></span>
<br>
<span name=”submitOrder”></span>
<br>
<br>
<span name=”serviceResponse”></span>
</form>
</body>
</html>
The HTML contains three span tags that replaced later in this section using builders in WPF: The first (serviceRequest) is for the request inputs, the second (submitOrder) is for a button to submit the form, and the third (serviceResponse) is for displaying the results of the service. Save the builder call when you are finished.
Adding a Portlet Adapter
The first builder call to add is a Portlet Adapter builder call, which surfaces the orderStock model as a portlet on the portal server specified in your deployment configuration. Add a Portlet Adapter builder call to the model, and then change the Name to orderStock. Also, change the Portlet Title to OrderStock and the Portlet Description to Allows users to order stock items. This surfaces your model to the portal server as a portlet called Order Stock. Save the builder call when you are finished.
Consuming the Service
Add a Service Consumer builder call to the model. You use this model to make the operations in the orderStockService service available in your model. Change the name of the builder call to orderStock, and then specify the location of the provider in the Provider Model input (chapter09/orderStockService). Save the builder call when you are finished.
Creating a Variable to Store the Request
Now add a Variable builder call to the model. This builder creates a variable based on the request schema for the orderStockService service, and is sent to the service when users press the Submit Order button in your portlet. Later, you use this variable to build an interface for users to enter ID and Quantity information.
Change the name of the variable to stockRequest, and then select the request schema from the service for the Type input (orderStockConsumeStockService_WSDLSchema_1/OrderStockRequest). This automatically populates the Namespace input with the appropriate namespace taken from the schema. Leave the Initial Value input blank (as the variable will be set by users when they run the application and enter values for the ID and Quantity fields) and save the builder call.
Displaying the Interface
Add a Data Page builder call to the model (for more information on the use of the Data Page builder, see Chapter 3, “Using Data from a Relational Data Source”). This Data Page is used to build an interface so that users can specify values for the order ID and Quantity. Change the name of the Data Page to displayServiceRequest, and change the Variable input to point to the variable you created earlier (Variables/stockRequest/OrderStockRequest). Change the Page Type input to Data Entry, so that text fields are automatically created for each element in the variable (ID and Quantity). Change the Page in Model input to page1, and the Location for New Tags input to serviceRequest, so that the results of the builder are displayed at the serviceRequest tag on page1. Save the builder call when you are finished.
The next step is to add a Data Page builder call to display the results of calling the Web service. Add a Data Page to the model and name it
displayServiceResponse. Select DataServices/orderStock/orderStockItem/results/OrderStockResponse for the Variable input and press OK. This makes the Data Page display the results of executing the operation described by the consumeStockService builder call.
Next, specify page1 for the Page in Model input, so that the results are displayed on the page created by the Page builder you created earlier, and specify ‘View Only’ for the Page Type (because there is no need to be able to edit the results). In the Created Element Settings section, specify serviceResponse in the Location for New Tags input, so that the results are displayed at the serviceResponse <span> tag, and then save the builder call.
Adding Submit Functionality
Next, add an Action List builder call. This action list is run whenever the user submits an order by pressing the Submit Order button, and it contains three actions: first, it sets the request object for the orderStockItem operation from the OrderStockRequest variable (which contains the ID and Quantity values entered by the user); then it executes the orderStockItem operation; and finally, it displays the page created by the Page builder call (which then displays the results of calling the service on the screen).
For the first action, use the Select Action dialog (which you open by pressing the ellipsis button to the right of the row you want to change), and select Assignment from under the Special section. Fill out the Make Assignment dialog that follows, as shown in Figure 9.7, and press OK to accept the action.
Figure 9.7 Configuring the Make Assignment dialog.

For the second action, select the orderStockItem operation (DataServices/orderStock/orderStockItem), and type page1 for the third action. Save the builder call when you are finished.
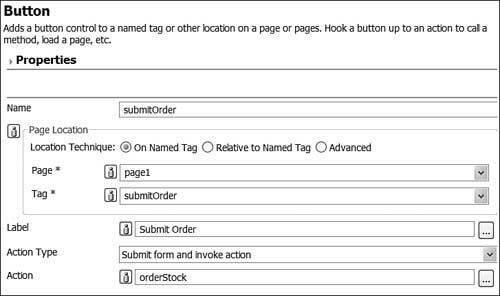
The last builder call to add is a Button builder call. This inserts a button at the submitOrder <span> tag on the HTML page, and it enables users to submit a stock order (by calling the Action List you created earlier, which calls the Web service and displays the results on the page). Add a Button builder call and configure it as shown in Figure 9.8. Save the builder call when you are finished.
The service consumer is now ready to test.
Figure 9.8 Configuring the Submit Order button.
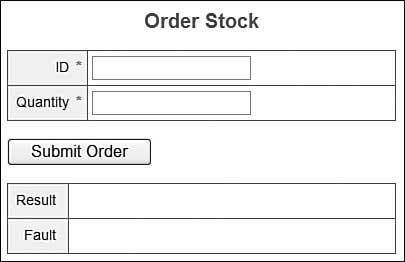
Testing the Order Stock Portlet
To test the orderStock model, run it from your IDE. The page shown in Figure 9.9 should display in your default Web browser. The functionality of the service consumer is the same as the service provider, so step through the same three tests for the service consumer.
Figure 9.9 Interface for the service consumer.
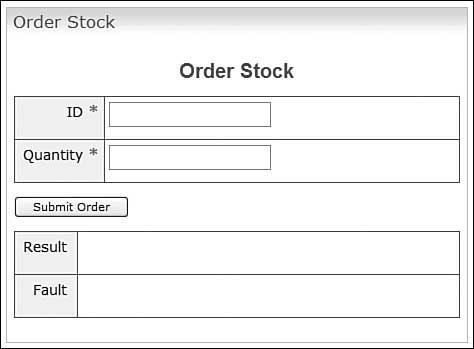
After you have tested your model, you should rebuild the application containing the portlet and test it on the portal server as a portlet (for instructions on how to do this, see the example in Chapter 1). After you have added the portlet to a page in the portal, your portlet should display as shown in Figure 9.10.
Figure 9.10 The Order Stock portlet.
XML Transform Builders
You have already seen how to create, access, and manipulate XML using the IXml interface, which gives you control over your XML processing. However, WPF also comes with a number of builders to perform several common XML transformations, which are discussed in the following sections. These builders don’t give you as much control as the IXml interface, but they can be implemented without writing any Java code (although it is also possible to extend them with custom Java transformation methods).
Transform
This builder can be used to copy a source XML document into a target XML document. You use this builder if you want to modify the structure of an XML document from one schema to another. To use this builder, both the source and target XML documents must be defined by a schema.
The example in the next chapter uses this builder to copy an XML element into a structure where it can be rendered as a chart via the Web Charts builder.
Transform - Filter
This builder can be used to filter elements in and out of an XML document or Java bean. The filtered XML can be saved over the top of the old XML document or into a new XML document. Note that although some of the other XML builders also enable basic element level filtering, the Transform - Filter builder enables you to specify detailed filter expressions based on variable values. So, for example, you can filter all elements with a name that does not equal a certain variable value.
Transform - Rename
This builder renames a particular element in an XML document, and then saves the results based on a particular schema (it doesn’t necessarily have to be the same as the original schema). The target XML of the builder does not have to be the same as the source XML.
Transform - Sort
This builder enables you to sort an XML document or Java Bean collection, based on a particular element name. The XML document must be based on a schema to be used by this builder. The source and target XML do not necessarily have to be the same, but they need to be based on the same XML schema.
An example using XML transformation is provided in Chapter 10, “Using Charts in Portlets.”
Summary
In this chapter, you learned how to create a Web service and consume it from WPF. You also learned how to store, access, and manipulate XML documents using WPF features, such as the IXml interface, the Variable builder, Schema builder, and the Transform builders. You also created, deployed, and tested two applications: a Web service providing an operation to order stock items and a portlet application to enable users to order stock items via the Web service.
The examples in this chapter can be extended not just to providing and consuming other Web services from within WPF, but to providing Web services to applications developed outside of WPF, and consuming publicly available Web services as well (which could have been developed in any number of different languages). A list of publicly available Web services can be found at www.xmethods.org.
Chapter 10 discusses how to create charts in a portlet using WPF.
Important Points
• Web services can be implemented in WPF using the service provider/consumer pattern. Web services built in WPF can be accessed both inside and outside of WPF applications. Applications built outside of WPF can access WPF Web services.
• A model can be converted into a Web service by adding a Web Service Enable builder, or by enabling the Generate WSDL option on the Service Definition builder.
• A model can call a Web service using the Web Service Call builder. Web services should be called from a service provider.
• XML documents are often used in WPF for Web service communication and are usually sent via SOAP messages. Consumers send a request message to the Web service, which then returns an appropriate response.
• The IXml interface is a powerful way to create, access, and manipulate XML documents in WPF.
• The Transform builders can be used to transform one XML document into another, without writing any Java code.
• The Schema builder can be used to define an XML schema for Web service requests and responses.