
CHAPTER 16 More Techniques for Domino
This chapter outlines some of the ways in which common Notes functionality can be surfaced in a portlet using WebSphere Portlet Factory (WPF). These functions are an extension of the techniques discussed in Chapter 4, “Using Domino Data.” By the end of the chapter, you will understand several common approaches to implementing Notes functionality in WPF. You will also create a sample application to demonstrate these approaches, and become aware of the various methods that WPF makes available to you through the Domino Data Access builder.
Both the models used in this chapter are available for download from ibmpressbooks.com/title/9780137134465 under the Chapter 16 folder (instructions for copying these files into your project are included in a readme.txt file in the same folder), although it is recommended that you build them yourself using the application developed in Chapter 4 as a starting point. If you haven’t already set up your environment to link to the Suppliers.nsf database, you should follow the instructions in the beginning of Chapter 4.
The following topics are covered in this chapter:
• Adding common Notes functionality
• Domino data access methods
Adding Common Notes Functionality
Most Notes application developers are acquainted with the different techniques used to build Notes applications, such as coding, scripting, GUI manipulation, and formula writing. When faced with the prospect of porting Notes applications to a portal, then, the question of how to implement this functionality in a portlet inevitably arises. How do you run a Notes agent from a portlet? Can you use formulas in portlets?
This section discusses several useful techniques for surfacing some of the more common Notes functionality in a portlet. The suppliers application built in Chapter 4 is used as a starting point for these modifications, so if you have not already completed the example in that chapter, it is recommended you set up a WPF project with these artifacts (you don’t need to walk through the whole example; just download the artifacts for Chapter 4 and configure your project according to the instructions in the “Configuring Your Environment” section of Chapter 4).
Note that the modifications in this chapter are independent of each other, so you don’t need to walk through each section in order (you can just skip the sections you aren’t interested in). Also, before you begin the examples in this section, ensure that you are using the suppliersService model as your service provider, rather than the suppliersStub model discussed at the end of Chapter 4.
Notes Formulas, Validation, and Translation
Notes formulas are an integral part of Notes development, and depending on the type of formula used, there are a number of different ways to bring them across to a portlet. Column formulas in Notes views, for example, are automatically brought across into WPF when you use a Domino Data Access builder call or Domino View & Form builder call. Form formulas, however, are a little more nuanced. As you saw in the example in Chapter 4, computed for display fields are not automatically brought across into WPF, so you need to evaluate their formulas and display the results from within the WPF application. Similarly, even though computed fields are brought across into WPF, they are not evaluated according to the field’s formula in Notes.
There are a number of ways to approach these situations. First, WPF comes with a Domino Formula builder, which is a quick and easy way to evaluate a Notes formula and display the results in a portlet. The downside of this builder is that it can’t send its output (the evaluated Notes formula) through a service, which means that it has to exist in the service consumer rather than the service provider. This is usually undesirable, as it mixes the presentation tier (what is displayed to the screen) with the model tier (the data itself); ideally, the field on the form should get its value from a service and should not have to worry about where the service is getting its data from. To implement a service-based approach to form formulas, then, you can use the evaluateFormula method of the Domino Data Access builder. The formula is evaluated by a service provider, and the results are then passed back to the service consumer, which displays the results to the screen. The example at the end of this section uses this approach.
Although formulas in computed and computed for display fields do not automatically transfer across into WPF, validation formulas do come across in the sense that the Notes form is computed when the form on the portlet is submitted. For example, when you submit the supplier form in WPF, the validation formula for the supplierName field on the Notes form is evaluated, and if the validation fails, an error is generated. You can then cater for these errors by writing validation routines in WPF to output appropriate information to the user (validating fields is covered in Chapter 11, “Field Validation, Formatting, and Translation”).
Field translation formulas, on the other hand, are not automatically transferred to WPF, and neither are the formulas specified in keyword lookups for form fields. In both of these cases, you need to implement the Notes formulas in WPF. Translating field data is covered in Chapter 11, and keyword lookups are covered in the “Keyword Lookups” section at the end of this chapter.
Finally, Notes formula agents cannot be run directly from a WPF portlet, and you will need to recode these agents in either LotusScript or Java. LotusScript and Java agents can be run from WPF portlets, and you can also recode them directly in WPF using the Java Domino API (using Java in WPF is discussed in Chapter 8, “Using Java in Portlets”).
The rest of this section describes how to transfer the supplier rating functionality of the Suppliers.nsf database into your WPF application. The formula is evaluated in the service provider and the results are published through the readSupplierRating operation, which is consumed by the service consumer and displayed when viewing or editing a supplier.
The following builders are added in this section:
• Comment (x2)
• Variable
• Service Operation
• Action List
• Text
Providing the readSupplierRating Operation
To add Notes formula functionality to your service provider, first make sure the suppliersService model is the currently active model in your IDE, and then add a Comment builder call to the suppliersService model and name it Formula. Save the builder call when you are finished, and add a variable to the suppliersService model by adding a Variable builder call. Name the variable supplierRatingFormula. This variable will hold the formula that you want to evaluate (you can enter the formula into the service operation directly, although using a variable makes your model clearer and easier to maintain). Set the type of the variable to String and enter the formula shown below into the Initial Value input. Save the builder call when you are finished.
currentYear := @Text(@Year(@Now));
returnsCount := @If(@IsError(@DbLookup(“”; “”;
“LookupReturns”;supplierName+currentYear; 1)); 0;
@Count(@DbLookup(“”; “”; “LookupReturns”;supplierName+currentYear; 1)));
@If(@IsNewDoc; “”;returnsCount < 1; “This supplier has an excellent rating.”;
returnsCount < 2; “This supplier has a good rating.”;
returnsCount < 3; “This supplier has an average rating.”;
returnsCount < 4; “This supplier has a poor rating.”;
This supplier has a very poor rating.”)
Add a service operation to the suppliersService model, and fill out the inputs as shown in Figure 16.1. This creates a new service operation called readSupplierRating, which runs the evaluateFormula method of the suppliersServiceView Domino Data Access builder. The operation takes two arguments: The first is the formula you specified in the previous step, and the second is the UNID of the document you would like to retrieve the supplier rating for. Only the second argument needs to be specified by the service consumer. Note that the Specify Input Values setting enables you to manually map operation inputs to inputs in the called action.
Figure 16.1 Configuring the readSupplierRating service operation.

For the Operation Results section of the builder call, specify ‘Use structure from called action’ for the Result Structure Handling input and make sure the Result Field Mapping input is set to Automatic. This causes the service operation to take the structure of its results from the evaluateFormula method (which leads to a String value being returned). Save the builder call when you are finished.
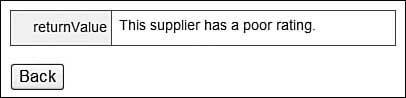
The formula is returned from the readSupplierRating operation on the service provider. You can test the operation by running the model from your IDE, and then selecting readSupplierView from the index test page. Copy one of the supplier’s universal identifiers (UNIDs), and then press the Back button to return to the index page. From the index page, select readSupplierRating and then paste in the UNID into the arg2 field (you can leave the arg1 field blank, as it is automatically set in the Service Operation builder). Note that you do not need to copy the UNID first if you specify a UNID in the testing defaults for the readSupplierRating operation in the Service Definition builder. Press the Submit Query button and you should see the results of the formula evaluation returned. The results for Fred Jackson, for example, are shown in Figure 16.2.
Figure 16.2 Supplier rating for Fred Jackson.
Consuming the readSupplierRating Operation
The next step is to configure the service consumer so that it consumes the readSupplierRating operation. To do this, make sure the suppliers model is the currently active model in your IDE, and then add a Comment builder call to the suppliers model and name it Formula. Save the builder call.
Add an action list to the suppliers model and name it getSupplierRating. This action list calls the readSupplierRating service operation, passing in the UNID that was used to read the supplier document, and returns the supplier’s rating. The action list will be run from builder calls you are about to create.
To add the appropriate action to the action list, open the Select Action dialog and then select the suppliersReadSupplierRatingsWithArgs method under the Methods heading. In the Define Method Call Arguments dialog that follows, leave the first argument blank but select the UNID used to read the supplier document from the Select Action dialog, as shown in Figure 16.3. Click OK to accept the argument, and then click OK again to accept the action. Save the builder call when you are finished.
Figure 16.3 Selecting the UNID of the current document.

The next step is to call this action list and display the results in the portlet. You can do this with a Text builder call, and you will need to add one for each page you would like the formula results displayed on. In this example, you add only the formula results to the detail page.
To add the formula results to the detail page, add a Text builder call to the suppliers model and fill out the inputs as shown in Figure 16.4. This calls the getSupplierRating action list and displays the results after the data table on the detail page for each supplier (the formula is evaluated whenever the detail page is opened for a supplier). Save the builder call when you are finished.
Figure 16.4 Adding formula results to the detail page.

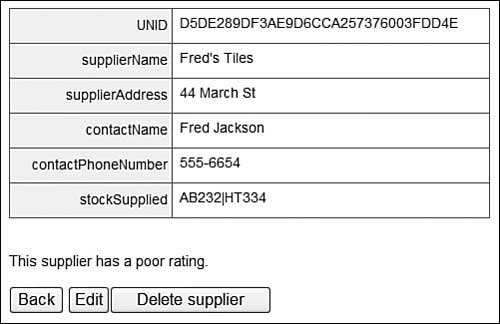
The Notes formula for evaluating a supplier rating is retrieved from your service consumer model via the service provider model, and displayed to the screen. The detail page for Frank Jackson, for example, should display as shown in Figure 16.5 when the suppliers model is run from the IDE.
Figure 16.5 A detail page displaying the supplierRating.
Notes Agents
LotusScript and Java Notes agents (but not formula Notes agents) can both be used from WPF portlets. Using Notes agents from WPF has a number of benefits:
• Notes agents provide an easy way to implement business logic from WPF, especially for Domino developers and even more so when working with Domino data.
• You can reuse existing Notes agents with minimal rewriting.
• Domino developers who don’t know how to code in Java can use LotusScript agents instead of Java methods in WPF.
• Business logic in Notes agents is separated from the presentation layer of your application (your portlet in WPF).
• Notes agents can take advantage of Domino security.
However, there are some disadvantages as well:
• Notes agents create a reliance on a Domino server, which is usually undesirable, unless the Domino server is also used as a data source.
• Notes agents are fairly useless unless they’re employed to manipulate Domino data, as they have no access to the context in which the portlet runs (the portal API, the WPF WebApp, and so on).
• If you use any Java methods in your applications (as often happens when implementing business logic for non-Domino data sources), then your applications can become confusing if you use Notes agents as well.
• Notes agents cannot return values to the functions that call them.
• Notes agents run outside the jurisdiction of the portal server, so the portal server has no control over them (apart from deciding whether they are run in the first place).
When faced with the task of implementing business logic in WPF, these points need to be taken into consideration as part of your development strategy. Writing business logic in Java methods is the generally preferred approach when there are non-Domino data sources or Java frameworks in place, as it provides the most flexibility for future development. However, Notes agents provide an effective alternative when working with Domino data, particularly if the agents have already been written in Notes or if the developers writing the code are Notes developers. There is no hard and fast rule as to which approach is best, so the decision probably needs to be made on a case-by-case basis for each environment.
The example that follows describes how to call the AddSupplierToMMDataSourceFromWPF Notes agent from a button on the supplier’s portlet. This agent is based on the code of the Add to Mail Merge Data Source button on the Supplier form, with only one or two minor changes required to make the code run from WPF. The code will add the current contact’s details to a file called supplierMailMerge.dat on the users C drive, which can then be used as a data source for mail merges. Because the changes to the code are very minor, using a Notes agent is a quick and easy solution for surfacing the Add to Mail Merge Data Source functionality. The agent functionality is provided by the service provider model and consumed by the service consumer.
The following builders are added in this section:
• Comment (x2)
• Service Operation
• Action List
• Button
Providing the addSupplierToMMDataSource Operation
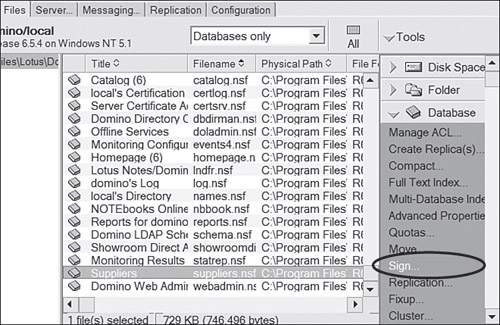
To add Notes agent functionality to the service provider model, first sign the AddSupplierToMMDataSourceFromWPF agent with a user who has access to run restricted agents on the server. You can do this by opening and saving the agent in the Domino Designer®, provided your user ID has access to run restricted agents on the server. Otherwise, you can sign the agent with the Domino server’s ID by navigating to the Files tab in a Domino Administrator client and clicking the Suppliers.nsf database in the file list. Then, select Sign from the Database menu, as shown in Figure 16.6. On the Sign Database dialog that follows, select the Active server’s ID radio button option and press OK.
Figure 16.6 Signing the supplier database.
Make sure the suppliersService model is the currently active model in your IDE. Add a Comment builder call to the suppliersService model and name it Agent. Save the builder call, and then add a service operation builder call to the suppliersService model and fill out the Service Operation Properties and Operation Inputs sections of the builder call as shown in Figure 16.7. This calls the runAgent method of the suppliersServiceView Domino Data Access builder, passing in the two arguments specified. The first argument is the name of the formula to call (AddSupplierToMMDataSourceFromWPF), and the second argument is a document UNID passed in from the service consumer. The formula is evaluated for the document UNID specified in the second argument.
Select No Results for the Result Structure Handling input in the Operation Results section, as no results are returned from running the agent. Make sure Automatic is specified for the Result Field Mapping input, and save the builder call when you are finished.
The agent can now be run from the addSupplierToMMDataSource operation on the service provider. You can test the operation by running the model from your IDE, and then selecting readSupplierView from the index test page. Copy one of the supplier’s UNIDs, and then press the Back button to return to the index page. From the index page, select addSupplierToMMDataSource, and then paste the UNID into the arg2 field (you can leave the arg1 field blank, as it is hard coded into the Service Operation builder). Press the Submit Query button and the agent runs. No results are returned, so when the screen reloads, it simply displays the Back button. However, if you check in the root of your C drive, you should have a file called supplierMailMerge.dat. If you open this file, you should see various details for the document specified in the second argument to the service operation. The results for Kate Tredeau, for example, are as follows:
“Tile Kingdom”,”Kate Tredeau”,”1 Park Place”
Figure 16.7 Configuring the service operation properties and inputs.

If you run the operation again, it appends information to the end of the file (you can reset the results by deleting the file from the file system).
Consuming the addSupplierToMMDataSource Operation
The next step is to configure the service consumer so that it consumes the addSupplierToMMDataSource operation. To do this, make sure the suppliers model is the currently active model in your IDE. Add a Comment builder call to the suppliers model, and name the builder call Agent. Save the builder call when you are finished.
Add an action list to the suppliers model, name the action list addSupplierToMMDataSource, and then add two actions to the list as shown in Figure 16.8. This action list calls the addSupplierToMMDataSource service operation, and then reloads the suppliers view page. Save the builder call when you are finished.
Next, add a button to the supplier detail page, which will run the action list you just created. To do this, add a Button builder call and fill out the inputs shown in Figure 16.9. Note that the action is only linked to; it does not generate a submit form event (which would raise an exception as there is no form to submit on the supplier detail page). Save the builder call when you are finished configuring it.
Figure 16.8 Configuring the addSupplierToMMDataSource action list.

Figure 16.9 Configuring the addSupplierToMMDataSourceButton builder call.

It is now possible to run the addSupplierToMMDataSource Notes agent from the suppliers model. Test the model now from your IDE, and open up the details page for World of Tiles. Press the Add to Mail Merge Data Source button, and you will be returned to the suppliers view. This automatically creates a .dat file on your local machine (or updates the file if it already exists) with information on World of Tiles, which you can use to run mail merges in a word processor. If you check in the C drive on your local machine, you should see a file called supplierMailMerge.dat. Open this file. The file contains details for World of Tiles as follows (in addition to any previous details you added to the file):
“World of Tiles”,”Jason Shearer”,”90 Centre Rd”
Keyword Lookups
Keyword lookups are often used on forms in Notes to provide users with a prepopulated list of options for field values. In the suppliers application, for example, the stockSupplied field has a lookup to the Stock view, and because the Allow Values Not in List checkbox on the stockSupplied field properties is not enabled, users can specify stock for a supplier only when that stock is listed in the database.
This functionality does not come across into WPF when using the View & Form builder, but there are two main options available for recreating the same functionality in your WPF portlets. The first is to use the Domino Keyword Lookup builder, which provides a list of values from a Notes view, profile document, or Notes formula. You can then add a Select builder call to your model, which takes a list of values that users can select from and inserts it at a particular tag on a page. The list used by the Select builder comes from the results of the keyword lookup. This approach is a quick and easy solution, but unfortunately, the Domino Keyword Lookup builder call requires a builder with Domino access in the same model. Because of this, the presentation and model tiers of your application are mixed together. As an alternative, you can use a service-based approach, where the presentation tier (your service consumer) makes calls to the model tier (the service provider) to provide the keyword lookup via a Lookup Table builder call. It is a little more work, but this approach allows a clearer separation of components, and is easier to maintain in the long run.
The rest of this section provides an example of how to implement a service-based keyword lookup. The Stock view in the suppliers database will be used as the basis for the lookup, which is then shown on the update and create pages of the supplier form. To simplify the example, the stockSupplied field referenced in the Domino database takes only a single value; if you change this field to accept multiple values, you also need to write a Java routine that separates out each value in the field (separated by the pipe (|) symbol) and then selects the appropriate values in the dropdown box. Working with Java is covered in Chapter 8.
The following builders are added in this section:
• Comment (x2)
• Domino Data Access
• Service Operation
• Lookup Table
• Data Field Modifier
Providing the readStockView Operation
To implement keyword lookup functionality in the service provider model, first make sure the suppliersService model is the currently active model in your IDE. Add a Comment builder call to the suppliersService model and name it Keyword lookup. Save the builder call.
Add a new Domino Data Access builder call to the suppliersService model by selecting Domino Data Access from the Builder Palette, and then pressing OK. Configure the builder call as shown in Figure 16.10. This connects to the Stock view rather than the Suppliers view. Don’t enable the Enable Document and Form Support checkbox under the Document Form Support section, as there is no need to enable document support; you just want to return the list of stock items for a keyword lookup.
Save the builder call when you are finished.
Next, add a Service Operation builder call to the suppliersService model. This service operation returns the list of stock items provided by the stockView Domino Data Access builder call. Fill out the Service Operation Properties and Operation Inputs sections of the builder call as shown in Figure 16.11.
Figure 16.10 Configuring the stockView builder call.

Figure 16.11 Configuring the service operation properties and inputs.

Fill out the Operation Results section of the builder by selecting Use Structure from Called Action for the Result Structure Handling input, and Automatic for the Result Field Mapping input. This specifies that the structure of the results should come from the DataServices/stockView/readTable action, which causes an XML list of stock items to be returned. Save the builder call when you are finished.
The keyword lookup is now available from the readStockView operation on the service provider. You can test the operation by running the model from your IDE, and then selecting readStockView from the index test page. You should see a list of stock items, as shown in Figure 16.12.
Figure 16.12 Testing the readStockView service operation.

Consuming the readStockView Operation
You now need to configure the service consumer so that it consumes the readStockView operation. To do this, make sure the suppliers model is the currently active model in your IDE. Add a Comment builder call to the suppliers model and name it Keyword lookup. Save the builder call.
Create a lookup table by adding a Lookup Table builder call to the model. Name the lookup keywordLookup, and specify Data Service as the Data Source. In the Data Service input, select DataServices/suppliers/readStockView from the Select Action dialog, and then type the text Item_Code into the Value Tag and Label Tag inputs. This retrieves a list of stock items from the readStockView operation, and then creates a keyword lookup based on the Item_Code column. The Label Tag for each stock item—that is, the text displayed to users—is the Item_Code (for instance, AB232, CT234), and the Value Tag for each stock item—the value that is stored for each selection—is also the Item_Code. Although these tags are often the same, you might want to use a different field for the label if the value isn’t user friendly (for example, the value might just be a numeric index, which won’t make much sense to end users). Save the builder call when you are finished.
The final step involves creating form inputs on the update and create pages so that users can specify the stock supplied based on the keyword lookup (you need to add two separate form inputs, although you can add both at one time with the same builder). To do this, add a Data Field Modifier builder call to the model and name it stockSuppliedLookup. Then, in the Fields input, specify the two form inputs as shown in Figure 16.13. Scroll down to the Field Settings section and change the Lookup Table Used input to keywordLookup. Save the builder call when you are finished.
Figure 16.13 Adding lookups for the stockSupplied fields.

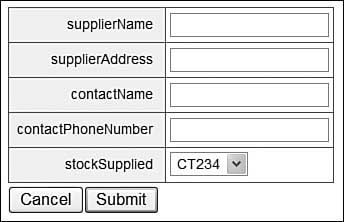
It is now possible to look up the stock view from the suppliers model. Test the model from your IDE, and press the Create Supplier button. You should see the output shown in Figure 16.14. Notice that the stockSupplied field displays as a drop-down list box with pre-populated values from the lookup view.
Figure 16.14 Testing the lookup view.
Categorized Views
Categorized views are data lists where one or more fields are used to group information together, and they can make your data easier to navigate. These views can be implemented in WPF using the Category View builder. In the example that follows, you add a screen for the Returns view in the suppliers database, which is a view of returned stock categorized on the return date.
The following builders are added in this section:
• Comment (x2)
• Domino Data Access
• Service Operation
• View & Form
• Button (x2)
• Category View
Providing the readReturnsView Operation
To add categorized view functionality to the suppliers application, the first step is to configure the service provider so that it provides an operation to access data from the Returns view. To start this configuration, open the suppliersService model from the Project Explorer view. Add a Comment builder call to the model and call it Category view. Save the builder call when you are finished.
Now add another Domino Data Access builder call to the model and call it returnsView. This builder call is used to access the Returns view in the Suppliers.nsf database. Type Returns in the View Name input, and then change the Rows to Include input to All Rows. By default, WPF does not display categorized rows, so if you do not change this input, you need to specify the categorized fields manually when you enable categorized view support in the service consumer. Save the builder call when you are finished.
Add a Service Operation builder call to the model, which is the public interface for service consumers to retrieve information from the Returns view. Change the Data Service input to suppliersService to associate the operation with the suppliersService service, and then type readReturnsView as the Operation Name. Specify DataServices/returnsView/readTable for the Action To Call, which accesses the Returns list from the Domino Data Access builder call.
Make sure the No Inputs option is selected for the Operation Inputs section. The Operation Results section can be left with the default settings, as you will let the structure of the results be defined by the Domino Data Access builder call. Save the builder call when you are finished.
If you test the service at this point and run the readReturnsView operation, you should see a list of returned documents, as shown in Figure 16.15.
Figure 16.15 Testing the lookup view.

Consuming the readReturnsView Operation
The next step is to configure the service consumer to display the results of the readReturnsView operation. To do this, open the suppliers model from the Project Explorer view and add a Comment builder call to the model. Name the builder call Category view, and save it when you are finished.
The suppliers model already has a Service Consumer builder call pointing to the suppliersService model, so it already has access to the new service operation for accessing returns information. However, you need to define an interface for using this information. Add a View & Form builder call to the model and name it returnsView. Specify DataServices/suppliers/readReturnsView as the View Data Operation, and disable the checkbox for Generate Main in the Advanced section (if you don’t do this last step, you will get errors when you try to run the model, as you already have a main method defined in your other View & Form builder call, and you can’t have more than one in the same model). Save the builder call when you are finished.
Next, you need to add some buttons to enable users to navigate between the Suppliers view and the Returns view. Add a Button builder call to the model, and fill out the inputs as shown in Figure 16.16. This button displays only when the suppliers list is visible, and it runs the returnsView_ShowResults method when pressed (this method first reloads the returns view by calling the suppliersReadReturnsView operation, and then it displays the results on the screen).
Figure 16.16 Configuring the switchToReturns builder call.

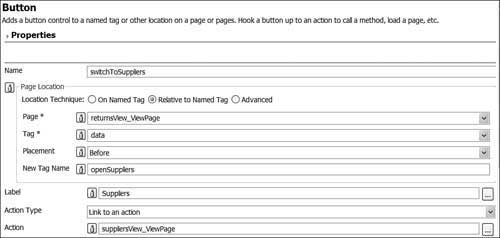
Now add a second Button builder call and fill out the inputs as shown in Figure 16.17. This second button displays only when the returns list is visible, and it shows the suppliersView_ViewPage page. Notice that the second button does not load the supplier information from the service when it is pressed; this is because the supplier information is already loaded by the main Action List, and there is no need to load it twice.
Figure 16.17 Configuring the switchToSuppliers builder call.
Save the model when you are finished. If you run the suppliers model at this stage, the returns view displays as an ordinary, noncategorized view. To add the collapsible twisties (small, clickable arrows) familiar to Notes users, you need to add a Category View builder call to your model. Do this now, and name the builder call categorizeReturns. Specify the Container Field input as [returnsView_ViewPage]returnsView_ViewPage/ViewData/Row, which applies the builder call to each row of the returns view. Also, make sure the Category Selection input is set to Use Domino Category Rows, which automatically sets the categories in the returns view as they are specified in the returns view in Notes. Note that this setting does not work if the Domino Data Access builder call that defines the view has the Document Rows Only option set for the Rows to Include input. Also, make sure the Span Columns input is disabled to prevent category fields from becoming merged together. Save the builder call when you are finished.
Removing Unwanted Fields from the Returns View
By default, the suppliersService service provides two additional fields (UNID and isDocumentRow) that you don’t need in this example, so you can remove them using your Data Field Modifier. In Chapter 4, you created a Data Field Modifier called hideUnwantedFields, which you can use to hide the rows in the Returns view. Open this Data Modifier builder call and add the two rows shown in Figure 16.18.
Figure 16.18 Adding fields to the Data Field Modifier builder call.

Before you save the builder call, you need to move the Data Field Modifier so that it can access the results of the returnsView View & Form builder call (Data Field Modifiers must follow the builder calls that create the fields that they act upon). Select both the Modifiers Comment builder call and the hideUnwantedFields builder call, and drag them into the white space at the bottom of the model. Save the model when you are finished.
It is now possible to access the Returns view as a categorized view from the suppliers model. If you test the model now, you should see the output shown in Figure 16.19.
Figure 16.19 Testing the suppliers model.

Notice that there is a button on the page to switch to the Returns view. If you press this button, the Returns view should display. You should be able to expand and collapse category sections in this view by clicking on the appropriate twisty icons (the small green arrow next to each category), as shown in Figure 16.20.
Figure 16.20 Testing the categorized view.

Hide-When Fields
In Domino development, hide-when fields are often used to hide fields (or entire sections) of a form based on the values of certain fields. In WPF, the best way to do this is to use the Visibility Setter, which lets you hide sections of a form based on another field value. The hide condition is evaluated only when the relevant section of the page is refreshed, so you don’t necessarily have to refresh the entire page (many builders contain a Post-Action Behavior section that lets you perform partial page refreshes. Partial page refreshing is covered in Chapter 13).
To refresh all or part of the page, you may also need to use an HTML Event builder to act as the trigger for the page refresh. For example, you can link an HTML Event builder call to the onChange event of a particular text field, and then tell the builder to refresh part of the page every time the event is fired. So, every time the text field changes, the fields in the refreshed part of the page may disappear or reappear, depending on the conditions specified in the Visibility Setter.
An example of hiding portions of a page without refreshing the entire page is provided in Chapter 13.
Rich Text
Rich text is a popular format for storing formatted text in Notes and can also be used to store attachments. You can display Notes Rich Text in WPF by enabling the Retrieve Rich Text Items as HTML input in the Domino Data Access builder, although note that this is specifically for Notes Rich Text fields, and not for Notes fields that contain HTML text (when displaying HTML text, you can use an ordinary Text builder in WPF, but make sure the Text Format input is set to Allow HTML Formatting of Text).
There is no native support in WPF for editing Notes Rich Text, however you can emulate Notes Rich Text edit functionality to some degree. For example, if you store your fields as HTML in Notes, then you can use a combination of HTML tags and the Dojo Rich Text Editor widget to display and edit them. This is not perfect Rich Text functionality (it does not, for example, enable you to attach files), but it may be suitable if you just want to use formatted text, as well as familiar HTML elements such as tables, images, and links. Attaching files is discussed in the next section.
The use of the Dojo Rich Text Editor is beyond the scope of this book, but an example is available for download from the WebSphere Portlet Factory wiki at www.ibm.com/developerworks/wikis/display/PortletFactoryID/IBM+-+Dojo+Rich+Text+Editor+sample. For more information on the Dojo toolkit and its use in WPF, see Chapter 13.
Attachments
You can use the Domino Attachment builder call in WPF to convert all of the attachments in a document into clickable links on the page, which gives users an interface to launch attachments from your portlets. You can then place a Browse button on the page to upload files using the File Upload builder, and copy the uploaded file into Domino via a Java method. For example, you can write an Action List that gets executed when you submit a form in WPF. This would run a Java method that would get a reference to the uploaded file (using the java.io.File class), and then it would copy the file into a Rich Text item in the appropriate document (using the Domino Java API).
There are a few caveats with this process, however. The File Upload builder may not be supported by certain portal server versions if they are part of a JSR-168 portlet application (however, version 6.x and later of WebSphere Portal fully support the use of the builder). Also, in order to use the Domino Attachment builder, it is necessary to link to a Domino View or Domino View & Form builder, and both of these builders mix your presentation layer with your data layer. This might be undesirable if you are trying to maintain a clean break between these layers in your application.
Attaching Domino documents is beyond the scope of this book, but for more information on using Java in WPF, see Chapter 8 of this book.
Domino Data Access Methods
The Domino Data Access builder provides a number of useful methods for accessing and manipulating Domino data. You can access these methods from a Select Action dialog of any model that contains a Domino Data Access builder call. For example, in the suppliersService model, you can press the ellipsis button next to the Action To Call input on any Service Operation builder call; this opens the Select Action dialog. Then, expand the Methods category and scroll down to the name of the Domino Data Access builder call (suppliersServiceView in the example). Each of these methods can be made available in a service provider, and the results can then be consumed from a service consumer. These method calls can also be inserted into other methods, which are useful for methods such as getDominoSession (this gives you access to the Domino Session object for the current user).
The runAgent and evaluateFormula methods have already been discussed in this chapter, as have the numerous methods used for basic interactivity with the supplier database (createDocument, deleteDocument, and so on). However, there are a number of other useful methods that you should be aware of, as discussed in the following sections.
getDominoSession()and getDominoDatabase()
The getDominoSession() and getDominoDatabase() methods provide you with access to the Session and Database objects, respectively (the Java versions of the NotesSession and NotesDatabase objects). These methods are useful in Java methods when you want to access and manipulate Domino data; as any Domino developer will know, after you have access to these two objects, you can get references to just about every object in Domino (documents, views, and so on).
setComputeWithFormEnabled(boolean)
This method enables you to toggle whether Notes forms are computed when the equivalent WPF form is submitted, which is more useful than it may at first seem. By default, the validation formulas on a Notes form are calculated when the form is submitted in WPF, but being able to turn this off saves you from having to recreate custom forms in Notes when you don’t want to use the Notes validation in WPF. This also enables you to use alternative methods of validation, such as that provided by some of the default validation builders. Validation in WPF is discussed in more detail in Chapter 11.
getUserName()
The getUserName() method can be useful when you want a string that names the current Notes user being used to authenticate with the Domino server from WPF. If you leave the default value of the Runtime Credentials input on the Domino Data Access builder (that is, ‘Use regen credentials specified above’), then the user that is specified in the Domino Server properties file is returned from this function. Otherwise, the returned value differs depending on the value of the Runtime Credentials input.
sendDocument(IXml, boolean, boolean) and getDocumentData(String)
The sendDocument method enables you to send a Notes document via an email message, and it accepts three arguments. The first is an IXml representation of the Notes document that you want to send, the second argument specifies whether you want to save the document before it is sent, and the third specifies whether you want to attach the Notes form to the email message (note that if you set both Boolean arguments to true, the form will be saved as part of the document). The IXml used for the first argument is a WPF interface used to manipulate XML documents (for more information on the IXml interface, see Chapter 9, “Using Web Services and Manipulating XML”). You can create the IXml argument for the sendDocument function by using the getDocumentData function, which returns an IXml object. The getDocumentData method takes one String argument, which is the UNID of the document that you would like an IXml representation of.
Summary
In this chapter, you learned about implementing common Notes functionality in WPF, including formulas, keyword lookups, agents, categorized views, hide-when fields, rich text, and attachments. The application built in this chapter provided this functionality by expanding on the suppliers application built in Chapter 4. You also learned about some of the different methods available to you via the Domino Data Access builder.
Important Points
• The Domino Data Access builder and Domino View & Form builder contain a number of Java methods for interacting with Domino data. It is usually preferable to use Domino Data Access builder calls rather than Domino View & Form builder calls, as they enable you to separate your presentation tier from your model tier.
• Calling the evaluateFormula method of the Domino Data Access builder in a Service Operation is the preferred method for using Notes formulas in WPF. The Domino Formula builder also enables you to perform this function, but it does not enable you to separate the presentation tier from the model tier.
• Notes procedures can be run in WPF by either recoding them in Java (using the Java Domino API) or including them in Notes agents, which are then run using the runAgent method of the Domino Data Access builder. When running Notes agents in WPF, the Runtime target setting in the agent properties should be set to None. The CurrentAgent.ParameterDocID method of the NotesSession class can be used to get a reference to the current document in the Notes agent.
• Using a Lookup Table builder call in a service provider model is the preferable method for emulating keyword lookup functionality in WPF. The Domino Keyword Lookup builder also enables you to perform this function, but it does not enable you to separate the presentation tier from the model tier.
• Categorized views can be implemented in WPF using the Category View builder. Note that the categorization is intended as an alternative to pagination, so you should not apply both to the same view.
• The best way to implement Notes hide-when functionality in WPF is to use the Visibility Setter builder. This builder can be used in conjunction with Ajax to perform partial page refreshes that simulate the use of hide-when fields in a Notes client.
• There is no native support in WPF for editing Notes Rich Text fields, but you can emulate this functionality using the Dojo Rich Text Editor widget and HTML fields. You can enable rich text fields to be displayed in WPF by enabling the Retrieve Rich Text Items as HTML input in the Domino Data Access builder.
• The Domino Attachment builder can be used to convert all of the attachments in a document into clickable links on a page. The File Upload builder provides a file upload button on a form.