CHAPTER 8 Using Java in Portlets
Although WebSphere Portlet Factory (WPF) automates much of the Java development required to build portlet applications, you can certainly fine-tune and extend your WPF applications with a little well-placed Java code. This chapter explains how you can work Java into your portlet applications and walks through the creation of a simple portlet demonstrating some common uses for Java. By the end of this chapter, you will have a good understanding of the different approaches available for extending your applications with Java, as well as knowledge of the benefits and drawbacks of each approach.
The example application discussed in this chapter utilizes one model and several Java source files, which are available for download from ibmpressbooks.com/title/9780137134465, under the Chapter 8 folder. (Instructions for copying these files into your project are included in a readme.txt file in the same folder.) However, to increase your understanding of the topics discussed in this chapter, it is recommended that you create the files yourself by following the example.
The following topics are covered in this chapter:
• Java development considerations
• Java methods
• Java Application Programming Interfaces
• Java beans
• Creating a Java bean and bean manager
• Creating a service provider
• Creating a shopping cart portlet
• Java archives
Java Development Considerations
If you look under the covers of a WPF application, you can see that Java is used extensively to implement each builder call; indeed, the Web application executed on the portal server is itself a Java application. You can view the Java code created by WPF from the WPF Designer by opening the WebApp Tree tab for a particular model and viewing the contents of the Method and Linked Java Object headings (see Figure 8.1). You cannot edit this Java from the WebApp Tree tab, but you can influence how it is created (or overwrite it entirely) by modifying the inputs in builder calls or by adding your own Java methods to the model.
Figure 8.1 Viewing a model’s Java methods.

There is nothing wrong with developers using Java in their WPF applications per se; Java undoubtedly improves your applications in certain scenarios, and in others, it is indispensable (such as in the implementation of complicated business logic). In most cases, however, the WPF builders are preferred to Java code as they are less error prone and easier to maintain. It also usually takes much longer to write a Java class than it does to implement the same functionality using builders.
Although it is important to keep the use of Java to a minimum, you should pay particular attention to minimizing the amount of Java used in presentation-level components (that is, those that are directly related to the look and feel of your portlet). A common problem in ordinary JSP development, for example, is the inclusion of inline Java scripts on the page. This increases the complexity of the page and also increases the skills required to understand it. Unless your Java code is performing some very basic calculation directly relevant to the presentation of data, you should abstract your Java code out into separate classes, and then surface them to your presentation components via a service provider.
Java can be particularly helpful in several areas of development, however:
• Processing and business logic—Although the Action List builder can be used to define program execution steps (and can also implement basic conditional statements), Java will give you much more control over how the logic in your application is handled. You cannot, for example, implement do…while or for…next loops using only the default WPF builders. You can, however, use conditional statements. See the Conditional Statements in Action Lists sidebar for instructions on how to do this. For anything but the most basic program logic, then, it is likely that you will need to use Java to implement at least some of the logic in your application.
• Action Lists can become difficult to read and understand if you are using large numbers of actions—In these cases, it is often preferable to use Java code.
• Manipulating XML documents—Again, a number of builders in WPF can manipulate XML (the Transform family of builders, for example), but the Java IXml interface provides you with a greater degree of control. An example of manipulating XML using the IXml interface is given in Chapter 9, “Using Web Services and Manipulating XML.”
• Interfacing with other Java frameworks—If your application needs to interact with other Java classes (say, for example, to process security information for the current user), you might need to write some Java methods to encapsulate this behavior. This is particularly true when using frameworks that make heavy use of Java beans; however, be aware that you can surface functionality from Java beans using builders as well. An example using the default WPF builders is given later in this chapter.
The rest of this chapter explains some of the different methods available for adding Java code to WPF applications. At the end of the chapter, a simple test application is created to demonstrate these techniques.
Java Methods
You can insert Java methods into WPF applications in a number of ways. This section describes the relative benefits and drawbacks of each approach. Note that Java methods can also be encapsulated in JARs and Java beans, which are discussed in separate sections later in the chapter.
Inline Java
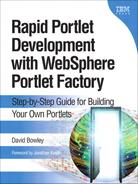
Java statements can be used to evaluate and return expression results for builder inputs that accept indirect references. Indirect references are where the input contains a reference to another variable or function that provides the input’s value, such as the Actions input in the Action List builder, or the Text input in the Text Input builder. For example, when you specify a parameter for an action in an Action List builder, an additional Java category will show up in the Choose Reference dialog (see Figure 8.2). The values under this category will give you access to particular Java objects, with the exception of the <replace with Java expression> category, which you can use to insert the results of a Java expression into the action list. All inline Java statements are in the form ${Java/[Java expression]}. For example, the expression:
${Java/webAppAccess.getModelName()}
could be used to return the name of the current model. (The webAppAccess object is a memory resident object you can use to access aspects of the WebApp and is discussed in the “Java Application Programming Interfaces” section later in this chapter.)
Figure 8.2 The Java category.
Inline Java should be used with caution because it can make action lists difficult to read and maintain. However, it can be useful for debugging, especially when used in conjunction with the SystemOut action from the Select Action dialog. The following line, for example, could be used to write the name of the current model to the console:
SystemOut!${Java/webAppAccess.getModelName()}
Action Lists
The Action List builder in WPF enables you to run Java commands and methods in the same way that you can from many of the builder inputs in WPF, only it also enables you to include more than one of these actions in a sequence. As a result, Action Lists are very useful for organizing execution flow in your application. For example, an Action List might be used to set the value of a variable, then call a Java Method (passing in the variable as a parameter), and then display a results page. Action Lists also enable you to use limited conditional statements (as discussed in the “Conditional Statements in Action Lists” sidebar earlier in this chapter). Although you will no doubt need to make extensive use of Action Lists in your WPF applications, you should try to keep them fairly simple (that is, using as few actions as possible) to maintain their readability. If you find that your Action Lists have so many actions that they are difficult to understand, you should look at the Method builder and Linked Java Object (LJO) builders as possible alternatives (both of these approaches are discussed in the following sections).
The Method Builder
If your Java methods are a bit more involved than a single expression, you might want to use the Method builder to contain your Java code. The Method builder enables you to encapsulate a Java method within a single set of curly braces (you cannot define multiple methods, or any classes, in a Method builder). You can then call this Java method from other builders or Java methods. You can also specify a list of arguments, a return type, and a list of imports for the method (note that you do not need to import any of the WPF classes or any of the Java core classes). You can see a list of all the methods in the current WebApp by opening a model, selecting the WebApp Tree tab, and navigating to the WebApp, Methods section.
The Method builder can also be used for overwriting functionality created by other WPF builders. Although overwriting builder functionality is error prone and should be used with caution, it also gives you that extra degree of control when you find that simply modifying the results of a builder is not sufficient. For example, you might look on the WebApp Tree tab and notice that WPF has created a method for you called page1_SaveData, which handles the save process for page1. This method might provide some functionality that you don’t want, or that you want to modify in some way. To modify the method, then, you can give your Method builder the same name as the method listed in the WebApp Tree, and then enable the Rename Existing Input box. Copy and paste the method from the WebApp Tree into your own method, and then change the code to your liking.
You do need to be aware of a number of caveats when using the Method builder. The first is that the Method builder does not have all of the features of the standard Java editor used in Eclipse. Also, Java Methods are harder to share between developers when they are contained in Method builders. These factors combine to make maintenance of Method builders more difficult than maintaining traditional Java files; as a result, the Method builder should only be used for simple methods that won’t be shared between models or projects. A good implementation of the Method builder, for example, would be encapsulating logic for other Java calls. Also, due to its convenience, the Method builder is well suited to quick and simple Java methods. You should, however, minimize the amount of Method builders used in an application, and if you intend to distribute your code between models or projects (or your methods are quite long), you should consider using a Linked Java Object builder instead (LJOs are discussed in the next section).
The numerous Java snippets included in the “Java Application Programming Interfaces” section of this chapter are ideal candidates for Method builder code. The example included in the “Java Beans” section of this chapter also demonstrates how you can use the Method builder to interact with an LJO and return a Java object to another builder call.
The Linked Java Object Builder
The final option available for inserting Java methods into a WPF application is the Linked Java Object (LJO) builder. An LJO links to an actual Java .class file in your project, and makes its methods available to other builders and Java methods in the model. You can see a list of all the LJOs in your project by opening a model, selecting the WebApp Tree tab, and navigating to the WebApp, Linked Java Objects section. LJOs have several advantages over the Method builder and inline Java code:
• They are easier to share between developers.
• They enable you to take advantage of all the Eclipse Java Editor features and shortcuts.
• You can make use of pre-existing Java files.
One disadvantage of using an LJO is that you need to manually write code to import Java libraries and define classes (tasks that you don’t have to perform when using the Method builder). However, these tasks are relatively straightforward and shouldn’t pose any problems for those who have any familiarity with Java.
You can use two locations when inserting Java files into your project. If you have (or want to create) .java files that you plan on editing, insert the files into the source folder in your project. By default, the source folder is the WebContent/WEB-INF/work/source directory of your project. A link to this folder is also available under the root folder of your project in the Project Explorer view. Whenever you save a Java file in this directory, the Java compiler creates (or updates if it already exists) a binary version of the file (located in the WebContent/WEB-INF/work/classes directory by default) that can then be linked to from an LJO or executed from other Java code. If, however, you don’t want to modify the source code and just want to use a precompiled version of a Java class, you can insert it into the WebContent/WEB-INF/classes directory or WebContent/WEB-INF/lib directory. Files stored in these directories are not automatically updated when you save source files elsewhere in the project.
The example at the end of the “Java Beans” section of this chapter demonstrates how you can use an LJO to create a factory class, which you use to access and manipulate customer information stored in a Java bean.
Java Application Programming Interfaces
When writing Java methods in WPF, you can use a number of Application Programming Interfaces (APIs) that interact with WPF artifacts. Some of the more useful APIs used in WPF are listed in this section.
When using Java APIs in the WPF Designer, you need to make sure the Java compiler knows where to find all of the relevant API classes. Classes in the WPF foundation libraries (such as WebApp and IXml) are automatically found, as are all of the basic classes in the Java runtime library (such as System). However, other classes need to be qualified (you can see which classes are automatically imported by scrolling to the top of the WebApp, Methods section in the WebApp Tree tab of the Model Editor). To qualify classes when using the Method builder, you can either type the fully qualified name of the class every time you use it (for instance, javax.naming.Context), or you can type just the class name (for instance, Context) and then specify the classes that you want to access in the Import List input (for instance, javax.naming.*). Similarly, when using LJOs, make sure you import the appropriate classes using the import command (for instance, import javax.naming.*).
com.bowstreet.WebApp.WebAppAccess
The WebAppAccess interface is arguably the most useful interface available in WPF, as it provides access to a running instance of a WebApp—that is, the executed product of your builders and Java methods (see Chapter 1, “Introduction to WebSphere Portlet Factory,” for a discussion of the WebApp in WPF). Methods defined in Method builders and inline Java calls automatically have access to an object called webAppAccess (which implements the WebAppAccess interface), giving you access to the model that contains the method. To use this object in LJO methods, however, you need to pass the webAppAccess object into the desired methods as a parameter.
To access the WebApp for a linked model (that is, a model accessible to your model via a Linked Model builder call), use this command:
webAppAccess.getLinkedModelInstance(“linkedModelBuilderCall”);
where linkedModelBuilderCall is the name of a Linked Model builder call in the current model that links to the WebApp that you would like to access. To get access to a WebApp outside the scope of the current model (that is, one that is not available through a link in the current model), use this command:
WebAppAccess remoteWebAppAccess =
![]() webAppAccess.getModelInstance(“modelPath/ModelName”, “”,
webAppAccess.getModelInstance(“modelPath/ModelName”, “”,
![]() false);
false);
where the first parameter is the path and filename of the model you would like to access (relative to the WebContent/WEB-INF/models directory). The second parameter is the profile set and profile combination that you would like to apply to the model (for example, Customer!Admin could be used to specify the Admin profile in the Customer profile set; alternatively, specify an empty String (“”) to use the default settings). The third parameter is a Boolean value determining whether the WebAppAccess object is created as a singleton (a singleton is a class that can only be instantiated once per JVM, which prevents multiple copies of the class from being created).
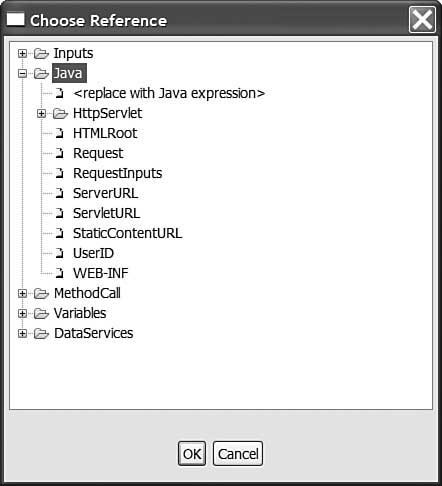
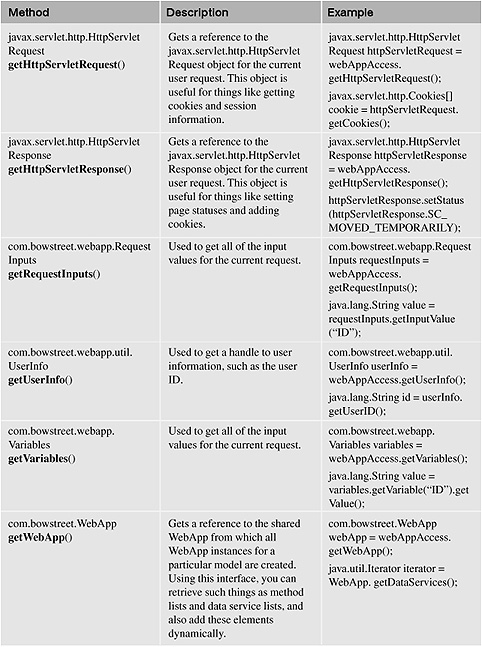
A description of some of the more useful methods in the WebAppAccess interface, along with examples of how to use these methods with the webAppAccess object, are described in Table 8.1. The full Javadoc for the WebAppAccess class is available in the WPF Designer help.
Table 8.1. WebAppAccess Useful Methods and Examples

com.bowstreet.webapp.Variables
The Variables interface provides access to the variables created by the Variable builder, enabling you to both get and set variable values. You can get access to the variables in a WebApp by using the getVariables method of the WebAppAccess class.
To get the value of a String variable called id, you can use the following line:
java.lang.String value =
![]() webAppAccess.getVariables().getString(“id”);
webAppAccess.getVariables().getString(“id”);
To set the variable’s value, you can use this line:
webAppAccess.getVariables().setString(“id”, “newIDValue”);
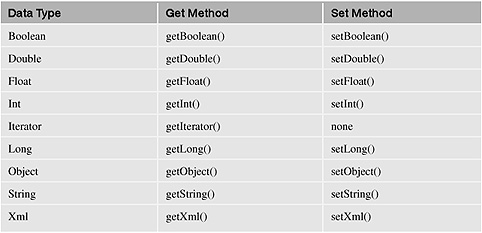
Note that each variable data type has its own get and set methods, which are listed in Table 8.2. You can also retrieve the data type of a variable as a String, using a line similar to the following:
java.lang.String variableType =
![]() webAppAccess.getVariables().getVariable(“id”).getType();
webAppAccess.getVariables().getVariable(“id”).getType();
Table 8.2. Variable Get and Set Methods
com.bowstreet.webapp.RequestInputs
The Variables interface is useful for getting variable values stored in WPF, but cannot be used to get the values or names of items on a form (such as the data entry fields created by a Data Page builder). For this purpose, you need to use the RequestInputs interface.
The following code snippet shows you how to iterate through the inputs on a form, and then write the names and values of these inputs to the SystemOut.log file:
java.util.Iterator names =
![]() webAppAccess.getRequestInputs().getInputNames();
webAppAccess.getRequestInputs().getInputNames();
while(names.hasNext())
{
//input name
String inputName = (String)names.next();
System.out.println(“Input name: “ + inputName);
//input value
String inputValue =
![]() webAppAccess.getRequestInputs().getInputValue(inputName);
webAppAccess.getRequestInputs().getInputValue(inputName);
System.out.println(“Input value: “ + inputValue);
}
com.bowstreet.util.IXml and com.bowstreet.util.XmlUtil
Another commonly used Java API, the IXml interface can be used to perform basic manipulations on XML documents. The IXml interface is discussed in more detail in Chapter 9. The other commonly used XML interface is XmlUtil, which provides some additional functionality for dealing with XML (particularly for creating an XML document, parsing XML structures, and finding an element within an XML document).
For example, to create a new XML document called Orders, you can use the following code:
try
{
IXml orders = XmlUtil.create(“Orders”);
}
catch (java.io.IOException e)
{
e.printStackTrace();
}
Notice that the code is enclosed in a try/catch block. This handles any IOExceptions thrown by the create method.
To create the same XML document based on a parsed text string, you can use this code:
try
{
IXml orders = XmlUtil.parseXml(“<Orders />”);
}
catch (java.io.IOException e)
{
e.printStackTrace();
}
To find an XML element called Item in the orders XML document, you can use this command:
List results = XmlUtil.findElements(orders,
![]() “Orders/Sales/Item”)
“Orders/Sales/Item”)
where Sales/Item is an XPath expression (you must specify a valid XPath for the element you are looking for inside the XML structure).
javax.servlet.http.HttpServletRequest and javax.servlet.http.HttpServletResponse
The HttpServletRequest and HttpServletResponse interfaces are not specific to WPF, but they can be quite useful in WPF development. In particular, you can use the HttpServletRequest interface to get objects (such as shared variable values) from the user’s current session, as shown in the following:
String objectValue=
![]() webAppAccess.getHttpServletRequest().getSession().get
webAppAccess.getHttpServletRequest().getSession().get
![]() “objectName”);
“objectName”);
And you can add objects into the session as follows:
webAppAccess.getHttpServletRequest().getSession().put
![]() (“objectName”,“objectValue”);
(“objectName”,“objectValue”);
This can give you a way to share user-specific variables between models (and even separate applications), but you should use this feature sparingly to minimize your application’s memory consumption.
You can also remove objects from the session as follows:
webAppAccess.getHttpServletRequest().getSession().remove
![]() (“objectName”);
(“objectName”);
The HttpServletResponse interface is particularly useful for adding cookies for a user. For example, to add a cookie to store the ID of a purchased item, you can use the following code:
String id = “00001”;
Cookie cookie = new Cookie(“Purchase”, id);
webAppAccess.getHttpServletResponse().addCookie(cookie);
To access the cookie, you would then use the getCookies method of the HttpServletRequest interface:
Cookie[]cookies =
![]() webAppAccess.getHttpServletRequest().getCookies();
webAppAccess.getHttpServletRequest().getCookies();
for(i=0;i < cookies.length; i++)
{
Cookie cookie = cookies[i];
if (cookie.getName().equals(“Purchase”))
{
//cookie object now holds reference to Purchase cookie
}
}
Java Beans
Java beans are Java classes that fulfill certain criteria and are intended to encapsulate a particular subset of functionality. The major criteria that a Java class should satisfy to be considered a Java bean are as follows:
• The class must have a no argument constructor (a constructor is a method that is executed when a class is instantiated).
• The private properties of the class are exposed through public getter and setter methods. For example, a property called name would require a getName and setName method.
You can convert an ordinary Java class into a Java bean simply by making sure the class adheres to the criteria previously specified. Usually the class also implements the java.io.Serializable interface, which handles the storage of bean data (this is referred to as persistence).
Java beans are commonly used in Java development to represent business objects (that is, entities that are part of the structure of the business, such as orders, customers, and stock). In WPF, you don’t necessarily need to use Java beans because you have all of the prepackaged data access builders available to directly access backend data sources. However, there are cases where it might be preferable to use Java beans. For example, you might be connecting to a data source that is not natively supported by WPF, you might want to execute some code before performing data functions, or you want to reuse existing data implementations in Java beans. In these scenarios, you need to create an interface to the Java bean from WPF.
To use a Java bean in WPF, you can import the bean class into the WEB-INF/work/source or WEB-INF/work/lib directory, add a Linked Java Object builder call to link to the class, and then use one or more Data Page builders to create a UI for the bean. You can also automatically create a UI for collections of beans using the Bean Master Detail builder. However, this builder should be used with caution because it mixes the presentation layer of your application with your data layer (that is, it is used to control both your data and how it is presented to end users). Ideally, Java beans should be hidden behind a service provider, so they can be changed without affecting the presentation of your application.
The next few sections describe how to build a simple shopping cart application, which stores the name and quantity of purchased items for a particular user in a Java bean. An ID is automatically assigned to each item in the cart, which can also be used to edit and delete cart items. A combination of Linked Java Objects, Action Lists, and Method builders is used to interact with the Java bean.
Creating a Java Bean and Bean Manager
The first step in creating your shopping cart portlet is to create a Java bean to interact with individual shopping cart items and another class to manage collections of these beans in a shopping cart. Before you proceed with this section, you need a WPF project to house the models and Java classes for the shopping cart portlet. If you have a project from a previous chapter, you can use that; otherwise, you should create a new WPF project (for more information on creating projects, see Chapter 1). The project will be published as a WAR file and deployed to a portal server, and you should also deploy the application to a local application server for testing. (You can use the portal server if it is running on your local machine; otherwise, it is recommended that you use the IBM WebSphere Application Server Community Edition server (WAS CE) that comes with WPF.)
You generally don’t need to change anything on the Java Settings screen unless you are referencing other projects, or you are using a customized set of JAR files.
Creating a Shopping Cart Item Bean
Create a Java source file for a shopping cart item Java bean by clicking File, New, Class in the WPF Designer. For the package, type com.ibm (substituting your own company name for ibm), specify ShoppingCartItem as the Name, and then click Finish. The package com.ibm is used throughout this chapter, but in each case you should substitute your own company name for ibm.
You now need to edit the contents of the new Java class so they read as shown in the following example. The fastest way to do this is to add the bolded code manually, and then right-click on the source file in the Project Explorer view. Select Source, Generate Getters and Setters, which opens the Generate Getters and Setters dialog. After this dialog is open, select the boxes to create getters and setters for the id, name, and quantity properties, and then click OK. This should automatically add in the get and set methods in the following code. Note that you can also copy this code from the ShoppingCartItem.java file, which is available for download from ibmpressbooks.com/title/9780137134465, under the Chapter 8 folder.
package com.ibm;
public class ShoppingCartItem implements java.io.Serializable
{
//properties
private String id;
private String name;
private int quantity;
//no argument constructor
public ShoppingCartItem()
{
}
public String getId() {
return id;
}
public void setId(String id) {
this.id= id;
}
public String getName() {
return name;
}
public void setName(String name) {
this.name = name;
}
public int getQuantity() {
return quantity;
}
public void setQuantity(int quantity) {
this.quantity = quantity;
}
}
The bean has three private properties: id, name, and quantity, which are changed via separate get and set methods. The bean also has a constructor with no arguments, which enables you to create new shopping cart items. Notice also that the bean implements the java.io.Serializable interface; this enables the bean data to be serialized (that is, persisted). The data is only serialized until the user’s session is terminated (although it is possible to persist data beyond the lifetime of the user’s session).
In the Problems view, you see the following warning (unless you have filtered out these warnings in your IDE preferences):
The serializable class ShoppingCartItem does not declare a
static final serialVersionUID field of type long
This message declares that you should set an identifying field for the class, so that when the class is modified, the Java serialization engine will recognize different versions of the same class. To add this field, place the cursor somewhere inside the line that begins public class ShoppingCartItem and press Ctrl+1. Select Add Generated Serial Version ID from the context menu. You should see an ID field added to the top of the class, similar to the following:
/**
*
*/
private static final long serialVersionUID =
![]() -7554150284752194927L;
-7554150284752194927L;
Save the ShoppingCartItem bean when you are finished.
Creating a Shopping Cart Item Manager
Now you need to create a class to manage collections of ShoppingCartItem beans for each user. This new class holds an ArrayList of shopping cart item beans called shoppingCart.
Create a new Java class called ShoppingCartItemManager in the com.ibm package (substituting ibm for your own company name), and fill out the class as shown in the following (note that you can copy this code from the ShoppingCartItemManager.java file, available for download from ibmpressbooks.com/title/9780137134465, under the Chapter 8 folder):
package com.ibm;
import java.util.ArrayList;
import java.util.Iterator;
public class ShoppingCartItemManager
{
//properties
private static ArrayList shoppingCart = new ArrayList();
private static int idCounter=0;
//get method for a shopping cart
public static ArrayList getShoppingCart()
{
//create blank shopping cart item
public static ShoppingCartItem createShoppingCartItem()
{
return new ShoppingCartItem();
}
//add newly created item to shopping cart
public static void addShoppingCartItem(ShoppingCartItem
![]() toAdd)
toAdd)
{
//increment Id counter and set Id of new item
idCounter++;
toAdd.setId(Integer.toString(idCounter));
//add new item
shoppingCart.add(toAdd);
}
//retrieves a particular item from the shopping cart
public static ShoppingCartItem getShoppingCartItem(String
![]() toGet)
toGet)
{
Iterator i = shoppingCart.iterator();
while (i.hasNext())
{
ShoppingCartItem item = (ShoppingCartItem)i.next();
if (item.getId().equals(toGet))
{
return item;
}
}
return null;
}
//updates a particular item in the shopping cart
public static void updateShoppingCartItem(ShoppingCartItem
![]() toUpdate)
toUpdate)
{
Iterator i = shoppingCart.iterator();
while (i.hasNext())
{
ShoppingCartItem item = (ShoppingCartItem)i.next();
if (item.getId().equals(toUpdate.getId()))
{
item.setName(toUpdate.getName());
item.setQuantity(toUpdate.getQuantity());
return;
}
}
}
//delete method for a shopping cart item (can be used with
![]() Bean Master Detail builder)
Bean Master Detail builder)
public static void deleteShoppingCartItem(ShoppingCartItem
![]() toDelete)
toDelete)
{
shoppingCart.remove(toDelete);
}
//delete method for a shopping cart item
public static void deleteShoppingCartItem(String toDelete)
{
Iterator i = shoppingCart.iterator();
while (i.hasNext())
{
ShoppingCartItem item = (ShoppingCartItem)i.next();
if (item.getId().equals(toDelete))
{
shoppingCart.remove(item);
return;
}
}
}
//deletes every item in the shopping cart
public static void clearShoppingCart()
{
shoppingCart.removeAll(shoppingCart);
idCounter = 0;
}
}
This class holds an ArrayList of ShoppingCartItem objects, called shoppingCart, as well as a counter that is used to generate IDs for each item. These IDs are then used to look up particular items in the shopping cart. Separate methods are provided for retrieving, adding, editing, and deleting items from the shopping cart. Note that each method and property in the class is declared as static, which means that they apply to the class as a whole rather than to a particular instance of the class. (However, note that each user accesses a different copy of the class, which also means that each user has his own shopping cart). In fact, you don’t even need an instance of the class to call these methods, which makes the job of calling each method a little simpler.
Save the file when you are finished.
Your IDE automatically creates compiled .class files of your java files whenever you save them. If you have any errors in the Problems view at this point, check that you have entered the Java in this section correctly.
The next section describes how to create an interface for these classes via a WPF service provider model.
Creating a Service Provider
In this section, you build a service provider model to interface with the Java classes created in the previous section. The service provider will have operations for clearing and viewing the cart, and viewing, adding, updating, and deleting an item from the cart. To achieve this, the following builders are used:
• Service Definition
• Linked Java Object
• Java/XML Converter
• Comment (x6)
• Method (x5)
• Service Operation (x6)
Note that although the order of builder calls is usually not important, some of the builder calls in this chapter need to be in a specific order. This is because some of the builder calls require certain things to be built by the time their build methods run (when the WebApp is generated). In the following example (as with other examples that use the same builders), the Service Definition builder call must come before the Service Operation builder calls, and the Service Operation builder calls must come after the Methods and Action Lists that they access (otherwise, you will get errors indicating that these resources are unavailable).
Creating a Model
Create a new model called shoppingCartService in your project, under the folder WEB-INF/models/chapter08. The model should be based on the Empty template, which creates a model with no builder calls in it.
You now need to add a number of builder calls to the model to make it a service provider.
Defining the Service
The first step is to add several general purpose builders that are used across each operation in the service. Add a Service Definition builder call to the model by selecting Service Definition from the Builder Palette and then clicking OK (you can open the Builder Palette by clicking the ![]() icon in the Outline view). Name the builder call
icon in the Outline view). Name the builder call shoppingCartService, and expand the Testing Support section of the builder call. Finally, enable the Add Testing Support checkbox and save the builder call when you are finished.
Adding a Linked Java Object
Now add a Linked Java Object builder call to the model and name it shoppingCartItemManager. For the Class Name, select com.ibm.ShoppingCartItemManager from the Select Action dialog (swapping ibm for your own company name). This builder call can be used to refer to the methods of the ShoppingCartItemManager class within the shoppingCartService model. Save the builder call when you are finished.
Adding a Java to XML Converter
Add a Java/XML Converter builder to the model and name it shoppingCartConverter. This builder call is used to convert bean data to XML (and vice-versa).
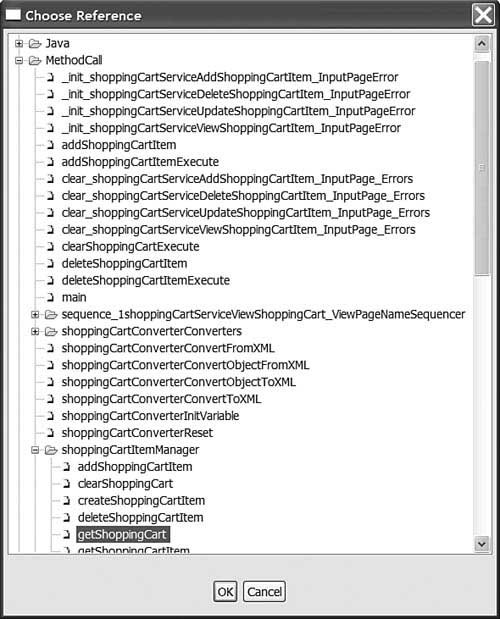
Change the Reference Type input to Collection of Objects, as you will be working with a collection of shopping cart item beans. For the Data Reference input, you need to specify a variable or method that returns the collection of beans that you want to use. In this example, the collection is provided in the form of the shoppingCart ArrayList, which you can access via the LJO created in the previous step. To do this, open the Choose Reference dialog for the Data Reference input (by clicking the ellipsis button to the right of the input), and specify the getShoppingCart method as shown in Figure 8.3.
Now select the com.ibm.ShoppingCartItem class for the Class Name input (by using the picker provided by the ellipsis button to the right of the field), and then in the Variable input, type the name shoppingCartVariable (once again, remember to swap ibm for your own company name). This creates a temporary variable called shoppingCartVariable to store the results of XML conversions.
Figure 8.3 Selecting the getShoppingCart method.
Finally, expand the XML Options section and change the Top-level Tag Name input to ShoppingCart, and the Row Tag Name input to ShoppingCartItem. This defines XML element names when WPF creates XML from shopping item beans. Save the builder call when you are finished.
Clearing a Shopping Cart
Add a Comment builder call to the model, and name it Clear shopping cart. This does not actually affect any of the other builder calls, but it does make your model easier to read. The next builder call in the model provides functionality for clearing all items from a shopping cart.
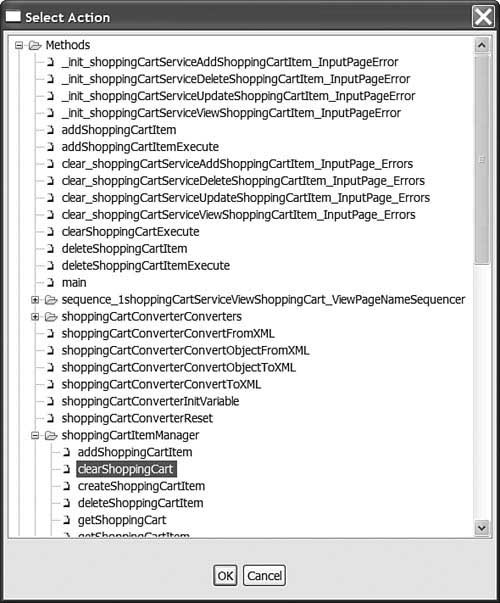
Add a Service Operation builder call to the model and name it clearShoppingCart. Specify the Operation Name as clearShoppingCart, and then for the Action to Call input, open the Select Action dialog and select the clearShoppingCart Method of the shoppingCartItemManager LJO, as shown in Figure 8.4.
Figure 8.4 Selecting the clearShoppingCart method.
This runs the shoppingCartItemManager LJO’s clearShoppingCart method. Note that there is no need to create an instance of the shoppingCartItemManager, as you are accessing a static method. Now specify the Data Service as shoppingCartService. Because this operation doesn’t require any inputs or return any results, specify ‘No Inputs’ for the Input Structure Handling input in the Operation Inputs section and ‘No Results’ for the Result Structure Handling input in the Operation Results section. Save the builder call when you are finished.
Viewing a Shopping Cart
Add a Comment builder call to the model, and name it View shopping cart. The next few builder calls in the model provide functionality for viewing the contents of a shopping cart.
Add a Method builder call to the model and name it viewShoppingCart. Change the Return Type of the builder call to IXml, and then type the following code into the Method Body input:
{
//set shopping cart variable from bean
webAppAccess.getVariables().setObject(“shoppingCartVariable”,
![]() webAppAccess.callMethod(“shoppingCartItemManager.getShoppingCart”));
webAppAccess.callMethod(“shoppingCartItemManager.getShoppingCart”));
//return shopping cart variable
return shoppingCartConverterConvertToXML(webAppAccess);
}
This retrieves the shopping cart from the shopping cart item manager and stores it in the shoppingCartVariable variable. The ConvertToXML method of the Java/XML Converter builder is then run, which converts the contents of the shoppingCartVariable variable into XML (remember that this variable is specified in the Java/XML Converter builder itself, so there is no need to pass the variable as a parameter). The result is then returned to the caller.
Save the builder call when you are finished.
Add another Service Operation builder call to the model and name it viewShoppingCart. Specify the Data Service as shoppingCartService, and then type viewShoppingCart for the Operation Name. For the Action to Call input, select the viewShoppingCart method you just created from under the Methods section of the Select Action dialog.
This operation doesn’t require any inputs, so specify No Inputs for the Input Structure Handling input. However, the operation should return an XML shopping cart object containing a sequence of shopping cart items. In some cases, you are able to use the result structure from the called action as the structure of the operation’s result, but you can’t do this when the action returns an XML document where the schema is not explicitly specified. In the example, you have returned a non-schema typed IXml object (you cannot return a schema typed variable from a Method builder call), so you need to manually specify the schema in the Service Operation builder call.
Change the Result Structure Handling input to ‘Specify result schema’, and then select shoppingCartConverterSchema/ShoppingCart for the Result Schema input (this is the top-level element created by the Java/XML Converter builder call). Save the builder call when you are finished.
Viewing a Shopping Cart Item
Add a Comment builder call to the model and name it View item. The next few builder calls in the model provide functionality for viewing an individual item in the shopping cart.
Add a Method builder call to the model and name it viewShoppingCartItem. Add an argument to the Arguments input in the Arguments section, called itemID of type String. Change the Return Type of the builder call to IXml, and then type the following code into the Method Body input:
{
//get shopping cart item
com.ibm.ShoppingCartItem shoppingCartItem =
![]() (com.ibm.ShoppingCartItem)webAppAccess.callMethod(“shopping
(com.ibm.ShoppingCartItem)webAppAccess.callMethod(“shopping
![]() CartItemManager.getShoppingCartItem”, itemID);
CartItemManager.getShoppingCartItem”, itemID);
//return XML representation of shopping cart item
return (IXml)webAppAccess.callMethod
![]() (“shoppingCartConverterConvertObjectToXML”,
(“shoppingCartConverterConvertObjectToXML”,
![]() shoppingCartItem);
shoppingCartItem);
}
This retrieves an item from the shopping cart based on the ID passed in to the Method builder call. The resulting shoppingCartItem bean is converted into XML using the ConvertObjectToXML method of the Java/XML Converter builder, and then returns this XML to the caller. Note that in this case, the shoppingCartItem has been specified as an argument to the ConvertObjectToXML method, rather than changing the value of the shoppingCartVariable variable and then using the ConvertToXML method with no arguments. This is necessary because the XML returned is an individual item, and the shoppingCartVariable XML holds a sequence of items.
Save the builder call when you are finished.
Add another Service Operation builder call to the model and name it viewShoppingCartItem. Specify the Data Service as shoppingCartService, then type viewShoppingCartItem for the Operation Name. Select the viewShoppingCartItem Method for the Action to Call input as well.
Specify ‘Use Structure from Called Action’ for the Input Structure Handling input, so that the operation takes a single String input as defined in the viewShoppingCartItem Method builder call. For the Result Structure Handling input, select Specify Result Schema and then select shoppingCartConverterSchema/ShoppingCartItem for the Result Schema input (this is the row-level element created by the Java/XML Converter builder call).
Save the builder call when you are finished.
Adding a Shopping Cart Item
Add a Comment builder call to the model, and name it Add item. The next few builder calls in the model provide functionality for adding an item to the shopping cart.
Add a Method builder call to the model and name it addShoppingCartItem. Add an argument to the Arguments input in the Arguments section, called toAdd of type IXml. Change the Return Type of the builder call to void, and then type the following code into the Method Body input:
{
//create new shopping cart item bean
ShoppingCartItem shoppingCartItem = new ShoppingCartItem();
//convert ‘toAdd’ object to bean
webAppAccess.callMethod(“shoppingCartConverterConvertObject
![]() FromXML”, shoppingCartItem, toAdd);
FromXML”, shoppingCartItem, toAdd);
//add new bean to shopping cart
webAppAccess.callMethod(“shoppingCartItemManager.addShopping
![]() CartItem”, shoppingCartItem);
CartItem”, shoppingCartItem);
}
This creates a new, blank shopping cart item, and then sets it to a Java representation of the toAdd IXml object using the ConvertObjectToXML method of the Java/XML Converter builder. The resulting bean is then added to the shopping cart via the shoppingCartItemManager.
Notice in the preceding code that the ShoppingCartItem class has not been fully qualified as it has been previously. Save the builder call now, and you will notice that this causes an error in your application. To remove this error, expand the Import List section of the builder call and enter the class com.ibm.ShoppingCartItem into the Import List input (swapping ibm for your own company name). Save the builder call, and the error should be removed from the Problems view. Although it is really a matter of preference how you choose to reference classes (particularly with small and simple methods), keep in mind that as your methods get larger, fully qualified classes in the method body can make your code more difficult to read.
Add another Service Operation builder call to the model and name it addShoppingCartItem. Specify the Data Service as shoppingCartService, and then type addShoppingCartItem for the Operation Name. Select the addShoppingCartItem Method for the Action to Call input, and then select ‘Specify input schema’ for the Input Structure Handling input. For the Input Schema input, select shoppingCartConverterSchema/ShoppingCartItem. This declares the structure of the operation’s input to be a single shopping cart item element, as defined by the row element of the Java/XML Converter builder call. For the Result Structure Handling input, select No Results.
Save the builder call when you are finished.
Updating a Shopping Cart Item
Add a Comment builder call to the model, and name it Update item. The next few builder calls in the model provides functionality for updating an item in the shopping cart.
Add a Method builder call to the model and name it updateShoppingCartItem. Add an argument to the Arguments input in the Arguments section, called toUpdate of type IXml. Change the Return Type of the builder call to void, and then type the following code into the Method Body input:
{
//create new shopping cart item bean
com.ibm.ShoppingCartItem shoppingCartItem = new
![]() com.ibm.ShoppingCartItem();
com.ibm.ShoppingCartItem();
//convert ‘toUpdate’ object to bean
webAppAccess.callMethod(“shoppingCartConverterConvertObject
![]() FromXML”, shoppingCartItem, toUpdate);
FromXML”, shoppingCartItem, toUpdate);
//update shopping cart with new bean
webAppAccess.callMethod(“shoppingCartItemManager.update
![]() ShoppingCartItem”, shoppingCartItem);
ShoppingCartItem”, shoppingCartItem);
}
This creates a new shopping cart item, and then sets it to the value of the converted toUpdate IXml object passed in to the Method builder call. The shopping cart is then updated with the new item. Save the builder call when you are finished.
Now add another Service Operation builder call to the model and name it updateShoppingCartItem. Specify the Data Service as shoppingCartService, and then type updateShoppingCartItem for the Operation Name input. Select the updateShoppingCartItem Method for the Action to Call input, and then select ‘Specify Input Schema’ for the Input Structure Handling input. After this is done, select shoppingCartConverterSchema/ShoppingCartItem for the Input Schema input. This declares the structure of the operation’s input to be a single shopping cart item element. For the Result Structure Handling input, select No Results.
Save the builder call when you are finished.
Deleting a Shopping Cart Item
Add a Comment builder call to the model, and name it Delete item. The next few builder calls in the model provide functionality for deleting an item from the shopping cart.
Add a Method builder call to the model and name it deleteShoppingCartItem. Add an argument to the Arguments input in the Arguments section, called itemID of type String. Change the Return Type of the builder call to void, and then type the following code into the Method Body input:
{
//delete shopping cart item
webAppAccess.callMethod(“shoppingCartItemManager.delete
![]() ShoppingCartItem”, itemID);
ShoppingCartItem”, itemID);
}
This deletes an item from the shopping cart based on the ID passed in to the Method builder call. Save the builder call when you are finished.
Now add the final Service Operation builder call to the model and name it deleteShoppingCartItem. Specify the Data Service as shoppingCartService, and then type deleteShoppingCartItem for the Operation Name. For the Action to Call input, select the deleteShoppingCartItem method.
Specify ‘Use Structure from Called Action’ for the Input Structure Handling input, so that the operation takes a single String input as defined in the deleteShoppingCartItem method builder call. For the Result Structure Handling input, select No Results. Save the builder call when you are finished.
Your service provider is now finished and ready to test.
Testing the Service Provider
Because you enabled testing support on the Service Definition builder call, WPF automatically generates test pages for your service provider when you run it in a browser.
To test the service provider, first run the shoppingCartService model from the WPF Designer by clicking the ![]() icon on the toolbar. This runs the currently active model (such as shoppingCartService) with the last run configuration you used. If you have not set up a run configuration before, you are prompted to do so—create a new configuration under the WebSphere Portlet Factory Model category (if you want more information on setting up a run configuration, see the “Testing the Application” section in Chapter 1).
icon on the toolbar. This runs the currently active model (such as shoppingCartService) with the last run configuration you used. If you have not set up a run configuration before, you are prompted to do so—create a new configuration under the WebSphere Portlet Factory Model category (if you want more information on setting up a run configuration, see the “Testing the Application” section in Chapter 1).
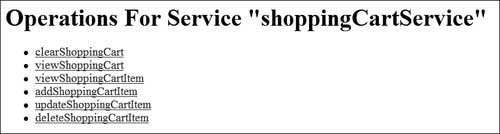
After you run shoppingCartService, you should see the index test page in your default Web browser, as shown in Figure 8.5. This screen lists all of the operations available on the shoppingCartService service.
Figure 8.5 Index test page from the shoppingCartService model.
Testing the addShoppingCartItem Operation
Because the shopping cart is empty by default, you need to test the operations in a particular order. First, test the addShoppingCartItem operation by adding a few items to the shopping cart. To do this, click the addShoppingCartItem link. You should see a data entry screen as shown in Figure 8.6. Enter a sample name and quantity, and then click Submit Query (note that there is no need to enter an ID, as it is automatically overwritten by the addShoppingCartItem method of the ShoppingCartItemManager class). The quantity should be a numeric value; otherwise, you will receive errors (note that the data type of these inputs are not validated—validation of data inputs is covered in Chapter 11, “Field Validation, Formatting, and Translation”). Click the Back button when you are finished, and add one or two more items to the cart.
Figure 8.6 Testing the addShoppingCart operation.

Testing the viewShoppingCart Operation
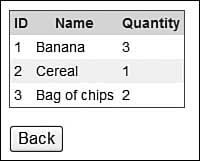
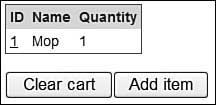
To test that the items were added and that they can be display correctly, click the viewShoppingCart link. You should see a list of the items similar to that shown in Figure 8.7. If not, check that you don’t have any errors showing in the Problems view in the IDE, and that you have completed all of the steps in the previous section correctly.
Click Back to return to the index page.
Figure 8.7 Testing that items can be added and viewed in a list.
Testing the viewShoppingCartItem Operation
Click on the viewShoppingCartItem link, and enter the ID of one of the items you just created (the IDs are in ascending order, starting at 1). Click the Submit Query button and you should see output similar to that shown in Figure 8.8. Return to the index page.
Figure 8.8 Testing that individual items can be viewed.

Testing the updateShoppingCartItem Operation
Click the updateShoppingCartItem link and enter an ID of an existing item. Now enter a new Name and Quantity for the item (different to the previous values the item had) and click the Submit Query button. Return to the index page and run the viewShoppingCartItem operation. The list of items should reflect the new values of the item just updated.
Testing the deleteShoppingCartItem Operation
To test the deleteShoppingCartItem operation, click the deleteShoppingCartItem link. Enter the ID of an already existing item and click the Submit Query button. Return to the index page and run the viewShoppingCartItem operation. The list of items should no longer display the item just deleted.
Testing the clearShoppingCart Operation
For the final test, click on the clearShoppingCart link. When you return to the index page and run the viewShoppingCartItem operation, the list of items in the cart should now be empty. Close the shoppingCartService model when you’ve finished testing it.
You now have a service provider that interacts with a collection of shopping cart item Java beans. The next section walks you through creating a service consumer model, which communicates with the shoppingCartService model and is surfaced to a portal server as a portlet.
Creating a Shopping Cart Portlet
In this section, you build a shopping cart portlet to consume the shopping cart service. The portlet provides a user interface to interact with a shopping cart (that is, to view, edit, add, and delete shopping cart items). A screenshot of the portlet is shown later in Figure 8.18.
Creating a Model
To add the shopping cart portlet, select File, New, WebSphere Portlet Factory Model from the File menu to bring up the WebSphere Portlet Factory Model dialog. On the next screen, select your WPF project and click Next. The next screen lists different types of models WPF can create for you automatically. You can create service consumers in WPF two ways: the first is to let WPF create one for you (which you can do by using the List and Detail Service Consumer option in the Select Model wizard), and the second is to create the service consumer manually. The List and Detail Service Consumer gives you everything you need in this example, so select it and click Next.
The List and Detail Service Consumer automatically surfaces your model as a portlet via a Portlet Adapter builder call. Specify the name of the portlet on the next screen as shoppingCart (this name is also used to name the other builder calls in your model). Also, specify the service provider shoppingCartService you created in the previous section. Click Next when you are finished.
The next screen enables you to specify the service operation that is used to provide the list of shopping cart items. Select viewShoppingCart and click Next. On the next screen, make sure the Create Link to Details checkbox is enabled, and then select Id for the Details Link Column field. Change the Details Action Type to ‘Display Data from Another Operation in this Service’, and then enter viewShoppingCartItem into the Details Operation input. These settings convert all of the values in the ID column in the shopping cart item list into clickable links. When a user clicks on the link, a value identifying the item is passed to the viewShoppingCartItem operation, and the results are displayed to the screen.
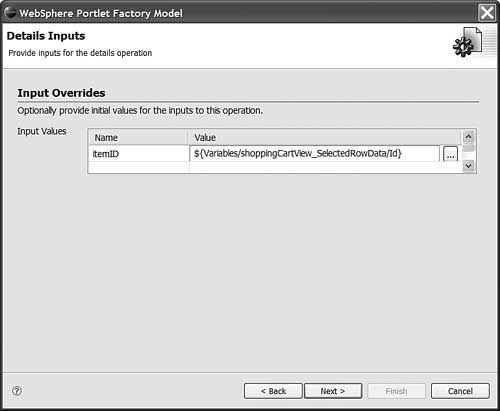
Click Next, and you should see some settings enabling you to configure the value that will uniquely identify each shopping cart item for the viewShoppingCartItem operation. Make sure the settings appear as shown in Figure 8.9, and then click Next. This uses the ID of the currently selected row to identify a shopping cart item when it is clicked.
Figure 8.9 Overriding inputs for each shopping cart.
You now need to name your model. Type shoppingCart, and make sure the model is created in the directory models/chapter08. Click Finish. This creates a new model called shoppingCart in your WPF project, and opens the model in the Model Editor and Outline view.
Configuring the Portlet Adapter
The shoppingCart model contains three builder calls: a Portlet Adapter, a Service Consumer, and a View & Form. The Portlet Adapter builder converts the model into a portlet, so that it can be viewed inside a portal (note that if you make any changes to this builder call—including the changes you are about to make—you need to rebuild the deployed application before you can see the results of the changes. For more information on this process, see the example in Chapter 1). The Service Consumer builder makes the operations in the shoppingCartService service available in the model, and the View & Form builder displays any list and detail data in the model to the screen. The View & Form builder also enables you to do some basic manipulation of how the data is displayed (the View & Form builder is discussed in Chapter 5, “Customizing Portlet Appearance”).
The builder calls don’t require any configuration in this example, except for two small changes to the Portlet Adapter builder call. Double-click the Portlet Adapter builder call to open it in the Model Editor, and then change the Portlet Title to Shopping Cart and the Portlet Description to Used to interact with a shopping cart. Save the builder call when you are finished. The Portlet Title identifies the portlet inside the portal (it is actually displayed in the title bar of the portlet), and the Portlet Description appears on various administration screens inside the portal.
You now need to add the following builder calls to the model to provide the portlet with its functionality:
• Action list (x2)
• Comment (x3)
• Input form
• Button (x3)
Implementing the updateShoppingCartItem Operation
To add update support to the model, open the View & Form builder call, and expand the Update Page Support section. Enable the Create Update Page checkbox, and then specify DataServices/shoppingCart/updateShoppingCartItem for the Update Method input that appears underneath the checkbox. This creates an update form for each item, and then executes the updateShoppingCartItem operation whenever an item is saved (by default, the input values on the form are sent in an XML object as the input to the operation). Also, change the Update Next Action input to shoppingCartView_ShowResults, which re-runs the viewShoppingCartItem operation to refresh the cart item list, and then displays the refreshed shoppingCartView_ViewPage page. Save the builder call when you are finished.
Because the View & Form builder does not automatically create an interface for adding new items, you need to add a separate builder call to the model for this purpose. Add an Input Form to the model and name it addItemForm. Enter the Input Submit Operation input as DataServices/shoppingCart/addShoppingCartItem, and then specify shoppingCartView_ShowResults as the Input Next Action. This consumes the addShoppingCartItem operation when an item is saved using the input form, and then refreshes the shopping cart after the save is finished (which also returns control to the item list page). Also, expand the Advanced section at the bottom of the builder, and disable the Generate Main checkbox so that an extra main Action List is not created (you are already using the main Action List created by the View & Form).
Leave the default settings for the rest of the builder call, and save the builder call when you are finished.
Implementing the addShoppingCartItem Operation
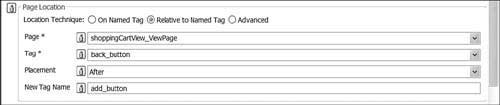
Now add a Button builder call to the model, which provides a means for users to open the input form. Name the builder call addShoppingCartItem, and then fill out the Page Location section of the builder call as shown in Figure 8.10. This adds the button to a new tag called add_button after the back_button tag, which automatically appears at the bottom of the list screen (even though the back button itself is not visible).
Figure 8.10 Configuring the page location for the Add item button.
For the label of the button, enter Add item, and then change the Action Type to ‘Link to an Action.’ Specify the Action as addItemForm_InputPage, which opens the input page created in the previous step. Save the builder call when you are finished.
Implementing the clearShoppingCart Operation
Add a Comment builder call to the model, and name it Clear cart. The next few builder calls in the model provide functionality for clearing the contents of a shopping cart. Now add another Action List builder call to the model, which you use to define the sequence of actions to be executed when the shopping cart is cleared. Name the Action List clearShoppingCart, and then specify DataServices/shoppingCart/clearShoppingCart as the first action. This clears the contents of the user’s shopping cart. Then specify shoppingCartView_ShowResults for the second operation, which refreshes the item list and displays the shoppingCartView_ViewPage page. Save the builder call when you are finished.
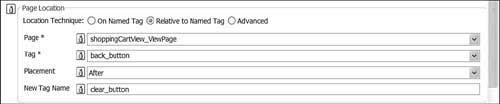
Add a Button builder call to the model and name it clearShoppingCart. This button provides users with a means to access the clearShoppingCart Action List and is displayed immediately after the Add item button on the item view page.
Fill out the Page Location section of the builder as shown in Figure 8.11.
Figure 8.11 Configuring the page location for the Clear cart button.
Type Clear cart for the Label input, and then change the Action Type to ‘Link to an Action.’ Specify the Action as clearShoppingCart, which executes the Action List created in the previous step. Save the builder call when you are finished.
Implementing the deleteShoppingCartItem Operation
The final piece of functionality is the delete operation.
Add a Comment builder call to the model, and name it Delete item. The next few builder calls in the model provide functionality for deleting an item from a shopping cart. Now add another Action List to the model and name it deleteShoppingCartItem. The first action in the Actions input needs to set the value of the itemID argument from the deleteShoppingCartItem operation to the ID of the currently selected item. To do this, click the ellipsis button on the first row of the Actions input and select Special, Assignment. For the Target variable, specify the itemID of the deleteShoppingCartItem operation, as shown in Figure 8.12.
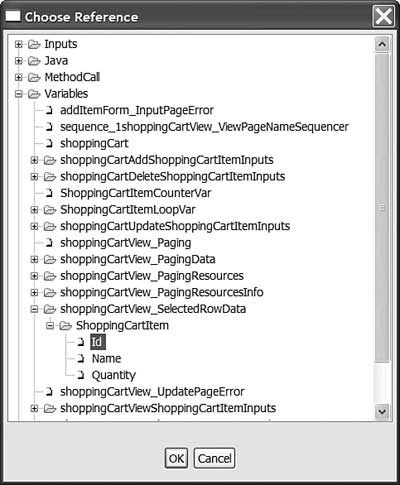
For the Source variable, specify the ID of the currently selected row as shown in Figure 8.13. Click OK to accept your settings and return to the Action List builder call.
For the second action, specify DataServices/shoppingCart/deleteShoppingCartItem. This calls the deleteShoppingCartItem operation, using the value set in the previous action as an input. Finally, specify shoppingCartView_ShowResults for the third operation, which updates the shopping cart and displays the view page created by the View & Form builder. Save the builder call when you are finished.
Figure 8.12 Assigning a target field.

Figure 8.13 Assigning a source field.
Add a Button builder call to the model, naming it deleteShoppingCartItem. This button provides users with a means to access the deleteShoppingCartItem Action List and is displayed immediately after the Back button on the detail page for each shopping cart item.
Fill out the Page Location section of the builder as shown in Figure 8.14.
Figure 8.14 Configuring the page location for the Delete item button.

Type Delete item for the Label input, and then change the Action Type to ‘Link to an Action.’ Specify the Action as deleteShoppingCartItem, which executes the Action List created in the previous step. Save the builder call when you are finished.
Your test portlet is now finished, and ready to test.
Testing the Shopping Cart Portlet
To test the shoppingCart portlet, first run the shoppingCart model from the WPF Designer. After you have run the shoppingCart model, you should see an empty list of shopping cart items, as well as several buttons for interacting with the shopping cart (see Figure 8.15).
Figure 8.15 The default screen for the shoppingCart model.

Testing the Add Item Button
Click on the Add Item button to add a new item to your shopping cart. Enter some sample data for the Name and Quantity on the input screen that follows (keep in mind that the ID is overwritten by the ShoppingCartManager class, so there is no need to enter one in) and click the Submit button. You are returned to the default list screen, and the new item should appear in the item list (similar to the screenshot in Figure 8.16). Add one or two additional items to the list for testing.
Figure 8.16 Adding a shopping cart item.
Testing the Edit Item Button
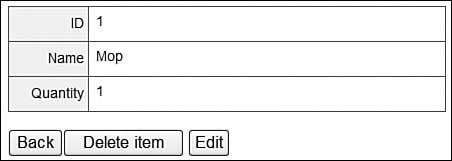
Click on the ID column for one of the items you just created, and you should see a detail page for that item similar to that shown in Figure 8.17. Click the Edit button to bring up an edit page for the item (similar to the input page seen when adding a shopping cart item) and make a change to the Name or Quantity of the item (you can’t change the ID of the item). You are returned to the default list screen, and the modified item details appear in the item list.
Figure 8.17 Item detail page.
Testing the Delete Item Button
To test the delete functionality, open one of the items you created and then click the Delete Item button. You are returned to the list screen, and the item no longer displays in the list.
Testing the Clear Cart Button
To test that you can clear the entire contents of the shopping cart, click the Clear Cart button. The screen should refresh and the list should now be empty.
After you have tested the shoppingCart model, you should rebuild your application on the portal server (for instructions on how to do this, see the example in Chapter 1), after which you are able to view the shoppingCart model as a portlet on the portal server. After you have added the shoppingCart portlet to a page in the portal, it should appear as shown in Figure 8.18.
The next section discusses how you can package Java files in your WPF applications using JAR files.
Figure 8.18 The Shopping Cart portlet.

Java Archives
Java Archives (JARs) are class file libraries that your project can utilize to take advantage of certain functionality. A typical WPF project employs numerous JAR files, which are used behind the scenes to facilitate such things as logging, XML manipulation, and builder generation routines. You can also import your own JAR files into a WPF project. If you have a collection of Java classes that you would like to distribute to others (or simply want to package together for ease of use), JAR files are a convenient way to achieve this. You can access Java classes contained in JAR files directly from inside builder calls or other Java code.
By default, WPF projects store all their JARs in the WebContent/WEB-INF/lib and WebContent/WEB-INF/work/lib directories. If you use the Project Explorer view to browse these directories, you can see that the only files that appear are the ones that are not on the build path. To view a list of all the JAR files that are on the build path (as well as their contents), use the Package Explorer view in the WPF Designer.
Importing JARs
If you want to add your own JAR files to a project, you can put them in a number of places. The usual place for custom JARs is either in the WebContent/WEB-INF/lib directory or WebContent/WEB-INF/work/lib directory. You can use the WebContent/WEB-INF/lib directory if you do not plan to change your JAR files, or the WebContent/WEB-INF/work/lib directory for any JAR files that you plan to update regularly (timestamps on JAR files in this directory are automatically checked whenever you rebuild the model, so that you can dynamically load in new JARs during development). You can also use the WebContent/WEB-INF/clientLibs directory for JAR files that you don’t want to add to the server’s classpath (such JARs might already exist on the server and would only be used at design time).
To add a new JAR file to your WPF project, first copy the JAR file to the WebContent/WEB-INF/lib directory inside the project. If you were going to be regularly updating the JAR file, you would want to copy it to the WebContent/WEB-INF/work/lib directory instead. JAR files in these locations are used when your application is deployed. If you copied your JAR from a location on the server (such as the shared/app directory on the portal), you should copy it to the WebContent/WEB-INF/clientLibs directory so that it is not added to the server’s classpath when deployed.
Open the Project Properties dialog by right-clicking on your project folder and choosing Properties. Switch to the Java Build Path page, and then click on the Libraries tab. Click the Add JARs button to display the JAR Selection dialog, navigate down to where the JAR file is stored, select it, and click OK. Click OK to close the Project Properties dialog, and you should now be able to access the JAR within your application.
Excluding JARs from WAR Files
WebSphere Portal installations have a shared repository for JAR files, which is located under the shared directory in your portal server’s root directory. If you are using JARs that contain functionality used across multiple applications, you might want to consider putting them in this directory. Java methods in your application are then able to access these JARs after they are deployed.
When testing or compiling your applications, however, the portal’s shared directory is unavailable, and you will get errors when you try to compile code that accesses nonexistent JARs. To get around this problem, you can import the JARs into your project (as described in the previous section) but exclude the JAR files from the deployed WAR (so only one copy of the JARs will exist after the application has been deployed). This also reduces the size of your deployable application (as opposed to storing JARs in the WebContent/WEB-INF/clientLibs directory, which only prevents them from being added to the server’s classpath).
To exclude a JAR file from the deployable application, first import the JAR file into your project as described in the previous section. Then copy the JAR file to the shared/app directory on your portal server and restart the portal server (your deployed application uses this JAR instead of the one currently in your project). After you’ve done this, open the .excludeFromServer file under the WebContent directory (by default you can’t see this file in the Project Explorer view, but you can see it by opening the Navigator view). Any entries in this file are excluded from the deployable WAR (all entries are relative to the project root folder).
Change the contents of the file so that it reads as follows:
# Add any files that you want excluded from the deployed
![]() server in this file.
server in this file.
# All paths start at the application root. For example:
![]() WEB-INF/lib/myJar.jar
WEB-INF/lib/myJar.jar
WEB-INF/lib/testJar.jar
where testJar.jar is the name of your JAR file. Save the contents of the file when you are finished, and deploy your application. To test that your change worked, rebuild your portlet application and open the deployable WAR when the process has finished. The specified JAR file should not be part of the WAR.
Summary
In this chapter, you learned how to extend your WPF portlet applications with Java. You learned about the use of the Method and Linked Java Object builders, as well as how to use JARs and Java beans. You also learned about some of the APIs that are useful in manipulating WPF applications, particularly in relation to the Domino Java API and the webAppAccess object. Finally, you created a service provider to interact with a collection of Java beans, and a shopping cart model to communicate with this service. The shopping cart model was surfaced to a portal server as a portlet.
Chapter 9 discusses how you can provide and consume Web services in WPF portlets, as well as how to manipulate XML using a combination of prepackaged builders and the Java IXml interface.
Important Points
• You can view a WPF application’s Java code by opening the WebApp Tree tab for a particular model, and then viewing the contents of the Method and Linked Java Object headings.
• Java statements can be used to return the results of Java expressions for inputs in a builder that accept indirect references (such as the Actions input in the Action List builder), using the following syntax:
${Java/[Java expression]}
where [Java expression] should be replaced with a Java expression that will be evaluated and returned to the builder input (for example: ${Java/webAppAccess.getModelName()}).
• The Method builder enables you to insert Java code inside your WPF applications and should be used when you want to insert small snippets of Java (particularly those that are not going to be reused in other models).
• The Linked Java Object (LJO) links to a physical Java class file in your project and makes the methods of this class available in a model. When implementing Java methods in WPF, the LJO should be preferred over the Method builder when long methods are used, or if the methods might be reused in more than one model.
• Javadoc for the WPF APIs is available in the WPF Designer Help, under IBM WebSphere Portlet Factory Designer, Reference, API documentation.
• To ensure the separation of your data and presentation tiers, Java beans should be made available via a service provider. The Bean Master Detail builder automatically creates a UI to interface with a Java bean, but it mixes data and presentation and should therefore only be used for testing purposes.
• In WPF, some builders provide methods to surface further functionality. These methods are of the following form:
{BuilderCallName}{BuilderMethod}
• Imported JARs can be stored in the WebContent/WEB-INF/lib directory, or under the WebContent/WEB-INF/work/lib directory if you intend to regularly change them.