Chapter 8
Playing Audio and Video on the Raspberry Pi
IN THIS CHAPTER
![]() Using LibreELEC to turn your Pi into a media center
Using LibreELEC to turn your Pi into a media center
![]() Playing music and video stored on USB devices or networked devices
Playing music and video stored on USB devices or networked devices
![]() Viewing photos in the media center
Viewing photos in the media center
![]() Playing music in the desktop environment
Playing music in the desktop environment
In this chapter, we show you how you can turn your Raspberry Pi into a media center, capable of playing high-definition video files and music.
To do that, we use dedicated media player software based on the Kodi software that powers some set-top boxes and smart TVs. You can use it to play music and video you have on storage devices connected to your Raspberry Pi, or to play back media from other devices on your home network. To a more limited degree, you can also use it to play back streaming TV shows and radio stations from the Internet.
At the end of this chapter, we also show you how to play music on your Raspberry Pi in the desktop environment.
Setting Up Your Media Center
The Raspberry Pi can play back full HD 1080p video, which makes it ideal as the heart of a cheap and low-powered media center. The NOOBS software includes two Linux distributions, both based on Kodi, that turn your Raspberry Pi into a media center. The choices are OSMC and LibreELEC. Because they’re both based on the Kodi core, they have many similarities. In this chapter, we use LibreELEC because it uses the default Kodi design (or skin), so it's more likely to resemble other Kodi systems you have used. It's also a more lightweight option, so it may perform better on lower-powered Raspberry Pi models.
If you're using OSMC, the design looks different, but you should still be able to follow along in this chapter. To make it easier, you can choose the default Kodi skin by clicking Settings on the left, choosing Interface from the menu that appears, and then choosing Skin. Click Skin in the main part of the screen to open the options and choose Estuary, which is the Kodi default. You can change back to the OSMC skin from Estuary by clicking the Cogwheel icon at the top of the menu on the left, choosing Interface Settings from the menu that appears, hovering over Skin on the left, and then clicking Skin in the main part of the screen. You can exit any of the menus by pressing Esc.
To start setting up your media center, create an SD or MicroSD card with NOOBS Lite on it (see Chapter 2), and then use that card to install LibreELEC (see Chapter 3).
When you first boot up LibreELEC, you'll be guided through its main settings, including its name on the network, the network connection itself, and the remote access settings (so that you can access files on your device over the network).
Navigating the Media Center
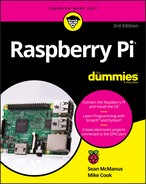
The Kodi screen looks like Figure 8-1. LibreELEC uses Kodi’s simple interface, which is designed to work with only a remote control. In this chapter, we assume you’re using a mouse, but we give you some pointers on using remote controls in the section “Using a Remote Control,” later in this chapter. If you’re using a remote control, you should find the interface intuitive.
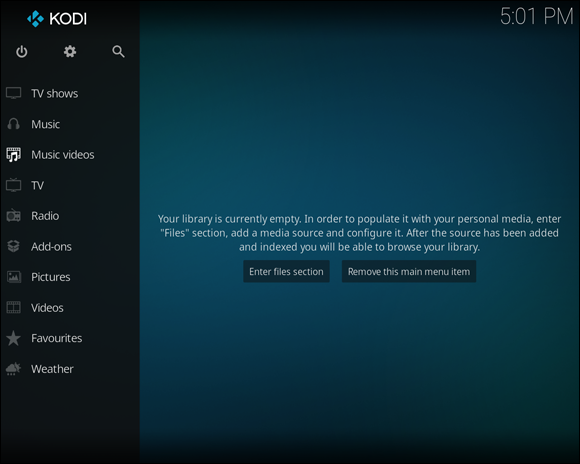
FIGURE 8-1: The main menu on the left and the empty library area on the right. This shows how Kodi appears before media is added.
The menu on the left side of the screen gives you access to the different content types, including movies, TV shows, music, and music videos. When you hover the mouse pointer over one of these options, the main screen area on the right shows you options and submenus for accessing your content. The Music section, for example, shows you categories you can browse, recently played albums, recently added albums, random albums, random artists, unplayed albums, and most played albums. You can use the cursor keys to move around the options; or the mouse, with the scroll wheel moving between the options within a menu. To exit a menu, press the Escape key.
To select an item and start to play it, simply click it. You can pause playback by tapping the spacebar, and tap Escape to get back to the menu.
 To use the TV and radio features, you'll need to have a separate tuner device and TV signal decoding software. For more information, see
 http://kodi.wiki/view/PVR_backend.
At the top of the menu on the left are buttons for switching off your Pi, accessing the settings menus (the Cogwheel icon), and searching for content (the magnifying glass).
Adding Media
Before you can play back content, you need to tell Kodi where it can find it. You have several options for providing it:
- USB drive: You can plug a USB drive that stores your movies or music directly into your Pi or its USB hub. A message appears in the top right, confirming that the USB device is being mounted, which means it’s being prepared so that you can use it.
- Networked media: You can connect your Pi to your home network and then access other devices on the same network. Sean, for example, was able to connect his Pi to his Windows PC over the network and use Kodi on the Pi to play back the music and movies stored there. You might have a router with a built-in media server, so it can share any files on USB devices you connect to it. These networked devices most likely use the UPnP (Universal Plug and Play) standard.
Kodi can create a library of your media and index it to provide you with easy access to it. You'll need to add your content to the library first to benefit from this.
Adding music
To add music to your library, follow these steps:
Hover over Music in the menu on the left.
If you've already added music, you'll see options to browse it by artist, album, and year, among other categories.
Choose Files from the Categories menu at the top of the screen. (Use the scroll wheel to scroll this menu horizontally until you find it.)
This will show you the folders you have added to your library already, and any connected storage devices.
- Choose Add Music.
Choose Browse in the Add Music Source dialog box that opens and use the options to find where your music is stored. (See Figure 8-2.)
If you’ve connected a USB drive to your Pi, you can find it by clicking Root filesystem, media, and then the name of your USB device. To find media connected on your network, try the Windows Network (SMB) or Network File System options.
 You may need to enter your username and password, and you should enable the option to remember them for this path if you don't want to have to enter them whenever you access your media. Click folders to open them. The .. (two dots) option at the top takes you up a level in the folder structure.
- Click OK when you have navigated to the folder that contains all the music folders or files you want to add.
In the Add Music Source dialog box enter a name for the media source, if you want.
This will help you to identify the source on the menus.
- Click OK.
- When prompted, confirm that you'd like to add the media to your library.

FIGURE 8-2: The browsing options for adding media to your Kodi installation.
 Content that Kodi doesn't recognize, including home recordings, won't be added to the library, but you can still view them in the folder you added by using the browser. Start by choosing Music from the menu on the left, choose Files (as you did when adding media), and then select the folder that contains your added media. From there, you can open the folders and select the music files to play them.
Adding videos
To add movies to your library, follow these steps:
Click Movies from the menu on the left.
If you can't see it, it's probably off the top of the screen. Hover the mouse cursor over the menu and use the scroll wheel to bring the Movies option back again.
If you've already added some films, you'll see a list of them with .. (two dots) at the top of the list. In that case, click .. twice to go up a level and then choose Files. This will show you the folders you have added to your library already.
- Choose Add Videos at the bottom of the folder list.
Choose Browse and use the options to find where your films are stored.
If you’ve connected a USB drive to your Pi, you can find it by clicking Root filesystem, media, and then clicking the name of your USB device. To find media connected on your network, try the Windows Network (SMB) or Network File System options. Click folders to open them. The .. option at the top takes you up a level in the folder structure.
- Click OK when you have navigated to the folder that contains all the video folders or files you want to add.
- In the Set Content options that open, click where it says This directory contains and select Movies.
- (Optional) If your movies are stored in separate folders that match the movie title — a common way of organizing them — turn that option on.
Click OK.
If prompted, confirm that you'd like to refresh items in this path.
Content that Kodi doesn't recognize, such as your home movies, won't be added to the library, but you can still view them in the folder you added by using the browser. Start by clicking Movies on the left, clicking .. twice, choosing Files, and then selecting the folder that contains your added media. From there, you can open the folders and select the movie files to play them.
You can add TV shows or music videos using a similar process — just change the media type to TV Shows or Music Videos in Step 5.
Adding pictures
To add photos, you follow a similar process to adding music and movies. Start by clicking Pictures from the main menu on the left, and then choose Add Pictures from the menu that appears. You can then add a folder of photos.
To view the folder, hover over Pictures on the main menu on the left and then select the folder name. You can use the left- and right-arrow keys to navigate your photos and hover over options in the bottom left to open a menu that enables you to display a slide show.
If you're in a folder and you want to view a different folder or add more pictures, click .. at the start of the photo folder.
Streaming media
Streaming media means that the content flows into your Raspberry Pi over the Internet as you watch it or listen to it. As a result, streaming services only work when you have a good Internet connection.
To enable streaming, you use add-ons, which are third-party applications that access sources of content online. Music add-ons, for example, enable you to listen to Internet radio stations and access some online music services. Video add-ons can give you access to online TV stations. The availability of add-ons varies over time as new services launch and older services disappear. The music and video add-ons can be particularly short-lived and unreliable because broadcasters are often keen to keep viewers using their own software and gateways.
To install an add-on, hover over Add-ons on the main menu on the left, and then choose Install from Repository from the menu at the top of the screen. From the new menu that appears, choose Kodi Add-On Repository to find add-ons from the official Kodi repository, which offers a range of add-ons that have undergone basic testing.
As well as music and video add-ons, there are options for a weather forecast provider, screensavers (in the Look and Feel category), and picture add-ons. Note that if you add a screensaver, you'll also need to enable it in the Interface settings.
Playing Music
To get started with playing music, hover over Music on the main menu to show your music collection in the main part of the screen. You can use the Categories menu at the top to browse by genre, artist, album, or song, among others. You can also choose Files from the Categories menu to go to the music folders you have added. In the main part of the screen are options for recently played or added albums, and random artists and albums too. Click a song to play it.
When music is playing, click the Options button in the bottom left to open a menu with options to pause, stop, or skip the track. From this menu or from the top of the main menu, click the icon showing four arrows, like a compass, to view the song full screen, where there are additional options for repeating or random song order. Note that there is a screensaver, so the screen display disappears after a moment or two. Press Escape to go back to the menu. You can tap the spacebar to pause or unpause the audio.
You can continue to browse your music while it is playing, and queue songs or albums to play next, by right-clicking them and choosing Queue Item from the menu that appears.
The Playlists option in the Categories section of the Music menu enables you to create lists of songs for playback that you can save and play whenever you want. Start by clicking New Playlist in the Playlists option to create a new playlist. To add a song from the Playlist browser, right-click its name and click Add from the menu that opens. When you've finished creating your playlist, choose Save from the menu on the left.
You can also make smart playlists, which are playlists that are generated from rules, such as songs that belong to particular years, genres, or artists. You need to add your rules before you can give your playlist a name. You use a simple menu system to set up your playlist rules.
Smart playlists can only contain songs that have been added to the music library, but standard playlists can contain songs from any of your connected media devices.
Playing Videos
Use the Movies, TV Shows, Music Videos, and Videos options to view your video content. What's available under each option will depend on the media you added in each section, and what type of media you told Kodi it was at the time (such as movie or TV show).
The Kodi software supports the H.264 video format to 1080p, which means you’ll be able to watch most .mp4, .m4v, and .avi files in high definition. Note that content protected by digital rights management, including files bought from iTunes, can't be played in Kodi.
If you want to watch other formats, you might be able to buy a license from the official Raspberry Pi website at www.raspberrypi.org. Licenses to watch MPEG2 and VC1 format videos are available and cost a couple of pounds or dollars apiece. Each license is valid for one Raspberry Pi. You need to add your license number to the config.txt file (see Appendix A), which is easiest to do if you boot from a different SD card and then use a card reader on the Pi to modify your Kodi card. The config.txt file is stored in the top-level folder of your Kodi card, not in the boot folder, where you might usually expect to find it.
To play films, hover over Movies on the main menu to see options for different categories, recently added movies, random films, and unwatched movies. Click a film to start watching it. You can also click Movies on the main menu to see a list of your films, together with artwork and a synopsis downloaded from the Internet. Click the .. option at the top of this menu, and then click it again on the next menu to get to your files if you want to play media that isn't indexed in the library. As with audio, you can tap the spacebar to pause or unpause a film.
Viewing Photos
Click Pictures from the main menu to see a simple file browser that you can use to access your pictures, with your added folders listed. The media center software supports standard image formats, including JPEG, BMP, and TIFF, and generates thumbnails of your photos and folders. Navigate to a photo and click it. You use the left and right keys to move through your photos, and the Escape key (or right-click the mouse) to return to the menu.
Changing the Settings
The cogwheel at the top of the main menu gives you access to the settings for Kodi, divided into several sections. They include, among others:
- Player settings, covering options such as whether the next song or video plays automatically, whether there is cross-fading between songs, and the use of subtitles.
- Media settings, which enable you to manage your sources of media in the library and choose information providers for artist and album information.
- Interface settings, which enable you to choose a skin (or design) for Kodi, your region, and a screensaver. If you install a screensaver add-on, you'll need to enable it here.
- System settings, which can be used to choose the correct audio output device, configure notification sounds in Kodi, and configure power and the Internet connection.
- LibreELEC, which includes options for managing the Internet connections available to the system and for enabling Secure Shell (SSH) for remote access to your Pi.
- File Manager, which enables you to copy files between different folders and storage devices.
By default, the sound is set to pass through your HDMI cable. If you want to use your Raspberry Pi’s audio output (and speakers) but you’re using HDMI for your screen, you’ll need to change the audio setting from HDMI to Analog. You’ll find this option on Kodi's System Settings menu. When you’re viewing the settings menu, select Audio on the left and select Audio Output.
Using a Remote Control
Considering all the functionality we’ve covered in this chapter, you’re not that far away from running a low-power home media center. To complete it, you can use a remote control.
There are many ways to remotely control your Raspberry Pi media center. You can use a USB device, a cheap infrared remote, a keyboard remote, or even your Xbox controller, if you have one. Or you can use the existing Kodi remote app (available for iOS and Android operating systems) to control Kodi on your Raspberry Pi.
You can find the remote-control settings on Kodi's System Settings menu, and then under Input. You might find that your remote control works without needing to change any settings, so try it first.
If you have a television that supports the HDMI CEC (Consumer Electronics Council) standard, a neat option is to enable your existing television remote to control your Pi. To do this, connect your networked Pi to your television’s HDMI socket. XMBC appears as a new input. Use the TV’s remote control to change to this input, and your Home screen then appears on the television.
Turning Off Your Media Center
To turn off your media center properly, click the Shutdown button in the top left of the Kodi main menu. You can just switch off the power supply, but you minimize the risk of corrupting your SD card or MicroSD card by shutting down properly.
Playing Music in the Desktop Environment
Looking for musical inspiration while you program? The good news is that you can also play music and video from the Raspbian desktop environment. (See Chapter 4.) If you’re still using LibreELEC or OSMC, shut down your Raspberry Pi using the Shutdown icon in the top left and then reboot into Raspbian. You will need to either swap SD or MicroSD cards or, if you’re using NOOBS, choose to use Raspbian when you reboot.
VLC Media Player is a music and video player that works on the PIXEL desktop. You can install VLC at the command line (see Chapter 5) using:
sudo apt-get install vlc
After VLC has been installed, you can find it in the Sound and Video category of the Applications menu and click its name there to start it up.
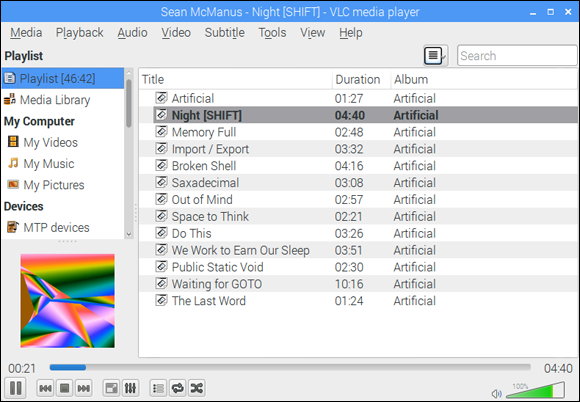
On the Media menu of VLC are options to open a file or directory. Usually, you’ll want to open a directory so that you can play a whole album. By default, VLC shows you the album artwork (where available), but you can open the View menu and choose Playlist to see a list of songs so that you can pick another to play (as shown in Figure 8-3). In the box on the left, you can pick a device to play from, including several Internet services for streaming music. Choose Playlist from the View menu again to revert to the full-window artwork.
Written by Hong Jen Yee and Juergen Hoetzel; icon by Arnaud Didry.
FIGURE 8-3: Playing music in VLC Media Player.
The playback controls to pause, play, skip, shuffle, and repeat songs are at the bottom left of the window. The volume control is at the bottom right.