Scratch is a visual programming application that you can use to write programs visually. In this chapter, we explore the Scratch application by creating blocks to build programs visually.
The following is a list of topics covered in this chapter:
Learn about visual programming
Set up Scratch
Develop a hello program
Work with Sprites
Work with backgrounds
Work with motion
Work with controls
5.1 Introducing Visual Programming and Scratch
Visual programming is a programming method that you can use to develop programs without writing codes/scripts directly. You can click and drag components or modules into the board and the tool will generate codes from your visual models.
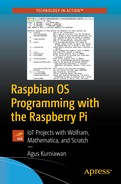
In this chapter, we explore visual programming with Scratch. Scratch is a free desktop and online multimedia authoring tool that can be used by students, scholars, teachers, and parents to easily create games. It provides a stepping-stone to the more advanced world of computer programming. It can even be used for a range of educational and entertainment purposes, from math and science projects, including simulations and visualizations of experiments, recording lectures with animated presentations, to social sciences animated stories, and interactive art and music. See Figure 5-1.
Figure 5-1
The Scratch application on Raspberry Pi with Raspbian OS
5.2 Setting Up Scratch
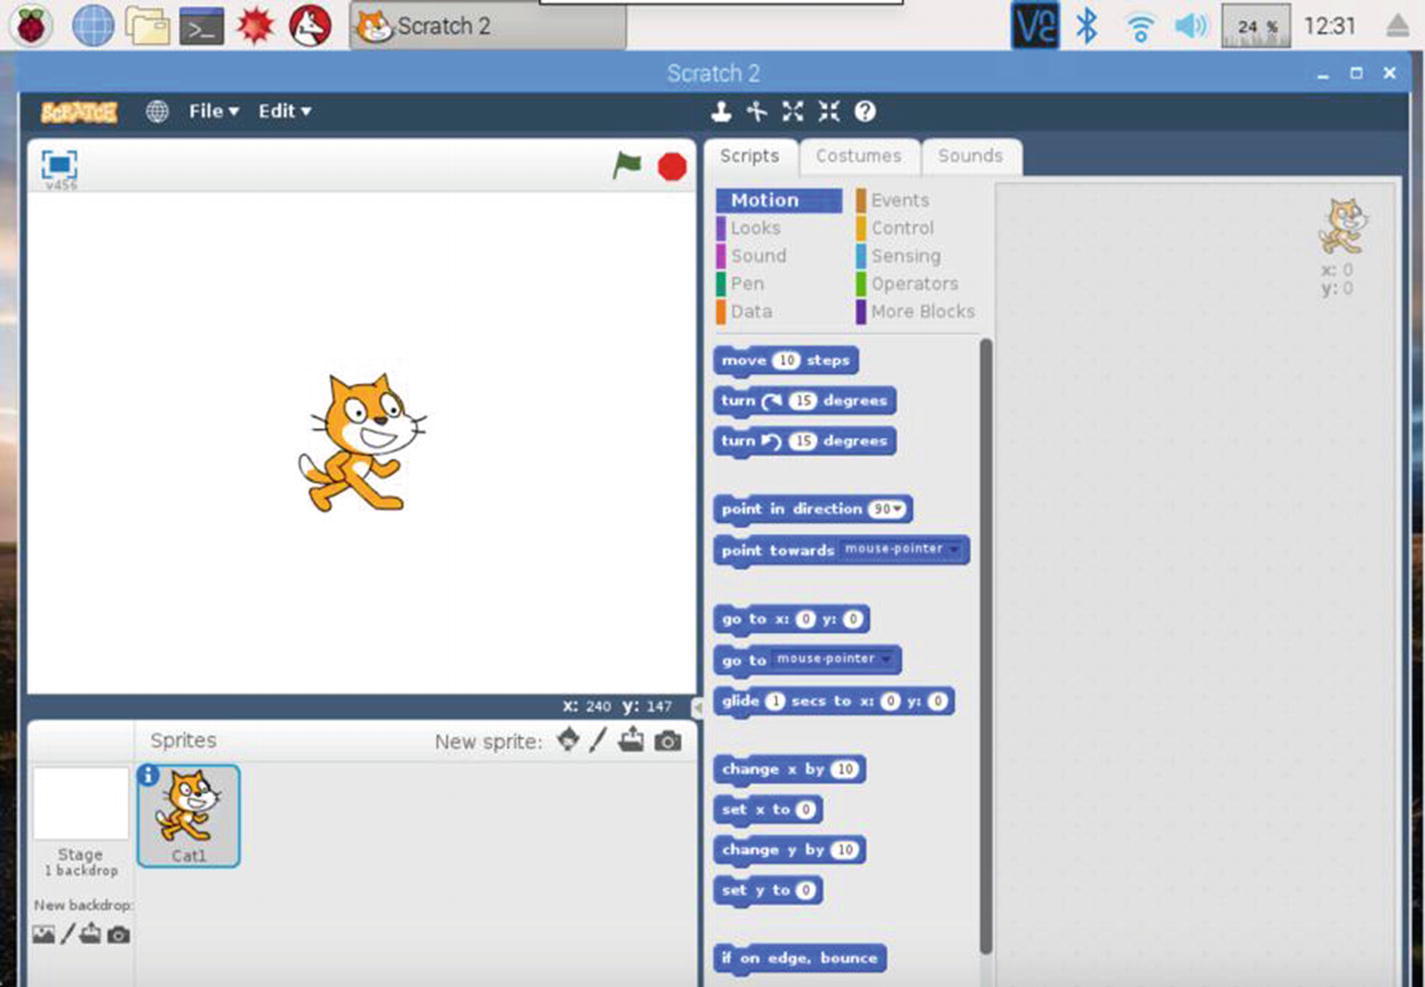
By default, the Scratch application has been installed in the Raspbian desktop on the Raspberry Pi board. You can access the Scratch and Scratch 2 applications from the Programming menu, which is on the main menu (see Figure 5-2).
In this chapter, we only explore the Scratch 2 application. We learn how to build and run programs.
Figure 5-2
The Scratch application on the main menu
5.3 Developing a Hello Program
In this section, you see how to build a Scratch program for a hello world application. Follow the steps in the next sections.
5.3.1 Creating a Project
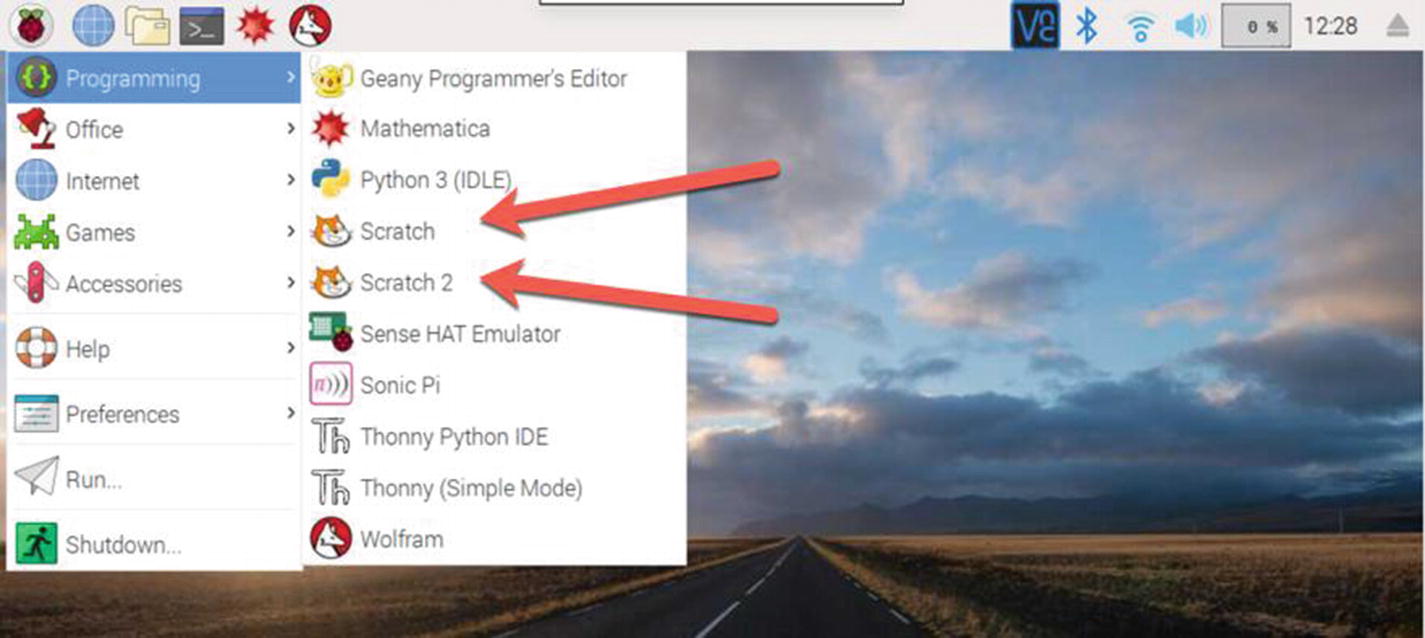
First, open the Scratch application and create a new program by choosing File ➤ New, as shown in Figure 5-3.
Figure 5-3
Creating a new project
You’ll get a blank script, as shown in Figure 5-4.
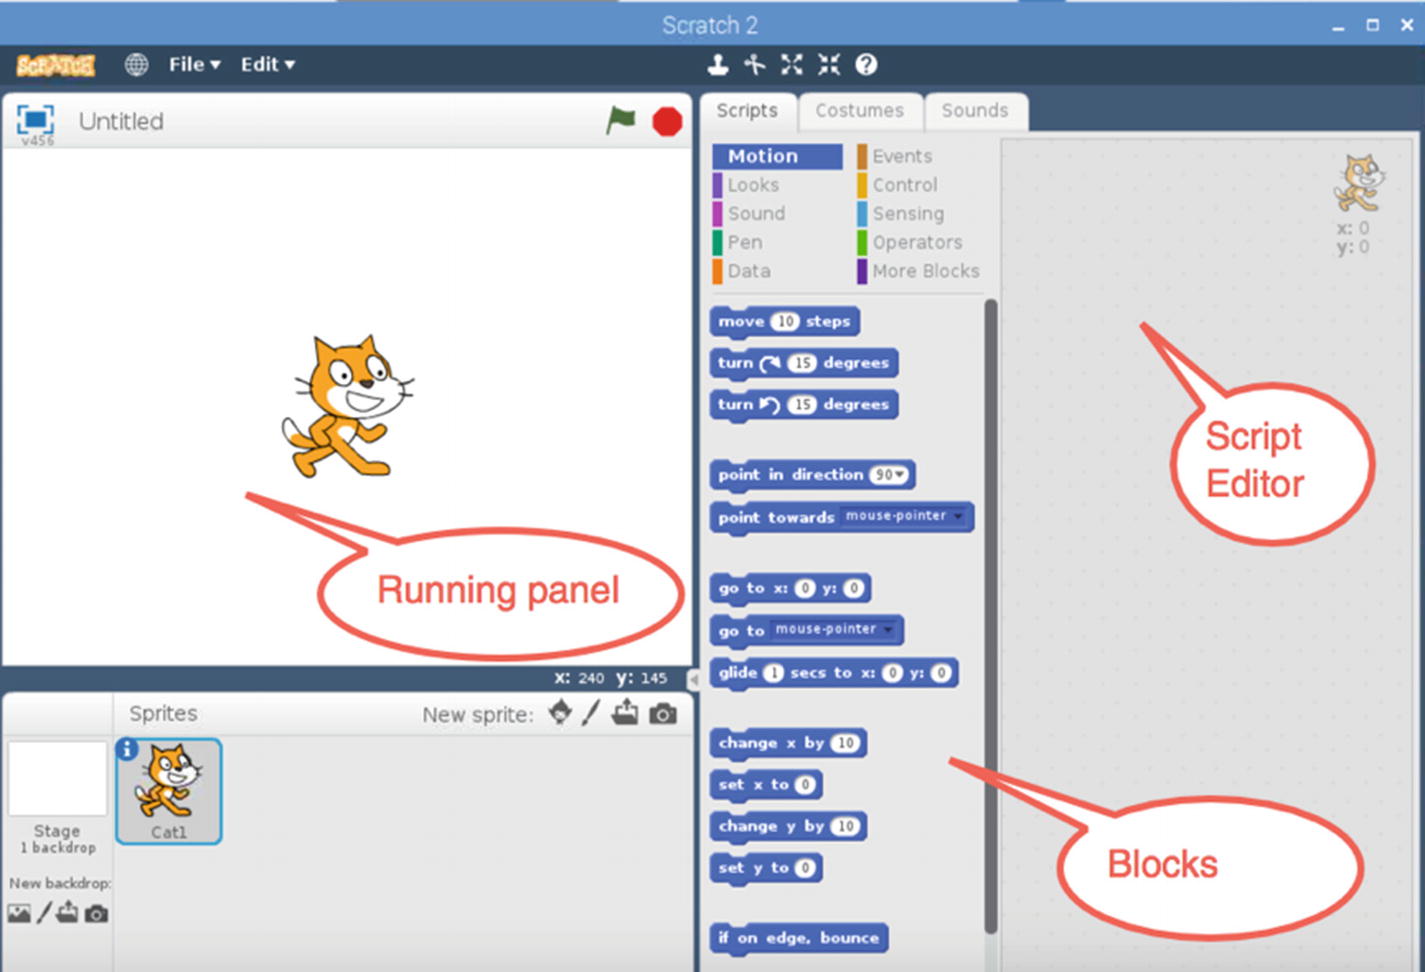
Figure 5-4
The Scratch Editor
Figure 5-4 shows the Scratch Editor. You build Scratch programs using the Script Editor panel. All the blocks that are used to develop Scratch programs can be taken from the Blocks panel. Each block is collected into a group.
Motion
Looks
Sound
Pen
Data
Events
Control
Sensing
Operators
You can simply click and drag from the Blocks panel to the Script Editor. Last, you can see a running panel that shows how your program runs.
5.3.2 Building a Scratch Program
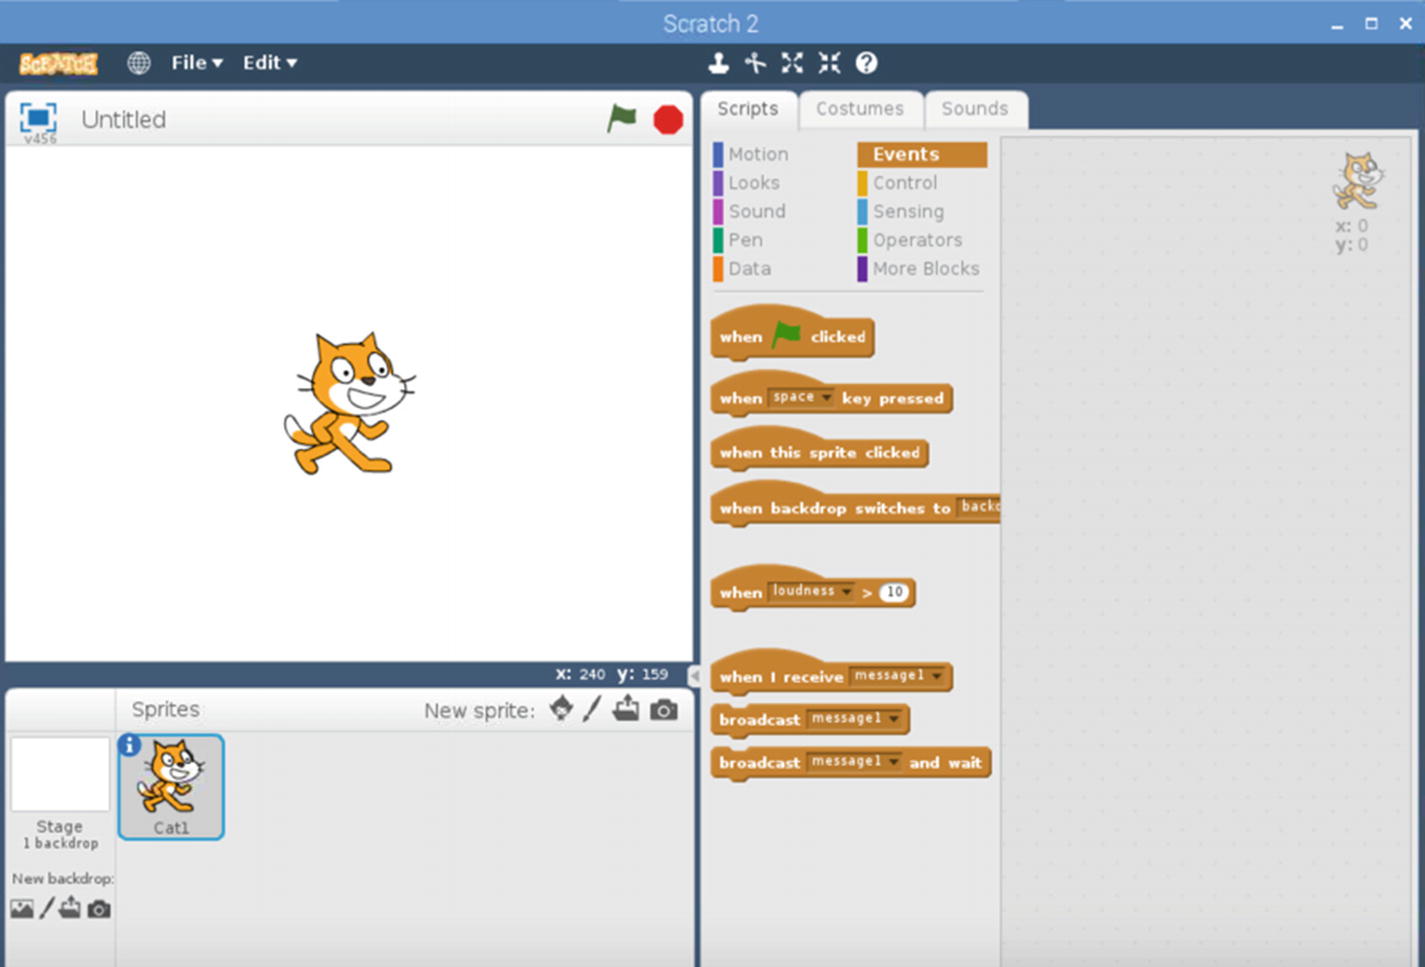
For demo purposes, this example shows the “Hello Raspberry Pi” text on the sprite when it’s clicked. Click Events from the palates area (on the Scripts tab). You will see a list of Scratch blocks for the Events blocks, as shown in Figure 5-5.
Figure 5-5
Listing the blocks on Events
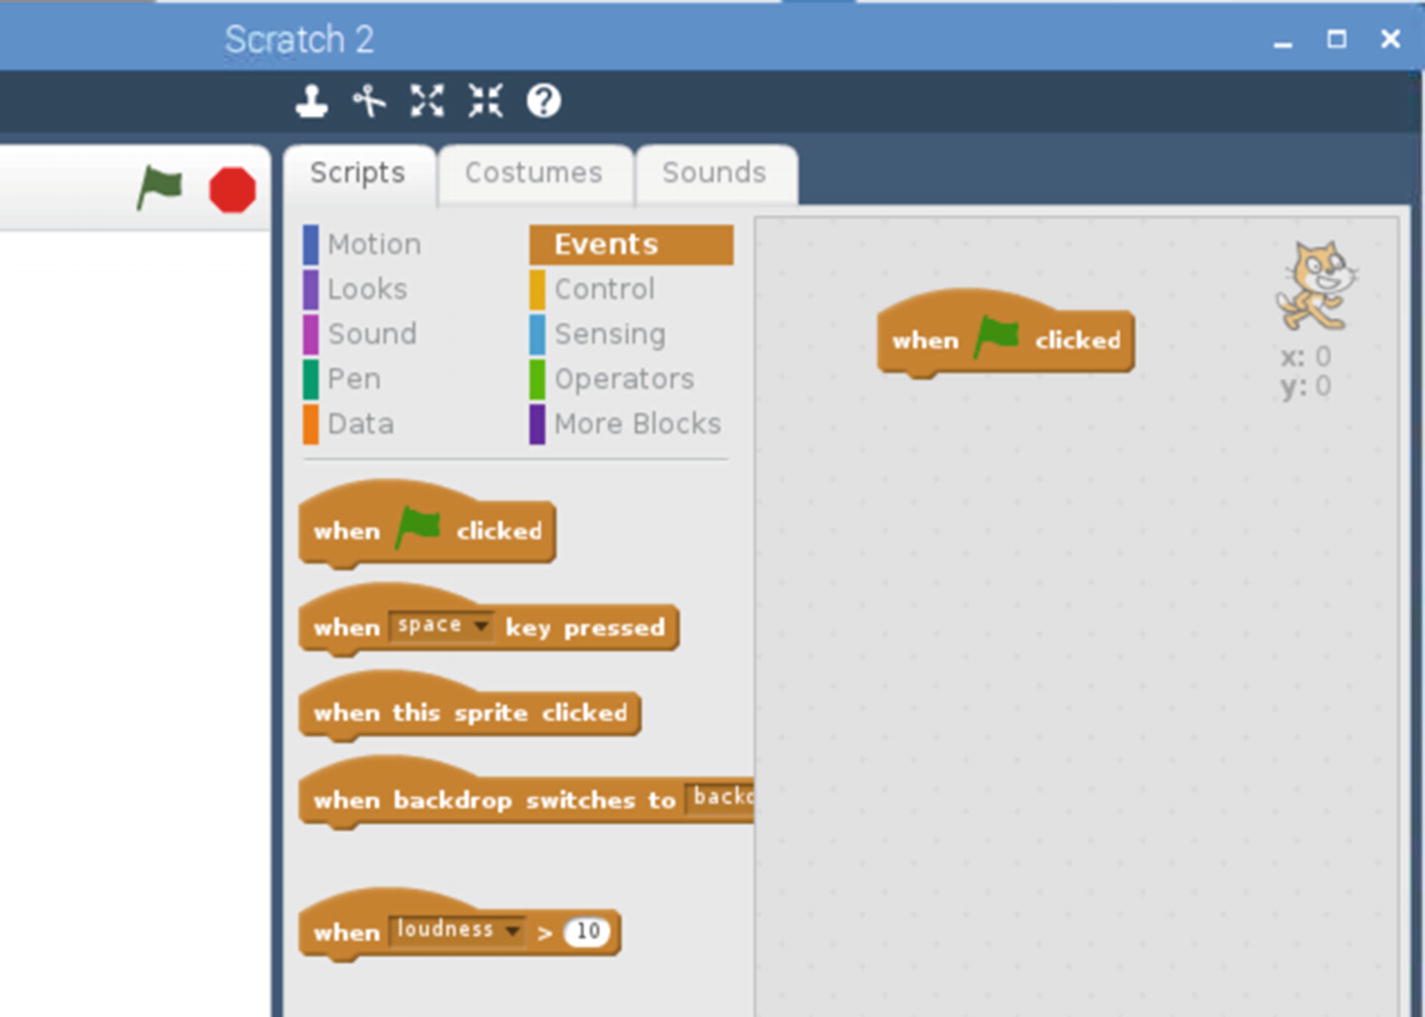
Click the When “Green Flag” Clicked block. Click and hold it to move it to the Script Editor. You can see the result in Figure 5-6.
Figure 5-6
Adding a block to the Script Editor
Now click Looks from the Scripts tab. You will see the Say “Hello!” block. Click and hold it. Then, move it into the editor. You can see the result in Figure 5-7.
Figure 5-7
Adding the Say “Hello” block
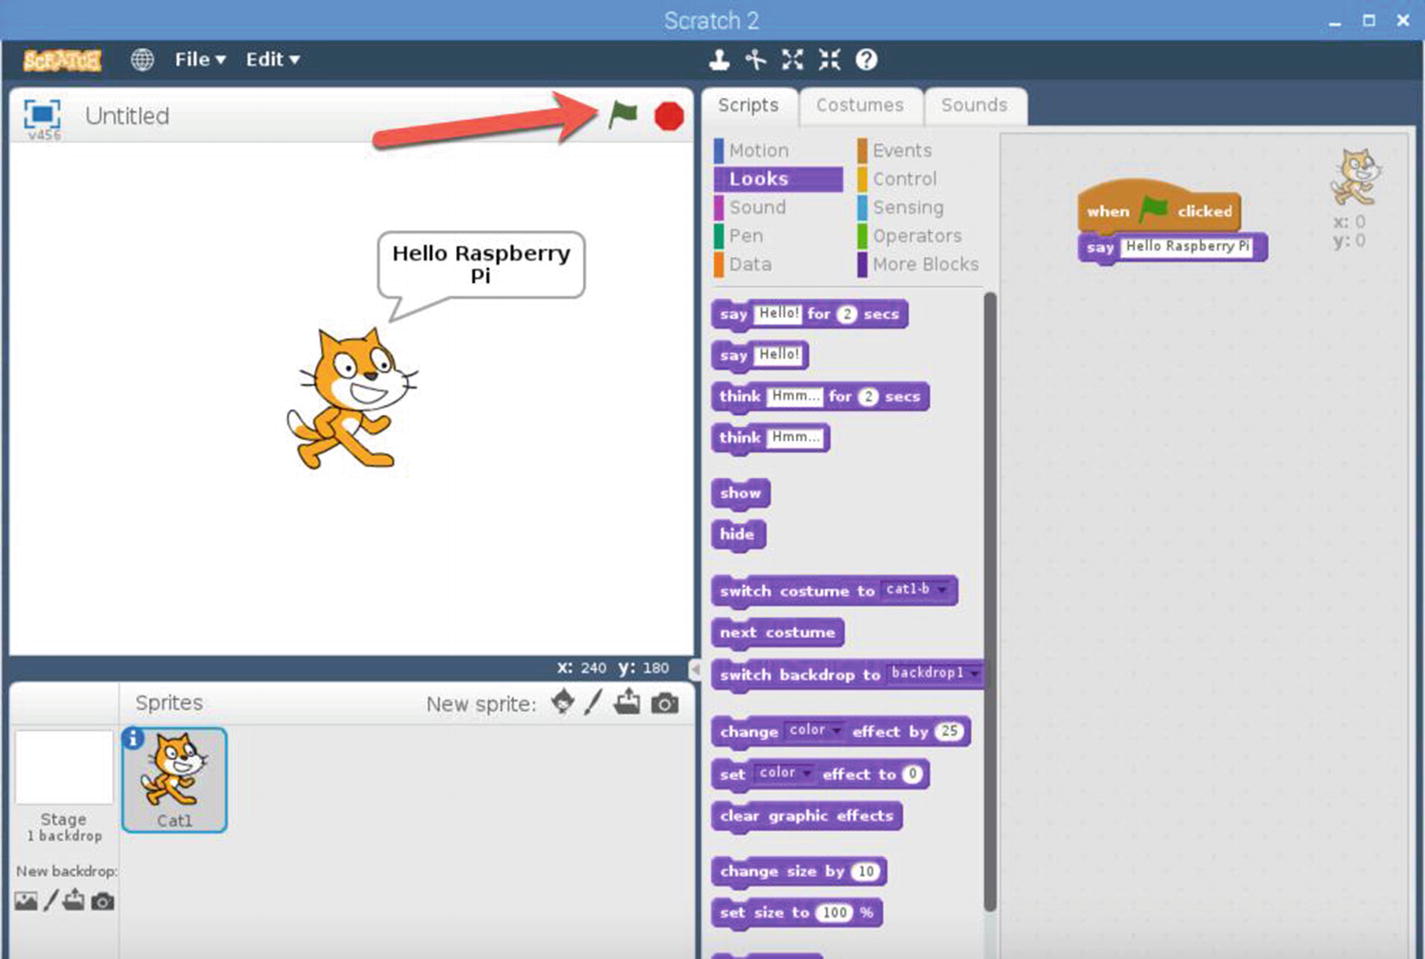
Change the text from “Hello” to “Hello Raspberry Pi”. You have officially created your first Scratch program. Now you are ready to run it.
5.3.3 Running the Program
To run a Scratch program, you can click the Green Flag icon on the top-right of the running panel. After it’s clicked, you should see the message “Hello Raspberry Pi” spoken by the Sprite cat. You can see these results in Figure 5-8.
Figure 5-8
An example of running a Scratch program
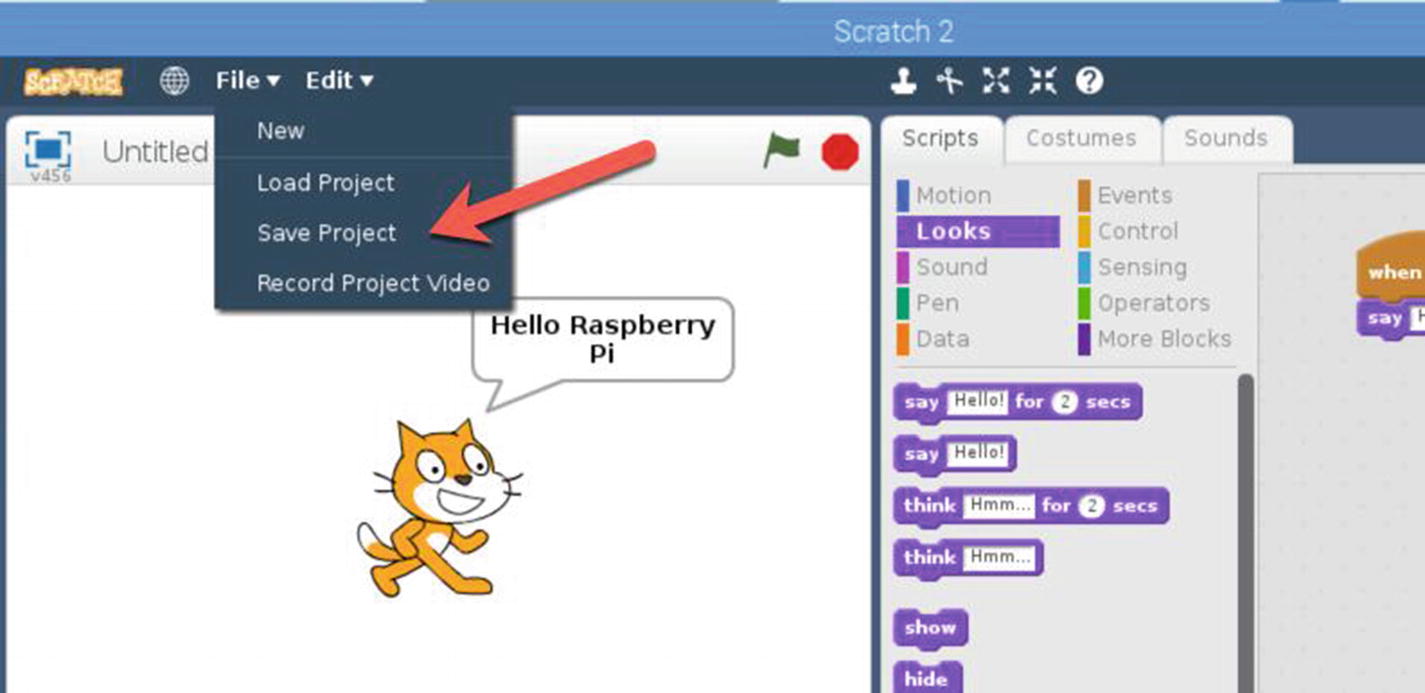
5.3.4 Saving a Program Into a File
If you want to save a Scratch program, you can do so by choosing File ➤ Save Project, as shown in Figure 5-9. You will get a dialog box to store the Scratch program file. Fill in the filename of your project. When you’re done, click the OK button.
Figure 5-9
Savinga project into a file
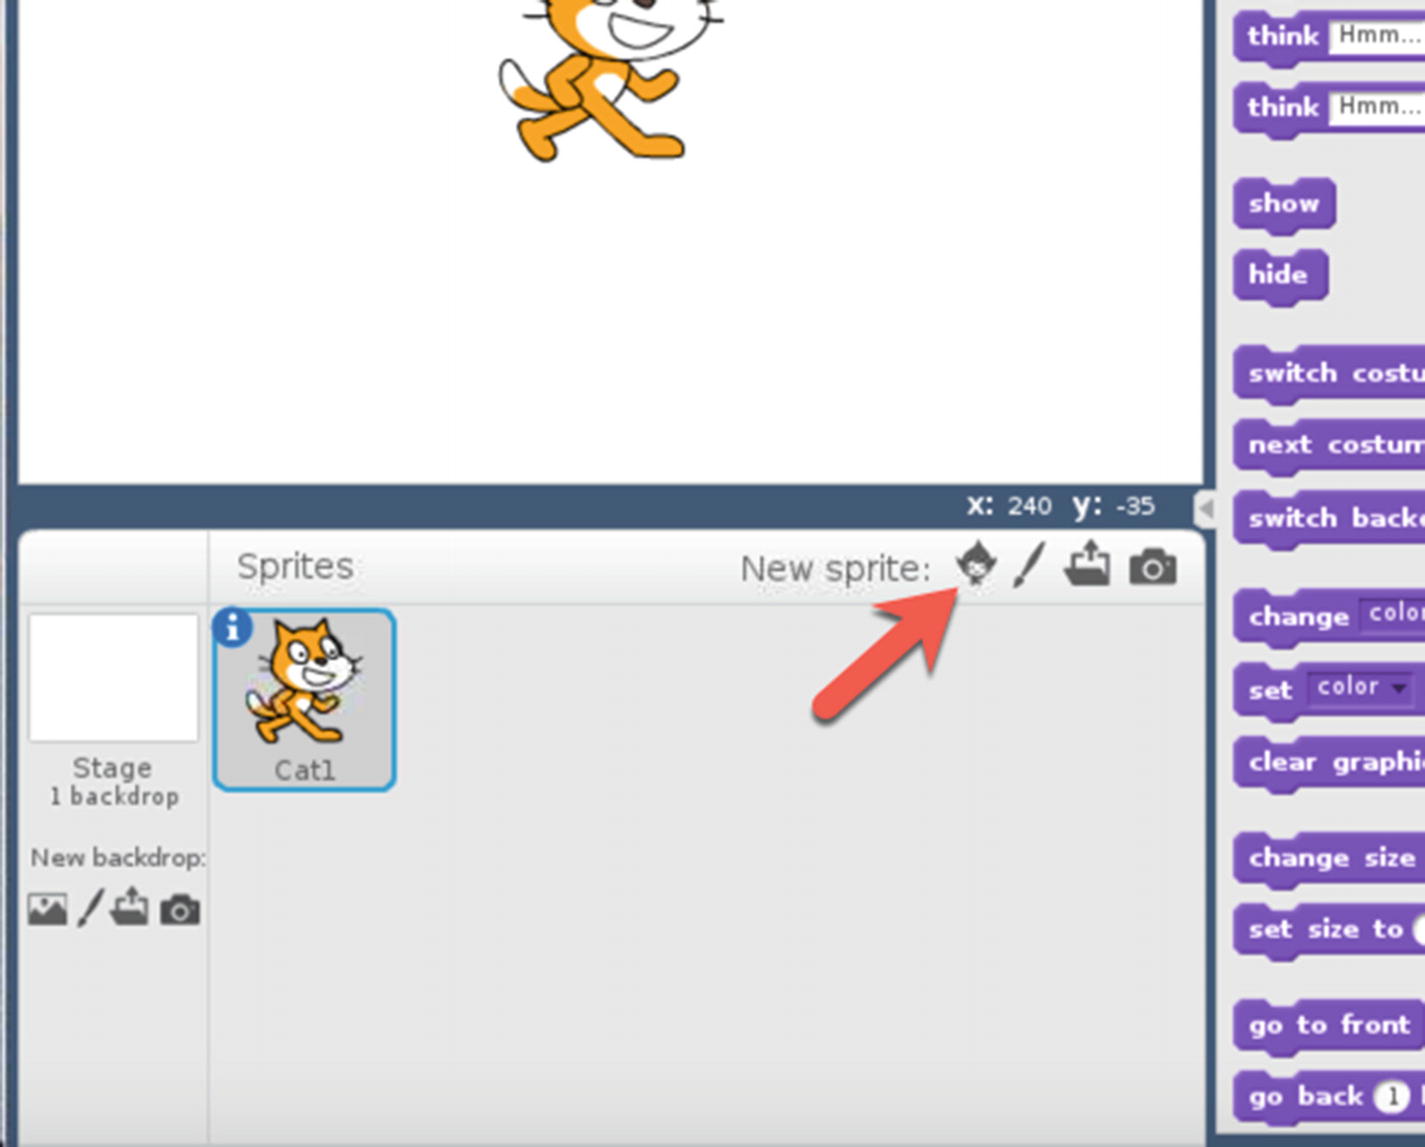
5.4 Working with Sprites
If you see a character image on the running panel, it is a sprite. You can change the sprites in your program. To change your sprite, click the sprite icon in Figure 5-10.
Figure 5-10
Addinga new sprite
After you click this icon, you’ll see a list of sprites, as shown in Figure 5-11. You can select one of your favorite Sprites.
Figure 5-11
A list of sprites in Scratch
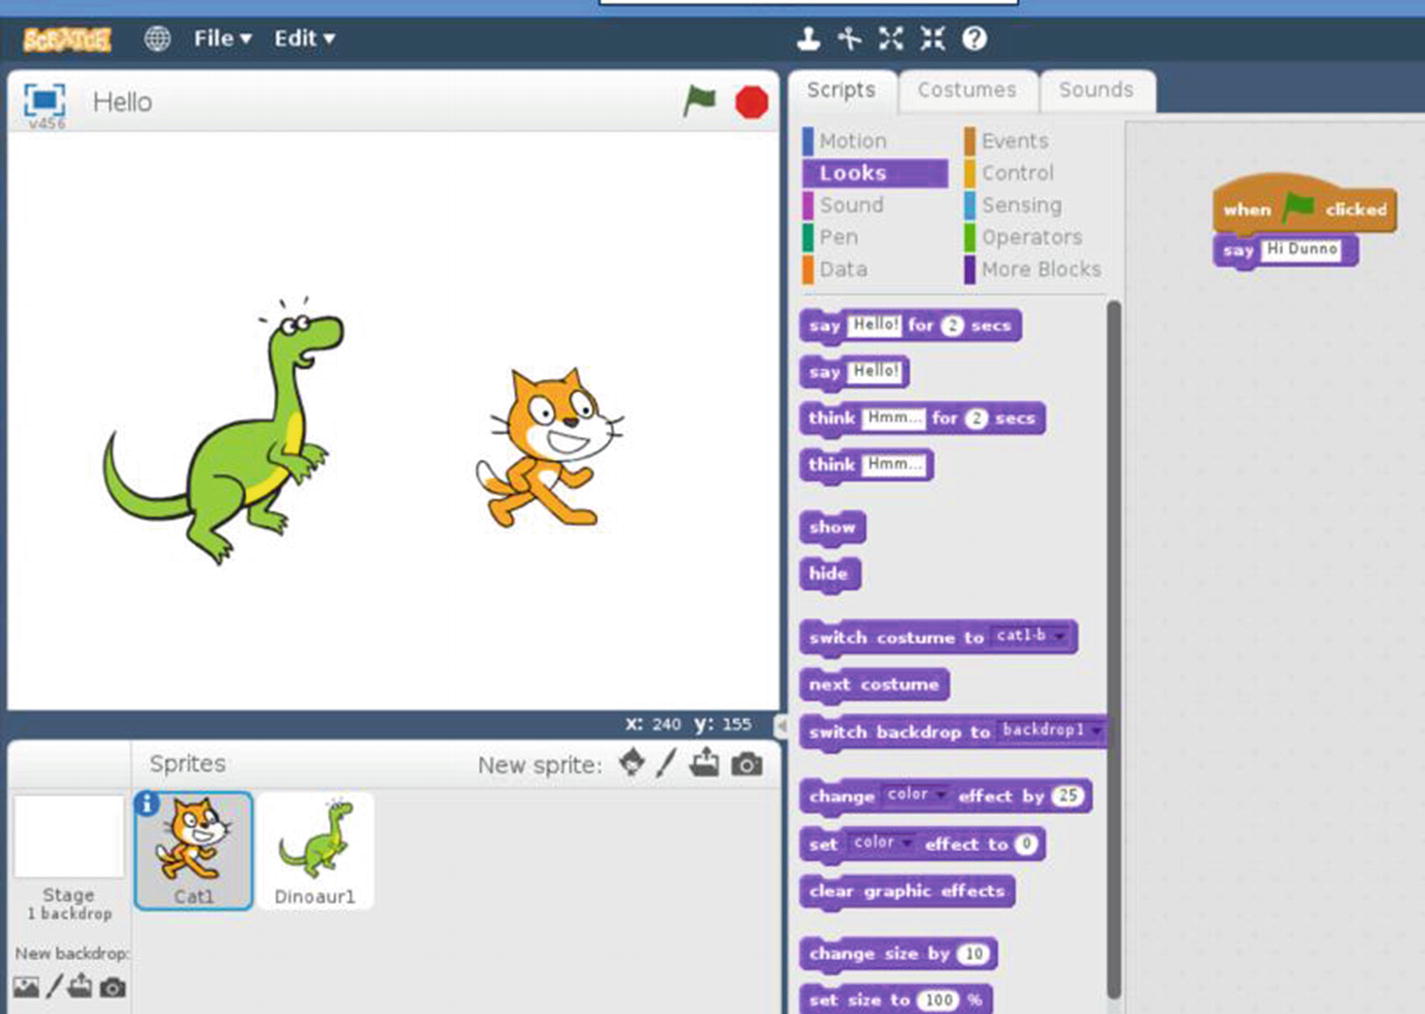
After selecting a sprite, you can see your selection in the panel, as shown in Figure 5-12.
Figure 5-12
Adding additionalspritesto the panel
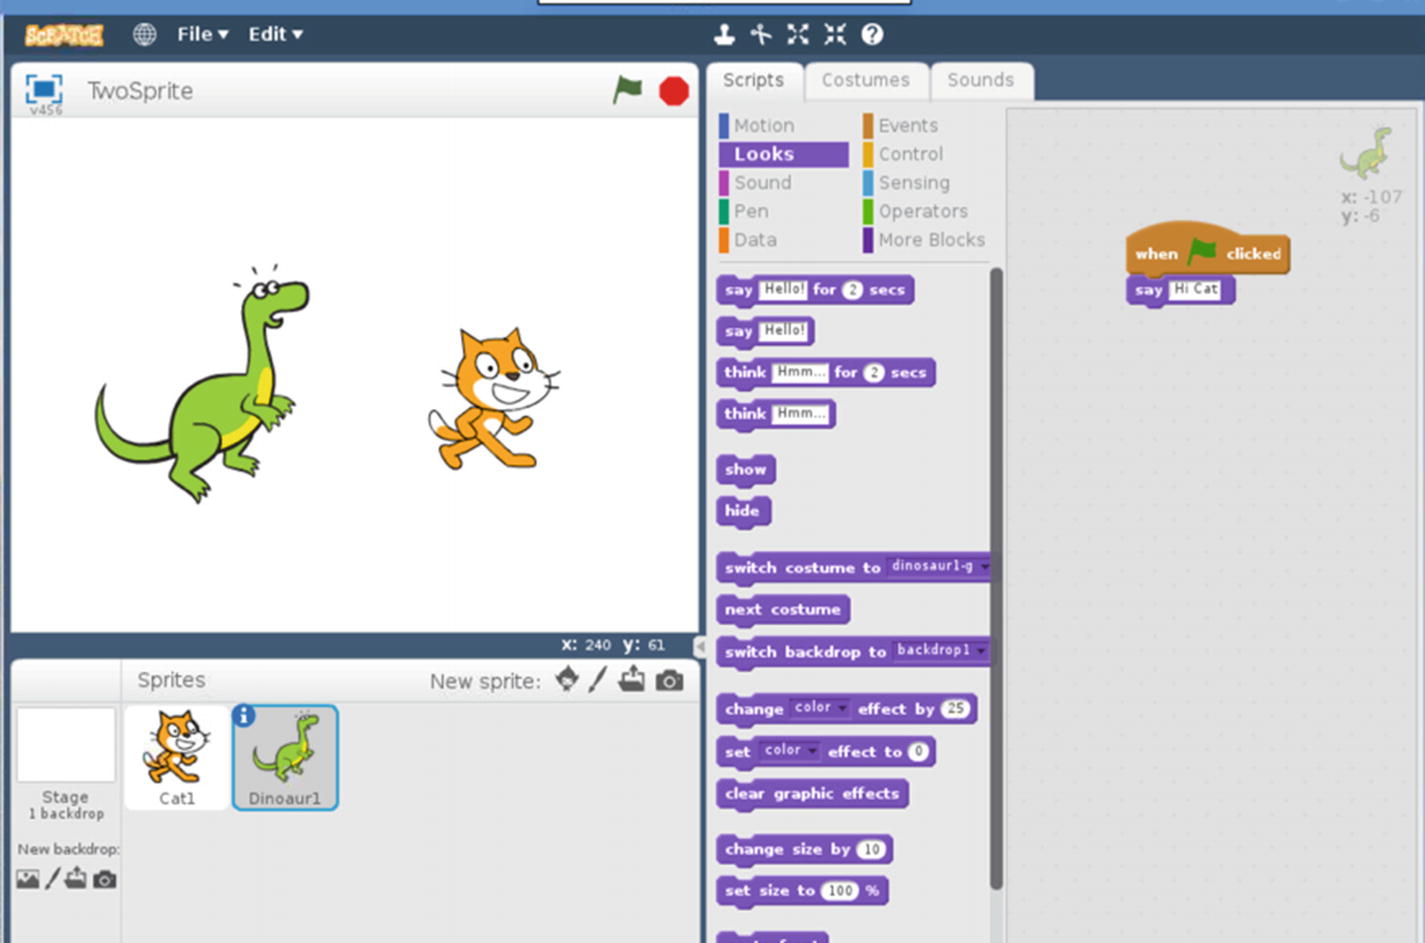
When you click a sprite on the bottom-left panel, you should see the Script Editor. This means each sprite has own Scratch program. For demo purposes, add the same scripts as the previous sprite script. You can see my script code for the second sprite in Figure 5-13.
Figure 5-13
Adding scriptsto the second sprite
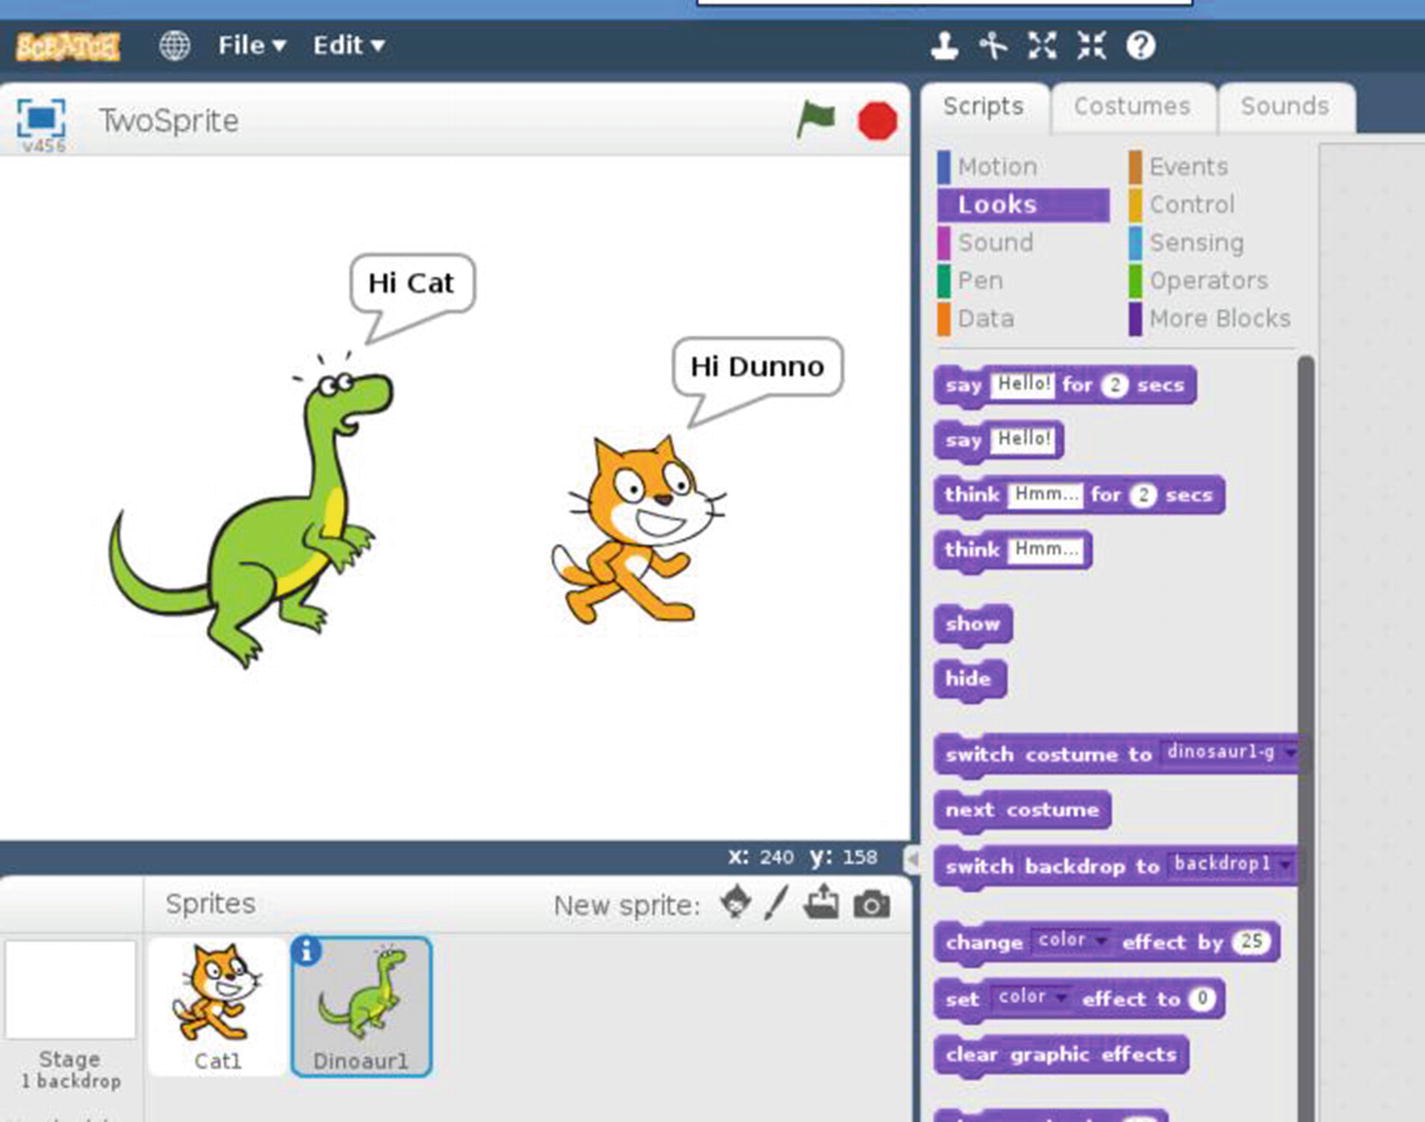
Now click the Green Flag icon to run this demo. You can see my demo in Figure 5-14.
Figure 5-14
Runninga Scratch program with two sprites
5.5 Working with the Background
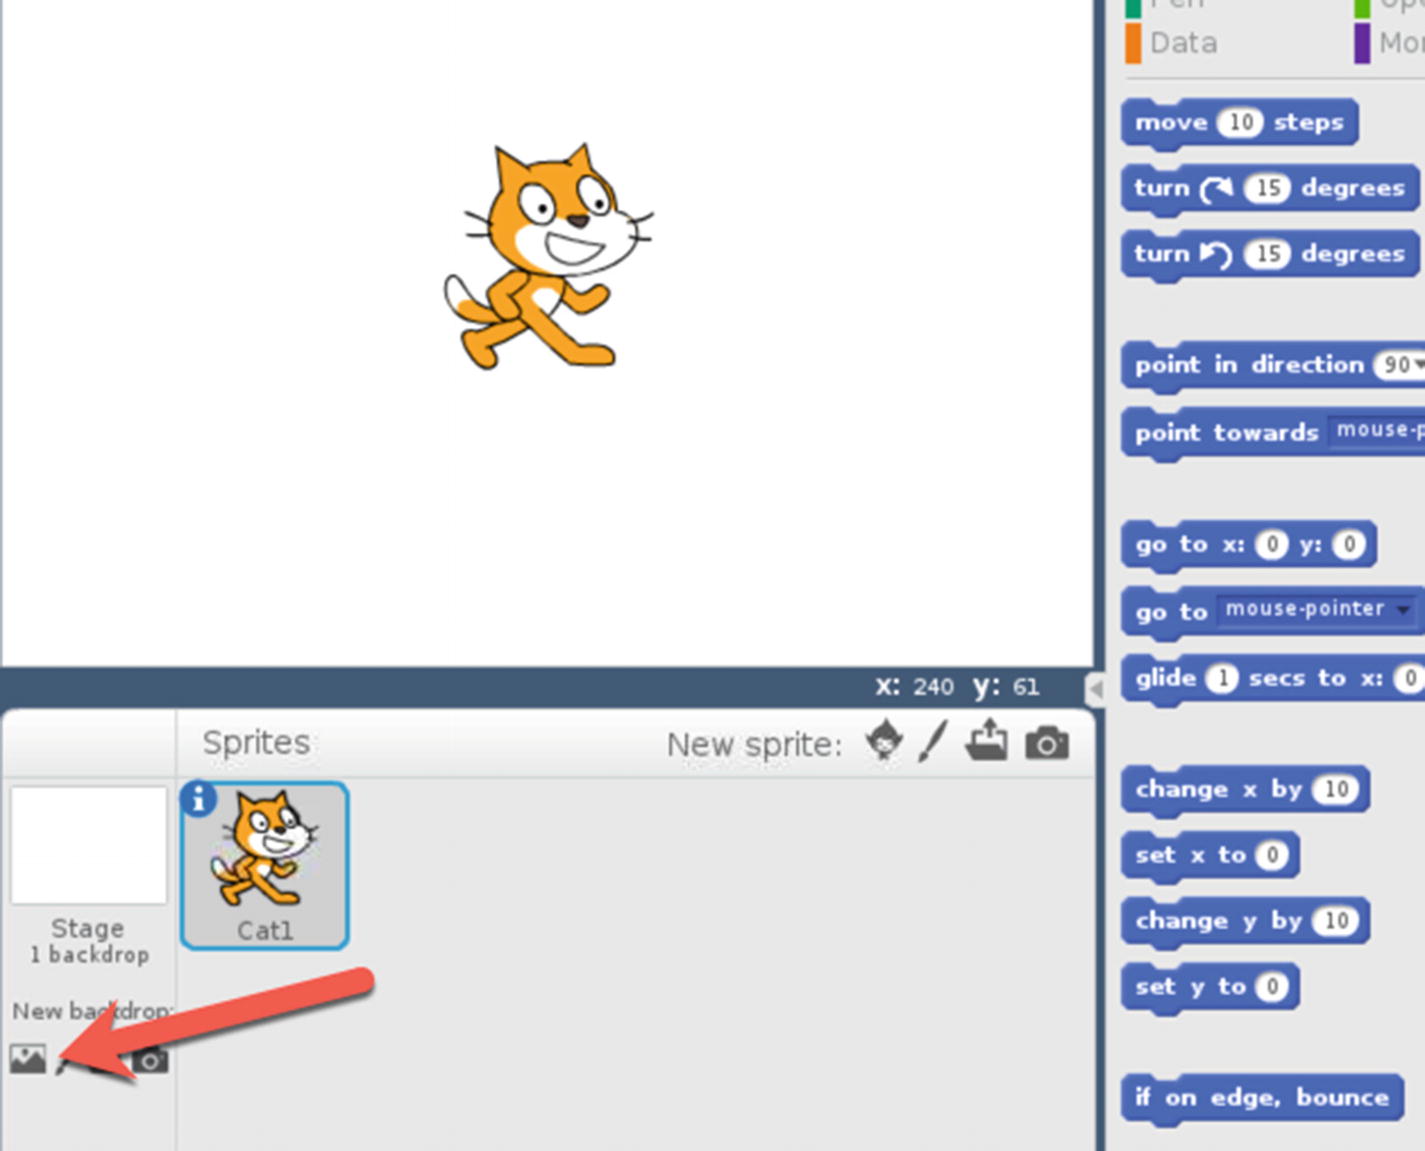
You also can change the Scratch program background. First, you need to add a background file by clicking the image icon. See the arrow in Figure 5-15.
Figure 5-15
Clicking the image icon
After it’s been clicked, you should get a dialog that displays a list of backgrounds. You can see this list in Figure 5-16.
Figure 5-16
A list of backgrounds for your Scratch programs
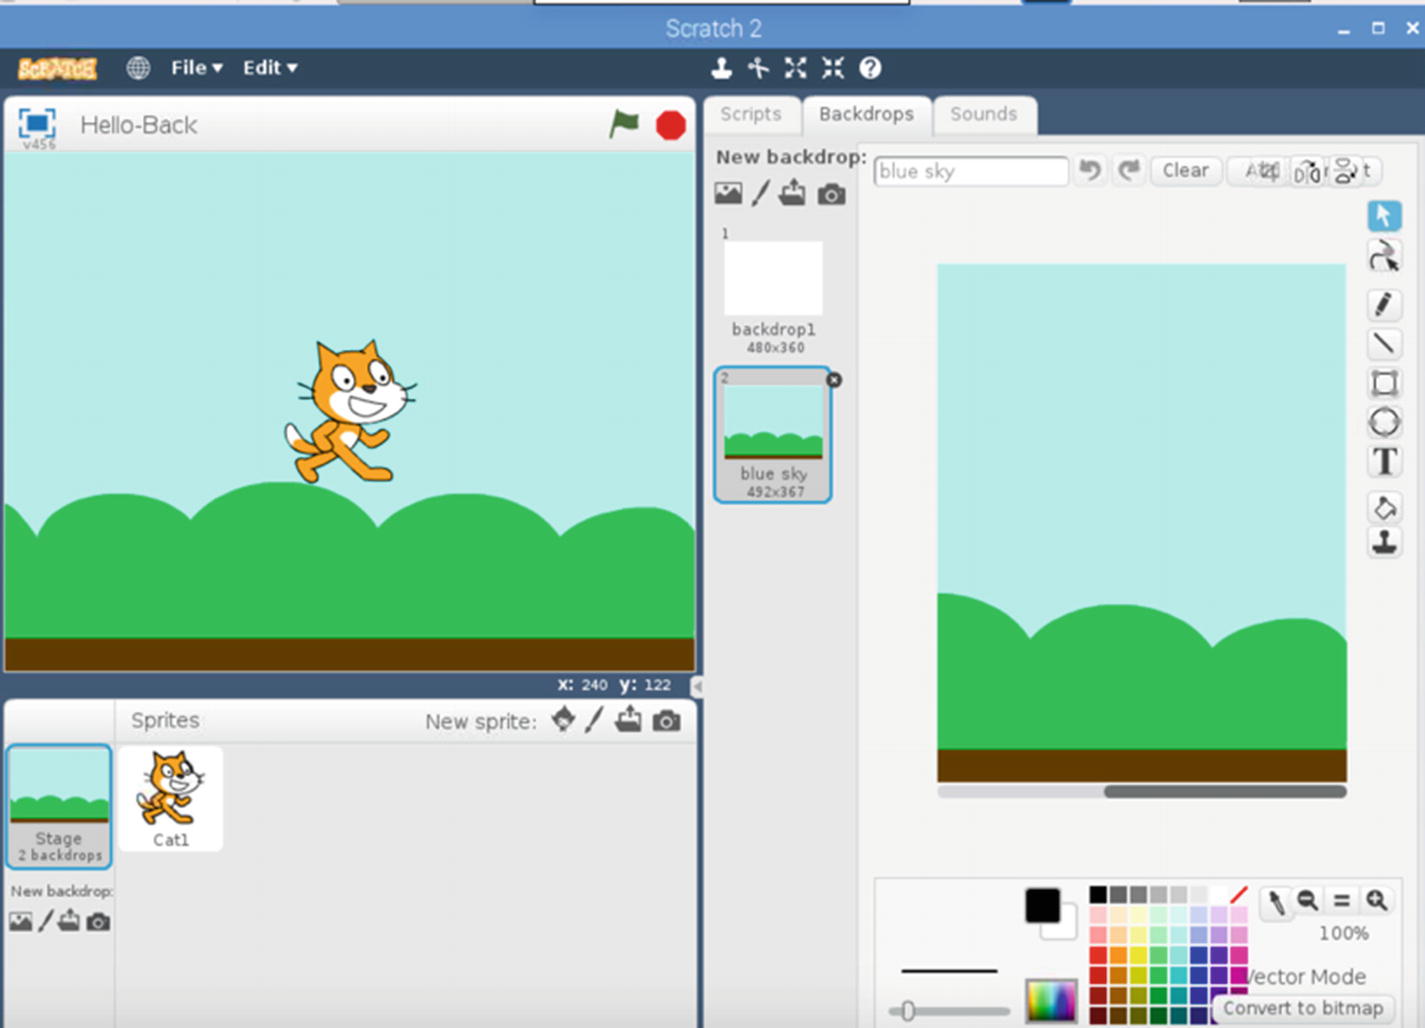
After you select a background, you should see that the current panel background changes, as shown in Figure 5-17.
Figure 5-17
A Scratch program with a custom background
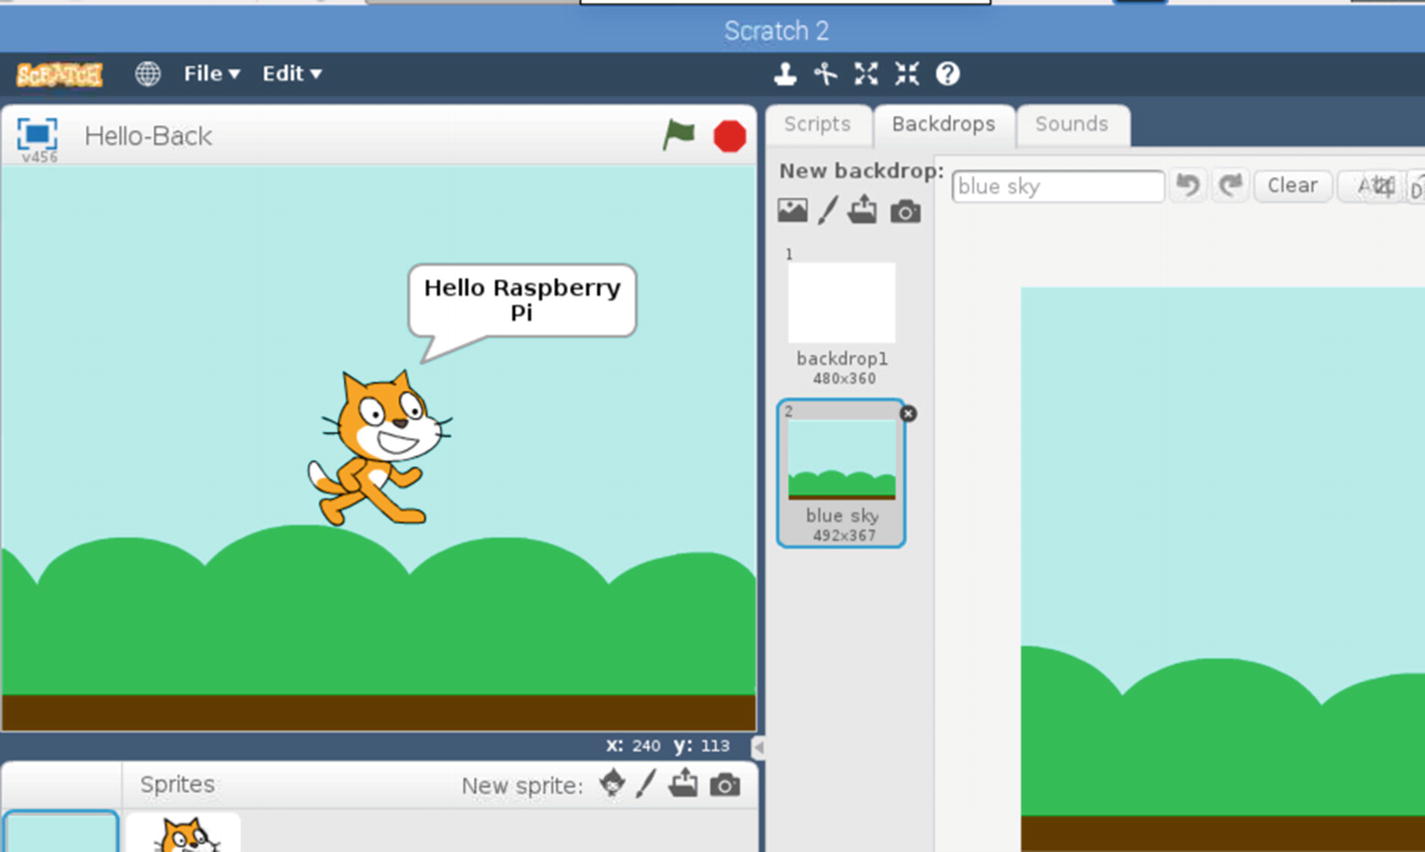
If you use the first demo Scratch program and try to run it, you should see the program output shown in Figure 5-18.
Figure 5-18
A hello Scratch program with a custom background
5.6 Working with Motion
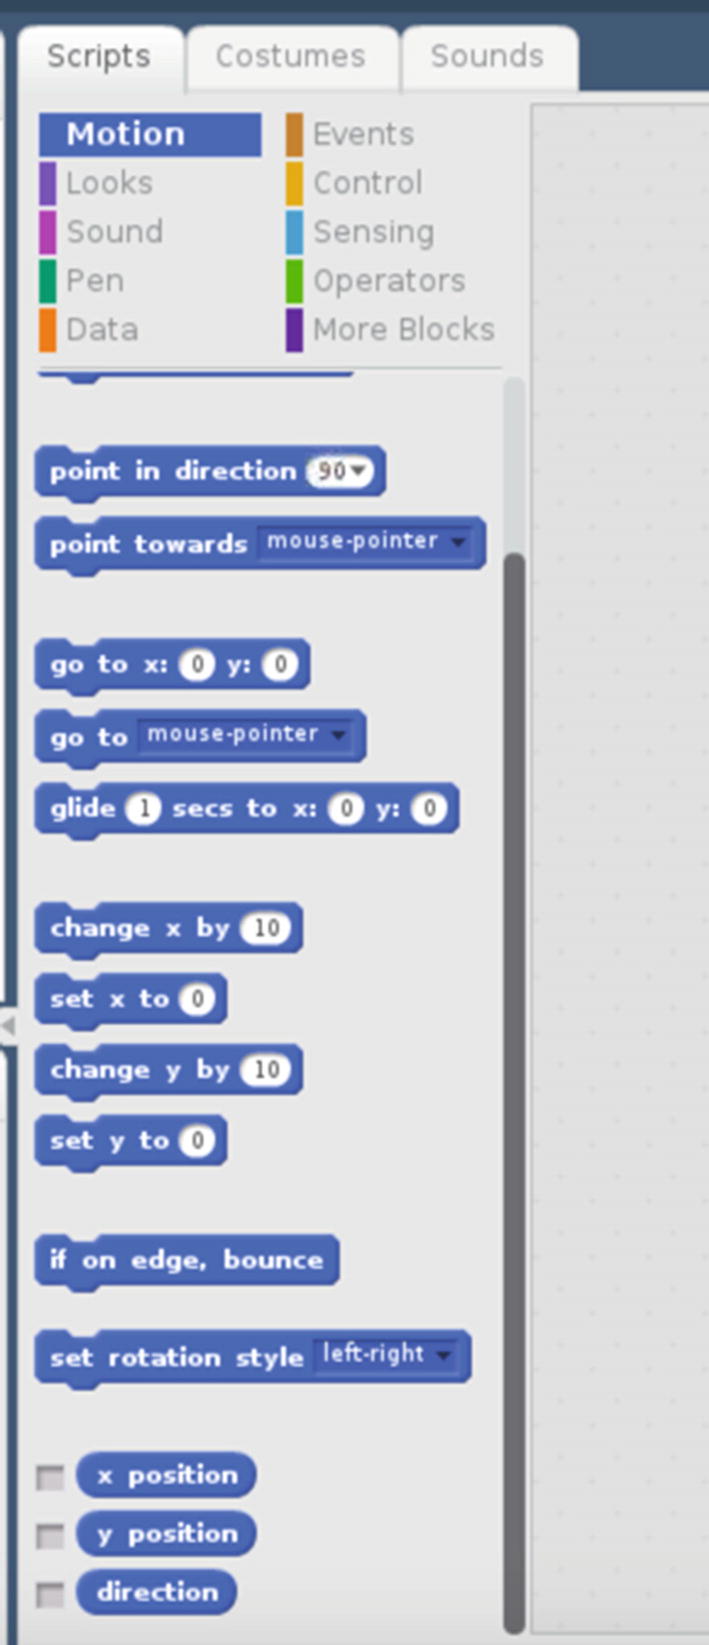
In this section, you learn to move your sprites using the Motion palette. You can see the Motion palette in Figure 5-19.
Figure 5-19
A list of blocks in the Motion palette
5.6.1 Coordinate System and Direction
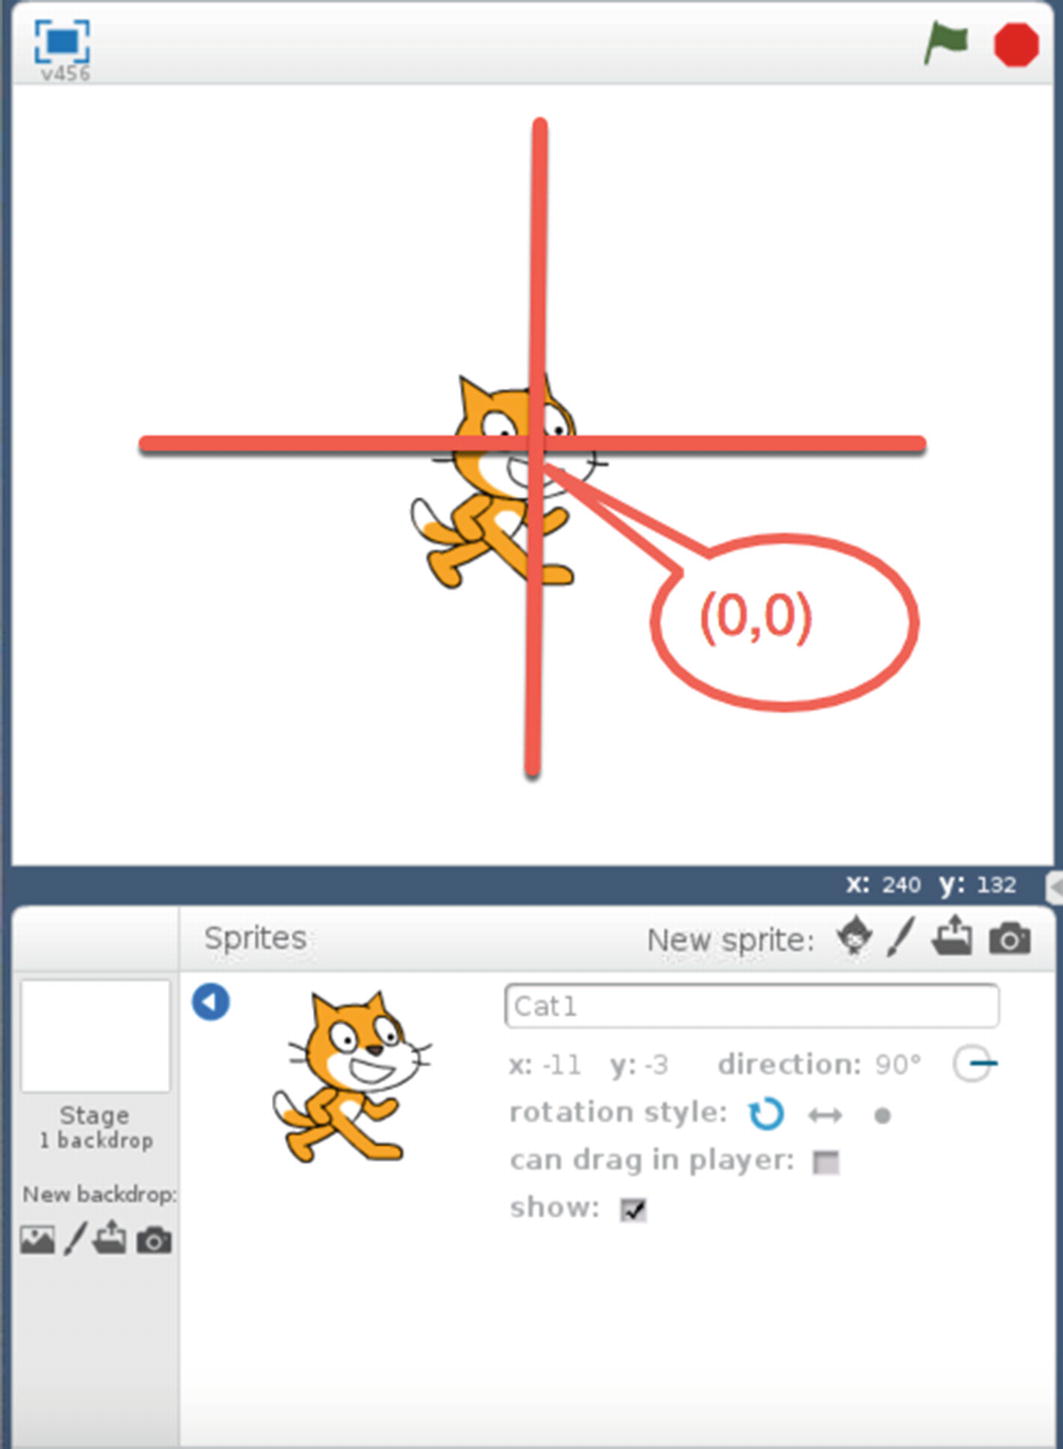
To move a sprite in a stage, you first need to understand how coordinate systems work on the stage. For instance, you can see a sprite in a stage, shown in Figure 5-20.
Figure 5-20
The coordinate system on Scratch
Point (0,0) is located on the middle of the stage. You can move this sprite using your mouse by clicking and holding the sprite. You can also get information about the sprite location, for instance, a sprite is located at x=0, y=0.
You can change the sprite direction by clicking and holding the sprite. Then move it using the mouse. Then, you can see the sprite direction output on the stage.
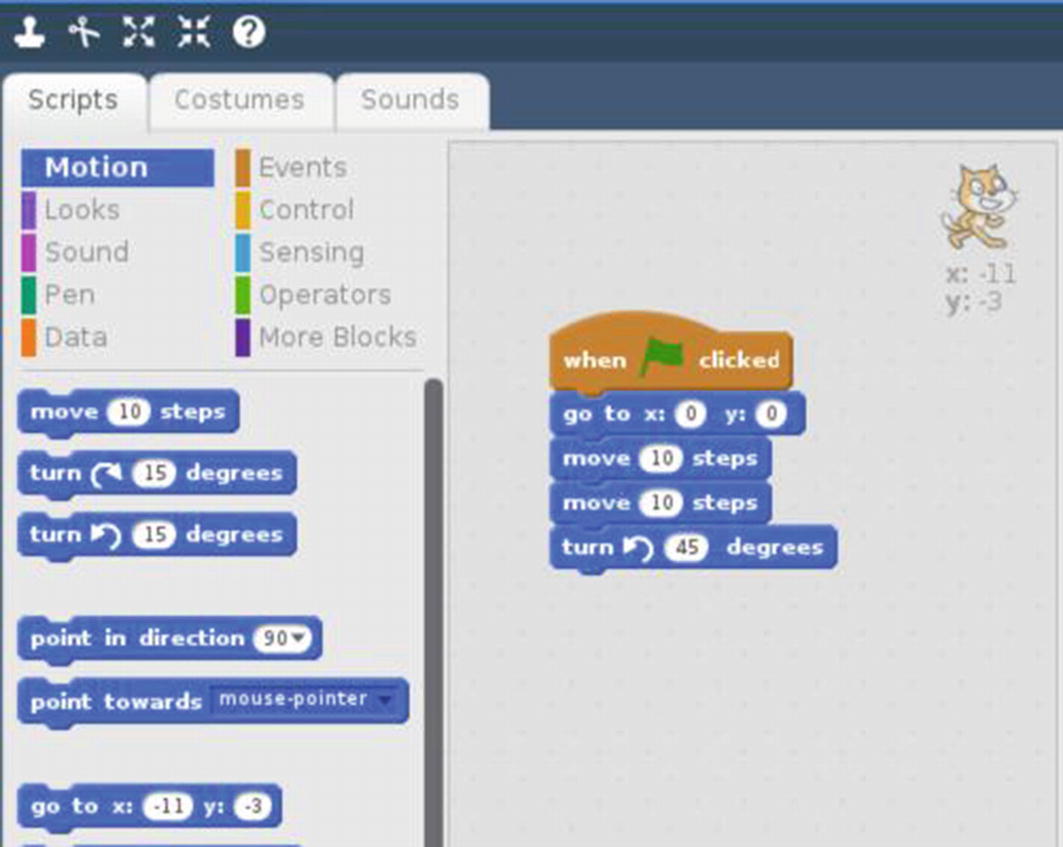
5.6.2 Demo 1: Movement
This demo shows you how to move a sprite on the stage. The following is our scenario:
A sprite starts on x=0, y=0
Move it 10 steps
Move it another 10 steps
Turn direction about 45 degrees
The program implementation can be seen in Figure 5-21.
Figure 5-21
Implementing a movement program
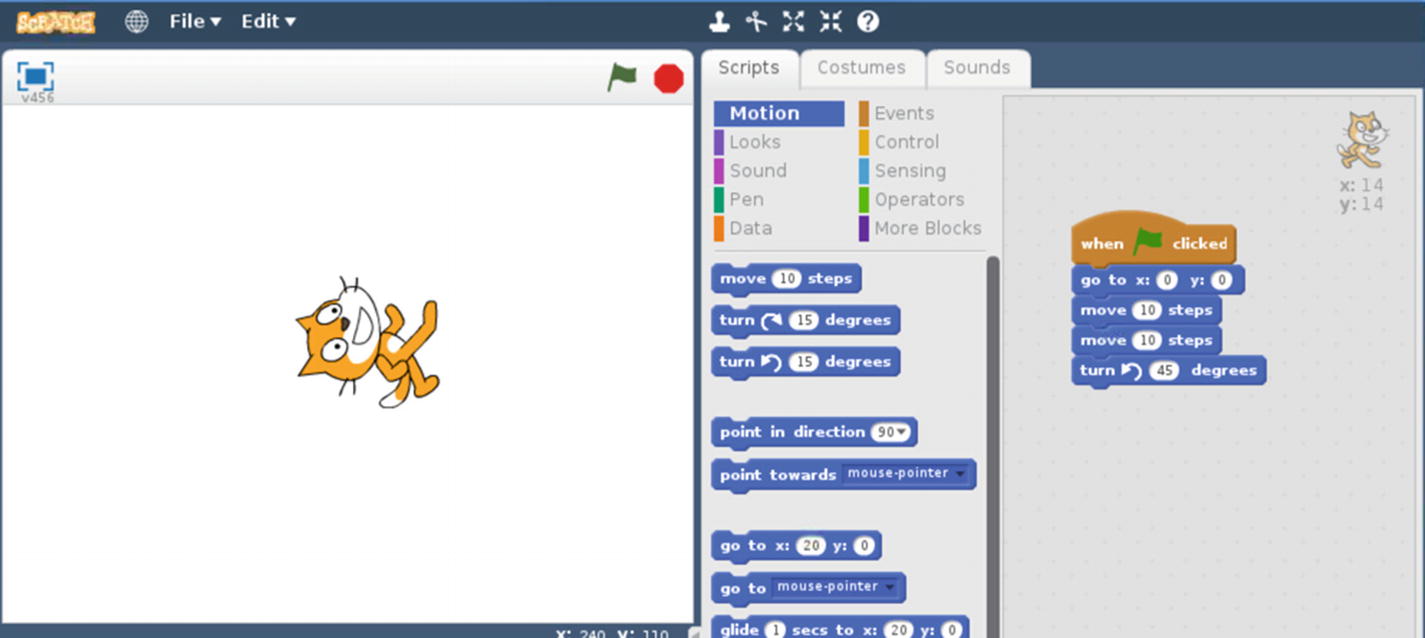
Save this program into a project file. To run it, you can simply click the Green Flag icon. You can see an example of the project output in Figure 5-22.
Figure 5-22
Running the Scratch application
5.6.3 Demo 2: Direction
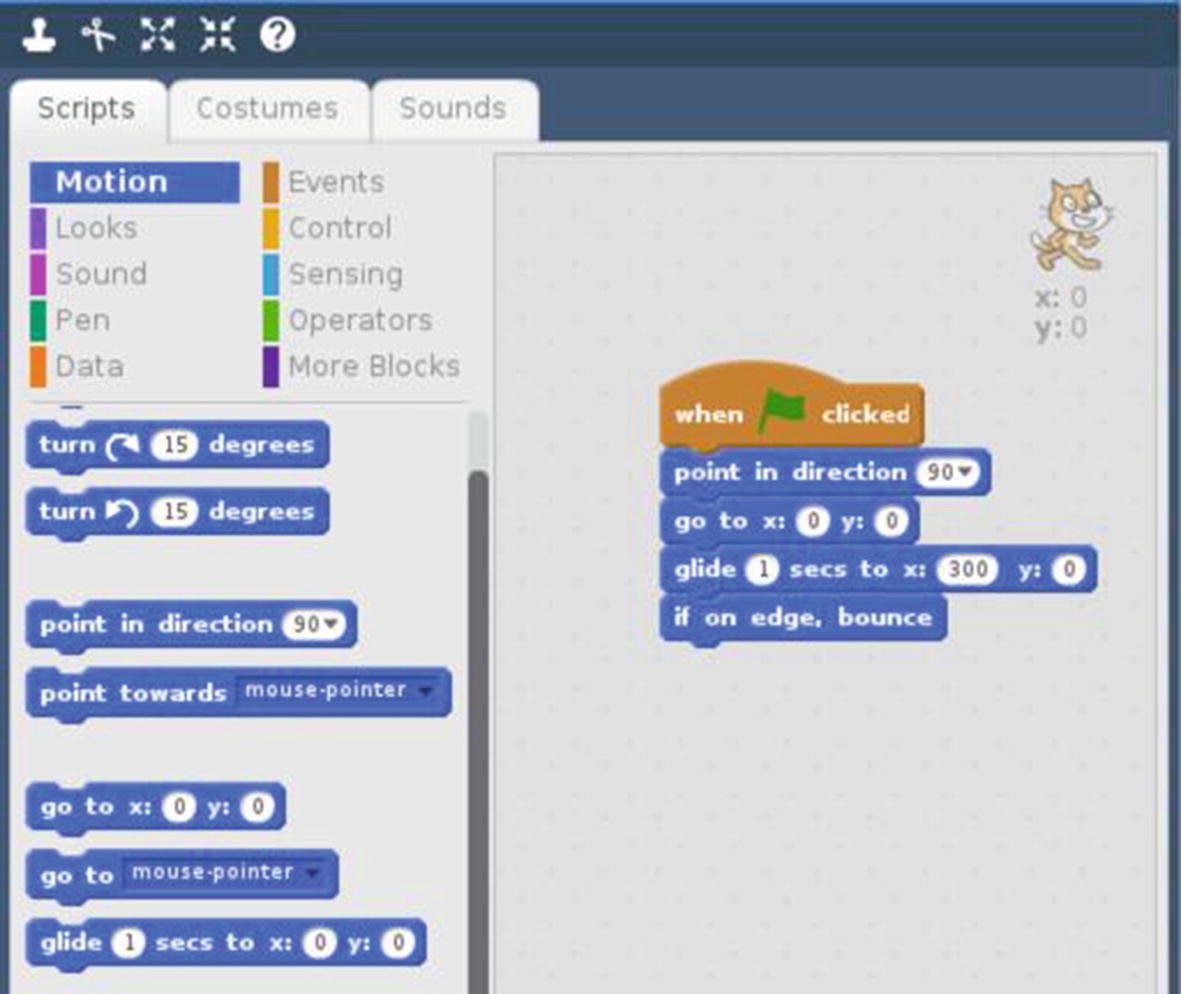
The second demo builds a program for changing the sprite’s direction. Our scenario is defined as follows:
Change the sprite’s direction 90 degrees
Move the sprite from x=0, y=0
Glide the sprite to x=300, y=0
Add a conditional whereby, if the sprite is on an edge position, it will bounce
For implementation, you can build the program shown in Figure 5-23.
Figure 5-23
Scratch program for demo 2
Save this program into a project file. To run it, click the Green Flag icon. See Figure 5-24.
Figure 5-24
Running a Scratch program for direction
5.7 Working with Control Blocks
You can see many different items on the Control palette. Technically, these items consist of decision and looping actions. In this chapter, we explore how to build Scratch programs using the decision and looping actions.
5.7.1 Building a Decision
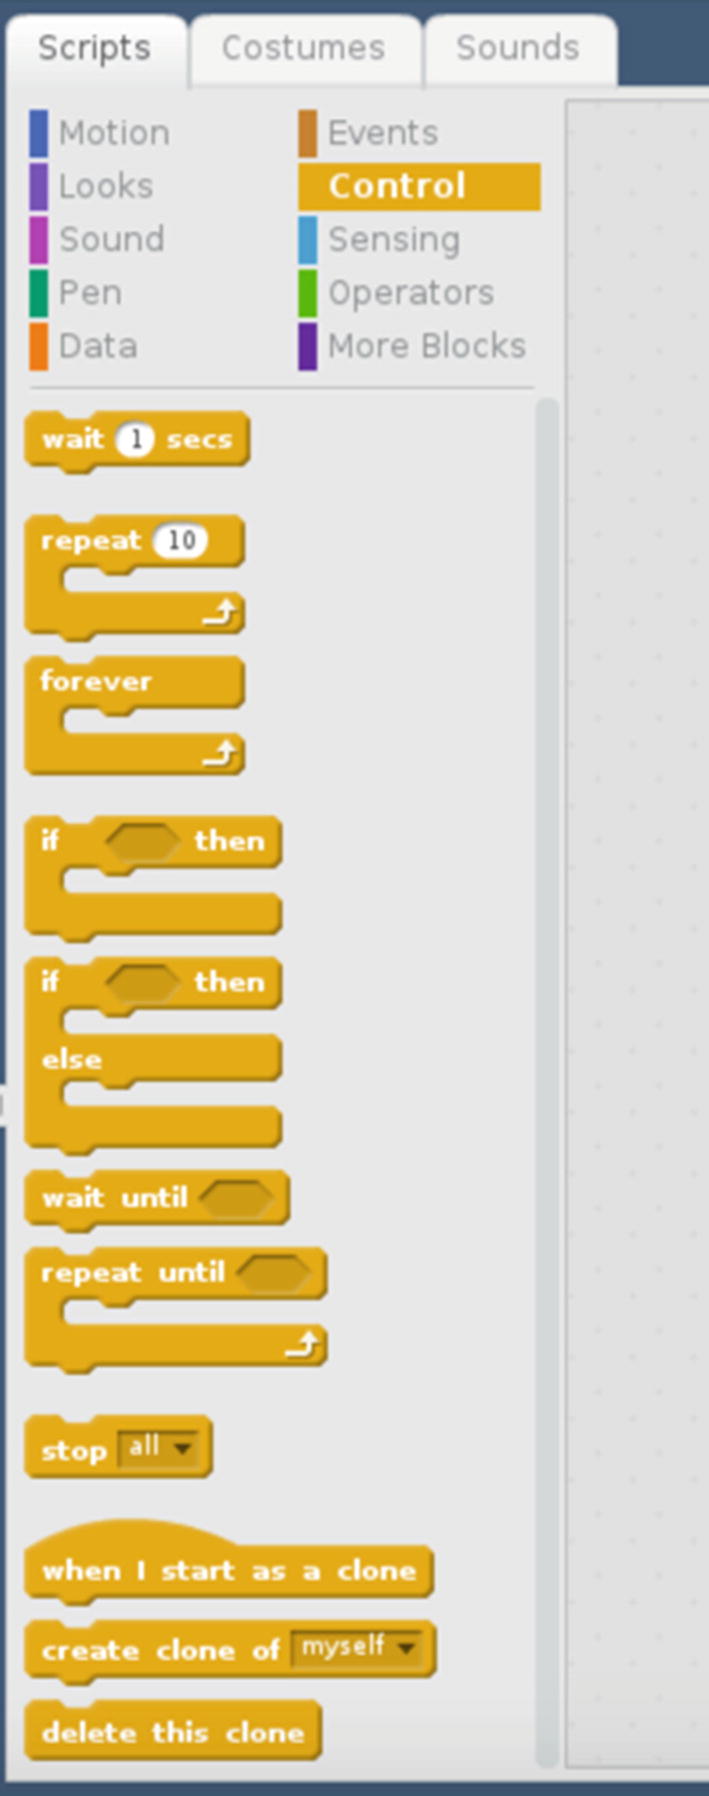
To build a decision, you can use if..else command, which is located on the Control palette. You can see a list of blocks on the Control palette in Figure 5-25.
For demo purposes, we build a Scratch app with the following features:
Define two variables, numA and numB
Set a random value for numA and numB
Check and compare numA and numB
Figure 5-25
Blocks on the Control palette
To implement the program, you can follow these instructions.
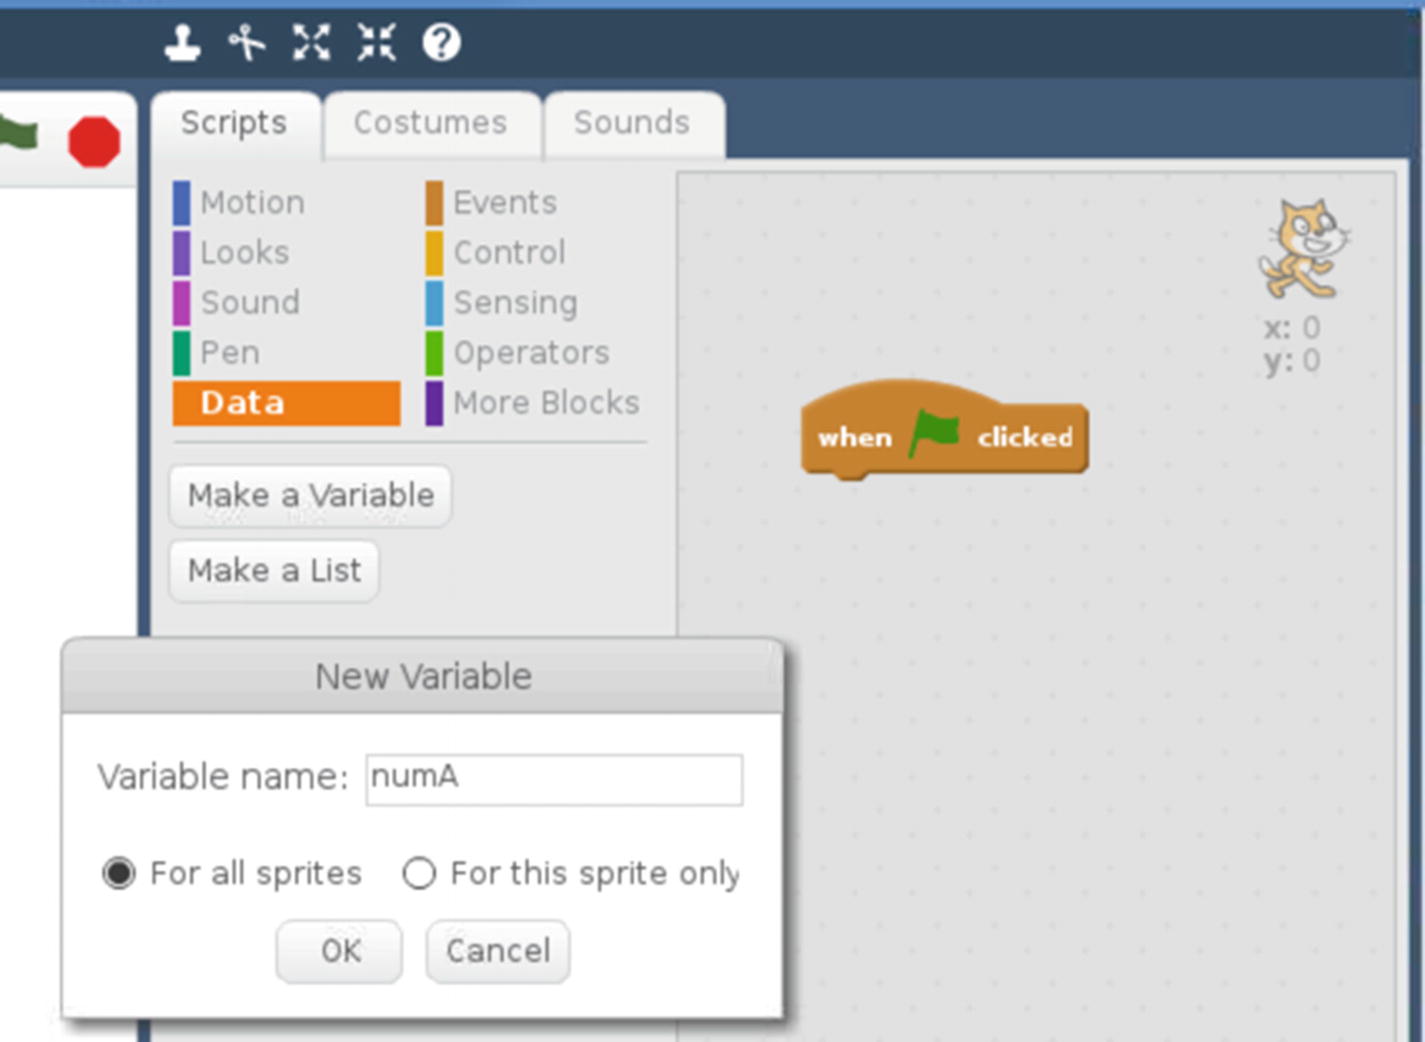
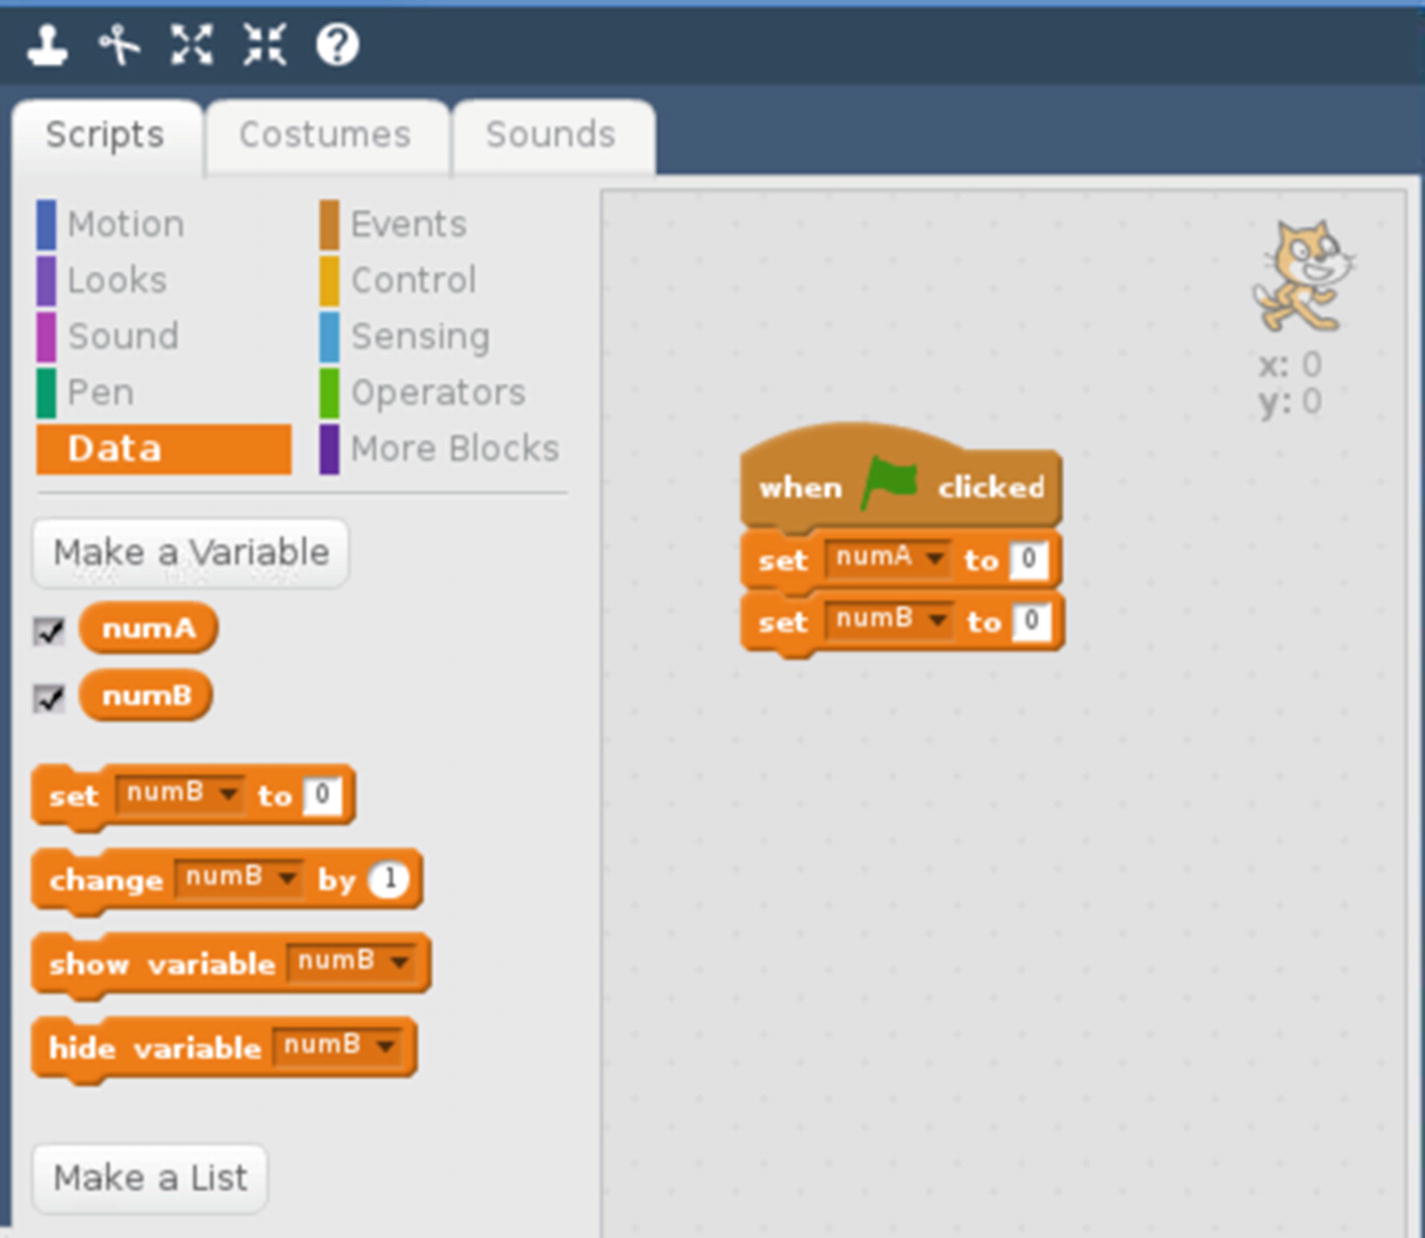
First, drag the When “Green Flag” Clicked block to the Script Editor. Next, you need to define the variables, called numA and numB, which can be found on the Data blocks. See Figure 5-26.
Figure 5-26
Defining the variables
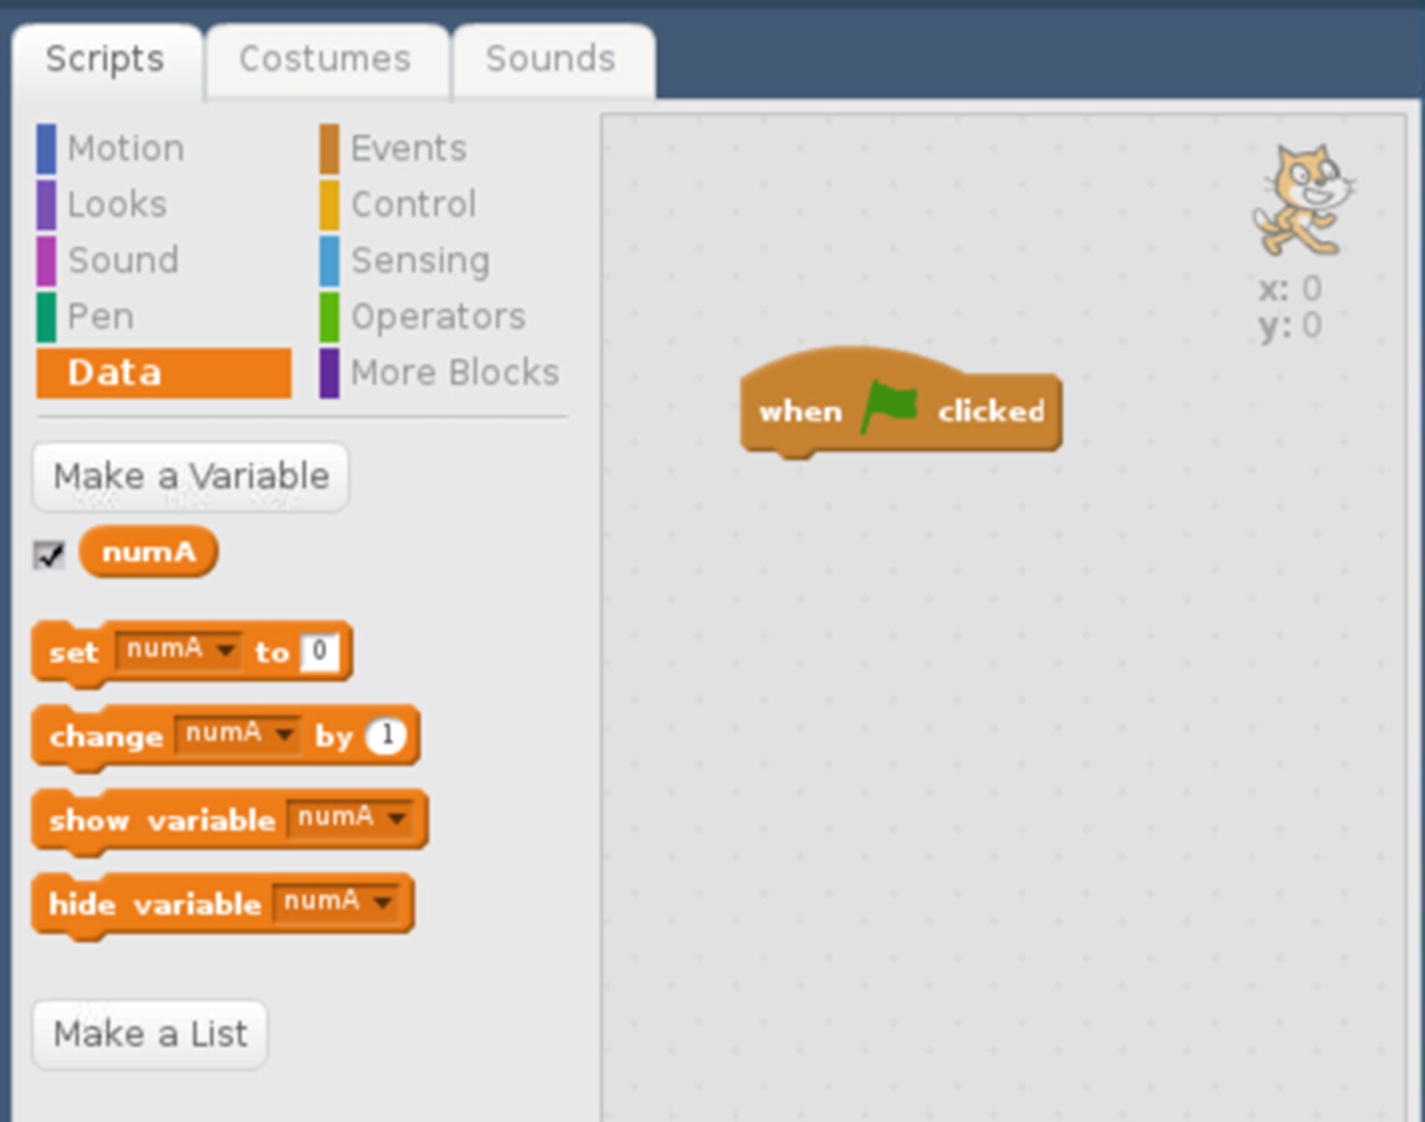
When you’re done, you can see your two variables. You can also see blocks related to your variables in Figure 5-27.
Figure 5-27
Adding data blocks
Drag two Set Variable To blocks onto the Script Editor, as shown in Figure 5-28.
Figure 5-28
Putting variables on the editor
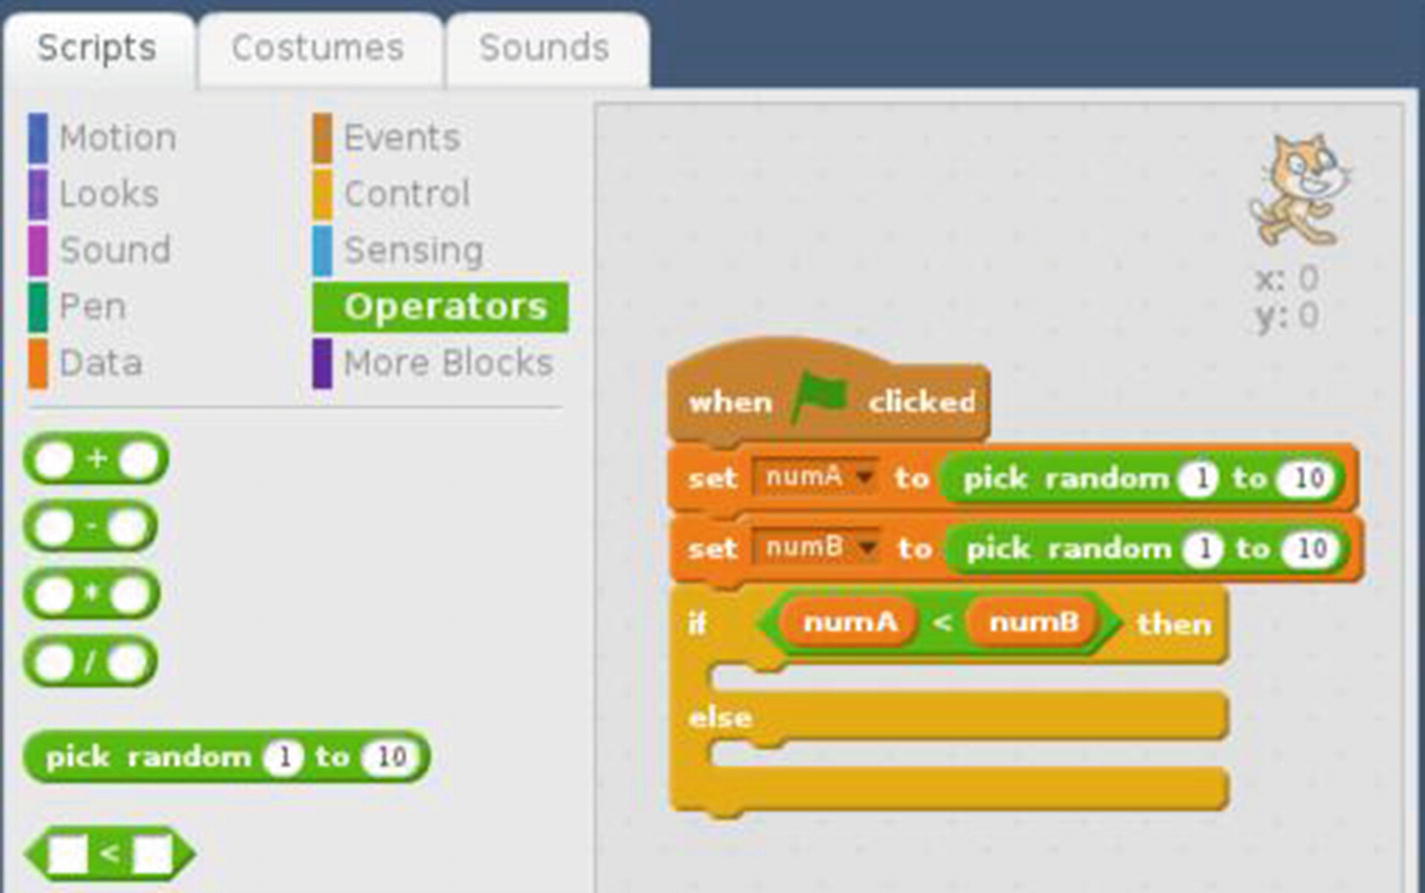
Replace the variable values, numA and numB, with the Pick Random 1 To 10 block from the Operators category. See Figure 5-29.
Figure 5-29
Setting random variables
After that, you can drag the if..else block from the Control palette. For conditional values on the if..else command, you use comparison operators. Drag the x < y comparison block from the Operators palette. Assign if-conditional to the numA and numB variables. The resulting form can be seen in Figure 5-30.
Figure 5-30
Adding an if-else block
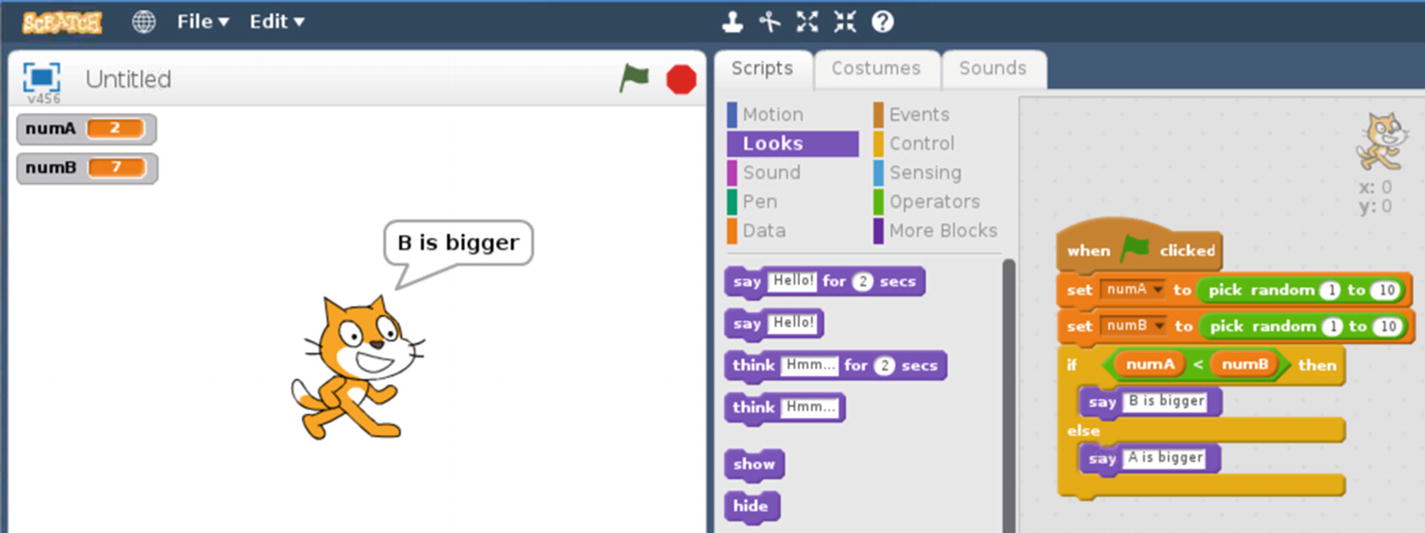
Now add Say “B is bigger” and “A is bigger” to the responses for the if..else command. As an example, you can see my script form in Figure 5-31.
Figure 5-31
Adding an if-else block
Save this program into a project file. Run this program by clicking the Green Flag icon. Figure 5-32 shows the result.
Figure 5-32
RunningScratch program with if-else block
5.7.2 Looping
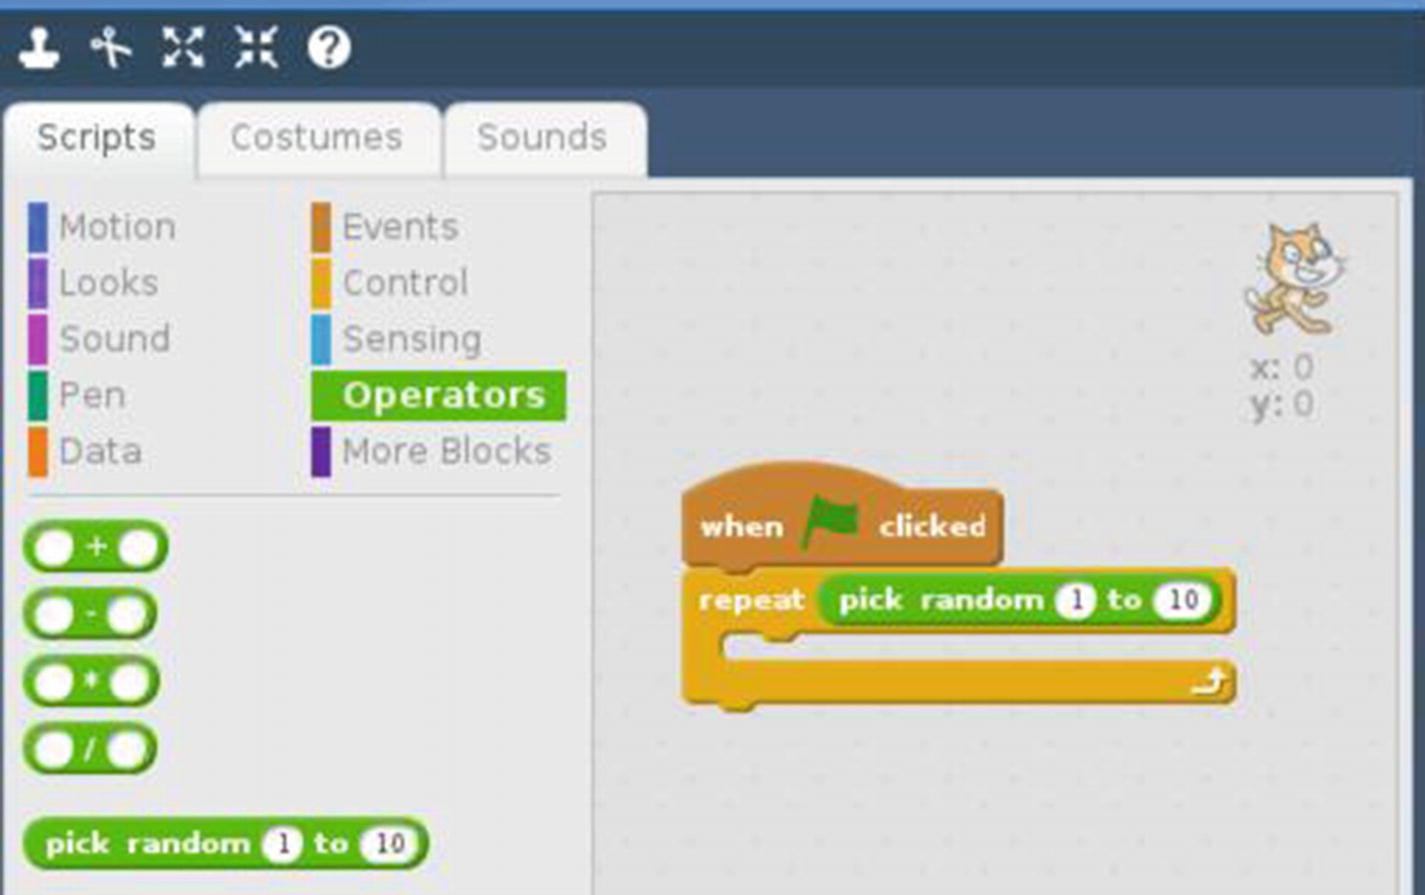
There are many options for building a Scratch program using looping. You can see them in Figure 5-33.
Figure 5-33
Putting the Repeat block into the script
For demo purposes, you’ll build a program that loops a random value. First, drag the When “Green Flag” Clicked block from the Events palette. Then, drag the Repeat 10 block from the Control palette. The resulting form is shown in Figure 5-33.
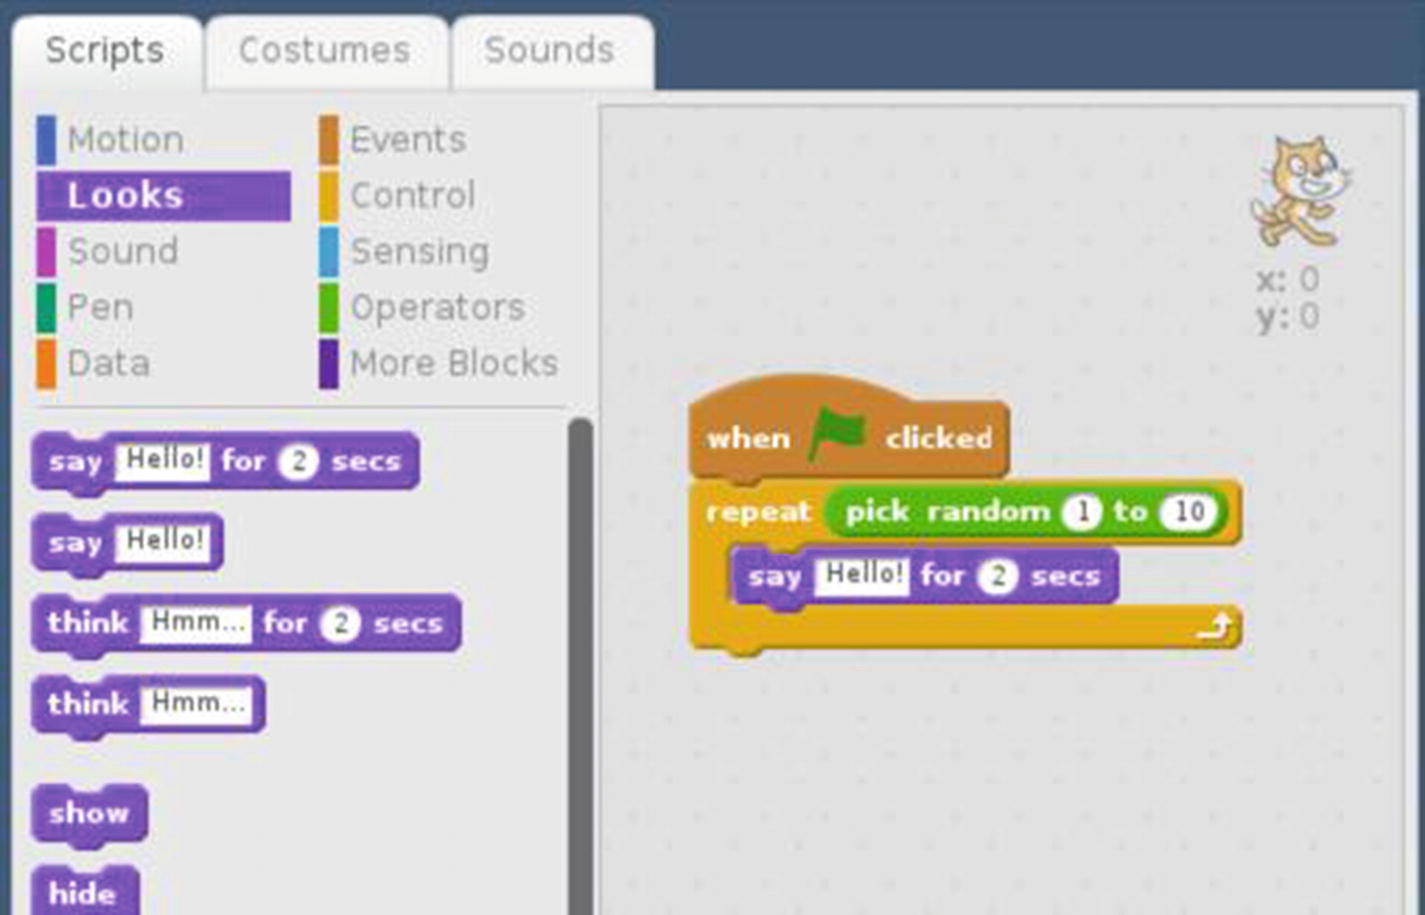
Change the 10 value using the Pick Random 1 to 10 block from the Operators palette. Last, you can drag the Say Hello! for 2 Secs block inside of the Repeat Command block. You can see the resulting script in Figure 5-34.
Figure 5-34
Final Scratch program for looping
Save this program into a project file.
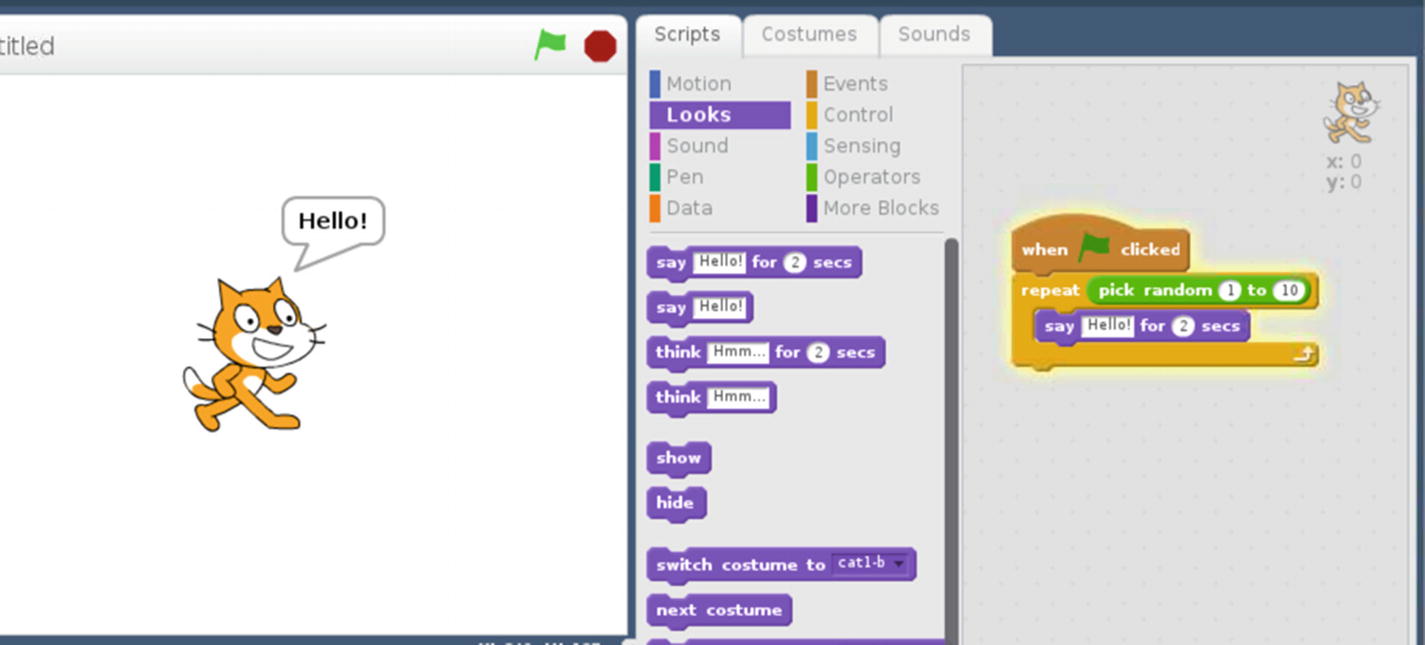
Now you can run the program by clicking the Green Flag icon. The program will display Hello! x times (x is a random value from 1 to 10). You can see my running program in Figure 5-35.
Figure 5-35
Running the looping program in Scratch
What’s next?
It’s a good idea to practice more with the various script blocks in Scratch. You also can see project examples that people have uploaded onto the Scratch website at https://scratch.mit.edu.
5.8 Summary
In this chapter, you learned how to work with the Scratch application to develop programs visually. The chapter reviewed several blocks—such as sprites, backgrounds, motions, and control blocks—and you were able to run many examples for practice. Visit the official website, https://scratch.mit.edu, to get inspired and to develop your own Scratch programs.