Raspberry Pi is a development board that can be applied to build IoT applications. Various sensors and actuator devices can be attached to the board. In this chapter, we explore Raspberry Pi and cover its models. We also learn how to set up the board for the first time.
Learn about the Raspberry Pi
Review the Raspberry Pi models
Learn about the Raspbian OS
Set up Raspbian OS on a Raspberry Pi board
Perform headless Raspbian SSH network setup
Configure a WiFi network
Explore the Raspbian OS desktop
Configure the VNC server
Learn to power off the Raspbian
1.1 What Is Raspberry Pi?
Raspberry Pi is a mini computer that you can operate as a normal computer. This board was developed by Raspberry Pi Foundation in the UK. Currently, Raspberry Pi runs on the top of an ARM processor. Raspberry Pi is not a PC, so we couldn’t expect more in computation. Raspberry Pi is designed to be small in size to perform some processes. The small form size of the Raspberry Pi form has advantages. We can put sensor and actuator devices on the Raspberry Pi board and then perform measurement and sensing.

Raspberry Pi 3 B+ board
The Raspberry Pi board usually exposes GPIO pins, to which we can attach sensors or actuator devices. Some Raspberry Pi models also provide network stacks such as Ethernet, WiFi, and Bluetooth. Raspberry Pi can also be connected to monitor through an HDMI connector.
Various operating systems can be applied to Raspberry Pi boards. A list of supported operating systems for Raspberry Pi can be found at this site: https://www.raspberrypi.org/downloads/ . Raspbian OS is the official operating system of the Raspberry Pi. This book focuses on Raspbian OS for implementation and evaluation.
1.2 Reviewing the Raspberry Pi Board Models
There are several Raspberry Pi models that we can use to perform specific purposes. The latest model as I am writing this book is Raspberry Pi 3 Model B+. This board consists of Broadcom BCM2837B0, Cortex-A53 (ARMv8) 64-bit SoC @ 1.4GHz, with 1GB LPDDR2 SDRAM. The board also provides Ethernet, WiFi, and Bluetooth 4.2 (BLE). You can see the Raspberry Pi 3 Model B+ board in Figure 1-1. For further information about Raspberry Pi 3 Model B+, see https://www.raspberrypi.org/products/raspberry-pi-3-model-b-plus/ .

Raspberry Pi Zero Wireless board
Raspberry Pi Model Comparison
Raspberry Pi Model | Processor | RAM | Network Modules |
|---|---|---|---|
Raspberry Pi 3 B+ | Broadcom BCM2837B0 | 1GB | Ethernet, WiFi, BLE |
Raspberry Pi Zero Wireless | Broadcom BCM2835 | 512MB | WiFi |
Raspberry Pi 3 | Broadcom BCM2837 | 1GB | Ethernet, WiFi, BLE |
Raspberry Pi Zero | Broadcom BCM2835 | 512MB | - |
Raspberry Pi 2 | Broadcom BCM2836 | 1GB | Ethernet |
Raspberry Pi A+ | Broadcom BCM2835 | 256MB | - |
Raspberry Pi B | Broadcom BCM2835 | 512MB | Ethernet |
Technically, all the Raspberry Pi models that are shown in Table 1-1 are designed for personal makers and hobbyists. There are limited GPIO pins on each Raspberry Pi model. If you need more GPIO pins on the board, you can extend it using GPIO extender modules. The Raspberry Pi Foundation also released the Raspberry Pi model for industry purposes. It is called the Raspberry Pi Compute Module. Currently, the latest model is Raspberry Pi Compute Module V3.
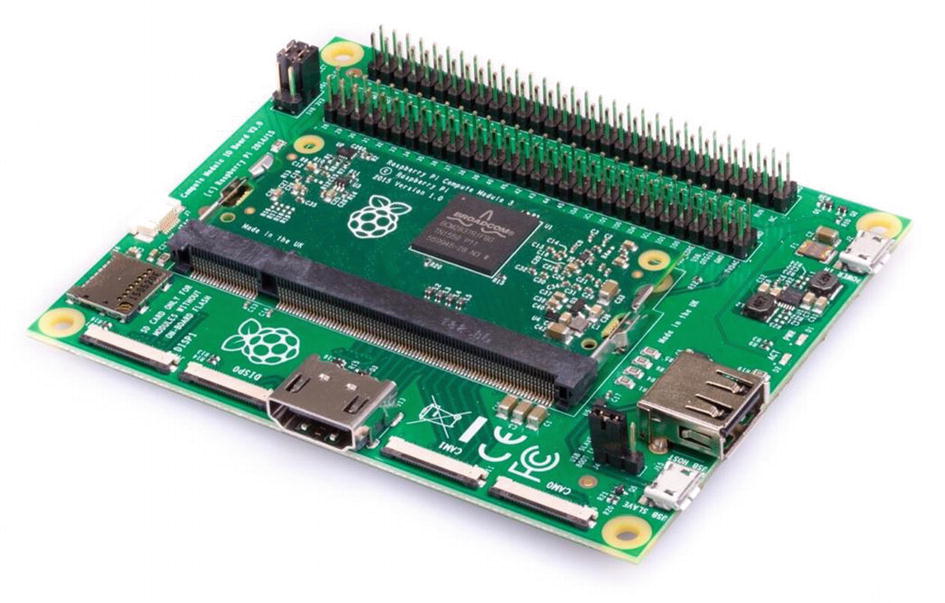
Raspberry Pi Compute Module v3
1.3 Introducing the Raspbian OS
Raspbian is an operating system-based Debian optimized for the Raspberry Pi hardware. When the Raspberry Pi board is released, Raspbian OS becomes the official OS for Raspberry Pi boards. Raspbian OS is an open source operating system that was initiated by Mike Thompson and Peter Green. The official Raspbian project can be found on this site: https://www.raspbian.org /.
If you have experience using Debian and Ubuntu Linux, you should be familiar with Raspbian OS since this OS is built based on Debian Linux and optimized on a Raspberry Pi board with ARMv6 CPU.

Download the Raspbian OS image
Next, I show you how to set up Raspbian OS on the Raspberry Pi 3 board.
1.4 Setting Up Raspbian OS on Raspberry Pi Boards
The Raspberry Pi models don’t have internal storage unless you’re using the Raspberry Pi Compute Module. You should attach external storage, such as an SD card or a microSD card. The new Raspberry Pi board model uses microSD for external storage.
I recommended that you use a microSD card that’s 16GB. You can install some libraries, frameworks, and tools for your personal and business needs. In this section, I’m going to show you how to set up Raspbian OS on a Raspberry Pi 3 board.

Etcher application
The Etcher application is easy to use. You can just select your Raspbian image and target the drive of the microSD card on your computer. Some computers don’t have microSD card readers, so you need an SDcard reader. Then put your microSD card into the reader.
After completing the flashing Raspbian step, you can plug your keyboard, mouse, and monitor into the Raspberry Pi board.
Details about Raspbian installation on the Raspberry Pi board can be found in the official guideline manual at https://www.raspberrypi.org/documentation/installation/installing-images/README.md .
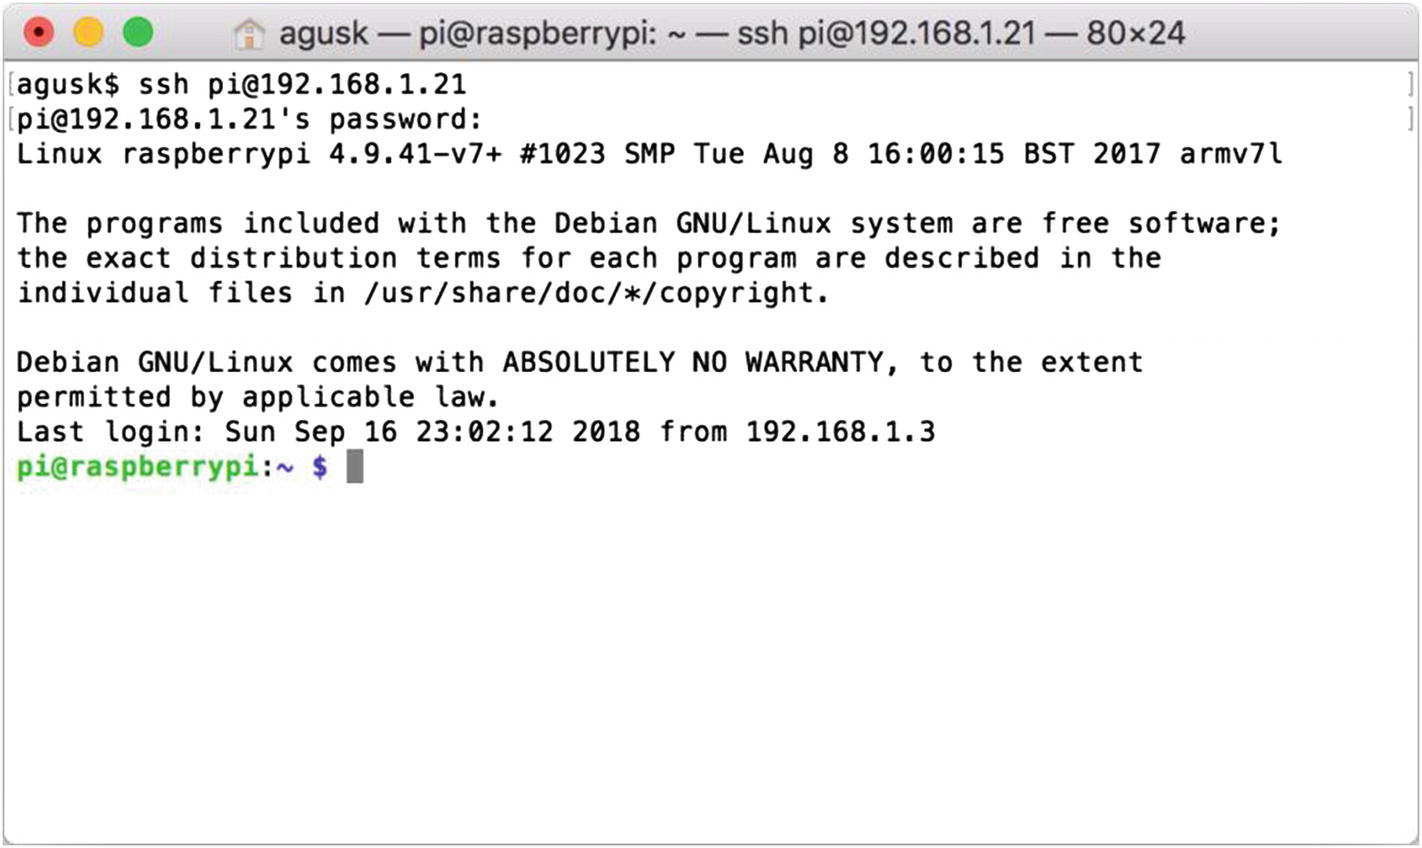
1.5 Headless Raspbian SSH Network Setup
Sometimes you won’t want to use a keyboard or monitor to manage the Raspbian network. We can perform a headless Raspbian network in this case. In this scenario, the Raspberry Pi board will be connected to a network via Ethernet. You’ll want to enable an SSH service on the Raspberry Pi without configuring your keyboard and monitor.
First, load your Raspbian microSD card into your computer. You should see a Raspbian drive. Now you want to enable SSH on Raspbian. You can create a file, called ssh without a file extension, with blank content. Put this file into the Raspbian drive. You can see it in Figure 1-6.

Adding an ssh file into Raspbian disk
Connecting to Raspbian via SSH
1.6 Expanding Storage
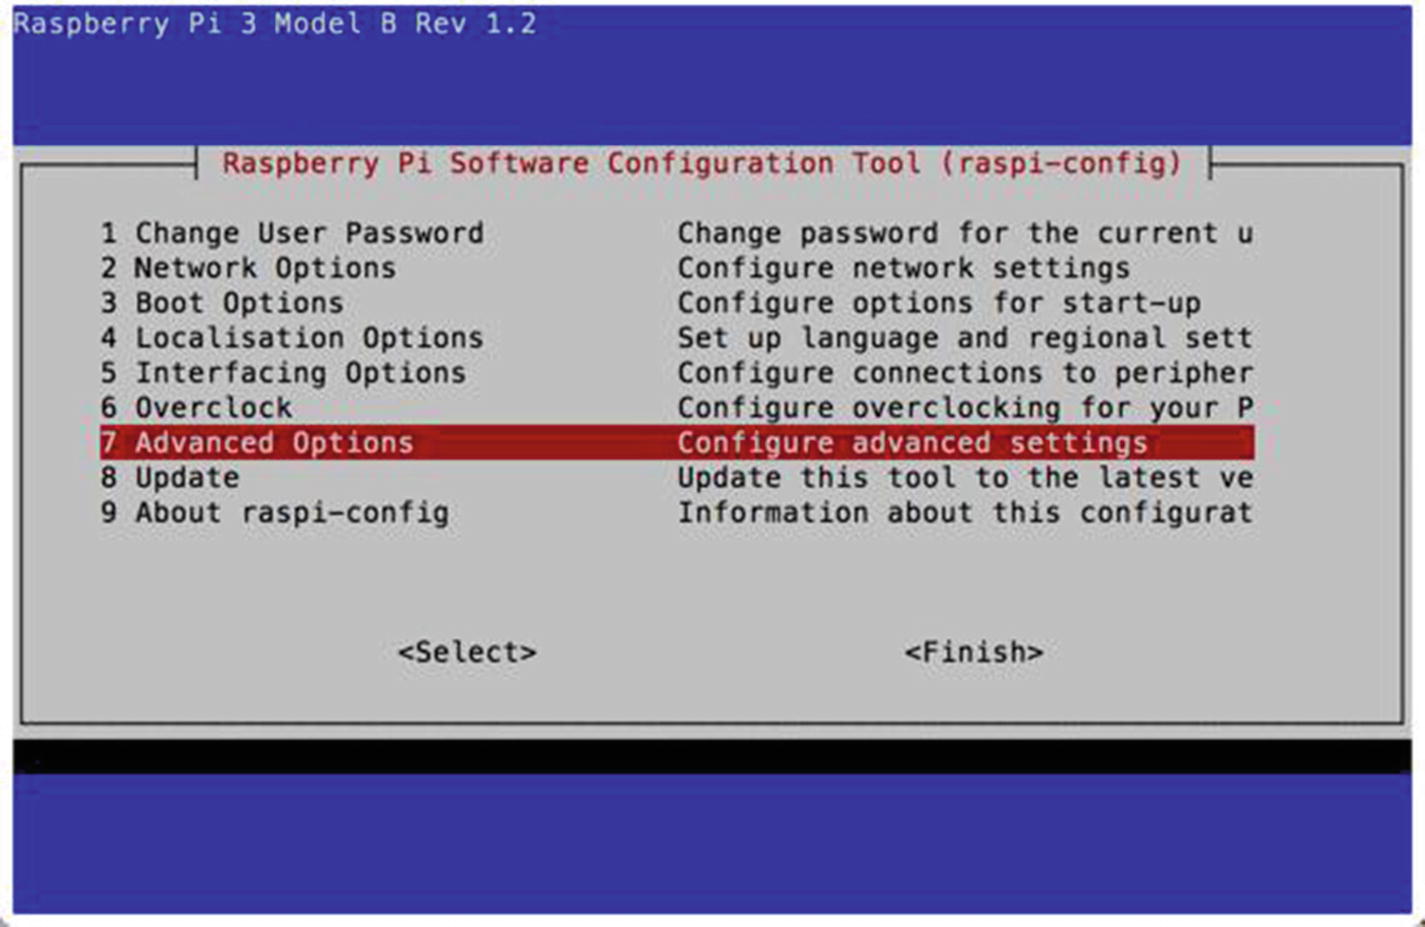
Select Advanced Options
From the main menu (see Figure 1-8), you can select the Advanced Options menu. Then, you should see the form that is shown in Figure 1-9.

Expand the filesystem
1.7 Configuring a WiFi Network

Connect to existing WiFi
After you select one of the WiFi SSIDs, you probably will be asked for the SSID pin. Fill in the SSID pin and then your Raspbian will connect to the network.
1.8 Exploring the Raspbian OS Desktop and Terminal

Raspbian Scratch OS desktop on Raspberry Pi 3

Main menu on Raspbian desktop OS

Opening a browser for Internet access
1.9 Configuring the VNC Server
You will probably access Raspbian desktop remotely, so you don’t need to use the keyboard and monitor to access the Raspbian desktop. In this section, we install the VNC server. An Internet network is required to perform this task. Make sure your Raspberry Pi has connected to the Internet via a LAN or a WiFi network.
- 1.
Install the VNC server.
- 2.
Enable the VNC server.
- 3.
Configure the boot option for desktop.
- 4.
Test with the VNC viewer.
Each task is presented in detail in the following sections.
1.9.1 Installing the VNC Server
This task will download and install the VNC server and viewer application on to your Raspbian.
1.9.2 Enabling the VNC Server
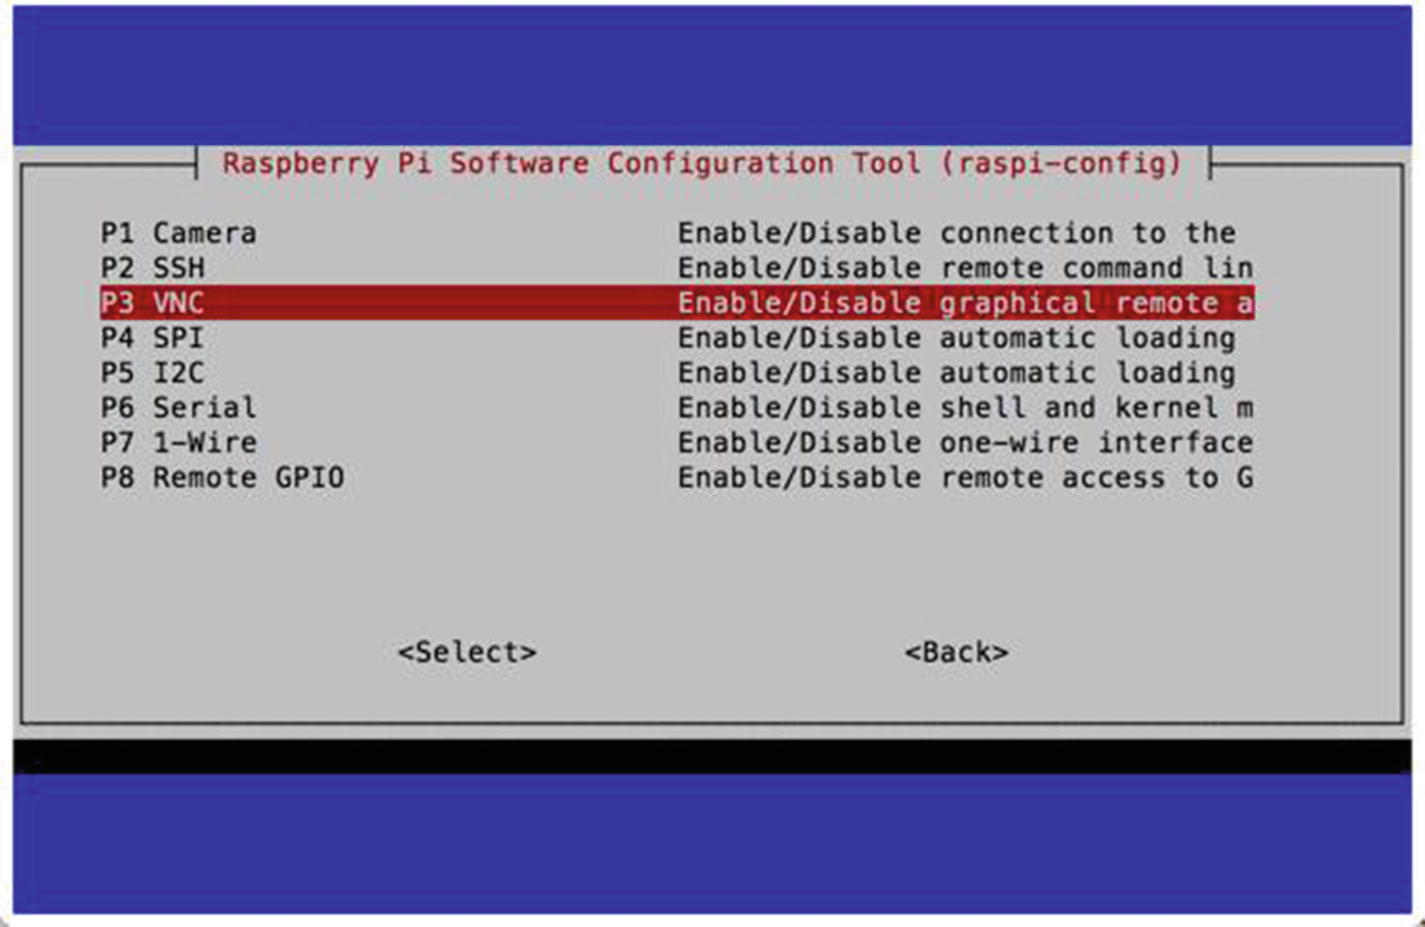
Selecting VNC

Confirmation for enabling the VNC server
Next, you need to enable the boot options for the desktop.
1.9.3 Configuring Boot Options for the Desktop

Selecting Boot Options

Selecting Desktop/CLI

Selecting Desktop Autologin Desktop GUI
When you’re done, your Raspbian will reboot.
1.9.4 Testing the Server
To test the VNC server, you need to install a VNC client. We can use the VNC Viewer application to do this. You can download this application based on your platform from https://www.realvnc.com/en/connect/download/viewer/ .

VNC Viewer application on the Mac platform

Connecting to the Raspbian desktop via the VNC Viewer

Accessing a Raspbian desktop through the VNC Viewer application
1.10 Powering Off the Raspbian
After Raspbian shuts down, you’ll see the red LED light up. Then unplug the power cable from the board.

The Shutdown button on the Raspbian desktop
After the shutdown process is complete, you can unplug the power cable from your Raspberry Pi board.
This is the end of the last session in this chapter.
1.11 Summary
In this chapter, you learned briefly what Raspberry Pi and Raspbian are. You also set up Raspbian on a Raspberry Pi board. Last, you learned how to configure the network and the VNC desktop.
In the next chapter, we focus on the command line in Raspbian. You learn how to operate and manage Raspbian through the Terminal.