
7
Implementing User Authentication and Global Notifications
In the previous chapters, we configured the pages, created mocked APIs, and made the API calls from our application. However, the application still relies on test data when it comes to the authentication of the users in the admin dashboard.
In this chapter, we will build the application’s authentication system, allowing users to authenticate and access protected resources in the admin dashboard. We will also be creating a toast notification system to provide feedback to users if an action happens that we want to notify them about.
In this chapter, we will cover the following topics:
- Implementing the authentication system
- Implementing notifications
By the end of the chapter, we will have learned how to authenticate users in our application and also how to handle the global application state with Zustand.
Technical requirements
Before we get started, we need to set up the project. To be able to develop the project, you will need the following things installed on your computer:
- Node.js version 16 or above and npm version 8 or above.
There are multiple ways to install Node.js and npm. Here is a great article that goes into more detail: https://www.nodejsdesignpatterns.com/blog/5-ways-to-install-node-js.
- VSCode (optional) is currently the most popular editor/IDE for JavaScript/TypeScript, so we will be using it. It is open source, has great integration with TypeScript, and you can extend its features via extensions. It can be downloaded from here: https://code.visualstudio.com/.
The code files for this chapter can be found here: https://github.com/PacktPublishing/React-Application-Architecture-for-Production.
The repository can be cloned locally with the following command:
git clone https://github.com/PacktPublishing/React-Application-Architecture-for-Production.git
Once the repository is cloned, we need to install the application’s dependencies:
npm install
We can provide the environment variables using the following command:
cp .env.example .env
Once the dependencies have been installed, we need to select the right stage of the code base that matches this chapter. We can do that by executing the following command:
npm run stage:switch
This command will prompt us with a list of stages for each chapter:
? What stage do you want to switch to? (Use arrow
 keys)
❯ chapter-02
  chapter-03
  chapter-03-start
  chapter-04
  chapter-04-start
  chapter-05
  chapter-05-start
(Move up and down to reveal more choices)
This is the seventh chapter, so you can select chapter-07-start if you want to follow along, or chapter-07 to see the final results of the chapter.
Once the chapter has been selected, all files required to follow along with the chapter will appear.
For more information about the setup details, check out the README.md file.
Implementing the authentication system
Authentication is the process of identifying who the user on a platform is. In our application, we need to identify users when they access the admin dashboard.
Before implementing the system, we should look closely at how it will work.
Authentication system overview
We are going to authenticate the users with a token-based authentication system. That means the API will expect the user to send their authentication token with the request to access protected resources.
Let’s take a look at the following diagram and the subsequent steps:

Figure 7.1 – Authentication system overview
The preceding diagram is explained as follows:
- The user submits the login form with the credentials by creating a request to the /auth/login endpoint.
- If the user exists and the credentials are valid, a response with the user data returns. In addition to the response data, we are also attaching an httpOnly cookie, which will be used from this point onward for authenticated requests.
- Whenever the user authenticates, we will store the user object from the response in react-query’s cache and make it available to the application.
- Since the authentication is cookie-based with httpOnly cookies, we do not need to handle the authentication token on the frontend. Any subsequent requests will include the token automatically.
- Persisting user data on page refreshes will be handled by calling the /auth/me endpoint, which will fetch the user data and store it in the same react-query cache.
To implement this system, we need the following:
- Auth features (login, logout, and accessing the authenticated user)
- Protect resources that require the user to be authenticated
Building authentication features
To build the authentication features, we already have the endpoints implemented.. We created them in Chapter 5, Mocking the API. Now we need to consume them in our application.
Logging in
To allow users to log in to the dashboard, we’ll require them to enter their email and password and submit the form.
To implement the login feature, we will need to make an API call to the login endpoint on the server. Let’s create the src/features/auth/api/login.ts file and add the following:
import { useMutation } from '@tanstack/react-query';
import { apiClient } from '@/lib/api-client';
import { queryClient } from '@/lib/react-query';
import { AuthUser, LoginData } from '../types';
export const login = (
  data: LoginData
): Promise<{
  user: AuthUser;
}> => {
  return apiClient.post('/auth/login', data);
};
type UseLoginOptions = {
  onSuccess?: (user: AuthUser) => void;
};
export const useLogin = ({
  onSuccess,
}: UseLoginOptions = {}) => {
  const { mutate: submit, isLoading } = useMutation({
    mutationFn: login,
    onSuccess: ({ user }) => {
      queryClient.setQueryData(['auth-user'], user);
      onSuccess?.(user);
    },
  });
  return { submit, isLoading };
};
We are defining the API request and the API mutation hook, allowing us to call the API from our application.
Then, we can update the login form to make the API call. Let’s modify src/features/auth/components/login-form/login-form.tsx.
First, let’s import the useLogin hook:
import { useLogin } from '../../api/login';Then, inside the LoginForm component body, we want to initialize the login mutation and submit it in the submit handler:
export const LoginForm = ({
  onSuccess,
}: LoginFormProps) => {
  const login = useLogin({ onSuccess });
  const { register, handleSubmit, formState } =
    useForm<LoginData>();
  const onSubmit = (data: LoginData) => {
    login.submit(data);
  };
     // rest of the component body
}
We should also indicate that the action is being submitted by disabling the Submit button:
<Button
  isLoading={login.isLoading}
  isDisabled={login.isLoading}
  type="submit"
>
  Log in
</Button>
When the form is submitted, it will call the login endpoint, which will authenticate the user if the credentials are valid.
Logging out
To implement the logout feature, we need to call the logout endpoint, which will clear the auth cookie. Let’s create the src/features/auth/api/logout.ts file and add the following:
import { useMutation } from '@tanstack/react-query';
import { apiClient } from '@/lib/api-client';
import { queryClient } from '@/lib/react-query';
export const logout = () => {
  return apiClient.post('/auth/logout');
};
type UseLogoutOptions = {
  onSuccess?: () => void;
};
export const useLogout = ({
  onSuccess,
}: UseLogoutOptions = {}) => {
  const { mutate: submit, isLoading } = useMutation({
    mutationFn: logout,
    onSuccess: () => {
      queryClient.clear();
      onSuccess?.();
    },
  });
  return { submit, isLoading };
};
We are defining the logout API request and the logout mutation.
Then, we can expose that from the auth feature by re-exporting it from the src/features/auth/index.ts file:
export * from './api/logout';
We want to use it when the user clicks the Log Out button, which will be located in the dashboard navbar. Let’s go to the src/layouts/dashboard-layout.tsx file and import additional dependencies:
import { useRouter } from 'next/router';
import { useLogout } from '@/features/auth';
Then, in the Navbar component, let’s use the useLogout hook:
const Navbar = () => {
  const router = useRouter();
  const logout = useLogout({
    onSuccess: () => router.push('/auth/login'),
  });
  // the rest of the component
};
Notice how we redirect the user to the login page when the logout action succeeds.
Let’s finally wire the action to the logout button:
<Button
  isDisabled={logout.isLoading}
  isLoading={logout.isLoading}
  variant="outline"
  onClick={() => logout.submit()}
>
  Log Out
</Button>
Now, when the user clicks the Log Out button, the logout endpoint will be called, and then the user will be taken to the login page.
Getting an authenticated user
To get started, let’s create the src/features/auth/api/get-auth-user.ts file and add the following:
import { useQuery } from '@tanstack/react-query';
import { apiClient } from '@/lib/api-client';
import { AuthUser } from '../types';
export const getAuthUser = (): Promise<AuthUser> => {
  return apiClient.get('/auth/me');
};
export const useUser = () => {
  const { data, isLoading } = useQuery({
    queryKey: ['auth-user'],
    queryFn: () => getAuthUser(),
  });
  return { data, isLoading };
};
This endpoint will return information about the user currently logged in.
Then, we want to export it from the src/features/auth/index.ts file:
export * from './api/get-auth-user';
Back to the src/layouts/dashboard-layout.tsx file, we need the user data there.
Let’s replace the useUser hook from the test data with the following:
import { useLogout, useUser } from '@/features/auth';Another place where we need the user data is the dashboard jobs page. Let’s open src/pages/dashboard/jobs/index.tsx and import the useUser hook:
import { useUser } from '@/features/auth';Protecting resources that require the user to be authenticated
What should happen if an unauthenticated user tries to view a protected resource? We want to ensure that any such attempt will redirect the user to the login page. To do that, we want to create a component that will wrap protected resources and let users view protected content only if they are authenticated.
The Protected component will fetch the user from the /auth/me endpoint, and if the user exists, it will allow the content to be shown. Otherwise, it will redirect the user to the login page.
The component has already been defined in the src/features/auth/components/protected/protected.tsx file, but it isn’t doing much right now. Let’s modify the file to the following:
import { Flex } from '@chakra-ui/react';
import { useRouter } from 'next/router';
import { ReactNode, useEffect } from 'react';
import { Loading } from '@/components/loading';
import { useUser } from '../../api/get-auth-user';
export type ProtectedProps = {
  children: ReactNode;
};
export const Protected = ({
  children,
}: ProtectedProps) => {
  const { replace, asPath } = useRouter();
  const user = useUser();
  useEffect(() => {
    if (!user.data && !user.isLoading) {
      replace(
        `/auth/login?redirect=${asPath}`,
        undefined,
        { shallow: true }
      );
    }
  }, [user, asPath, replace]);
  if (user.isLoading) {
    return (
      <Flex direction="column" justify="center" h="full">
        <Loading />
      </Flex>
    );
  }
  if (!user.data && !user.isLoading) return null;
  return <>{children}</>;
};
The component accepts children as props, meaning it will wrap nested content and decide whether it should be rendered.
We are accessing the user from the same useUser hook. Initially, while the data is being fetched, the component renders the Loading component. Once the data is fetched, we check in useEffect to see whether the user exists, and if it doesn’t, we will redirect to the login page. Otherwise, we can render children as usual.
The Protected component is meant to be used in the dashboard. Since we already have a reusable layout for the dashboard, rather than wrapping every page with Protected, we can do that only once in the dashboard layout.
Let’s open src/layouts/dashboard-layout.tsx and import the Protected component:
import { Protected } from '@/features/auth';Then, in the JSX of the DashboardLayout component, let’s wrap everything with Protected as follows:
export const DashboardLayout = ({
  children,
}: DashboardLayoutProps) => {
  const user = useUser();
  return (
    <Protected>
      <Box as="section" h="100vh" overflowY="auto">
        <Navbar />
        <Container as="main" maxW="container.lg" py="12">
          {children}
        </Container>
        <Box py="8" textAlign="center">
          <Link
            href={`/organizations/${user.data?.
              organizationId}`}
          >
            View Public Organization Page
          </Link>
        </Box>
      </Box>
    </Protected>
  );
};
If you try to visit the http://localhost:3000/dashboard/jobs page, you will be redirected to the login page.
Go ahead and try to log in with the existing credentials (email: [email protected]; password: password). If everything is successful, you can access the dashboard with the data that belongs to the given user organization.
Implementing notifications
Whenever something happens in the application, such as a successful form submission or a failed API request, we want to notify our users about it.
We will need to create a global store that will keep track of all notifications. We want it to be global because we want to show these notifications from anywhere in the application.
For handling global states, we will be using Zustand, a state management library that is lightweight and very simple to use.
Creating the store
Let’s open the src/stores/notifications/notifications.ts file and import the dependencies we will use:
import { createStore, useStore } from 'zustand';
import { uid } from '@/utils/uid';
Then, let’s declare the notification types for the store:
export type NotificationType =
  | 'info'
  | 'warning'
  | 'success'
  | 'error';
export type Notification = {
  id: string;
  type: NotificationType;
  title: string;
  duration?: number;
  message?: string;
};
export type NotificationsStore = {
  notifications: Notification[];
  showNotification: (
    notification: Omit<Notification, 'id'>
  ) => void;
  dismissNotification: (id: string) => void;
};
The store will keep track of active notifications in an array. To show a notification, we need to call the showNotification method, and to dismiss it, we will call dismissNotification.
Let’s create the store:
export const notificationsStore =
  createStore<NotificationsStore>((set, get) => ({
    notifications: [],
    showNotification: (notification) => {
      const id = uid();
      set((state) => ({
        notifications: [
          ...state.notifications,
          { id, ...notification },
        ],
      }));
      if (notification.duration) {
        setTimeout(() => {
          get().dismissNotification(id);
        }, notification.duration);
      }
    },
    dismissNotification: (id) => {
      set((state) => ({
        notifications: state.notifications.filter(
          (notification) => notification.id !== id
        ),
      }));
    },
  }));
To create the store, we use createStore from zustand/vanilla to make it more portable and testable. The function provides us with the set and get helpers, which allow us to modify and access the store, respectively.
Since we created the store using the vanilla approach, we need to make it compatible with React. We do that by exposing the store with the useStore hook provided by Zustand as follows:
export const useNotifications = () =>
  useStore(notificationsStore);
And that’s the notification store. As you can see, it is very simple with minimal boilerplate.
Any time we need to access the store inside React components or hooks, we can use the useNotifications hook. Alternatively, if we want to access the store from a plain JavaScript function outside React, we can use notificationStore directly.
Creating the UI
Now that we have the notifications store, we need to build a UI to display those notifications when active.
Let’s open the src/components/notifications/notifications.tsx file and import the required dependencies:
import {
  Flex,
  Box,
  CloseButton,
  Stack,
  Text,
} from '@chakra-ui/react';
import {
  Notification,
  NotificationType,
  useNotifications,
} from '@/stores/notifications';
Then, let’s create the Notifications component, which will display the notifications:
export const Notifications = () => {
  const { notifications, dismissNotification } =
    useNotifications();
  if (notifications.length < 1) return null;
  return (
    <Box
      as="section"
      p="4"
      position="fixed"
      top="12"
      right="0"
      zIndex="1"
    >
      <Flex gap="4" direction="column-reverse">
        {notifications.map((notification) => (
          <NotificationToast
            key={notification.id}
            notification={notification}
            onDismiss={dismissNotification}
          />
        ))}
      </Flex>
    </Box>
  );
};
We are accessing the notifications via the useNotifications hook, which provides us with access to the store.
As you can see, we are mapping through the active notifications. We render the NotificationToast component for each active notification and pass the notification object and the dismiss handler as props. Let’s implement it by describing the variants and prop types:
const notificationVariants: Record<
  NotificationType,
  { color: string }
> = {
  info: {
    color: 'primary',
  },
  success: {
    color: 'green',
  },
  warning: {
    color: 'orange',
  },
  error: {
    color: 'red',
  },
};
type NotificationToastProps = {
  notification: Omit<Notification, 'duration'>;
  onDismiss: (id: string) => void;
};
Then, implement the NotificationToast component:
const NotificationToast = ({
  notification,
  onDismiss,
}: NotificationToastProps) => {
  const { id, type, title, message } = notification;
  return (
    <Box
      w={{ base: 'full', sm: 'md' }}
      boxShadow="md"
      bg="white"
      borderRadius="lg"
      {...notificationVariants[type]}
    >
      <Stack
        direction="row"
        p="4"
        spacing="3"
        justifyContent="space-between"
      >
        <Stack spacing="2.5">
          <Stack spacing="1">
            <Text fontSize="sm" fontWeight="medium">
              {title}
            </Text>
            {notification.message && (
              <Text fontSize="sm" color="muted">
                {message}
              </Text>
            )}
          </Stack>
        </Stack>
        <CloseButton
          onClick={() => onDismiss(id)}
          transform="translateY(-6px)"
        />
      </Stack>
    </Box>
  );
};
Now that we have the notifications store and the UI created, it is time to integrate them into the application.
Integrating and using notifications
To integrate notifications into the application, let’s open the src/providers/app.tsx file and import the Notifications component:
import { Notifications } from '@/components/notifications';Then, let’s render the component in AppProvider:
export const AppProvider = ({
  children,
}: AppProviderProps) => {
  return (
    <ChakraProvider theme={theme}>
      <GlobalStyle />
      <Notifications />
      {/* rest of the code */}
    </ChakraProvider>
  );
};
Perfect! Now we are ready to start showing some notifications.
As mentioned, we can use the store both in the React world and outside it.
We will need to use it in a React component from the page for creating jobs. Any time we create a job successfully, we want to let the user know.
Let’s open the src/pages/dashboard/jobs/create.tsx file and import the useNotifications hook:
import { useNotifications } from '@/stores/notifications';Then, let’s initialize the hook inside the DashboardCreateJobPage component body:
const { showNotification } = useNotifications();Then, we can call showNotification in the onSuccess handler:
const onSuccess = () => {
  showNotification({
    type: 'success',
    title: 'Success',
    duration: 5000,
    message: 'Job Created!',
  });
  router.push(`/dashboard/jobs`);
};
We are showing a new success notification that will disappear after 5 seconds.
To see it in action, let’s open http://localhost:3000/dashboard/jobs/create and submit the form. If the submission is successful, we should see something like this:
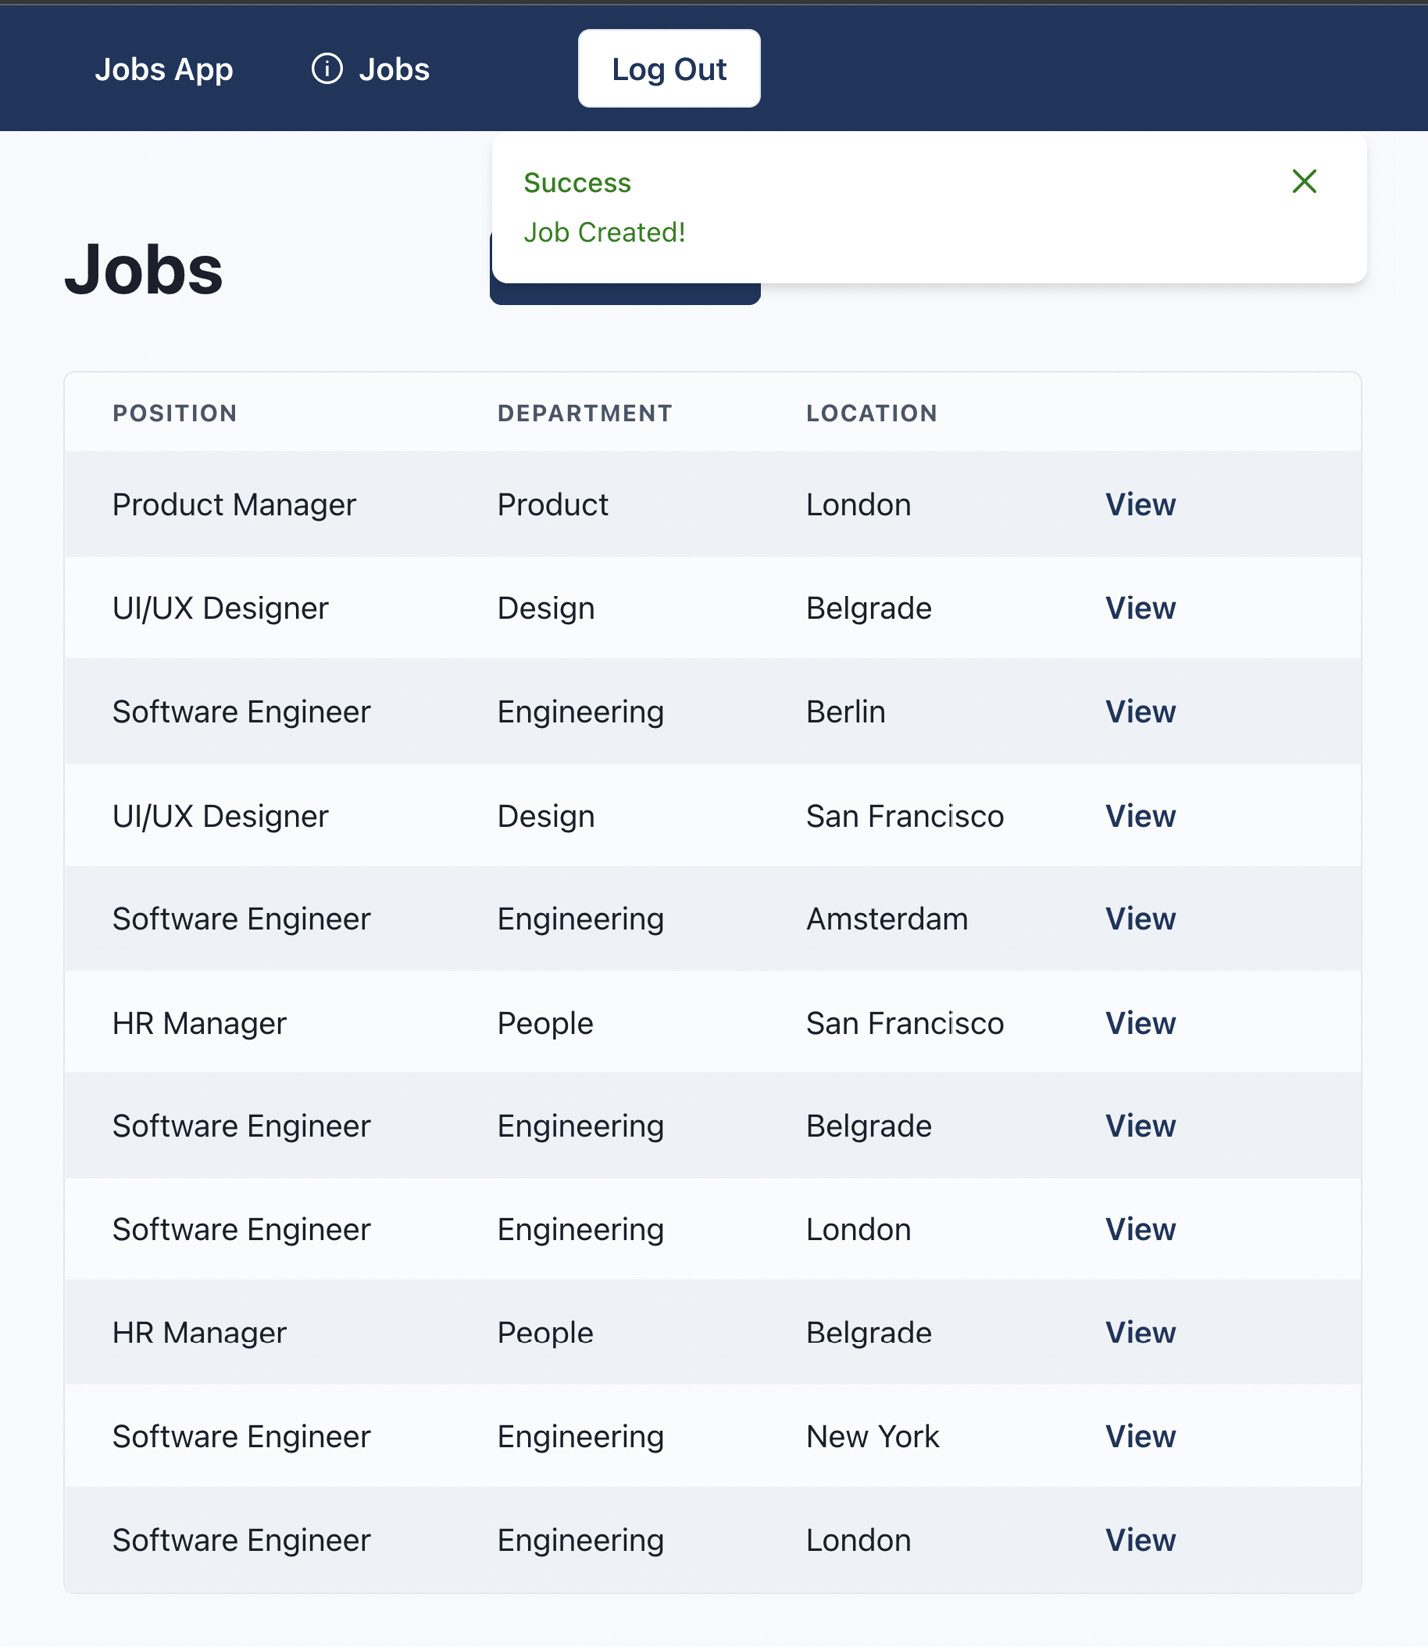
Figure 7.2 – Notifications in action
Perfect! Any time a job is created, the user will be notified about it.
Another place that we can utilize notifications is in API error handling. Whenever an API error happens, we want to let the user know something went wrong.
We can handle it on the API client level. Since Axios supports interceptors, and we already have them configured, we just need to modify the response error interceptor.
Let’s open src/lib/api-client.ts and import the store:
import { notificationsStore } from '@/stores/notifications';Then, in the response error interceptor, let’s locate the following:
console.error(message);
We’ll replace it with the following:
notificationsStore.getState().showNotification({
  type: 'error',
  title: 'Error',
  duration: 5000,
  message,
});
To access values and methods on a vanilla Zustand store, we need to call the getState method.
Any time an error on the API happens, an error notification will be shown to the user.
It’s worth mentioning that Chakra UI has its own toast notification system out of the box, which is very simple to use and would fit our needs, but we made our own to learn how to manage the global application state in a nice and simple way.
Summary
In this chapter, we learned how to handle authentication and manage the global state of the application.
We started with an overview of the authentication system and how it works. Then, we implemented authentication features such as login, logout, and getting the authenticated user info. We also built the Protected component, which controls whether the user is allowed to see a page based on their authentication status.
Then, we built a toast notification system where the user can trigger and display notifications from anywhere in the application. The main goal of building it was to introduce Zustand, a very simple and easy-to-use state management library for handling global application state.
In the next chapter, we will learn how to approach testing the application with unit, integration, and end-to-end tests.