This chapter serves as the ground school before we take off and start flying with React. We will create a minimalistic, stand-alone React application called “Hello World.” Then we will review how it works and see what’s happening under the hood. We will also learn about TypeScript and the starter template projects we can use to expediate development.
This chapter is the basis for understanding React, and although we are not building a flashy application here, the concepts that are covered are crucial. Feel free to return to the chapter again once you complete the book or even while reading later chapters if you need to reference some of the basic concepts.
Let’s get started!
Getting Started with React
In this section, we will create a minimalistic, stand-alone “Hello World” React example. We will be installing an integrated development environment (IDE), and we will cover crucial concepts such as JSX, the DOM, the React virtual DOM, Babel, and ES5/ES6.
First, though, we’ll talk about what React is and why to use it. Although it may be more gratifying to jump right in and start writing code, paying attention to the key concepts will help you understand React better. The entire book relies on you understanding the ideas in this section.
What Is React?
React (also known as ReactJS) is a JavaScript library developed by Facebook (https://github.com/facebook/react) to create user interfaces for the Web. React was invented by Jordan Walke, who was working at Facebook Ads at the time. It competes with other front-end development frameworks and libraries such as jQuery, Angular, Vue.js, Svelte, etc.
In its previous version, React 16.x, which was released in September 2017, the React team added more tools and development support and eliminated bugs. React 17 was released in October 2020.
React 17 is a “stepping-stone” release, and the release is primarily focused on making it easier to upgrade React in future versions as well as improving compatibility with browsers. React team’s support shows that the library has great momentum and is not going away anytime soon.
Why React?
React is a favorite among developers. In fact, according to a StackOverFlow survey (https://insights.stackoverflow.com/survey/2020), React.js has been the “most loved” web framework for two consecutive years.
The need for React developers has ballooned; according to Indeed.com (https://www.indeed.com/q-React-jobs.html), there are close to 56,000 open React developer positions.
The React library itself is lighter than competing Web frameworks such as Ember or Angular, see here: https://gist.github.com/Restuta/cda69e50a853aa64912d (around 100KB) and fast.
React is easy to get started with.
Installing an IDE
When working with code, it’s recommended that you use an IDE.
Why Do I Even Need an IDE?
You don’t “need” an IDE; you can always write your code with a text editor. However, an IDE helps write people code and increases productivity. This is done by providing common needed functionality for writing code, such as source code editor, build automation tools, and a debugger, as well as many other functionalities.
When it comes to IDEs, there are many to choose from. Some examples are Microsoft Visual Studio, IntelliJ IDEA, WebStorm, NetBeans, Eclipse, and Aptana Studio.
For this book, I selected Visual Studio Code (VS Code) since it’s a lightweight, free, cross-platform (Linux, macOS, Windows) editor that can be extended with plugins. You may be working for a company that will provide you with a specific IDE, or you may decide to invest and buy a top-rated IDE license. Most top IDEs mentioned offer similar functionalities, so it boils down to what you are used to using, licenses, etc.
Choosing an IDE depends on many factors that I will not get into. You can install or use whatever IDE you are used to using; VS Code is just a suggestion.
You can also pick the Microsoft Visual Studio Express version instead of VS Code, which has reduced functionality compared to Microsoft Visual Studio.
How to Install VS Code?

Visual Studio Code Welcome page
Creating a Minimalistic Stand-Alone “Hello World” Program
You can download all the code and exercises you see in this book from the book’s GitHub location (https://github.com/Apress/react-and-libraries). The files are organized by chapter.

React “Hello World” index.html app in the browser
Congratulations, you just created your first React application!
Now, let’s decode this example to understand what’s happening here.
Although the code looks like HTML, it is not. It’s JavaScript eXtension (JSX) code.
JSX is a React extension that uses JavaScript tags to mimic HTML code, so the code is similar to HTML but not the same.
What Is JSX, and Why Do We Need It?
To understand why React is using JSX instead of just HTML, we first need to talk about the Document Object Model (DOM). The quick answer is that React processes your JSX code in the background before committing these changes to the user’s browser to speed up how quickly the user’s page loads. Let’s dive deeper into that process.
The DOM in HTML stands for Document Object Model. It is an in-memory representation of HTML and is tree-structured.
DOM
The Document Object Model is the API for HTML and even XML documents such as SVG images. The API describes the document by including interfaces that define the functionality of the HTML’s elements as well as any interfaces and types they rely on. The HTML document includes support and access to various things such as interacting with users such as event handlers, focus, copy and paste, etc.

A DOM document consists of a hierarchical tree

Chrome’s DevTools Console inspector showing the DOM document
DOM manipulation is the core of modern interactive web pages and can dynamically change the content of a web page. Technically speaking, this can be done using JavaScript with methods such as getElementById and getElementsByClassName as well as removeChild and getElementById("myElement").remove();. These APIs are exposed by the HTML DOM and intended to provide the ability to change code during runtime.
React determines what changes to make to the actual DOM based on the React element representation and do the changes in the background inside a virtual DOM. You can think of the React virtual DOM as a simulation.
Then it commits only needed changes to the actual user’s DOM (browser). The reason behind this process is to speed up performance.
It’s crucial that the actual DOM tree-structured manipulation be as quick as possible. For example, say we have a product page, and we want to update the first item of our product’s list. Most JavaScript frameworks would update the entire list just to update one item, which may contain hundreds of items.
Most modern web pages hold large DOM structures, and this behavior taxes the user too much, resulting in slower-loading HTML pages.
React Virtual DOM Under the Hood
The virtual DOM (VDOM) is a programming concept where an ideal, or virtual, representation of a UI is kept in memory and synced with the “real” DOM by a library such as ReactDOM. This process is called reconciliation. The React VDOM’s aim is to speed up this process.
React holds a copy of the HTML DOM (that’s the virtual DOM). Once a change is needed, React first makes the change to the virtual DOM, and it then syncs the actual HTML DOM, avoiding the need to update the entire HTML DOM, which speeds up the process.
For example, when we render a JSX element, every single virtual DOM object gets updated. This process of updating the entire virtual DOM instead of the actual HTML DOM is faster. In the reconciliation process, React needs to figure out which objects changed, and this process is called diffing. Then React updates only the objects in the real HTML DOM that need to be changed instead of the entire DOM tree.
In our code, the JSX code is wrapped inside a ReactDOM.render method . To further dig into the process behind the scenes and understand what’s happening under the hood, we also need to understand Babel and ES5/ES6.
Babel and ES5/ES6
The JSX code we write is just a terser way to write the React.createElement() function declaration. Every time a component uses the render function, it outputs a tree of React elements or the virtual representation of the HTML DOM elements that the component outputs.
ECMAScript version 5 (ES5) is plain old “regular JavaScript,” which was finalized in 2009. It is supported by all major browsers. ES6 is the next version; it was released in 2015, and it added syntactical and functional additions. ES6 is almost fully supported by all major browsers at the time of writing. In fact, the React team in version 17 made many changes to be more consistent and compatible with ES6.
We want to take advantage of ES6 functionality; however, at the same time, we want to be backward compatible with the old ES5 so we can be compatible in all versions of browsers. To do that, we use Babel.
Babel is the library that transpiles ES6 to ES5 (needed for browsers that don’t support ES6). The ReactDOM.render() function , as the name suggests, renders the DOM. The render function is expected to return a virtual DOM (representation of browser DOM elements).
Starting from Babel 8, React gets a special function. The render method was changed to jsx.
Note that starting from Babel 8, React gets a special function called jsx to replace the render function. In Babel 8, it also automatically imports react (or other libraries that support the new API) when needed, so you don’t have to manually include them anymore if you write to Babel directly.
Also starting from Babel 8, jsx will automatically be the default runtime. You can read more about these changes in my article on Medium: http://shorturl.at/bxPZ7.
React version 17: We use React to define and create our elements, for example to use lifecycle hooks (more about hooks later in the book).
ReactDOM version 17: This is used for web applications (there is React Native for mobile devices). That’s why there is a split in the code between React and ReactDOM. ReactDOM is the glue between React and the DOM. It includes features that allow us to access the DOM, such as ReactDOM.findDOMNode() to find an element or ReactDOM.render() to mount our component.
Babel version 8: As we explained, Babel is the library that transpiles ES6 to ES5.
Now that we have looked at the React “Hello World” code, we understand why we imported these libraries and what’s happening under the hood. These key concepts are crucial to understanding React. Feel free to return to this chapter if you need a refresher.
In this section, we created a minimalistic stand-alone React application called “Hello World” and reviewed how to works. We installed the VS Code IDE and learned about crucial concepts such as JSX, DOM, the React virtual DOM, Babel, and ES5/ES6.
Getting Started with TypeScript
When it comes to writing React code, there are two options. You can write your code using JavaScript (JS) or TypeScript (TS). TypeScript is a transpiler, meaning ES6 doesn’t understand TS, but TS gets compiled down to standard JS, which can be done with Babel. We will configure our project to accept TS files as well as ES6 JS files in the next chapter.
Why Should You Integrate TypeScript into Your React Project?
Did you know that TypeScript is an open source programming language developed and maintained by Microsoft?
According to a 2020 StackFlow survey, the TypeScript programming language is second in popularity, surpassing Python!
The ReactJS framework is second at 35.9 percent and on its way to bypassing the “king” jQuery.
At the same time, 32.9 percent of respondents said that they actually dreaded TypeScript.
The question is, why TypeScript is so popular?
TypeScript vs. JavaScript: What’s the Big Deal?
JavaScript is a scripting language, while TypeScript (TS) is a full-blown programming language. TS, as the name suggests, is all about having more types. TS is easier to debug and test than JS, and TS prevents potential problems by describing what to expect (you will see this in action when we test our components later in this book). Having a full-blown object-oriented programming (OOP) language and modules brings JS to an enterprise level and increases code quality.
TypeScript is an OOP language; JavaScript is a scripting language.
TypeScript uses static typing following the ECMAScript specification.
TypeScript support modules.
A type system associates a type to each value. By examining the flow of these values, it ensures there are no type errors.
Static typing means that types are checked before runtime (allowing you to track bugs before runtime). JS includes only the following eight dynamic (at runtime) types: BigInt, Boolean, Integer, Null, Number, String, Symbol, Object (objects, functions, and arrays), and Undefined.
All these types are called primitive types, except for Object, which is a nonprimitive type. TS adds static types to JavaScript by setting a compiler to type-checking the source code to turn it into dynamic code.
React and TypeScript work nicely together, and by using TypeScript and describing the types your code quality improves the code quality of your app using OOP best practices, it’s worth the learning curve.
In the next chapter, we will create a startup project with TypeScript; however, you can start experimenting with TypeScript right now and learn the basics.
This step gives you a good overview of the types of TS and how you can harness the power of TS in your code.

TS Playground
The left side of the Playground is TS, and the right side is the same code compiled into JS. Next, open the JavaScript Console and hit Run to see the code running.
The Playground site has plenty of examples that can help you better understand TS. I recommend exploring the examples.
Notice the example uses “strict,” and in the Config menu item, you can set the compiler options from the Config link. The different compiler options are at https://www.typescriptlang.org/docs/handbook/compiler-options.html.
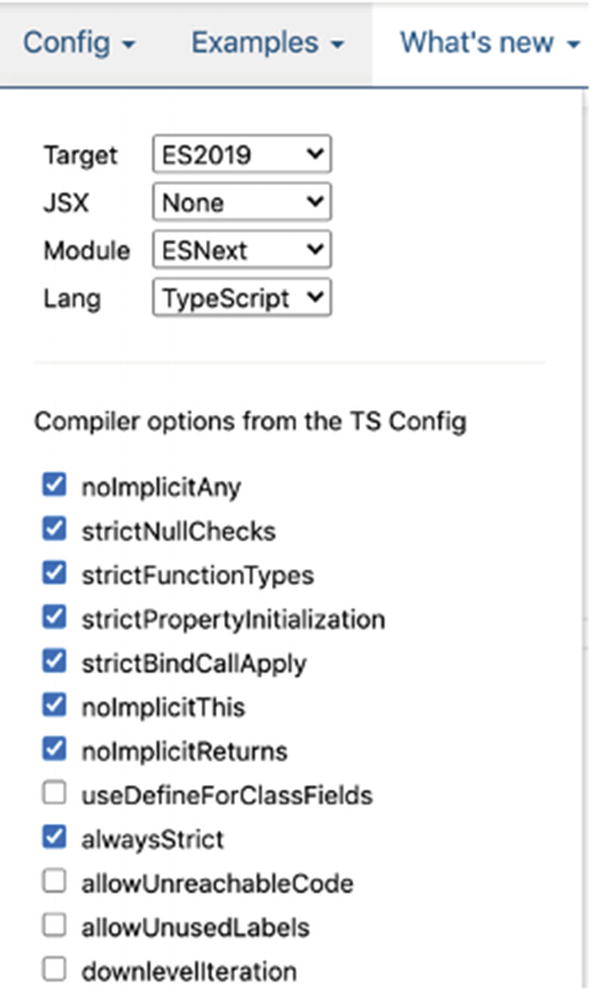
Specifying the ECMAScript (ES) target in TS Playground
TypeScript Cheat Sheet
A great place to start working with TypeScript is to understand the power of TS by looking at the different types available. My programming style is to follow the function naming conventions of coding like Shakespeare and having the names of the method self-explain themselves.
To try TypeScript, paste the TypeScript cheat sheet code shown here into the TS Playground at https://www.typescriptlang.org/play/. Then you can follow along and look at the results of the JS compiler and run the code. As you can see, I split my examples into primitive types and nonprimitive types.

TypeScript Playground examples
React Template Starter Project Options
When it comes to writing React applications, you have a few options. You can just write the entire code yourself, as we did for our “Hello World” example, and then add libraries to help you take care of tasks of packaging your code and getting it ready for production. Another option is to use a starter template project that already takes care of the scaffolding and configurations and includes libraries to help you get the job done quickly with just writing your code.
As you have seen, the VDOM process happens behind the scenes, and we don’t need to refresh the page when there is a page change.
In fact, the most popular template for creating a React app is the Create-React-App (CRA) project (https://github.com/facebook/create-react-app). The project was created by the Facebook team with close to 84,000 stars on GitHub.
CRA is based on a single-page application (SPA), which is great because you don’t get a page refresh, and the experience feels like you are inside of a mobile app.
The pages are meant to be rendered on the client side. This is great for small to medium-sized projects.
The other option is server-side rendering (SSR). SSR renders the page on the server so the client (browser) will display the app without doing any work. It’s good for certain use cases (usually large apps), where there is much going on and the user experience would be sluggish if the rendering happened on the client side.
CRA doesn’t support SSR out of the gate. There are ways to configure and get CRA to work as SSR, but that may be too complex to some developers and involve maintaining configuration on your own, so it may not be worth the effort.
If you’re building something bigger that needs SSR, it’s better to just work with a different React library that is already configured out of the box with SSR such as the Next.js framework, Razzle, or Gatsby (include a prerender website into HTML at build time).
If you want to do server rendering with React and Node.js, check out Next.js, Razzle, or Gatsby. Create React App is agnostic of the backend and only produces static HTML/JS/CSS bundles. See https://github.com/facebook/create-react-app.
With that being said, with CRA we can do a prerender, which is the closest you can get to SSR, as you will see in the last chapter of this book when we optimize our React app.
In this book’s examples, we will be using CRA; however, with a solid understanding of this book, you can easily migrate to any template library that uses React.
Summary
In this chapter, we created a minimalistic stand-alone React application called “Hello World” and explored how it worked. We installed the VS Code IDE and learned about crucial concepts such as JSX, DOM, React’s virtual DOM, and Babel, as well as ES5/ES, SPA, SSR and TypeScript.
In the next chapter, we will learn more about the CRA project and set up our starter project and development environment with essential libraries.