
Chapter 4: Fetching Data as Streams
It is all about data! The way you manage your application's data has a huge impact on your UI performance and also the user experience. And, as far as I'm concerned, today, great user experience and performant UIs are no longer an option. In fact, they are key determinants of user satisfaction. Besides, managing data efficiently optimizes the code and enhances its quality, which consequently minimizes maintenance and improvement costs.
So, how can we manage our data efficiently? Well, this is what we will be answering in the following chapters. There are a few reactive patterns that come in handy in many use cases, and we will start by exploring the reactive pattern to fulfill a common and crucial use case, which is displaying values received from a REST endpoint for users to read and interact with.
We will start by explaining the requirement that we're going to implement in the RecipesBook application. Then, we will introduce the classic pattern to retrieve data, followed by the different approaches that you can use to manage unsubscriptions and all the important technical concepts surrounding them. Following this, we will explain the reactive pattern to fetch data. Finally, we will highlight the advantages of the reactive pattern over the classic one. Ready? Let's get started.
In this chapter, we're going to cover the following main topics:
- Defining the requirement
- Exploring the classic pattern for fetching data
- Exploring the reactive pattern for fetching data
- Highlighting the advantages of the reactive pattern.
Technical requirements
This chapter assumes that you have a basic understanding of HTTP Client.
We'll be using a mocked REST API using JSON Server, which allows you to spin up a REST API server with a fully working API. We'll not be learning how to use JSON Server, but if you are interested in learning more, you can find more information at https://github.com/typicode/json-server.
You can access the project source code for this chapter from the GitHub repository at https://github.com/PacktPublishing/Reactive-Patterns-with-RxJS-for-Angular/tree/main/Chapter04.
The project is composed of two folders:
- recipes-book-api: This contains the mocked server.
- recipes-book-front: This contains the frontend application that was built with Angular 12 and RxJS7 to help us build beautiful UI components quickly. Please refer to the previous chapter's Technical requirements.
The project complies with the standard Angular style guide, which can be found at https://angular.io/guide/styleguide.
You need to start the server by running the following command in the recipes-book-api folder:
npm run server:start
The server will be running at http://localhost:3001.
Then, you start the frontend by running the following command in the recipes-book-front folder:
ng serve --proxy-config proxy.config.json
You can read more about the --proxy-config parameter at https://angular.io/guide/build#proxying-to-a-backend-server
Defining the requirement
First, let's define the requirement we are going to fulfill in a reactive way. To define the requirement properly, we should answer this question: what do we want to do? Or, in other words, how should the application behave? Well, we want to display a list of recipes on the home page.
The component responsible for displaying the list of recipes is RecipesListComponent. So, we will display this component on the home page. We are going to progressively build the user story detailed in View one – the landing page section of Chapter 3, A Walkthrough of the Application.
Of course, we need to retrieve the list of recipes beforehand in order to display it to the user, right? So, the list of recipes represents the first Data that we need to request. This is available on a remote RESTful server. We are going to use a GET request and call the /api/recipes REST endpoint implemented in our recipes-book-api backend, which we started in the Technical requirements section.
In the following sections, we will explore the classic and recommended patterns used to fetch data.
Exploring the classic pattern for fetching data
Let's start by exploring the classic pattern for collecting our data. In our scenario, the requested data is the list of recipes.
Defining the structure of your data
First and foremost, we need to define the structure of our data so that we can strongly type it.
We can use the Angular CLI to generate the Recipe model underneath the src/app/core/model folder:
$ ng g i Recipe
For conventional purposes, we will change the name of the generated file from recipe.ts to recipe.model.ts. Then, we will populate the interface with the specific properties of Recipe, as follows:
export interface Recipe {
id: number;
title: string;
ingredients: string;
tags?: string;
imageUrl: string;
cookingTime?: number;
prepTime?: number;
yield: number;
steps?: string;
rating:number;
}
One by one, we put the properties of the recipe we are going to use followed by the type. The description of each property is detailed in View two – the new recipe interface section of Chapter 3, A Walkthrough of the Application.
For optional properties, we placed a question mark (?) just before the property's type annotation when declaring the interface.
Creating an Angular service
The next step is to create an Angular service named RecipesService that will be responsible for managing all the operations around the recipes. This service will encapsulate the Create, Read, Update, and Delete (CRUD) operations and make them available to the various UI components. In this chapter, we will only implement the read operation.
And why do we do this? Well, we do it to increase modularity in the first place and to ensure the reusability of the service over the other components.
We used the Angular CLI to generate the service underneath the core/services folder:
$ ng g s Recipes
Retrieving the data through a method
We will inject the HttpClient service and define a method to retrieve the data. The service will look like this:
import { Injectable } from '@angular/core';
import { HttpClient } from '@angular/common/http';
import { Observable } from 'rxjs';
import { Recipe } from '../model/recipe.model';
import { environment } from 'src/environments/environment';
const BASE_PATH = environment.basePath
@Injectable({
providedIn: 'root'
})
export class RecipesService {
constructor(private http: HttpClient) { }
getRecipes(): Observable<Recipe[]> {
return this.http.get<Recipe[]>(`${BASE_PATH}/recipes`);
}
}
Let's break down what is going on at the level of this service. Well, it's nothing fancy!
We have a getRecipes() method that gets the list of recipes over HTTP and returns a strongly typed HTTP response: Observable<Recipe[]>. This Observable notifier represents the data stream that will be created when you issue the HTTP GET request. As a best practice, we externalized BASE_PATH in the environment.ts file because, in many cases, it depends on the environment.
Injecting and subscribing to the service in your component
Next, we will inject the service in the RecipesListComponent component, which is responsible for displaying the list of recipes, and call the getRecipes() method in ngOnInit() (when the component has been initialized). We are making a read operation against the API server.
In order to get the data emitted, we need to subscribe to the returned Observable notifier from the getRecipes() method. Then, we bind the data to a local property created in our component; in our case, this is the recipes array.
The component's code will look like this:
import { Component, OnInit } from '@angular/core';
import { Observable } from 'rxjs';
import { Recipe } from '../core/model/recipe';
import { RecipesService } from '../core/services/recipes.service';
@Component({
selector: 'app-recipes-list',
templateUrl: './recipes-list.component.html',
styleUrls: ['./recipes-list.component.css']
})
export class RecipesListComponent implements OnInit {
recipes!: Recipe[];
constructor(private service: RecipesService) { }
ngOnInit(): void {
this.service.getRecipes().subscribe(result => {
this.recipes = result;
});
}
}
Now that we retrieved the data and stored it in a local property, let's see in the next section how we will display it in the UI.
Displaying the data in the template
Finally, we can use the recipes property (which is available in the component) in our HTML template to display the list of recipes in our UI. In our case, we are using the DataView PrimeNG component to display the list of recipes as cards in a grid layout. Further details can be found at https://primefaces.org/primeng/showcase/#/dataview.
Of course, our goal is not to focus on the template code, but the manipulation of the data inside it. As you can see, in the following example, we passed the recipes array to the value input of the data view component. You can also use structural directives to handle this with pure HTML if you don't want to include a third-party dependency:
<div class="card">
<p-dataView #dv [value]="recipes" [paginator]="true"
[rows]="9" filterBy="name" layout="grid">
/** Extra code here **/
</p-dataView>
</div>
This is the basic pattern for collecting data, which we discovered back when we started to learn about Angular. So, you might have seen this before.
Just one thing left! You should handle the unsubscription of the observable, as this code manages subscriptions manually. Otherwise, the Observable notifier will not complete after the component has been destroyed, and the memory's reference will not be released, which will cause memory leaks.
Therefore, you should always be careful of this when manually subscribing to observables inside Angular components.
Managing unsubscriptions
There are two commonly used ways to manage unsubscriptions: the imperative pattern and the declarative and reactive patterns. Let's look at both of these patterns in detail.
Imperative unsubscription management
The imperative unsubscription means that we manually call the unsubscribe() method on the subscription object that we manage ourselves. The following code snippet illustrates this. We simply store the subscription inside a variable called subscription and unsubscribe from the ngOnDestroy() life cycle hook:
export class RecipesListComponent implements OnInit, OnDestroy {
recipes!: Recipe[];
subscription: Subscription;
constructor(private service: RecipesService) { }
ngOnInit(): void {
this.subscription=this.service.getRecipes()
.subscribe(result => {
this.recipes = result;
});
}
ngOnDestroy(): void {
this.subscription.unsubscribe();
}
Well, this works fine, but it is not a recommended pattern. There are better ways of using the power of RxJS.
Declarative unsubscription management
The second way is far more declarative and cleaner; it uses the RxJS takeUntil operator. Before we dive into this pattern, let's gain an understanding of the role of takeUntil, and there is no better way to understand it than with a marble diagram.
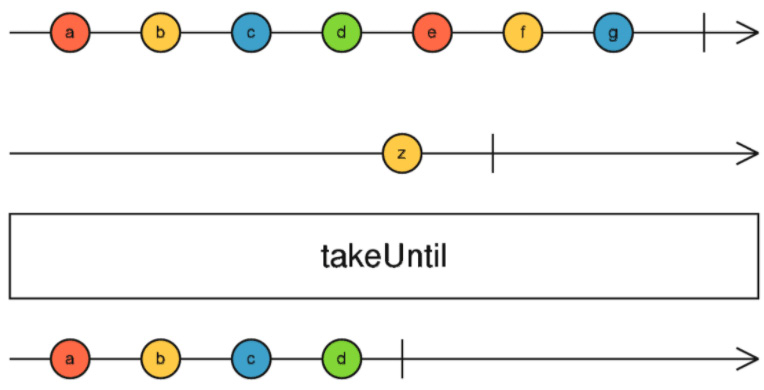
Figure 4.1 – The takeUntil marble diagram
The takeUntil() operator takes values from the source observable (the first timeline) until the Observable notifier, which is given as input (the second timeline), emits a value. In the previous marble diagram, the source observable emitted the values of a, b, c, and d. So, takeUntil() will emit them, respectively. After that, the Observable notifier emits z. So, takeUntil() will stop emitting values and will complete.
The takeUntil operator will help us keep the subscription alive for a period that we define. We want it to be alive until the component has been destroyed, so we will create an RxJS subject that will emit a value when the component has been destroyed. Then, we will pass this subject to takeUntil as input:
recipes!: Recipe[];
destroy$ = new Subject<void>();
constructor(private service: RecipesService) { }
ngOnInit(): void {
this.service.getRecipes().pipe(
takeUntil(this.destroy$)).
subscribe(result => {
this.recipes = result;
});
}
ngOnDestroy(): void {
this.destroy$.next();
this.destroy$.complete();
}
Note
The $ sign is an informal convention that is used to indicate that the variable is an Observable notifier. You can read more about the trailing $ sign on the Angular website at https://angular.io/guide/rx-library#naming-conventionsfor-observables.
And that's it! We're done.
The first thing you might notice here is that it's less code than the first approach. Furthermore, when we call unsubscribe() on a returned subscription object (the first way), there's no way we can be notified that the unsubscription happened. However, using takeUntil(), in this case, you will be notified of the observable completion through the completion handler.
Additionally, you can use other operators that manage the unsubscription for you in a more reactive way. For example, take a look at the following:
- take(X): This emits x values and then completes. However, bear in mind that if your network is slow and the xth emission didn't happen, then you have to unsubscribe.
- first(): This emits the first value and then completes.
- last(): This emits the last value and then completes.
This was the classic pattern that we learned at the beginning, and it is a relatively valid way. To sum up, the following diagram describes all the steps that we walked through:
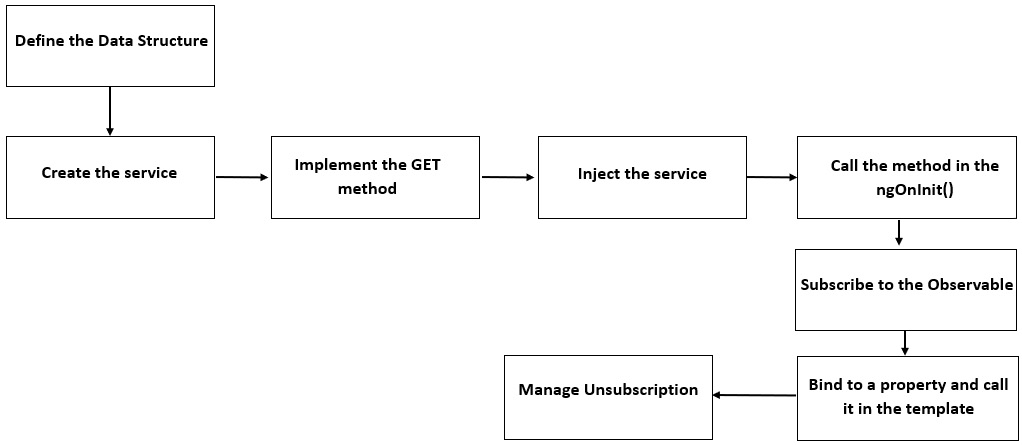
Figure 4.2 – The classic pattern workflow
However, there is another pattern that we can use, which is much more declarative and reactive and has many advantages. Let's discover it next!
Exploring the reactive pattern for fetching data
The idea behind this reactive pattern is to keep and use the observable as a stream throughout the application. Don't worry; this will become more apparent to you later in this section.
Retrieving data as streams
So, instead of defining a method to retrieve our data, we will declare a variable inside our service:
import { Injectable } from '@angular/core';
import { HttpClient } from '@angular/common/http';
import { Observable } from 'rxjs';
import { Recipe } from '../model/recipe';
import { environment } from 'src/environments/environment';
const BASE_PATH = environment.basePath
@Injectable({
providedIn: 'root'
})
export class RecipesService {
recipes$ = this.http.get<Recipe[]>(
`${BASE_PATH}/recipes`);
constructor(private http: HttpClient) { }
}
Here, we are declaring the recipes$ variable as the result of HTTP GET, which is either an observable or the data stream.
Defining the stream in your component
Now, in RecipesListComponent, we are going to do the same thing we did in the classic pattern, that is, declaring a variable holding the stream returned from our service. This time, the variable is an observable:
import { Component, OnDestroy, OnInit } from '@angular/core';
import { RecipesService } from '../core/services/recipes.service';
@Component({
selector: 'app-recipes-list',
templateUrl: './recipes-list.component.html',
styleUrls: ['./recipes-list.component.css']
})
export class RecipesListComponent implements OnInit {
recipes$= this.service.recipes$;
constructor(private service: RecipesService) { }
}
But wait! We need to subscribe in order to get the emitted data, right? That's absolutely right.
Using the async pipe in your template
We will not subscribe manually; instead, we will use the async pipe.
The async pipe makes rendering values emitted from the observable easier. First of all, it automatically subscribes to the input observable. Then, it returns the latest value emitted. And best of all, when the component has been destroyed, it automatically unsubscribes to avoid any potential memory leaks.
This means there is no need to clean up any subscriptions when the component has been destroyed. And that's amazing. Whenever a new value is emitted, it marks the component to be checked for changes.
So, in the template, we bind to an observable using the async pipe. Here, as recipes describes the array variable that the values are emitted into. We can use it in the template as follows:
<div *ngIf="recipes$ |async as recipes" class="card">
<p-dataView #dv [value]="recipes" [paginator]="true"
[rows]="9" filterBy="name" layout="grid">
/** Extra code here **/
</p-dataView>
</div>
By doing this, we don't need the ngOnInit life cycle hook. We will not subscribe to the Observable notifier in ngOnInit() and unsubscribe from ngOnDestroy(), as we did in the classic pattern. We simply set a local property in our component, and we are good to go.
So, you don't need to handle the subscription and unsubscription on your own.
The total code of the HTML template is available in the GitHub repository.
To sum up, the following diagram describes all the steps we walked through:
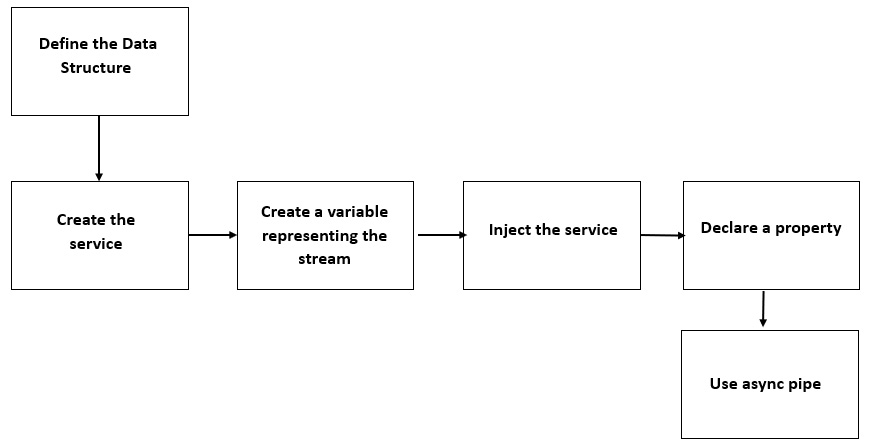
Figure 4.3 – The reactive pattern workflow
Now that we have explained the reactive pattern in action, in the next section, let's discover its advantages.
Highlighting the advantages of the reactive pattern
I think you might have guessed the first advantage: we don't have to manually manage subscriptions and unsubscriptions, and what a relief! But there are a lot of other advantages; it is not only about the async pipe. Let's look at the other advantages in more detail.
Using the declarative approach
Let's shed light on the fact that we don't explicitly use the subscribe() method. What's wrong with subscribe()? Well, subscribing to a stream inside our component means we are allowing imperative code to leak into our functional and reactive code. Using the RxJS observables does not make your code reactive and declarative systematically. But what does declarative mean exactly?
Well, first, we will nail down some key terms. Then, let's iterate from there:
- Declarative refers to the use of declared functions to perform actions. You rely upon pure functions that can define an event flow. With RxJS, you can see this in the form of observables and operators.
- A pure function is a function that will always return identical outputs for identical inputs, no matter how many times it is called. In other words, the function will always predictably produce the same output.
So, why should you care? Well, you should care because the declarative approach using RxJS operators and observables has many advantages, namely, the following:
- It makes your code cleaner and more readable.
- It makes your code easier to test because it is predictable.
- It makes you able to cache the stream output given a certain input, and this will enhance performance. We will explore this in more detail in Chapter 8, Multicasting Essentials, Chapter 9, Caching Streams, and Chapter 10, Sharing Data between Components.
- It enables you to leverage RxJS operators and transform and combine streams coming from different services or even within the same service. This is what we will see in Chapter 7, Transforming Streams.
- It helps you react easily to user interactions in order to execute an action.
So, more declarative means more reactive. However, be careful. This doesn't mean you can't ever call the subscribe() method. It is unavoidable in some situations to trigger the Observable notifier. But try to ask yourself, do I really need to subscribe here? Can I instead compose multiple streams together, or use RxJS operators, to achieve what I need without subscribing? Aside from cases where it is unavoidable, never use subscribe().
Now, let's move to the performance advantages.
Using the change detection strategy of OnPush
The other really cool thing is that we can use the changeDetection strategy, OnPush.
Change detection is one of the powerful features of Angular. It is about detecting when the component's data changes and then automatically re-rendering the view or updating the DOM to reflect that change. The default strategy of "check always" means that, whenever any data is mutated or changed, Angular will run the change detector to update the DOM. So, it is automatic until explicitly deactivated.
In the OnPush strategy, Angular will only run the change detector when the following occurs:
- Condition 1: A component's @Input property reference changes (bear in mind that when the input property object is mutated directly then the reference of the object will not change and consequently the change detector will not run. In this case we should return a new reference of the property object to trigger the change detection).
- Condition 2: A component event handler is emitted or gets triggered.
- Condition 3: A bound observable via the async pipe emits a new value.
Therefore, using the changeDetection OnPush strategy minimizes any change detection cycles and will only check for changes to re-render our components in the preceding cases. This strategy applies to all child directives and cannot be overridden.
In our scenario, we only need the change detector to run if we get a new value; otherwise, we get useless updates. So, our scenario matches Condition 3. The good news is that we can use the change detection onPush strategy as follows:
import { ChangeDetectionStrategy, Component} from '@angular/core';
@Component({
selector: 'app-recipes-list',
templateUrl: './recipes-list.component.html',
styleUrls: ['./recipes-list.component.scss'],
changeDetection: ChangeDetectionStrategy.OnPush
})
So, if we remember to use the async pipe as much as possible, we will see a couple of advantages:
- We will make it easier to switch from the default change detection strategy to OnPush later if we need to.
- We will run into fewer change detection cycles using OnPush.
Using the async pipe will help you to achieve a high-performing UI, and it will have a lot of impact if our view is doing multiple tasks.
And here's the output of our UI:
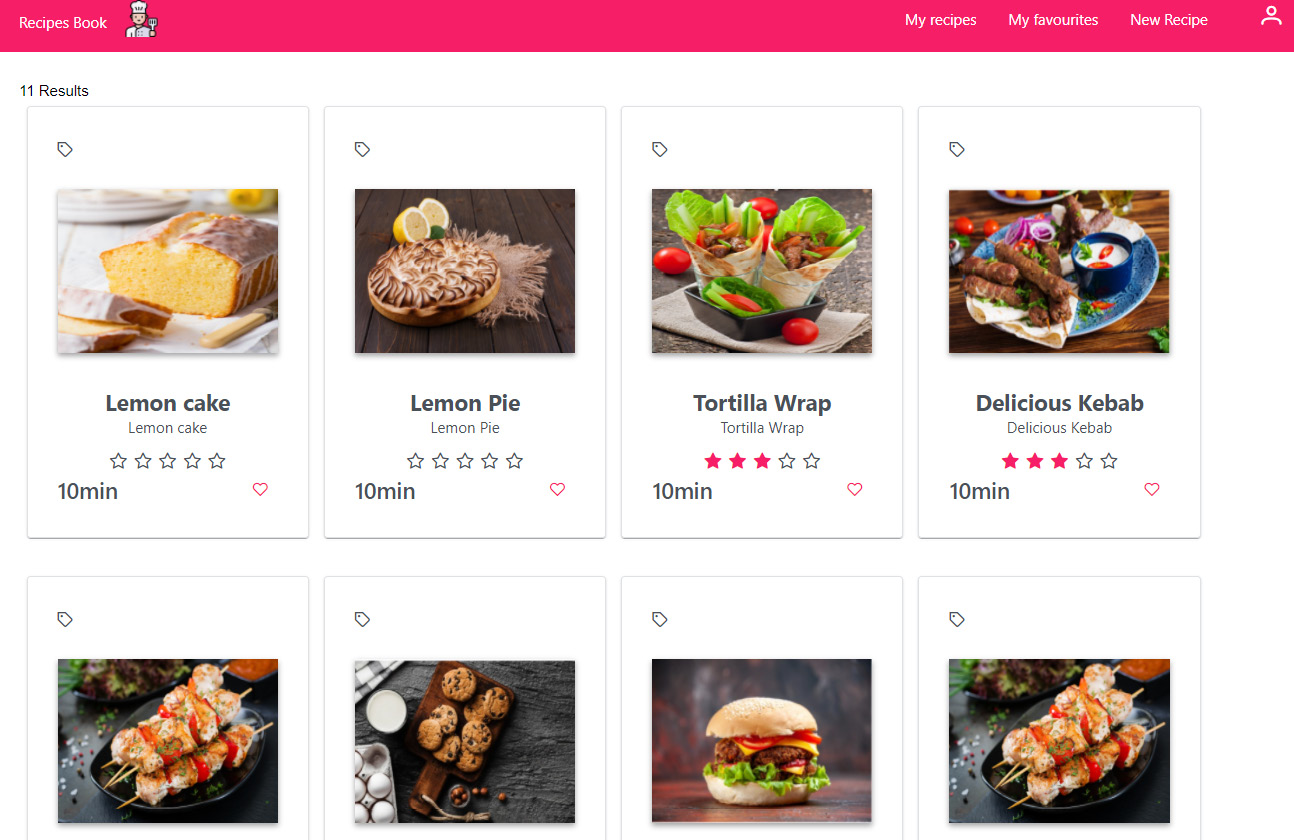
Figure 4.4 – An overview of the list of recipes
Wrapping up
In a nutshell, using the reactive pattern for fetching data will ensure the following:
- It improves the performance of your application.
- It improves the change detection strategy.
- It improves code clarity and readability.
- It makes the code more declarative and more reactive.
- It makes it easier to leverage RxJS operators.
- It makes it easier to react to user action.
Summary
In this chapter, we explored the classic and reactive patterns for fetching data. We learned the imperative way in which to manage unsubscriptions and the reactive pattern. We explained some useful RxJS operators and also shed light on the advantages of using the reactive pattern and we learned about all the technical aspects around.
Now that we have retrieved our data as RxJS streams, in the next chapters, let's start playing with those streams to react to user actions using RxJS streams and, consequently, build our RecipesApp application in a reactive way. In the next chapter, we will focus on the reactive patterns for error handling and the different strategies that are available.