
Chapter 7: Transforming Streams
When dealing with streams, one of the most frequent use cases you will face is the need to transform a stream of certain values into a stream of other values. And this is what this chapter is about.
We will start by explaining the requirement that we will resolve by transforming streams. It is about implementing autosave behavior in the recipe app. Then, we will explore the imperative way of implementing this feature. Following that, we will learn the declarative pattern for doing it and study the most commonly used RxJS transformation operators for this situation.
In this chapter, we're going to cover the following main topics:
- Defining the requirement
- Exploring the imperative pattern for autosave
- Exploring the declarative pattern for autosave
- Learning about other useful higher-order mapping operators
Technical requirements
This chapter assumes that you have a basic understanding of RxJS.
For more details about Reactive forms, please refer to https://angular.io/guide/reactive-forms.
The autosave service used in this chapter and available in recipes-book-api is a fake used for demonstration purposes as the focus is not the backend.
The source code of this chapter, except for the samples, is available at https://github.com/PacktPublishing/Reactive-Patterns-with-RxJS-for-Angular/tree/main/Chapter07.
Defining the requirement
As described in the View 2 – The new recipe interface section of Chapter 3, A Walkthrough of the Application, the user can add a new recipe by clicking on the New Recipe menu item. This will display the following form to be filled out:
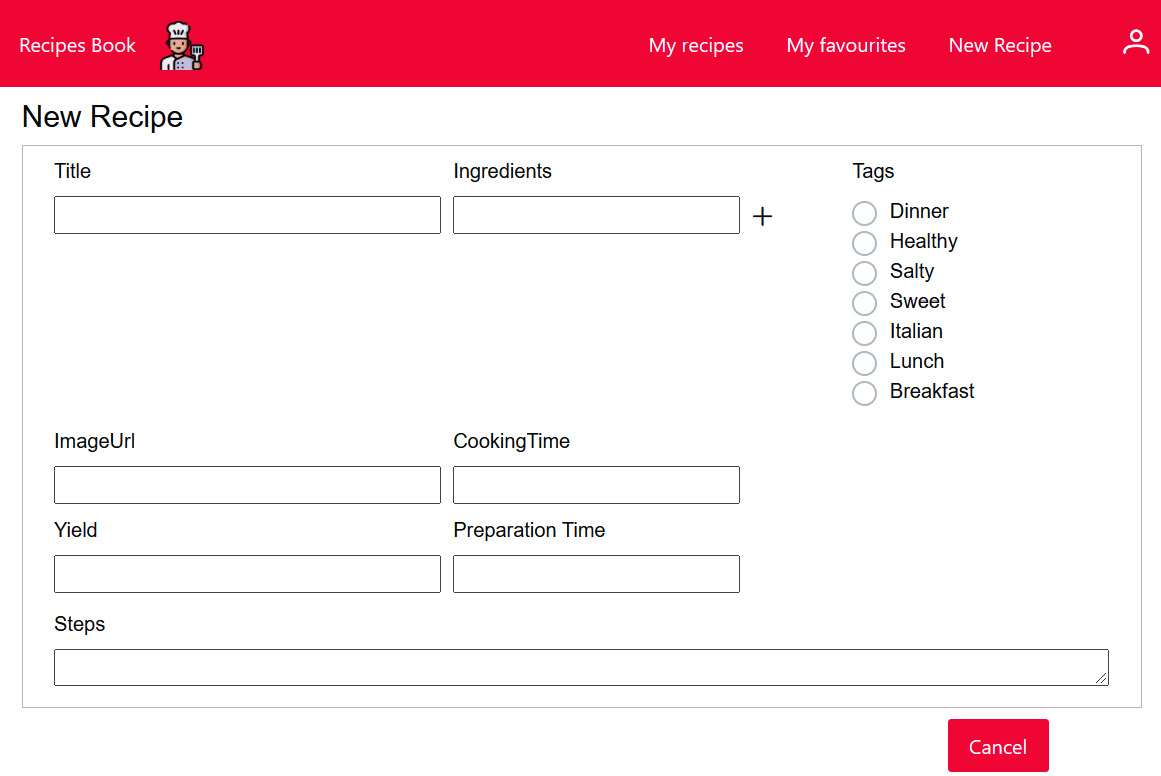
Figure 7.1 – The New Recipe form
The component responsible for displaying the New Recipe form is called RecipeCreationComponent and is available under recipes-book-frontsrcapp ecipe-creation. We want to implement autosave behavior, which consists of storing the user's changes in the form automatically. In this example, we will be storing the form changes in the backend, but they can also be stored on the client side; it all depends on the context. This feature improves the user experience by preventing data loss.
Now that we understand the requirement, let's look in the next section at the imperative way to implement autosave.
Exploring the imperative pattern for autosave
We used Angular Reactive forms to build the New Recipe creation form. As described in the Using RxJS in Angular and its advantages section of Chapter 1, The Power of the Reactive Paradigm, Reactive forms leverage RxJS by using the valueChanges observable to track the FormControl changes. This makes our jobs easier since we want to listen to the form's value changes in order to perform a save on every change. You can find the HTML code of the New recipe creation form in the file recipe-creation.component.html template.
In recipe-creation.component.ts, we only define the form as follows:
export class RecipeCreationComponent implements OnInit {
constructor(private formBuilder: FormBuilder) { }
recipeForm = this.formBuilder.group({
id: Math.floor(1000 + Math.random() * 9000),
title: [''],
ingredients: [''],
tags: [''],
imageUrl: [''],
cookingTime: [''],
yield: [''],
prepTime: [''],
steps: ['']
});
tags = recipeTags.TAGS;
Please note that the formControl id is not going to be displayed in the form. We only create it to initialize the new Recipe object with a random identifier in order to save the new instance of the recipe properly in the backend.
The tags property is retrieved from a constant declared in src/app/core/model/tags.ts that represents the list of available tags.
The first thing that comes to mind to implement the autosave feature is subscribing to the valueChanges observable of recipeForm in the ngOninit() instance of our RecipeCreationComponent. Every time the valueChanges observable emits a new form value, we should perform a save request to save the most recent value of the form:
ngOnInit(): void {
this.recipeForm.valueChanges
.subscribe(
formValue => {
this.service.saveRecipe(formValue);
}
);
The saveRecipe method is defined and implemented in our RecipeService as follows:
saveRecipe(formValue: Recipe) : Observable<Recipe> {
return this.http.post<Recipe>(`${BASE_PATH}/recipes/save`, formValue);
}
Note
The backend implementation is not the focus of this book. We provided a fake implementation of '/api/recipes/save' in the recipes-book-api project. The goal is simulating the call to an HTTP request to save the data.
The code of RecipeCreationComponent will look like this:
export class RecipeCreationComponent implements OnInit {
constructor(private formBuilder: FormBuilder, private
service: RecipesService) { }
recipeForm = this.formBuilder.group({
id: Math.floor(1000 + Math.random() * 9000),
title: [''],
ingredients: [''],
tags: [''],
imageUrl: [''],
cookingTime: [''],
yield: [''],
prepTime: [''],
steps: ['']
});
tags = recipeTags.TAGS;
ngOnInit(): void {
this.recipeForm.valueChanges
.subscribe(
formValue => {
this.service.saveRecipe(formValue);
}
);
}
}
But this code won't work. You should know by now that the result of this.http.post<Recipe>(`${BASE_PATH}/recipes/save`, formValue) is an observable, and since observables are lazy, we should subscribe to it in order to initiate the HTTP POST request. This way, we will fall, unfortunately, into the nested subscribes anti-pattern, and the code will look like this:
ngOnInit(): void {
this.recipeForm.valueChanges
.subscribe(
formValue => {
this.service.saveRecipe(formValue).subscribe(
result => this.saveSuccess(result),
errors => this.handleErrors(errors)
);
}
);
This implementation is problematic for several reasons:
- Every time we use subscribe(), we open the door to imperative code, and we have learned throughout this book that we should avoid that as much as we can.
- Nested subscriptions should be cleaned carefully; otherwise, we can run into various performance problems.
- We open up the possibility of serious timing issues. In fact, if multiple form values are emitted by valueChanges successively, many save requests will be sent in parallel. And if the requests take some time to complete, there is no guarantee that the backend will process the save requests in order. For instance, we cannot ensure that the last valid form value is indeed the one saved in the backend. Consequently, we will end up with data incoherence. What we really want to do is perform a save request after the previous one is completed.
So, let's see in the following section how we can implement this in a reactive and declarative way.
Exploring the reactive pattern for autosave
Let's think of the save operation as a stream; it is the result of the this.service.saveRecipe(formValue) method, which calls this.http.post<Recipe>(`${BASE_PATH}/recipes/save`, formValue. We will call it the saveRecipe$ observable.
The saveRecipe$ observable is responsible for saving the data in the backend. It will initiate the http request when subscribed to.
What we can do in this situation to avoid nested subscriptions is mapping or transforming the form value emitted by the valueChanges observable to the saveRecipe$ observable. The result is what we call a higher-order observable. Not clear? Don't worry, we will explain this in detail in the next section. So, what is a higher-order observable? And how can it help us in this situation?
Higher-order observables
A higher-order observable is just an observable like any other, but its values are observables as well. In other words, it emits observables that you can subscribe to separately. OK, but when is it useful?
You can create a higher-order observable whenever you use data emitted from one observable to emit another observable. In our case, for every emitted form value from the valueChanges observable, we want to emit the saveRecipe$ observable. In other words, we want to transform or map the form value to the saveRecipe$ observable. This would create a higher-order observable where each value represents a save request. In this situation, the valueChanges observable is called the outer observable and saveRecipe$ is called the inner observable. We then want to subscribe under the hood to each saveRecipe$ observable emitted and receive the response all in one go to avoid nested treatments. The following figure illustrates my explanation:
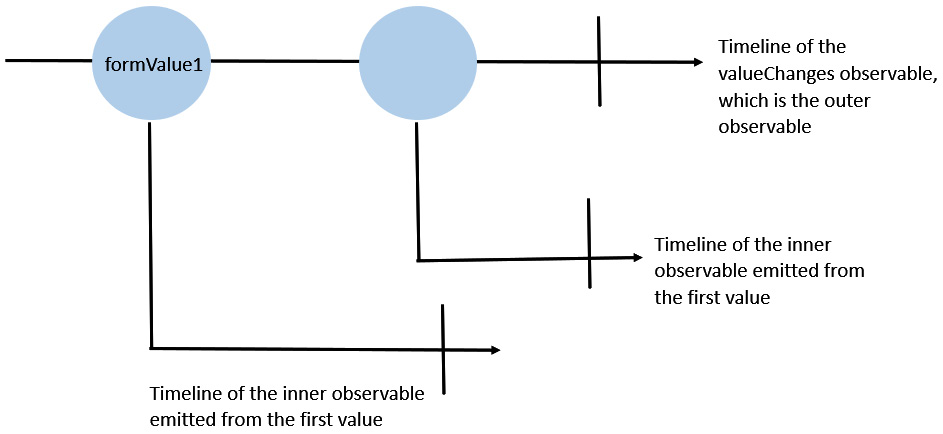
Figure 7.2 – The higher-order observable diagram
Now that we have learned what higher-order observables are and when to use them, let's focus on the higher-order mapping operators.
Higher-order mapping operators
In order to transform the outer observable, we should use higher-order mapping operators. The role of these operators is to map each value from an outer observable to a new inner observable and automatically subscribe and unsubscribe from that inner observable.
What is the difference between a higher-order mapping and a regular mapping?
Regular mapping involves mapping one value to another value. One of the most used basic mapping operators is the map operator:
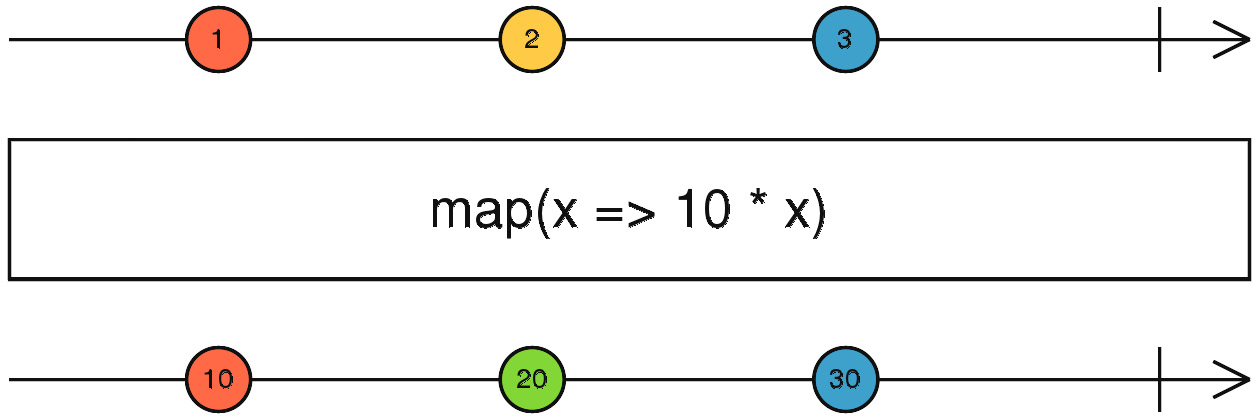
Figure 7.3 – The map operator – marble diagram
As described in this marble diagram, the map operator will transform the values of the input stream by multiplying each emitted value by 10. x=>10*x is the transformation function. This is how basic mapping works; higher-order mapping is about mapping one value into an observable.
RxJS provides several higher-order mapping operators. We will learn in the next section about the concatMap() operator, which we will use to implement the autosave behavior. Then, we will discover the other commonly used operators and the differences between them.
The concatMap operator
concatMap is the combination of the concatenation strategy and transformation (or mapping):
concatMap = concat (concatenation) + map (higher-order mapping)
We have already looked at the concepts of basic and higher-order mapping in the previous section.
Now let's look at the following marble diagram to understand the concatenation strategy. We will take the example of the concat operator:
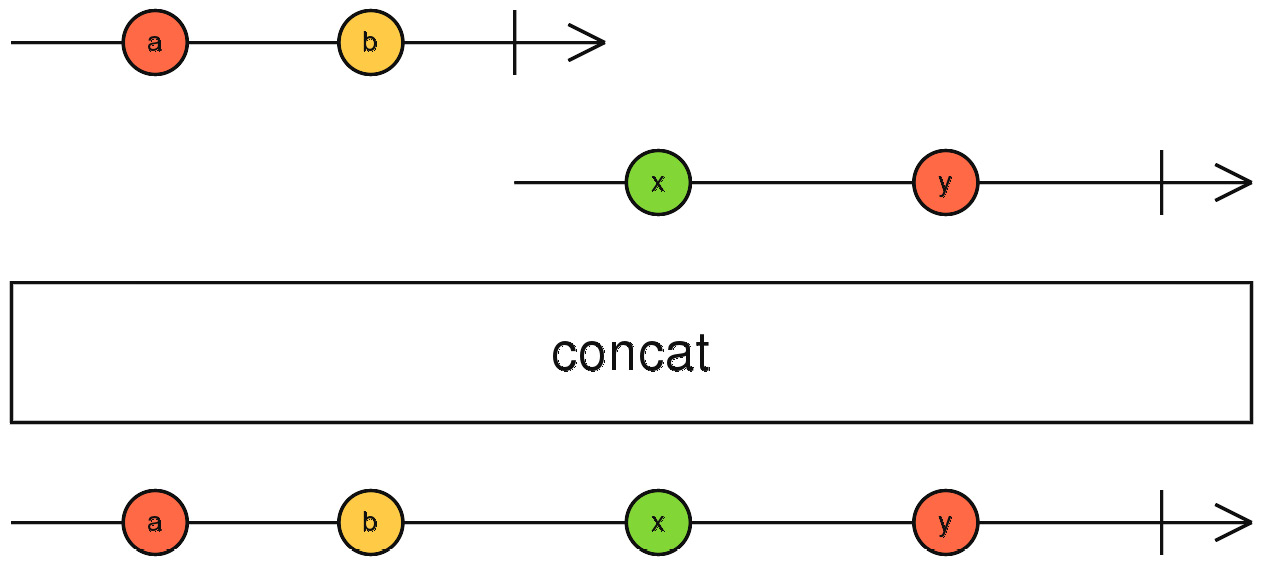
Figure 7.4 – The concat operator – marble diagram
- The first line represents the timeline of the first observable passed as input to the concat operator.
- The second line represents the timeline of the second observable passed as input to the concat operator.
- The concat operator in this example has two inputs. It will subscribe to the first observable but not to the second one. The first observable will emit the values a and b, which get reflected in the result observable (the last line).
- Then, the first observable completes, and at that moment, the concat operator subscribes to the second observable. This is how a sequential process is guaranteed.
- The second observable will emit the values x and y, which get reflected in the result observable.
- When the second observable completes, the output observable will also complete.
As you may have noticed, observable concatenation is all about observable completion. This is the key point. It emits the values of the first observable, waits for it to complete, and then emits the values of the next observable, and so on and so forth, until all the observables complete.
Now that we understand the concatenation strategy, we can define the concatMap operator as a mixture of higher-order mapping and observable concatenation: it waits for each inner observable to complete before processing the next one.
And the concatMap operator fits very well to our autosave requirement for the following reasons:
- We want to take the form value and turn it into a saveRecipe$ observable and automatically subscribe and unsubscribe from the saveRecipe$ inner observable — this is what a higher-order mapping operation does.
- We want to perform a save request only after the previous one is completed. When one HTTP save request is in progress, the other requests that come in the meantime should wait for its completion before getting called to ensure sequentiality. So, we need to concatenate the saveRecipe$ observables together.
This is what the code will look like:
valueChanges$ = this.recipeForm.valueChanges.pipe(
concatMap(formValue =>
this.service.saveRecipe(formValue)),
catchError(errors => of(errors)),
tap(result=>this.saveSuccess(result))
);
Let's break down what is going on at the level of this code:
- Here, the outer observable, which is valueChanges, emits form values. For each emitted form value, concatMap transforms it to this.service.saveRecipe(formValue), which is the saveRecipe$ observable – our inner observable.
- concatMap automatically subscribes to the inner observable and the HTTP POST request will be issued.
- Another form value might come faster than the time it takes to save the previous form value in the backend. In this case, the form value will not be mapped to the saveRecipe$ observable. Instead, concatMap will wait for the previous save request to return a response and complete before transforming the new form value to saveRecipe$, subscribing to it, and sending a new save request. When all inner observables complete, the result stream completes.
- Then, we use the catchError operator to handle the errors and register a side effect with the tap operator in order to log the message Saved successfully in the backend. You can customize this, of course, and display a message to the end user.
The complete code of RecipeCreationComponent will now look like this:
export class RecipeCreationComponent {
constructor(private formBuilder: FormBuilder, private
service: RecipesService) { }
recipeForm = this.formBuilder.group({
id: Math.floor(1000 + Math.random() * 9000),
title: [''],
ingredients: [''],
tags: [''],
imageUrl: [''],
cookingTime: [''],
yield: [''],
prepTime: [''],
steps: ['']
});
tags = recipeTags.TAGS;
valueChanges$ = this.recipeForm.valueChanges.pipe(
concatMap(formValue =>
this.service.saveRecipe(formValue)),
catchError(errors => of(errors)),
tap(result=>this.saveSuccess(result))
);
saveSuccess(result: any) {
console.log('Saved successfully');
}
One thing is left: we should subscribe to the valueChanges$ observable in order to make all of this work. And we will do so as usual through the async pipe in our template as follows:
export class RecipeCreationComponent {
<ng-container *ngIf="valueChanges$ | async"></ng-
container>
/** All the form code here**/
Now the reactive implementation is complete. As you may have noticed, the first benefit of using concatMap is that now we no longer have nested subscriptions. We also get rid of explicit subscriptions thanks to the async pipe. Besides, all form values are going to be sent to the backend sequentially, as shown here in the Chrome Developer Tools Network tab:
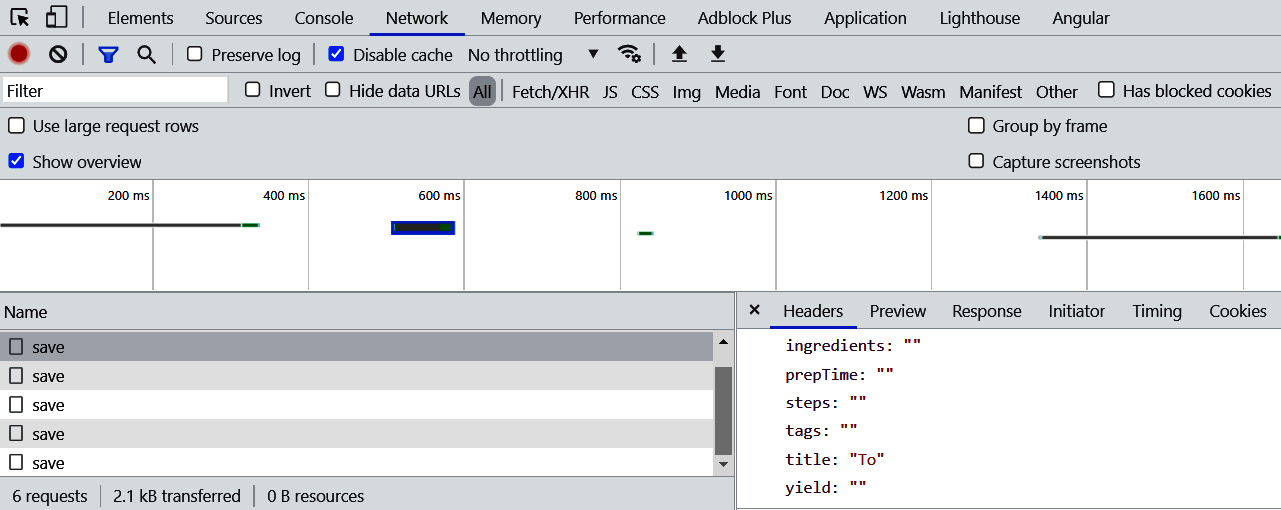
Figure 7.5 – Network tab
In order to avoid sending requests for every character introduced by the user, we can use the debounceTime(waitingTime) operator to wait for the user input to stabilize before sending the requests. We can optimize it further by ignoring duplicates, invalid values, and so on. This was an example of an implementation to dig deep into the concatMap operator.
Note
For more details about the debounceTime operator, please refer to https://rxjs.dev/api/operators/debounceTime.
To sum up, use concatMap when you want to ensure that operations are processed in sequence and each inner observable is processed one at a time and in order. There are other higher-order mapping operators that are useful in many situations. Let's talk about those operators in the next section.
Learning about other useful higher-order mapping operators
All higher-order mapping operators map each value from an outer observable to a new inner observable and automatically subscribe and unsubscribe from that inner observable. But not all operators adopt the concat strategy. There are different strategies, such as merge, switch, and exhaust. Let's break down those strategies!
The mergeMap operator
mergeMap is the combination of the merge and transformation (or mapping) strategies:
mergeMap = merge(merge) + map (higher-order mapping)
Now that you understand well the concepts of higher-order mapping, let's look at this marble diagram to understand the merging strategy. We will take the example of the merge operator:
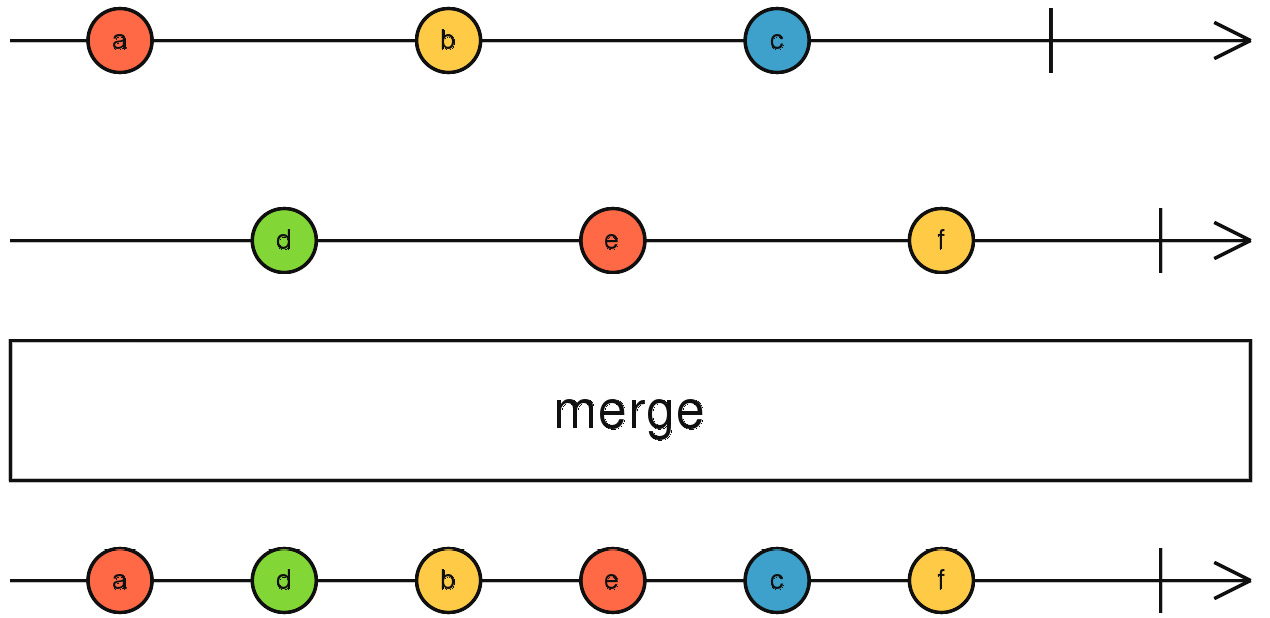
Figure 7.6 – The merge operator – marble diagram
Unlike concat, merge will not wait for an observable to complete before subscribing to the next observable. It subscribes to every inner observable at the same time and then outputs the values to the combined result. As described in this marble diagram, the values of the input observables are reflected in the output immediately. The result will not complete until all the merged observables complete.
mergeMap is a higher-order mapping operator that processes each inner observable in parallel.
Use mergeMap when you want to run operations in parallel. It enhances performance since each inner observable is processed concurrently, but only use mergeMap if the resulting order doesn't matter because it's possible that these requests will be processed out of order.
The switchMap operator
switchMap is the combination of the switch and transformation (or mapping) strategies:
switchMap = switch(switch) + map (higher-order mapping)
Let's look at the marble diagram of the switch operator to understand the switch strategy:
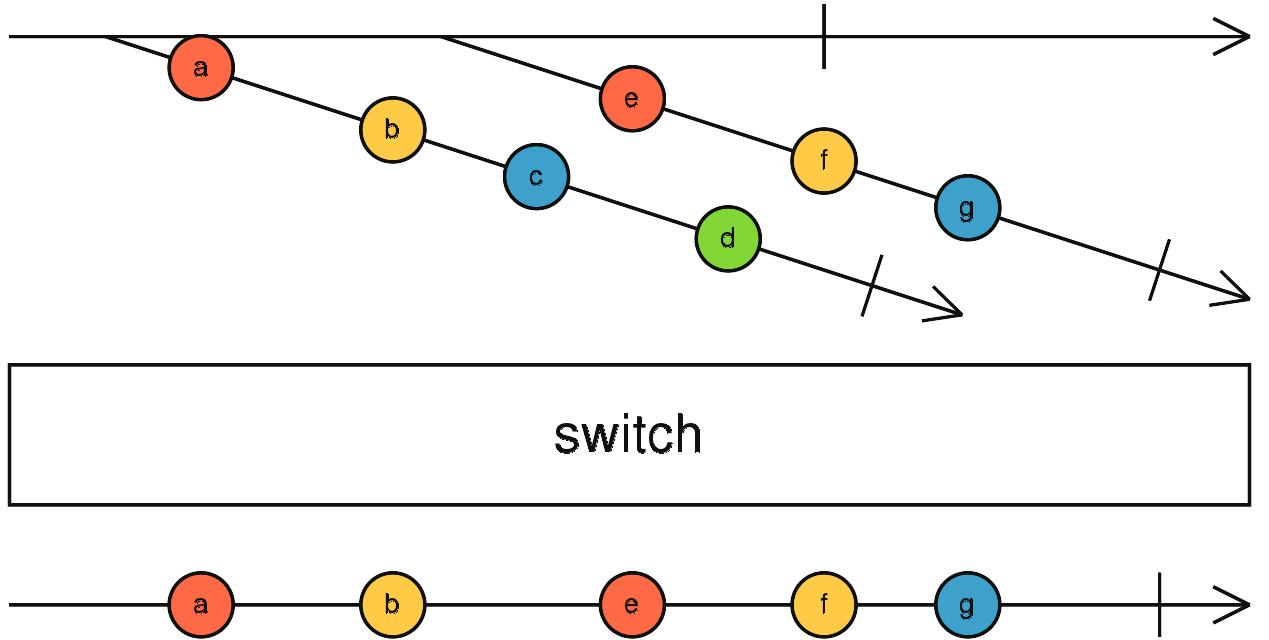
Figure 7.7 – The switch operator – marble diagram
Let's break down what is happening here. You are not used to seeing those diagonal lines, I know.
The top line is the higher-order observable. The higher-order observable emits the first inner observable (which has the values a, b, c, and d). The switch operator subscribes to it under the hood.
The first inner observable emits the values a and b, and they get reflected automatically to the resulting observable.
Then, the higher-order observable emits the second inner observable (which has the values e, f, and g).
The switch will unsubscribe from the first inner observable (a-b-c-d) and it subscribes to the second inner observable(e-f-g); that's why the values e, f, and g get reflected right after a and b.
As you may have noticed in switching, if a new observable starts emitting values, then the switch will subscribe to the new observable and unsubscribe from the previous one.
The switchMap operator is a higher-order mapping operator that unsubscribes from any prior inner observable and switches to any new inner observable. It is useful when you want to cancel an operation when a new one is triggered.
The exhaustMap operator
exhaustMap is the combination of the exhaust and transformation (or mapping) strategies:
exhaustMap = exhaust(exhaust) + map ()higher-order mapping
Let's look at this marble diagram to understand the exhaust strategy:
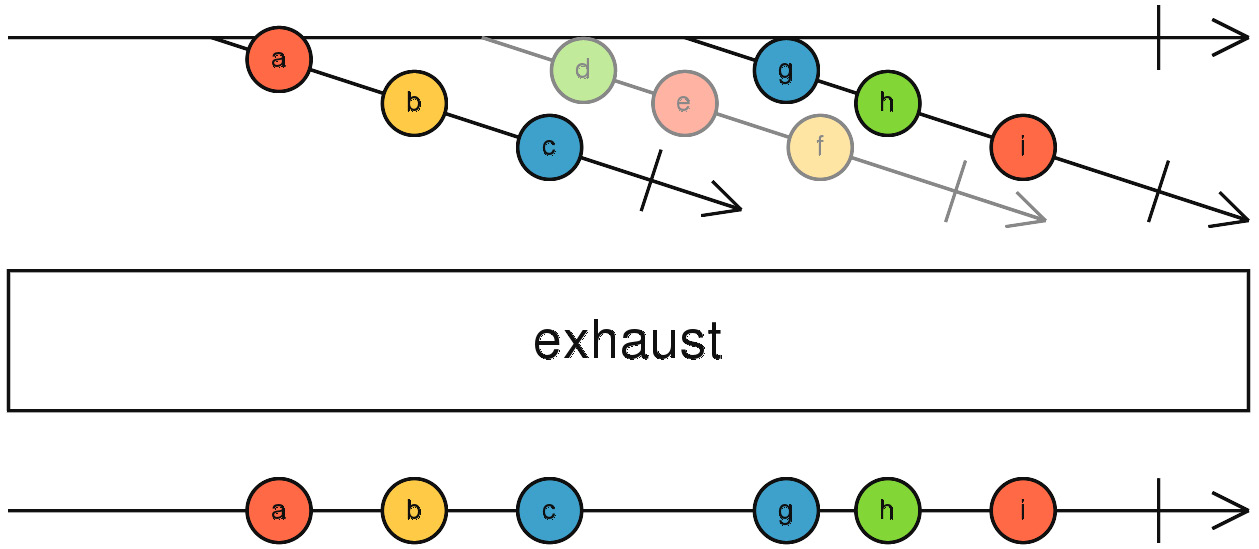
Figure 7.8 – The exhaust operator – marble diagram
The top line is a higher-order observable producing three inner observables over time. When the first inner observable (a-b-c) is emitted, exhaust will subscribe to it.
The values a-b get reflected in the output observable. Then, the second inner observable comes and gets ignored by the exhaust operator; it will not be subscribed to (this is the key part of exhaust).
Only when the first inner observable completes will exhaust subscribe to new observables.
So, the value c will get reflected, and the first inner observable completes. exhaust is ready now to treat other observables. At that point, the third inner observable comes. The switch will subscribe to and the values of the third inner observable, g-h-i, get reflected in the output.
switchMap is a higher-order mapping operator that unsubscribes from any prior inner observable and switches to any new inner observable.
In a nutshell, we can simply pick the right operator based on the use case:
- If the order is important and you need to process operations in sequence while waiting for completion, then concatMap is the right choice.
- If the order is not important and you need to process operations in parallel to enhance performance, mergeMap is the best operator.
- If you need to put a cancellation logic to release resources and take always the most recent information, then switchMap is the way to go.
- To ignore new observables while the current one is still ongoing, use exhaustMap.
Summary
In this chapter, we learned about the concepts of higher-order observables and higher-order mapping operators. We also learned about the concat strategy and how the concatMap operator works and how it can help us implement the autosave requirement in the recipe app in a reactive way. We focused on practical examples to better understand the concepts. Then, we explored other strategies, namely the use of the merge, switch, and exhaust higher-order mapping operators; we saw how each of them works and when and why to use each.
Let's move on to multicasting essentials in the next chapter.