
Chapter 12: Processing Real-Time Updates
Real time is a very hot topic nowadays. The demand for real-time features has been growing in web applications. So, how can you process real-time messages in the frontend and update the displayed data automatically in the UI? This is what we will cover in this chapter. We will start by explaining the requirement, and then we will walk you through the different steps to implement the reactive pattern for consuming real-time updates. Finally, we will learn the reactive pattern for handling reconnection.
In this chapter, we're going to cover the following main topics:
- Defining the requirement
- Learning the reactive pattern for consuming real-time messages
- Learning the reactive pattern for handling reconnection
Technical requirements
This chapter assumes that you have a basic understanding of RxJS.
We used the ws library, which is a WebSocket Node.js library, in order to support WS in our backend. For more details, you can check out this link: https://github.com/websockets/ws.
The source code of this chapter is available at https://github.com/PacktPublishing/Reactive-Patterns-with-RxJS-7-in-Angular-applications/.
Defining the requirement
There are two techniques available for publishing real-time data on the web:
- Pull technique: This is where the client raises a request to get the latest version of data. HTTP polling and HTTP long polling are two examples of implementations of the pull technique.
- Push technique: This is where the server pushes updates to the client. WebSockets and Server Sent Events are two implementations of the push technique.
In general, push techniques have a lower latency compared to pull ones. We are not going to dive into these techniques in detail and compare them, as it is not the goal of this chapter. However, we will use the WebSocket technology for our requirement.
In short, the WebSocket protocol is a stateful communication protocol that establishes a low-latency bidirectional communication channel between a client and a server. This way, messages can be sent back and forth between the server and the client. The following diagram illustrates the WebSocket communication flow:
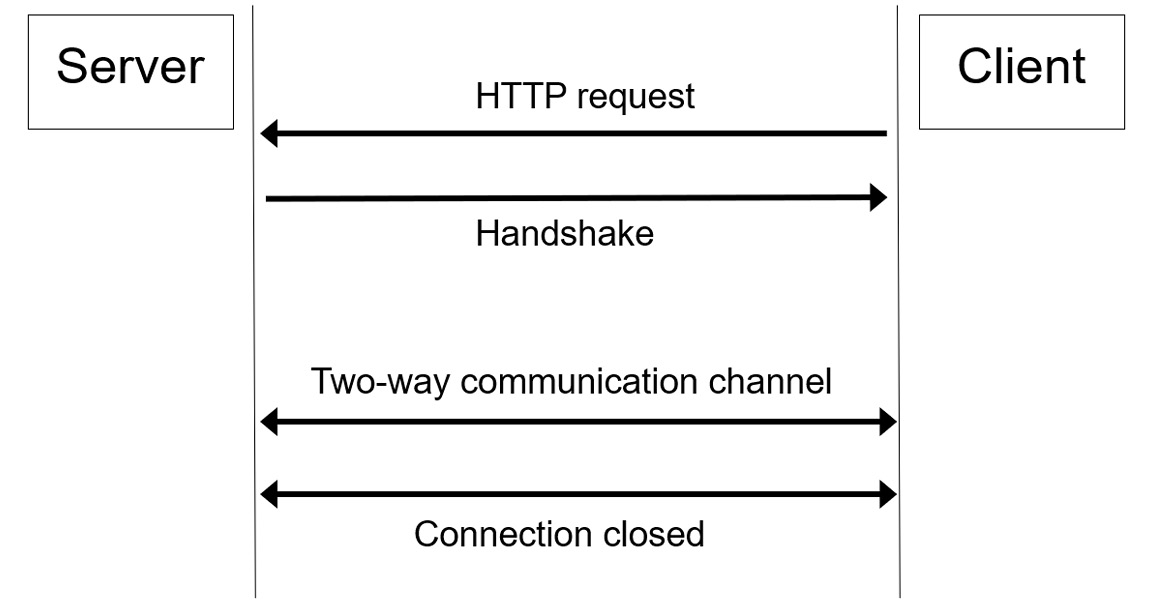
Figure 12.1 – WebSocket communication
As illustrated in the preceding figure, there are three steps in WebSocket communication:
- Opening the connection: In this step, the client issues an HTTP request to tell the server that a protocol upgrade will occur (from HTTP to WebSocket). If the server supports WebSockets, then the protocol switch will be accepted.
- Establishing the communication channel: Once the protocol upgrade is done, then a bidirectional communication channel will be created, and messages start to be sent back and forth between the server and the client.
- Closing the connection: When the communication is over, a request will be issued to close the connection.
At this level, that is all that you need to know about WebSockets. You will find a ready-to-use WebSocket backend under the recipes-book-api folder that pushes notifications to the client.
Now that we have highlighted the different techniques available for implementing a real-time feature and learned the basics of the WebSocket protocol, let's explore in the next section the reactive pattern for consuming real-time messages. We want to consume the live updates sent by the WebSocket server and update the UI automatically without having to trigger a Refresh button.
Learning the reactive pattern for consuming real-time messages
RxJS has a special type of Subject called WebSocketSubject that allows you to communicate with a WebSocket server. Let's learn about the behavior of this Subject and its capabilities.
The WebSocketSubject behavior
WebSocketSubject is nothing but a wrapper around the W3C WebSocket object available in the browser. It allows us to both send and consume data through a WebSocket connection.
The WebSocketSubject creation
In order to use WebSocketSubject, you have to call the webSocket factory function that produces this special type of Subject and takes the endpoint of your WebSocket server as input. The following is the function signature:
webSocket<T>(urlConfigOrSource: string | WebSocketSubjectConfig<T>): WebSocketSubject<T>;
It accepts two types of arguments: either a string representing the URL of your endpoint or a special object of the WebSocketSubjectConfig type that contains the URL of your endpoint, along with other properties. We will explore WebSocketSubjectConfig in detail in the Learning the reactive pattern for handling reconnection section.
The following is an example of calling the webSocket factory function with the first type of argument:
import { webSocket } from "rxjs/webSocket";
const subject = webSocket("ws://localhost:8081");
The following is an example of calling the webSocket factory function with the second type of argument:
import { webSocket } from 'rxjs/webSocket';
const subject$ = webSocket({url:'ws://localhost:8081'});
In our case, the URL of our endpoint is ws://localhost:8081. You can use ws for a secure WebSocket connection (which is the same as HTTPS for a secure HTTP connection).
Opening the connection
Now that you have a reference of WebSocketSubject, you should subscribe to it in order to establish the connection with your ws endpoint and start receiving and sending data:
import { webSocket } from 'rxjs/webSocket';
const subject$ = webSocket({url:'ws://localhost:8081'});
subject$.subscribe();
If you don't subscribe, the connection will not be created.
Listening to incoming messages from the server
As WebSocketSubject is nothing but a regular RxJS Subject, you can register callbacks to process the incoming messages from the WebSocket server.
In order to listen to messages, you should subscribe to the produced WebSocketSubject from the webSocket factory function and register a callback, as follows:
const Subject$ = webSocket('ws://localhost:8080');
// Listen to messages from the server
const subscription1 = Subject$.subscribe(msg => {
console.log('Message received from the socket'+ msg);
});
Pushing messages to the server
In order to send messages to the server, we can use the next method available in the subject type, as follows:
// Push messages to the server
subject$.next('Message to the server')
Handling errors
You can also catch errors coming from the server using catchError as usual and push errors to the server by calling the error method. But bear in mind that when you send an error, the server will get notified about this error, and then the connection will be closed. So, nothing will get emitted thereafter:
// Push errors to the server
subject$.error('Something wrong happens')
// Handle incoming errors from the server
subject$.error('Something wrong happens')
Closing the connection
You can use unsubscribe or complete to close the connection:
// Close the connection
subject$.complete();
//or
subject$.unsubscribe();
As you may have noticed, only the creation of WebSocketSubject is specific to this special kind of Subject. All the other APIs used are the same as those used for regular Subjects. So, there is nothing fancy here.
The following figure illustrates the whole process:

Figure 12.2 – WebSocketSubject possible events
Connection management
If the same instance of WebSocketSubject has many subscribers, then they will share the same connection to save resources. However, if we have two different instances of WebSocketSubject, it will establish two distinct connections, even if they are referencing the same endpoint. Be aware of this behavior! The following code explains the connection management for both use cases:
const firstSubject$ = webSocket('ws://localhost:8080');
const secondSubject$ = webSocket('ws://localhost:8080');
// the first subscriber, opens the WebSocket connection
const subscription1 = firstSubject$.subscribe(msg => {
});
// the second subscriber, uses the already opened WebSocket
connection
const subscription2 = firstSubject$.subscribe(msg => {
});
//this subscriber opens a new connection
const subscription3 = secondSubject$.subscribe(msg => {
});
Let's explain what's happening in this code. We create two instances of WebSocketSubject called firstSubject$ and secondSubject$ respectively that reference the same ws endpoint. Then, we create a subscription to the firstSubject$; this first subscription will open the WebSocket connection. Then, we create a second subscription to the same Observable, firstSubject$; this second subscription will use the already opened WebSocket connection.
However, the subscription to secondSubject$ will open a new WebSocket connection. Why? Because it is a new reference to the WebSocket Subject, even though it references the same ws endpoint as firstSubject$.
Now, if we have many subscribers sharing the same connection and one of those subscribers decides to complete, then the connection will be released unless there are no more subscribers listening, as described in the following code block:
const subject$ = webSocket('ws://localhost:8080');
// the first subscriber, opens the WebSocket connection
const subscription1 = subject$.subscribe(msg => {});
// the second subscriber, uses the already opened WebSocket
connection
const subscription2 = subject$.subscribe(msg => {});
// the connection stays open
subscription1.unsubscribe();
// closes the connection
subscription2.unsubscribe();
This is all that you need to know to make a basic scenario work. Simple, right? Now, let's see the recommended pattern to put in place our Recipes app.
Putting the pattern into action
Now that we know how to create a connection to our ws endpoint, it is time to explore the different steps to consume real-time messages. The first step is isolating all the interactions with WebSocketSubject in a separate Angular service.
Step one – creating a real-time service
We will create an Angular service called RealTimeService under src/app/core/services. In this service, we will start by creating the following:
- A private property, socket$, that will contain the reference to the WebSocket Subject that we will create in the getNewWebSocket() method.
- A private method, getNewWebSocket(), that returns WebSocketSubject produced by the webSocket factory function that takes WS_ENDPOINT as input. WS_ENDPOINT is a constant that contains the value of the wsEndpoint property available in the environment file. The URL of the endpoints can change from one environment to another. That's why it is recommended to put that information in the environment files.
- A public method, sendMessage(), that sends a message given as input to the socket, which will forward the message to the server.
- A public method, close(), that closes the connection by completing the Subject.
This is how the code of RealTimeService will look after putting all these pieces together:
import { Injectable } from '@angular/core';
import { webSocket, WebSocketSubject } from 'rxjs/webSocket';
import { environment } from '../../../environments/environment';
import { Observable, EMPTY, BehaviorSubject } from 'rxjs';
import { tap, switchAll, catchError } from 'rxjs/operators';
import { Message } from '../model/message.model';
export const WS_ENDPOINT = environment.wsEndpoint;
export const RECONNECT_INTERVAL = environment.reconnectInterval;
@Injectable({
providedIn: 'root'
})
export class RealTimeService {
private socket$!: WebSocketSubject<Message> | undefined;
public getNewWebSocket(): WebSocketSubject<Message> {
return webSocket(WS_ENDPOINT);
}
sendMessage(msg: Message) {
this.socket$?.next(msg);
}
close() {
this.socket$?.complete();
}
}
Then, we will add the connect() method that will listen to the incoming messages in a reactive way:
public connect(): void {
if (!this.socket$ || this.socket$.closed) {
this.socket$ = this.getNewWebSocket();
const messages = this.socket$.pipe(
tap({
error: error => console.log(error),
}), catchError(_ => EMPTY));
}
}
Let's break down what is going on in this method. If socket$ is undefined (not yet created) or closed, then socket$ will be populated by the newly produced WebSocketSubject from the getNewWebSocket method. Then, we will combine the tap and catchError operators to handle errors. The tap operator is used to log a message when an error occurs or when the connection closes.
The catchError operator handles errors and returns an empty Observable. The returned Observable from the pipe operation will be stored in a constant called messages.
So far, so good! Now, we will create a private Subject named messagesSubject$ that will emit the messages Observable (the messages observable returned from the socket). So, it is an Observable of Observables:
private messagesSubject$ = new BehaviorSubject<Observable<Message>>(EMPTY);
public connect(): void {
if (!this.socket$ || this.socket$.closed) {
this.socket$ = this.getNewWebSocket();
const messages = this.socket$.pipe(
tap({
error: error => console.log(error),
}), catchError(_ => EMPTY));
this.messagesSubject$.next(messages);
}
}
After that, we will provide a read-only copy from the messagesSubject$ observable through the messages$ public Observable. We used the SwitchAll operator to flatten the Observable of Observables:
private messagesSubject$ = new BehaviorSubject<Observable<Message>>(EMPTY);
public messages$ = this.messagesSubject$.pipe(switchAll(), catchError(e => { throw e }));
public connect(): void {
if (!this.socket$ || this.socket$.closed) {
this.socket$ = this.getNewWebSocket();
const messages = this.socket$.pipe(
tap({
error: error => console.log(error),
}), catchError(_ => EMPTY));
this.messagesSubject$.next(messages);
}
}
We will be subscribing to messages$ in every component that needs to consume real-time updates.
Why do we do this?
The idea is to protect Subject$ and the incoming messages from any external update and expose the messages as read-only to the external components and services. This way, any component interested in consuming the real-time messages has to subscribe to messages$, and all the logic related to the socket will be handled privately in this service.
Step two – triggering the connection
After putting the server in place, we should call the connect method from our root component because we want it to be called only once:
constructor(private service: RealTimeService ) {
this.service.connect();
}
Step three – defining the Observable emitting live updates
Then, we call the messages$ Observable in the Angular component that consumes the live updates:
liveData$ = this.service.messages$.pipe(
map(rows => rows.message),
catchError(error => { throw error }),
tap({
error: error => console.log('[Live component] Error:',
error),
complete: () => console.log('[Live component]
Connection Closed')
}
)
);
As you can see in the preceding code snippet, in our case, we process the incoming messages from the server and transform the current Observable – map(rows => rows.message). We handle the errors using the catchError and tap operators, and then the result is stored in the liveData$ Observable.
Step four – subscribing to the Observable emitting live updates
Now, we are one step from displaying the live data; we just have to subscribe to the liveData$ Observable in our component's template using the async pipe.
And we are done!
Step five – changing detection strategy
In case of frequent updates in the UI, it is highly recommended to set the change detection strategy to onPush in order to optimize the performance:
changeDetection: ChangeDetectionStrategy.OnPush
That's it! You will be able to consume live updates in a reactive way using this pattern.
At this point, you may be wondering how to handle reconnection. When the server is restarted or the connection crashes for whatever reason, does this Subject restore the lost connection under the hood? The answer is no. The reconnection capability is not provided by WebSocketSubject.
But you can implement this easily in your web application using RxJS. Let's learn how you can do this in the next section.
Learning the reactive pattern for handling reconnection
When the connection to the WebSocket server is lost, the channel will be closed, and WebSocketSubjet will no longer emit values. This is not the expected behavior in the real-time world. The reconnection capability is a must in most cases.
Therefore, let's imagine, for example, that after a disconnection, a system tries to reconnect after every 3 seconds. The solution, in this case, is intercepting the closure of the socket and retrying the connection. How can we intercept the closure of the connection?
This is possible thanks to WebSocketSubjectConfig, which is responsible for customizing some behavior in the socket life cycle. The following is the API:
export interface WebSocketSubjectConfig<T> {
url: string;
protocol?: string | Array<string>;
openObserver?: NextObserver<Event>;
serializer?: (value: T) => WebSocketMessage;
deserializer?: (e: MessageEvent) => T;
closeObserver?: NextObserver<CloseEvent>;
closingObserver?: NextObserver<void>;
WebSocketCtor?: { new(url: string,
protocols?:string|string[]): WebSocket };
binaryType?: 'blob' | 'arraybuffer';
}
The properties of WebSocketSubjectConfig previously described are ones that you can customize, namely the serialization and deserialization methods. The closure and opening of the connection…
The full description of each property is available at the official documentation link: http://bit.ly/RxJS-WebSocket.
In order to benefit from WebSocketSubjectConfig, you should call the webSocket factory function that takes the second type of parameter. The following code creates WebSocketSubject using WebSocketSubjectConfig and simply intercepts the closure event to display a custom message:
public getNewWebSocket(): WebSocketSubject<Message> {
return webSocket({
url: WS_ENDPOINT,
closeObserver: {
next: () => {
console.log('[DataService]: connection closed');
}
},
})
}
Now that we know how to intercept the closure of the connection, let's learn how to retry the reconnection.
Retrying the reconnection
We can combine the retryWhen operator that resubscribes to an Observable conditionally after it completes with the delayWhen operator that sets the delay between two consecutive connections.
Let's create a function that will retry to connect to a given Observable every configurable RECONNECT_INTERVAL. We will log in to the browser's console on every attempt at reconnection:
private reconnect(observable: Observable<Message>): Observable<Message> {
return observable.pipe(retryWhen(errors => errors.pipe(tap(val => console.log('[Data Service] Try to reconnect', val)), delayWhen(_ => timer(RECONNECT_INTERVAL)))));
}
This reconnect function will be used as an RxJS custom operator to handle the reconnection after the socket's closure in the connect() method of our RealTimeService, as follows:
public connect(cfg: { reconnect: boolean } = { reconnect: false }): void {
if (!this.socket$ || this.socket$.closed) {
this.socket$ = this.getNewWebSocket();
const messages = this.socket$.pipe(cfg.reconnect ?
this.reconnect : o => o,
tap({
error: error => console.log(error),
}), catchError(_ => EMPTY))
this.messagesSubject$.next(messages);
}
}
As you can see, a new Boolean reconnect parameter is added to the connect function to differentiate between the reconnection and the first connection. This optimizes the code and avoids adding an additional function.
Then, all you have to do is call the connect function with reconnect: true when intercepting the connection closure, as follows:
public getNewWebSocket(): WebSocketSubject<Message> {
return webSocket({
url: WS_ENDPOINT,
closeObserver: {
next: () => {
console.log('[DataService]: connection closed');
this.socket$ = undefined;
this.connect({ reconnect: true });
}
},
})
}
This way, after the connection closure, you will see many outgoing requests from the client trying to reach the server every 3 seconds.
The reconnection capability is a must in the real-time world. This is how we handled it using RxJS in a few lines of code. Many developers don't know that RxJS offers this feature that enables you to consume real-time messages coming from WebSocket and add many third-party libraries to handle this requirement, while it is also available out of the box. So choosing RxJS, in this case, is one less dependency!
Summary
In this chapter, we implemented a real-world example of consuming real-time messages coming from a WebSocket server in a reactive way. We explained the requirement and the context. Then, we explored the features of WebSocketSubject and learned how we can consume real time messages through the WebSocketSubject and how this special kind of Subject works. Finally, we learned how we can build a reconnection mechanism in a reactive way using WebSocketSubjectConfig and the RxJS operators.
Now, it is time to learn how we can test the reactive patterns that we have built so far using RxJS, which we will see in the next chapter.