Welcome to our journey into the reactive programming world with Angular . You are going to build a web application using Angular, ngrx modules, and reactive programming concepts.
You may have experience with AngularJS, and you may have heard that Angular is completely different. You may have experience in other MV* frameworks and want to get into the world of reactive programming using Angular. In either case, I’m sure your experience will be handy.
In this chapter, we lay the groundwork for building a web application that is capable of running on any browser that Angular supports. This is usually the latest A-grade browser, but might include backward compatibility in older versions. Here, I cover subjects such as getting familiar with the final product, understanding the structure of the application and its architecture, and getting familiar with the reactive extension that will be used in the final app.
Browser and Development Environment
We’ll work with Chrome and its Developer Tools panel. Chrome is defined as an A-grade browser and follows the latest standards of the web.
Note
All examples in this book are displayed using Chrome. However, it is possible to run the application on other modern A-grade browsers.
Augury Dev Tools Extension
Augury is an extension available for the Developer Tools panel (currently available for Chrome only). Its main purpose is to assist in debugging and inspecting Angular applications.
A full description and an installation link can be found on its home page: https://augury.angular.io/ .
After installing the extension via the Chrome web store, when you open an Angular application in development mode in the browser, you can open the Developer Tools panel and switch to the new panel, Augury, at which point you will see the panel shown in Figure 1-1.

Figure 1-1. Augury panel in Chrome’s Developer Tools panel
Augury provides the following benefits when developing with Angular:
It outlines the application as a tree of Angular components.
When a component is selected, its properties can be viewed and edited in the right-hand panel.
An injector graph visualizes the inject tree.
You can search for a specific component and show HTML elements.
Version Control and Deployment
When we create applications, we’ll work off a boilerplate. We’ll make changes and updates to the files and folders. It is a good idea to use some sort of a version-control system.
I usually work with git. It saves everything locally and is widely supported by Cloud services, such as Github, Bitbucket, and GitLab, so you could easily use it for online backup as well. However, any other version-control system will do, like mercurial, svn, or another option.
As for deployment, in both Github and Bitbucket you can host a static web server and run the application on the Cloud. From there, there are many options with which to automate the deployment process as well as run unit tests and connect to other services.
If you don’t know either service, I suggest you pick Github. It’s easy to install and configure for one of the Cloud providers.
Setting the Development Environment
The development environment in Angular is based on node.js, which is an open source, cross-platform JavaScript runtime environment. Its interpreter engine uses Google’s V8 JavaScript engine.
Node.js has many built-in modules, sometimes referred to as packages. Aside from the built-in modules, there are thousands of modules that can be installed using node’s package manager, npm ( https://npmjs.com ). npm has other uses, including running scripts for deployment and running unit tests.
Angular is a framework that is composed of npm modules that can be installed via npm.
In the next chapters, we’ll use npm several times in order to run some build tasks through the terminal (or command line, in Windows). In fact, using npm should be second nature when developing web applications today, as it simplifies both the development process and preparing for production. I’m sure that by the time you hit the end of this book, you’ll be familiar with some of the capabilities of npm.
Instructions on how to install node.js can found at https://nodejs.org .
Terminal/Command Line
As explained before, in order to run npm scripts, you’ll need a terminal or a command line . Any operating system is packaged with one.
There are few differences between a terminal and a command line , which are used in Linux and Windows, respectively. However, usually we’ll interact with npm scripts, which act as an adapter between those platforms, and usually, if used with the right tools, npm abstracts the usage in each operating system.
If you’d like to work with a Linux-like terminal in Windows, ConEmu emulates the Linux terminal, and other terminals as well, and can found at https://conemu.github.io/ .
Editor (IDE or Code Editor )
The editor is where you’ll do all your work developing the application. Angular is written with Typescript, though you can use plain JavaScript as well. If you choose to go with Typescript, it’s beneficial if you choose a Typescript-aware editor.
Some of the benefits of using such an editor are the following:
Code auto-completion
Display errors (if there are any) as you type
Easy navigation within the code
Assistance in importing modules
Code editors that I’ve worked with while developing with Angular and that I can recommend are as follows:
Sublime Text – http://www.sublimetext.com/
Atom.io (by Github) – https://atom.io/
Visual Studio Code (By Microsoft) – https://code.visualstudio.com/
These editors are cross-platform. They support Mac, Windows, and Linux. There are more editors and IDEs that can be used for Angular development as well, including WebStorm.
Application Structure
After your computer is set up with the recommended tools, you’re ready to go ahead and start building the application. But before we write any code, as with any other process, it is wise to stop for a few moments and think.
Once we understand the base structure and fundamentals, it will be easier for us to understand where to add new code and how to approach a new feature.
The Angular application structure follows some best practices, which are described in the formal Angular style guide, found at the documentation website at https://angular.io/docs/ts/latest/guide/style-guide.html . It is also derived from the application boilerplate that this project is based on—AngularClass’s angular2-webpack-starter at https://github.com/AngularClass/angular-starter . I’ll dive into this boilerplate later in a dedicated chapter.
I chose to adjust the structure a little bit so that learning to locate domain-specific files (logics, actions, services, core app files, etc.) will be easy.
Since we’re going to use ngrx/store as a state-management solution with Angular, it is important to get familiar with the structure of the app.
The application is illustrated in Figure 1-2 and consists of the following main parts:
App – the main app directory; includes all the app files
Assets & Styles – files and directories that are located relatively to the app’s root directory that will run in development mode.
App Files – files that define the main app and are the only files without a directory under the app directory (i.e., app.routes.ts, app.html index.ts, etc.)
Components (container) – A directory that includes components that wraps presentational components and is often responsible for fetching data with services; orchestrates between several other components; interacts with the core app. Often referred as Smart Components.
Core – A directory that includes any fundamental modules (functions, components, or other) that should be consumed by Container Components. The core services, state, side effects, and others have their own directories inside the core directory.
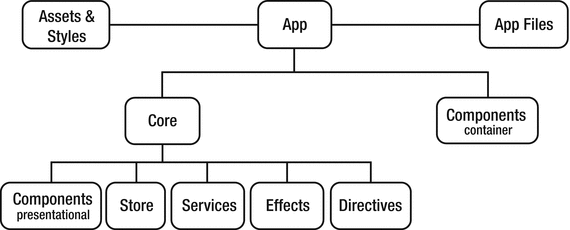
Figure 1-2. The parts of the application
The following are Core directories :
Components (presentational) – Often referred as “dumb” components or “stateless” components, these are logic-less components that concern how to render data that are given to them. Sometimes, these components may notify of certain interesting events (by emitting events) that might influence new or updated data, cause a chain reaction to other events, as so on. Any component that should be available to other developers that want to develop a container component should reside here. Such components may be Grid, Dropdown, Tabs, User Profile Card, and so forth.
Store – This directory defines the one and only store, which holds the state of the application. With this special module, we’re able to build the foundation for neat and clean reactive programming (Redux). Alongside this definition, there are going to be function reducers that alter this state or part of it, actions, and action creators (we’ll look at this in more depth later in a dedicated chapter and explain what Redux is).
Effects – This is another important foundation of reactive programming. Simply put, sometimes an action involves side effects that need handling in some manner (a chain reaction). A good example is a situation where the user clicks on a button to save, a “saving…” animation is then shown in response to the request that has been initialized, and after save is completed and the response has been returned to the client, the “saved!” notification is shown.
Services – this directory includes application-wide services and is responsible for creating requests to external services (usually backend microservices). These can be Authorization, Searching, REST APIs, Websockets, and much more.
Directives – these are application-wide directives that should be available to Container Components, much like Tabs and Grid. A good example is the Draggable directive, which enhances any element/component with a drag ability.
RxJS and ngrx: Reactive Extensions for Angular
Angular includes the RxJS library as a development dependency. RxJS is essentially a “toolbox” library that includes functions that eventually allow us to program code using a functional approach.
ngrx is a set of libraries that uses the concepts of reactive programming and uses the RxJS library to implement it. It includes libraries that provide state management (ngrx/store), side-effects management (ngrx/effects), integration of routing to state management (ngrx/router-store), and more.
RxJS
RxJS is based on the concept of streams—objects that hold data, while over time this data may be updated or changed. Usually, we would like to perform some action when this data changes, or react to these changes by performing one action or more.
Note
A stream of data might be updated synchronously or asynchronously, while the notification of the data update will occur right after the operation.
RxJS includes the concept of operators, or functions, which are the main tools for dealing with streams of data, transforming it, processing it, and achieving complex tasks with just a few lines of code.
One of the main concepts in RxJS is that of an observable. Usually, an observable is a collection of values that may be updated over time. This means that this collection can be observed by an observer—a collection of callbacks—which will be invoked whenever the data is changed. To simplify this idea, you can think of it as a very powerful “Event Bus.” You can register to events, deregister from events, and trigger events, quite the same as you would on a regular Event Bus. However, at any step in these operations, you can define an operator function in order to combine, filter, and create new events at any time. This is actually the operation of looking at a stream of data (or better: observing) and performing actions to alter that stream to the application’s needs.
There’s much more to RxJS than I have described thus far. It is greater than the scope of this book and deserves its own fully dedicated book. However, as we progress in developing and understanding reactive programming with Angular and ngrx libraries, we will get more familiar with a few of the main concepts and building blocks of RxJS.
ngrx: Reactive Extensions for Angular
ngrx is a set of reactive-oriented modules for Angular. It aims to provide common features for the Angular platform by leveraging reactive programming concepts, with RxJS at its core.
In this book, we’ll get to know a few of these features while integrating ngrx into our application.
ngrx/core
The core is a library that all ngrx modules are based on. As its name suggests, it includes core reactive-style operators and utilities. These are based on RxJS operators and expose a high-level API to assist with creating reactive objects for use with the Angular platform.
ngrx/store
The store is a state-management solution inspired by the famous library Redux. Redux popularized the idea of organizing the application state into simple objects (use primitive and non-primitive types in JavaScript) and updating this state by replacing it with a new state. This means that the object shouldn’t be mutated directly, but rather should be replaced with a new state object.
The store instance is a singleton data object. You can think of it as a database that you can get access to in order to retrieve or update the data that the application operates on.
In order to update data in the store (a state), we can use the dispatch method. This method takes an action argument (a string) and a second optional data argument of any type. This method actually triggers an event (remember Event Bus?) that will handle those functions that are registered (we’ll get into it in depth in a later chapter).
The event that has been triggered by the dispatch method should be handled by a reducer—a pure function. A reducer function should receive two arguments, as follows:
State
Action
The State argument is the actual current data state.
The Action argument is an object that includes only two properties—type and payload. Type is required and is usually a string that represents the event type that this reducer should handle. Payload is a property that can hold any type of data relevant to the action that should be handled.
A reducer function should not mutate the State argument directly, but rather “derive” the data from it and create a new state, which will be returned as the new state value and as the return value of this function. This kind of function is very easy to test since the output becomes predictable once the input arguments are known.
Since by nature JavaScript objects are mutable, you should stick to the convention of not mutating the state object, or use a third-party library to enforce the state’s being immutable.
Note
A pure function is defined as pure as long as it outputs the same value given the same input arguments, and as long as it doesn’t mutate any value outside its scope or cause any side effects. It aids in predictability and ease in writing simple unit tests.
ngrx/effects
The ngrx/effects module is essentially a factory with which to create a side effect model for ngrx/store. Sometimes, a certain action should be followed by another action.
Usually, a side effect happens when an asynchronous operation starts. For example, take a simple HTTP request to retrieve data. In this case, the UI should indicate that this operation is in process, and when it’s completed the UI should display the new data, and perhaps this new data will cause a few UI changes.
There are at least two actions that happen here:
A Start Data retrieve action
A Success (completed) Data action
Both actions can be defined in this case as a change in state. We know this is true because the state alters what is displayed in the UI.
I like to think of ngrx/effects as a layer that groups several actions as a specific chain of reactions. This leads to organize the code in such a way that the logics for side effects are placed in a dedicated directory- “effects” - while services are managed separatley in the “services” directory.
ngrx/store-log-monitor
This module is actually a developer tool extension. It’s a little bit different from the previous modules. Its aim is to assist in development with the previous “ngrx” extensions. The “ngrx/store-log-monitor” a port of redux devtools log monitor.
It adds a panel to Chrome’s Developer Tools . This new panel displays the current state and logs any action that has been triggered, along with its data. You can also interact with this panel to actually “go back in time” to any previous state that has been logged. This is a very powerful extension that can assist in debugging and trace an action flow once it has been triggered.
In the last chapter, I show the steps required to connect this module to the application that we build so we can see how it can leverage the debug process.
The Sample Application
Throughout this book’s chapters we will create a real application while getting to know reactive programming with Angular and ngrx modules.
The application is Echoes Player (Lite). It’s a lite version of an open source application that I developed with AngularJS and Angular. The app consumes YouTube’s data API to allow searching for videos and playlists. YouTube Player (an iframe) is also used to allow the playback of videos. Finally, we’ll authenticate users with the Google Sign-in API and retrieve the user’s YouTube playlists.
I started developing this application as a way to explore Angular’s libraries and in order to have a playground for experimenting with several features and ideas. It also gives me the opportunity to develop with my favorite tools while listening to music—the best of both worlds.
You can navigate to the real application at http://orizens.github.io/echoes/ . Figure 1-3 is a screenshot of the live production application, developed with AngularJS.

Figure 1-3. Echoes Player with Angular 1 ( http://orizens.github.io/echoes/ )
Figure 1-4 is a screenshot of the application created with Angular. It’s a little bit different than AngularJS version.

Figure 1-4. Echoes Player with Angular ( http://orizens.github.io/echoes-player )
Summary
In this chapter, I introduced the development environment, the tools that we can work with when developing with Angular, the libraries that we will work with, and the Echoes Player application that we will build with these tools. You should now have a full working development environment and an understanding of the basic concepts.
In the next chapter, we are going to get familiar with the code boilerplate that the Echoes Player application will be based on. This will give us a bird’s eye view of the project structure as well as of the build tools that are used to run the development environment, the testing environment, and the production build process.