
Therefore, against those skilled in attack, an enemy does not know where to defend; against the experts in defense, the enemy does not know where to attack. Therefore I say: 'Know the enemy but know yourself; in a hundred battles you will never be in peril.' | ||
| --Sun Tzu, The Art of War | ||
This chapter looks in detail at several tools, available on the Internet, that hackers can use to attack Wi-Fi networks. Most are UNIX based and require the ability to compile (and sometimes tweak) the tool. However, more are becoming available for Microsoft Windows all the time. We explain where to get the tools, what they do, and how to use them. Some people might feel uncomfortable about our publicizing these tools and explaining their use. However, it is our goal to remove any doubt you may have about their potency. By getting in the driver's seat, you will get a better understanding of how weak the older Wi-Fi systems are. The good news is that the tools are of very limited use against WPA or RSN. Certainly, you would not be able to use them to gather any information about secret keys or encrypted data. So view this chapter as a cautionary tale and feel glad that you at least “know the enemy.”
By understanding how the bad guys operate, and the tools they use, you can better design, install, and operate your defenses (in other words, better understand the threat against your system). Understanding today's threat does not necessarily make you immune. The computer security process is very much like the Borg in Star Trek: The Next Generation. That is, the bad guys will adapt based on what you do. You must stay vigilant, react to the changes that the attackers make, and plan your responses.
Before describing the attack tools, we review the attacker's process in a generic sense to give you some insight into how you might be attacked. Not all of the bad guys operate exactly as we describe, but their process is similar.
One of the main issues to understand is, “What is the goal and/or goals of the attacker?” Different attackers have different goals. For instance, the disgruntled employee may only want to “to turn the lights out” with a denial-of-service (DoS) attack, which is an availability attack. Another attacker may want to steal personal information to facilitate identity theft, which is a confidentiality attack.
Fortunately, the goals of the attacker align with the three main security properties: availability, confidentiality, and integrity. Which one is most important to a specific attacker depends on their motivation and the underlying value of your information.
You now have an idea what the attackers want to achieve. Let's take a look at how they're going to try and do it.
The process an attacker follows is very similar to the process that the military uses when planning an operation. In essence, you have to first find out where you want to go (reconnaissance). Then, you have to figure out how to get there and what you will do when you arrive (planning and collection). Finally, you need to review your collection and then execute the operation.
While it might be a bit of a stretch to say that an attacker plans and executes with military-like precision, even the most undisciplined attackers follow (unknowingly) some aspects of this process, as shown in Figure 16.1.
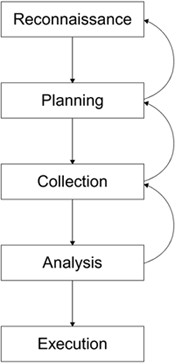
The process is cyclic because, at any point, additional information may be required that forces a return to an earlier phase to obtain the information.
One of the most important aspects of any attack is reconnaissance; the target must be identified. In the wireless LAN case, there are two ways that an attacker can identify a target, and the motive of an attacker plays an important part here. If the attacker is just looking for network access, then he will seek until he finds an easy victim. By contrast, in a targeted attack, the attacker focuses on finding access associated with his target, which is slightly more difficult for the attacker and significantly more difficult for the defender to defend against.
If the attacker is only looking for network access, his reconnaissance could be limited to looking at any of the many publicly available databases or maps of access points. These maps and databases can be found on many Internet sites, such as www.nodedb.com, and an attacker need only find one near his current location. The process, however, is slightly more difficult for the attacker if he has to find a specific target.
Finding a wireless LAN target requires war driving, which is a process named after the term war dialing.[1]. War driving, or wilding, seeks to find access points accessible outside the bounds of their deployment—in the street, for example.
The tools required for war driving are simple and widely available: a notebook computer, a Wi-Fi PC card, a special software program, and, optionally, a directional antenna and GPS receiver. Simple war driving can be done with a completely standard setup because both Microsoft Windows XP and Apple's MacOS X have a means to identify Wi-Fi equipment built in. They lack, however, the ability to trace; that is, to record the time and location of identified access points.
The next two sections discuss two of the most popular war driving software programs available at the time of this writing.
One of the most popular software programs for war driving is the NetStumbler program (www.stumbler.net). This program, which only works under Microsoft Windows, provides an intuitive user interface along with the ability to connect with several types of GPS receivers. The result, when combined with a laptop and GPS, is an easily installed and operated tool for war driving.
One of the main reasons for the popularity of NetStumbler, besides the fact that it runs on the most popular operating system family, is that it is easy to install and operate. Just download, plug in a supported Wireless LAN card, and double-click!
NetStumbler displays most of the information needed in one screen, broken down into two panes (see Figure 16.2). The left pane provides shortcuts for displaying the networks in just about any fashion. By default, the main pane on the right displays all the networks. However, you can easily choose to view only those networks on a specific channel, specific SSIDs or those with encryption, and so on. In fact, the interface is so intuitive and easy to use, we won't waste any more time explaining it.

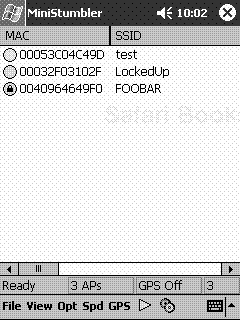
The maker of NetStumbler, Marius Milner, even has a tool worthy of James Bond: MiniStumbler, which runs on a Pocket PC (see Figure 16.3). Now, attackers can walk around the interiors of office buildings, without attracting attention, with a PDA hidden in their inner suit pocket. With this program, any wireless LANs located in publicly accessible buildings are at risk of detection, and potential compromise, if they lack basic security protection.
While NetStumbler is easy to operate, it lacks the sophistication of the next tool that we're going to describe: Kismet. From an attacker's point of view, one of the major problems with NetStumbler is that it operates in an active mode—that is, it transmits probe requests as part of the process of finding access points. Using probe requests creates an additional problem for the attacker because the attacker won't be able to identify any of the closed or cloaked networks; these networks will not respond to a probe request without the correct network name (SSID).
Another popular tool for war driving is Kismet (www.kismetwireless.net). Kismet is a completely passive tool (does not transmit probe requests) that runs under the Linux and OpenBSD operating systems. Kismet includes all of the functionality of NetStumbler as well as basic traffic analysis functionality. An attacker running Kismet easily determines the network configuration for those networks running without basic WEP protection, and it displays character strings it sees in the traffic. This is good for finding passwords and so on. Kismet does this by examining and displaying the traffic on the targeted network such as IP headers and ARP requests. This process provides essential information to the attacker so that they may use (or should we say abuse) the targeted network.
Kismet saves the information it collects in a series of files that can be viewed later. These files contain lists of all of the information about a network, raw packet dumps, and captured WEP traffic so that it can be fed into one of the open source WEP crackers available (more on that later in this chapter).
The main window of Kismet is shown in Figure 16.4. On the right side, there is a short informational panel displaying the number of networks found (Ntwrks), the number of packets (Pckets) seen, the number of encrypted packets (Cryptd), the number of encrypted packets with a weak IV (Weak), packets interpreted as noise (Noise), the number of packets discarded due to bad CRC (ICV) values (Discrd), the packet rate (Pkts/s), and the total elapsed time in seconds (Elapsd). The lower panel lists status messages as they occur. The largest and main panel of Kismet provides a network list of all of the networks found since Kismet was started as well as information about each of the networks. The exact information shown for the networks is configurable. Figure 16.4 shows the default configuration.

The first column lists the name, or SSID, of the network found. An exclamation point (!) before the name indicates activity was seen in the last three seconds, while a period (.) indicates activity was seen in the last six seconds. The next column, headed by “T”, indicates the type of network identified. An “A” indicates an access point in infrastructure mode, a “D” indicates a data-only host or station, and an “H” indicates an ad-hoc network master.
The third column, headed by “W”, indicates whether WEP is used by the network. “Y” indicates yes, and “N” indicates no. One of the interesting things about Kismet is what the developer calls “fuzzy encryption detection.” Some access points don't properly indicate when WEP is used by setting the appropriate bit in the IEEE 802.11 header of the packet. As a result, relying solely on that bit results in misidentifying some networks as not using WEP when they really do. Kismet looks at the first few bytes of the LLC header to see whether they are the same. If they are, WEP is not used. If they aren't, encryption is being used.
The fourth column, “Ch”, shows the channel that the network is using. This is followed by the number of packets seen, Packts. The sixth column, Flags, provides information about the network. Specifically, it indicates how the IP Range in the next column was determined. An “A” indicates that the IP block was found by an ARP packet, and a “U” indicates that the block was found with a UDP packet. Both indicators (“A” and “U”) can be followed by a positive integer value that indicates the number of octets that match within the address block. Finally, a “D” indicates that the block was found with a DHCP packet, and a “C” indicates that Kismet identified Cisco discovery packets on the network, and thus Cisco equipment.
In addition to the main window, Kismet provides several other popup displays that provide additional information about a specific network. When Kismet starts up, it is in Auto fit mode. In this mode, the network names change position automatically based on the last network seen. In this mode, you're unable to scroll among the networks and select one to learn more information. So, the first thing you want to do is select the Sort window by pressing “s”. You are presented with a number of different ways to sort the network information in the main pane. When you make a choice, the window redisplays.
You are now able to scroll among the displayed networks with the up and down arrows. In Figure 16.4, the first network, WideOpen, is selected. By pressing the “i” key, a popup window appears with all of the information Kismet knows about the selected network. An example is shown in Figure 16.5.
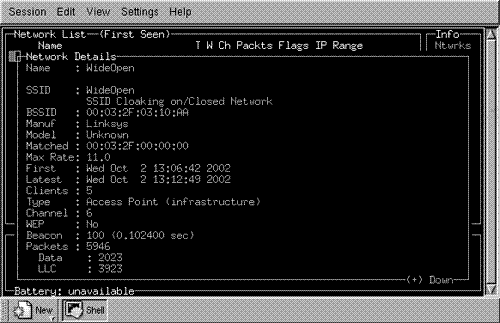
As you can see in Figure 16.5, Kismet provides a great deal more information about the selected network than NetStumbler. Kismet can even provide a real-time dump of the ASCII strings that it sees on the selected network. To get that information, click the “d” key in the main window (see Figure 16.6). The strings from the intercepted traffic are displayed, indicating in the example in the figure, the download of a Web page from www.ieee802.org, which we initiated as part of a test. This window continues to show the intercepted strings until you exit by clicking the “x” key.
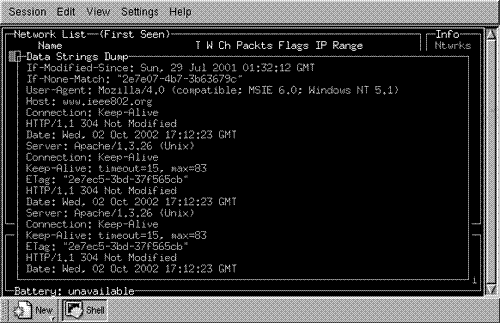
Note that one potential issue with the use of Kismet, and specifically this function, is that it may violate state and/or federal law by intercepting communications. We certainly do not advocate such use and, if you are tempted to try the tool, we highly recommend that you discuss this issue with your own legal counsel before proceeding.
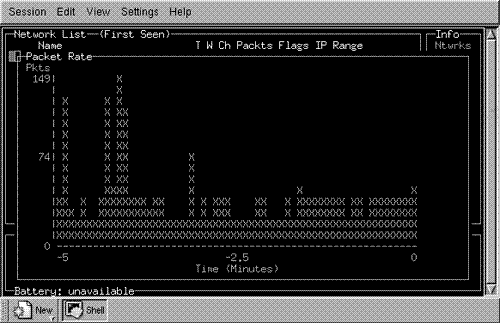
Kismet provides two other informational popup windows. The first provides statistics about channel and encryption usage (Figure 16.7). Open it by clicking “a” from the main window. Open the second window (Figure 16.8) by clicking “r” to show the packet reception rate.

We've covered only part of Kismet's capability. We haven't covered the files that Kismet generates as archival information, or the integration of Kismet with a global positioning system (GPS). Learning and using these capabilities are straightforward; but as with any powerful tool, Kismet takes a little bit of time to get the most out of it. Once you've learned the basics, however, Kismet becomes a potent tool.
The remainder of this chapter describes two example scenarios. The first is a network that does not provide any security; we'll call it WideOpen. The second, which uses the original basic Wi-Fi protections, we'll call LockedUp. Both the WideOpen and the LockedUp network are shown in Figure 16.4 so you can see the initial identification of the network.
We will now pretend to be an attacker with the goal, in each case, of becoming a fully functional peer on the network.
This section explains the steps we need to follow to meet our goal of becoming a fully functional peer on each of the example, or target, networks.
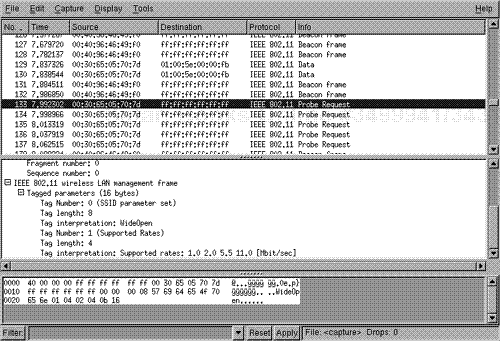
The WideOpen network is running without WEP, and as such Kismet was able to determine the IP network address range (refer back to Figure 16.4). Kismet also creates a file of all of the captured packets (usually named Kismet-<date>.dump, where <date> is the date when the packets were captured), which you can review with a tool such as Ethereal (www.ethereal.com), as shown in Figure 16.9. Using Ethereal, you can determine the MAC address of valid clients as well as determine whether the wireless network is using shared-key authentication. In Figure 16.9, a packet trace is shown of the WideOpen network using Ethereal. A probe request from a client is shown prior to the client joining the network.
At this point, we probably don't need any collection beyond that already done by Kismet. Therefore, we're ready to execute and become a peer on the network once we've successfully identified a valid client and determined whether shared-key authentication is being used. We don't expect that shared-key authentication is being used because, although shared key is specified by IEEE 802.11, shared key is not allowed in Wi-Fi certified equipment.
Things are much different with the LockedUp network (see Figure 16.10). In this case, we can't see any of the network parameters we see in Kismet. Therefore, we must first crack the WEP key with one of the many WEP-cracking utilities that are available on the Internet. One of the more effective programs, bsd-airtools by David Hulton (www.dachb0den.com/projects/bsd-airtools.html), comes with a set of utilities for scanning and cracking WEP networks. This example covers two of those tools, dwepdump and dwepcrack. Dwepdump collects WEP-encrypted packets and stores them in a file for later use by dwepcrack, which attempts to recover the corresponding WEP key. Both tools are explained in more detail later in this chapter.

So our plan now is to move on to collection, when we'll use dwepdump to collect enough traffic to successfully break the WEP key.
The process of using dwepdump to collect enough packets to recover a WEP key is simple; the most difficult part is determining what key size (40 bits or 104 bits) the network is using. As a rule of thumb, you're probably best starting with 40 bits unless you suspect the target network is particularly concerned about security.
A sample invocation and screenshot of dwepdump collecting traffic for 40-bit WEP is shown in Figure 16.11. The screen shows six columns. The first three indicate the number (in hexadecimal) of weak IVs found for the first three key bytes. The first column is the one described by Scott Fluhrer et al. (2002) and the second and third columns are those described by the developer of bsd-airtools, who extended the FMS beyond the first key byte. The fourth column displays the total number of packets with a weak IV, the fifth column lists the total number of packets seen, and the last column displays the actual weak IV found of the first class only. We made this modification to help show what weak IVs look like; you won't see this column in the tool you download. You'll also note that the IV is printed backward.

Dwepdump must run until you collect at least 60 (0x3c in hexadecimal) weak IVs for the first byte (first column displaying 0x3c). You may also require more than 60 weak IVs for the first key byte in practice because this attack is probabilistic—in other words, each weak IV for the first byte provides a hint as to the first key byte with a 5% probability. In our experience, having around 80 weak IVs guarantees success, while 60 works most (but not all) of the time.
The length of time required to recover these packets depends on the load and number of clients visible to the collection client. It also depends on the type of equipment being used by the target. If all of the equipment being used by the target filters out weak IVs (as most of the major vendors' latest firmware does), dwepdump may never collect enough of the important first class of IVs. If, however, the equipment is not filtering weak IVs, the length of time will vary from 20 minutes to several days, depending on the network load.
At this point in the process, we've collected enough data to begin analyzing it. In some scenarios, however, more data may be required. In such scenarios, we could just go back to collection or planning when we need to revise our plan.
Once enough packets have been collected, recovering the WEP key is straightforward using dwepcrack. An example of starting dwepcrack is shown in Figure 16.12. In this case, however, the key is not correctly identified. When this happens, you have two choices. You can go back and try and collect more packets to add to those you've already collected, or you can use a fudge factor to identify the key. Dwepcrack works by calculating the probability for all 256 potential byte values for each position within the key. Thus, a 40-bit key would have an array of probabilities of [5 × 256]. The fudge factor tells the cracking program how far down the list of probabilities to try for each position. Thus, a fudge value of 2 would try the top two likely key values in each position until it found the correct match or finished trying each value. A brute-force of the entire key space would, therefore, be a fudge value of 256. It's not worth using a fudge value of 256 because it probably won't finish. Instead, you could use a value under six when you have more than 60 of the first class of weak IVs.

Figure 16.13 shows a run of dwepcrack using a fudge factor under six on the same set of data analyzed in Figure 16.12. In this case, however, the WEP key is found quickly after all of the data is read into memory from the file system. You'll find that the reading of the data into memory is usually the most time-consuming process and that, once that data is in memory, the amount of time spent analyzing the data is less than a minute.

Dwepcrack is an incredibly powerful tool, and it doesn't take a significant effort to learn how to use all of its power. Current versions of dwepcrack run on both FreeBSD and OpenBSD.
At this point, you've recovered the WEP key. But you know nothing of the network configuration. You basically have two choices. The first is to write a custom program (none currently exists for downloading) that decrypts the data you've already collected and formats it for display in Ethereal. The second is to use the WEP key and collect more traffic with your wireless LAN card set to decrypt the traffic and display it in Ethereal. Alternatively, you can set the encryption key in the Kismet configuration file and Kismet will identify the network parameters for you.
In either case, you must examine the raw packet traces to determine the IP space and other network parameters used by the target network. While this process may sound daunting, it in fact is rather trivial to accomplish.
Once you've completed this step, you have all of the information you need to become a peer on the LockedUp network.
At this point, you have obtained all of the information needed to become a fully functional peer on both the LockedUp and WideOpen networks. You cracked the WEP key for the LockedUp network, and WideOpen does not use encryption. Next, you simply pick the time to join the network and set the parameters on your computer just as you do for any other network. The only possible curve ball is if MAC address filtering is being used. In this case, you'll immediately realize that you can't use the network, so you need to go back to the data you collected and identify a MAC address that was using the network. Now, just listen first to make sure that the address isn't still being used, and if it isn't, use the driver interface to set the MAC address to the address you've identified as valid. This works only with certain types of Wi-Fi cards on certain operating systems, for example, FreeBSD, OpenBSD, and Linux.
This section describes some other tools that can be used against your wireless network. The first tool is Airsnort, one of the original tools to implement the FMS attack against WEP. The second tool is Airjack, which implements wireless DoS attacks as well as establishes man-in-the-middle attacks.
Airsnort (http://airsnort.shmoo.com), compared to the bsdairtools described earlier in this chapter, is easy to use. It has an X-windows–based interface and an MS-Windows version in alpha testing, shown in Figure 16.14.
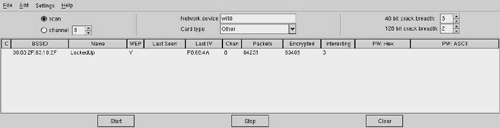
Figure 16.14 shows Airsnort running against our LockedUp network. Airsnort offers several features over the bsdairtools family that make the tool much easier to use. One of these features is the parallel cracking. The program is constantly working in the background to break the WEP key. When it does, it displays it in both hexidecimal and ASCII in the right columns (PW Hex and PW ASCII). Airsnort also allows you to capture on multiple networks or access points by scanning across the channels. This design causes you to miss packets sometimes, yet it remains a powerful feature.
Airsnort doesn't have the performance that bsdairtools has. In head-to-head tests we've run, bsdairtools seriously outperforms Airsnort. In one case, bsdairtools cracked the key in approximately 20 minutes, whereas Airsnort ran for six hours without recovering the key. The user forum for Airsnort located at http://airsnort.sourceforge.net indicates that others have had approximately the same performance from Airsnort.
Airjack is a series of tools written by Abaddon. The tools were first described at the Black Hat Conference in 2002, and were available on the Internet for a short while at http://802.11ninja.net and run under the GNU/Linux operating system only. The tools provide an attacker with the ability to perform a DoS attack against an access point, actively determine the ESSID for a closed network, establish a man in the middle, and set the MAC address of the wireless card.
The program wlan_jack continuously sends a Deauthentication message to the LAN broadcast address masquerading as an AP by using the same MAC address as the AP. This causes all of the stations/clients associated to that AP to drop their connections to the AP (disassociate); and because the attacker is continuously sending the Deauthentication message, the stations/clients can never associate to the AP for long, thereby creating a DoS attack (see Chapter 15).
The program essid_jack actively determines the ESSID for a closed network. Recall that some equipment uses the ESSID as a shared secret for access control (see Chapter 15). The ESSID can be determined passively by being patient and waiting until a station sends a Probe-Request message. If you're in a hurry, however, you can use essid_jack, which works similarly to wlan_jack in that it sends a forged Deauthentication message. It differs in that it only sends it to a single client, and then listens for the client to reassociate with the AP, during which step the ESSID is broadcast in the clear for essid_jack to sniff it and display it for you!
The program monkey_jack performs a man-in-the-middle attack against a station and a specific access point, as shown in Figure 15.6. However, we were unable to get the code to work by simply compiling it. In discussions with the author, he explained that the code is a proof of concept and that it does have several problems, such as a race condition, because the same card that knocks the target station off the AP (using a DoS) is also the card that is acting as the fake AP. Additionally, monkey_jack requires some changes to a wireless card driver that the author has not released.
While monkey_jack doesn't work as originally packaged, the author hobbled the code on purpose. The point of releasing the code, and of giving a talk at Black Hat 2002 (Abaddon, 2002), is to show that man-in-the-middle attacks can be accomplished, not to provide another tool to potential attackers.
This chapter focuses on the tools that are readily available on the Internet for anyone with the skills to compile a program under UNIX. The very existence of these tools dramatically increases the number of people who can crack your network if you are not using proper security. Our hopes in providing you with this information are twofold. First, it is essential to understand what attackers can accomplish against your defenses; this is the only way that you can have any hope of designing an effective defense. Second, you can use some of this material to test the security of your own network (with the proper approvals first) to ensure that your organization is using effective security as well.
The good news is that WPA and RSN provide the tools you need to respond to these threats. It is likely that attempts will be made to crack WPA in the future. If a crack is found, more tools will be produced. However, WPA and RSN are in a different class than WEP when it comes to the approach taken in their design, and confidence in their ability to hold up to attack is much higher.
[1] War dialing describes how attackers find computer systems on the plain old telephone system (POTS) network. Several tools, most notably toneloc, were written to assist attackers in finding computers attached to telephones by “brute forcing” telephone numbers—trying every possible telephone number (9999) in a given exchange. In war driving, rather than brute force telephone numbers, people drive or walk around looking for access points.