© Nicolas Modrzyk 2020
N. ModrzykReal-Time IoT Imaging with Deep Neural Networkshttps://doi.org/10.1007/978-1-4842-5722-7_5

5. Vision and Home Automation

Nicolas Modrzyk1 
(1)
Tokyo, Tokyo, Japan
 

Home is a place you grow up wanting to leave and grow old wanting to get back to.

—John Ed Pearce

The first four chapters of this book showed you how to bring in video streams of all sorts and analyze them first on a computer and then on the small limited device that is the Raspberry Pi.

This last chapter closes the gap while opening up the possibilities by linking the video part to the voice part.

With the advent of voice platforms such as Apple Siri, Google Assistant, Amazon Alexa, and Microsoft Cortona, voice-assisted services are popping up everywhere. Humans are language creatures; we have to express ourselves. Drawing is also an option to interact with devices, like was done in the movie Minority Report, but to be honest, you need pretty big and expensive screens to do something like that. Voice works everywhere, and we don’t need expensive tooling to use it. Using voice is intuitive and empowering.

I personally have many examples of how voice assistants could be used in everyday life. Start by entering a coffee shop and asking for a “double-shot cappuccino with cinnamon on top, on the front terrace, please”, and then it is automatically made and delivered to you while you’re sitting in the sun outside.

Here’s another simple example: I wish it were possible to go to an ATM and say, “Please withdraw $100 from my main account, in five notes of $20.” The voice assistant recognizes your voice so you do not need to scroll through endless confirmation screens; you just get your bills. (I know, with all the virtual currencies nowadays, you don’t really even need to go to the ATM anymore, do you?)

Those are some day-to-day examples, but you can also look to science-fiction movies to see voice-controlled spaceships as well as coffee machines. This is big.

So, why don’t we use one of the existing software assistants for voice recognition, like Siri? Well, all of the big players basically control all of your user data and can access whatever data is going through their pipelines at any time. This can be annoying as an end user—just about as annoying when creating and engineering your own solutions. But, as much as possible, you want to be able to control where your data flows or, indeed, doesn’t flow.

In this chapter, we thus introduce Rhasspy (https://github.com/synesthesiam/rhasspy).

Rhasspy was created for advanced users who want to have a voice interface to a home assistant but who value privacy and freedom. Rhasspy is free/open source and can do the following:
  • Function completely disconnected from the Internet

  • Work well with Home Assistant, Hass.io, and Node-RED

In this chapter, we’ll do the following:
  • We will install and learn how to interact with the MQTT protocol and Mosquitto, a broker that can be used to send recognized messages from Rhasspy.

  • We will set up the Rhasspy interface to listen to intents and view those messages in the MQTT queue.

  • We will integrate those messages with the content of the previous chapters and run real-time video analysis, updating the object detection parameters and using the voice commands received from Rhasspy.

Rhasspy Message Flow

Basically, Rhasspy continuously looks for “wake-up words.” It wakes up when it’s called by one of these words and records the next sentence and turns it into words. Then it analyzes the sentence against what it can recognize. Finally, if the sentence matches against known sentences, it returns a result with probabilities.

From an application point of view, the main thing you need to interact with when building a voice application is the messaging queue, which in most IoT cases is an MQTT server. MQTT was developed to focus on telemetry measures and thus had to be lightweight and as close to real time as possible. Mosquitto is an open source implementation of the MQTT protocol; it is lightweight and secure and was designed specifically to service IoT applications and small devices.

To do voice recognition, you start by creating Rhasspy commands, or intents, with a set of sentences. Each sentence is of course a set of words and can contain one or more variables. Variables are words that can be replaced by others and are assigned corresponding values once the voice detection has been performed by the voice engine.

In a simple weather service example, the following sentence:
  • What is the weather tomorrow?

would be defined as follows:
  • What is the weather <when:=datetime>?

Here, when is of type datetime and could be anything like today, tomorrow, this morning, or the first Tuesday of next month.

“What is the weather” is fixed within the context of that command and will never change. But the <datetime> location is a variable, so we give the engine hints on its type for better recognition.

Once an intent is recognized, Rhasspy posts a JSON message in a Mosquitto topic associated with the intent.

The example we will build in this chapter is to ask the application to highlight certain objects detected in the video stream.

For example, in the following sentence, where cats is the variable container, we specify which object to detect:
  • Show me only cats!

In this example, when the intent has been recognized, the message sent will be a JSON-based message with the following main sections:
  • Some message headers, notably the recognized input.

  • Automatic speech recognition (ASR) tokens, or the confidence of each word of the sentence.

  • The overall ASR confidence.

  • The intent that was recognized and its confidence score.

  • The value for each of the “slots,” the variable defined within the sentence, and their associated confidence scores.

  • Alternatives intents are also provided, although I found them to not be very useful in most contexts; therefore, looking for second best choice and trying to recover the flow is usually not worth it.

Listing 5-1 shows a sample of the JSON message.
     {
    "sessionId": "9d355e0e-218b-4efa-bf36-9c8b13a7df42",
    ...
    "input": "show me only cats",
    "asrTokens": [
        [
            {
                "value": "show",
                "confidence": 1,
                "rangeStart": 0,
                "rangeEnd": 4,
                "time": {
                    "start": 0,
                    "end": 0.98999995
                }
            },
            ...
        ]
    ],
    "asrConfidence": 0.9476952,
    "intent": {
        "intentName": "hellonico:highlight",
        "confidenceScore": 1
    },
    "slots": [
        {
            "rawValue": "cats",
            "value": {
                "kind": "Custom",
                "value": "cats"
            },
            "alternatives": [],
            "range": {
                "start": 13,
                "end": 17
            },
            "entity": "string",
            "slotName": "object",
            "confidenceScore": 0.80663073
        }
    ],
    "alternatives": [
        {
            "intentName": "hellonico:hello",
            "confidenceScore": 0.28305322,
            "slots": []
        },
       ...
    ]
}
Listing 5-1

JSON Message

JSON messages from intents are sent to a given named message queue, one queue per intent, in the MQTT broker. The queue name used to send the intent message follows this pattern:
hermes/intent/<appname>:<intentname>
So, this is what it looks like in our example:
hermes/intent/hellonico:highlight
To summarize, Figure 5-1 shows a simple message flow.
../images/490964_1_En_5_Chapter/490964_1_En_5_Fig1_HTML.jpg
Figure 5-1

Rhasspy message flow

Since the main point of interaction for the system is the system queue, let’s see first how we can install the queue broker and then interact with it.

MQTT Message Queues

To be able to use the message queue and receive messages from Rhasspy, we will install the message broker Mosquitto, one of the most widely used MQTT brokers. MQTT is a lightweight and energy-efficient protocol, with different levels of quality of service that can be set at the message level. Mosquitto is a very lightweight implementation of MQTT.

Installing Mosquitto

Mosquitto install instructions are available for every platform, and the download page has the links to the installers.
https://mosquitto.org/download/
On Windows, you should download the .exe-based installer, but other platforms have software available through the usual package managers, as shown here:
# on mac os
brew install mosquitto
# on debian/ubuntu
apt install mosquitto
# with snap
snap install mosquitto
Once Mosquitto is installed, you should check that the Mosquito service has started properly and is ready to relay messages. For example, on a Mac, use this:
$ brew services list mosquitto
Name         Status    User   Plist
mosquitto    started   niko   /Users/niko/Library/LaunchAgents/homebrew.mxcl.mosquitto.plist

On the command line, you already have two commands available to you: one to publish messages on given topics and one to subscribe to messages on given topics.

Comparison of Other MQTT Brokers

For your reference, you can find a comparison of a few other MQTT brokers here: https://github.com/mqtt/mqtt.github.io/wiki/server-support.

RabbitMQ is a strong open source contender, but while clustering support is definitely robust, the setup is not quite easy.

MQTT Messages on the Command Line

Once Mosquitto is installed, on the command line it’s rather easy to send messages about any topic to the broker using the mosquitto_pub command . For example, the following command sends the message “I am a MQTT message” on the topic hello to the broker located on host 0.0.0.0:
mosquitto_pub -h 0.0.0.0 -t hello -m "I am a MQTT message"
You, of course, have an equivalent subscriber command with mosquitto_sub, as follows:
$ mosquitto_sub -h 0.0.0.0 -t hello
I am a MQTT message
Message To Raspberry

It’s good practice to start the queue on the Raspberry Pi and read messages from the computer, or vice versa.

The main problem is simply in knowing the IP address or the hostname of the target machine, computer, or Raspberry, but sending messages is done in the same way using the mosquitto_pub and mosquitto_sub commands.

As an extra step, you could even run your Mosquitto MQTT broker in the cloud, for example, creating and integrating a queue from a service like https://www.cloudmqtt.com/.

Usually, my favorite graphical way to see messages is to use MQTT Explorer, a graphical client to MQTT, as shown in Figure 5-2.
../images/490964_1_En_5_Chapter/490964_1_En_5_Fig2_HTML.jpg
Figure 5-2

MQTT Explorer, I am a MQTT message

You can download MQTT Explorer from the following location:
https://github.com/thomasnordquist/MQTT-Explorer/releases

It should also be available through your favorite package manager.

Let’s get back to sending the full equivalent of an intent message. You can use the command line to send a JSON file directly to the target intent queue, which as we have just seen is as follows: hermes/intent/hellonico:highlight.

So, using mosquitto_pub, this gives you the following:
mosquitto_pub -f onlycats.json -h 0.0.0.0 -t hermes/intent/hellonico:highlight

where onlycats.json is the JSON file with the content we have just seen in Listing 5-1.

If you still have MQTT Explorer running, you will see the message in the corresponding queue, as shown in Figure 5-3.
../images/490964_1_En_5_Chapter/490964_1_En_5_Fig3_HTML.jpg
Figure 5-3

Sending Rhasspy-like intent messages from the command line

We have seen how to interact, publish, and subscribe to messages with MQTT from the command line. Let’s do the same using Java now.

MQTT Messaging in Java

In this section, we will send and receive messages to and from our Java/Visual Studio Code setup. This will help you understand the message flow more easily.

Dependencies Setup

Either using the project from previous chapters or creating a new one based on the project template, we are going to add some Java libraries to interact with the MQTT messaging queue and to parse JSON content.

The dependencies section in the pom.xml file should look like Listing 5-2.
<dependencies>
<dependency>
  <groupId>org.eclipse.paho</groupId>
  <artifactId>org.eclipse.paho.client.mqttv3</artifactId>
  <version>1.1.0</version>
 </dependency>
 <dependency>
  <groupId>origami</groupId>
  <artifactId>origami</artifactId>
  <version>4.1.2-5</version>
 </dependency>
 <dependency>
  <groupId>org.json</groupId>
  <artifactId>json</artifactId>
  <version>20190722</version>
 </dependency>
 <dependency>
  <groupId>origami</groupId>
  <artifactId>filters</artifactId>
  <version>1.3</version>
 </dependency>
</dependencies>
Listing 5-2

Java Dependencies

Basically, we will make use of the following third-party libraries:
  • origami and origami-filters for real-time video processing

  • org.json for JSON content parsing

  • mqttv3 for interacting with the MQTT broker and handling messages

Sending a Basic MQTT Message

Since I’m writing part of this book on a plane flying over Russia, we will send a quick “hello” message to our fellow Russian spies using the MQTT protocol.

To do this, we will go through the following steps:
  1. 1.

    Create an MQTT client object, connecting to the host where the broker is running.

     
  2. 2.

    Use that object to connect to the broker using the connect method.

     
  3. 3.

    Create an MQTT message with a payload made of a string converted to bytes.

     
  4. 4.

    Publish the message.

     
  5. 5.

    Finally, cleanly disconnect.

     
Listing 5-3 shows the rather short code snippet.
package practice;
import org.eclipse.paho.client.mqttv3.MqttClient;
import org.eclipse.paho.client.mqttv3.MqttMessage;
public class MqttZero {
    public static void main(String... args) throws Exception {
        MqttClient client = new MqttClient("tcp://localhost:1883", MqttClient.generateClientId());
        client.connect();
        MqttMessage message = new MqttMessage();
        message.setPayload(new String("good morning Russia").getBytes());
        client.publish("hello", message);
        client.disconnect();
    }
}
Listing 5-3

Hello, Russia

To check that things are in place, verify that the message is showing in your running MQTT Explorer instance, as shown in Figure 5-4.
../images/490964_1_En_5_Chapter/490964_1_En_5_Fig4_HTML.jpg
Figure 5-4

MQTT Explorer in Russia

Note that you should of course be listening to the hello topic first.

Simulating a Rhasspy Message

Sending the equivalent of a Rhasspy message is not going to be that much more difficult; we just read the content of the JSON file into a string and then send it like we just did with a simple string, as shown in Listing 5-4.
package practice;
import java.nio.file.Files;
import java.nio.file.Paths;
import java.util.List;
import java.util.stream.Collectors;
import org.eclipse.paho.client.mqttv3.MqttClient;
import org.eclipse.paho.client.mqttv3.MqttMessage;
public class Client {
    public static void main(String... args) throws Exception {
        MqttClient client = new MqttClient("tcp://localhost:1883", MqttClient.generateClientId());
        client.connect();
        List<String> nekos = Files.readAllLines(Paths.get("onlycats.json"));
        String neko = nekos.stream().collect(Collectors.joining(" "));
        MqttMessage message = new MqttMessage();
        message.setPayload(neko.getBytes());
        client.publish("hermes/intent/hellonico:highlight", message);
        client.disconnect();
    }
}
Listing 5-4

Intent message handling from Java

Our never-ending love of cats is again showing in Figure 5-5 in the MQTT Explorer window.
../images/490964_1_En_5_Chapter/490964_1_En_5_Fig5_HTML.jpg
Figure 5-5

JSON files showing in the MQTT Explorer window

JSON Fun

Before being able to handle Rhasspy messages from the MQTT topic, we need to be able to do a bit of JSON parsing.

Obviously, there are many ways to do parsing in Java; we can parse manually (hint, don’t do this) or use different libraries. Here we are going to use the org.json library because it’s pretty fast at handling incoming MQTT messages.

Here are the steps for parsing a string to get the wanted value with the org.json library:
  1. 1.

    Create a JSONObject using the string version of the JSON message.

     
  2. 2.
    Use one of the following functions to navigate the JSON document:
    • get(),

    • getJSONObject()

    • getJSONArray()

     
  3. 3.

    Get the wanted value with getInt, getBoolean, getString, etc.

     
Overengineering

Most of the time, Java is seen as complicated because somewhere in the layers a complicated piece of middleware was introduced. I actually find the language pretty succinct these days and fast to work with given all the autocompletion and refactoring tooling.

Anyway, here we are just pulling out one value of the message, but you could also unmarshal the whole JSON message into a Java object...and also create an open source library for us. Let me know when it is ready to use!

That’s it. Applied to the somecats.json file we have used before, if we want to retrieve the value that was recognized by Rhasspy, we will do something along the lines of Listing 5-5.
package practice;
import java.nio.file.Files;
import java.nio.file.Paths;
import java.util.List;
import java.util.stream.Collectors;
import org.json.JSONObject;
public class JSONFun {
    public static String whatObject(String json) {
        JSONObject obj = new JSONObject(json);
        JSONObject slot = ((JSONObject) obj.getJSONArray("slots").get(0)).getJSONObject("value");
        String cats = slot.getString("value");
        return cats;
    }
    public static void main(String... args) throws Exception {
        List<String> nekos = Files.readAllLines(Paths.get("onlycats.json"));
        String json = nekos.stream().collect(Collectors.joining(" "));
        System.out.println(whatObject(json));
    }
}
Listing 5-5

Parsing JSON Content

Listening to MQTT Basic Messages

Listening to messages, or subscribing , is done via the following steps:
  1. 1.

    Subscribe to a topic or parent topic.

     
  2. 2.

    Adda listener that implements the IMqttMessageListener interface.

     
The simplest code for subscribing is shown in Listing 5-6.
package practice;
import org.eclipse.paho.client.mqttv3.IMqttMessageListener;
import org.eclipse.paho.client.mqttv3.MqttClient;
import org.eclipse.paho.client.mqttv3.MqttMessage;
public class Sub0 {
    public static void main(String... args) throws Exception {
        MqttClient client = new MqttClient("tcp://localhost:1883", MqttClient.generateClientId());
        client.connect();
        client.subscribe("hello", new IMqttMessageListener() {
            @Override
            public void messageArrived(String topic, MqttMessage message) throws Exception {
                String hello = new String(message.getPayload(), "UTF-8");
                System.out.println(hello);
            }
        });
    }
}
Listing 5-6

From Russia with Love

Note that the message-handling part can of course be replaced with Java lambdas, thus making it even more readable, as in Listing 5-7.
MqttClient client = new MqttClient("tcp://localhost:1883", MqttClient.generateClientId());
client.connect();
client.subscribe("hello", (topic, message) -> {
 String hello = new String(message.getPayload(), "UTF-8");
 System.out.println(hello);
});
Listing 5-7

Messages with Java Lambdas

If you’re running everything from your Raspberry Pi, then the following Visual Studio Code setup will do everything properly and display the Russian message, as shown in Figure 5-6.
../images/490964_1_En_5_Chapter/490964_1_En_5_Fig6_HTML.jpg
Figure 5-6

From Russia with love

Sending a Message From Java To The Raspbery Pi

Obviously, the fun is in having a distributed system and handling messages coming from different places. Here, try to run the broker on the Raspberry Pi. After setting up the IP address of your Raspberry Pi in the sender listing, send a message from your computer to the Raspberry Pi in Java.

Or send a message in Java from the Raspberry Pi to a broker located remotely or, again, in the cloud.

Listening to MQTT JSON Messages

So, now it is the time to listen for and parse the content of the JSON message from within Java, which is mostly a combination of listening to basic messages and implementing the JSON fun you had in the previous pages. The code snippet is in Listing 5-8.
package practice;
import org.eclipse.paho.client.mqttv3.IMqttMessageListener;
import org.eclipse.paho.client.mqttv3.MqttClient;
import org.eclipse.paho.client.mqttv3.MqttMessage;
import org.json.JSONObject;
public class Sub {
    public static void main(String... args) throws Exception {
        MqttClient client = new MqttClient("tcp://localhost:1883", MqttClient.generateClientId());
        client.connect();
        client.subscribe("hermes/intent/#", new IMqttMessageListener() {
            @Override
            public void messageArrived(String topic, MqttMessage message) throws Exception {
                String json = new String(message.getPayload(), "UTF-8");
                JSONObject obj = new JSONObject(json);
                JSONObject slot = ((JSONObject) obj.getJSONArray("slots").get(0)).getJSONObject("value");
                String cats = slot.getString("value");
                System.out.println(cats);
            }
        });
    }
}
Listing 5-8

Cats Coming

Now that you know everything about keys and brokers, it is time to get and install Rhasspy.

Voice and Rhasspy Setup

The Rhasspy voice platform needs a set of services running to be able to deploy applications with intents. In this section, you will see how to install the platform first and then how to create applications with intents.

The easiest way to install Rhasspy is actually via Docker (https://www.docker.com/), which is a container engine on which you can run images. The Rhasspy maintainer has created a ready-to-use Docker image for Rhasspy, so we will take advantage of that.

Preparing the Speaker

You do need a working microphone setup before executing any of the voice commands.

We recommend ReSpeaker. If you have it, you can find the installation instructions here:
http://wiki.seeedstudio.com/ReSpeaker_4_Mic_Array_for_Raspberry_Pi/
Provided you have plugged in the speaker on the Pi, you can perform the necessary module installation with the following short shell script:
sudo apt-get update
sudo apt-get upgrade
git clone https://github.com/respeaker/seeed-voicecard.git
cd seeed-voicecard
sudo ./install.sh
reboot

Standard USB microphones should be plug-and-play, and I have been using conference room microphones with pretty good results.

So, if things are working, the microphone should show up in the list output from this arecord command:
arecord -L
You ReSpeaker/Raspberry Pi setup should look like the one in Figure 5-7.
../images/490964_1_En_5_Chapter/490964_1_En_5_Fig7_HTML.jpg
Figure 5-7

ReSpeaker lights

Installing Docker

The Docker web site has a recent entry on how to set up Docker for the Raspberry Pi; you can find it here:
https://www.docker.com/blog/happy-pi-day-docker-raspberry-pi/
All the steps are repeated in the following code:
#   a. Install the following prerequisites.
sudo apt-get install apt-transport-https ca-certificates software-properties-common -y
#   b. Download and install Docker.
curl -fsSL get.docker.com -o get-docker.sh && sh get-docker.sh
#   c. Give the 'pi' user the ability to run Docker.
sudo usermod -aG docker pi
#   d. Import Docker CPG key.
sudo curl https://download.docker.com/linux/raspbian/gpg
#   e. Setup the Docker Repo.
sudo echo "deb https://download.docker.com/linux/raspbian/ stretch stable" >> /etc/apt/sources.list
#   f. Patch and update your Pi.
sudo apt-get update
sudo apt-get upgrade
#   g. Start the Docker service.
systemctl start docker.service
#   h. To verify that Docker is installed and running.
docker info
#    i. You should now some information in regards to versioning, runtime,etc.

Installing Rhasspy with Docker

The whole Rhasspy suite can be started by running the prepared container, and this is done by executing the following command on the Raspberry Pi, provided you have installed Docker properly.

You use docker run to start the image itself; you can picture the image as being a small OS containing prepackaged software and configuration and thus being easy to deploy.
docker run -d -p 12101:12101
      --restart unless-stopped
      -v "$HOME/.config/rhasspy/profiles:/profiles"
      --device /dev/snd:/dev/snd
      synesthesiam/rhasspy-server:latest
      --user-profiles /profiles
      --profile en
Here’s a breakdown of the code:
  • docker: This is the command-line executable that communicates with the Docker daemon and sends commands to start and stop the container.

  • -d: This tells Docker to run the image as a daemon, not waiting for the execution of the image to finish and starting the container as a background process.

  • -p 12101:12101: This does port mapping between Docker and the host; without this, open ports within the container cannot be viewed from the outside world. Here we tell Docker to map port 12101 of the container to port 12101 of the Raspberry Pi.

  • --restart unless-stopped: This speaks for itself, meaning even if the container is dying because of an internal exception or error, the Docker daemon will automatically restart the image.

  • -v "$HOME/.config/rhasspy/profiles:/profiles": Here we want to “mount” a folder of the Raspberry Pi and make it available to the Docker container, and vice versa. This is kind of a shared-network folder. It will be used to store files downloaded by Rhasspy for us.

  • --device /dev/snd:/dev/snd: This is pretty neat; it maps the raw data coming to the sound system of the Raspberry Pi and makes it available to the Docker container.

  • synesthesiam/rhasspy-server:latest: This is the name of the image used to start the container. Think of this image as a verbatim copy of the file system used to start the container.

  • The next two are parameters that the Rhasspy image understands:
    • --user-profiles /profiles: This is where to store the profiles, and this is the path of the folder we are sharing with the Raspberry Pi.

    • --profile en: This is the language to use.

To check that the container is started properly, let’s verify its status with the docker command, as shown here:
docker ps --format "table {{.Status}} {{.Ports}} {{.Image}} {{.ID}}"
This should show something similar to the following; make sure to especially check the status field, which we have put up front:
STATUS           PORTS                       IMAGE                                CONTAINER ID
Up 22 minutes    0.0.0.0:12101->12101/tcp    synesthesiam/rhasspy-server:latest   af7c56961d5c

The Rhasspy server and its console are ready, so let’s go back to the main computer and access the Raspberry Pi via the browser-based IDE.

Starting the Rhasspy Console

To access the console, go to http://192.168.1.104:12101/, where 192.168.1.104 is the IP address of the Raspberry Pi.
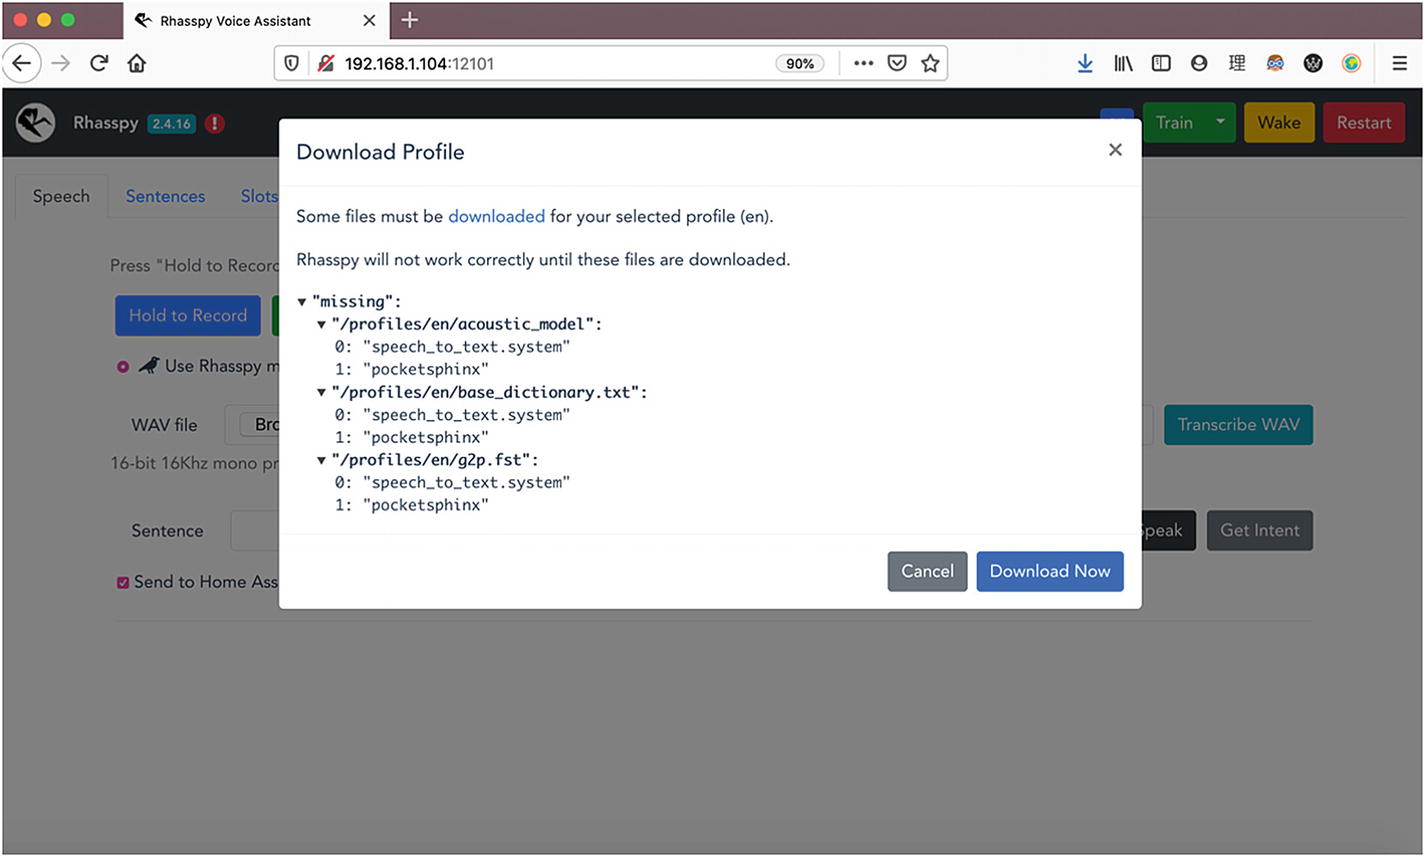
You’re then presented with the lively screen shown in Figure 5-8.
../images/490964_1_En_5_Chapter/490964_1_En_5_Fig8_HTML.jpg
Figure 5-8

The Rhasspy console

The console makes it quite obvious for you on first start that it should go and fetch some remote files, so provided your Raspberry Pi is connected to the Internet, just click the Download Now button.

The operation takes a few minutes to complete, so don’t lose your patience here. Wait for the dialog box shown in Figure 5-9.
../images/490964_1_En_5_Chapter/490964_1_En_5_Fig9_HTML.jpg
Figure 5-9

Download complete

The console refreshes by itself, and we’re now being greeted with Figure 5-10.
../images/490964_1_En_5_Chapter/490964_1_En_5_Fig10_HTML.jpg
Figure 5-10

Refreshed Rhasspy console

But we seem to still have some markers telling us something is missing, as shown in Figure 5-11 and Figure 5-12.
../images/490964_1_En_5_Chapter/490964_1_En_5_Fig11_HTML.jpg
Figure 5-11

Red markers

../images/490964_1_En_5_Chapter/490964_1_En_5_Fig12_HTML.jpg
Figure 5-12

The setup problems are nicely explained

Fortunately, and for now, clicking the top-right green Train button makes our console shiny and free of red markers, as in Figure 5-13. We are now ready to use the Rhasspy console.
../images/490964_1_En_5_Chapter/490964_1_En_5_Fig13_HTML.jpg
Figure 5-13

The console is ready!
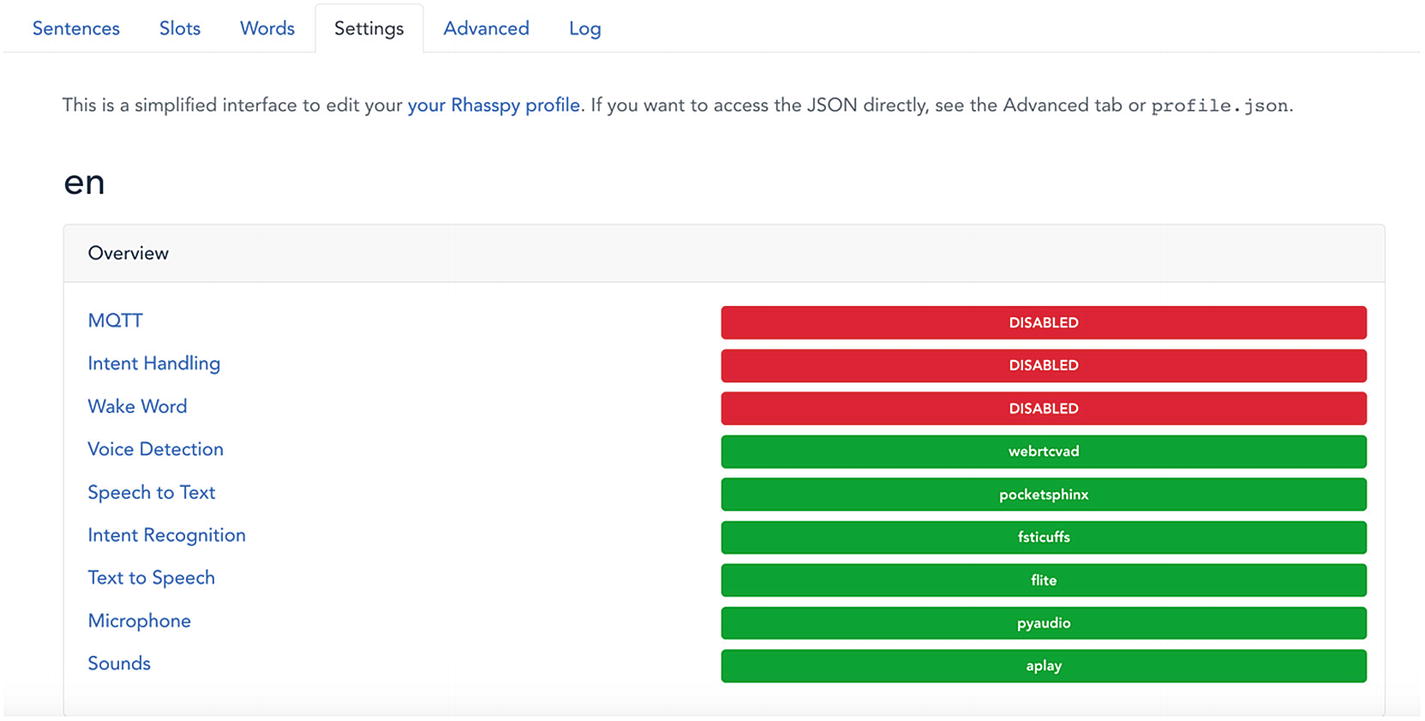
The Rhasspy Console

Let’s take a look at the Rhasspy menu in more detail. Figure 5-14 shows the different sections for configuring the home assistant.
../images/490964_1_En_5_Chapter/490964_1_En_5_Fig14_HTML.jpg
Figure 5-14

More configuration options

The usage of each tab is explained in the following list:
  • Speech: This is where you can try your assistant.

  • Sentences: This is where you define what your vocal assistant can detect and recognize.

  • Slots: Sentences have variables in them. Each possible value for a variable can be defined in a line in the Sentences section, or you can create lists of possible values in the Slots section.

  • Words: This is the section where you define how to pronounce words. This is especially useful for names, as the English engine is sometimes not so well prepared for French people’s pronunciations!

  • Settings: This is an all-encompassing screen where you can configure the way engines work and what to do with recognized intents.

  • Advanced: This is the same as Settings except the configuration is exposed as a text file that can be edited directly in the browser.

  • Log: This is where engine logs can be viewed in real time.

    A few notes…

    The browser IDE (to be correct, the processes inside the Docker container) will ask you to restart Rhasspy each time you change a configuration setting.

    It will also ask you to train Rhasspy each time you make changes to either the Sentences or Words section.

    There is no specific reason to not do this, unless you’re in the middle of surgery and need to ask your assistant for immediate help.

We know how to navigate the console now, so let’s make our vocal assistant recognize something for us.

First Voice Command

To create a voice command that generates an intent, we need to make some edits in the Sentences section. As just explained, the Sentences section is where we define the sentences our engine can recognize.

First Command, Full Sentence

For once, the grammar used to define intents is quite simple and is inserted via an .ini file (which comes from the good old Windows 95 days).

The pattern is as follows:
[IntentName]
Sentence1
So, if it is Monday morning and you are really in need of coffee, you could write something like this:
[Coffee]
I need coffee
Let’s try it. Let’s start by deleting the content of that .init file and adding just the previous coffee intent, so the Sentences section now looks like Figure 5-15.
../images/490964_1_En_5_Chapter/490964_1_En_5_Fig15_HTML.jpg
Figure 5-15

I do really need coffee

If you click the nicely visible Save Sentences button, you’ll get the training reminder shown in Figure 5-16.
../images/490964_1_En_5_Chapter/490964_1_En_5_Fig16_HTML.jpg
Figure 5-16

First Rhasspy training

Speech Section and Trying Your Intent

The Rhasspy engine is now trained, and you can try it by heading to the Speech section, shown again in Figure 5-17.
../images/490964_1_En_5_Chapter/490964_1_En_5_Fig17_HTML.jpg
Figure 5-17

Speech section

The Speech section is where you can either speak or write a sentence and see whether and what intent is recognized.

Supposed we type “I need coffee” in the Sentence field; the engine should recognize and generate the “Coffee” response that we just defined, as in Figure 5-18.
../images/490964_1_En_5_Chapter/490964_1_En_5_Fig18_HTML.jpg
Figure 5-18

I…need…coffee

The voice command “Coffee” is recognized, and an associated generated JSON document is attached to it, with various inputs on confidence and raw values.

Since we’re focusing on voice commands here, you can also just tap and hold the “Hold to record” button, say “I need coffee,” and see the spoken sentence being turned into text first, then displayed in the Sentence field, and then analyzed as was just done.

This is probably the time to plug in the ReSpeaker or your USB microphone.

If you have installed eSpeak (http://espeak.sourceforge.net/), which is a text-to-speech command-line tool, you can also generate a WAV file and feed it to Rhasspy.
espeak "I need coffee" --stdout >> ineedcoffee.wav

Upload that ineedcoffee.wav file and click the Get Intent button.

Fine-Tuned Intents

It is of course possible to just pop in optional words, variables, and placeholders in the commands defined in the Sentences section. Let’s improve our game here and add details to our intent so as to create better voice commands.

Optional Words

It is of course possible to make words optional in the sentence to make the commands more natural to users.

In the previous coffee example, you could have an optional urgency embedded into the intent, as in you may really need coffee at times. This is done by putting the optional words inside square brackets, as shown here:
[Coffee]
I [really] need coffee
After training, you see in Figure 5-19 and Figure 5-20 how the same Coffee intent is being properly recognized by Rhasspy.
../images/490964_1_En_5_Chapter/490964_1_En_5_Fig19_HTML.jpg
Figure 5-19

Coffee intent without the optional word

../images/490964_1_En_5_Chapter/490964_1_En_5_Fig20_HTML.jpg
Figure 5-20

Coffee intent with the optional word, which is really

Adding Alternatives
But what about when it’s a day where you feel really good about yourself and you don’t really need that addicting black stuff to wake you up? Let’s rewrite our coffee intent so it can recognize both when you need coffee and when you don’t.
[Coffee]
I (need | don't need) coffee
Training and using this new intent, you can now tell your coffee assistant that you do not need coffee. Back on the Speech tab, you would get the intent shown in Figure 5-21.
../images/490964_1_En_5_Chapter/490964_1_En_5_Fig21_HTML.jpg
Figure 5-21

I don’t need coffee (although, to be honest, that’s not true)

You probably already noticed one problem with this generated intent. Yes, it’s not very useful as is, because the same intent is generated whether we want coffee or not.

We could of course parse the received string or write two different intents, but what if we simply give a name to that list of possibilities? This is done with round brackets, as shown here:
[Coffee]
I ((need | don't need) {need}) coffee

Now, our Coffee intent will add a slot named “need” to the JSON document, and its value will be either “need” or “don’t need.”

Let’s try again; see the result in Figure 5-22.
../images/490964_1_En_5_Chapter/490964_1_En_5_Fig22_HTML.jpg
Figure 5-22

Maybe I don’t need coffee

You should notice several things here. First, the summary of the intent is now showing more details, the intent is marked in red, and each slot is nicely shown in a list with its associated value (here, need = don’t need).

Second, the full JSON document of the intent contains an entities section, and each entity has an entity name and associated value.

As a side note, the JSON document also contains a slots section, with a simple list of all the slots of the intent.

What’s next?

Making Intents with Slots More Readable

You probably noticed that if we add one too many slots, then the whole sentence becomes messy quite quickly.

We can move the slot definition right below the intent name and assign possible values with =.

For example, the same coffee intent can be rewritten as shown here:
[Coffee]
need = ((need | don't need) {need})
I <need> coffee

Nothing has changed, and the intent behaves the same as before, but it is now vastly more readable.

That’s great, but what’s next?

Defining Reusable Slots

Yes, defining slots inline also brings extra complexity to our sentence definitions, so it is possible to move them out and define them on the Slots tab.

Slots are defined in a simple JSON file, and to move our coffee need to the Slots tab, you would write the JSON file shown here:
{
    "need": [
        "need",
        "don't need"
    ]
}
This shows up in the browser as in Figure 5-23.
../images/490964_1_En_5_Chapter/490964_1_En_5_Fig23_HTML.jpg
Figure 5-23

Slots of coffee needs

To use that in the sentence file, you would now have to write the intent, as shown here:
[Coffee]
myneed = $need {need}
I <myneed> coffee
Here is a breakdown of the code:
  • myneed: This is the placeholder in the sentence, meaning its definition can be seen as being inlined at training time.

  • $need: The dollar sign specifies that this is coming from the slots JSON file.

  • {need}: This is the name of the slot within that intent, meaning you can reuse the same list in different intents, each time with a different slot name.

Great. Now we have highly configurable intents, with a complex list of options on hand.

Let’s move to the section where the external system can make use of the generated JSON file when an intent is recognized.

Settings: Get That Intent in the Queue

The generated JSON file looks like it could be useful, but we want to have it external to Rhasspy and in the MQTT queue so that we can do more processing.

Let’s head to the Settings section of the console, as shown in Figure 5-24.
../images/490964_1_En_5_Chapter/490964_1_En_5_Fig24_HTML.jpg
Figure 5-24

Rhasspy Settings section

Here we get an overview of how the system is configured. There are zillions of configurable options for Rhasspy, but we will focus on the following:
  • MQTT: This sends the JSON to the MQTT queue.

  • Wake word: The background process is always listening for possible “wake-up” keywords; this is your “Hey, Siri” or “Hey, Google” spy here.

Let’s look at the MQTT interaction first. If you click the MQTT link, you’ll be taken to the corresponding section, where you can enter the details of your running MQTT daemon, as shown in Figure 5-25.
../images/490964_1_En_5_Chapter/490964_1_En_5_Fig25_HTML.jpg
Figure 5-25

MQTT settings

Make sure to fill in the hostname or the IP address of your Raspberry Pi here. Restart Rhasspy when asked, and that’s it. Now let’s try to get some coffee on MQTT.

Back on the Speech tab, we can now trigger a new coffee intent, as in Figure 5-26.
../images/490964_1_En_5_Chapter/490964_1_En_5_Fig26_HTML.jpg
Figure 5-26

One more coffee?

Let’s now take a look at the MQTT Explorer window of Figure 5-27.
../images/490964_1_En_5_Chapter/490964_1_En_5_Fig27_HTML.jpg
Figure 5-27

Rhasspy and MQTT

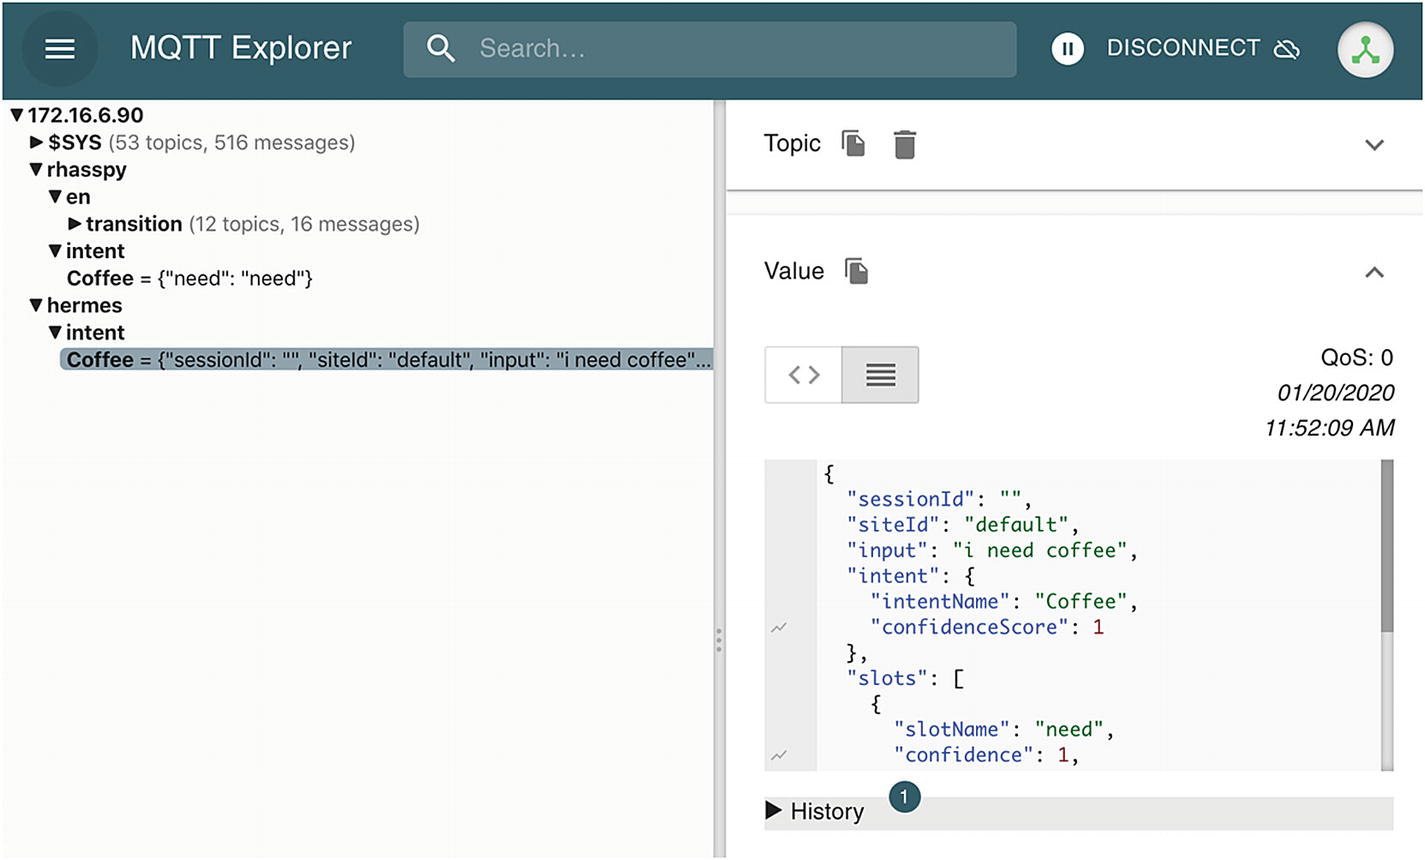
What do you see? We see a message being sent to the hermes/intent/coffee topic, which is something similar to what you saw in the previous sections of this chapter.

Yes, you can feel it too—this is going to work.

You can also see that there is a simple MQTT message sent to Rhasspy/intent/coffee, with just the slot’s name and value in the message body. If you don’t need to play with the confidence and other details, this is the best alternative. Working with this message is left as an exercise for you.

Hint

This is easy.

You can get some instant gratification by trying a few messages specifying whether you want or don’t want coffee; just make sure to not drink too much of it.

Settings: Wake-Up Word

It’s nice to go back to speech every now and then, but it would be nice to just leave the Raspberry Pi by itself, and when saying a given word, or set of words, get Rhasspy to listen for intents.

This is done by using wake-up words , which are defined in the Settings section.

I have been having some luck with enabling the Snowboy kit (https://snowboy.kitt.ai/) in the configuration, as shown in Figure 5-28.
../images/490964_1_En_5_Chapter/490964_1_En_5_Fig28_HTML.jpg
Figure 5-28

Snowboy configuration

There is a default UMDL file downloaded locally for you when you enable Snowboy; it will be at the following location on the Raspberry Pi:
/home/pi/.config/rhasspy/profiles/en/snowboy/snowboy.umdl
You can create your own files and keywords easily by recording your keyword and uploading the audio files to the Snowboy web site, as detailed here:
http://docs.kitt.ai/snowboy/

Now, when you say “Snowboy,” Rhasspy will wake up, as if you were holding the Record button.

So, now, we just have to say the following:
  • “Snowboy”

  • “I need coffee”

We’re getting there, aren’t we?

Creating the Highlight Intent

Now, we have to create a small intent that we will use to tell our main object detection application which object we want to focus on.

The intent will be specified according to the following rules:
  • Name: highlight

  • Command: show me only <something>, where <something> is either cat or person

  • Name of the slot: only

You should definitely try this on your own before reading ahead…

The resulting code for the intent to put in the sentence file is as follows:
[highlight]
object = (cats | person) {only}
show me only <object>
The best way to try is of course by saying the following:
  • “Snowboy”

  • “Show me only cats”

to have the intent JSON be published in the hermes/intent/highlight queue, with the content as shown in Figure 5-29.
../images/490964_1_En_5_Chapter/490964_1_En_5_Fig29_HTML.jpg
Figure 5-29

Show me only cats, Snowboy

Voilà, we’re mostly done with the Rhasspy and voice command section, so we can now go back to detecting objects, cats, and people in real time.

Voice and Real-Time Object Detection

This is the part of the chapter where we bridge it all, meaning the video analyses from previous chapters and the voice recognition using Rhasspy.

First, let’s get ready with a simple origami project setup, with messages being sent by Rhasspy.

Simple Setup: Origami + Voice

In this section, we will do the following:
  1. 1.

    Start a video streaming on the main camera in full-screen, in a new thread.

     
  2. 2.

    The video streaming is using the origami core filter annotate, where you can just add some text to the picture.

     
  3. 3.

    Connect to MQTT on the main thread.

     
  4. 4.

    On a new intent message, we update the annotate text.


The intent used here is the highlight intent that was defined earlier, with a slot to recognize the names taken from the object categories of the COCO dataset.

The rest of Listing 5-9 should be easy to follow.
package practice;
import org.eclipse.paho.client.mqttv3.IMqttMessageListener;
import org.eclipse.paho.client.mqttv3.MqttClient;
import org.eclipse.paho.client.mqttv3.MqttMessage;
import org.json.JSONObject;
import origami.Camera;
import origami.Origami;
import origami.filters.Annotate;
public class Consumer {
    public static void main(String... args) throws Exception {
        Origami.init();
        Annotate myText = new Annotate();
        new Thread(() -> {
            new Camera().device(0).filter(myText).fullscreen().run();
        }).start();
        MqttClient client = new MqttClient("tcp://localhost:1883", MqttClient.generateClientId());
        client.connect();
        client.subscribe("hermes/intent/#", new IMqttMessageListener() {
            @Override
            public void messageArrived(String topic, MqttMessage message) throws Exception {
                String json = new String(message.getPayload(), "UTF-8");
                JSONObject obj = new JSONObject(json);
                JSONObject slot = ((JSONObject) obj.getJSONArray("slots").get(0)).getJSONObject("value");
                String cats = slot.getString("value");
                myText.setText(cats);
            }
        });
    }
}
Listing 5-9

Origami + Rhasspy

If things are all good and you say “Show me only cats,” the annotate filter will update the upper-left text, as shown in Figure 5-30.
../images/490964_1_En_5_Chapter/490964_1_En_5_Fig30_HTML.jpg
Figure 5-30

Webcam streaming

Now let’s connect this setup with object recognition and with the real-time video streaming part.

Origami Real-Time Video Analysis Setup

From the previous chapter, you will remember that we were using an origami filter, called Yolo, to perform object detection. Just like the annotate filter, the Yolo filter is included in the origami-filters library, and in a very Java way, you just have to extend the base filter to highlight the detected objects.

Available in the origami-filter library, the Yolo filter allows you to download and retrieve networks on demand using a network specification.So, for example, networks.yolo:yolov3-tiny:1.0.0 will download yolov3-tiny and cache for further usage, depending on which device you’re on. This is a feature of the origami framework.

For Yolo, the following network specs are available for training Yolo networks on the Coco data set:
  • networks.yolo:yolov3-tiny:1.0.0

  • networks.yolo:yolov3:1.0.0

  • networks.yolo:yolov2:1.0.0

  • networks.yolo:yolov2-tiny:1.0.0

Each one is either faster or more precise than the one before it.

Creating the Yolo Filter

In Listing 5-10, we prepare the groundwork for showing either the number of all the objects detected, using annotateWithTotal, or the display only, via the only switch. Note that the entry point is in the function annotateAll, where it is decided whether to display all the boxes or a subset of them.

Listing 5-10 shows the code for the MyYolo filter.
package filters;
import org.opencv.core.Mat;
import org.opencv.core.Point;
import org.opencv.core.Rect;
import org.opencv.core.Scalar;
import org.opencv.imgproc.Imgproc;
import origami.filters.detect.Yolo;
import java.util.List;
public class MyYolo extends Yolo {
    Scalar color = new Scalar(110.0D, 220.0D, 0.0D);
    String only = null;
    boolean annotateWithTotal = false;
    public MyYolo(String spec) {
        super(spec);
    }
    public MyYolo annotateWithTotal() {
        this.annotateWithTotal = true;
        return this;
    }
    public MyYolo annotateAll() {
        this.annotateWithTotal = false;
        return this;
    }
    public MyYolo only(String only) {
        this.only = only;
        return this;
    }
    public MyYolo color(Scalar color) {
        this.color = color;
        return this;
    }
    @Override
    public void annotateAll(Mat frame, List<List> results) {
        if (only == null) {
            if (annotateWithTotal)
                annotateWithCount(frame, results.size());
            else
                super.annotateAll(frame, results);
        } else {
            if (!annotateWithTotal)
                results.stream().filter(result -> result.get(1).equals(only)).forEach(r -> {
                    annotateOne(frame, (Rect) r.get(0), (String) r.get(1));
                });
            else
                annotateWithCount(frame, (int) results.stream().filter(result -> result.get(1).equals(only)).count());
        }
    }
    public void annotateWithCount(Mat frame, int count) {
        Imgproc.putText(frame, (only == null ? "ALL" : only) + " (" + count + ")", new Point(50, 500), 1, 4.0D, color, 3);
    }
    public void annotateOne(Mat frame, Rect box, String label) {
        if (only == null || only.equals(label)) {
            Imgproc.putText(frame, label, new Point(box.x, box.y), 1, 3.0D, color, 3);
            Imgproc.rectangle(frame, box, color, 2);
        }
    }
}
Listing 5-10

MyYolo Filter

With the filter now ready, we can start doing analysis again.

Running the Video Analysis Alone

In this short section, we’ll play a video by starting the camera on one thread and in another thread updating the selection of shown objects of the Yolo filter in real time. The second main thread directly calls the only function of the MyYolo filter, which we just defined in the previous section. Listing 5-11 shows the full code for this.
package practice;
import origami.Camera;
import origami.Filter;
import origami.Filters;
import origami.Origami;
import origami.filters.FPS;
import filters.MyYolo;
public class YoloAgain {
    public static void main(String[] args) {
        Origami.init();
        String video = "mei/597842788.852328.mp4";
//        Filter filter = new Filters(new MyYolo("networks.yolo:yolov3-tiny:1.0.0").only("car"), new FPS());
        MyYolo yolo = new MyYolo("networks.yolo:yolov3-tiny:1.0.0"); //.only("person");
        yolo.thresholds(0.4f, 1.0f);
        yolo.annotateWithTotal();
        Filter filter = new Filters(yolo, new FPS());
        new Thread(() -> {
            new Camera().device(video).filter(filter).run();
        }).start();
        new Thread(() -> {
            try {
                Thread.sleep(5000);
                System.out.println("only cat");
                yolo.only("cat");
                Thread.sleep(5000);
                System.out.println("only person");
                yolo.only("person");
            } catch (InterruptedException e) {
                //e.printStackTrace();
            }
        }).start();
    }
}
Listing 5-11

Running Yolo on a Video, Updating Parameters in Real Time

You can probably tell where we are heading now, linking the message received from Rhasspy to update the selection of the Yolo analysis.

Integrating with Voice

In this final section, we will highlight a subset of objects based on the input received from the Rhasspy intent.

To get this working, we have to do the following:
  1. 1.

    Start a video streaming on the main camera in full screen, in a new thread.

     
  2. 2.

    The video streaming is using a MyYolo filter loading the Yolo network.

     
  3. 3.

    Connect to MQTT on the main thread.

     
  4. 4.

    On a new message, we update the annotate text.

     
  5. 5.
    When a message arrives in the highlight queue, we do the following:
    • Parse the JSON object.

    • Retrieve the only value.

    • Update the selection of the MyYolo filter.

     
The final code snippet of this book shows how to put all of this together; see Listing 5-12.
import filters.MyYolo;
import org.eclipse.paho.client.mqttv3.MqttClient;
import org.json.JSONObject;
import origami.Camera;
import origami.Origami;
import static java.nio.charset.StandardCharsets.*;
public class Chapter05 {
    public static String whatObject(String json) {
        JSONObject obj = new JSONObject(json);
        JSONObject slot = ((JSONObject) obj.getJSONArray("slots").get(0)).getJSONObject("value");
        String cats = slot.getString("value");
        return cats;
    }
    public static void main(String... args) throws Exception {
        Origami.init();
//        String video = "mei/597842788.852328.mp4";
        String video = "mei/597842788.989592.mp4";
        MyYolo yolo = new MyYolo("networks.yolo:yolov3-tiny:1.0.0");
        yolo.thresholds(0.2f, 1.0f);
//        yolo.only("cat");
        new Thread(() -> {
//            new Camera().device(0).filter(yolo).run();
            new Camera().device(video).filter(yolo).run();
        }).start();
        MqttClient client = new MqttClient("tcp://localhost:1883", MqttClient.generateClientId());
        client.connect();
        client.subscribe("hermes/intent/hellonico:highlight", (topic, message) -> {
            yolo.only(whatObject(new String(message.getPayload(), "UTF-8")));
        });
    }
}
Listing 5-12

Real-Time Detection, Integrating with the Rhasspy Queue

In the different sample videos or directly in the video stream of the webcam of the Raspberry Pi, you can directly update the objects to be detected.

We could have look for cats in this final example, but in a timely manner my daughter Mei just sent me videos of her at school and out with friends at night. See her highlighted by our YOLO setup while she’s in action in Figure 5-31 and Figure 5-32.
../images/490964_1_En_5_Chapter/490964_1_En_5_Fig31_HTML.jpg
Figure 5-31

Mei at school

../images/490964_1_En_5_Chapter/490964_1_En_5_Fig32_HTML.jpg
Figure 5-32

Mei at night

In this chapter, you learned about the following:
  • The Rhasspy message flow

  • How to interact from Java with MQTT for IoT messaging

  • How to set up Rhasspy and intents

  • How to connect messages sent by Rhasspy to our Java code

  • How to update the real-time video analysis running on the Raspberry Pi by interpreting voice sent by Rhasspy with custom intents

This short book has come to an end, so now it’s your turn to change the world. We’ve only scratched the surface of what is possible, but I really hope this gives you some ideas to try to implement.

..................Content has been hidden....................

You can't read the all page of ebook, please click here login for view all page.
Reset
3.145.38.117