
Chapter 10: Working with SEO and Managing Performance
SEO (short for Search Engine Optimization) and performances are two topics that go hand in hand during the development process as a whole.
Even though there have been multiple enhancements on the Next.js side to improve performances and facilitate SEO best practices, we still need to know where our application could potentially create any problems that would result in poor search engine indexing and a lousy user experience.
In this chapter, we will cover the following topics in detail:
- Choosing the proper rendering method for your application (SSR, SSG, CSR).
- When an application will typically fail on the performance aspect
- How to use the Vercel Analytics module
- Tools that help us to write SEO-friendly web applications
By the end of this chapter, you'll be able to optimize your web application for SEO and performance by learning some of the best practices and tools for dealing with such complex topics.
Technical requirements
To run the code examples in this chapter, you need to have both Node.js and npm installed on your local machine.
If you prefer, you can use an online IDE such as https://repl.it or https://codesandbox.io; they both support Next.js, and you don't need to install any dependency on your computer. As for the other chapters, you can find the code base for this chapter on GitHub: https://github.com/PacktPublishing/Real-World-Next.js.
SEO and performance – an introduction
Since the rise of the first big search engines, web developers have struggled to find a way to optimize their web applications to get better positioning in search results on Google, Bing, Yandex, DuckDuckGo, and many other popular search engines.
With the evolution of frontend web frameworks, things became even more complicated. While React, Angular, Vue (and many others) provide a fantastic way to deal with complex UIs, they make things a bit harder for web spiders, the bots responsible for indexing websites into a search engine. They need to execute JavaScript, wait for the UI to render, and eventually index highly dynamic web pages. In addition, many contents would be initially hidden, as they get generated dynamically by JavaScript on the frontend directly following user interaction.
That caused many problems and made countless developers regret the good old days when the web was essentially server side rendered, where JavaScript was used to add just a touch of dynamism inside the UI.
OK, I exaggerated a bit. Developers eventually faced the fact that React, Angular, Vue, and all the other fellow frameworks bring such significant innovation to the web development sphere, and they wouldn't give up on them.
Next.js is, in part, a response to those problems. While there are frameworks that only care about SEO and performance by generating all the web pages statically at build time (with all the limitations that this can bring, as seen in Chapter 2, Exploring Different Rendering Strategies), Next.js lets you decide which page needs to be statically generated and server side rendered, and which components need to be rendered exclusively on the client side.
In Chapter 2, Exploring Different Rendering Strategies, we described the differences between those rendering methods. In the next section, we will discuss some real-world examples of how to choose a rendering strategy when it comes to rendering a web page using Next.js.
Rendering strategies, from a performance and SEO perspective
Depending on the website or web application you want to build, you may consider different rendering strategies.
Every rendering strategy has its pros and cons, but the great thing about Next.js is that you don't have to compromise. Instead, you can choose the best rendering strategy for every single page in your web application.
Let's pretend Next.js doesn't exist for a moment. Pretty scary, isn't it?
We want to build a web application using React, but we have to compromise between rendering strategies.
Client-side rendering is a great starting point. The application would be deployed as a JavaScript bundle that dynamically generates the HTML content once it gets downloaded to the web browser. The performances will be outstanding, as all the computation will be done on the client side. In addition, the user experience will be amazing, as the customers would feel as if they were using a native app. On the other hand, you'd have to struggle with SEO, as client-side rendering makes life harder for search engine bots.
On second thought, we may consider server-side rendering. We would render all the content that is important for SEO purposes on the server side, allowing the client to generate the rest. This could be the best option security-wise, as we can hide many data fetch, validation, and sensitive API calls on the backend. That's a good alternative but has some drawbacks. With client-side rendering, we've seen how the app could be bundled into a unique JavaScript file. With SSR, we will need to set up, maintain, and scale a server. With an increase in traffic, it would get slower, more expensive, and harder to maintain. Time to look for a third option.
Our last option is to generate the whole website at build time statically. We would achieve the best possible performance, while SEO scores would increase significantly, but we'd still have some significant drawbacks.
If our SEO-sensitive content changes frequently, we may need to re-render the whole website multiple times in a few hours. That could be a significant issue on large websites, as building can require quite a long time. Also, it would be harder to handle user security, as every sensitive API call (occurring after the building phase) or computation would happen on the client side exclusively.
Let's recap our options:
- Client-side rendering (CSR): Great performance, highly dynamic content, but lousy SEO and security
- Server-side rendering (SSR): Better SEO, excellent security, but possibly inferior performance, and more challenging to manage the server
- Static site generation (SSG): Best possible performance, best possible SEO score, but lacking security and bad for highly dynamic content
Now we can finally stop pretending that Next.js doesn't exist and start appreciating the possibilities that this framework is giving us.
We don't have to choose one single rendering methodology to implement our web app. We can choose them all.

Figure 10.1 – Next.js rendering strategies
One of the key features of Next.js is the ability to choose whether to render a page on the server or generate it at build time (or even on the client side entirely).
Given that possibility, we can start reasoning about our website as a composition of different sections rendered in many different ways, depending on the purpose of each individual section.
In the next section, we will see how to choose the right rendering approach in a real-world website example.
The reasoning behind a real-world website example
Let's pretend we're building a photography website. Users can upload their pictures and receive feedback and votes from the other users on the platform. When a user logs in, the home page will display a list of images posted by the user-followed profiles. Clicking on any of these pictures will open the picture detail page where we can read the comments, feedback, and history behind the photo.
Given this information, we can start to think about how we want to render these website sections.
First, we know that the home page content changes depending on how the user browses it. We can then exclude statically generating the main list of pictures on the home page at build time, as the content is highly dynamic.
We have the following options:
- We statically render the home page with some placeholders for the images, which will be loaded later after React hydration on the client side, depending on whether the user is logged in and following anyone on the website.
- We can render the page on the server side. Thanks to session cookies, we may already know if the user is logged in, and we can pre-render this list on the server before sending the page to the client.
One thing is for sure: we don't really care about SEO when dealing with this specific list of pictures. Google bots will never log in to this website, as there's no reason to index custom content that is different for each user.
Talking about performance, we should consider a couple of points before deciding how we want to render the home page. If the API used for generating a customized stream of pictures is fast enough and the images are highly optimized, we can surely pre-render the whole list on the server side. Otherwise, we could create some good-looking skeleton loading placeholders that can entertain the user while we're waiting for the API to respond and the images to render on the frontend.
The worst-case scenario is that the API is slow, and the images are not optimized, hence we need to be prepared for that eventuality. We then decide to generate the whole page statically at build time, but we'll wait for React hydration to make the API call and generate the optimized images (maybe using the Next.js built-in image component, as seen in Chapter 3, Next.js Basics and Built-In Components).
So, the final verdict is SSG and CSR. We'll statically generate the home page and create the list of images on the client side.
In the next section, we will see the best way to handle the image detail page.
Rendering the image detail page
Moving on to the following sections of our websites, we want to create a single image page template. Here, we will render the photo posted by a user, its description, some tags, and all the comments and feedback given by other users.
In that case, we want this page to be indexed by search engines, as its content doesn't depend on user sessions or any other variable of that kind.
Again, we must choose how we want to render this page. We already know that SEO is essential, so we exclude full client-side rendering as an option. We have to choose between statically generating this page at build time or server-side rendering it with each request.
We know that either choice will help us with SEO, but the wrong decision here would affect the performance of this website as soon as it needs to scale. It's time to compare the pros and cons of SSG and SSR for this specific use case.
Static site generation pros and cons for dynamic pages
Static site generation provides many pros for that kind of application:
- Once we generate a static page during the build process, the server won't need to re-render it on each request. That brings less load to the server, which leads to cheaper infrastructure costs and effortless scalability under high loads.
- The picture author may want to change some of the static content following generation. However, at this point, we don't want to wait for the next build to occur: we can just use incremental static regeneration for re-rendering the static page on the server once every (let's say) 30 minutes if anything changes.
- Page performances will be the best possible.
- Dynamic parts such as comments and like counts (that might not be important for SEO) can be rendered later on the client side.
- When a user wants to add a new picture, they don't have to wait for the next build for their image to appear on the website. In fact, we can set the fallback: true parameter inside the returning object of the getStaticPaths function to let Next.js statically render a new page at request time.
There is just one big disadvantage when rendering this kind of web page at build time: if you have thousands of pages, it will take a lot of time for your website to build. That's something to keep in mind when choosing SSG for dynamic routes. How many dynamic pages are we likely to support in the future? How much would it take for the build process to generate them?
Now let's move on looking at the pros and cons of server-side rendering for the single picture detail page.
Server-side rendering pros and cons for dynamic pages
Server-side rendering provides a couple of important pros when compared to static site generation for this specific page.
The first one is that if a user changes the content of a page, we don't have to wait for incremental static regeneration to occur. We can see the changes reflected on the production page as soon as the picture author changes any information about their photo.
The second pro is even more critical. As seen before, SSG can take up to several minutes to complete when generating a large number of static pages. Server-side rendering solves this problem by just rendering the page at request time, making the whole deployment pipeline faster.
If you think about large-scale websites such as Google and Facebook, you can easily understand why generating those pages at build time could be a problem. It can work fine if you want to render dozens or hundreds of pages, but it will become a huge bottleneck if you generate millions or even billions of them.
In our case, we expect to host thousands of pictures, with each picture having a detail page. Therefore, we will eventually decide to adopt server-side rendering for them.
Another option would be statically generating the most popular pages at build time (let's say the first thousand pages), then using the "fallback" property to generate them at runtime.
We now only need to define the rendering strategy for private routes, where users can change their own profile details. We will cover that right in the next section.
Private routes
As the adjective "private" suggests, private pages are not meant to be reached by everybody. Instead, they should be accessible by logged-in users only and contain the essential information needed to manage their account settings (username, password, email, and so on).
That said, we won't really care about SEO, but we'll focus on security instead. The data contained in those pages is sensitive, and we want to protect it at all costs.
This is one of those rare cases where we want to sacrifice some performance to improve our security.
We could quickly generate the private routes statically and then make all the required API calls on the client side, but this could expose some personal (or private) data if not handled correctly. So instead, we will adopt the server-side rendering strategy to detect anonymous users right before rendering the page and redirect them away. Also, if the user making the request is logged in, we can preload all of their data on the backend and pass it to the client side via getServerSideProps, which drastically improves security while transmitting data to the client.
Now that we've defined how to manage private routes, we've completed the basic rendering strategy analysis, so it's time for a quick recap. We'll see that in the next section.
A quick recap regarding our decisions
In the previous sections, we made some decisions based on the kind of pages that we'll need to render for our photography website.
This analysis is critical and should be considered for every website we will be working on in the future. If we need to add new pages to an existing Next.js website, we will need to perform a similar analysis to understand the best solution possible to get the best performances, security, and SEO compliance.
For our photography website, we came up with the following structure:
- Home page: We will statically generate the whole home page except for the custom list of images, which will be rendered on the client side depending on the user browsing it.
- Image detail page: We can either choose to server-side render it (as this will allow us to optimize the page for SEO and guarantees an excellent way of scaling our website up to millions of different image detail pages) or statically generate the most popular pages at build time and then use the "fallback" property to generate missing pages at runtime.
- Private pages: We will server side render them to determine whether a user is logged in before rendering the page. Also, we will be able to fetch all the private data on the server side, hiding that API call from the frontend.
In Chapter 13, Building an E-Commerce Website with Next.js and GraphCMS, for example, we will need to make this kind of decision to build a real-world Next.js e-commerce website. However, if you want to practice before getting into that, I'd suggest you think about how you would recreate your favorite websites.
Facebook, Google, YouTube, Amazon – they all have specific needs, security requirements, and SEO specifications. So, how would you handle that? How are they dealing with those features?
In the next section, we will concentrate on improving SEO by using some open source tools that will help us deal with search engine bots.
Working with SEO
SEO in Next.js is not different from any other framework. Search engine bots make no difference; they only care about website content and quality. So, even though Next.js tries to simplify things, we still need to respect specific rules and develop our websites on the basis of the search engine specifications to get a good indexing score.
Given the rendering possibilities that Next.js provides for us, we already know that particular decisions can negatively impact the final SEO score (for example, rendering important data on the client side). We talked about that in the previous sections, so we won't go deep into it again.
There are specific SEO metrics that might be a bit out of our control when developing the website. Domain authority, referring domains, page impressions, click-through rate, and organic market share are just a few of them. Even though we are unlikely to improve those metrics during the development process (as they are the product of good content management on the website), we should do our best to improve whatever we can by coding the website. This includes a series of optimizations and developments that include (but are not limited to) the following:
- Creating an SEO-friendly routing structure: A well-made routing system is essential for search engine bots to index a website correctly. URLs should always be human-friendly and composed according to a certain logic. For example, if we're creating a blog, we should use a URL structure to help the user identify the page content by just looking at the page URL. While something like https://myblog.com/posts/1 can be easier to work with, it makes things harder for blog users (and search engines too!) since, by looking at the page address, we can't tell what the content is about. https://myblog.com/posts/how-to-deal-with-seo is a better URL, which tells us that on this page, we're talking about SEO and how to deal with it.
- Fill the pages with correct and complete metadata: In Chapter 3, Next.js Basics and Built-In Components, we've already seen how to deal with metadata. This is essential data that we should always include in our pages, with no exception. There are great libraries such as next-seo (https://github.com/garmeeh/next-seo) that can drastically reduce the development time required to manage the metadata during the development process.
- Optimize your images: We've already talked about how we can optimize images. The built-in image component has been developed in cooperation with the Google Chrome team to give better support for images, and that is also reflected in some SEO metrics (such as Cumulative Layout Shift and First Contentful Paint).
- Generate a proper sitemap: Once we're ready to deploy a website, we can submit the sitemap to search engines to help them index our content. A well-made sitemap is essential for any website as it allows the creation of a neat, structured path for search engines to follow to index the site. As for today, there's no built-in solution in Next.js for creating a sitemap, but there are several great libraries, including nextjs-sitemap-generator (https://github.com/IlusionDev/nextjs-sitemap-generator), that can help to create it.
- Use the correct HTML tags: Using semantic HTML tags to build a website is essential as they tell the search engine bots how to index the content in terms of priority and importance. As an example, while we always want our content to be indexed, using <h1> HTML tags for every text content is not the best choice for SEO. We always need to find the right balance in order for our HTML tags to be meaningful for users and search engine bots.
Dealing with SEO is not an easy task. It has always been challenging and can only become harder in the future as new technologies and rules rise. The good thing is that every rule is the same for every website, so you can bring your experience with other frameworks, CMSes, and development tools to Next.js with ease, as it can only help you create more optimized websites with less effort.
One other metric that can impact SEO is the performance of the website. Again, this is a crucial topic, and we will look into that in the next section.
Dealing with performance
Performance and SEO are two important aspects of any web application. Performance, in particular, can affect the SEO score, as a lousy-performing website will lower the SEO score.
At the beginning of this chapter, we've already seen how choosing the right rendering strategy can help us improve performance, but sometimes, we have to compromise between a slightly lower performance in favor of security, business logic, and suchlike.
Another thing that can potentially increase (or decrease) performance is the deployment platform. For instance, if you're deploying a Next.js static website to a CDN such as Cloudflare or AWS Cloudfront, you're likely to get the best possible performance. On the other hand, deploying a server-side rendered application to a small, cheap server will probably give you some trouble once the website starts to scale and the server is not prepared for handling all the incoming requests, leading to bad performance. We will discuss this topic in depth in Chapter 11, Different Deployment Platforms. As for now, keep in mind that this is another big topic to consider during performances analysis.
When we talk about performance, we don't always refer to server-side metrics; even the frontend performance is essential, and if not carefully handled, this can lead to lousy SEO scores and a bad user experience.
With the release of Next.js 10, the Vercel team has announced a new built-in function to be used in our pages: reportWebVitals.
It has been developed in collaboration with Google and allows us to collect valuable information about our frontend performances, including the following:
- Largest contentful paint (LCP): This measures the loading performance, which should occur within 2.5 seconds of the initial page load.
- First input delay (FID): This measures how much time it takes for the page to be interactive. It should take less than 100 milliseconds.
- Cumulative layout shift (CLS): This measures visual stability. Remember when we talked about images? A heavy picture might take a long time to load. Once it appears, it would shift the layout, causing the user to lose track of the section they were looking at. The image is a typical example, but other elements could be involved in this: ADV banners, third-party widgets, and so on.
When we deploy our Next.js website, we can enable the platform to track those values to help us understand the performance of our web application on real-world data. Vercel will give us a well-made dashboard that will keep track of deployments and how new features affect overall website performance. Let's look at the following example dashboard:
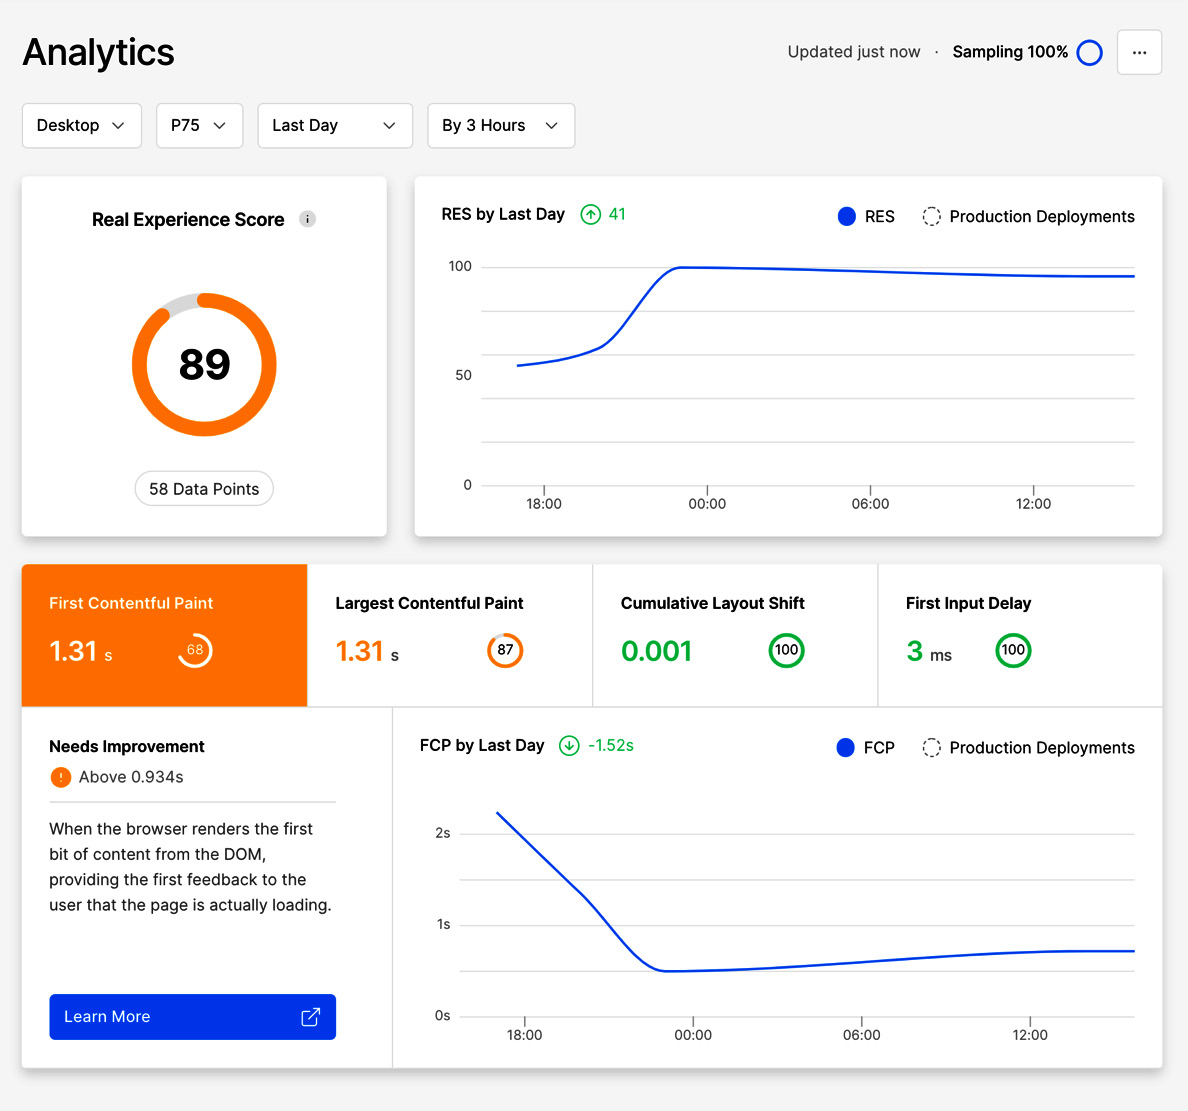
Figure 10.2 – Vercel analytics dashboard
As you can see, the preceding dashboard shows the average data for a whole website. While CLS and FID values are well implemented, we can clearly see that FCP and LCP can be improved.
If you're unwilling to host your web application on Vercel, you can still collect that data by implementing the reportWebVitals function on your _app.js page. Let's make a simple example:
export const reportWebVitals = (metrics) => console. log(metrics);
export default function MyApp({ Component, pageProps }) {
return <Component {...pageProps} />;
}
Thanks to this one-line function, we will see the following output in the console every time we enter a new page:
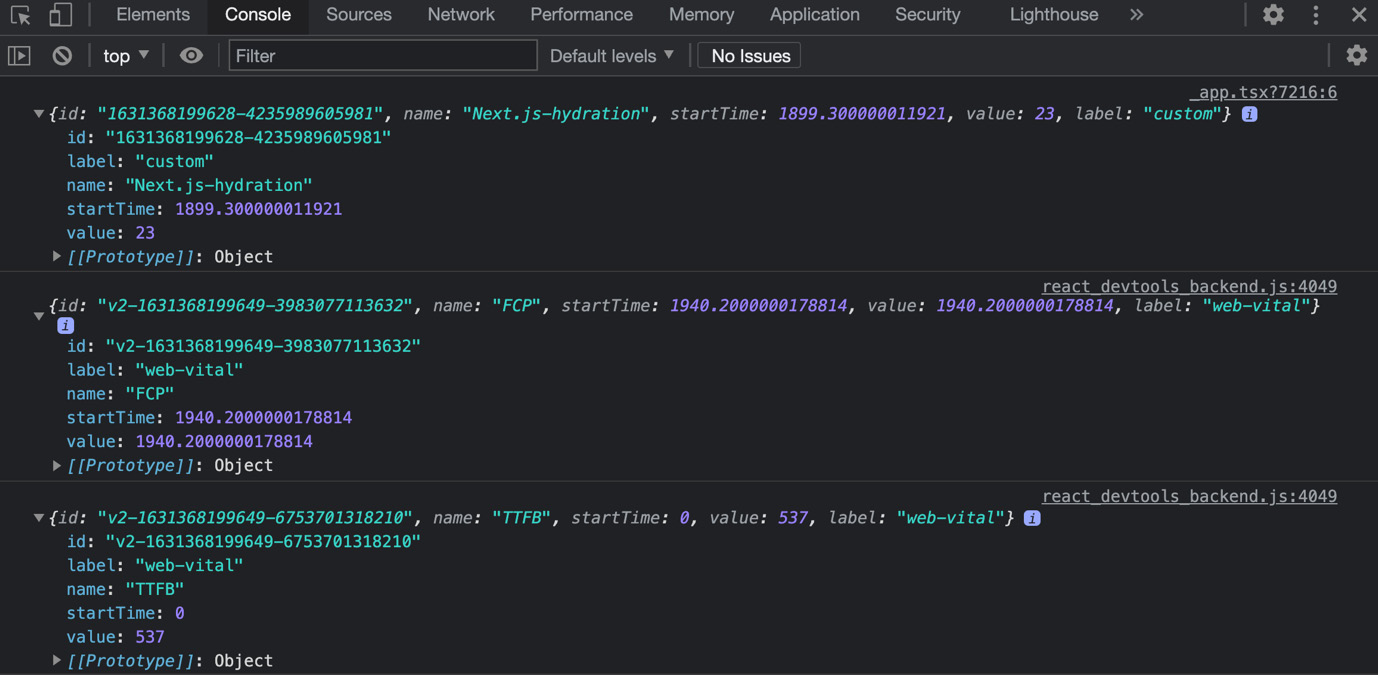
Figure 10.3 – Web vitals
We can then decide to send this data to any external service, such as Google Analytics or Plausible, to collect this helpful information:
export const reportWebVitals = (metrics) =>
sendToGoogleAnalytics(metric);
export default function MyApp({ Component, pageProps }) {
return <Component {...pageProps} />;
}
If you want to learn more about web vitals, the official website maintained by Google is always up to date with the latest improvements and rules: https://web.dev/vitals. I strongly suggest you read this before getting started with collecting and measuring frontend performances in your web application.
Summary
In this chapter, we've seen how to reason in relation to our pages regarding SEO, performance, and security. Even though those topics are quite complex, the primary purpose of this chapter was to give a kind of framework of thinking. In fact, those topics are likely to evolve in the future, as the web itself is moving forward fast with new performance metrics, SEO rules, and security standards.
In the next chapter, we will continue talking about these topics from another perspective. We will see how to deploy our web applications and choose the right hosting platform with respect to our needs.