
Giving a nice graphical front end to Linux
The X Windowing System (or just X, if you like) is a windowing system designed to give a GUI to UNIX.
The implementation of X for Linux is XFree86, and it is almost always installed as part of a normal Red Hat installation. While installing X is not required, it makes administration much easier due to the graphical applications that Red Hat provides to administer the system. The power behind X is that you can change just about any operation of the interface, like the way menus are presented and the contents of the menus. There's even an interface that closely resembles Windows 95, in case you need a familiar face.
The idea behind X is a client/server setup. The server is really an X protocol server on the user's console, which handles the display to the screen. The server then talks to clients, such as a window manager and applications and puts them on the screen.
The configuration file for XFree86 is called XF86config and it is located in /etc/ X11/XF86config. This file contains setup information for your mouse, the video card you're using, and the type of display (monitor) that you're using.
The programming for XFree86 allows you, as the user, to set your monitor and video card to much better resolutions than you can get by default through Windows 98 or other video graphics array (VGA) modes. The default modes (640X480, 800X600, and 1024X768) are still available, and very easy to set up. To get custom modes, you'll need some information about the video card and your monitor (video bandwidth, horizontal frequency, and vertical frequency).
Red Hat's Xconfigurator program gives a simple text-based interface for setting up X. The drawback is that you have less control over the screen modes, but you do get choices for the standard video rates (640X480 through whatever your monitor and video card support).
Before running Xconfigurator, make sure that your mouse is set through Red Hat. Run the mouseconfig program to set this in case you need to. You can also check /etc/sysconfig/mouse to make sure the settings look correct.
Xconfigurator can be started by the root user as /usr/X11R6/bin/Xconfigurator. If your video card can be detected, it will be listed; otherwise, you will get a list of supported cards and you can select the card that most closely resembles yours. For the most part, this is a list of chipsets that X supports. It should be easy from your video card documentation (or by looking at the video card) to find out what chipset is being used in your system.
Next you'll be asked about the type of monitor you have. If yours is not on the list, select something close to what you have and see if it works—you can always re-run Xconfigurator in case your first configuration doesn't work. You can also select custom or standard monitor or standard multisync. The custom selection will ask for the horizontal and vertical settings of your monitor, which you can find in the monitor's manual.
The screen will blink a few times to test the monitor and video card settings. If the program cannot determine how much video memory you have, you will have to select the amount that you have. Then you'll be asked to select whatever video modes you want to use as a combination of resolution and color depth. Eight-bit color depth is 256 unique colors, 16-bit is 65,536 colors, and 24-bit is true color (16 million colors). X will start in the lowest resolution and color depth listed unless you tell it at startup to change to a different color mode. The best bet is to choose a few settings in the 16- and 24-bit areas, unless you need 256-color support. Also remember that more colors take up more memory, so if you have under 32MB, you may want to use 8-bit mode. Once the program completes, there will be an XF86config file in /etc/X11. You can edit this file to make changes about the mouse you have or modify other settings. Xconfigurator doesn't autodetect any wheel-based mice (like the Microsoft Intelliwheel), but you can get a program like imwheel to add support. You can find the latest version of imwheel at http://www.freshmeat.net.
To configure your X system with default modes, make sure your X server is installed. For normal VGA modes, this is the X_VGA file. Going from there, the Mach32 server is called XF86_Mach32, the S3 server is called XF86_S3, and so on. Since these servers are included on the Red Hat CD-ROM as .rpm files, you can easily install the desired server. See the chapter on RPM for more information on installing .rpm files.
The XF86config program will allow you to set up some default video modes. Starting the program as root gives a few configuration screens and some text to read. Then you get into the configuration section. Select your mouse type (Microsoft, MouseSystems, Bus, etc.). The preference here is to select a three-button mouse, since X will allow you to use all three buttons. If you select a two-button mouse, you'll need to press both the left and right mouse buttons to simulate the middle button.[1]
The next few options depend on the type of mouse you selected. If you selected a three-button mouse, then you won't need to select Emulate3Buttons. Next you'll need to enter the location of the mouse, which may be /dev/mouse. If /dev/mouse doesn't exist, enter the /dev file that has your mouse in it. Remember that COM1: under DOS is /dev/ttyS0 under Linux, and so on. A few other options may follow, including using the ALT key as the "meta" key to generate characters not normally available on your keyboard.
Next is the monitor configuration section. This is where you need to know the horizontal sync range. There are nine predefined monitors you can choose from, and a tenth allows you to define your own range.
WARNING: Be sure that the numbers entered here are correct, because a wrong monitor and video card pair can damage your monitor, video card, or both.
Next is the vertical sync. Here you have a choice of about four monitor types, plus one to let you define your own. Once the vertical sync is set, you can enter information about your monitor. This section isn't necessary, as it allows XFree86 to use multiple monitors at the same time. You can either press ENTER and use the default for each, or enter a unique identifier for your monitor, along with a vendor name and model name.
Once this is completed, you set up the video card. It's important to select the correct video card because two video cards from the same vendor can have very different hardware internally. Selecting the wrong card can damage your card or monitor.
Now you get to select the type of server to run. If you selected a video card that has an accelerator chip supported by XFree86, you'll be able to select that X server.
The options are as follows.
The
XF86_Mono server, which has 640x480 resolution with two colors, black and white. This should work for all VGA cards. If you suspect a problem with your video card or are unsure of the type of video card you have, this may be a good starting point.XF86_VGA16 server, which is also 640x480, but with 16 colors. This should also work with all VGA-compatible cards.XF86_SVGA server, which provides super VGA (SVGA) resolutions with 256 colors. Most SVGA cards will work with it, but may not have the best acceleration.Accelerated server, which is for accelerated cards. This gives more than 256 colors for most servers, and higher resolutions. These servers also utilize any of the faster chipsets in most modern video cards.The server for the video card you selected earlier.
If you select the fifth option, the best server for your card is set up for installation.
Now you must give information about your video card. First you'll probably be asked about the amount of video memory on your card. You'll get five selections from 256K to 4096K (4MB), and a sixth selection that allows you to enter your own amount.
Once that is completed, you'll be allowed to enter a description for your video card similar to the monitor descriptions above. You can either press ENTER through the entries, or type in the description, vendor, and model of your video card.
If you have an S3- or AGX-based video card, you may need to know the type of random access memory digital-to-analog converter (RAMDAC) the card has. The RAMDAC is used to get high color (greater than about 32K colors) from the server. Choose the appropriate option if you have those cards and know the RAMDAC type, or you can just press ENTER.
Some video cards also have a programmable clock. Most clocks are not programmable, but if yours is (some Diamond cards and some S3 cards are), enter the type of clockchip you have. It should be found in your owner's manual, or on the card itself. If you don't have a clockchip, just press ENTER.
At this point, the XF86config program will attempt to find the clocks that your card supports by using the X
-probeonly command. This command doesn't start X itself, but asks the video card to return what clocks it knows about. These clocks are important to determine the correct resolutions you can use.
Now you should be ready to start X. Doing this is simply a matter of getting to a command prompt and typing:
> startx
This will start the X server in the lowest color depth and resolution you selected. If you configured your server to use 8-bit color (256 colors) and also 16-bit color (65K colors), just typing startx will start the X server in 8-bit mode. To start it up in 16-bit mode, use the following:
> startx -- -bpp 16
For the sake of extra memory, you may want to log out of other virtual consoles (VCs) before starting X. You can start multiple shells called xterms from within X. You can switch to a VC while in X by pressing CTRL-ALT-Fn, where n is a number between 1 and 6. The first X server usually uses VC 7. You can see what VC is being used when X starts up, or by going through the VCs.
Once you enter the startx command, you should see some text fly off the screen. The screen will change to a graphic screen and a mouse cursor. The window manager will then start. If something doesn't work right, you can press CTRL-ALT-BACKSPACE and this will immediately drop you out of X.
While you cannot change color depths within X, you can change the resolution by pressing CTRL-ALT-Minus (-) and CTRL-ALT-Plus (+). These will cycle through the resolutions set up for your color depth in decreasing and increasing order, respectively.
The gdm program is a graphical login window that is used instead of the regular text-based login and password prompt most UNIX users are familiar with. It's better for use with newer users or in a lab environment, since the user doesn't have to issue any commands to start X. You can automatically have gdm start on boot by changing the default runlevel to 5 (see Chapter 3 for more information on runlevels). You can test out using gdm by switching to Runlevel 5 using the telinit 5 command.
The way that X looks is determined by two things: the contents of the window and the window manager. The windows merely interact with the X server and there is no real way of moving the windows around the screen, or resizing the windows. This is the job of the window manager. The window manager places a border around the window and can provide maximize (full-screen) and minimize (iconize) buttons. The window manager also allows you to resize, move, or kill windows. The window manager provides for menus and the general "look and feel" of the X display. Operating systems like Windows NT combine both the display manager and the window manager, so if you're new to Linux, this may take some getting used to.
There are a few different window managers available with Red Hat, such as fvwm-95, AfterStep, KDE, and GNOME. Each window manager has its own look. Some of these window managers (such as Enlightenment and GNOME or KDE) have their own libraries, so programs can be specifically written to tie the application into the window manager.
Even though the windows look different, they perform many of the same functions. One advantage thatmost of the window managers have over Windows 98 or NT is support for virtual desktops. That is, you can have more than one main window (also called the root window) available to you at one time. This lets you have a neater X desktop, or it can let you open more windows and be able to see all of them.
The fvwm2-95 program is an extension of FVWM, which has a Windows 95 look and feel. However, the interface is much more configurable. You have the advantages of the task bar and Start menu, but you get additional features such as "focus follows mouse," where the current window is wherever the mouse is. You also get the advantage of configuring all the mouse buttons however you like. This is the most popular window manager for those coming from the MS Windows environment since it's so familiar. The nice advantage, though, is that fvwm2-95 doesn't crash.
The .fvwm2rc (or .fvwm2rc95) file contains startup information for FVWM. Many of the commands are similar between fvwm2 and fvwm2-95. Since for our purposes the two window managers are rather similar, we'll use .fvwmrc to talk about both the .fvwm2rc and . fvwm2rc95 files.
There are three ways to determine which window has the "focus," that is, which window will be controlled by the keyboard. The first method is the one you're most familiar with—click in the window to make it the active window. This is called ClickToFocus and it is turned on in the .fvwmrc file with the following:
Style "*" ClickToFocus
The other two methods, MouseFocus and SloppyFocus, are very similar. MouseFocus means that wherever the mouse pointer is has the control. SloppyFocus is the same as MouseFocus, with the exception that if the mouse pointer leaves the window but does not enter another window (for example, goes to the root window), the window you were just in remains focused. You can turn on this focus method with either of these options:
Style "*" MouseFocus
Style "*" SloppyFocus
Besides the regular Start menu that has about the same configurability as the Windows 95 Start menu, there are also menus available if you left-click on the root window. These menus are defined in the .fvwmrc file. The menus are pretty much self-documenting. The AddToMenu line adds a menu definition called Quit-Verify that has a title of Really Quit Fvwm?
The next lines define the items in that menu. A + at the beginning of a line means it's part of the menu, followed by the text in the menu. You can include an icon in this if you enclose the icon name in %. The last part of the menu line is the actual command. The Restart in this menu means to quit FVWM and then start the named program. This allows you to quit FVWM and start another window manager. If a menu option has no text and an action of Nop, then it will create a separator in the menu. Replacing Restart with Exec will start the new program without quitting FVWM—but note that it's not a good idea to start multiple window managers.
#
# This menu is invoked as a sub-menu-it allows you to quit,
# restart, or switch to another WM.
#
AddToMenu "Quit-Verify" "Really Quit Fvwm?" Title
+ "Restart%mini-turn.xpm%"   Restart fvwm95-2
+ "" Nop
+ "Start twm"                Restart  /usr/X11R6/bin/twm
+ "Start MWM"                Restart/usr/X11R6/bin/mwm
+ "Start olvwm%mini-olwm.xpm%" Restart /usr/openwin/bin/olvwm
+ "Start olwm%mini-olwm.xpm%  Restart /usr/openwin/bin/olwm
+ ""                         Nop
+ "Yes, Really Quit%mini-exclam.xpm%" Quit
+ "No, Don't Quit%mini-cross.xpm%" Nop
One of the reasons that everyone likes FVWM2 so much (besides the configurability, cheap price, number of people who have configuration files, look and feel of Windows 95, etc.) is the fact that many functions of FVWM are in modules that don't always have to be loaded in memory. This allows one configuration to have a very bare-bones setup, while another setup may have all the bells and whistles (literally).
Modules get started either in the .fvwmrc file or they can be started from the menu. Here are some of the major modules you'll see in FVWM2:
Pager—. Sets up a virtual desktop, allowing you to have multiple desktops to work in. FVWM can also be configured to start specific programs in specific virtual desktops for easier use.
Task bar—. This is one of the critical parts of FVWM2-95. The task bar acts very much like the task bar of Windows 95, giving a list of running programs, the current time, status of any incoming email, and the ever-popular
Startmenu.Buttons—. If you look above the task bar in the FVWM2-95 window, you'll see a series of buttons, a clock, and the desktop (the pager module). This is the button module, and it cannot only create buttons to start programs (Netscape, xterm, etc.), but it can also have the output of some programs running inside it. The clock and FVWM pager are two examples of this. Some users have CD players, system load programs, and other programs running within the buttons. As with most FVWM functions, the style, size, contents, and location of the buttons can be set from within the
.fvwmrcfile.Audio—. Yes, if you choose, you can have FVWM make noises when you do things within FVWM (opening windows, starting FVWM, stopping FVWM, etc.).
Auto—. This module allows you to automatically "raise" (bring to the front) a window after a certain amount of time. The window must have the focus for the allotted time before the window gets raised.
GNOME stands for the GNU Network Object Model Environment. GNOME's goal is similar to KDE: It aims to provide an open source, user-friendly, feature-rich desktop environment. Unlike KDE, it does not have a built-in window manager; rather, one may use any of several window managers that make use of GNOME's features. GNOME also is standards-compliant, using common, open standards for object brokering, drag-and-drop, documentation, and 3D programming.
GNOME uses GTK+ as its toolkit. One of the great features of GTK+ is its themeability. This feature allows you to change the look and feel of GTK+ applications without recompiling them.
GNOME also uses an object model named Baboon for interoperablilty between its components. Baboon complies with the CORBA specification.
GNOME 1.0 comes with Red Hat 6.0 and subsequent versions should include current or nearly current versions of GNOME. At the present time, development is proceeding rapidly enough that you will likely want to update GNOME independently of Red Hat.
Information on getting and installing GNOME can be found at http://www.gnome.org/start/getting.shtml. Unfortunately, the number of packages that comprise the base GNOME installation is quite large. The total is nearly 50 RPM packages. In addition, if you plan to compile or develop GNOME software, you will need the additional 17 or so GNOME development packages.
Download all the files to the same directory and run rpm -Uvh *.rpm to upgrade/install all the packages. You may run into version dependency problems. If you do, you will likely have to remove the conflicting packages.
Alternately, you can compile GNOME and its associated programs from source. There are still about 50 archives to download and compile, for which you will need a couple hundred megabytes of disk space and a lot of time.
The family of GNOME-aware applications is growing and developing at a rapid pace. Many applications are still in beta or even alpha, but are still usable.
All GNOME software applications share these features:
Session awareness—. When you restart an application, it is restored to the state it was in when shutdown occurred.
Drag-and-drop—. GNOME supports several drag-and-drop protocols, including Xde and the X windowing system's drag-and-drop protocol.
Internationalization—. The uniforum internationalization standard and localization allow a new language to be supported without recompilation.
3D—. GNOME uses Mesa, a free implementation of OpenGL, a popular 3D programming application.
DocBook SGML standard—. Documentation can be viewed directly with the GNOME help browser, converted to HTML for viewing over the Web, or converted to PostScript for printing.
A number of traditional Linux utilities and user programs have GNOME-aware versions. To name a few:
gtop—. A graphical replacement for top, gtop shows the normal top-like display, plus graphs of memory or CPU usage.
gftp—. A graphical FTP client. It supports simultaneous downloads, resuming of interrupted downloads, proxies, and more.
Electric Eyes—.
eeis an image viewer, similar toxv.gEdit—. A simple GNOME-aware-based text editor.
gtalk—. A talk daemon and GTK-based talk client.
gmc—. A GNOME-aware file manager.
Balsa—. A GNOME application for reading email. It supports POP and IMAP, as well as the reading of local mail.
Scores of other GNOME-aware, or at least GTK, applications exist: IRC clients, GNOME interfaces to other languages (Python, Perl, C++, Pike), games, financial packages (a la QuickBooks), and scientific programs, just to name a few.
For a complete list of software, as well as information on its state of development, see the GNOME software map at http://www.gnome.org/applist/list-martin.phtml.
The GNOME Control Center can be used to configure nearly every aspect of GNOME. Functional items such as which window manager to use, keyboard and mouse parameters, session management and MIME handlers can be configured, as well as more trivial aspects such as backgrounds, themes and sound triggers.
The following shows a screenshot of the control center.

GNOME can be used with any window manager, although unless the window manager is GNOME-compliant, you will be missing out on the full power the combination can deliver. To start GNOME upon starting X, comment out the line that starts your normal window manager and add this line to the end of your X startup file: exec gnome-session. If you want to use GNOME but don't want the session management (which works only with GNOME-aware applications), add exec gnome-wm instead. The X startup file is usually ~/.Xclients, ~/.xinitrc, or ~/.xsession. There should be no other exec statements in the startup script. A short example:
#
# .xsession, run from an XDM based login
#
# start the gnome terminal (an xterm replacement), Gnome midnight
  commander
# (a file manager and more), and the Gnome panel (and application
  launcher)
#

gnome-terminal &
gmc &
panel &

#
# start the window manager - commented out since gnome starts the wm
  now.
#

#fvwm2 &

#
# start gnome with session management
#
exec gnome-session
To set your default window manager and add or delete window managers to GNOME, run the Control Center from the GNOME panel. Go to Window Managers and add, delete, and change window managers as you want.
Two popular window managers are nearly fully GNOME-compliant: Enlightenment and IceWM. Some others are partially compliant; among these are FVWM, WindowMaker, and SCWM.
Enlightenment is the window manager preferred by most GNOME users it seems. It is highly configurable and feature-rich. This does not come without a price, however. Many Enlightenment configurations are very resource-intensive. More information on Enlightenment, or "E" as it is sometimes called, can be found at http://www.enlightenment.org/.
Enlightenment comes with a separate configuration tool, e-conf. With it, you can tune E's behavior with great detail. Various sound and visual effects can be added as well.
A basic E desktop can be seen in Figure 15.2.
IceWM is a leaner, less feature-full window manager. It tries to be compatible with mwm (the CDE window manager), as well as faster and less resource-intensive than E. It is not designed to be highly configurable or support fancy looks. There is a utility for converting fvwm2 menus to IceWM menus, as well as a configuration tool. For more information, see http://www.kiss.unilj.si/~k4fr0235/icewm/.
FVWM is discussed more completely above. To make FVWM GNOME-aware, you need the fvwm2gnome package. Information on it is available at http://fvwm2gnome.fluid.cx/.
WindowMaker is a window manager that tries to emulate the look and feel of the NextStep GUI. It is relatively fast and feature-rich, as well as easy to configure. See http://windowmaker.org/ for more information.
SCWM, which stands for the Scheme-Configurable Window Manager, aims to be highly dynamic and extensible. It includes an X11 scripting facility that supports powerful features through the Guile- (a Scheme implementation) based configuration language. Additional functionality can be introduced via compiled, dynamically loadable modules.
In case you ever wanted the functionality that Windows 98 has without all the excess baggage, there's KDE. Like Windows 98, many of the functions of the desktop are integrated with the application software. KDE comes with its own HTML browser that, while not as full-featured as Netscape, does the job quite well. The only drawback is that for applications to take full advantage of KDE, they have to be written to work with KDE, and use the Qt library. However, there are a number of applications already written in KDE from CD players to editors to games.
When KDE is installed on a system, you can switch to using KDE as your default window manager by using the switchdesk command. This will allow you to change window managers and select KDE, GNOME, or AfterStep.
Once that's done, you can just start X and KDE will start with default settings. One nice feature of KDE (and GNOME, for that matter) is that both can run each other's programs, so you could have a GNOME-based application running within the KDE window manager. GNOME and KDE also share drag-and-drop functionality, so you could drag from a GNOME application to a KDE application and the data will get transferred correctly.
By default, the KDE screen looks like a jumble of concepts pulled from Windows 95, MacOS, and CDE. That's intentional. The top menu bar contains a list of running programs, no matter what virtual screen you're in. The bottom menu bar contains the Start button (which looks like a large "K") and icons representing other menus or applications along the width of the bar. The center contains a list of the virtual screens available. By default, four virtual screens are started. To the immediate left of these tabs are two small buttons, one an x and the other a padlock. The x will quit KDE and X, returning you to character mode. The padlock will lock the screen. We'll get to configuration of this later on. The right side contains "docked" applications. These are applications that may be running in the background, but don't necessarily require a window. This is similar to the docked applications you see under Windows 98. Sample applications that use this include the PPP dialer, mail programs, Kpilot (for 3Com PDAs), and language settings. To the right of these docked applications are the current date and time.
You'll note that spaces at both the far left and far right of this menu bar contain small arrows pointing offscreen. These arrows allow you to collapse the entire bar to the left or right side, hiding it from view altogether. If you click one of the arrows, you'll see the bar collapse and be replaced with a small arrow pointing into the center of the screen. Clicking that brings the menu bar back.
The left side of the screen contains a list of icons that are drag-and-drop-capable. Dragging a file from the File Manager to the printer sends the file to the printer, or sending it to the Trash icon sends the file to the trash can. Other icons, like the CD-ROM and Floppy, mount the CD-ROM or floppy drive (assuming you're root, or you have user in /etc/fstab) and then open up a File Manager window for that directory. The Home, Templates, and Autostart icons bring up File Manager windows. Home opens the home directory (duh). Autostart allows you to copy applications to start when KDE starts. The Templates window allows you to build your own icons and settings. You can create device entries (if you have a ZIP drive), FTP and WWW URL icons, MIME settings, and applications.
To show how this works, let's add Netscape to the main window so you can kick it off at any time. Open the Templates window and select the Program icon. Drag the Program icon to the desktop and let go of the mouse button. You'll get a menu list of Copy, Move, and Link. Since we want a new icon, select Copy. Then, right-click on the new icon and select Properties. Under General, change the name of the file to Netscape.kdelink. Select the Execute tab and enter /usr/bin/netscape. You can also select a new icon (instead of the gear) by clicking the icon button and selecting a new one. Under the Application tab, enter the name of the application under Binary Patter (Netscape) and a note under Comment (we put in that Browser thing). We don't need to change anything else, so just click OK. Once that's done, you'll see that the icon changed; the name now says Netscape, and if you put the mouse cursor over the icon, you'll see a small box pop up that reads that browser thing.
KDE has the ability to configure every aspect of its operation and interaction with the user. The KDE Control Center, available from the KDE main menu, is the primary way to configuring KDE (see Figure 15.3).
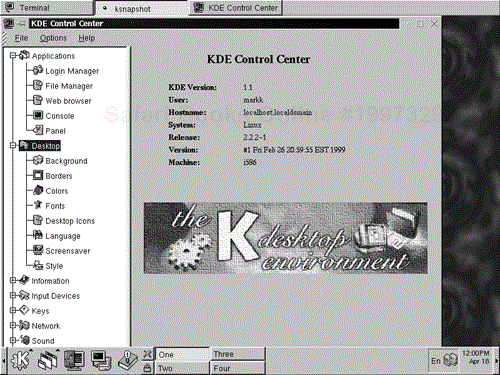
The main screen shows information about the versions of KDE and Linux, along with login and machine information. The left side of the window contains the following list of configuration menus:
Applications. This menu can set up the
Login Manager(kdm, which is the KDE replacement for xdm), the built-inFile ManagerandWeb browser,Consoleoperations, and options for the bottom and top panels.Desktop. This section sets
Backgroundimages, windowBordersandColors,Fonts,Desktop Icons,Languages,Screensavers, and miscellaneousStylesettings, including MacOS and Windows 95 style settings.Information. Much of the information from
/procis reported here, including Samba, SCSI, processor, memory, and sound status.Input Devices. Here you can control keyboard configuration (auto repeat, style of keyboard, and keyclicks) and mouse configuration (acceleration and mouse settings).
Keys. To make the transition from MS Windows a bit easier, KDE has support for many of the keys you're familiar with, including
ALT-F4(close application),ALTby itself to focus the keyboard on the menu, and a few others. You can set the configuration of the keyboard in the KDEControl Center, underKeyboard Settings. You can make assignments for a number of different functions, or stick with the globals. There are two sets of keyboard settings:Standard Shortcuts, which are recognized by KDE-aware applications and represent commands likeInsert,Paste,Close,Save,Undo, and so on; the other set of assignments is known asGlobal Shortcutsand represents commands likeClose Window,Window Iconify,Switch to Desktop, and so on.Network. KDE comes with its own Talk daemon and client. You can configure sounds on a talk request and talk clients. You can also set an "answering machine", in case you get a talk request when you're not at your machine. Or, you can forward talk requests to another machine or user.
Sound. There are two sets of sounds that you can configure. First is the system beep that comes out of the speaker. You can configure the volume, pitch, and length of the beep. It at least makes you sound better than the standard beep. The other set comes through the sound card and is activated by things like windows opening and closing, starting and shutting down KDE, and other events.
Windows. There are two special key combinations that KDE uses for switching windows:
CTRL-TABswitches between virtual desktops, if enabled;ALT-TABswitches between windows, and there are two ways that this can work. If enabled, you can makeALT-TABswitch between windows only on the same virtual desktop. The other setting sets howALT-TABswitches between windows. KDE uses the same method as MS Windows, where pressingALT-TAB, releasingALT, and pressingALT-TABagain will switch back to the first window. This allows you to quickly jump back and forth between two windows. The CDE mode will advance through the windows in one direction only, making you cycle through all the windows.
Many developers have started making their applications KDE-aware, so they will interface with the window manager. In some cases, the applications have been re-written to do this. There are also unique applications specifically written for use in KDE. Here's a list of some of the applications available:
kvt—.
xterm.kpackage—. Install RPM or DEB (Debian package) files.
kedit—. Text editor.kfm—. File manager and HTML browser.
aKtion!—. Based on the xanim movie viewer and can play
.AVI,.MOV, and.MPGfiles.kview—. Graphics viewer.
kvoicecontrol—. Adds simple voice control to KDE.
klyx—. KDE-aware version of the LyX word processor.
kmp3—. MP3 audio player.
kPilot—. Synchronizes, installs files, and backs up software for 3Com Pilot PDAs.
korganizer—. Calendar application that can also tie into kPilot.
ksendfax—. Sends faxes using
mgetty+sendfax,hylafax, orefax.
Many of these applications can be started from KFM by using MIME types. Clicking on a .JPG file starts kview, clicking on a text file starts a text editor, and so on. When KDE goes to open a file, it first looks up an application based on the extension, so KFM knows that foo.gif is to be opened by kview. If that fails, KFM checks the "magic" header of the file. Most file types have a few bytes in the front that identify the file. Once this is complete, KDE looks up the MIME type under /usr/share/mimelnk/{mimetype}.kdelnk. For example, the configuration file for image/gif is located at /usr/share/mimelnk/image/gif.kdelnk. KDE knows that kview handles image/gif MIME types because the definition for kview includes handling the image/gif MIME type. The kview.kdelnk file is located in /usr/share/ applnk/Graphics.
To make configuration changes on a per-user basis, you can go to /home/ user/.kde/ as a directory prefix instead of /usr. If you install KDE from ftp.kde.org, the prefix for kde is /opt/kde. Keep this in mind if you upgrade.
More applications and their current status (stable, unstable, etc.) can be found on the KDE application page, located at http://www.kde.org/current.html.
The default X setup has a bunch of user programs, including shells, utilities, and a couple of games. These programs all have a few default options that you can set when you first start them. We'll show this by introducing xterm, which is the X terminal emulator. It is almost the same as logging into the shell. The big difference is that the .login file is not read, but the .cshrc is instead.
Here are a few of the common options you can use with almost all X programs:
-display <host>:<display>
sends the display (not just the output) to the named host and display number. In most cases, the display can be 0.0, which means the first X server and the first display on the X server. The program still gets executed on the remote CPU, but the window gets displayed elsewhere. This setting will override the DISPLAY environment variable if it's set. If the DISPLAY variable is set and the -display option is not used, the window will automatically be displayed on the host and the display set in DISPLAY.
-bg <color>
sets the background color of the window. The color setting can either be a name of a color (grey or blue) or a collection of RGB (red, green, blue) values in hex. The syntax for this is rgb:h/h/h, where h is a hex number relating to the amount of red (in the first slot), green (in the second slot), and blue (in the third slot) needed to make a particular color. The hex number can be one to four characters long, depending on the number of colors your X server supports. For example, rgb:0/0/0 is black, while rgb:ffff/0/0 is red. A list of colors that have names is available in the /usrX11/lib/X11/rgb.txt file. Each entry has the RGB values in decimal (0 to 255) and a name, which can be used instead of the rgb:h/h/h entry.
-fg <color>
sets the color of the foreground.
-fn <font>
specifies the default font to use in the window. You can get lists of available fonts using the xfontsel or xlsfonts programs.
-geometry <WIDTH>x<HEIGHT>+<XOFF>+<YOFF>
sets the size and position of the window. For xterm, this is in terms of characters, so a geometry of:
would create a window that is 80 characters wide and 25 lines long. XOFF and YOFF set where the upper left-hand corner of the window should be placed. In the case of a positive XOFF or YOFF, the offset is from the left or top side, respectively. For a negative XOFF or YOFF, the offset is from the right or bottom side, respectively. Here are some example screen placements:
+0+0 Upper left-hand corner.
-0+0 Upper right-hand corner.
-0-0 Lower right-hand corner.
+0-0 Lower left-hand corner.
Note that you can enter either a geometry or an offset, but you can't enter only XOFF or a width by itself. Both the geometry and the offset must be entered as a pair. That is, you can't enter:
or
but the following will work:
or
There's one other way to specify default settings for X programs, and this is through the .Xdefaults file. Anything you can set through the command line can be stored in the .Xdefaults file, so when you start the program, you don't need to give all the options. These options are known as resources.
An X resource can consist of four item types:
where:
program—. Program name.widget—. One or more levels of widgets, which are sub-portions of the window. Awidgetcan be a button, menu, scrollbar, option list, and so on.resource—. -The "least common denominator" of the widgets. Theresourcemay be used by more than one program. For example,geometryis used by all X programs and is aresource.value—. What theresourcegets set to. Can be a number, Boolean (true or false), color, or some other value. It depends on theresource.
Any text from an exclamation point (!) to the end of the line is commented out.
To get from the most-specific widget (program) to the least specific widget (resource), the widgets must be combined. These combinations can be specified by either a period (.) or a star (*). A period indicates a tight binding, and a star (or asterisk) represents a loose binding.
In a loose binding, the link between two widgets does not have to be direct, and it acts almost like a regular expression in grep. That is, you can have an entry such as:
*geometry: 80x25
This says that all geometry settings will be 80x25. While this is good for text-based programs, a graphical application with a setting of 80x25 pixels would be rather small indeed.
If you have a particular program, you can then become more specific. That is, if you want all programs that use the vt100 widget to have a geometry of 80x25, you can make the setting like this:
*vt100.geometry: 80x25
And you can get even more specific. Say that you want your terminal emulators to have a size of 80x25, and you want your Seyon[2] emulator to have a size of 80x40. Then you would have two settings of:
Here you have tight bindings. The Seyon program uses the vt100 widget, which sets the geometry. Using a loose binding for Seyon as follows:
Seyon*geometry: 80x40
would cause all of the windows that Seyon creates to be 80x40. Since Seyon creates a few graphical-based windows, this would bring us back to having graphical windows that are 80 pixels by 40 pixels.
Note that you can replace tight bindings with loose bindings. The following two entries have identical effects:
Seyon.vt100.geometry: 80x40
Seyon*vt100*geometry: 80x40
Along with xterm and Seyon, there are a number of other client programs that you can run. Almost all X programs use the -display, -geometry, and -background commands, plus some extra options. Note that while these options override the settings in the .Xdefaults file, it is really up to the window manager to make the settings. These options (and the settings in .Xdefaults) are really suggestions to the window manager. The window manager often allows the requests, but there may be a case where the window manager does its own thing.
-fg <color>or-foreground <color>—. Foreground color.-fn <font>or-font <font>—. Default font.-iconic—. Starts the program as an icon.-title <text>—. Gives a window a title.
There are also other X applications not part of the X project that are sometimes installed with Linux:
As Linux's popularity has grown, so has the number of "non-server" applications. These range from the frivolous to the so-called personal productivity applications usually associated with Windows or Macintosh desktops.
Most of the applications we have discussed so far have been server-oriented or programming languages. The few exceptions have been office suites, word processors, and spreadsheets.
Here we want to talk about some of the "fun" software for Linux. These packages range from pure eye candy to the semi-useful to various games. Some of these were developed under Linux; others have been developed elsewhere; and some even pre-date Linux.
Wine (http://www.winehq.com/) not an emulator, or so the authors say. Wine is really two components in one. First, it is a way of running many Win16 and Win32 applications under Linux. Second, it is a way of compiling Windows applications for use under Linux. Companies like Corel are assisting with Wine development since it will reduce the amount of time needed to port their applications to Linux. A full list of applications that are supported under Wine can be found at the Wine Web site. Additionally, Wine will run only on Linux for x86 chips.
VNC stands for Virtual Network Console. Using a browser that runs Java, like Netscape, or a Java client that runs on any OS that runs Java, you can view a UNIX or Windows 95/98/NT screen on a remote display. In a UNIX machine, you get a new X display started, and under MS Windows, you get control of the actual screen. This makes it similar to PCAnywhere. Using this, you can get an X display on Windows, or access a Windows machine from a Linux box. Very cool stuff.
This is a silly little program that creates snow on your X desktop, which accumulates on your window tops. Periodically, a sleigh pulled by reindeer flies across the screen and it blizzards. Run it around Christmas to get in the holiday mood. Figure 15.4 shows Xsnow.

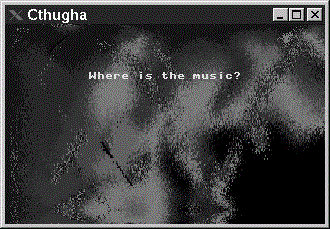
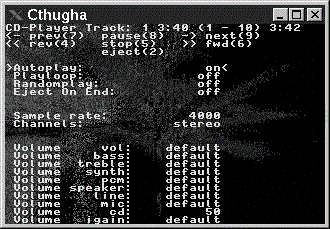
Xcthugha is another CD player. Compared to the interfaces of Workman and Xmcd, it is pretty thin. However, Xcthugha's forte is not its interface; it's what else it does with the music. It creates a visual representation of the sound stream.
Depending on the music and the individual, it induces anything from mesmerization to motion sickness. It can be run in an X or full-screen VGA mode. Under X, it can run in a window, in the root window, or as a screensaver. Finally, it can be used in client/server mode.
Figures 15-5, 15-6, and 15-7 show Xcthugha, its control panel, and the CD controls (reached by typing F1, c).

Sure, a basic CD audio player comes with almost every OS these days, but why be satisfied with just play, pause, stop, and skip? WorkMan is a very full-featured CD player. It sports play lists, a CD database, balance control, play modes, and just about everything else you would expect. Many WorkMan users make their CD databases available for download. Figure 15-8 shows the main WorkMan interface that you use to control the CD player. Figure 15-9 shows the track and CD information screen used to input tracks, play lists, and so on.


As a result of its SunOS heritage, WorkMan requires the Xview libraries to run. To compile it yourself, you will need the header files as well. Luckily these are freely available.
If you ever wanted to watch .AVI and .MOV files on your Linux machine, then xanim is for you. It brings up a window that shows the movies along with a control panel to fast-forward, rewind, and so on. Due to licensing restrictions, the version of xanim distributed by Red Hat cannot include the functionality to play some .AVI or .MOV files. However, you can download the necessary files from the xanim home page to add in the functionality yourself.
As its name implies, this is a full-featured application for recording, mixing, and editing sound. It is commercial software, but the Linux pricing is very low. Also, it uses Motif, so be sure to get the statically linked version if you don't have Motif. The main window of SoundStudio is shown in Figure 15-10.

RealNetworks makes a free version of their integrated RealAudio and RealVideo players for Linux. With RealPlayer, you can listen to and/or view streaming audio/video served from RealNetworks' streaming audio and visual server.
RealPlayer can run as a standalone application or as a plug-in for Netscape. The plug-in version will not play video in an 8-bit color display, although the standalone version will.
Real has recently released a beta version of their G2 player for Linux, and they do offer streaming servers and encoders so you can create your own content for your Web site.
The number of games for Linux is increasing every day. Hey, you need something to do while waiting for the kernel to recompile. There are a number of Web sites that are dedicated to gaming on Linux; for example, http://www.happypenquin.org and http://www.linuxgames.com
In addition to the games listed here, Wine will allow you to run many Windows 98 games under Linux, including Starcraft and Unreal.
For those of you who want just a simple game, xpat may be for you. It's a collection of Solitaire games (including classic Solitaire and the "freecell" games that are so popular on other operating systems).
It's not hard to ignore these rather popular games (and their predecessors—Doom and Doom II). Quake and Quake II are available for Linux and provide all the same features that are in the Windows versions. Linux provides three display types for playing: X11, SVGAlib, and 3Dfx. The X11 interface brings Quake up in a window and allows you to play with other applications up at the same time. The SVGAlib allows for full-screen play, but requires root access and exclusive use of the screen and keyboard. The 3Dfx version (GLquake) uses the Mesa GL library and a 3Dfx-based 3D card to provide superior texture mapping and graphics. The Mesa library and 3Dfx can also be used with VRML applications to make very high-quality graphics. Check the Id software home page (www.idsoftware.com) for more information about Linux Quake.
If this isn't proof that Linux has come into its own arena for gaming, we don't know what is. The latest version of the Civilization series has been ported to Linux as a commercial, off-the-shelf program. Be sure that you pick up the Linux version instead of the Windows version.
The biggest advantage of X over Macintosh, Windows 95, and even standard Windows NT is that X can send the output of a program to another X server. That is, you could be running a program in New York, with the display in an office in Massachusetts. Or, programs can run across an office, allowing you to control a Linux machine from anywhere.
Three things are required for remote displays to work. First, there has to be a TCP /IP connection between the two machines. This can be Ethernet, PPP, ATM, and the like. Next, the X server (where you'll be watching the program) has to know that a client wants to send a display. This can be done with the xhost program. Running xhost + will allow connections to your X server from anywhere. Running xhost +host adds host to the list of machines that can access your display. You can deny access using xhost - host. Note that by default, only the local machine has access to your display. Every other machine that wants to send a window to your display must be given access. The third item is that the client program needs to know where to send the display. This can be done using -display or by setting the DISPLAY environment variable. We prefer setting the DISPLAY variable.
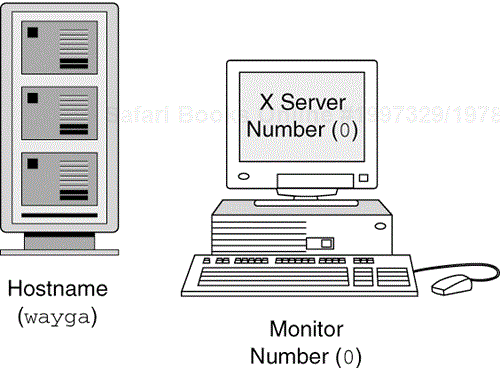
Displays are set with two items: the host to display on and the X server running on that host to display to. The server itself is broken into two parts: the server number and display number. Since X can handle multiple monitors at the same time, you will need to specify the host, X server, and monitor to send the client program to.
Fortunately for most Linux installations, this is easy. The X server and monitor always begin counting at 0, making the first X server 0.0. Tie this in with the hostname (let's call it wayga), and you get the setup shown in Figure 15-11.
There are a number of libraries available for X that should be mentioned here. Many are available already on Red Hat, but some may need updating, depending on the application you are trying to run or compile.
The Qt library from TrollTech is the library basis for the KDE Window Manager. It's written entirely in C++, though there are hooks to interfaces with Python and Perl. One of the limiting factors of KDE and Qt is the licensing of the library. Qt has recently greatly relaxed its licensing requirements, and many have confirmed that the Qt library can now be considered open source.
These libraries were originally developed to provide a graphical widget library for GIMP, which stands for the GNU Image Manipulation Program. They are now part of the basis of the GNOME environment and Enlightenment Window Manager.
LessTif is designed to be a Motif clone and implement much of the API from Motif 1.2. There are a number of applications written for Motif that now work with LessTif, including the free Mozilla browser.
The Mesa library is an open source version of OpenGL, the standard for 3D graphics under UNIX (see below). In addition to doing software-based 3D transformations, it also allows you to use 3D cards such as the 3Dfx-based voodoo series cards to display 3D applications. There are a number of applications using Mesa, including realistic flight simulators and VRML viewers.
A number of commercial products related to X11 are available. Here we try to give you a fairly complete list and short description of each. Few of these packages are available for architectures other than the x86, though Alpha and Sparc versions are beginning to crop up.
AcceleratedX is a high-performance replacement for the Xservers that come with XFree86. It is produced by XiGraphics ( http://www.xinside.com/).
AcceleratedX supports hundreds of video cards, considerably more than XFree86 alone does. Additionally, it supports more monitors and often supports higher-resolution monitors than XFree86. Typically, it will also squeeze better performance out of your video card and monitor. However, this increase in performance comes at a cost; AcceleratedX will also consume more system resources than XFree86.
XiGraphics also makes a multiheaded Xserver, allowing you to run X on up to three monitors simultaneously.
Metro-X is another commercial Xserver. It also boasts support for more cards and monitors than XFree86, though not as many as AcceleratedX. Its performance is not as good as AcceleratedX's either. It does, however, cost less and consumes fewer resources. Metro-X has support for up to four displays built in.
In addition to the many additional freeware or shareware X libraries and tool-kits, there are a couple of commercial toolkits for X.
Motif was developed by the Open Software Foundation. Its specification is freely available, which has allowed the LessTif project to work on a free clone of Motif.
Motif is popular because it provides a number of widgets that allow for the building of complex and powerful, but aesthetically pleasing, GUIs. It is somewhat resource-intensive, but most developers find it a fair trade.
Red Hat (http://www.redhat.com/) ships Motif 2.0.1 for the x86, Alpha, and Sparc platforms.
OpenGL is a three-dimensional graphics library developed by SGI. It has quickly became a standard part of nearly every 3D developer's toolkit. Most Linux users can use the Mesa library and a supported 3D card on Linux.
X is the most popular standard for graphics display on Linux and UNIX. It can be configured however you want, providing the control and interface that suits you best, instead of having to change the way you work to suit the operating system. The applications that are available for X rival those of Windows 98, and more are being written every day.