Administering the human side of your network—the users
There is more to administration than making sure that the system itself is running properly. You must keep the users of the system running as well.
As you've probably discovered by now, user data and group information are stored in two files:[1]/etc/passwd and /etc/group. The /etc/passwd file stores usernames, encrypted passwords, real names, and other user information. The /etc/group file stores group information and lists the groups of which the user is a member.
There are several methods you can use to add a user. The first, and probably the most difficult, is to make an entry in the /etc/passwd file (and /etc/group, if necessary) for the new user. The passwd entry looks something like this:
As you can see, there are seven fields separated by colons. In order, these are the username, encrypted password, user ID (UID), primary group ID (GID), real name, home directory, and login shell.
To enter a new user, simply add your own line. Replace the entire encrypted field with an asterisk (*) or some other character. Be sure the UID is unique. Now, create the home directory for the user you entered, copy files from /etc/skel to the home directory, and chown all the files in the home directory to the new user. Once the user exists, give the user a password by using the command as root:
Assuming that markk is the UID you created, this will put a valid encrypted password in the passwd field, and the user can now log in. The first thing the new user should do is change their password.
If that whole procedure seems a bit complicated, there are three other methods you can use. First, Red Hat comes with a usercfg that will allow root to create or delete users from the system. It does all of this automatically. The downside is that it's X -based, which is not much fun for automated scripts and the like. The other option for creating users is the /usr/sbin/adduser command. The only option required by this program is the username you wish to create. The program will then create the user, move files around, chown, and so on. Both adduser and usercfg create groups and assign unique UIDs based on the last UID used above 500.
The third method is to use linuxconf, which we'll get to later in this chapter.
Groups and GIDs are used to collect logical groups of people together. For example, engineering would have files they'd want to share among themselves, but not necessarily with sales. Or, accounting might want to share files with each other, but not with the rest of the company. The three levels of access for Linux files are user, group, and world. User is for the individual user who owns the file. Group is the group the file and user belong to, and world is everyone else. If you belong to the eng group (engineers) and want anyone else in the eng group to read a file, make sure the file resides in the eng group:
Then, set appropriate permissions on the file:
This particular chmod command gives read and write permissions to the owner (you) and anyone else in the eng group. No other users have access to this file.
The chmod command actually uses four octal numbers (0-8) to specify permissions:
| Ownership | User | Group | Others |
|---|---|---|---|
| 0—no setting | 0—no permissions | 0—no permissions | 0—no permissions |
| 1—save text image | 1—execute | 1—execute | 1—execute |
| 2—set GID | 2—write | 2—write | 2—write |
| 4—set UID | 4—read | 4—read | 4—read |
The ownership settings are rather special in that they give some extra functionality, but they are also security holes. The "save text image" setting means that once a program has finished running, it will save only the text portion in memory to decrease the amount of time it takes the program to load later on. This can quickly eat up memory if many programs have this, but if you use some programs a lot, this may be helpful.
The "set GID" setting means that once a program runs, set the group ID of the user to be that of the file. For example, if a program is in the sales group and has its GID bit set, when you run that program, you will be in the sales group only within that program while it is running. Some email programs use "set GID" to lock files in the /var/spool/mail directories. The user becomes part of the "mail" group while the E-mail program is running and can write to /var/spool/mail.
The "setUID" setting is the same as "setGID," but works with user IDs instead. Some programs, like network snoopers, require the use of devices or functions that can be run only by root. By setting ping to "set UID" root, everyday users can run the ping program. If you set a program to "set UID," be careful. If a program creates a new shell process, it will have the UID of the owner of the file. If the owner of the file is root, this can lead to common users getting root access very quickly. All the user would have to do is start a shell, and the new shell would be running as root.
This directory contains a "skeleton" user. That is, it contains files that you can use as a base for other users. It contains setup files for X, /bin/bash configuration files, and a .login. You can add to or change these files as you like, but remember that existing users will not have these changes taken into account. Only new users will see them. If you want to have common settings for all users, you can use the /etc/.login, /etc/csh.cshrc, and so on.
To disable a user account (that is, prevent the user from logging in again), replace the password in the /etc/passwd file with an asterisk (*) or some other character. Since the * isn't a valid encrypted password, there is no password that will allow you to log into that account.[2]
To delete an account, remove the entire line from the /etc/passwd file. The user will cease to exist to the system, and root cannot su to that user.
The differences? If you disable an account, the account technically still exists. That user can still receive mail,[3] has a home directory (that other people can access if the permissions are correct), and has all the rights of any other account. The user just can't log in. When an account is deleted, the system will bounce any mail that comes to that user, and all files owned by the former user will now be owned by the UID that the user had. Also, any accesses to the home directory (cd ~bob, for example) will not work.
So, when should you disable an account and when should you delete it? It depends on what information you want to keep. If you're an Internet Service Provider (ISP) and a customer cancels, you may just want to delete the account. If you're in a business and an employee quits, you'd probably want to make the account disabled for six months to give everyone else time to transfer files to other users, or to back up the account to tape.
The best criterion for this is: If the user has data in their home directory that others would want or need to access, disable the account. Once the files needed by the disabled account have been moved to other locations, delete the account. If the account has no information needed by other users, back up the home directory and any other files the user owns and delete the account.
There are a few advantages to using shadow passwords instead of using /etc/passwd. One is that encrypted passwords are not stored in a location where just anyone can read them. The /etc/shadow file contains the encrypted passwords for users and is readable only by root. Thus, only processes running as root can access the passwords. Another advantage is that /etc/shadow stores more than just passwords. It can also store data such as the last time a user changed their password. To maintain good security, you should have users change their passwords at least once every six months or so, or immediately if there is the possibility that the password has been compromised.
The disadvantage to using shadow passwords is rather large—many Linux programs may assume you're not using them. This can cause a major headache while compiling programs. Also, many installations do not give shadow passwords by default, meaning that you'll have to put them in after installation.
In the old days (just a few years ago), there were two big problems with the administration of user accounts:
Managing accounts on a large number of machines.
Ensuring security on each machine.
In the first case, it was inconvenient to synchronize /etc/passwd files on each machine, especially if you had a lot of machines to handle. NIS and NIS+ helped this situation a bit, but NIS and NIS+ had their problems. In the second case, there were a number of ways of ensuring password authentication on each machine. They ranged from your typical /etc/passwd with passwords encrypted to /etc/shadow to one-time passwords such as S/KEY. For programs such as login, rlogin, and even locking screensavers to understand the fact that a machine could have multiple ways of verifying a password, there had to be some method of verifying passwords, no matter what method you chose.
Linux is starting to get a handle on both issues. Red Hat makes it easier using the Pluggable Authentication Module (PAM). PAM creates independent modules that verify passwords and tell the appropriate program (login) that the entered password is correct. This greatly increases security (since PAM can tell passwd that a given password is too easy to guess), and also increases the ways of authenticating a user. PAM can verify passwords from a variety of sources, from NIS to an NT server to an LDAP server. PAM also handles changing passwords and can apply methods to passwords, such as timing out a password and forcing a user to change their password.
A useful starting point for information is the /usr/doc/pam*/ directory. Underneath that are three documents: The Linux-PAM System Administrator's Guide, The Linux-PAM Module Writer's Guide, and The Linux-PAM Application Developer's Guide. These three documents cover most of what PAM is as it's implemented on Red Hat. Since we're mostly concerned with system administration here, you'll probably want to print out or read The Linux-PAM System Administrator's Guide.
Here are some of the highlights of account administration using PAM:
The configuration files used by PAM are stored under the /etc/pam.d/ directory. Some older systems may have a pam.conf file. While the pam.conf file will be read if it exists, its use is not recommended anymore.
In the /etc/pam.d/ directory, each filename is the name of the program that will validate the service. For example, the configuration file for login is /etc/pam.d/login and the file for rlogin is /etc/pam.d/rlogin. If a service requests PAM authentication and no specific configuration file exists, PAM will check the /etc/pam.d/other file.
Let's take a look at the default login configuration file so it can be referenced later on:
auth      required      /lib/security/pam_securetty.so
auth      required      /lib/security/pam_pwdb.so shadow nullok
auth      required      /lib/security/pam_nologin.so
account   required      /lib/security/pam_pwdb.so
password  required      /lib/security/pam_cracklib.so
password  required      /lib/security/pam_pwdb.so shadow nullok
use_authtok
session   required      /lib/securitypam_pwdb.so
PAM configuration files contain up to four items per line:
module-type control-flag module arguments
module-type—. The module type defines what kind of module will be defined in this entry. At this point, there are four types of modules:Authentication—. Used to authenticate an entered user. This is the section that checks a given password against
/etc/passwdor/etc/shadow.Account—. This module type can restrict account access based on (for example) time of day or
loginlocation.Session—. Used to set up external services before the given service starts. Extra information can be logged to a file or to
syslog, for example.Password—. Used to change the "authentication token", commonly known as the password. For a typical
/etc/passwd, this just updates the file. For an LDAP server, this changes the password on the server. A one-time password should not use this since the password is only good once.As usual for configuration files, blank lines or lines that start with a # (called a hash, pound, number, or whatever) are comments and not read.
Typical configuration files mostly contain Authentication and Password module entries.
control-flag—. This defines what to do on the success or failure of the module. That is, if an authentication module succeeds, will another module be checked, or will a user be given access to that service? There are fourcontrol-flagtypes:Required—. The module must succeed for the user to be granted access. If this module fails, do not immediately report failure, but continue on to the next module if it exists. An example of this type of control flag is when a user tries to log in remotely as root. As part of the login, PAM setup checks
/etc/securettyto see if where the user is logging in from is listed in/etc/securetty. If thettyis not listed there, the user will not be able to log in as root. As you can see in the sample above, thepam_securetty.somodule is checked first, before the password is requested (which happens in thepam_pwdb.so). Had the securetty not been set to "required", the user trying to log in as root would have been denied login before ever entering a password. With the above configuration, the user just gets an "invalid login" error after what seems to be a normal login process (entering username and password).Requisite—. Unlike required, if a requisite module fails, PAM immediately stops and reports failure. This is rarely used since it may give an intruder a reason as to why their authentication was denied.
Sufficient—. Unlike required, if a sufficient module succeeds, PAM immediately stops checking and reports success. This control type is used in
rlogin, which checks to see if~/.rhostsexists, and if so, allows immediate use without further checking (or asking for a password).Optional—. Not used by default on Red Hat. Optional entries do not require success or failure to authenticate a user.
module—. The module is a full list of where each module lives. This must be a full path to a shared library. Under Red Hat, these files are stored by default under/lib/security/.argument—. Arguments to the module are listed after the module itself. This allows you to pass items to the module to affect how it works. For example, the
pam_pwdbmodule can look like this:
password   required    /lib/security/pam_pwdb.so shadow nullok
  use_authtok
When a password is changed, PAM knows to put the password in the shadow file. It also knows that a user can change a password that was null (but not to a password that is null, since cracklib prevents this), and to use the password given previously (that cracklib already checked and said was okay).
So, how do you use PAM to increase security on your system? You can easily implement many of the features that are offered by other operating systems (such as VMS or NT) that allow you to configure the kinds of passwords that are acceptable. You can also have accounts (or other services) available only at certain times or on certain days. Here's an overview of some of the modules you may want to use in your security system:
pam_time—. Determines what accounts have access to what services on what days. It has an external configuration file that is used by all PAM configuration files, located in/etc/security/time.conf. The configuration file has lines that look like this:
service; tty; user; time
These fields represent:
service—. The service affected by this rule in a list (so you couldlogin, but notsu, or the other way around).tty—.ttyswhere the user is attempting to access the service from. Remember thatttyrepresents a local connection,ttyprepresents a remote connection, andttySrepresents a serial connection.user—. Users affected by this rule, in a list.time—. The time when this rule is in effect. Days are two-character entries (mothroughfr, withwkbeing weekdays,wdweekend days, andalall days). If two items follow, the first item is unset. That is, if you enter a day string ofTuWk, it means all days except Tuesday, orWdAlmeans all days except weekend days, which is really wk. Times which follow the day are listed in 24-hour format as four digits (0000-2400)Each of the above entries can be entered in what is called a logic list. The logic list can have three extra characters that apply: * to represent every possible item in the list, | to logically OR two items together, or & to logically AND two items together.
For example, to prevent all logins on the
markkaccount except for between the hours of 3 A.M. and 6 A.M. on Tuesday, the rule would look like this:
login ; * ; markk ; Tu0300-0600
To prevent all logins on the console except for the markk account, you'd do something like this:
login ; tty* & !ttyp* ; !markk ; !Al0000-2400
pam_cracklib—. Checks a given password for "crackability," or ease of an intruder's cracking the password. The password is first compared against a dictionary (given in/usr/lib/cracklib_dict.) that contains a list of packed words to check against. To create a new dictionary of words to check against, use the/usr/sbin/create-cracklib-dictfile command to create a new dictionary. If the password passes this check, it is then compared to the previous password for the following:Is the new password a palindrome of the old one?
Is the change in password more than just one of changing the case of some letters?
How close are the old password and new one?
Is the password too short?
Is the new password a rotated version of the old one?
If all these tests pass, then cracklib reports success.
The linuxconf program gives access to the configuration of your Linux system through a few methods: Web, X, Java, and text-based. Each interface is about the same, but we'll concentrate on the Web interface.
This configuration can include examining logs, creating or disabling users, network configuration, and kernel configuration. To improve configurability, non-root users can be allowed certain kinds of access to linuxconf. One user has access to only the logs, while another is allowed to shut down the machine, and a third has no access at all. As new modules get written, it's easy to expand what linuxconf can do to ease administration. Such modules include activating IP filtering or accounting to ease the construction of a firewall.
Note that using linuxconf over the Web does have a few security issues. It should only be used in a fairly secure environment behind a firewall or packet filter, and access should be granted only to other machines on the network. By default, Web access is turned off, so you have to explicitly activate it and set up hosts that can use it before it is allowed. However, this is the only method for non-root users to access linuxconf.
The linuxconf Web section is started via inetd.conf. Any connection to the linuxconf port (by default it's TCP 98) will start up linuxconf in http mode. The easiest way to get into linuxconf to configure the Web connection is to use the text-based interface. You can start the program with linuxconf --text as the root user. The first time you start it, you'll get some usage and navigation information, then you'll get right into it.
The initial screen gives two menu items (Config and Control) and one menu button (Quit). TAB allows you to jump between the menu items and the button. The cursors allow you to move between the menu items, and the ENTER key will either select a menu item (if there is no + sign in front of it) or expand/contract submenus. Since you have more than just Config and Control available, you can press ENTER while on the Config option to see the submenus there. You'll get a list that looks like the following:
+Config
  +Networking
  +Users accounts
  +File systems
  +boot mode
+Control
With the plus signs in front of each submenu, you can see that they too have submenus (but not ad infinitum). Now let's expand the Networking menu, followed by the Misc submenu:
+Config
  +Networking
    +Client Tasks
    +Server Tasks
    +Misc
       Information about other hosts
       Information about other networks
       Linuxconf network access
  +Users accounts
  +File systems
  +boot mode
+Control
Select Linuxconf network access, which then gets you into a screen of options. First is the Enable Network Access checkbox. Since we want network access, press the SPACEBAR to select it. If the Log access box is not checked, check it now. This way, you can see who accesses linuxconf through the Web and be aware of any potential problems. Underneath all this is a list of IP address and netmask listings. A netmask is optional, but may be helpful if you want to restrict access to just a few hosts within the subnet. Listing a class C network (192.168.1.0) or a host by itself (127.0.0.1) does not require a netmask. Any other settings should have a netmask associated with them. If you're not sure how the subnet mask works, check the networking chapter for setting up a TCP/IP network.
So, let's give access to our fake class C network and also to the local host. Use the arrow keys to put in 192.168.1.0 and 127.0.0.1 under the Network and Host fields. Then TAB to the Accept button and press ENTER. You'll go back to the original menu.
Quit linuxconf and start lynx or Netscape, pointing at http://localhost:98/. You'll get a screen similar to Figure 4-1:
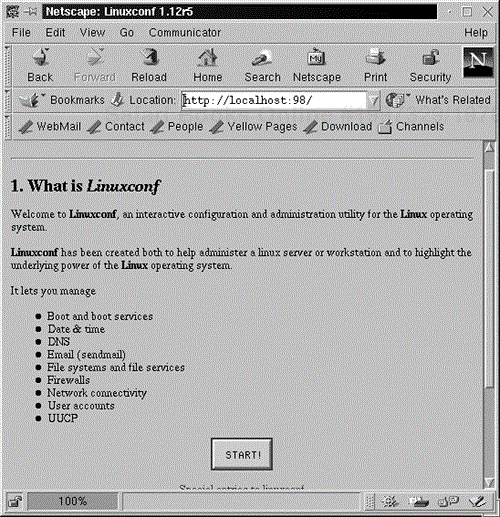
If you click on the START button at the bottom of the screen, you'll get prompted for a username and password. For now, root is the only user authorized to use linuxconf. This is the next thing we'll change, but for now, enter the root username and password.
You'll wind up with the same menu listing that you saw before, with each menu now being a hyperlink to another screen instead of actually expanding menus. Don't worry about getting lost in the menus, as the top of each page lists each set of menus you burrowed through (starting with the main page) to get where you are now. You can go back a menu level by clicking the last item on that list.
Now on to giving the "markk" (replace "markk" with your username if you like) account access to linuxconf, so you don't have to give the root username and password every time. Click Users accounts then User accounts. You'll get a list of all the local users known to linuxconf. If the markk account doesn't exist, you can click Add to create a new account. Otherwise, click the existing markk user (either way, you'll wind up in about the same screen shown in Figure 4-2).

You may notice that the root user is not in the list of users. There's a separate menu item for changing the root password. This way, you can't mess up the root settings and you'll always have something to fall back on in case of serious trouble.
In the user screen, there are a few changes from the traditional user account setup. For one thing, you may see information about expiring the password. Change this information as you see fit. By default, the password won't expire anytime soon (99999 days, or about 273 years). The minimum password change day is -1, meaning the user can change their password immediately. You can also set the account to expire after X days (if X is -1, the account won't expire) or you can set the account to expire on a specific date. If left blank and the number of days to expiration is not set, the account will never expire.
Next, the linuxconf access gives a listing of what access you want to provide to the user (see Figure 4-3). Shutdown, viewing logs, and access to PPP, POP, and UUCP management can all be denied or granted (plus access to linuxconf itself). Grant or deny access as you see fit. Since it's your machine and your account, you must decide if you trust yourself enough to have a certain kind of access. As you add new modules, like Message of the Day configuration, you may or may not get separate listings for access to those modules. Granting "superuser equivalence" gives access to pretty much everything, and may introduce security issues if you give too many users this kind of access.

Along with the modules built into linuxconf, there are additional modules that can be added or removed to give access to other parts of the system. We've already mentioned the MOTD module, and there are modules for configuring Apache, FPTD services, DHCP, firewall administration, email, RARP, and Samba. A full list of the modules that are available can be found under /usr/lib/linuxconf/modules. They're binary files, so you won't be able to find out much more from the directory listing other than the names.
You can have root activate a module as linuxconf --setmod <module name>, where <module name> is the name of the file under the modules directory before the so. For example, if you have linuxconf version 1.12.5 and a module for setting the MOTD, the module would appear in the directory listing as motd.so.1.12.5 and the <module name> would be motd. So, you could install the MOTD module with linuxconf --setmod motd. To remove modules, use the --unsetmod switch.
The other way to activate modules is via the Web interface to linuxconf itself. Under Control and Control files and systems is the option Configure Linuxconf modules. This option allows you to enter new modules (assuming you know what they are). You'll see that treemenu is already there. After this, you can enter new modules to load (like MOTD) to add them to the system. Click Accept, then go into Control and Control panel and select Restart Linuxconf. After that, the new menus for the module become available. You may have to poke around a bit to find where the new modules were loaded.
Linuxconf also allows you to build profiles or backups of major system files. There are many purposes for this: the biggest advantage is for notebook users whose configurations may change between a home network, office network, and dial-in network. Many settings may remain the same, but network settings will be different. Linuxconf allows you to store each setting and restore it to the system on demand. Another good application of this is to store last known good settings. If you want to go tweak some network settings to see if you can get slightly better routing, you won't have to worry about the configuration. The last settings that you knew were okay (before you started tinkering) can be saved and you can then restore them on demand to get back to them.
Let's work with the two default configuration settings that come with linuxconf-Home and Office. Since the only things that really change between the two settings are networking configurations, that's all that linuxconf needs to know to backup and restore. The default is Office mode. You can see the configurations under Control, Control files and systems, and Configure system profiles. You can then examine what subsystems are backed up as part of the Office and Home configurations. So let's test it. First, archive the settings that you currently have, using Control, Control panel, and Archive Configurations. Now select Switch system profile. Switching system profiles will also archive your settings, but we'll do it twice to be on the safe side. The system profile screen shows that we're in the Office setting, and the only available profile to switch to is Home. Select that, and you'll see all the Office files backed up again. Try to restore the Home files. Since the Home files don't exist, you may see a bunch of errors. Ignore them for now.
Now you'll see that you're in the Home profile. Use linuxconf or some other tool to change your network settings. Since markk has Ethernet both at home and work, this is easy. He just changes the Ethernet settings for Home, then archives the home settings. Part of changing these settings also gives a kick to the network to make it restart with the new IP information. Once you're in the new configuration, check your network services to make sure they restarted as they should have.
Each time you change profiles, the files get backed up in RCS format. Therefore, every time you change a file, you can go back to a previous version of the same file. In the event of your messing up a bunch of files, you can use linuxconf to restore an older version of the files. It doesn't exist to do this automatically yet, but will probably arrive sometime soon. However, you should be able to use regular RCS commands to pull out older versions of files. By default, RCS files are stored in /etc/linuxconf/archive. The program that creates the RCS files is located in /usr/lib/linuxconf/lib/cfgarchive. It's a shell script, so you can see how the archives are made. You can also replace the files with a different archiving program, if you like.
The filesystem configuration tool (fsconf) provides a nice front-end to the /etc/fstab file. The /bin/fsconf file is really a pointer to /bin/linuxconf. Since the Web interface is similar to the /bin/fsconf program, we'll cover this section of the program here. The fsconf mainscreen is shown in Figure 4-4. You can add, delete, or edit mount points for local or NFS partitions. The main screen has a total of five options, which are described in the following sections.
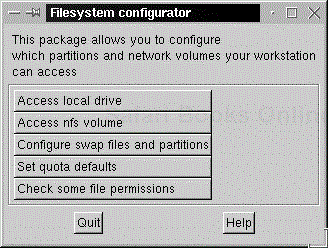
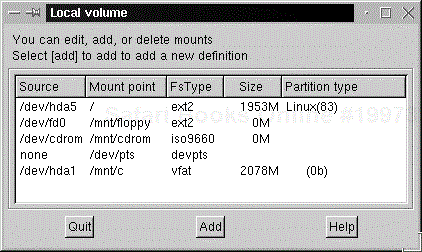
Clicking this option beings up a list of known mount points and options for the local drive only. NFS drives are handled in a different menu. Clicking on any of the mounts brings up a menu with options for that particular volume, including partition, filesystem type, and mount points (see Figure 4-5).
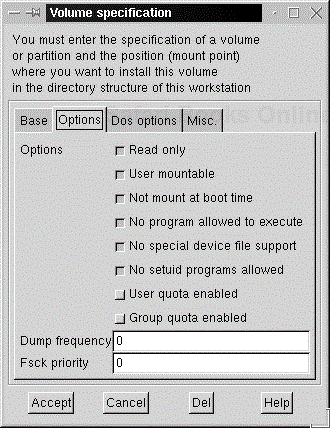
The options tab gives a view of mounting options. As you can see in Figure 4-6, we want to have the CD-ROM mounted read only, and mountable by a normal user. It's not mounted at boot time, and we don't want any applications to be able to run off the CD-ROM, nor do we want Linux to recognize any device files that exist on the CD-ROM. The final checked option indicates that no setuid programs will run. Since we don't want quota support on this volume, it's turned off. The dump and fsck levels are set to 0, indicating that we don't want this volume backed up or checked. If this were an actual hard drive, we'd set the dump and fsck levels to 1, indicating that we wanted the drive checked on bootup.
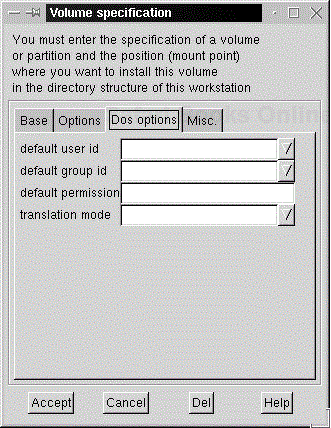
Because DOS (really the FAT, VFAT, and FAT32 volume types) does not recognize users or permissions, we can have Linux handle some of this for us with the DOS options tab (Figure 4-7). If you're mounting a FAT filesystem, you can have all the files appear as being owned by a specific user or group. You can also set default permissions for all files in octal format (see the section on chmod for more information on this). And lastly, you can set a default translation mode. Since Linux has only an LF (^L) as an end-of-line marker, while FAT uses CR-LF (^M^L), you have to make sure that text files get translated properly, while binary data does not get this translation applied. Linux is very good at automatically recognizing this, but if you need to set a translation mode, you can do it here. Binary indicates no translation at all, Text means translate everything, and Auto (the default) means to figure it out based on the filename extension. A complete list of these extensions can be found by clicking the Help button.

Under the Misc tab (Figure 4-8), you can use additional mount options (may not be covered elsewhere) under the Other options field. Comments (have no effect on the mounting of the partition) can be added in the Comments field.
The setup here is similar to local volumes, so we'll cover only the differences between mounting an NFS volume and a local volume. The main screen shows a list (if any) of known NFS mounts. Clicking on one (or clicking add) brings up the Volume specification window.
The Base tab allows you to enter the serving host and volume, plus the local mount point. The Options. tab is the same as under local volumes, except there are no options for dump or fsck.
The NFS options tab has four of the most common options used in mounting NFS volumes. The Soft mount option (if checked) will return an I/O error immediately to an application if there is a problem contacting the NFS server. With the option unchecked, called a hard mount, the request will continue indefinitely and the application may appear to hang. The Background mount option tells mount to first try mounting in the foreground, then try all other requests in the background. This allows mount to return without much delay, and allows Linux to fully boot even if some NFS servers are not responding. With the option unchecked, it is considered a foreground mount, and the mount program will either time out or wait a long time before returning. The last two options allow you to set the read and write sizes for blocks to send to and from the NFS server. The default is 1024 bytes, but you may find better performance going up to something like 8192.
Since swap partitions are rather easy to set up, there are not many options to configure. The Base tab contains the partition (or file) to use as swap, and the Misc tab has additional options and comments, just like local and NFS volume mounting. If you choose to use a file as a swap partition (in case you need more swap space), create a file the size of the swap partition you'll need. The easiest way to do this is to use dd to create a file (the mkswap man page uses the example dd if=/dev/zero of=swapfile bs=1024 count=65536, which creates a 64MB swap file), then use mkswap to format the space (mkswap swapfile). Once that is complete, you can enter the full path to swapfile as the partition to use and add it to the swap space.
If quotas are set on a partiton, you can set up default quotas for users and groups on each partition. Quotas are set up in the following ways:
Soft Limit—. This is a limit that can be exceeded, but only for a defined amount of time. After this time, the user cannot write to the filesystem.
Hard Limit—. This limit can never be exceeded. Attempting to do so will return an error.
Grace Period—. Amount of time (in days, hours, minutes, and seconds) that a soft limit can be exceeded.
By default, soft limit and hard limit are set to -1 (none) and the grace period is 7 days. Note that these limits get applied not only to total disk space, but also to individual file size. This can be handy in preventing mailboxes from getting too big (as an example). Also note that these limits are set per partition.
Once the defaults are set, you can use an application like linuxconf to fine-tune these settings per user.
This section is more for the human side of interaction. The way you interact with your users determines how they will interact with you. The first thing to remember is that your users will probably not know as much about Linux as you do. They may need simple concepts or programs explained to them. Giving them a lot of low-level gibberish makes you look cool, but it probably won't answer their questions.
As an example, you could say, "Well, sendmail is thinking your mail host is foo when it should be bar, so I'll have to go change the /etc/aliases file on the NIS server to make it point to the right server." Or you could say, "The mail isn't in the right location. I'll try and move it." If you knew absolutely nothing about computers, which would make you feel better? Don't let your sadistic side get the better of you, no matter how tempting it is.
One other important thing you should do is keep your users informed. If you need to shut down the server, be sure to give everyone at least a few minutes' warning before you do it. If you have to take the server down for maintenance, do it near the end of the day and give everyone a few hours to get their work done. Just dropping people off the server may cause them to lose files and work. Also be sure that your backups work and test the backups frequently so you can be sure that you can restore them if needed.
Some administrators have the notion that the people they're assisting in their day-to-day activities are not really customers—they're just people they work with. We see it differently. Your primary job, if you're an administrator, is to make sure that the people you're helping are able to do their jobs. If they can't do their jobs, then you won't have one to do. So, it would be fair to think of the people you're helping as customers. As such, you have to be nice to them and should be ready to drop what you're doing to make sure they can keep doing their jobs.
/etc/passwordand/etc/groupcontain all the user and group information on the system.File permissions are based on user, group, and everyone (world).
PAM can increase system security.
Linuxconfcan assist with many routine administration functions.Be nice! Your users are your customers.