
Chapter 4. Using Ad Hoc Commands
This chapter covers the following subjects:
• Understanding Ad Hoc Commands
• Consulting Module Documentation
• Running Ad Hoc Commands from Shell Scripts
The following RHCE exam objectives are covered in this chapter:
• Understand core components of Ansible
• Modules
• Use provided documentation to look up specific information about Ansible modules and commands
• Configure Ansible managed nodes
• Validate a working configuration using ad hoc Ansible commands
• Script administration tasks
• Create simple shell scripts
• Create simple shell scripts that run ad hoc Ansible commands
• Create Ansible plays and playbooks
• Know how to work with commonly used Ansible modules
“Do I Know This Already?” Quiz
The “Do I Know This Already?” quiz allows you to assess whether you should read this entire chapter thoroughly or jump to the “Exam Preparation Tasks” section. If you are in doubt about your answers to these questions or your own assessment of your knowledge of the topics, read the entire chapter. Table 4-1 lists the major headings in this chapter and their corresponding “Do I Know This Already?” quiz questions. You can find the answers in Appendix A, “Answers to the ’Do I Know This Already?’ Quizzes and Review Questions.”
Table 4-1 “Do I Know This Already?” Section-to-Question Mapping

1. Using ad hoc commands is useful in multiple situations. Which of the following is not one of them?
a. Making it easy to repeat tasks in a consistent way
b. Using setup tasks to quickly bring a managed node to a desired state
c. Performing a quick test to verify that a playbook has executed successfully
d. Running a discovery task to verify that a node meets certain criteria
2. What is wrong in the following sample ad hoc command?
ansible all -a "rpm -qa | grep http"
a. Nothing.
b. There is no option -m to specify which module should be used.
c. It uses the command module but uses a pipe in the argument.
d. It misses the key=value format in the specification of the arguments.
3. A user runs the ad hoc command ansible all -m user -a “name=lisa” on a host where user lisa already exists. What happens?
a. A second user with the name lisa_0 is created.
b. The current user lisa is removed, and a new user lisa is created.
c. The command gives an error message, and nothing is changed.
d. The command shows the SUCCESS result, and nothing is changed.
4. Which of the following modules must be used if you want to run a shell command that redirects the output of the command to the file output.txt?
a. command
b. shell
c. raw
d. bash
5. You want to run a command on an Ansible-managed Cisco router. Which module should you use?
a. command
b. shell
c. raw
d. bash
6. You want to install software in a network that has multiple Linux distributions. Which module would you use to do this on the Ubuntu nodes?
a. apt
b. package
c. software
d. install
7. Which of the following is the most accurate statement about the ping module?
a. It tests connectivity to an Ansible-managed machine.
b. It tests whether a host is currently running.
c. It tests the contents of the inventory.
d. It tests whether the host is in a manageable state.
8. Which command should you use to get a list of all modules installed on your control node?
a. ansible-modules
b. ansible -l
c. ansible-doc -l
d. ansible-modules --list
9. Which command shows you just a list of arguments that can be used with a module in a format that is ready to be used in a playbook?
a. ansible-doc
b. ansible-doc -l
c. ansible-doc -s
d. ansible-doc -e
10. What is the best approach to get a list of modules that can be used for system management?
a. Grep on the output of ansible-doc -l.
b. Use ansible-doc system.
c. Look up the module index in docs.ansible.com and navigate to the system modules section.
d. Use ansible-doc --system.
Foundation Topics
At this point you should have a base Ansible infrastructure available, so let’s start using it! In Ansible, you typically work with playbooks. Playbooks are scripts that are written in YAML and provide all the instructions for getting managed nodes in their desired state. Configuring playbooks will be covered in Chapter 5, “Getting Started with Playbooks.” In this chapter we work on some of the preliminary knowledge that is required before you start working with playbooks. You learn about ad hoc commands and modules, which allow you to perform quick tasks on Ansible without having to create any playbooks.
Understanding Ad Hoc Commands
An ad hoc command is an Ansible task that you can run against managed hosts without the need to use any playbook files or other script-like solutions. Ad hoc commands are easy to use and they are fast, and for that reason, they are commonly used.
![]()
Ad hoc commands are used in particular on the following:
• Setup tasks that bring nodes to a desired state
• Quick tests to verify that a playbook was indeed successful
• Quick discovery tasks to verify that a node meets certain criteria
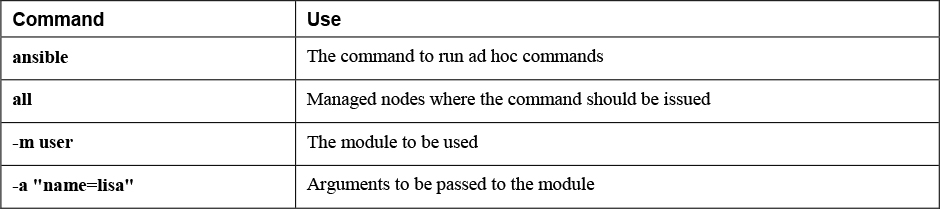
Let’s look at a sample command, and based on that sample, try to understand what is needed in an ad hoc command:
ansible all -m user -a "name=lisa"
This command contains a few ingredients. To start with, there is the ansible command, which is the command for running ad hoc commands. Next, you need to specify on which hosts you want to run the ad hoc commands, which is accomplished by the all part of the command. The third element refers to the module that you want to run. A module is a script that is executed by Ansible to perform a specific task. In the sample command shown, the -m option is used to call the module, and the specific module in this example is user. Finally, you need to provide arguments to the module by using the -a option. In an ad hoc command, all arguments are provided between double quotes. In this case there is just one argument, but if there are many arguments, all of them need to be included between double quotes. Table 4-2 summarizes all these components of the ad hoc command.
Table 4-2 Ad Hoc Command Components
When running an ad hoc command, you must be using your Ansible user account (not root), and you must be in a project directory where the inventory file and the ansible.cfg file can be found. Next, you run the command ansible all -m user -a “name=lisa”, which reaches out to all hosts in inventory to ensure that user lisa exists.
While doing so, Ansible compares the desired state (which is what you just specified in the ad hoc command) with the current state of the managed machine, and if so required, it applies changes to the managed machine. In Listing 4-1 you can see what the output of the command looks like. Notice the listing executed the command on ungrouped, which refers to all hosts that are not a part of any specific group.
Listing 4-1 Ad Hoc Command Output
[ansible@control ~]$ ansible ungrouped -m user -a "name=lisa"
ansible2 | SUCCESS => {
    "ansible_facts": {
        "discovered_interpreter_python": "/usr/libexec/platform-python"
    },
    "append": false,
    "changed": false,
    "comment": "",
    "group": 1002,
    "home": "/home/lisa",
    "move_home": false,
    "name": "lisa",
    "shell": "/bin/bash",
    "state": "present",
    "uid": 1002
}
ansible1 | CHANGED => {
    "ansible_facts": {
        "discovered_interpreter_python": "/usr/libexec/platform-python"
    },
    "changed": true,
    "comment": "",
    "create_home": true,
    "group": 1001,
    "home": "/home/lisa",
    "name": "lisa",
    "shell": "/bin/bash",
    "state": "present",
    "system": false,
    "uid": 1001
}
Listing 4-1 shows the output of the ad hoc command. You can see that the first line shows ansible2 | SUCCESS. This line indicates that host ansible2 already meets the desired state, and as a result, no changes had to be applied. For host ansible1, you can see ansible1 | CHANGED, which indicates that host ansible1 did not meet the desired state yet, and changes had to be applied.
This is how each Ansible command works. Ansible commands are idempotent, which means that regardless of the current condition, Ansible brings the managed host to the desired state. No matter how often you run the command, it always results in the same desired state. This is what is referred to as the idempotent behavior of Ansible commands: even if you run a command multiple times, the result is always the same. In Exercise 4-1 you can try running an ad hoc command for yourself.
Note
In this and the following exercises, you need to execute tasks as a non-root user account. To do so, according to the setup instructions in Chapter 2, “Installing Ansible,” you have created a user with the name ansible. If you have created a user with a different name, make sure that the name of that specific user is used instead of “user ansible”.
Exercise 4-1 Running an Ad Hoc Command
1. Open a shell as user ansible on the control host. Make sure that you are in a directory that contains the ansible.cfg configuration file that you created in Exercise 3-3.
2. Create an inventory file with the name inventory and make sure it has the following contents:
ansible1
ansible2
3. Type ansible all -m user -a “name=lisa” to instruct the user module to create a user with the name lisa. This creates user lisa on all managed hosts.
4. Observe the command output, and make sure that all hosts return either the SUCCESS state or the CHANGED state.
5. Run the command again. All hosts now return the SUCCESS state because nothing needed to be changed this time: the current state of the hosts already met the desired state.
6. Type the command ansible all -m command -a “id lisa”. In this command you run the command module, a module that enables you to run arbitrary commands on managed machines, with the argument id lisa, which actually is the command executed on the managed nodes.
7. Observe the output of the command, which should show that user lisa exists and show the groups the user is a member of.
8. Clean up the managed machines using ansible all -m user -a “name=lisa state=absent”. This command reaches out to the managed machines and removes user lisa again.
Working with Modules
Ansible functionality is provided by modules. More than 3000 modules are available to take care of a wide range of tasks, allowing administrators to manage Linux servers, Windows servers, cloud infrastructure, cloud instances, containers, network devices, and much more. Knowing Ansible equals knowing modules. Finding the right module for the right task is a key skill, and the more modules you know, the easier working with Ansible will be.
The modules can best be seen as plug-in programs that are used in Ansible playbooks or when using ad hoc commands. The modules themselves are written as Python scripts. That doesn’t mean that you have to know Python though. Python knowledge is required only if you are a developer who wants to develop your own modules.
Exploring Essential Modules
Because working with modules is key, let’s explore some key modules. Table 4-3 provides an overview.
Table 4-3 Ansible Key Modules
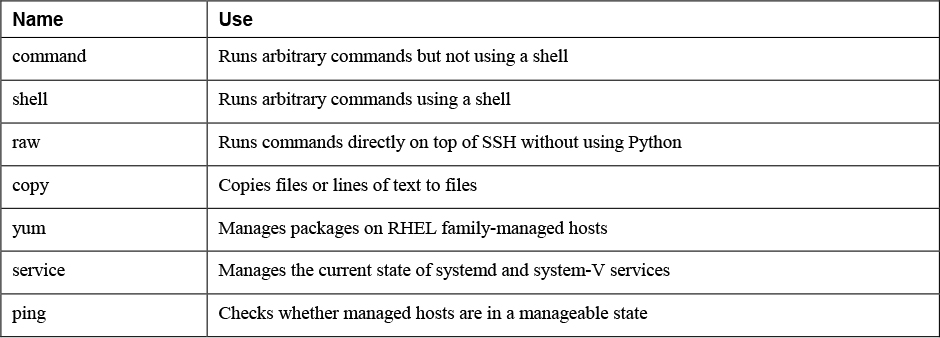
Let’s take a closer look at these core modules.
command
The command module allows users to run arbitrary commands using Ansible. Commands that are run by the command module are not interpreted by a shell. This means that common shell features, such as pipes and redirects, don’t work while using the command module. For instance, the command ansible all -m command -a “rpm -qa | grep nmap” does not work.
The command module is the default module. This means that if the option -m command is omitted, Ansible interprets the argument that is provided by default as an argument to the command module. If another default module is needed, the option module_name = module can be set in ansible.cfg.
Exam tip
You need to perform quite a few tasks on the RHCE exam. For sure, the most elegant way to do so is to use the appropriate module. However, using the command module or the shell module is not wrong; it’s just not elegant. So if, on the exam, you cannot accomplish a task using the module that was designed to perform that task, just use the command module instead. All that counts is the result, and on the exam it doesn’t really matter how you got there.
shell
The shell module is similar to the command module and allows you to run arbitrary commands, with one important difference: the shell module does run the commands through a shell. That means the usual shell features, such as pipes and redirects, do work while using this module. Compare, for instance, the result of the command ansible all -m shell -a “rpm -qa | grep nmap” to the command used before. This time it will work.
raw
The third module that enables you to run arbitrary commands on managed nodes is the raw module. The shell and the command modules, when used, generate a Python script, which is sent over SSH to be executed on the managed host. The raw module, however, doesn’t need Python on the managed host; it sends the command straight over the SSH connection. This makes the raw module an excellent choice while setting up a machine or to work on a managed machine that doesn’t have a Python stack, such as a network device.
Using the appropriate options, you can use the raw module to perform initial setup tasks on managed hosts. An example is the command ansible -u root -i inventory ansible3 --ask-pass -m raw -a “yum install python3”, which can be used to install Python 3 on host ansible3, which may be a node that hasn’t received any Ansible configuration yet. Notice that the raw module could be used as an alternative to the command or shell module, but this approach is not recommended. As a generic rule of thumb, you should always try to use the module that is the most specific for the task that you want to accomplish.
Note
The command, shell, and raw modules are all used to run arbitrary commands on a managed node. In most cases, it is recommended to avoid using them. Most other modules are idempotent and make it easy to track changes. The command, shell, and raw modules just run an arbitrary command, and it’s hard to track what exactly has been changed using these modules, and for that reason it is difficult to guarantee idempotency when they are used. For that reason, you should try to avoid them as much as you can.
copy
As its name suggests, the copy module is used to copy things. You can use it to copy files, but you can also use it to copy simple lines of text into a managed files. An example is ansible all -m copy -a 'content="hello world" dest=/etc/motd', which copies the text “hello world” into the /etc/motd file.
yum
The yum module can be installed to manage software on the Red Hat distribution and related distributions. Use, for example, ansible all -m yum -a “name=nmap state=latest” to install the latest version of the nmap package on all managed nodes. Notice that yum is not the only module available for managing software. A more generic module is package, which has the advantage that it works on any Linux distribution. Between the two of them, use the yum module if you need to work with specific yum command features, and use the package module if the highest priority is to manage software on different managed distributions.
service
The service module is used to manage the state of services through either the legacy system V (init) process, or systemd. While using it, make sure that you don’t just start the service using the argument state=started, but also enable the service using enabled=yes. If you just use state=started, the managed service is started now but won’t be started automatically again after a restart. It’s like using systemctl start myservice without using systemctl enable myservice.
Use, for instance, ansible all -m service -a “name=httpd state=started enabled=yes” to enable and start the httpd service. (Obviously, you have to use the yum module to install the httpd service before you can do that.)
ping
The ping module is a simple module that can be used to check whether hosts have been set up correctly to be managed with Ansible. So it doesn’t just test connectivity; it tests manageability. It doesn’t need any arguments. Just use ansible all -m ping to check connectivity for all hosts in inventory. Listing 4-2 shows what the answer looks like for hosts that are available but also shows what you see if a host is not available. To get the same result, just add the hostname ansible3 to the inventory file. In Exercise 4-2 you can practice working with this module as well as the other modules discussed here.
Listing 4-2 Analyzing ping Module Output
[ansible@control ~]$ ansible all -m ping
ansible3 | UNREACHABLE! => {
    "changed": false,
    "msg": "Failed to connect to the host via ssh: ssh: Could not resolve hostname ansible3: Name or service not known",
    "unreachable": true
}
ansible2 | SUCCESS => {
    "ansible_facts": {
        "discovered_interpreter_python": "/usr/libexec/platform-python"
    },
    "changed": false,
    "ping": "pong"
}
ansible1 | SUCCESS => {
    "ansible_facts": {
        "discovered_interpreter_python": "/usr/libexec/platform-python"
    },
    "changed": false,
    "ping": "pong"
}
Exercise 4-2 Using Modules in Ad Hoc Commands
1. Use ansible all -m ping to verify that all hosts in inventory are in a manageable state.
2. Type ansible ansible1 -m yum -a “name=httpd state=installed” to install the httpd software package on host ansible1.
3. Verify that the package is installed using ansible all -m command -a “rpm -qa | grep httpd”. Analyzing the output, you can see that the rpm -qa command runs successfully on the managed hosts, but the pipe is ignored.
4. Use ansible all -m shell -a “rpm -qa | grep httpd”. In the output you can see that node ansible2 gives a “non-zero return code” message, meaning that the command did not complete successfully. You can also see a list of matching packages on ansible1. Last, you can see a warning message stating that you should use the yum module instead. Notice that the shell as well as the command modules reported a changed status as the result, even if nothing has really changed.
5. Use ansible all -m yum -a “list=httpd” and compare the output to the output of the command used in step 4.
6. Use ansible all -m command -a “systemctl status httpd” to verify the current status of the httpd service. It should show the service is not found on ansible2 and the service is inactive and disabled on ansible1.
7. Use ansible ansible1 -m service -a “name=httpd enabled=yes state=started” to start and enable the httpd service on ansible1.
8. Run the command ansible all -m command -a “systemctl status httpd” again to verify the modification has been applied.
Browsing Available Modules
As mentioned before, to be successful with Ansible, you need to know modules. There are many modules, of course, and to figure out which modules are available, you can use ansible-doc -l. This command lists all modules that are installed on your system. When you use it on a CentOS 8.1 installation with a default Ansible installation, you see that no fewer than 3387 modules are installed!
The fact is that many modules are available for Ansible—so many that you’ll never use all of them, and also so many that in some cases you’ll have a choice between different modules to accomplish the same task. When you’re new to Ansible, finding the appropriate module can be hard. By working your way through this Cert Guide, you’ll learn about some of the most useful modules, but you’re always advised to search whether a better module might be available. You can do that by using ansible-doc -l and filtering the output using the Linux grep utility. Use, for instance, the command ansible-doc -l | grep vmware to see all the modules available in Ansible to manage VMware environments.
Consulting Module Documentation
Ansible modules are well documented. You can find documentation for all the installed modules using the ansible-doc command. Apart from the ansible-doc command, which is always available on your Ansible installation, you can visit the Ansible documentation website, which is available at https://docs.ansible.com.
Exam tip
Documentation is available on your exam, so learn how to use it. You have access to the ansible-doc command but also to a local copy of all documentation at https://docs.ansible.com for the Ansible version used on the exam. As you study for the exam, make sure you practice using these valuable resources!
Using ansible-doc
The ansible-doc command provides information about all Ansible modules. This documentation is presented in a structured way. Listing 4-3 shows the result of the command ansible-doc ping.
Listing 4-3 Analyzing ansible-doc Command Output
> PING    (/usr/lib/python3.6/site-packages/ansible/modules/system/ping.py)

        A trivial test module, this module always returns `pong’ on
        successful contact. It does not make sense in playbooks, but
        it is useful from `/usr/bin/ansible’ to verify the ability to
        login and that a usable Python is configured. This is NOT ICMP
        ping, this is just a trivial test module that requires Python
        on the remote-node. For Windows targets, use the [win_ping]
        module instead. For Network targets, use the [net_ping] module
        instead.

  * This module is maintained by The Ansible Core Team
OPTIONS (= is mandatory):

- data
        Data to return for the `ping’ return value.
        If this parameter is set to `crash’, the module will cause an
        exception.
        [Default: pong]
        type: str


SEE ALSO:
      * Module net_ping
           The official documentation on the net_ping module.
           https://docs.ansible.com/ansible/2.9/modules/net_ping
        _module.html
      * Module win_ping
           The official documentation on the win_ping module.
           https://docs.ansible.com/ansible/2.9/modules/win_ping
        _module.html


AUTHOR: Ansible Core Team, Michael DeHaan
        METADATA:
          status:
          - stableinterface
          supported_by: core


EXAMPLES:

# Test we can logon to ’webservers’ and execute python with json lib.
# ansible webservers -m ping

# Example from an Ansible Playbook
- ping:

# Induce an exception to see what happens
- ping:
    data: crash


RETURN VALUES:

ping:
    description: value provided with the data parameter
    returned: success
    type: str
    sample: pong
Because all the ansible-doc resulting pages show the same structure, it makes sense to understand the different elements. Table 4-4 shows default elements in the ansible-doc command result.
Table 4-4 ansible-doc Output Elements
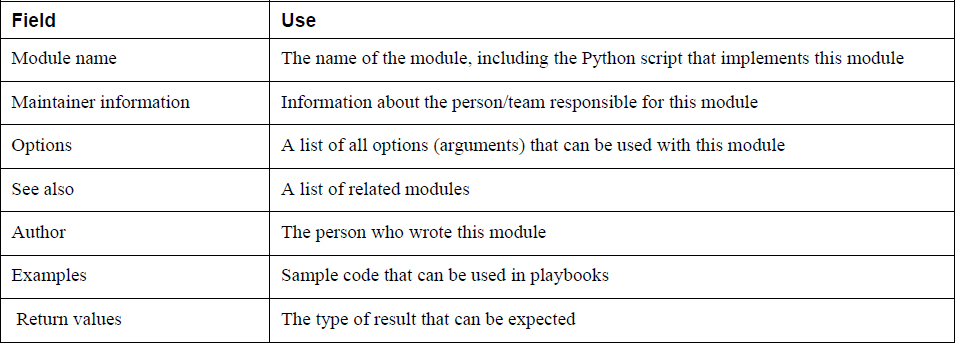
The first interesting element in the result of ansible-doc is the name of the module, which is followed by the name of the Python script that is used by this module. Ansible modules are written in Python, and the Python scripts are just installed on your control system. So if you want to see what is happening, you can open the Python script, analyze it, and—if you want—even optimize it.
Following the name of the underlying script is a short module description. It’s a good idea to read the module description, particularly if you’re using a module for the first time. The examples that you may have copied from your Google search don’t provide information about the gotchas in a particular module, so read it!
Next, you see who is responsible for maintaining a module. This is important information that can help you in selecting the best module for your specific purpose. In general, it’s a good idea to look for modules that are maintained by the Ansible Core Team, but if you’re working on a specific network appliance, using the modules provided by the appliance vendor may be a better idea.
The following element is a list of all the options. Most modules have options, and many modules have at least one option that is mandatory. If your module has mandatory options, you’ll find the option indicated as =option (instead of -option). The SEE ALSO section that is next gives information about related and/or similar modules. It’s a good idea to have a look at this section because you might find yourself in a specific module where there’s also another module that is just a little bit better to accomplish your task.
At the end of the ansible-doc output, you’ll find the name of the author, and most important, usage examples. In most cases, the examples show sample playbook code. This information is most useful because you’ll find examples of the most common use cases and the playbook code you need to use to implement the module in a playbook. All the way at the end of the output you’ll find the return values. This section provides information about the type of output that is to be expected from this module.
By default, the ansible-doc command provides full documentation about a module. When working on playbooks, you are typically most interested in how to use required parameters in a playbook. To get that information, you can use ansible-doc -s modulename. The result of this command shows a sample playbook structure, with a list of the arguments that can be used and a short description for each argument. Because the result of ansible-doc -s is not as overwhelming as the complete output, many people like using this approach. Listing 4-4 shows partial sample output of this command.
Listing 4-4 Showing Usage Information with ansible-doc -s service
- name: Manage services
  service:
      arguments:             # Additional arguments provided on the
                               command line.
      enabled:               # Whether the service should start on boot.
                               *At least one of state and
                               enabled are required.*
      name:                  # (required) Name of the service.
      pattern:               # If the service does not respond to the
                               status command, name a substring to
                               look for as would be
                               found in the output of
                               the `ps’ command as a
                               stand-in for a status
                               result. If the string
                               is found, the service
                               will be assumed to be
                               started.
      runlevel:              # For OpenRC init scripts (e.g. Gentoo) only.
                               The runlevel that this
                               service belongs to.
      sleep:                 # If the service is being `restarted’ then
                               many seconds between
                               the stop and start
                               command. This helps to
                               work around badly-
                               behaving init scripts
                               that exit immediately
                               after signaling a
                               process to stop. Not
                               all service managers
                               support sleep, i.e when
                               using systemd this
                               setting will be
                               ignored.
Using https://docs.ansible.com
Apart from the on-system documentation provided by ansible-doc, on the exam you’ll also have access to the docs.ansible.com website (see Figure 4-1). On this website you can find all you need to know about Ansible, but in some cases it’s not obvious where to find that information. For that reason, you must practice using the documentation before taking the exam. In particular, you use the search bar in the upper-left part of the screen. Where appropriate, you’ll also find guidelines in this book on where to find specific types of information. You can practice working with the documentation in Exercise 4-3.

Figure 4-1 Browsing documentation at docs.ansible.com
Exercise 4-3 Working with the Documentation
1. Type ansible-doc -l | grep user. You see a long list of all modules that have the string “user” either in the module name or in the description of the module.
2. Type ansible-doc user and look up mandatory arguments. You should find that the name argument is mandatory. Also, look at the SEE ALSO section, where you can find information about related modules.
3. Scroll forward to the EXAMPLES section and look at the examples there.
4. Type ansible-doc -s user to see the output of this command. Notice that the output looks like a combination of the list of arguments and the examples in the ansible-doc command.
5. Open the Ansible documentation at https://docs.ansible.com from your browser and click Documentation in the upper-left corner.
6. In the search bar in the upper-left corner, type user module system.
7. In the results list, open the link to System Modules. This takes you to a list with all modules that relate to system management tasks. From this list, select the User module and look at the web page. Notice that the resulting web page contains the exact same information as what you find in the result of ansible-doc user.
Running Ad Hoc Commands from Shell Scripts
To understand why in a book about Ansible there is a section about shell scripting, you need to look at the Exam Format section on the “What you need to know” page in Red Hat’s description of the Ansible exam (https://www.redhat.com/en/services/training/ex294-red-hat-certified-engineer-rhce-exam-red-hat-enterprise-linux-8). In this section you find the following text:
Your work will be evaluated by applying the playbooks created during the exam against freshly installed systems and verifying that those systems and services work as specified.
This means that during the exam, you will be creating Ansible playbooks, and during the exam you can test these playbooks on the managed machines that are provided. Once the exam is over, your playbook will be graded. In the grading process, a new set of managed machines will be provided, and your playbooks will be executed against this new set of managed machines.
In the exam, it is most likely that you will have to work with ad hoc commands as well, and “Create simple shell scripts that run ad hoc Ansible commands” is one of the exam objectives. You’ll have to do that in a script because that is the only way the exam evaluation engine will be able to verify your work. As a result, you need to have at least minimal knowledge about using shell scripts. In this section you get a minimal introduction to working with Bash shell scripts. The purpose is not to teach everything there is to know about shell scripts, but just to show you the shell scripting essentials required on the exam.
On Red Hat Enterprise Linux, the Bash shell is used as the default command interpreter. Users can type commands at the shell prompt, and the command will provide its output. For complex tasks, it may be useful to create a script that executes all the commands that are needed to run a task. Doing this is not complicated: just enter all commands you want to use as a list in the script. Also, to avoid any interpretation issues, it’s a good idea to include a “shebang” (#!) on the first line of the shell script. The shebang indicates which shell should be used while executing the commands in the script.
Listing 4-5 shows a sample script that is created to run two ad hoc commands.
Listing 4-5 Running Ad Hoc Commands from a Script
#!/bin/bash

ansible all -m yum -a "name=httpd state=latest"
ansible all -m service -a "name=httpd state=started enabled=yes"
If you put the sample lines in Listing 4-5 into a file, you can then run that file as a shell script.
To create a shell script, the file has few requirements. The contents must be plain ASCII text that is not formatted. The filename itself has no requirements, but many people like using the .sh file extension. This extension is not needed (the Linux operating system doesn’t work with extensions), but the extension may make it easier to recognize a script as a script file. If you agree to that statement, call your script file myscript.sh instead of myscript.
After creating the script code, you need to run it. To run a script, it needs to have the execute permission. The easiest way to apply that permission is to use chmod +x myscript.sh. This applies the execute permission to all users who currently have read permission to the file. Next, you can run the script.
To run a script from the current directory, you would normally use the command ./myscript.sh. In this command, the dot refers to the current directory. Using this dot is required if the current directory is not in the $PATH variable. If you want to run the script without having to enter the ./ first, you need to make sure it is in a directory that is in the $PATH variable. You can do that by copying the script to the /usr/local/bin directory, which is in the $PATH variable for normal users. In Exercise 4-4 you can practice writing a shell script that runs Ansible ad hoc commands.
Exercise 4-4 Running Ad Hoc Commands from a Script
1. From the directory that contains the inventory and ansible.cfg files, type vim setup.sh to create a setup script.
2. Make sure the script contains the following lines and save the file:
#!/bin/bash

ansible all -m yum -a "name=vsftpd state=installed"
ansible all -m service -a "name=vsftpd state=started enabled=yes"
3. Type chmod +x setup.sh to make the script file executable.
4. Type the command ./setup.sh to run the script and perform the selected tasks on the managed hosts.
Summary
In this chapter you learned how to work with ad hoc commands to set up managed hosts and to run quick checks on managed hosts. You also learned about Ansible modules and how to get information about Ansible modules using the appropriate tools. In the next chapter you’ll learn how to use playbooks, which allow you to work with Ansible in a consistent way.
Exam Preparation Tasks
As mentioned in the section “How to Use This Book” in the Introduction, you have a couple of choices for exam preparation: the exercises here, Chapter 16, “Final Preparation,” and the exam simulation questions on the companion website.
Review All Key Topics
Review the most important topics in this chapter, noted with the Key Topics icon in the outer margin of the page. Table 4-5 lists a reference of these key topics and the page numbers on which each is found.
![]()
Table 4-5 Key Topics for Chapter 4

Memory Tables
Print a copy of Appendix D, “Memory Tables” (found on the companion website), or at least the section for this chapter, and complete the tables and lists from memory. Appendix E, “Memory Tables Answer Key,” also on the companion website, includes completed tables and lists to check your work.
Define Key terms
Define the following key terms from this chapter, and check your answers in the glossary:
bash script
Review Questions
1. In what situations would you use ad hoc commands?
2. Which module should you use to install Python on a managed host?
3. Which module should you use to run the rpm -qa | grep httpd command?
4. On the RHCE exam, you cannot find the specific module to install software, so you decide to install software using the command module. Is that acceptable?
5. Which arguments should you use to start and enable the httpd service with the service module?
6. You use ansible-doc on the user module and find out that this module cannot create users on Windows. Which part of the documentation would you look at to find the command that needs to be used on Windows?
7. You are a Python programmer and want to optimize a module for use in your environment. Where do you get the module source code?
8. While executing a script that runs ad hoc commands, you get a “permission denied” error message. What is the most likely explanation?
9. How would you change the default module used in ad hoc commands?
10. What is the best way to get some examples of playbook code that can be used for a specific module?
End-of-Chapter Lab
In the end-of-chapter lab, this time you create a script that runs some ad hoc commands on managed hosts.
Lab 4-1
Create a script with the name install.sh that makes sure managed hosts meet the following requirements. It doesn’t matter if the hosts already meet the requirements; your script should be created such that it sets up a managed host according to these requirements if it has not yet been configured.
• Install the httpd web server.
• Start and enable the httpd web server.
• Create a user with the name anna.
• Copy the /etc/hosts file from the control machine to the /tmp/ directory on the managed host.