
Chapter 6. Working with Variables and Facts
This chapter covers the following subjects:
• Understanding the Use of Variables in Ansible Playbooks
• Using Vault to Manage Sensitive Values
• Capturing Command Output Using register
The following RHCE exam objectives are covered in this chapter:
• Understand core components of Ansible
• Variables
• Facts
• Create Ansible plays and playbook
• Use variables to retrieve the results of running a command
• Use advanced Ansible features
• Use Ansible Vault in playbooks to protect sensitive data
“Do I Know This Already?” Quiz
The “Do I Know This Already?” quiz allows you to assess whether you should read this entire chapter thoroughly or jump to the “Exam Preparation Tasks” section. If you are in doubt about your answers to these questions or your own assessment of your knowledge of the topics, read the entire chapter. Table 6-1 lists the major headings in this chapter and their corresponding “Do I Know This Already?” quiz questions. You can find the answers in Appendix A, “Answers to the ’Do I Know This Already?’ Quizzes and Exam Questions.”
Table 6-1 “Do I Know This Already?” Section-to-Question Mapping

1. A user wants to print the message “lisa is created,” where lisa refers to the value of a variable. How should this variable be written in the playbook YAML code?
a. “{{ ansible_user }}”
b. {{ ansible_user }}
c. ’{{ user }}’
d. “{{ user }}”
2. Which module is used to gather facts using an ad hoc command?
a. facter
b. setup
c. gather
d. collect
3. There are different valid methods to address the value of a fact. Which of the following should be considered the preferred way?
a. ansible_facts[’default_ipv4’][’address’]
b. ansible_facts.default_ipv4.address
c. ansible_default_ipv4.address
d. ansible_default_ipv4[’address’]
4. Custom facts have different requirements. Which of the following is not one of them?
a. Custom facts must be stored on the managed host in the directory /etc/ansible/facts.d.
b. Custom fact files must be executable.
c. Custom facts are written in INI or JSON format.
d. Custom fact files must use the .fact extension.
5. Which of the following variable names is correct?
a. my.file1
b. 1file
c. my_file1
d. my-file
6. Which of the following is not a valid way to define variables in a playbook?
a. Use vars_files: in the playbook header.
b. Create a file with the name group_vars/groupname that contains variables that apply to a host group.
c. Create a file with the name host_vars/hostname that contains variables that apply to a specific host.
d. Define the variables: key in the play header and give it a list value.
7. Which of the following is used as a magic variable and cannot be overwritten for that reason?
a. hostvars
b. host_groups
c. inventory
d. config_file
8. Which command can you use to change the password on an Ansible Vault-encrypted file?
a. ansible-vault change
b. ansible-vault rekey
c. ansible-vault create
d. ansible-vault password
9. Which option can you use with the ansible-vault command to decrypt multiple Ansible Vault-encrypted files with different passwords from one playbook?
a. --ask-vault-pass
b. --vault-id @prompt
c. --vault-password-file=password-file
d. Use --ask-vault-pass multiple times.
10. How can the result of a command be used as a variable in Ansible?
a. Get it from Ansible facts.
b. Use the command_facts module.
c. Use the register parameter.
d. Redirect the standard output to a file and analyze that.
Foundation Topics
Understanding the Use of Variables in Ansible Playbooks
Up to now you’ve learned how to work with playbooks. Although convenient, a playbook that just works with static data is not very impressive. That’s why using variables is important in Ansible. Variables are labels that refer to data that can be dynamically changed, and that makes Ansible really flexible, particularly when variables are used in combination with conditionals, as discussed in Chapter 7, “Using Task Control.” Before learning about variables and facts in detail, let’s look at the example in Listing 6-1 showing how variables are used.
Listing 6-1 Using Variables Example
---
- name: create a user using a variable
  hosts: ansible1
  vars:
    users: lisa
  tasks:
    - name: create a user {{ users }} on host {{ ansible_hostname }}
      user:
        name: "{{ users }}"
As you can see, the sample playbook in Listing 6-1 has a vars section. In this section, one variable is defined, using the common key: value syntax. Next, in the task definition the user module is used to work with this variable. To refer to the variable, you just place the name definition between double curly brackets. However, in the name argument to the user module, the variable is between double quotes and double curly braces. The reason is that the value in this case starts with the variable. If a value starts with a variable, the variable must be placed between double quotes. If more than just the variable name in the line specifies the value, the entire line that starts with the variable must be between double quotes.
Next you see the variable ansible_hostname, which is not defined anywhere. That is because this variable is an Ansible fact. Ansible facts are also used as variables, but they are variables that are automatically set, based on properties of the managed system. Fact discovery is used by default to discover all that Ansible possibly might want to know about a machine to use in conditionals. You don’t have to define facts; facts are a part of the system properties.
Listing 6-2 shows the command output when running this playbook.
Listing 6-2 Running the Listing 6-1 Sample Playbook
[ansible@control ~]$ ansible-playbook listing61.yaml

PLAY [create a user using a variable] ***********************************************************************

TASK [Gathering Facts] ***********************************************************************
ok: [ansible1]

TASK [create a user lisa on host ansible1] ******************************************************************
changed: [ansible1]

PLAY RECAP ***********************************************************************
ansible1                   : ok=2    changed=1    unreachable=0    failed=0    skipped=0    rescued=0    ignored=0
As shown in Listing 6-2, the ansible-playbook command shows the task description “create a user lisa on host ansible,” in which the variable defined in the playbook is used along with the Ansible fact ansible_hostname, which is the discovered variable that reveals system properties.
Working with Ansible Facts
In Ansible, there are three types of variables. Table 6-2 provides an overview.
Table 6-2 Ansible Variable Types Overview

Ansible facts are system properties that are collected when Ansible executes on a remote system. After facts are gathered, the facts can be used as variables. Apart from the system facts, which just exist as a system property, there are custom facts. These facts are defined by an administrator and stored as a file on the managed hosts. In the following sections, you learn how to work with facts on Ansible-managed systems. Magic Variables are specific system variables, which will be discussed later in this chapter.
Gathering Facts
When any Ansible playbook is used, it first gathers facts for all the managed hosts. This is done by an implicit fact gathering task in every playbook. The result of this process is stored in the ansible_facts variable. Let’s run the simple playbook in Listing 6-3 to analyze fact gathering.
Listing 6-3 Simple Playbook to Show Fact Gathering
---
- name: show fact gathering
  hosts: all
  tasks:
  - name: show all facts
    debug:
      var: ansible_facts
The playbook in Listing 6-3 collects all known facts about the managed hosts and stores them in the variable ansible_facts. To show how this process works, Listing 6-3 uses the debug module. This module can be used for debugging purposes, and it is used to either show a message or print the contents of a variable. In this case, the debug module prints all the contents of the multivalued variable ansible_facts; see Listing 6-4 for a partial result. Notice that when variables are referred to using the var argument to the debug module, the name of the variables doesn’t have to be between curly brackets and quotes. This is one of many exceptions that you may find while working with variables.
Listing 6-4 Fact Gathering Partial Result
TASK [show all facts] ***************************************************************************************
ok: [ansible1] => {
    "ansible_facts": {
        "_facts_gathered": true,
        "all_ipv4_addresses": [
            "192.168.122.1",
            "192.168.4.201"
        ],
        "all_ipv6_addresses": [
            "fe80::e564:5033:5dec:aead"
        ],
        "ansible_local": {},
        "apparmor": {
            "status": "disabled"
        },
        "architecture": "x86_64",
        "bios_date": "07/29/2019",
        "bios_version": "6.00",
        "cmdline": {
            "BOOT_IMAGE": "(hd0,msdos1)/vmlinuz-4.18.0-147.el8.x86_64",
            "crashkernel": "auto",
            "quiet": true,
            "rd.lvm.lv": "cl/swap",
            "resume": "/dev/mapper/cl-swap",
            "rhgb": true,
            "ro": true,
            "root": "/dev/mapper/cl-root"
        },
        "date_time": {
            "date": "2020-03-30",
            "day": "30",
            "epoch": "1585579970",
            "hour": "10",
            "iso8601": "2020-03-30T14:52:50Z",
            "iso8601_basic": "20200330T105250355357",
            "iso8601_basic_short": "20200330T105250",
            "iso8601_micro": "2020-03-30T14:52:50.355419Z",
            "minute": "52",
            "month": "03",
            "second": "50",
            "time": "10:52:50",
            "tz": "EDT",
            "tz_offset": "-0400",
            "weekday": "Monday",
            "weekday_number": "1",
            "weeknumber": "13",
            "year": "2020"
        },
        "default_ipv4": {
            "address": "192.168.4.201"
The result of fact gathering is stored in a multivalued variable with the name ansible_facts, which is organized as a dictionary (see the “Using Multivalued Variables” section). To address specific values in this dictionary, you can use two formats:
![]()
• Notation with square brackets: ansible_facts[’default_ipv4’][’address’]
• Dotted notation: ansible_facts.default_ipv4.address
Of these two notations, the notation with the square brackets is preferred.
As you can see when browsing through the result of Ansible fact gathering, a wide range of facts is collected. Table 6-3 provides an overview of some of the most commonly used facts.
![]()
Table 6-3 Commonly Used Ansible Facts
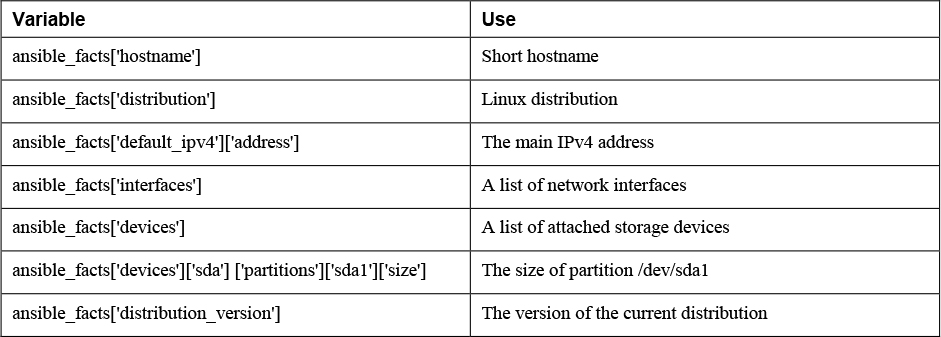
Note that Ansible gathers a lot of facts by default. Some information is not included, though, and if that type of information is needed, it may be collected using additional modules. For an overview of all available modules for gathering specific types of facts, type ansible-doc -l | grep fact. This command shows that a wide range of fact gathering modules is available. One of these modules is package_facts, which collects information about software packages installed on managed hosts.
Understanding How Facts Are Displayed
![]()
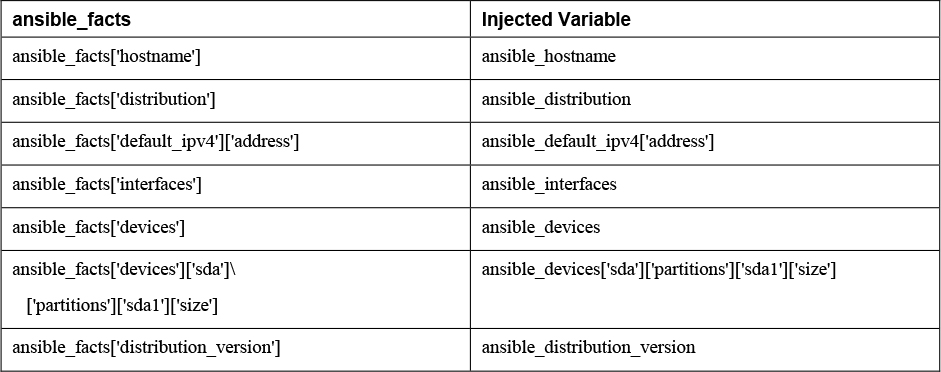
While working with facts, you may encounter two different ways in which facts are displayed. In the current way, all facts are stored in a dictionary with the name ansible_facts, and items in this dictionary are addressed using the notation with square brackets, which can be seen in Table 6-3. In the old way, Ansible facts were injected as individual variables, which were prefixed with the string ansible_ (like ansible_hostname), allowing the variables to be addressed individually. This approach is known as injected variables.
The confusing thing is that the old approach and the new approach both still occur. Compare, for instance, the output of the ansible ansible1 -m setup command shown in Listing 6-5 with the output of the playbook that displays contents of the ansible_fact variable, which you saw in Listing 6-4. As you can see, in Listing 6-5 Ansible facts are injected as variables.
Listing 6-5 ansible -m setup Shows Facts Injected as Variables
ansible1 | SUCCESS => {
    "ansible_facts": {
        "ansible_all_ipv4_addresses": [
            "192.168.122.1",
            "192.168.4.201"
        ],
        "ansible_all_ipv6_addresses": [
            "fe80::e564:5033:5dec:aead"
        ],
        "ansible_apparmor": {
            "status": "disabled"
        },
        "ansible_architecture": "x86_64",
        "ansible_bios_date": "07/29/2019",
        "ansible_bios_version": "6.00",
        "ansible_cmdline": {
            "BOOT_IMAGE": "(hd0,msdos1)/vmlinuz-4.18.0-147.el8.x86_64",
            "crashkernel": "auto",
            "quiet": true,
            "rd.lvm.lv": "cl/swap",
            "resume": "/dev/mapper/cl-swap",
            "rhgb": true,
            "ro": true,
            "root": "/dev/mapper/cl-root"
        },
        "ansible_date_time": {
            "date": "2020-03-31",
            "day": "31",
            "epoch": "1585645366",
            "hour": "05",
            "iso8601": "2020-03-31T09:02:46Z",
            "iso8601_basic": "20200331T050246844129",
            "iso8601_basic_short": "20200331T050246",
            "iso8601_micro": "2020-03-31T09:02:46.844200Z",
            "minute": "02",
            "month": "03",
            "second": "46",
            "time": "05:02:46",
            "tz": "EDT",
            "tz_offset": "-0400",
            "weekday": "Tuesday",
            "weekday_number": "2",
            "weeknumber": "13",
            "year": "2020"
        },
        "ansible_default_ipv4": {
            "address": "192.168.4.201",
            "alias": "ens33",
            "broadcast": "192.168.4.255",
            "gateway": "192.168.4.2",
            "interface": "ens33",
            "macaddress": "00:0c:29:1f:c1:23",
            "mtu": 1500,
            "netmask": "255.255.255.0",
            "network": "192.168.4.0",
            "type": "ether"
        },
When you are working with facts, the recommended way is to use the ansible_facts variable, not injected facts, because at some point, injected variables won’t be supported anymore. Table 6-4 shows how injected variables compare to the new ansible_facts style to address variables.
Table 6-4 Comparing ansible_facts Versus Injected Facts as Variables
Listing 6-6 and Listing 6-7 show two playbooks. Listing 6-6 addresses facts in the old way, and Listing 6-7 addresses the facts using the new way, using the ansible_facts variable. To make sure you understand that different notations can be used in either method, the listings address the facts in dotted notation, not in the notation with square brackets.
Listing 6-6 Addressing Facts with Injected Variables
---
- hosts: all
  tasks:
  - name: show IP address
    debug:
      msg: >
        This host uses IP address {{ ansible_default_ipv4.address }}
Listing 6-7 Addressing Facts Using the ansible_facts Variable
---
- hosts: all
  tasks:
  - name: show IP address
    debug:
      msg: >
        This host uses IP address {{ ansible_facts.default_ipv4.address }}
Tip
If, for some reason, you want the method where facts are injected into variables to be the default method, you can use inject_facts_as_vars=true in the [default] section of the ansible.cfg file.
Because there are many different ways to refer to facts, they may be quite confusing. Let’s finish this section with an overview of all options:
![]()
• In Ansible versions since 2.5, all facts are stored in one variable: ansible_facts. This method is used while gathering facts from a playbook
• Before Ansible version 2.5, facts were injected into variables such as ansible_hostname. This method is used by the setup module. (Note that this may change in future versions of Ansible.)
• Facts can be addressed in dotted notation: {{ ansible_facts.default_ipv4.address }}.
• Alternatively, facts can be addressed in square brackets notation: {{ ansible_facts[’default_ipv4’][’address’] }}. This notation is preferred.
Managing Fact Gathering
By default, upon execution of each playbook, facts are gathered. This does slow down playbooks, and for that reason, it is possible to disable fact gathering completely. To do so, you can use the gather_facts: no parameter in the play header. If later in the same playbook it is necessary to gather facts, you can do this by running the setup module in a task.
Even if it is possible to disable fact gathering for all of your Ansible configuration, this practice is not recommended. Too many playbooks use conditionals that are based on the current value of facts, and all of these conditionals would stop working if fact gathering were disabled altogether.
As an alternative to make working with facts more efficient, you can disable a fact cache. To do so, you need to install an external plug-in. Currently, two plug-ins are available for this purpose: jsonfile and redis. To configure fact caching using the redis plug-in, you need to install it first. Next, you can enable fact caching through ansible.cfg. The following procedure describes how to do this:
1. Use yum install redis.
2. Use service redis start.
3. Use pip install redis.
4. Edit /etc/ansible/ansible.cfg and ensure it contains the following parameters:
[defaults]
gathering = smart
fact_caching = redis
fact_caching_timeout = 86400
Note
Fact caching can be convenient but should be used with caution. If, for instance, a playbook installs a certain package only if a sufficient amount of disk space is available, it should not do this based on information that may be up to 24 hours old. For that reason, using a fact cache is not recommended in many situations.
Working with Custom Facts
Apart from the facts that can be gathered in all cases, Ansible also offers an option to work with custom facts. A custom fact is used to provide a host with arbitrary values that Ansible can use to change the behavior of plays. Custom facts can be provided as static files. These files must be in either INI or JSON format, have the extension .fact, and on the managed hosts must be stored in the /etc/ansible/facts.d directory.
Alternatively, custom facts can be generated by a script, and in that case the only requirement is that the script must generate its output in JSON format. Dynamic custom facts are useful because they allow the facts to be determined at the moment that a script is running. Listing 6-8 provides an example of a static custom fact file.
Listing 6-8 Custom Facts Sample File
[packages]
web_package = httpd
ftp_package = vsftpd

[services]
web_service = httpd
ftp_service = vsftpd
To get the custom facts files on the managed hosts, you can use a playbook. Listing 6-9 provides an example of a playbook that copies a local custom fact file (existing in the current Ansible project directory) to the appropriate location on the managed hosts. Notice that this playbook uses variables, which are explained in more detail in the section titled “Working with Variables.”
Listing 6-9 Sample Playbook to Copy Custom Facts
---
- name: Install custom facts
  hosts: all
  vars:
    remote_dir: /etc/ansible/facts.d
    facts_file: listing68.fact
  tasks:
  - name: create remote directory
    file:
      state: directory
      recurse: yes
      path: "{{ remote_dir }}"
  - name: install new facts
    copy:
      src: "{{ facts_file }}"
      dest: "{{ remote_dir }}"
Custom facts are stored in the variable ansible_facts.ansible_local. In this variable, you use the filename of the custom fact file and the label in the custom fact file. For instance, after you run the playbook in Listing 6-9, the web_package fact that was defined in listing68.fact is accessible as
{{ ansible_facts[’ansible_local’][’listing67’][’packages’][’web_package’] }}
To verify, you can use the setup module with the filter argument. Notice that because the setup module produces injected variables as a result, the ad hoc command to use is ansible all -m setup -a “filter=ansible_local”. The command ansible all -m setup -a “filter=ansible_facts[’ansible_local’]” does not work. In Exercise 6-1 you practice working with facts.
Exercise 6-1 Working with Ansible Facts
1. Create a custom fact file with the name custom.fact and the following contents:
[software]
package = httpd
service = httpd
state = started
enabled = true
2. Write a playbook with the name copy_facts.yaml and the following contents:
---
- name: copy custom facts
  hosts: ansible1
  tasks:
  - name: create the custom facts directory
    file:
      state: directory
      recurse: yes
      path: /etc/ansible/facts.d
  - name: copy the custom facts
    copy:
      src: custom.fact
      dest: /etc/ansible/facts.d
3. Apply the playbook using ansible-playbook copy_facts.yaml.
4. Check the availability of the custom facts by using ansible all -m setup -a “filter=ansible_local”.
5. Use an ad hoc command to ensure that the httpd service is not installed on any of the managed servers: ansible all -m yum -a “name=httpd state=absent”.
6. Create a playbook with the name setup_with_facts.yaml that installs and enables the httpd service, using the custom facts:
---
- name: install and start the web service
  hosts: ansible1
  tasks:
  - name: install the package
    yum:
      name: "{{ ansible_facts[’ansible_local’][’custom’][’software’][’package’] }}"
      state: latest
  - name: start the service
    service:
      name: "{{ ansible_facts[’ansible_local’][’custom’][’software’][’service’] }}"
      state: "{{ ansible_facts[’ansible_local’][’custom’][’software’][’state’] }}"
      enabled: "{{ ansible_facts[’ansible_local’][’custom’][’software’][’enabled’] }}"
7. Run the playbook to install and set up the service by using ansible-playbook setup_with_facts.yaml.
8. Use an ad hoc command to verify the service is running: ansible ansible1 -a “systemctl status httpd”.
Working with Variables
In the previous section you learned how you can use Ansible facts to work with dynamic values that are based on something that exists on a managed host. In this section you learn about variables. Variables in general are used to separate static data from dynamic data. By putting the dynamic data in variables, you make it easier to manage the dynamic data, in particular if the variables are excluded from external files.
Variables can be used to refer to a wide range of dynamic data, such as names of files, services, packages, users, URLs to specific servers, and much more.
Defining Variables
To define a variable, you can just use the key: value structure in a vars section in the play header. Other ways to define and include variables are discussed later in this section. A variable definition may look like the sample in Listing 6-10.
Listing 6-10 Defining Variables in a Playbook Header
---
- name: using variables
  hosts: ansible1
  vars:
    ftp_package: vsftpd
  tasks:
  - name: install package
    yum:
      name: "{{ ftp_package }}"
      state: latest
In the example in Listing 6-10, a vars section is included in the play header to define the variable ftp_package. This variable is next referred to in the yum task. As the variable is the first item in the value, its name must be placed between double curly brackets as well as double quotes.
When you define variables, there are a few requirements:
![]()
• Variable names must start with a letter.
• Variable names are case sensitive.
• Variable names can contain only letters, numbers, and underscores.
Using Include Files
When you are defining variables, you can define them all in the header of the play. For small playbooks this approach can work fine, but as a playbook grows bigger and gets more complex, you can easily lose oversight. For that reason, it is common to define variables in include files. Specific host and host group variables can be used as include files (see the section “Managing Host and Group Variables” later in this chapter), but it’s also possible to include an arbitrary file as a variable file, using the vars_files: statement. Notice that the vars_files: parameter can have a single value or a list providing multiple values. If a list is used, each item needs to start with a dash; see the “Using Multivalued Variables” section for more information about using lists.
When you include variables from files, it’s a good idea to work with a separate directory that contains all variables because that makes it easier to manage as your projects grow bigger.
Listing 6-11 shows a sample playbook, where the line vars_files: vars/common is used to include variables defined in the file vars/common, for which contents are displayed in Listing 6-12.
Listing 6-11 Using a Variable Include File
---
- name: using a variable include file
  hosts: ansible1
  vars_files: vars/common
  tasks:
  - name: install package
    yum:
      name: "{{ my_package }}"
      state: latest
Listing 6-12 Variable Include File Contents
my_package: nmap
my_ftp_service: vsftpd
my_file_service: smb
Among the most important benefits of using variable include files is the option to manage variables from one central location. If variables are defined in individual playbooks, they are spread all over, and it may be difficult to get an overview of all variables that are used on a site. When you put variables in variable files, it’s much easier to manage them in a consistent way and to guarantee that the same variables are used throughout a site.
Managing Host and Group Variables
In some cases you might want to set variables for specific hosts or specific host groups. You can do this by using host_vars and group_vars inclusions. In older versions of Ansible, it was common to set host variables and group variables in inventory, but this practice is now deprecated.
If you want to use host variables, you must create a subdirectory with the name host_vars within the Ansible project directory. In this directory, create a file that matches the inventory name of the host to which the variables should be applied. So the variables for host ansible1 are defined in host_vars/ansible1. To use host group variables, you use a similar approach. To start, you create a directory with the name group_vars. In this directory, a file with the name of the host group is created, and in this file all variables are defined. So if you want to define variables for the host group web servers, you need to create a file with the name group_vars/webservers. In Exercise 6-2 you practice working with host and host group variables.
Exercise 6-2 Using Host and Host Group Variables
1. Create a project directory in your home directory. Type mkdir ~/chapter6 to create the chapter6 project directory, and use cd ~/chapter6 to go into this directory.
2. Type cp ../ansible.cfg . to copy the ansible.cfg file that you used before. No further modifications to this file are required.
3. Type vim inventory to create a file with the name inventory, and ensure it has the following contents:
[webservers]
ansible1

[dbservers]
ansible2
4. Create the file webservers.yaml, containing the following contents. Notice that nothing is really changed by running this playbook. It just uses the debug module to show the current value of the variables.
---
- name: configure web services
  hosts: webservers
  tasks:
  - name: this is the {{ web_package }} package
    debug:
      msg: "Installing {{ web_package }}"
  - name: this is the {{ web_service }} service
    debug:
      msg: "Starting the {{ web_service }}"
5. Create the file group_vars/webservers with the following contents:
web_package: httpd
web_service: httpd
6. Run the playbook with some verbosity to verify it is working by using ansible-playbook -vv webservers.yaml.
As you saw in Exercise 6-2, the host group variables are automatically picked up, even if there is not any specific reference to the file that should be included anywhere in the playbook.
Note
Using host and host group variables this way is efficient, but at the same time it’s confusing. In Ansible it’s possible to get variables and other contents from multiple locations, and because the group_vars and host_vars locations are not specified in the playbook, it’s easy to overlook where they are coming for. Therefore, it’s a good idea to analyze the entire project directory to understand what is happening in a playbook. And using these includes is also one reason why it makes sense to work with project directories and to ensure that these project directories don’t become too big.
Using Multivalued Variables
When you work with variables in Ansible, it is common to work with multivalued variables. Two types of multivalued variables can be used: the array (also known as a list) and the dictionary (also known as a hash). Each of these has its own specific use cases.
In variable definition, a list (also known as an array) is a key that can have multiple items as its value. Each item in a list starts with a dash (-). Individual items in a list can be addressed using the index number (starting at zero), as in {{ users[1] }} (which would print the key-value pairs that are set for user lisa). Listing 6-13 shows an example of a variable that is defined as an array.
Listing 6-13 Array Example
users:
  - linda:
    username: linda
    homedir: /home/linda
    shell: /bin/bash
  - lisa:
    username: lisa
    homedir: /home/lisa
    shell: /bin/bash
  - anna:
    username: anna
    homedir: /home/anna
    shell: /bin/bash
In Python, a dictionary (also known as a hash) is an unordered collection of items, a collection of key-value pairs. In Python, a dictionary is defined as my_dict = { key1: ’car’, key2:’bike’ }. Because it is based on Python, Ansible lets users use dictionaries as an alternative notation to arrays, though dictionaries are not as common in use as arrays. Items in values in a dictionary are not started with a dash. Using dictionaries is one way; the alternative is to use a list. Listing 6-14 shows an example of a variable that is defined as a dictionary.
Listing 6-14 Dictionary Example
users:
  linda:
    username: linda
    homedir: /home/linda
    shell: /bin/bash
  lisa:
    username: lisa
    homedir: /home/lisa
    shell: /bin/bash
  anna:
    username: anna
    homedir: /home/anna
    shell: /bin/bash
Using multivalued variables is particularly useful in combination with task control structures such as loops because this allows you to iterate through the multiple values of the variable. Read Chapter 7 for more examples about this. Listing 6-15 shows a sample playbook that uses the debug module to show how to address different keys in a dictionary multivalued variable.
Listing 6-15 Addressing Specific Keys in a Dictionary Multivalued Variable
---
- name: show dictionary also known as hash
  hosts: ansible1
  vars_files:
  - vars/users-dictionary
  tasks:
  - name: print dictionary values
    debug:
      msg: "User {{ users.linda.username }} has homedirectory {{ users.linda.homedir }} and shell {{ users.linda.shell }}"
As you saw in “Working with Ansible Facts,” multivalued variables can be addressed in two ways. In Listing 6-14 the dotted notation is used. In Listing 6-16 you can see how to use the square brackets notation as an alternative. Of these two notations, the recommendation is to use the notation with square brackets.
Listing 6-16 Using the Square Brackets Notation to Address Multivalued Variables
---
- name: show dictionary also known as hash
  hosts: ansible1
  vars_files:
    - vars/users-dictionary
  tasks:
    - name: print dictionary values
      debug:
        msg: "User {{ users[’linda’][’username’] }} has homedirectory {{ users[’linda’][’homedir’] }} and shell {{ users[’linda’][’shell’]  }}"
Working with Magic Variables
Apart from the variables that can be set by the Ansible user or administrator and the variables that are discovered as Ansible facts, there are also the so-called magic variables. Magic variables are variables that are set automatically by Ansible to reflect an Ansible internal state. There are about 30 magic variables; Table 6-5 shows an overview of some of the most important magic variables.
Table 6-5 Magic Variables Overview
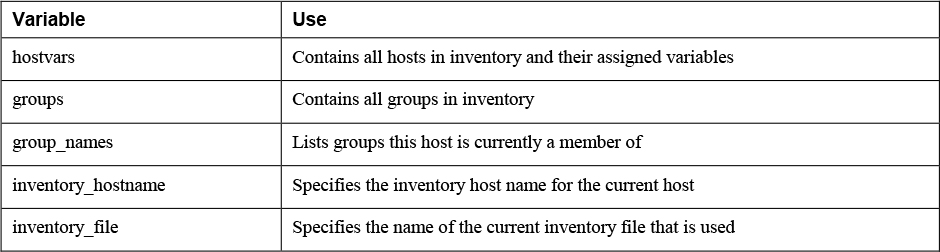
The most important thing that you should remember about magic variables is that you cannot use their name for anything else. If you try to set a magic variable to another value anyway, it always resets to the default internal value. So don’t try to set your own variable groups to store usergroups; the variable groups is already used as a magic variable! In Listing 6-17 you can see how the debug module is used to show the current values assigned to the hostvars magic variable. As you can see, this variable shows many settings that you can change by modifying the ansible.cfg configuration file. If local facts are defined on the host, you will see them also.
Listing 6-17 Using the debug Module to Show Hostvars Variables
[ansible@control ~]$ ansible localhost -m debug -a ’var=hostvars["ansible1"]’
localhost | SUCCESS => {
    "hostvars["ansible1"]": {
        "ansible_check_mode": false,
        "ansible_diff_mode": false,
        "ansible_facts": {},
        "ansible_forks": 5,
        "ansible_inventory_sources": [
            "/home/ansible/inventory"
        ],
        "ansible_playbook_python": "/usr/bin/python3.6",
        "ansible_verbosity": 0,
        "ansible_version": {
            "full": "2.9.5",
            "major": 2,
            "minor": 9,
            "revision": 5,
            "string": "2.9.5"
        },
        "group_names": [
            "ungrouped"
        ],
        "groups": {
            "all": [
                "ansible1",
                "ansible2"
            ],
            "ungrouped": [
                "ansible1",
                "ansible2"
            ]
        },
        "inventory_dir": "/home/ansible",
        "inventory_file": "/home/ansible/inventory",
        "inventory_hostname": "ansible1",
        "inventory_hostname_short": "ansible1",
        "omit": "__omit_place_holder__38849508966537e44da5c665d4a784c3bc0060de",
        "playbook_dir": "/home/ansible"
    }
}
Understanding Variable Precedence
With all the different locations where variables can be set, it’s important to know what happens if variables are set at multiple levels. Understanding variable precedence is not always easy because they can be set at so many different levels. The most important advice is to just keep it simple and avoid using variables with the same names that are defined at different levels. That way, you avoid having to think about variable precedence.
If a variable with the same name is defined at different levels anyway, the most specific variable always wins. Variables that are defined while running the playbook command using the -e key=value command-line argument have the highest precedence. After variables that are passed as command-line options, playbook variables are considered. Next are variables that are defined for inventory hosts or host groups. Consult the Ansible documentation item “Variable precedence” for more details and an overview of the 22 different levels where variables can be set and how precedence works for them.
Variable Precedence Overview
![]()
1. Variables passed on the command line
2. Variables defined in or included from a playbook
3. Inventory variables
Using Vault to Manage Sensitive Values
Sometimes, you must deal with sensitive data when working with Ansible—think about webkeys, passwords, and other types of sensitive data that you really shouldn’t store as plain text in a playbook. Ansible Vault is the solution to that problem. You can use Ansible Vault to encrypt and decrypt sensitive data to make it unreadable, and only while accessing data does it ask for a password so that it is decrypted.
Understanding Vault
Ansible may need to access environments where passwords, webkeys, or other authentication tokens are needed. Storing these elements as plain text in a playbook would be a huge risk, so Ansible Vault is the solution. Ansible Vault can be used to encrypt and decrypt any data file in Ansible.
The following approach is used while working with Ansible Vault:
![]()
1. Sensitive data is stored as values in variables in a separate variable file.
2. The variable file is encrypted, using the ansible-vault command.
3. While accessing the variable file from a playbook, you enter a password to decrypt.
Managing Encrypted Files
The foundation of working with Ansible Vault is the creation of encrypted files. When the command ansible-vault create secret.yaml is used, Ansible Vault prompts for a password and then opens the file using the default editor. Alternatively, the password can be provided in a password file. In that case, the password file must be really well protected (for example, by putting it in the user root home directory). If a password file is used, the encrypted variable file can be created using ansible-vault create --vault-password-file=passfile secret.yaml.
Apart from using ansible-vault create to create a new encrypted file, you can use the command ansible-vault encrypt to encrypt one or more existing files. The encrypted file can next be used from a playbook, where a password needs to be entered to decrypt. Alternatively, the ansible-vault decrypt command can be used to decrypt the file. Table 6-6 gives an overview of the most commonly used ansible-vault commands.
Table 6-6 ansible-vault Command Options

Using Vault in Playbooks
When a Vault-encrypted file is accessed from a playbook, a password must be entered. To have the ansible-playbook command prompt for a password, you need to tell the appropriate option. The option --vault-id @prompt provides the most elegant option, where the ansible-playbook command prompts for a password for each of the Vault-encrypted files that may be used.
Using --vault-id @prompt enables a playbook to work with multiple Vault-encrypted files where these files are allowed to have different passwords set. If all Vault-encrypted files a playbook refers to have the same password set, you can use the command ansible-playbook --ask-vault-pass.
Alternatively, you can use the command ansible-playbook --vault-password-file=secret to obtain the Vault password from a password file. The password file should contain a string that is stored as a single line in the file. Make sure the vault password file is protected through file permissions, such that it is not accessible by unauthorized users!
Managing Files with Sensitive Variables
When you work with Vault-encrypted variable files, it’s good practice to separate files containing unencrypted variables from files that contain encrypted variables. A good approach to do so is to use group_vars and host_vars variable inclusion. You read earlier that in the group_vars directory, a file with the name of a host group can be used. Likewise, in the host_vars directory, a file with the name of a host can be created.
While separating encrypted variables from unencrypted files, you may create a directory (instead of a file) with the name of the host or host group. Next, within that directory you can create a file with the name vars, which contains unencrypted variables, and a file with the name vault, which contains Vault-encrypted variables. Alternatively, Vault-encrypted variables can be included from a file using the vars_files parameter. In Exercise 6-3 you practice your skills working with Ansible Vault.
Exercise 6-3 Working with Ansible Vault
1. Create a secret file containing encrypted values for a variable user and a variable password by using ansible-vault create secrets.yaml. Set the password to password and enter the following lines:
username: bob
pwhash: password
Note
When creating users, you cannot provide the password in plain text; it needs to be provided as a hashed value. Because this exercise focuses on the use of Vault, the password is not provided as a hashed value, and as a result, a warning is displayed. You may ignore this warning. In Chapter 13, “Managing Users,” you’ll learn how to create users with a password provided as a properly hashed value.
2. Create the file create-users.yaml and provide the following contents:
---
- name: create a user with vaulted variables
  hosts: ansible1
  vars_files:
    - secrets.yaml
  tasks:
  - name: creating user
    user:
      name: "{{ username }}"
      password: "{{ pwhash }}"
3. Run the playbook by using ansible-playbook --ask-vault-pass create-users.yaml. Provide the password when asked for it.
4. Change the current password on secrets.yaml by using ansible-vault rekey secrets.yaml and set the new password to secretpassword.
5. To automate the process of entering the password, use echo secretpassword > vault-pass.
6. Use chmod 400 vault-pass to ensure the file is readable for the ansible user only; this is about as much as you can do to secure the file.
7. Verify that it’s working by using ansible-playbook --vault-password-file=vault-pass create-users.yaml.
Capturing Command Output Using register
Variables can be set by the user or the Ansible administrator. Alternatively, the result of commands can be used as a variable, using the register parameter in a task. Let’s look at the example in Listing 6-18 to understand how it works:
Listing 6-18 Sample Playbook That Uses register
---
- name: test register
  hosts: ansible1
  tasks:
  - shell: cat /etc/passwd
    register: passwd_contents
  - debug:
      var: "passwd_contents"
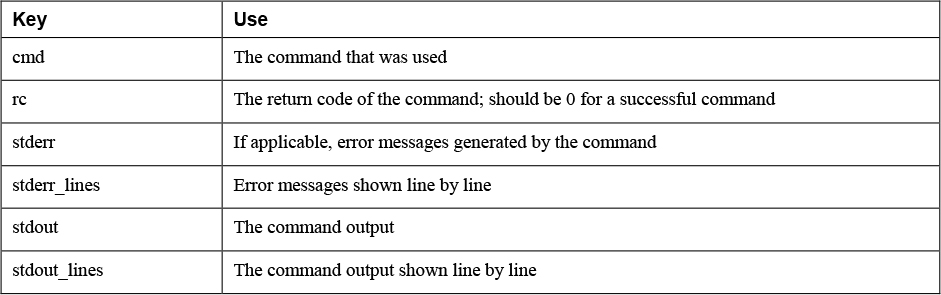
In the sample playbook in Listing 6-18, the cat /etc/passwd command is executed by the shell module. Notice that in this playbook no names are used for tasks. Using names for tasks is not mandatory; it’s just recommended in more complex playbooks because this convention makes identification of the tasks easier. The entire contents of the command are next stored in the variable passwd_contents. This variable contains the output of the command, stored in different keys. Table 6-7 provides an overview of the most useful keys, and Listing 6-19 shows the partial result of the ansible-playbook listing618.yaml command.
Table 6-7 Keys Used with register
Listing 6-19 Partial Result of Running ansible-playbook listing618.yaml
[ansible@control ~]$ ansible-playbook listing618.yaml

PLAY [test register] *******************************************************************

TASK [Gathering Facts] *****************************************************************
ok: [ansible2]
ok: [ansible1]

TASK [shell] ***************************************************************************
changed: [ansible2]
changed: [ansible1]

TASK [debug] ***************************************************************************
ok: [ansible1] => {
    "passwd_contents": {
        "changed": true,
        "cmd": "cat /etc/passwd",
        "delta": "0:00:00.004149",
        "end": "2020-04-02 02:28:10.692306",
        "failed": false,
        "rc": 0,
        "start": "2020-04-02 02:28:10.688157",
        "stderr": "",
        "stderr_lines": [],
        "stdout": "root:x:0:0:root:/root:/bin/bash
bin:x:1:1:bin:/bin:/sbin/nologin
daemon:x:2:2:daemon:/sbin:/sbin/nologin
adm:x:3:4:adm:/var/adm:/sbin/nologin
lp:x:4:7:lp:/var/spool/lpd:/sbin/nologin
sync:x:5:0:sync:/sbin:/bin/sync
shutdown:x:6:0:shutdown:/sbin:/sbin/shutdown
halt:x:7:0:halt:/sbin:/sbin/halt
ansible:x:1000:1000:ansible:/home/ansible:/bin/bash
apache:x:48:48:Apache:/usr/share/httpd:/sbin/nologin
linda:x:1002:1002::/home/linda:/bin/bash
lisa:x:1003:1003::/home/lisa:/bin/bash",
        "stdout_lines": [
            "root:x:0:0:root:/root:/bin/bash",
            "bin:x:1:1:bin:/bin:/sbin/nologin",
            "daemon:x:2:2:daemon:/sbin:/sbin/nologin",
            "adm:x:3:4:adm:/var/adm:/sbin/nologin",
            "lp:x:4:7:lp:/var/spool/lpd:/sbin/nologin",
            "sync:x:5:0:sync:/sbin:/bin/sync",
            "shutdown:x:6:0:shutdown:/sbin:/sbin/shutdown",
            "halt:x:7:0:halt:/sbin:/sbin/halt",
            "ansible:x:1000:1000:ansible:/home/ansible:/bin/bash",
            "apache:x:48:48:Apache:/usr/share/httpd:/sbin/nologin",
            "linda:x:1002:1002::/home/linda:/bin/bash",
            "lisa:x:1003:1003::/home/lisa:/bin/bash"
        ]
    }
}
Using register is particularly useful in combination with conditionals, as discussed in Chapter 7. While doing so, you can ensure that a task runs only if a command produces a specific result.
Notice that register shows the values that are returned by specific tasks. Tasks have common return values, but modules may have specific return values. That means you cannot assume, based on the result of an example using a specific module, that the return values you see are available for all modules. Consult the module documentation for more information about specific return values.
Summary
In this chapter you learned how to work with variables in many different ways. First you read about Ansible facts, the variables that are automatically set to contain many different system parameters. You also read how to use Ansible facts to set local variables on a host, using custom facts. Next, you explored working with variables and saw how single-valued as well as multivalued variables can be used. After that you read how to secure variables using Ansible Vault, and in the last part of this chapter, you saw how the register parameter can be used to store the result of a command that is used in a playbook.
Exam Preparation Tasks
As mentioned in the section “How to Use This Book” in the Introduction, you have a couple of choices for exam preparation: the exercises here, Chapter 16, “Final Preparation,” and the exam simulation questions on the companion website.
Review All Key Topics
Review the most important topics in this chapter, noted with the Key Topics icon in the outer margin of the page. Table 6-8 lists a reference of these key topics and the page numbers on which each is found.
![]()
Table 6-8 Key Topics for Chapter 6

Memory Tables
Print a copy of Appendix D, “Memory Tables” (found on the companion website), or at least the section for this chapter, and complete the tables and lists from memory. Appendix E, “Memory Tables Answer Key,” also on the companion website, includes completed tables and lists to check your work.
Define Key Terms
Define the following key terms from this chapter, and check your answers in the glossary:
Review Questions
1. What are the two requirements for working with custom facts?
2. Which module is used to enable fact gathering or to run fact gathering manually?
3. What needs to be done to use a fact cache?
4. How can you include a variables file in a playbook?
5. How do you set variables that apply to a group of hosts as defined in the inventory?
6. Which type of multivalued variable should you use if you want to use a loop to parse through the different values?
7. Which magic variable can be used to request current settings for variables on a specific host?
8. How do you change the password on a file that has been encrypted with ansible-vault?
9. How can a Vault-encrypted file that contains variables be assigned to hosts in a specific inventory host group?
10. You have used register in a playbook to register the result of a command in a variable cmd_result. How would you show the exit code of the command in a playbook?
End-of-Chapter Lab
Now that we’re at the end of this chapter, it’s time to do a more complex end-of-chapter lab. This lab consists of two parts: in the first part, you work with custom facts, and in the second part, you use the custom facts in a second playbook.
Lab 6-1
Configure a playbook that works with custom facts and meets the following requirements:
• Use the project directory chapter6.
• Create an inventory file where ansible1 is member of the host group named file and ansible2 is member of the host group named lamp.
• Create a custom facts file that contains a section named packages and set the following variables:
smb_package = samba
ftp_package = vsftpd
db_package = mariadb
web_package = httpd
firewall_package = firewalld
• Create another custom facts file that contains a section named services and set the following variables:
smb_service = smbd
ftp_service = vsftpd
db_service = mariadb
web_service = httpd
firewall_service = firewalld
• Create a playbook with the name copy_facts.yaml that copies these facts to all managed hosts. In this playbook define a variable remote_dir to specify the directory the fact files should be copied to. Use the variable fact_file to copy the fact files to the appropriate directories.
• Run the playbook and verify whether it works.
Lab 6-2
After copying over the facts files, create a playbook that uses the facts to set up the rest of the environment. Make sure it meets the following requirements:
• Use a variable inclusion file with the name allvars.yaml and set the following variables:
web_root = /var/www/html
ftp_root = /var/ftp
• Create a playbook that sets up the file services and the web services. Also ensure the playbook opens the firewalld firewall to provide access to these servers.
• Make sure the webservice provides access to a file index.html, which contains the text “Welcome to the Ansible Web Server.”
• Run the playbook and use ad hoc commands to verify that the services have been started.