
Chapter 10. Using Ansible in Large Environments
This chapter covers the following subjects:
• Optimizing Ansible Processing
• Including and Importing Files
The following RHCE exam objectives are covered in this chapter:
• Install and configure an Ansible control node
• Create a static host inventory file
• Manage parallelism
“Do I Know This Already?” Quiz
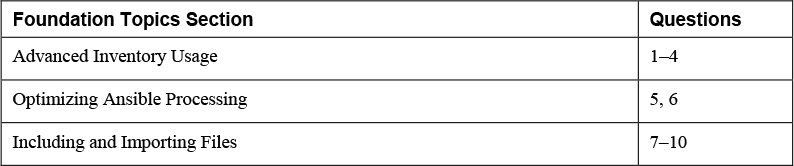
The “Do I Know This Already?” quiz allows you to assess whether you should read this entire chapter thoroughly or jump to the “Exam Preparation Tasks” section. If you are in doubt about your answers to these questions or your own assessment of your knowledge of the topics, read the entire chapter. Table 10-1 lists the major headings in this chapter and their corresponding “Do I Know This Already?” quiz questions. You can find the answers in Appendix A, “Answers to the ’Do I Know This Already?’ Quizzes and Exam Questions.”
Table 10-1 “Do I Know This Already?” Section-to-Question Mapping
1. Which of the following host name patterns is invalid?
a. webservers*
b. 192.168.4.200,web1
c. all,!web1
d. web&,file
2. Dynamic inventory scripts can be used in many environments. Which of the following environments is not supported?
a. Red Hat Satellite
b. Active Directory
c. OpenStack
d. None of the above
3. The ansible-inventory command can be used with different options. Which of the following is not one of them?
a. --list
b. --graph
c. --host
d. --all
4. Dynamic inventory scripts have some requirements. Which of the following is not one of them?
a. Is written in Python
b. Produces output in JSON format
c. Implements a --list option
d. Implements a --host <hostname> option
5. How would you make sure that all tasks in one specific playbook are fully executed on a group of three hosts before moving over to the next group of three hosts?
a. Use forks: 3 in ansible.cfg.
b. Start the play using the --forks 3 parameter.
c. Use serial: 3 in ansible.cfg.
d. Use serial: 3 in the play header.
6. How would you improve performance and make sure that tasks can be executed on 50 hosts simultaneously?
a. Use forks: 50 in ansible.cfg.
b. Start the play using the --forks 50 parameter.
c. Use serial: 50 in ansible.cfg.
d. Use serial: 50 in the play header.
7. Which solution should you use if contents from an external file need to be processed in a playbook if a specific condition is true?
a. Role
b. Include
c. Import
d. Expansion
8. Which do you need if you want tasks to be included in the playbook before the work on any task in the playbook is started?
a. import_playbook
b. import_tasks
c. include_playbook
d. include_tasks
9. When you use include_tasks, several limitations apply. Which of the following is not one of them?
a. When you use ansible-playbook --list-tasks, tasks that are included tasks are not displayed.
b. You cannot use ansible-playbook --start-at-task to start a playbook at a task from an included task file.
c. You cannot use notify to trigger a handler that is in the included tasks file.
d. You cannot use a conditional statement on included task files.
10. When you use import_tasks, several limitations apply. Which of the following is not one of them?
a. Loops cannot be used.
b. If a variable is used to specify the name of the file to import, this cannot be a host or group inventory variable.
c. The ansible-playbook --start-at-task command cannot be used.
d. When using a when statement on an entire import_tasks file, the conditional statements are applied to each of the tasks in this file.
Foundation Topics
Advanced Inventory Usage
You have already learned how to create an inventory file. Up to now, you have worked with a small inventory file that contains just a couple of hosts, which can be put into inventory groups. When an environment is getting bigger, you’ll probably want some more flexibility regarding inventory files. This section is about advanced inventory usage. You learn how to make inventory flexible by working with host name patterns, dynamic inventory, and multiple inventory files.
Working with Host Name Patterns
To work with hosts, you need to list them in inventory. This can be done by including host names, as well as IP addresses. If you want to use an IP address in a playbook, the IP address must be specified as such in the inventory. You cannot use IP addresses that are based only on DNS name resolving. So specifying an IP address in the playbook but not in the inventory file—assuming DNS name resolution is going to take care of the IP address resolving—doesn’t work.
The easiest way to refer to multiple hosts is to use host groups. Groups can be specified in inventory, and apart from the specified groups, there are the implicit host groups all and ungrouped. Apart from that, host name wildcards may be used. For instance, you can use ansible -m ping ’ansible*’ to match all hosts that have a name starting with ansible. When you use wildcards in host name patterns, it is important to always put the pattern between single quotes: the command ansible -m ping ansible* will fail with a no matching hosts error. Wildcards can be used at any place in the host name. So you also can use ansible -m ping ’*ble1’, as long as the pattern is placed between single quotes.
Notice that when you use wildcards to match host names, Ansible doesn’t distinguish between IP addresses, host names, or hosts; it just matches anything. So the pattern ’web*’ matches all servers that are members of the group ’webservers’, but also hosts ’web1’ and ’web2’.
To address multiple hosts, you can also specify a comma-separated list of targets, as in ansible -m ping ansible1,192.168.4.202. The comma-separated list can be a mix of anything and can include host names, IP addresses, and host group names.
Some more advanced patterns are possible as well. You can specify a logical AND condition by including an ampersand (&), and a logical NOT by using an exclamation point (!). So the pattern web,&file applies to hosts only if they are members of the web and file groups, and the pattern web,!webserver1 applies to all hosts in the web group, except host webserver1. When you use the logical AND operator, the position of the ampersand doesn’t really matter. So you can rewrite web,&file as &web,file also. Notice that you can use a colon (:) instead of a comma (,), but using a comma is better to avoid confusion when using IPv6 addresses, which contain colons by default.
Configuring Dynamic Inventory
Static inventories work well for a small environment. However, if the environment is getting bigger and more dynamic, static inventories are not that efficient anymore, so dynamic inventories may be considered. A dynamic inventory is a script that can be used to detect whether new hosts have been added to the managed environment.
![]()
Dynamic inventory scripts are provided by the community and exist for many different environments. Alternatively, it is fairly easy to write your own dynamic inventory script. The main requirement is that the dynamic inventory script works with a --list and a --host <hostname> option and produces its output in JSON format. Also, the script must have the Linux execute permission set. Many dynamic inventory scripts are written in Python, but this is not a requirement. Any script that supports the --list and --host options and generates JSON output will do.
Writing dynamic inventory scripts is not an exam requirement, but Listing 10-1 shows what a sample dynamic inventory script looks like.
Listing 10-1 Sample Dynamic Inventory Script
#!/usr/bin/python

from subprocess import Popen,PIPE
import sys

try:
     import json
except ImportError:
     import simplejson as json

result = {}
result[’all’] = {}

pipe = Popen([’getent’, ’hosts’], stdout=PIPE, universal_newlines=True)

result[’all’][’hosts’] = []

for line in pipe.stdout.readlines():
    s = line.split()
    result[’all’][’hosts’]=result[’all’][’hosts’]+s

result[’all’][’vars’] = {}

if len(sys.argv) == 2 and sys.argv[1] == ’--list’:
    print(json.dumps(result))

elif len(sys.argv) == 3 and sys.argv[1] == ’--host’:
    print(json.dumps({}))

else:
    print("Requires an argument, please use --list or --host <host>")
As you can see in Listing 10-1, the script core is the line pipe = Popen([’getent’, ’hosts’], stdout=PIPE, universal_newline=True), which gets a list of hosts using the getent function. This queries all hosts in /etc/hosts and other mechanisms where host name resolving is enabled. To show the resulting host list, you can use the --list command, and to show details for a specific host, you can use the option --host hostname. Listing 10-2 shows an example of the output in JSON format.
Listing 10-2 JSON Output of the listing101.py Script
[ansible@control rhce8-book]$ ./listing101.py --list
{"all": {"hosts": ["127.0.0.1", "localhost", "localhost.localdomain", "localhost4", "localhost4.localdomain4", "127.0.0.1", "localhost", "localhost.localdomain", "localhost6", "localhost6.localdomain6", "192.168.4.200", "control.example.com", "control", "192.168.4.201", "ansible1.example.com", "ansible1", "192.168.4.202", "ansible2.example.com", "ansible2"], "vars": {}}}
Even if simple, the script in Listing 10-1 is beneficial because it automatically detects when new hosts have been added to DNS or modify the /etc/hosts file. Dynamic inventory scripts are activated in the same way as regular inventory scripts: you use the -i option to either the ansible or the ansible-playbook command to pass the name of the inventory script as an argument. You just need to make sure that the dynamic inventory script has the Linux execute permission set. Use chmod +x scriptname if this is not the case.
You can see the real value of dynamic inventory scripts when they are used in large environments. That can be an environment where an external directory service is used, one that keeps track of all hosts in the environment. Such a directory service can be based on a wide range of solutions, including FreeIPA, Active Directory, or Red Hat Satellite. Dynamic inventory scripts also are available for virtual machine-based infrastructures such as VMware of Red Hat Enterprise Virtualization, where virtual machines can be discovered dynamically. Another main area where dynamic inventory scripts can be found is in cloud environments, where scripts are available for many solutions, including AWS, GCE, Azure, and OpenStack.
When you are working with dynamic inventory, additional parameters are normally required. For instance, to get an inventory from an EC2 cloud environment, you need to enter your web keys. To pass these parameters, many inventory scripts come with an additional configuration file that is formatted in .ini style. The community-provided ec2.py script, for instance, comes with an ec2.ini parameter file.
Another feature that is seen in many inventory scripts is cache management. To make working with inventory scripts more efficient, you can use a cache to store names and parameters of recently discovered hosts. If a cache is provided, options exist to manage the cache, allowing you, for instance, to make sure that the inventory information really is recently discovered.
Using the ansible-inventory Command
As shown in Listing 10-2, the default output of a dynamic inventory script is unformatted. To show formatted JSON output of the scripts, you can use the ansible-inventory command. Apart from the --list and --host options, this command also uses the --graph option to show a list of hosts, including the host groups they are a member of. In Listing 10-3, you can see the output of the ansible-inventory -i listing101.py --graph command. Remember this will work only if the Linux execute permission is set on the dynamic inventory file.
Listing 10-3 Showing Output of the ansible-inventory Command
[ansible@control rhce8-book]$ ansible-inventory -i listing101.py --graph
[WARNING]: A duplicate localhost-like entry was found (localhost). First found
localhost was 127.0.0.1
@all:
  |--@ungrouped:
  |  |--127.0.0.1
  |  |--192.168.4.200
  |  |--192.168.4.201
  |  |--192.168.4.202
  |  |--ansible1
  |  |--ansible1.example.com
  |  |--ansible2
  |  |--ansible2.example.com
  |  |--control
  |  |--control.example.com
  |  |--localhost
  |  |--localhost.localdomain
  |  |--localhost4
  |  |--localhost4.localdomain4
  |  |--localhost6
  |  |--localhost6.localdomain6
Working with Multiple Inventory Files
![]()
Ansible supports working with multiple inventory files. One way of using multiple inventory files is to enter multiple -i parameters with the ansible or ansible-playbook commands to specify the name of the files to be used. So ansible-inventory -i inventory -i listing101.py --list would produce an output list based on the static inventory in the inventory file, as well as the dynamic inventory that is generated by the listing101.py Python script. Alternatively, you can specify the name of a directory using the -i command-line option. This approach uses all files in the directory as inventory files. Notice that when using an inventory directory, dynamic inventory files still must be executable for this approach to work. In Exercise 10-1, you practice working with multiple inventories.
Exercise 10-1 Using Multiple Inventories
1. Open a shell as the ansible user and create a directory with the name inventories.
2. Copy the file listing101.py to the directory inventories.
3. Also copy the inventory file to the directory inventories.
4. To make sure both inventories have some unique contents, add the following lines to the file inventories/inventory:
webserver1
webserver2
5. Add the following lines to the Linux /etc/hosts file:
192.168.4.203    ansible3.example.com    ansible3
192.168.4.204    ansible4.example.com    ansible4
6. Use the command ansible-inventory -i inventories --list. In the result you should see the web servers that you added to the static inventory file, as well as the hosts that you added to /etc/hosts, which is the input file for the dynamic inventory. This result proves that the new inventory directory works.
Optimizing Ansible Processing
To optimize the working of Ansible, you can manage parallel as well as serial task execution. Parallel task execution manages the number of hosts on which tasks are executed simultaneously. Serial task execution can be used to make sure that all tasks are executed on a host or group of hosts before proceeding to the next host or group of hosts.
Managing Parallel Task Execution
While processing a playbook, Ansible can apply the tasks to multiple hosts simultaneously. Theoretically, Ansible can run tasks on all hosts at the same time, and in many cases that would not be a problem because processing is executed on the managed host anyway. If, however, network devices or other nodes that do not have their own Python stack are involved, processing needs to be done on the control host. To prevent the control host from being overloaded in that case, the maximum number of simultaneous connections by default is set to 5. You can manage this setting by using the forks parameter in ansible.cfg. Alternatively, you can use the -f option with the ansible and ansible-playbook commands.
Processing a maximum of five managed nodes simultaneously is good if processing needs to be done on the control host. Because processing in most environments is done on the managed hosts, the maximum setting of five forks just slows down the working of Ansible, and it is a good idea to increase this maximum to something significantly higher. If only Linux hosts are managed, there is no reason to keep the maximum number of simultaneous tasks much lower than 100.
While executing tasks, Ansible processes tasks in a playbook one by one. This means that, by default, the first task is executed on all managed hosts. Once that is done, the next task is processed, until all tasks have been executed. Notice that there is no specific order in the execution of tasks, so you may see that in one run ansible1 is processed before ansible2, while on another run they might be processed in the opposite order.
Managing Serial Task Execution
By default, Ansible runs task by task. This means that it runs the first task on all hosts, and once that is done, it proceeds to run the next task on all hosts. In some cases, this is undesired behavior. If, for instance, a playbook is used to update a cluster of hosts this way, this would create a situation where the old software has been updated, but the new version has not been started yet and the entire cluster would be down. To prevent this situation from happening, you can configure serial task execution. To do so, you use the serial keyword in the play header.
When, for instance, the serial: 3 keyword is used in the header of a play, all tasks are executed on three hosts, and after completely running all tasks on three hosts, the next group of three hosts is handled. In Exercise 10-2, you practice using the serial and forks parameters.
Exercise 10-2 Managing Parallelism
1. Apply the instructions in Chapter 2, “Installing Ansible,” to add two more managed nodes with the names ansible3.example.com and ansible4.example.com. Specific steps are shown in Exercises 2-1, 2-5, 2-6, and 2-7.
2. Open the inventory file with an editor and add the following lines:
ansible3
ansible4
3. Open the ansible.cfg file and add the line forks = 4 to the [defaults] section.
4. Write a playbook with the name exercise102-install that installs and enables the Apache web server and another playbook with the name exercise102-remove that disables and removes the Apache web server. Because this is a fairly basic task, no specific instructions are provided. Consult the files exercise102-install.yaml and exercise102-remove.yaml in the GitHub repository at https://github.com/sandervanvugt/rhce8-book if you need additional help with these tasks.
5. Run ansible-playbook exercise102-remove.yaml to remove and disable the Apache web server on all hosts. This is just to make sure you start with a clean configuration.
6. Run the playbook to install and run the web server, using time ansible-playbook exercise102-install.yaml, and notice the time it takes to run the playbook.
7. Run ansible-playbook exercise102-remove.yaml again to get back to a clean state.
8. Edit ansible.cfg and change the forks parameter to forks = 2. Run the time ansible-playbook exercise102-install.yaml command again to see how much time it takes now; it should take considerably longer. Notice that apart from the time that it takes, you see no output in the playbook execution while it runs.
9. Edit the exercise102-install.yaml playbook and include the line serial: 2 in the play header.
10. Run the ansible-playbook exercise102-remove.yaml command again to get back to a clean state.
11. Run the ansible-playbook exercise102-install.yaml command again and observe that the entire play is executed on two hosts only before the next group of two hosts is taken care of.
Including and Importing Files
When playbooks get larger, the recommendation is to split them into separate files. This makes managing large playbooks easier and allows you to dedicate specific management tasks to specific administrators. Also, splitting the files makes it possible to reuse playbook contents in different projects.
You have already seen how roles can be used to include generic code from other playbooks. Apart from using roles, you also can include and import files. When content is included, it is dynamically processed at the moment that Ansible reaches that content. If content is imported, Ansible performs the import operation before starting to work on the tasks in the playbook.
Files can be included and imported at different levels:
![]()
• Roles: Roles are typically used to process a complete set of instructions provided by the role. Roles have a specific structure as well.
• Playbooks: Playbooks can be imported as a complete playbook. You cannot do this from within a play. Playbooks can be imported only at the top level of the playbook.
• Tasks: A task file is just a list of tasks and can be imported or included in another task.
• Variables: As discussed in Chapter 6, “Working with Variables and Facts,” variables can be maintained in external files and included in a playbook. This makes managing generic multipurpose variables easier.
Importing Playbooks
Importing playbooks is common in a setup where one master playbook is used, from which different additional playbooks are included. According to the Ansible Best Practices Guide (which is a part of the Ansible documentation), the master playbook could have the name site.yaml, and it can be used to include playbooks for each specific set of servers, for instance. When a playbook is imported, this replaces the entire play. So, you cannot import a playbook at a task level; it needs to happen at a play level. Listing 10-4 gives an example of the playbook imported in Listing 10-5. In Listing 10-6, you can see the result of running the ansible-playbook listing105.yaml command.
Listing 10-4 Sample Playbook to Be Imported
- hosts: all
  tasks:
  - debug:
      msg: running the imported play
Listing 10-5 Importing a Playbook
---
- name: run a task
  hosts: all
  tasks:
  - debug:
      msg: running task1

- name: importing a playbook
  import_playbook: listing104.yaml
Listing 10-6 Running ansible-playbook listing105.yaml Result
[ansible@control rhce8-book]$ ansible-playbook listing105.yaml

PLAY [run a task] **************************************************************

TASK [Gathering Facts] *********************************************************
ok: [ansible2]
ok: [ansible1]
ok: [ansible3]
ok: [ansible4]

TASK [debug] *******************************************************************
ok: [ansible1] => {
    "msg": "running task1"
}
ok: [ansible2] => {
    "msg": "running task1"
}
ok: [ansible3] => {
    "msg": "running task1"
}
ok: [ansible4] => {
    "msg": "running task1"
}

PLAY [all] *********************************************************************

TASK [Gathering Facts] *********************************************************
ok: [ansible2]
ok: [ansible1]
ok: [ansible3]
ok: [ansible4]

TASK [debug] *******************************************************************
ok: [ansible1] => {
    "msg": "running the imported play"
}
ok: [ansible2] => {
    "msg": "running the imported play"
}
ok: [ansible3] => {
    "msg": "running the imported play"
}
ok: [ansible4] => {
    "msg": "running the imported play"
}

PLAY RECAP *********************************************************************
ansible1                   : ok=4    changed=0    unreachable=0    failed=0    skipped=0    rescued=0    ignored=0
ansible2                   : ok=4    changed=0    unreachable=0    failed=0    skipped=0    rescued=0    ignored=0
ansible3                   : ok=4    changed=0    unreachable=0    failed=0    skipped=0    rescued=0    ignored=0
ansible4                   : ok=4    changed=0    unreachable=0    failed=0    skipped=0    rescued=0    ignored=0
Importing and Including Task Files
Instead of importing complete playbooks, you may include task files. When you use import_tasks, the tasks are statically imported while executing the playbook. When you use include_tasks, the tasks are dynamically included at the moment they are needed. Dynamically including task files is recommended when the task file is used in a conditional statement. If task files are mainly used to make development easier by working with separate task files, they can be statically imported.
There are a few considerations when working with import_tasks to statically import tasks:
![]()
• Loops cannot be used with import_tasks.
• If a variable is used to specify the name of the file to import, this cannot be a host or group inventory variable.
• When you use a when statement on the entire import_tasks file, the conditional statements are applied to each task that is involved.
As an alternative, include_tasks can be used to dynamically include a task file. This approach also comes with some considerations:
![]()
• When you use the ansible-playbook --list-tasks command, tasks that are in the included tasks are not displayed.
• You cannot use ansible-playbook --start-at-task to start a playbook on a task that comes from an included task file.
• You cannot use a notify statement in the main playbook to trigger a handler that is in the included tasks file.
Tip
When you use includes and imports to work with task files, the recommendation is to store the task files in a separate directory. Doing so makes it easier to delegate task management to specific users.
Using Variables When Importing and Including Files
The main goal to work with imported and included files is to make working with reusable code easy. To make sure you reach this goal, the imported and included files should be as generic as possible. That means it’s a bad idea to include names of specific items that may change when used in a different context. Think, for instance, of the names of packages, users, services, and more.
To deal with include files in a flexible way, you should define specific items as variables. Within the include_tasks file, for instance, you refer to {{ package }}, and in the main playbook from which the include files are called, you can define the variables. Obviously, you can use this approach with a straight variable definition or by using host variable or group variable include files.
Exam tip
It’s always possible to configure items in a way that is brilliant but quite complex. On the exam it’s not a smart idea to go for complex. Just keep your solution as easy as possible. The only requirement on the exam is to get things working, and it doesn’t matter exactly how you do that.
In Listings 10-7 through 10-10, you can see how include and import files are used to work on one project. The main playbook, shown in Listing 10-9, defines the variables to be used, as well as the names of the include and import files. Listings 10-7 and 10-8 show the code from the include files, which use the variables that are defined in Listing 10-9. The result of running the playbook in Listing 10-9 can be seen in Listing 10-10.
Listing 10-7 The Include Tasks File tasks/service.yaml Used for Services Definition
- name: install {{ package }}
  yum:
    name: "{{ package }}"
    state: latest
- name: start {{ service }}
  service:
    name: "{{ service }}"
    enabled: true
    state: started
The sample tasks file in Listing 10-7 is straightforward; it uses the yum module to install a package and the service module to start and enable the package. The variables this file refers to are defined in the main playbook in Listing 10-9.
Listing 10-8 The Import Tasks File tasks/firewall.yaml Used for Firewall Definition
- name: install the firewall
  package:
    name: "{{ firewall_package }}"
    state: latest
- name: start the firewall
  service:
    name: "{{ firewall_service }}"
    enabled: true
    state: started
- name: open the port for the service
  firewalld:
    service: "{{ item }}"
    immediate: true
    permanent: true
    state: enabled
  loop: "{{ firewall_rules }}"
In the sample firewall file in Listing 10-8, the firewall service is installed, defined, and configured. In the configuration of the firewalld service, a loop is used on the variable firewall_rules. This variable obviously is defined in Listing 10-9, which is the file where site-specific contents such as variables are defined.
Listing 10-9 Main Playbook Example
---
- name: setup a service
  hosts: ansible2
  tasks:
  - name: include the services task file
    include_tasks: tasks/service.yaml
    vars:
      package: httpd
      service: httpd
    when: ansible_facts[’os_family’] == ’RedHat’
  - name: import the firewall file
    import_tasks: tasks/firewall.yaml
    vars:
      firewall_package: firewalld
      firewall_service: firewalld
      firewall_rules:
      - http
      - https
The main playbook in Listing 10-9 shows the site-specific configuration. It performs two main tasks: it defines variables, and it calls an include file and an import file. The variables that are defined are used by the include and import files. The include_tasks statement is executed in a when statement. Notice that the firewall_rules variable contains a list as its value, which is used by the loop that is defined in the import file.
Listing 10-10 Running ansible-playbook listing109.yaml
[ansible@control rhce8-book]$ ansible-playbook listing109.yaml

PLAY [setup a service] *********************************************************

TASK [Gathering Facts] *********************************************************
ok: [ansible2]

TASK [include the services task file] ******************************************
included: /home/ansible/rhce8-book/tasks/service.yaml for ansible2

TASK [install httpd] ***********************************************************
ok: [ansible2]

TASK [start httpd] *************************************************************
changed: [ansible2]

TASK [install the firewall] ****************************************************
changed: [ansible2]

TASK [start the firewall] ******************************************************
ok: [ansible2]

TASK [open the port for the service] *******************************************
changed: [ansible2] => (item=http)
changed: [ansible2] => (item=https)

PLAY RECAP *********************************************************************
ansible2                   : ok=7    changed=3    unreachable=0    failed=0    skipped=0    rescued=0    ignored=0
The interesting thing in the Listing 10-10 output is that the include file is dynamically included while running the playbook. This is not the case for the statically imported file. In Exercise 10-3 you practice working with include files.
Exercise 10-3 Using Includes and Imports
In this exercise you create a simple master playbook that installs a service. The name of the service is defined in a variable file, and the specific tasks are included through task files.
1. Open the file exercise103-vars.yaml and define three variables as follows:
packagename: vsftpd
servicename: vsftpd
firewalld_servicename: ftp
2. Create the exercise103-ftp.yaml file and give it the following contents to install, enable, and start the vsftpd service and also to make it accessible in the firewall:
- name: install {{ packagename }}
  yum:
    name: "{{ packagename }}"
    state: latest
- name: enable and start {{ servicename }}
  service:
    name: "{{ servicename }}"
    state: started
    enabled: true
- name: open the service in the firewall
  firewalld:
    service: "{{ firewalld_servicename }}"
    permanent: yes
    state: enabled
3. Create the exercise103-copy.yaml file that manages the /var/ftp/pub/README file and make sure it has the following contents:
- name: copy a file
  copy:
    content: "welcome to this server"
    dest: /var/ftp/pub/README
4. Create the master playbook exercise103.yaml that includes all of them and give it the following contents:
---
- name: install vsftpd on ansible2
  vars_files: exercise103-vars.yaml
  hosts: ansible2
  tasks:
  - name: install and enable vsftpd
    import_tasks: exercise103-ftp.yaml
  - name: copy the README file
    import_tasks: exercise103-copy.yaml
5. Run the playbook and verify its output
6. Run an ad hoc command to verify the /var/ftp/pub/README file has been created: ansible ansible2 -a “cat /var/ftp/pub/README”.
Summary
In this chapter you learned how to work with Ansible in a large environment. We focused on three different aspects. First, you learned how to manage large numbers of hosts in an efficient way, using dynamic inventory and host name patterns. Next, you learned how to optimize working with Ansible by modifying the number of hosts in parallel as well as serial task execution. In the last part of this chapter, you learned how to work with includes and imports of plays and tasks.
Exam Preparation Tasks
As mentioned in the section “How to Use This Book” in the Introduction, you have a couple of choices for exam preparation: the exercises here, Chapter 16, “Final Preparation,” and the exam simulation questions on the companion website.
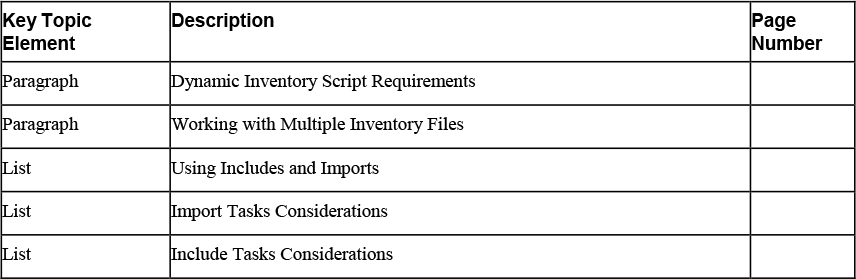
Review All Key Topics
Review the most important topics in this chapter, noted with the Key Topics icon in the outer margin of the page. Table 10-2 lists a reference of these key topics and the page numbers on which each is found.
![]()
Table 10-2 Key Topics for Chapter 10
Define Key Terms
Define the following key terms from this chapter, and check your answers in the glossary:
Review Questions
1. How would you address only hosts that are a member of the group web as well as a member of the group file?
2. Which two arguments must be implemented in every dynamic inventory script?
3. If a dynamic inventory script needs additional parameters, how do you normally provide them?
4. Which command do you use to show all currently known hosts including the groups that they are a member of in a tree-like output?
5. Which command-line option can you use with the ansible-playbook command to ensure that 10 hosts are configured at the same time while running a playbook?
6. How do you write a playbook in such a way that all tasks are first executed on three hosts before the next group of three hosts is dealt with?
7. What should you do if you want to dynamically include tasks?
8. What is the recommended way to work with variables, assuming that you want to separate static code from dynamic parameters?
9. You have split up your project into different task files, but now you cannot use ansible-playbook --list-tasks anymore. How can you fix this?
10. What is a good reason to import playbooks instead of tasks?
End-of-Chapter Lab
In the end-of-chapter lab with this chapter, you reorganize a playbook to work with several different files instead of one big file. Do this according to the instructions in Lab 10-1.
Lab 10-1
The lab82.yaml file, which you can find in the GitHub repository that goes with this course, is an optimal candidate for optimization. Optimize this playbook according to the following requirements:
• Use includes and import to make this a modular playbook where different files are used to distinguish between the different tasks.
• Optimize this playbook such that it will run on no more than two hosts at the same time and completes the entire playbook on these two hosts before continuing with the next host.