
Chapter 9. Using Restlet in browsers and mobile devices
This chapter explains how to access web APIs using Restlet from clients ranging from light web browsers to mobile devices. First, it’s possible to use the Restlet API within a browser, with no additional plug-ins, via the Google Web Toolkit (GWT). This chapter discusses the Restlet edition for GWT, a port of the Restlet client-side API to GWT, and how to use Restlet on the server side to address issues such as cross-domain calls and automatic object serialization. This approach allows Rich Internet Applications (RIA) to consume and modify REST resources.
We then look at the Android OS for mobile devices. It runs a Dalvik virtual machine that understands code compiled from Java source and provides a subset of Java SE APIs, plus specific APIs. We describe how the Restlet edition for Android makes it easy to access the web APIs from Android applications.
For each technology we provide basic introductions, describing concepts and how to use them. No prior knowledge is required for these technologies before reading this chapter. Moreover we always follow an “in action” approach by developing our mail application as a case study for both technologies. In the case of the GWT technology, this consists of a mail client which calls our example mail server to retrieve and send emails. For Android, we implement a mobile mail program with both client- and server-side applications.
We begin by describing what GWT is and how REST can be used within it.
9.1. Understanding GWT
Implementing AJAX or RIA can be a painful task. Such applications require advanced skills in several different technologies such as HTML, CSS, and JavaScript. Many developers have basic skills in these areas, but things become harder with advanced concepts, like connecting client and server with AJAX.
The situation becomes even more problematic when trying to handle browser specifics. Making applications have a consistent behavior across different browsers is a tedious task. Because JavaScript is dynamically and weakly typed, debugging is more complex than when using strongly typed languages like Java. Moreover such technologies don’t benefit from integrated development environments as advanced as those for the Java platform.
The GWT enhances productivity while developing high-performance web applications without having strong knowledge of technologies involved in browsers. In this section we give an overview of the technology and describe how to implement it. Finally we tackle how to make it consume web APIs.
9.1.1. GWT overview
With GWT, you can continue to develop your web applications using the Java language on both the browser side and on the server side. Implementing browser-side processing in Java without relying on an Applet plug-in is unusual. It doesn’t mean that the code will be executed in the same way as with an Applet. In fact, GWT compiles this code into JavaScript code that will be executed natively by the browser without any additional plug-in. Figure 9.1 describes this mechanism.
Figure 9.1. GWT application mechanisms

The main benefit of this approach is that GWT can apply optimizations for distinct browser types at compilation time. Browser-specific idiosyncrasies are taken into account while still providing the same behavior. Furthermore, this complex task is done transparently for developers, contributing to the magic of this solution.
Figure 9.1 shows a GWT application using Java on the server side. But once compiled into JavaScript, the client side of a GWT application corresponds to a set of static JavaScript files that could be served from any web server, such as PHP or Python.
Let’s go deeper inside the organization of a GWT application. Such an application is composed of a set of GWT modules that follow a particular file structure. Here’s how a module is composed:
- Java classes related to the UI, data objects, and remote service interfaces— All these classes will be compiled into JavaScript in order to be natively executed within web browsers.
- Java classes related to remote services used within the module— They respond to AJAX requests triggered from the client side of the GWT module, and corresponding classes will be typically executed within a Java server application.
- Web resources— CSS style sheets, HTML pages, and additional JavaScript code required by the module.
- A configuration file per module— This defines GWT elements used and the entry point class.
In order to provide these files, GWT requires the following structure:
- Root package for the module can be freely named.
- Packages corresponding to the client side must be located by default under a client subpackage of the module package.
- Packages corresponding to the server side must be located by default under a server subpackage of the module package.
- The folder for web resources must be under the public one right below the root package.
- A module called MODULE-NAME is described by a configuration file named <MODULE-NAME>.gwt.xml located directly under the module package.
Now we’ll describe how to install and use it.
9.1.2. Installing and using GWT
GWT provides a dedicated Software Development Kit (SDK) which consists of a set of JAR files and command-line tools to create applications and tune them. This SDK is provided as a standalone tool that can be downloaded from the GWT website on Google Code at http://code.google.com/webtoolkit/.
Although you can develop GWT applications with this SDK and any Java IDE, we chose Eclipse because Google offers a convenient plug-in for it. Here are the additional features it provides:
- Wizards to create and configure the project files necessary for GWT applications
- Efficiently build GWT applications, execute them, and debug them
- Dedicated editors for GWT artifacts
To install this tool, you can use the Update Manager of Eclipse, which is available from the Help > Install new Software menu. Then you need to specify the Update Site for the Google Plugin using http://dl.google.com/eclipse/plugin/3.6 for version 3.6 of Eclipse. (Change the number at the end of the address for another version of Eclipse.) Next you can see the installable items, as shown in figure 9.2.
Figure 9.2. Google Plugin for Eclipse installation through Eclipse’s update manager tool

As you can see, the SDK is also available through the update site, so you don’t need to download and install it separately. You can select the required Google Plugin for Eclipse and even additional ones such as the visual GWT Designer; then launch the installation. After a restart of Eclipse, the Google Plugin for Eclipse with GWT support is available within your workspace.
9.1.3. GWT and REST
As you’ve seen in previous chapters, REST provides much flexibility between the client- and server-side resources in the way they interact.
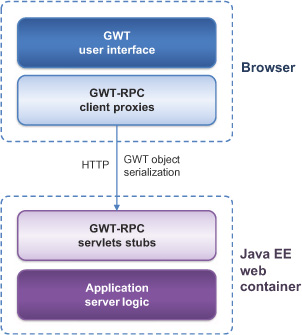
GWT natively integrates mechanisms to execute remote calls using a built-in proprietary protocol called GWT-RPC. It requires the use of a custom object serialization format to exchange content. This structure is specific to the GWT technology and isn’t compatible with the standard Java object serialization format. By default, GWT favors the use of its GWT-RPC technology to communicate between the browser and the back end, relying on GWT-provided Servlets on the server side to interact with remote methods. This clearly discourages you from using non-GWT-based server-side services such as RESTful web APIs and technologies other than Java. Figure 9.3 illustrates this GWT-RPC architecture.
Figure 9.3. Default GWT remoting support
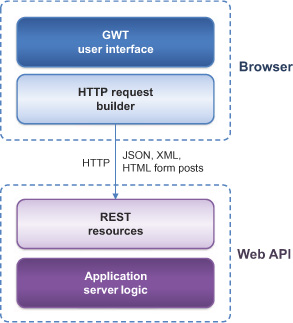
The first concern with this solution is that it relies on the RPC paradigm, which has many drawbacks compared to REST, as explained in appendix C. In particular, when RESTfully using HTTP, you can benefit from content negotiation to select among several representation media types, reducing the coupling between clients and specific server–side technologies—the opposite of the GWT-RPC architecture. Figure 9.4 illustrates how GWT applications can access REST resources without using GWT-RPC-based calls, relying instead on the Request-Builder class in GWT’s HTTP module.
Figure 9.4. Using REST resources from GWT applications without GWT-RPC
We dive deeper into these aspects in the next section. In particular we demonstrate the flexibility offered by Restlet Framework on the GWT client side in section 9.2.2.
9.2. The Restlet edition for GWT
As introduced before, Restlet provides different editions for various execution environments. At this point in the book you’ve seen the Java SE, Java EE, OSGi, and GAE editions, but Restlet also provides a dedicated edition for GWT. In this case only a limited part of the Restlet API is provided, including most of the client side, due to limitations inherent to browsers.
In this section we describe the Restlet support on the GWT client side. First we introduce classes provided by GWT to execute HTTP requests and then we show how to use them to call REST resources.
9.2.1. The RequestBuilder class of GWT
As described in section 9.1.3, you need to bypass the remote procedure call mechanisms of GWT in order to access RESTful origin servers and reuse an existing web API.
You need to use the low-level Java API provided by GWT to execute HTTP calls without the RPC abstraction layer. For this purpose, GWT has the RequestBuilder class supporting all HTTP methods and providing two ways of handling requests. The first way uses the command pattern. After instantiating the RequestBuilder, you set request parameters and the response callback. Then execute the request with the send method. In the second approach, you provide a callback method when executing the request using the sendRequest method, which also accepts data to send as parameter. (In either case you need to specify headers before calling the method.)
Listing 9.1 describes how to use this second approach to call a remote web resource with the GET method.
Listing 9.1. Using RequestBuilder class

First you instantiate the RequestBuilder class and provide it the HTTP method to use and the URL of the resource to address. After specifying HTTP headers, send the
request using the sendRequest method ![]() , passing a callback object including a method invoked in case of success
, passing a callback object including a method invoked in case of success ![]() of the HTTP request and another in case of error
of the HTTP request and another in case of error ![]() .
.
The RequestBuilder class is close to the HTTP protocol. It allows you to completely define request content and to extract content from the corresponding response. Using it can be painful because it requires knowledge of all the subtleties of the HTTP protocol such as how to format and parse HTTP headers. In addition, as strange as it sounds, RequestBuilder doesn’t natively support HTTP Basic authentication, which requires a Base 64 algorithm implementation to encode the header value.
As you can see, using this class in the context of REST would be tedious when trying to take advantage of all the capabilities such as authentication, content negotiation, partial requests, conditional requests, or precise cache control. This is where the Restlet API brings its value to GWT applications with a dedicated edition built on top of RequestBuilder.
9.2.2. Restlet port to GWT
Although GWT offers support for low-level HTTP calls, it doesn’t help much when you want to use HTTP features such as content negotiation, ranged questions, or cache management. In addition, it lacks an easy way to automate representation serialization and deserialization at the Java class level, leading many developers to use GWT-RPC instead, requiring a GWT-specific backend, when a RESTful web API can talk with any client, not only GWT ones.
There is a need for a higher-level API and framework to solve those issues. As you’ve guessed, this is exactly what the Restlet Framework edition for GWT provides! In this section you’ll see the ideas behind the Restlet port for GWT and how to call REST resources in action.
Concepts
As described in previous sections, GWT lets you develop using the Java language, but because it runs inside the web browser with no plug-in, it has to be compiled into JavaScript before being executed, limiting the number of Java SE APIs supported.
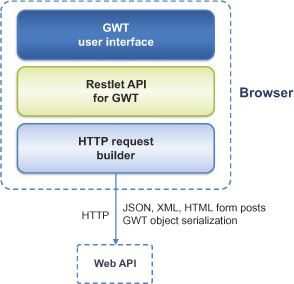
Restlet port to GWT is an adaptation of Restlet’s client-side API to work on top of GWT’s low-level HTTP client API, as shown in figure 9.5. This edition doesn’t include the server-side parts of Restlet and comes with a limited set of extensions. In addition, on the server side the full Restlet API from other editions can be used and can even benefit from a server-side GWT extension that we cover later on.
Figure 9.5. How the Restlet edition for GWT fits in the overall GWT architecture
This approach provides a flexible way to use Restlet on the GWT client side and to let RIA communicate with web APIs. As previously mentioned, Java isn’t required on the server side. Let’s see how to concretely use Restlet Framework edition for GWT with such architecture.
Architecture Flexibility
GWT comes with a default RPC-style mechanism to interact with the server-side part of applications. As previously mentioned in section 9.1.3, GWT integrates a proprietary GWT-RPC protocol which ties the server side to GWT and the Servlet API. Although this approach can work for applications using GWT technology exclusively, it isn’t flexible in the context of REST. A RESTful web API should be accessible from any kind of HTTP client, and not be tied only to GWT.
The Restlet edition for GWT brings this flexibility within your GWT-based applications. It allows using an open range of formats for exchanging content, such as JSON and XML (and any other content type that you can parse and format from a string). Moreover you aren’t tied to a particular technology on the server side (not even Restlet). Figure 9.6 summarizes this.
Figure 9.6. All the aspects shown here display the flexibility of the Restlet edition of GWT, which is one of its key features.

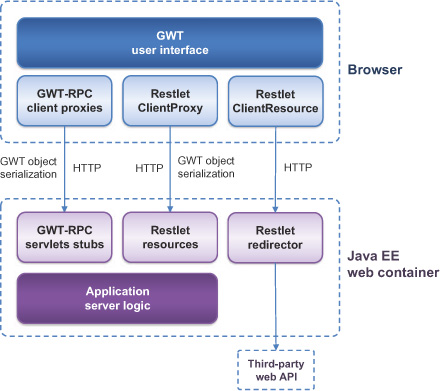
Restlet isn’t required on the server side, but it offers comprehensive server-side support, including a convenient solution to cross-domain calls in an AJAX environment with the Redirector class. We discuss this feature in section 9.3.3. Moreover Restlet support doesn’t prevent you from using GWT-RPC if necessary (or more likely, if already in place), as both mechanisms can work in parallel. Figure 9.7 shows the full flexibility of using GWT with Restlet.
Figure 9.7. Full flexibility using GWT-RPC and Restlet for GWT
Now that we’ve set the scene for the GWT client-side support of Restlet, it’s time to see how to use it in practice when calling a REST resource from a GWT client.
9.2.3. Communicating with a REST API
The central feature of the GWT edition of Restlet consists of communicating with REST resources from the client side of GWT applications. As introduced in the previous section, Restlet for GWT provides an API that’s close to other Restlet editions. It also takes advantage of GWT features like deferred binding to make Restlet easier to use and remove the need for representation formatting and parsing.
In this section we implement a web mail client application based on the example code available in the GWT distribution at http://gwt.google.com/samples/Mail/ that provides a rich mail client UI, but without true persistence. You’ll connect this GUI to the mail application developed in previous chapters using the Restlet Framework edition for GWT.
Using Client-Side Restlet API
The nature of the underlying AJAX mechanism limits the Restlet API available in the GWT edition. Some standard classes, like java.net.URI, aren’t available. The use of asynchronous calls is required and there is no support for reflection. Calling REST resources located in other domains also requires some workarounds.
In the Restlet edition for GWT, the base package is org.restlet.client instead of the usual org.restlet. The reason is that a GWT application contains both client and server sides in the same web application, and having different packages for each side greatly facilitates their coexistence.
This edition corresponds to a GWT module and needs to conform to GWT naming conventions, as described in section 9.1.1. In this context, client-side content is located in a client subpackage by default.
The Restlet edition for GWT makes it possible to use extensions within GWT applications. The list of available extensions is much more restricted than in other editions due to the underlying browser capacities. Table 9.1 lists all compatible Restlet modules available.
Table 9.1. Modules usable with GWT
|
Description |
|
|---|---|
| org.restlet.Restlet | Port of client-side of the Restlet API |
| org.restlet.JSON | Port of JSON representation support |
| org.restlet.XML | Port of XML representation support |
As with every GWT module, you need to specify the required dependencies within the module descriptor file. The GWT edition of Restlet integrates such a descriptor in each JAR file. For this example, you use the core module as well as the JSON and XML extensions. In the GWT mail client application, the descriptor called Mail.gwt.xml and located in the org.restlet.example.book.restlet.ch09 package contains these lines:
<module>
 (...)
 <inherits name="org.restlet.Restlet"/>
 <inherits name="org.restlet.JSON"/>
 <inherits name="org.restlet.XML"/>
 (...)
</module>
Unsurprisingly the central class of Restlet client support for GWT is ClientResource. It has a similar contract to what we’ve seen, except that some methods have been removed due to GWT limitations for client side, as summarized in table 9.2
Table 9.2. ClientResource methods removed for the GWT edition
|
Method kind |
Description |
|---|---|
| Static create methods | Take a Class parameter and are built on the wrap method, which uses Java reflection. |
| ClientResource constructor using URI class | The URI class isn’t available in client-side GWT support. |
| handle methods accepting Class parameter | Indirectly use Java reflection. |
| Methods to execute HTTP methods and accepting Class parameter | These methods (get, post, put, delete, and options) accept a Class parameter and are built on the previous handle methods. |
| Methods getChild, getParent and wrap | Some signatures of these methods accept a Class parameter and use Java reflection. |
The major change when using the GWT edition of ClientResource is that only asynchronous response handling is supported. For this reason, responses must be retrieved using callbacks, and calling methods always return immediately. Executing a call without specifying a callback throws an exception.
Let’s now enhance the GWT-based webmail application to add data persistence using Restlet. To remain concise, you’ll focus only on the contacts list, corresponding to code in the Contacts class initially in the com.google.gwt.sample.mail.client package and moved into org.restlet.example.book.restlet.ch09.client.
We first remove the inner class Contact from the original sample code and the contacts property. Instead, we use the ContactRepresentation class provided by the Restlet mail application in the common package as defined in the previous chapter for GAE.
Listing 9.2 describes how to use the ClientResource class to make HTTP calls from client-side GWT code and retrieve the list of contacts for an artificially fixed Homer user. The way to initialize the instance and execute the request is different from the previous use you’ve seen, as you need to make asynchronous calls.
Listing 9.2. Using the ClientResource class within GWT client side
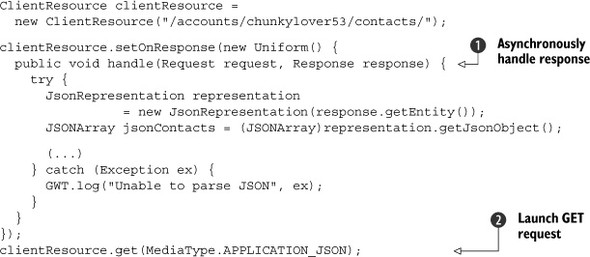
After creating the ClientResource and specifying the target resource URI, set the callback to handle the response using the setOnResponse method and the Uniform callback interface. The latter has a handle method ![]() that is only called when the response has been received from the server. Now that the callback is set, you can execute the
request using the get method
that is only called when the response has been received from the server. Now that the callback is set, you can execute the
request using the get method ![]() , which immediately returns (Void result parameter). Specify the desired representation format (JSON in the listing) with the first method parameter. Now let’s concentrate on
using GWT support for JSON and XML with the corresponding Restlet extensions.
, which immediately returns (Void result parameter). Specify the desired representation format (JSON in the listing) with the first method parameter. Now let’s concentrate on
using GWT support for JSON and XML with the corresponding Restlet extensions.
Using Json and Xml Representations
Using JSON and XML technologies within GWT is a bit specific because they correspond to the port of JavaScript ones into Java. They’re provided through modules com.google.gwt.json.JSON and com.google.gwt.xml.XML.
For JSON, the central class is JSONParser, which parses text and returns a set of JSON objects. But the use of the JSON parser is hidden within the JsonRepresentation class of Restlet. The root type for JSON element corresponds to JSONValue, which has subclasses for specific types available in the com.google.gwt.json.client package, as listed in Table 9.3
Table 9.3. Classes corresponding to supported JSON types
|
JSON type |
Description |
|---|---|
| JSONArray | Array of JSON values |
| JSONBoolean | Boolean value |
| JSONNull | Null value |
| JSONNumber | Numeric value |
| JSONObject | JSON object with string-keyed property values |
| JSONString | String value |
The next listing describes how to use these classes to browse the contacts array present in the received JSON content. According to the expected type of element, you can cast it to the corresponding one listed in Table 9.3
Listing 9.3. Parsing JSON content received through the representation
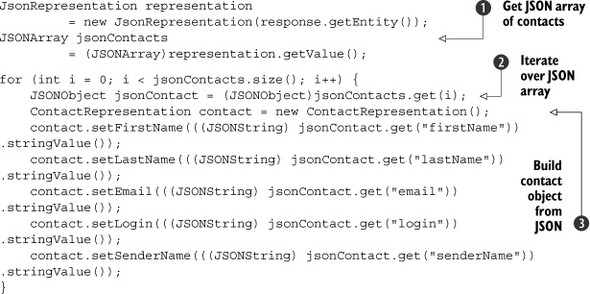
You first get the JSON contact array directly from the representation using its get-Value method ![]() , noting that since version 2.1 there is now a getJsonArray() method. Then iterate the array and get a JSONObject instance representing a contact for each contained element
, noting that since version 2.1 there is now a getJsonArray() method. Then iterate the array and get a JSONObject instance representing a contact for each contained element ![]() . You’re now able to build a Contact instance from the properties of this JSONObject
. You’re now able to build a Contact instance from the properties of this JSONObject ![]() . You can then use the Contact instance to update the contact part of the UI (not shown).
. You can then use the Contact instance to update the contact part of the UI (not shown).
Next we’ll implement the same processing in XML. In this case the representation gives access to a Document instance representing the XML document. From the latter you have access to the root document and its children. Using the getFirstChild and getElementsByTagName methods, you can browse the whole XML tree of information, making it possible to build a list of contacts that will be used to update the UI. The following listing describes how to use the GWT XML API to handle the received XML content.
Listing 9.4. Parsing XML content received through the representation

You first get the XML document directly from the representation using its get-Document method ![]() . You then browse the XML tree and get an Element instance representing a contact for each contained element
. You then browse the XML tree and get an Element instance representing a contact for each contained element ![]() . You can now instantiate a ContactRepresentation instance and fill it with the previous element’s attributes
. You can now instantiate a ContactRepresentation instance and fill it with the previous element’s attributes ![]() .
.
As you can see, directly using JSON and XML formats within GWT applications can be painful and results in a lot of code. In the next section we describe an automatic serialization mechanism that version 2.0 of Restlet Framework introduced for GWT.
Automatic Object Serialization Support
As you saw in the previous section, writing the formatting and parsing code for exchanged data is time-consuming. The GWT edition of Restlet provides a convenient way to automatically generate this serialization code.
This edition goes further than the simple port of the ClientResource class and relies on a powerful feature of GWT called deferred binding. Using this feature, extra code can be automatically generated during the compilation phase. Restlet uses it to generate automatic serialization code.
With this approach, you don’t need to manually provide implementations of the Restlet annotated interface; you can directly create instances with the GWT.create static method. The deferred binding is activated during the compilation phase if you extend the org.restlet.client.resource.ClientProxy interface in your annotated Restlet interfaces:
<module>
 (...)
 <generate-with class="org.restlet.rebind.ClientProxyGenerator">
 <when-type-assignable class="org.restlet.client.resource.ClientProxy"/>
 </generate-with>
</module>
Nothing else has to be done in the module file of your GWT application except specifying the org.restlet.Restlet module as in the previous section. The deferred binding configuration is automatically inherited.
Before we describe how to call the REST resource with this feature, you need to declare a ClientProxy extension dedicated to this resource. This entity will act as a proxy in front of the resource and handle all the plumbing required to communicate with it through REST. The power of this approach is that you can use common Restlet annotations to associate HTTP methods with Java methods. When a method of this interface is invoked, a call to the related HTTP method is transparently executed.
Restlet Framework version 2.0 supports version 2.0 and 2.1 of Google Web Toolkit, but not later, due to API breaking changes introduced in GWT 2.2. Restlet Framework version 2.1 supports GWT 2.3 and above, but not previous versions.
In addition, you have to add a parameter of type Result<?> to each method corresponding to a remote call in order to asynchronously handle the response. The following snippet describes how to declare a dedicated ClientProxy extension for the contacts resource in order to remotely manage it through REST:

ContactsResourceProxy extends the ClientProxy interface ![]() , indicating that it acts as a client proxy for the remote Contacts resource. It adds a method to retrieve contacts and associates it with the corresponding HTTP method
, indicating that it acts as a client proxy for the remote Contacts resource. It adds a method to retrieve contacts and associates it with the corresponding HTTP method ![]()
![]() to use when executing them. The same Restlet annotations are used as in other editions, for example @Get for the GET HTTP method, except that they come from the org.restlet.client.resource package.
to use when executing them. The same Restlet annotations are used as in other editions, for example @Get for the GET HTTP method, except that they come from the org.restlet.client.resource package.
In the end, a call to retrieve turns into an HTTP GET call. The method has one parameter of type Result to handle the response. This type is parameterized by the expected type for response. The magic here is that Restlet will internally manage the conversion to and from representations, relying on GWT-specific object serialization format.
In regular Java SE, there are two ways to automatically serialize Java objects. The first uses a special binary format via the java.io.ObjectInputStream and Object-OutputStream classes, and the second uses an XML format via the java.beans.XMLEncoder and XMLDecoder classes.
Restlet edition for Java SE supports those mechanisms by default when handling media types corresponding to the MediaType.APPLICATION_JAVA_OBJECT and APPLICATION_JAVA_OBJECT_XML constants.
GWT object serialization is another compact format optimized for size but comparable to native Java serialization. It’s specific to the GWT technology and was introduced for the GWT-RPC mechanism. Restlet only reuses the object format and not the rest of the GWT-RPC plumbing, associating it to the APPLICATION_JAVA_OBJECT_GWT constant.
Note that each class that needs to be serialized by GWT needs to implement the Serializable interface and not use collections interfaces by concrete classes such as ArrayList instead of List.
The GWT AsyncCallback interface is also supported as the last parameter of each Restlet-annotated method corresponding to a remote call. This interface from GWT-RPC defines a similar contract to Restlet’s Result class and can be useful to reduce code changes when converting GWT-RPC calls into RESTful ones. If you care more about portability of the client side, then you should use the Result class, which is also supported in non-GWT editions to make asynchronous calls.
Although GWT-RPC requires you to write special server-side code, you don’t need to change anything on the server side for Restlet resources besides adding the org.restlet.ext.gwt extension. It’s now time to illustrate this approach by calling REST resources from GWT client code. The code shown in listing 9.5 retrieves the list of contacts.
At the time of writing, the deferred binding support of Restlet only supports the special GWT object serialization format. In future versions, XML and JSON-based formats could be added by leveraging the Piriti library. This library provides JSON and XML mappers for GWT based on annotations and deferred binding. Further details are available on Google Code at http://code.google.com/p/piriti/.
Listing 9.5. Using deferred binding support of Restlet to execute REST call
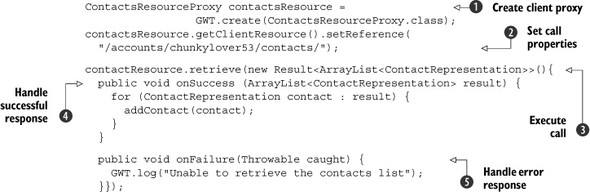
The first step consists of creating the client proxy for the contacts resource with GWT.create ![]() . Because the ContactsResourceProxy extends the ClientProxy interface, you have access to the underlying ClientResource instance through the getClientResource method to set properties of the call, like the target address, supported media types, or authentication info
. Because the ContactsResourceProxy extends the ClientProxy interface, you have access to the underlying ClientResource instance through the getClientResource method to set properties of the call, like the target address, supported media types, or authentication info ![]() . The call to the retrieve method
. The call to the retrieve method ![]() executes the HTTP request. Handling the corresponding response
executes the HTTP request. Handling the corresponding response ![]()
![]() is done asynchronously using the Result callback interface in its onSuccess method (if everything goes well).
is done asynchronously using the Result callback interface in its onSuccess method (if everything goes well).
Now that every part of the execution chain is implemented, you can test it to get contacts from a RESTful application and display them in the UI. Let’s start the application within Eclipse using Run As > Web Application. This starts hosted mode; access it in a browser using the address http://127.0.0.1:8888/Mail.html?gwt.codesvr=127.0.0.1:9997.
When the Contacts tab in the menu on the left is displayed, you should see all the contacts returned by the RESTful mail server, as illustrated in figure 9.8.
Figure 9.8. GWT mail client accessing the RESTful web API

Before describing the server-side GWT extension, let’s see how to handle cross-domain requests on HTTP resources from the client side.
9.2.4. Handling cross-domain requests on the client side
A common issue with web browsers is that they block resources located in domains different from the one that served the resource making the request. This security policy is known as the Same Origin Policy (SOP) and comes from restrictions on using the XMLHttpRequest object in JavaScript. Restlet provides an elegant solution on the server side, as we describe in section 9.3.3.
Past solutions to cross-domain limitations used workarounds, such as dynamic script element generation, which aren’t convenient because they don’t provide a consistent solution across browsers and don’t support all representation media types for data. The common JSONP approach, natively supported by GWT with its JsonpRequestBuilder class, is shown in the following listing.
Listing 9.6. Using jsonp within GWT
JsonpRequestBuilder jsonp = new JsonpRequestBuilder();
jsonp.requestObject("http://otherdomain.com/mypath", new
 AsyncCallback<MyData>() {
 public void onFailure(Throwable throwable) {
 (...)
 }
 public void onSuccess (MyData data) {
 (...)
 }
});
The problem here is that the returned content contains not only data but also the name of the JavaScript callback, as described in following snippet. For this reason, this approach is more of a hack than an ideal solution because it doesn’t truly follow the REST principles:
<callback>(<json data>)
In addition to these workarounds, the W3C has proposed the new Cross-Origin Resource Sharing (CORS) working draft, which provides a way for web servers to support cross-site access controls based on response headers. Such an approach is built on the Access-Control-Allow-Origin header, which is not yet supported by all browsers.
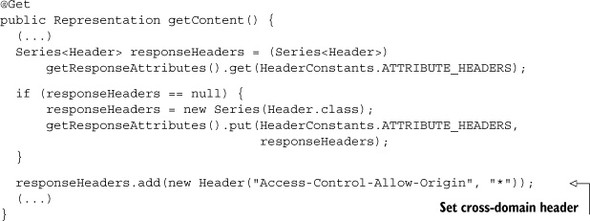
The browser uses the content of the header to determine whether the resource can be accessed by any domain in a cross-site manner. Specifying * defines that all domains can access the resource whereas a specific one or a list restricts this access. Listing 9.7 describes how to use the Access-Control-Allow-Origin header in the response to an HTTP resource call using Restlet. Even though it requires changes on the server-side to set this header, the calls will effectively be made directly by the client.
Listing 9.7. Using cross-domain header in a Restlet response
You’ve now completed your tour of the client-side edition of Restlet for GWT. It provides a way to access REST resources from GWT applications that mimics the way Restlet works in Java SE and EE applications. This edition also uses GWT’s deferred binding to allow transparent calls to REST resources with a minimum amount of manual code. So far we’ve only discussed the client side of GWT applications, but Restlet also supports GWT on the server side.
9.3. Server-side GWT extension
In addition to the edition for GWT on the client side, the Restlet Framework provides a dedicated server-side extension called org.restlet.ext.gwt, available in the following editions: Java SE, Java EE, Google App Engine, and OSGi. This extension is light because it only converts between GWT binary representations and Java objects, based on a dedicated media type, without implementing additional GWT-RPC plumbing. The ConverterService uses this extension to convert Java objects in GWT object serialization format for request with the corresponding media type. (We detail the conversion mechanism in section 4.5.4.)
These entities are directly integrated with the Restlet engine when the extension is present in the classpath; no explicit configuration is necessary.
Two issues regarding the server side need to be detailed here: How to make GWT-RPC work with the Restlet support for GWT, and how to enable cross-domain requests from the server side.
9.3.1. Working along with GWT-RPC
As described in section 9.2.2, Restlet edition for GWT retains the ability to use GWT-RPC in parallel to a RESTful web API.
Imagine that you want to have a remote contact service on a server that you can call using default remoting mechanisms of GWT. By default, implementing such services requires you to implement the remote interface by extending the GWT Remote-ServiceServlet Servlet with service methods. These GWT remote services are typically Servlets, as described in following snippet:
public class ContactsServiceImpl
                   extends RemoteServiceServlet
                   implements ContactsService {
  public List<Contact> getContacts() {
  (...)
  }
  (...)
}
The ContactsServiceImpl class is then configured within the web.xml file as a Servlet. Now that this first part is done, let’s configure the REST resources.
There are several ways to configure such resources on the server side with Restlet. For this demonstration, you’ll configure the Restlet application using the Servlet extension and its ServerServlet class. The following listing describes how to configure both approaches in the web.xml file of a web application, the Restlet application, and the GWT-RPC remote service.
Listing 9.8. Configure both GWT-RPC and Restlet support
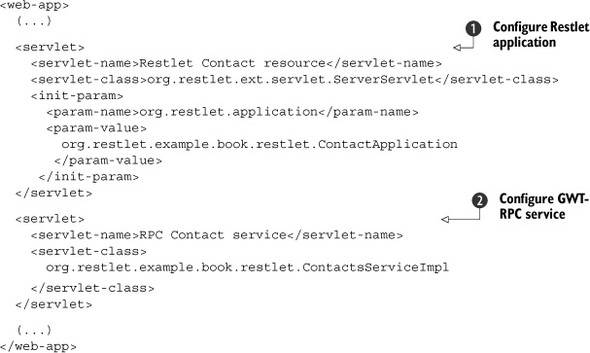
As you can see, you configured two Servlets in the web.xml file, corresponding to the two approaches. First the ServerServlet Servlet ![]() of Restlet configures the entry point to the Restlet application called org.restlet.example.book.restlet.ch09.resource. ContactApplication using the org.restlet.application initialization parameter. The default GWT-RPC approach is then configured
of Restlet configures the entry point to the Restlet application called org.restlet.example.book.restlet.ch09.resource. ContactApplication using the org.restlet.application initialization parameter. The default GWT-RPC approach is then configured ![]() using an implementation of RemoteServiceServlet called ContactsServiceImpl.
using an implementation of RemoteServiceServlet called ContactsServiceImpl.
Configuring the REST approach along with RPC-based approach is based on Servlet configurations. Before ending our discussion of server-side support for GWT, we’ll explain a convenient and elegant way to issue cross-domain calls without the previous limitations.
9.3.2. Handling cross-domain requests on the server side
Although there are some solutions on the client side to make cross-domain calls on HTTP resources, they aren’t completely standard or they depend on proper browser support. You can implement an alternative approach on the server side. In this case you need to have an additional component acting as a reverse proxy for the target HTTP resources. This approach can add latency because two requests are now executed in sequence.
Restlet provides the org.restlet.routing.Redirector class to implement a reverse proxy, as shown in figure 9.9. This class is much more generic than this GWT use case and therefore isn’t part of the GWT extension for this reason. We describe it here, though, because it provides a convenient solution to this problem. For further details, refer to section 8.3.
Figure 9.9. Implementing reverse proxy using the Redirector class

The redirector is typically configured in the createInboundRoot method of the application, as described in the following snippet:
public Restlet createInboundRoot() {
 Router router = new Router(getContext());
 String target = "http://www.restlet.org{rr}";
 Redirector redirector = new Redirector(
                                getContext(), target,

                                Redirector.MODE_SERVER_OUTBOUND);
 router.attach("/search", redirector);
}
In the preceding snippet the first step consists of instantiating the Redirector class. The use of this class is described in section 7.3.
Notice the {rr} pattern when attaching the redirector on the router. This allows appending to the target URI all elements present at the end of the original URI. Without it, all requests would be redirected to only one. In the end, requests to www.myexample.com/search/foo/bar will be served as if they were made to www.restlet.org/foo/bar, but without the cross-domain limitations.
This section ends the coverage of the GWT edition of the framework. Restlet integrates all internal issues and also takes advantage of GWT’s deferred binding to simplify use further. Based on the design experience of this edition, asynchronous call support was added to the Restlet API in other editions. Its use is almost identical, involving both ClientProxy and Result interfaces. We now turn to another thin client for RESTful applications: Android. We’ll describe how to use Restlet on Android-based mobile phones with the Restlet edition for Android.
9.4. Understanding Android
With the commodification of smartphones started by the Palm Treo and pushed further by the Apple iPhone, more and more mobile users have a usable access to the web from their phones. So far developers have been stuck with proprietary platforms that lacked the productivity and portability common in the Java world. Then came Android!
Android is an open source mobile OS initiated and driven by Google and the Open Handset Alliance, including prestigious manufacturers. Needless to say, Android has gained a lot of traction recently.
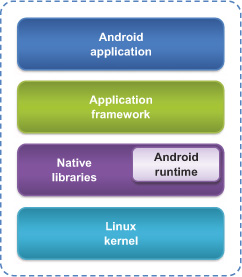
Technically speaking, Android is built on a customized Linux kernel, libraries such as WebKit for the web browser, and an extensible Application Framework developed in the Java language but running on a special Dalvik virtual machine (see a complete overview in figure 9.10). All the built-in applications are written in Java and can be accessed or customized via the Android API.
Figure 9.10. Layers of the Android platform
Before describing how to use REST with Android, we’ll give a few more details about the Android technology itself. We’ll then describe how Restlet can help and how you can use it within Android applications to access RESTful web APIs.
9.4.1. Android overview
Android is a complete software stack targeting mobile devices that includes an OS, middleware, and key applications. It provides a complete foundation to build native mobile applications. For this purpose, the Android SDK includes tools and APIs written for the Java programming language. Figure 9.10 shows a high-level description of the Android platform.
Table 9.4 lists more details on each part of this platform.
Table 9.4. Different parts of the Android platform
|
Part name |
Description |
|---|---|
| Applications | Android comes with a set of core applications for common use cases. These applications correspond to email and SMS clients, calendar and contact managers, maps, browsers, and so on. All these are built on the application framework and are written using the Java programming language. |
| Application framework | This framework is powerful and truly open because it gives access to the same Java APIs as core applications and is used in a component-based approach. Reusing components is simple, and any application can publish its features and consume other ones. The framework also makes it possible to override or replace components. |
| Libraries | Android includes a set of C/C++ libraries used by components of the Android platform, such as System C library, media, and 2D/3D libraries. You don’t need to know more about these libraries right now—only that their features are exposed to developers through the previously described application framework. |
| Android runtime | Android internally uses a special virtual machine (VM) called Dalvik, which has been optimized to run on mobile devices and to run multiple VMs efficiently. This virtual machine is built on the Linux kernel for underlying functionality such as threading and low-level memory management. This tool includes a set of core libraries that provides most of the functionality available in the core libraries of the Java programming language. |
| Linux Kernel | Android uses Linux version 2.6 as the OS for core system services, memory and process management, network stack, and driver model. The kernel can be seen as an abstraction layer between the hardware and the rest of the software stack above it. |
Because a full description of Android is beyond the scope of this book, we won’t provide details here; we recommend Android in Action, 3rd Edition, by W. Frank Ableson, Robi Sen, Chris King, and C. Enrique Ortiz (Manning, 2011), for more information.
9.4.2. Installing Android and Eclipse plug-ins
Developing Android applications requires you to install the Android SDK, available at http://developer.android.com/sdk/. An emulator called the Android Virtual Device (AVD) comes with the SDK and simulates real Android-based mobile phones. After downloading the SDK, you should run the Android SDK Manager and install the suggested packages, including the Android SDK Platform tools, as shown in figure 9.11.
Figure 9.11. Android SDK Manager

As you install plug-ins for GWT, GAE, and Android, the memory allocated by default to your Eclipse environment might become too limited and produce strange errors when you try to launch an Android application in the device emulator.
To raise this limit, edit your eclipse.ini file and set a value of 512m or higher for the launcher.XXMaxPermSize property, and 512m or higher for the -Xmx argument.
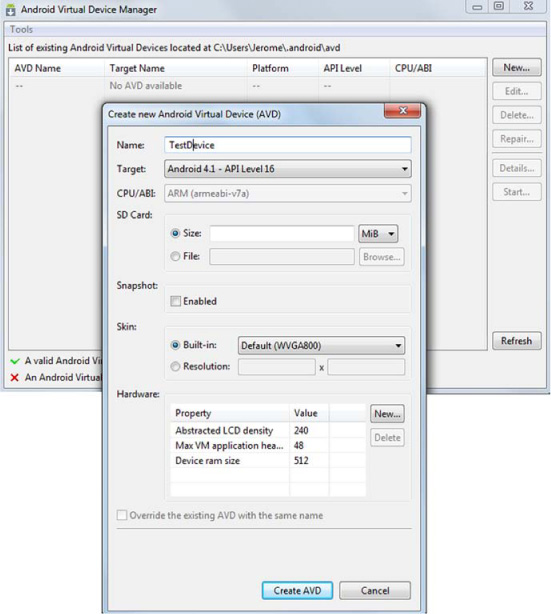
Next, you’ll use the AVD Manager that manages the AVD, on which you’ll execute Android applications developed with Eclipse. Click the New button, provide a name for the AVD, and leave default values in properties. When you’re done, click the Create AVD button, and the new AVD will appear in the list, as shown in figure 9.12.
Figure 9.12. Android Virtual Device Manager
In addition to the basic SDK, a special integration with Eclipse, called the Android Development Tools (ADT) plug-in, provides the following features:
- Integration of external Android development tools within Eclipse
- Wizards to create and configure artifacts necessary for Android applications
- Facilities to efficiently build Android applications and generate signed APKs (Android packages similar to JAR files), which can be shipped to end users
- Dedicated editors for Android application files like layout files
To install this tool, use the Update Manager of Eclipse, available from the Help > Install New Software menu. You need to specify the Update Site for ADT within the corresponding window. The address of this site is https://dl-ssl.google.com/android/eclipse/. After specifying it, you have access to the modules described in figure 9.13. In addition to Android development tools, select the following modules:
- Dalvik Debug Monitor Server tool (DDMS)— Provides a debugging tool for Android application development
- Android Hierarchy view— To debug and optimize your user interfaces
- Android TraceView— Provides a graphical viewer for execution logs saved by your application
Figure 9.13. ADT modules to install through Eclipse’s update manager tool

Let’s select all of them and start their installation. After restarting Eclipse, ADT is available within your Eclipse instance.
Now that you have everything properly installed for developing Android applications with Eclipse, let’s come back to our subject and tackle how to use REST within Android applications. Because Android targets mobile devices, corresponding applications are commonly connected to the internet and can access its resources. As you’re about to see, the Restlet Framework can provide a useful help to access remote web APIs from Android applications.
9.5. The Restlet edition for Android
As with GWT, Android provides a particular execution environment based on the Java language but with differences in terms of available runtime APIs. Differences between the Dalvik VM and the regular Java VM correspond to issues such as garbage collection, memory footprint, and CPU use. The other differences are related to the runtime APIs available, with some packages added and others removed. For this reason Restlet provides a dedicated edition that’s compatible with Dalvik and the APIs provided by Android.
You’ll see throughout this section that all facilities provided by Restlet to consume web APIs are usable within Android-based devices. After describing the features of the edition for Android, we’ll illustrate Restlet’s use in Android native applications for both client-side and server-side support. The major benefit here is the ability to use the high-level API of Restlet instead of the low-level HTTP clients provided natively by Android.
9.5.1. Restlet port to Android
The Restlet edition for Android contains some adjustments to take into account, such as classes not supported by the Android runtime environment, but otherwise is similar to the Java SE edition.
With this edition, you can use Restlet on Android with both client-side and server-side HTTP connectors. Restlet extensions are being progressively ported; at the time of writing, all extensions listed in table 9.5 have been tested and work on the Android platform.
Table 9.5. Restlet extensions that can be used with Android
Let’s look at how to develop Android applications using Restlet support for client and server sides.
9.5.2. Client-side support
The client-side support in Android edition remains the same as the Java SE edition and is based on the ClientResource class. Three HTTP client connectors are currently available: the internal Restlet one, the Apache HTTP client already available on Android, and the HttpURLConnection class.
As the time of writing, the best choice for Android 2.2 (Froyo) and above is to use the HttpURLConnection class, which has the lightest footprint and is recommended by the Android team moving forward [11]. When the footprint isn’t a concern, and internet connectivity is reliable, you can also consider the two other connectors that bring other benefits.
In all cases, you need to remember to add the android.permission.INTERNET Uses Permission in your AndroidManifest.xml file to ensure that your Android application is allowed by the end user to access the internet via the HTTP protocol.
The internal HTTP client has been rewritten using the java.nio package. On some android devices, this may lead to encountering this kind of exception: java.net.SocketException: Bad address family. In this case, you can turn off the IPv6 preference as follows:
System.setProperty("java.net.preferIPv6Addresses", "false");
Also, contrary to other editions, the Android edition can’t make use of Restlet’s autodiscovery mechanism for connectors and converters provided as Restlet extensions. This is due to a limitation in the way Android repackages JAR files into APK files, leaving out the descriptor files in the META-INF/services folder used by the Restlet Framework for autodiscovery. The internal connector and converters are still automatically configured and can be used without additional configuration.
The workaround for extensions consists in manually registering those additional connectors and converters with the Restlet Engine. You can do this by adding to the list returned by the getRegisteredConverters and getRegisteredClients methods of the org.restlet.engine.Engine instance, as illustrated in listing 9.9
Now that we’re done with the Android-specific set-ups, we can focus on the application. We’ll implement a simple Android application to display emails based on the GAE mail server that you used for the GWT client earlier.
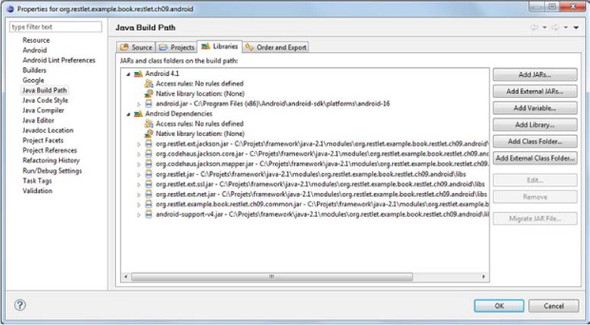
You first create an Android Project with the corresponding New wizard of Eclipse ADT, check the activity creation, and specify MobileMailClientMainActivity for its name. Because you want to use the Restlet edition for Android, you must add the corresponding library JARs to the special libs folder, which adds them to the Java Build Path, as shown in figure 9.14.
Figure 9.14. Configuring Restlet JARs for the Android project
Everything is now configured within the project. No time to waste—let’s complete the autogenerated MobileMailClientMainActivity class to retrieve the list of emails from the web application in the back end at startup. For that, you complete the existing onCreate method. This class extends ListActivity because you want to display a list of emails, as shown in the next listing.
Listing 9.9. Implementation of the SimpleWebMailActivity class
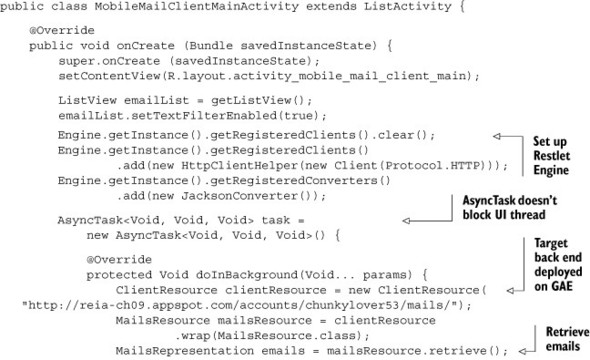

The use of the ClientResource class within an Android activity is identical to regular Java applications, including the ability to use annotated interfaces. The main differences are in the way Android strongly suggests you run your HTTP calls using AsyncTask and only updating the UI using the runOnUiThread method.
Now, if you launch the Android client via the emulator, it should properly connect to the GAE back end accessible publicly and display the UI in figure 9.15.
Figure 9.15. Simple mobile Android mail client

This section discussed how to access RESTful applications using the client-side support in the Restlet edition for Android. There were additional steps to take in order to make Restlet work in this context, but it still provided higher-level support compared to the native Android platform, especially when you already use Restlet for your backend. Let’s now describe Restlet’s server-side support for Android.
Be careful when using 127.0.0.1 or localhost within a URI. They correspond to the phone itself and not the machine when using Android emulator within Eclipse, for example. If you want to access RESTful applications running outside Android applications, you must necessarily use host names or IP addresses.
9.5.3. Server-side support
In contrast to GWT, which compiles Java into JavaScript, Android applications are, like regular Java applications, compiled into byte code and executed on a Linux OS instead of a web browser. This aspect makes it possible for these applications to act as HTTP servers, not just clients.
Keep in mind that Android targets mobile devices that are less capable in terms of memory and CPU. Although Dalvik is similar to a JVM, it doesn’t provide all the APIs present in standard JVMs. Because of these restrictions, it’s not so simple to use classic server-side tools such as Java EE web containers. But Restlet edition for Android comes to the rescue.
As on the client side, you can use server-side support for Restlet in Android applications. This makes it possible to implement server applications, including HTTP servers. For that purpose, you can use all of Restlet’s capabilities described throughout the book to implement RESTful applications on your mobile phone. The next listing describes how to start a standalone Restlet server within the onCreate method of an Android activity. This method is called when the activity is first created.
Listing 9.10. Starting a Restlet server within an Android activity

An Android port of the well-known web container Jetty is also provided by the i-Jetty project. Although Restlet provides its own internal HTTP server and all you need to implement server-side RESTful applications, i-jetty might be useful if you need Servlet support.
Using Restlet server support on smartphones is a marginal use case, because it’s impossible to reach the IP of smartphones through mobile networks due to telco security restrictions. But this issue will become more useful because Android is starting to target other mobile devices, such as tablets and notebooks, using more open wifi networks.
In addition, the Android Cloud to Device Messaging framework (C2DM) helps developers send data from servers to their applications running on Android devices.
9.6. Summary
The edition-based approach of Restlet allows you to use the same Java API (or at least a subset because of specific restrictions) when implementing or accessing RESTful applications across various execution environments. Some of these editions target cloud environments as seen in chapter 8, and others target RIAs and mobile devices, as covered in this chapter.
GWT is a technology that allows the development of rich browser-based applications using the Java language. The client part is compiled to JavaScript and can be executed within a regular web browser. The server side is a full Java-based server application executed by an application server. You can use the client Restlet API within client-side GWT applications to asynchronously call RESTful applications. Although the standard Restlet API is usable, this edition goes further and uses the deferred binding feature of GWT to provide an even simpler way to use Restlet with automatic representation serialization.
Android is a popular technology focused on mobile devices such as smartphones and providing a complete execution environment based on a Linux kernel and a special Dalvik VM. Using Restlet in this environment is possible thanks to its Android edition taking into account restrictions on the client side and server side. As a result, your Android applications can both consume and expose RESTful web APIs.
In this chapter you saw how to deploy Restlet applications to different execution environments using the same API and features. This makes the Restlet Framework a good choice to increase the portability of your client- or server-side code across those various environments, especially if you rely on Google technologies such as Android, GWT, and GAE.
In the next chapter we’ll connect the dots between the REST world, its hypermedia roots, and the quickly-growing subject of Linked Data, which is part of the larger Semantic Web. Chapter 10 will give you another great example of the benefits of basing your application architecture on a REST foundation using the Restlet Framework.