
Appendix B. Installing the Restlet Framework
The goal of this appendix is to help you install the Restlet Framework and get started with it, from a tooling perspective. We describe several ways to retrieve the framework artifacts, called distributions. We guide you through the basic installation and usage steps for major IDEs, showing in detail how to run a first Restlet program.
We also review recommended testing tools and illustrate their basic use with Restlet. This provides an opportunity to focus on the key task of debugging Restlet-based programs.
B.1. Restlet distributions
The Restlet Framework is composed of a core module that depends only on Java SE, plus a set of extensions that generally depend on third-party libraries. Initially, the framework was distributed as a zip containing the Java binaries and source code of all of these artifacts. Then an automated installer for Windows was added, later a Maven repository, and recently an Eclipse update site. This section details these distributions and gives hints about how to use them. We’ll begin the tour with the Maven repository.
B.1.1. Maven repository
Maven is a software tool for the management of Java projects and for build automation. Created by Jason van Zyl in 2002, it is hosted by the Apache Software Foundation. Among other features that make this project popular, Maven allows users to keep their installation up-to-date by automatically retrieving dependent JAR files. Some Restlet users were frustrated by having to regularly check for the fresh bits and promoted this solution. It’s been decided to provide a public Maven repository available at http://maven.restlet.org. This is updated on a daily basis and stores all Restlet artifacts and third-party libraries that aren’t part of the central Maven repository (http://search.maven.org) or other public ones.
Once Maven has been installed in your environment, you should declare the Restlet public repository either in the POM configuration file of your project or parent project. Add the following snippet of text in the <repositories> section:
<repository>
   <id>maven-restlet</id>
   <name>Public online Restlet repository</name>
   <url>http://maven.restlet.org</url>
</repository>
As an alternative, you can declare the repository for all your projects. Go to the installation directory of your Maven copy. Open and edit the conf/settings.xml file and add to the <profiles> section the following code:
<profile>
  <id>restlet</id>
  <repositories>
    <repository>
      <id>maven-restlet</id>
      <name>Public online Restlet repository</name>
      <url>http://maven.restlet.org</url>
    </repository>
  </repositories>
</profile>
After the </profiles> section add the following:
<activeProfiles>
  <activeProfile>restlet</activeProfile>
</activeProfiles>
With the introduction of the notion of edition, the group identifiers have evolved to match the template org.restlet.<edition>, where <edition> is the code of an edition:
- jse for the Java SE edition
- jee for the Java EE edition
- osgi for the OSGi edition
- gwt for the Google Web Toolkit edition
- gae for the Google App Engine edition
- android for the Android edition
If the artifact is a Restlet extension, the artifact identifiers follow the template org.restlet.ext.<extension>, where <extension> is the name of the extension. Note that the artifact ID is also the name of the root package of the extension.
If the artifact is a third-party library, its artifact identifier follows the template: org.restlet.lib.<jar identifier>, where <jar identifier> is more or less the name of the root package of the third-party library.
Regarding the version number, there are two cases. Assuming that the version is divided into three parts (major, minor, and patch), in case the patch part is a numerical value, the Maven version is as follows: major.minor.patch. Otherwise, the release is either a milestone or a release candidate, and the version is respectively as follows: major.minor-M<increment> or major.minor-RC<increment>, where <increment> is a numerical value starting from 0. Additional details on versioning are available in appendix A, section A.5.
Each project based on the Restlet Framework needs to declare at least one dependency: the Restlet core module. According to your needs, you should complete the list of dependencies with the required extensions and connectors. For example, assuming your project is a web server delivering static files, you could use an extension HTTP server connector such as the one based on Simple.
Because your Maven client correctly references the Restlet online repository, open and edit the pom.xml file for your project and add the following lines of text into the <dependencies> section. You should use the most recent version number available at the time you’re reading instead of 2.1-RC2, such as 2.1.0:
<dependency>
  <groupId>org.restlet.jse</groupId>
  <artifactId>org.restlet</artifactId>
  <version>2.1-RC2</version>
</dependency>
<dependency>
  <groupId>org.restlet.jse</groupId>
  <artifactId>org.restlet.ext.simple</artifactId>
  <version>2.1-RC2</version>
</dependency>
The next section introduces a less integrated way to get the several Restlet distributions by using compressed archives files.
B.1.2. Zip files
The zip file is available for all releases and by edition. All are available from www.restlet.org/downloads/.
The zip contains the following directories and files:
- docs—The Javadocs of the Restlet API, the Restlet Engine, and the extensions
- lib—The JAR files of the Restlet API, the Restlet Engine, the extensions, and their dependencies
- src—The source code of the framework and the provided examples
- changes.txt—The list of fixed bugs and enhancements by release
- readme.txt—Summary of the Restlet project
- copyright.txt, license.txt, trademarks.txt—Some legal materials
Once downloaded, decompress the zip file into the desired directory. When developing, you’ll need to have a closer look at the lib directory in order to pick up the needed JAR files to add to your classpath (they aren’t all needed at the same time), and the docs directory, in order to read the Javadocs in your web browser.
On Windows-based computers, an executable installer enables you to automate the installation of a distribution.
B.1.3. Windows Installer
The Windows Installer is available for all releases and all editions at www.restlet.org/downloads/. This distribution is more or less the self-extracting version of the zip file based on the NSIS installation software, with the addition of an easy way to uninstall it.
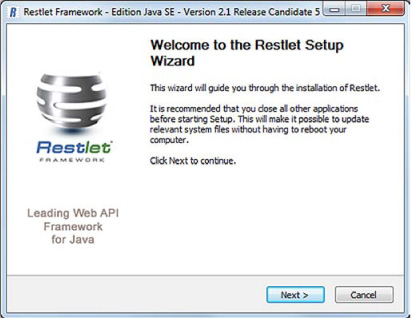
The installation process is simple and requires your attention only in two places: to specify the installation directory and to accept the license. Figures B.1–B.5 are snapshots of the installation process. Double-clicking the executable file bring up the screen in figure B.1.
Figure B.1. Front page of the installation process
Click the Next button, and you’re asked to read and accept the license (figure B.2).
Figure B.2. Read and accept the license.

After you agree to the license, enter the root directory to put the files into and click Next (figure B.3).
Figure B.3. Specify the installation directory.

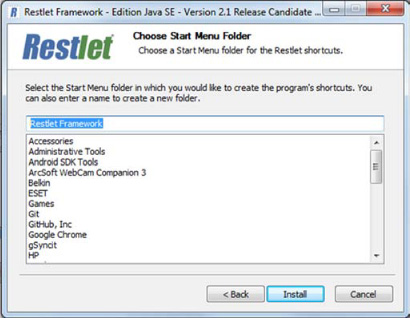
The next step is to confirm the Start Menu folder and launch the installation by clicking Install (figure B.4).
Figure B.4. Choose the Start Menu folder.
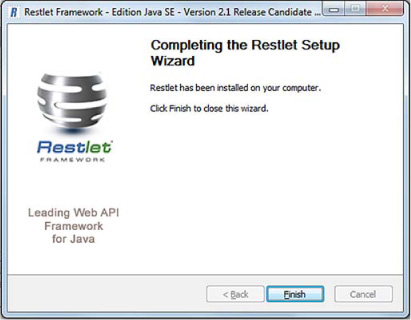
The installation will take a few minutes. Validate the last installation step (figure B.5).
Figure B.5. End of the installation process
The next section is dedicated to Eclipse users interested in the development of Eclipse plug-ins or OSGi-based applications. An Eclipse p2 repository provides the Restlet modules as OSGi bundles ready to be installed in the Eclipse IDE.
B.1.4. Eclipse update site
This update site is only available for the Restlet edition for OSGi environments since version 2.1. It allows the retrieval of Restlet modules as plain OSGi bundles (including their dependencies) directly from the Eclipse IDE. They’re gathered by type of module: Core module, support of standards, pluggable connectors, and integrations with third-party libraries.
This Eclipse update site distribution is only useful for pure OSGi developments such as in an Eclipse RCP or Eclipse RT environment. For regular Eclipse IDE use of the Restlet Framework, such as for Java SE or Java EE, refer to section B.2.1.
The URL of the update site is based on the following pattern: http://p2.restlet.org/<major_version>.<minor_version>. It provides all tagged releases (such as current snapshot, or milestones, releases candidates, and so on) and allows for easy upgrade.
The next screenshots illustrate how to install the bundles into your Eclipse IDE. Choose Help > Install New Software. Enter the URL of the desired repository in the upper field, and click Add (figure B.6).
Figure B.6. List of available items

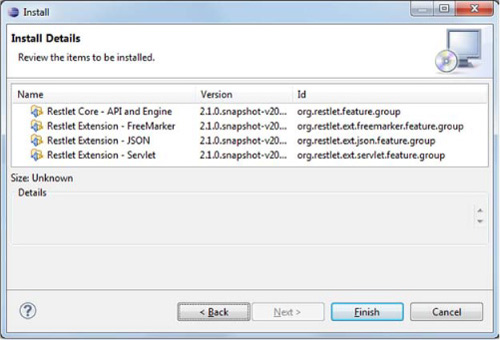
Make your selection from the list of available items, which are listed by category (Restlet Core, Pluggable connectors, and so forth). After you make your selection, click Finish (figure B.7).
Figure B.7. List of selected items
After a moment, which includes the detection of dependencies, you’ll be warned that you’re about to install unsigned content. Stick to your choice and click OK (figure B.8).
Figure B.8. Warning: the content is unsigned

The installation process goes on, and after a moment you’ll be asked to restart Eclipse in order to finalize the installation (figure B.9).
Figure B.9. End of the installation

The next section deals with the installation of the Restlet Framework into usual Integrated Development Environments (IDEs), such as Eclipse, NetBeans, and IntelliJ.
B.2. Setting up your IDE
The aim of this section is to give Java beginners a short review of the steps required to code a simple program based on the Restlet Framework with three major IDEs: Eclipse (version 3.6, aka Helios), NetBeans (version 7.0.1), and IntelliJ IDEA (version 10.51). This guide will help beginners go through the basic tasks needed to create a project and update the list of dependencies.
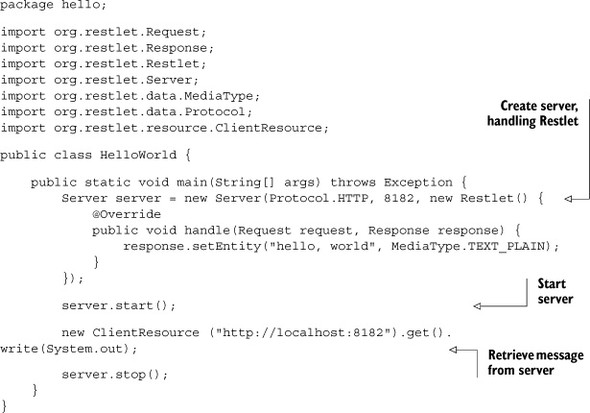
Although the three IDEs propose unsurprisingly distinct interfaces, note that they share at least some basic concepts that make it easy to go from one IDE to another if needed. This guide is illustrated by a simple test combining a simple server Restlet that serves the “hello, world” text and a simple ClientResource that gets it and prints it to the console. It depends only on the core module of the Restlet: org.restlet.jar.
The whole test code is located in a single Java class called HelloWorld, whose package name is hello. In the following listing, you’ll find the content of this class.
Listing B.1. Sample HelloWord program
The remainder of this section assumes that the Restlet Framework has already been installed via the Windows Installer or the zip distribution so that the archives are available via the file system. Let’s start with the Eclipse IDE.
B.2.1. Eclipse
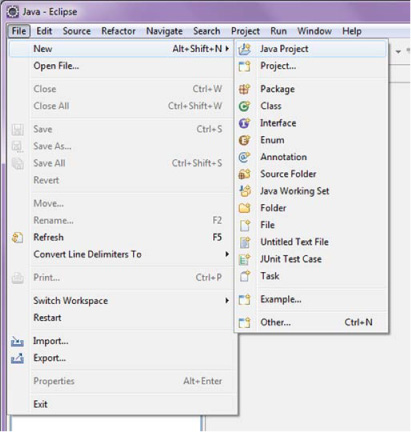
Eclipse is an open source project developed by the Eclipse community (www.eclipse.org). For the purpose of this book, we present a basic configuration of a Java application using Eclipse 3.6, known as Helios. Once Eclipse is started, go to the Java perspective and choose File > New > Java Project (figure B.10).
Figure B.10. Create a new project.
The first page of the wizard is where you enter the name of the project. Call it test-Restlet and leave the other parameters as their default values. Because the Next button leads you to define specific or advanced parameters, you’ll ignore it and finish the process by clicking Finish (figure B.11).
Figure B.11. Enter the project name.

Once the project is created, you need to add the dependency to the Restlet Framework, which, in that simple case, consists of a single Java archive: the code module org.restlet.jar. Open the contextual menu of the project by right-clicking the name of the project. Follow the Build Path submenu (figure B.12).
Figure B.12. Open the contextual menu.

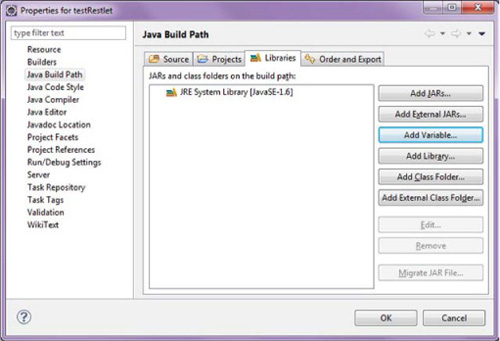
Click Configure Build Path, and make sure the Libraries tab is selected. You should see the window shown in figure B.13.
Figure B.13. Configure the build path.
A direct way to add an archive is to click the Add External JARs button and browse your disk to select the desired archive. One drawback with this is that your project now depends on your filesystem. Eclipse offers two smarter ways to achieve this. The first is based on the declaration of variables which can be extended. The other is based on the declaration of the user library—refer to the documentation of the Eclipse project for more detail on this feature. In this case, you’ll create a RESTLET_HOME variable pointing to the root directory that contains Restlet libraries, and then this variable will be extended to list real Java archives. To achieve these two tasks, click the Add Variable button. You’ll see the dialog in figure B.14.
Figure B.14. Creating and extending a variable, first page

The first step is to create the variable. Click the Configure Variables button and then New.
In this case, the variable is called RESTLET_HOME and points to a local directory. You can either browse your file system using the Folder menu or enter the directory manually. Here, you use the root directory of Restlet previously installed using the Windows Installer (figure B.15).
Figure B.15. Creating a variable

Once the variable has been created, you’re redirected to the window that lists the available variables (figure B.16).
Figure B.16. Listing variables

Because you’ve only defined a directory, you need to extend it. Choose the RESTLET_HOME variable and click the Extend button to reveal the extensions. This is a simple browser that will help you to choose the single entry used to extend the variable. In this case, the entry org.restlet.jar is located under the lib directory (figure B.17).
Figure B.17. Locating the entry to extend the RESTLET_HOME variable

Once the JAR file is selected, click OK and return to the Java Build Path dialog to see the new entry added to it (figure B.18).
Figure B.18. Extending variables

As a side note, classpath variables and user libraries can be configured outside a project in the preferences of Eclipse. They’re both available under the submenu Java > Build Path (figure B.19).
Figure B.19. Managing variables and user libraries in Eclipse

The project is created and its build path configured. Create a new package called hello and a new class called HelloWorld, and copy and paste the code specified in listing B.1. Figure B.20 gives a view of what you should see in your Eclipse session. Display the contextual menu by right-clicking the class. It will allow you to run the main method; choose Run As > Java Application.
Figure B.20. Run the main class.
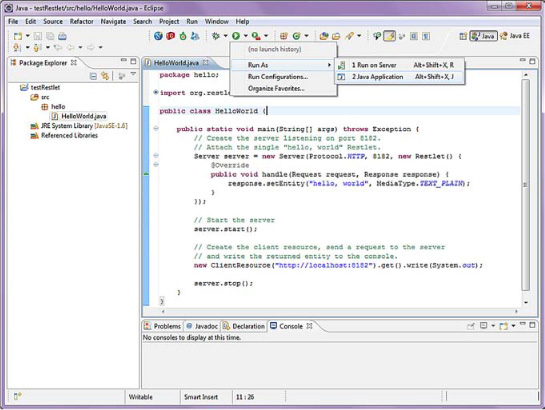
Figure B.21 illustrates the result of the code once it has run. You should see in the Console view some log trace in red and the “hello, world” string printed in black.
Figure B.21. The Console view

Note that Eclipse is also integrated with Maven using the m2 plug-in. In addition, as seen in the previous section, Eclipse provides its own distribution system known as update sites. In the next section, you’ll repeat the same tasks using another open source IDE called NetBeans.
B.2.2. NetBeans
NetBeans is the development environment provided by Oracle (www.NetBeans.org). This section illustrates the basics steps of creating a simple Java project and running it using NetBeans version 7.0.1.
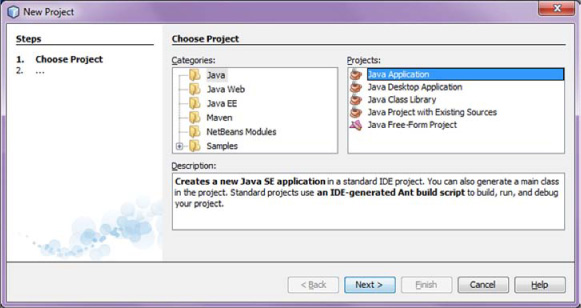
Let’s begin with the creation of a brand-new project. Choose File > New project (figure B.22).
Figure B.22. Create a new project.

Choose Java Application in the first step of the creation process (figure B.23) and click Next.
Figure B.23. Create a new Java project.
On the second pane, enter the name of the project; the location will be built automatically (figure B.24).
Figure B.24. Choose the project name and location.

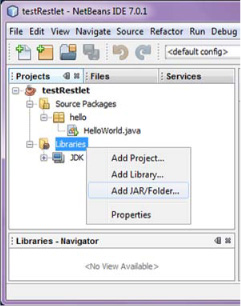
Once the project is created, it’s time to configure the dependency to the Restlet Framework (the single core module). Right-click the Libraries item (figure B.25).
Figure B.25. Update dependencies. Figure B.26 Add a new global library.
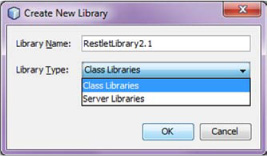
You can directly browse your local disks until you find the org.restlet.jar file using the Add JAR/Folder option. A better way is to first configure a container of Java archives for the whole workspace. This will ease the configuration of the next projects and prevent your project from depending directly on your filesystem. To do so, NetBeans proposes the concept of the library. Select the Add Library option and click Create. Enter the name of the library—for example, RestletLibrary2.1—and choose the Class Libraries type (figure B.26).
Figure B.26. Add a new global library.
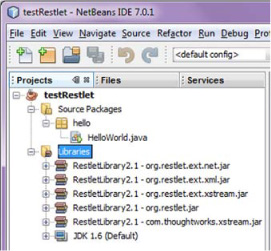
The next step consists of gathering the list of Java archives that will be part of this library. Use the Add JAR/Folder button to pick each JAR file that you want to use. You can pick them one by one (figure B.27).
Figure B.27. Complete the library.

At the end of the process (after a few additional clicks), you can select this library for your project (figure B.28).
Figure B.28. Add the library dependence to the project.
Note
You can manage the libraries of your NetBeans workspace using the Tools/Libraries global menu.
You’re done with the project creation and configuration. Create a new package called hello and a new class called HelloWorld, and copy and paste the code from listing B.1.
Figure B.29 gives a view of what you should see in your NetBeans session. Display the contextual menu by right-clicking the class. It will allow you to run the main method by choosing the Run File option.
Figure B.29. Run the main class.

Figure B.30 illustrates the result of the execution of the main method. The Output view contains the log traces in red and the “hello, world” string in black.
Figure B.30. The Output view

It’s time to end this tour of development environments by introducing a popular commercial IDE called IntelliJ IDEA.
B.2.3. IntelliJ IDEA
As stated by the originators of IntelliJ IDEA (www.jetbrains.com/idea/): “IntelliJ IDEA is an intelligent Java IDE intensely focused on developer productivity. Our code editor is consistently called the best in the industry, and we support all the major languages and technologies with your productivity and teamwork in mind.”
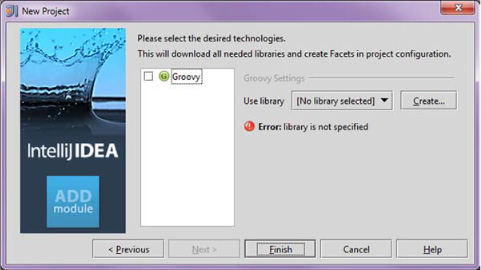
If you want to try it, download the community release—which is free but supports only the Java SE and not Java EE. Unsurprisingly, the story begins by choosing File > New Project (figure B.31).
Figure B.31. Choose File > New Project.

Enter the name, and choose Java Module as the project type. In the next panel (figure B.32), choose Create Project from Scratch and click Next.
Figure B.32. Create a new project.
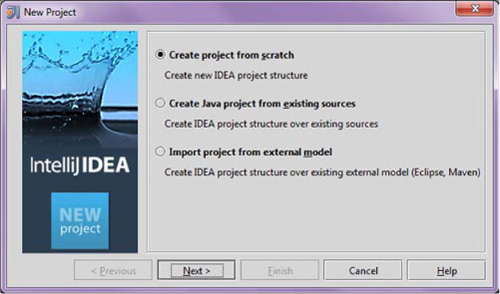
Figure B.33 shows you the window where you enter the name of the project.
Figure B.33. Specify the project name, location, and type.

Leave the default values of the source directory, and click Next (figure B.34).
Figure B.34. Specify the source directory.

Leave the default JDK unless you have a special need (figure B.35).
Figure B.35. Specify the JDK.

The dialog in figure B.36 ends the project creation process. Click Finish.
Figure B.36. Final step
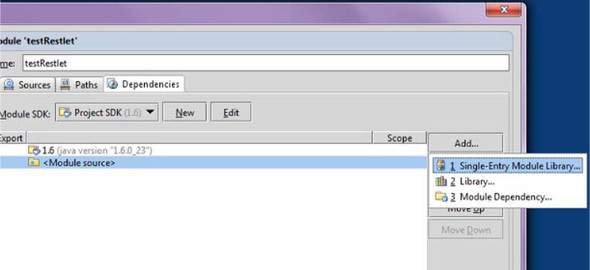
Once the project is created, you configure its dependency with only the core module of the Restlet Framework. Choose File > Project Structure (figure B.37).
Figure B.37. Begin configuring the project dependency.

In the left panel, choose Modules. In the right panel, select the Dependencies tab and click the Add button, using the Single-Entry Module Library option (or “JARs or directories” in version 11). See figure B.38.
Figure B.38. Adding a dependency
You can explore the filesystem to look for the org.restlet.jar file. Once found, select it. The project is then created and configured. Create a new package called hello and a new class called HelloWorld, and copy and paste the code from listing B.1. Figure B.39 shows what you should see in your IntelliJ session. Display the contextual menu by right-clicking the class. You can run the main method by choosing the Run HelloWorld.main() option (figure B.39).
Figure B.39. Run the main class.

Figure B.40 illustrates the result of the execution of the main method. The Output view contains the log traces in red and the “hello, world” string in black.
Figure B.40. The Output view

This concludes the steps for creating, configuring, and running a Restlet project inside IDEs. But this isn’t the end of the appendix. We’ll next discuss a less friendly way to develop a Restlet application, using only the command line.
B.2.4. Command line
Let’s go back to basics, relying only on the simple tools provided by the JDK: javac for compiling your source code and java to run the compiled code, plus a simple text editor. Once the content of the code has been written (in this case, the sample Java class HelloWorld.java), you can compile and launch your code with only two command lines, as illustrated in figure B.41, assuming that your org.restlet.jar file is available in the current directory.
Figure B.41. Compile and launch the code.

Note that you have to correctly and cautiously set the classpath for each command via the -cp parameter. The classpath should contain at least the core module of the Restlet Framework.
B.3. Suggested testing tools
This section reviews a set of common tools used for testing web APIs covering unit tests (JUnit, TestNG) and integration tests (cURL, RESTClient, ClientResource). We end with advice on debugging problems you may face during Restlet development.
B.3.1. Unit testing
This section illustrates the testing features of the Restlet Framework. The main one is that you can programmatically invoke all the API classes (Component, Application, Server-Resource, and so on) used during the development of your application, without going through regular network layers. This operation consists of creating the desired instance of the Request class with all its properties set (URI, method, entity, media type preferences, and so on) and invoking the handle(Request, Response) method. This method is available for any subclass of org.restlet.Restlet, such as Component, Application, Router, Filter. A similar handle() method is also available for subclasses of ServerResource.
The rest of this section discusses how to do unit testing using the common JUnit and TestNG tools to automate and structure your test suites.
JUnit
JUnit is a widely known testing framework integrated into several tools and IDEs such as Eclipse, NetBeans, and IntelliJ IDEA. We’ll illustrate it using the mail management application developed in this book. We’ll focus on a particular resource and test it using three distinct layers of the application: the server resource itself, the hosting application, and the component.
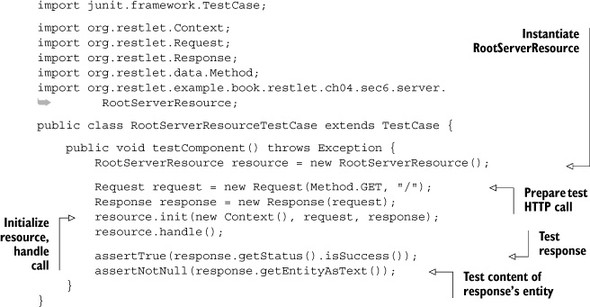
The following listing contains a simple JUnit test case that instantiates the RootServerResource class, builds a request/response as it would be received, and lets the resource handle the call.
Listing B.2. Unit test for RootServerResource
In this case the target server resource is simple, and its logic doesn’t rely on services offered by the parent application, such as the tunnel service. In real life, server resources are frequently using services and data from their parent application, shared with a sibling resource. It’s therefore better to test them in their natural context.
The following listing contains a simple JUnit test case that builds a request/response as it would be received by the server connector and directly invokes a local instance of the MailServerApplication class.
Listing B.3. Unit test for Application

Another way to issue the client request is to create a ClientResource instance and locally attach the application to it using its setNext(...) method.
To complete the test suite, you can test the resource at an even higher level using a parent Component. The following listing shows almost the same test code except that it targets the MailServerComponent class.
Listing B.4. Unit test for Component

As a side note, the editions for Java SE and Java EE include a test module called org.restlet.test that contains the whole test suite for the Restlet Framework. These tests are all written using JUnit and offer a good start point for discovering Restlet code.
TestNG
Inspired by JUnit, TestNG offers additional features such as running tests concurrently using thread pools. It’s also integrated by various tools and IDE such as Eclipse, IntelliJ IDEA, and more. The following listing is a transposition of the test case used for testing the Component class, but using 10 concurrent threads issuing a total of 100 calls.
Listing B.5. Unit test for Component


TestNG is also a good tool for integration testing, end to end, functional, and more.
B.3.2. Integration testing
This section introduces a set of tools that allows testing your application at the network level.
cURL (HTTP://CURL.HAXX.SE/)
cURL is a command-line tool that supports several communication protocols including HTTP, HTTPS, and FTP. It’s available for a wide range of OSs, including numerous Linux-based OSs, Windows, and MacOS.
It offers a large set of commands, but we’ll stick to the simpler ones here. The first command allows you to get the representation of a resource. Give the URL of the remote resource as a single argument to the cURL command like this:
C:>curl http://localhost:8111/
Welcome to the RESTful Mail Server application !
To get the whole set of response headers, add the –D option. The headers will be dumped to the provided text file:
C: >curl -D header.txt http://localhost:8111/
Welcome to the RESTful Mail Server application !
C: >more header.txt
HTTP/1.1 200 OK
Date: Sun, 18 Sep 2011 16:21:57 GMT
Accept-Ranges: bytes
Server: Restlet-Framework/2.1.m5
Content-Length: 48
Content-Type: text/plain; charset=UTF-8
cURL is complete enough to give you the ability to manually specify all aspects of the request including headers (use the –H options), method (-X), and entity (--data, --data-binary, -T). We’ll let you discover the other capabilities of this tool. For now we’ll introduce RESTClient, which can be seen as a graphical version of cURL.
RESTClient
RESTClient (http://code.google.com/p/rest-client/)is a Java application to test RESTful web services. You can use it to test any kind of HTTP server.
You’ll repeat the same GET method as in the preceding section. The window is more or less divided into two parts. The upper part lets you configure the request—for example, the URL of the remote resource—and the method (figure B.42).
Figure B.42. Specify the request.

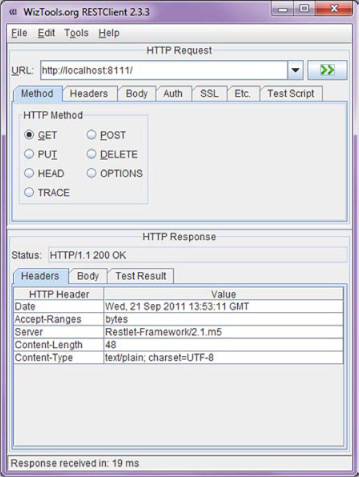
The lower part is dedicated to the introspection of the response attributes: headers, body, and so forth. You can glance quickly at the set of response headers (figure B.43).
Figure B.43. Response headers
As you may have noticed, this tool offers a simple but powerful interface for precisely testing your web APIs. In addition, writing test scripts using Java code against a RESTClient Java API is possible.
The following section adds the Restlet Framework to the heap.
ClientResource (Java Code)
In case you need to programmatically test your REST API, you may find it useful to rely on the client API offered by the Restlet Framework. It’s able to give you fine control on the request and access to all parts of the response: headers, entity, and entity attributes. Figure B.44 illustrates this in a few lines of code.
Figure B.44. Use of a ClientResource to test a remote resource

That’s our short review of tools that help you test your web API. We’ll end this appendix by sharing best debugging practices.
B.3.3. Debugging problems
How do you debug a Restlet application? On a running system, the main source of debugging information is the log file recording the application’s activity. We’ll consider some of the logging features in the Restlet Framework that ease the configuration of log traces and the exploitation of these traces. Then we’ll describe debugging practices when developing an application within an IDE.
The Restlet Framework log feature is based on the standard java.util.logging log API provided by Java SE (since version 1.4). By default, Restlet components generate Apache/IIS-like logs, which facilitate their exploitation by standard tools such as Analog. Thanks to the standard log API, you can also configure the format, the location of the log files, the rotation of the log files, and more. By default, the configuration of the logs relies on the system property java.util.logging.config.file, which locates the standard configuration. In case this property is missing, it’s still possible to configure the log programmatically thanks to the org.restlet.engine.Engine class. This relies on two static members: logLevel and restletLogLevel. The first line of code in the following listing turns off the log level for all loggers, and the second one turns on all traces for the loggers with names starting with org.restlet.
Listing B.6. Programmatically configuring the log level
![]()
Another feature is the ability to restrict the generated logs according to the properties of the incoming request. Each Restlet component has a dedicated LogService object that copes with the access traces. The LogService class enables subclasses to customize the isLoggable(Request) method, which returns a Boolean. By default, it looks up the Request.loggable property that you can easily modify.
You can also create your own implementation of the LogService class and override this method to enable a log for a particular set of URIs, method, or any other attributes of the incoming request. The following listing shows how to enable traces for Internet Explorer browsers only.
Listing B.7. Programmatically enable log traces for MSIE clients
public class MyLogService extends LogService {
   @Override
   public boolean isLoggable(Request request) {
      return request.getClientInfo().getAgent() != null
            && request.getClientInfo().getAgent().contains("MSIE");
   }
}
When something goes wrong, and no trace can easily let you know what is going on, it’s easy to use the step-by-step debugger of your IDE. To get a hold on the current request, you need to override the handle(Request, Response) method of the specific Restlet you want to start inspection from, put a breakpoint inside it, and follow the processing. You should attach the source code of the Restlet Framework available in the distributions to let you step inside the Restlet code and be able to follow the processing chain down to the problem you encounter.
Another rarely used feature offered by Java and easily usable with modern IDEs such as Eclipse is the ability to remotely debug a running JVM, including doing step-by-step debugging. If your server is hidden behind a firewall, it’s still possible to use this feature by setting a local port forwarding through an SSH session using tools such as Putty on Windows.